
Chapter 3
Basic Filesystem Management
THE FOLLOWING LINUX PROFESSIONAL INSTITUTE OBJECTIVES ARE COVERED IN THIS CHAPTER:
- 203.1 Operating the Linux filesystem (weight: 4)
- 203.2 Maintaining a Linux filesystem (weight: 3)
- 203.3 Creating and configuring filesystem options (weight: 2)
- 203.4 udev Device Management (weight: 1)
 Linux files are stored in one or more filesystems, which are large data structures that enable access to stored files by name. Filesystems require a certain amount of effort to manage and maintain. Specific areas that must be attended to include mounting filesystems (that is, making disk filesystems accessible by attaching them to the Linux directory tree), creating filesystems, repairing errors in filesystems, and tuning them for optimal performance.
Several special-case filesystems and variants on filesystems also exist. Swap space isn't technically a filesystem, but it is disk storage space and so is covered in this chapter. Optical discs use their own special filesystems, which have unique methods of creation. Finally, the Linux udev tool creates a special filesystem that's used to access hardware devices. You can write udev rules that adjust the names and other characteristics of the files Linux creates to enable program access to hardware.
![]() The word filesystem has two meanings. This first, as just described, refers to the low-level disk data structures associated with the storage areas for files. The second meaning is that of an entire Linux directory tree, as in “the /etc directory in the Linux filesystem holds configuration files.” Not every filesystem in the sense of a low-level data structure has an /etc directory, but every high-level Linux root filesystem does have such a directory. This distinction is usually clear from context, but when there might be confusion, I use additional or different terms to clarify matters; for instance, I might use the terms low-level or high-level to refer to a specific meaning of the word filesystem, or I might use the term directory tree rather than filesystem when referring to the high-level structure. This chapter is concerned with low-level filesystems.
The word filesystem has two meanings. This first, as just described, refers to the low-level disk data structures associated with the storage areas for files. The second meaning is that of an entire Linux directory tree, as in “the /etc directory in the Linux filesystem holds configuration files.” Not every filesystem in the sense of a low-level data structure has an /etc directory, but every high-level Linux root filesystem does have such a directory. This distinction is usually clear from context, but when there might be confusion, I use additional or different terms to clarify matters; for instance, I might use the terms low-level or high-level to refer to a specific meaning of the word filesystem, or I might use the term directory tree rather than filesystem when referring to the high-level structure. This chapter is concerned with low-level filesystems.
Making Filesystems Available
Filesystems are useless unless they are accessible, so this chapter begins with a look at how filesystems may be mounted in Linux. This task begins with a tally of filesystem types. You can then look into methods of mounting a filesystem, either on a one-time basis or permanently (so that a filesystem will reappear when you reboot the computer). You may also want to use an automounter, which is a software component that automatically mounts filesystems you have not explicitly described. Automounters are especially useful with removable media. No matter how particular filesystems were mounted, you should be able to determine what filesystems are currently mounted. You should also be able to unmount filesystems.
Identifying Filesystem Types
Linux supports quite a few different filesystems, both Linux native and those intended for other OSs. Some of the latter barely work under Linux, and even when they do work reliably, they usually don't support all the features that Linux expects in its native filesystems. Thus, when preparing a Linux system, you'll use one or more of its native filesystems for most or all partitions:
Ext2fs The Second Extended File System (ext2fs or ext2) is the traditional Linux native filesystem. It was created for Linux and was the dominant Linux filesystem throughout the late 1990s. Ext2fs has a reputation as a reliable filesystem. It has since been eclipsed by other filesystems, but it still has its uses. In particular, ext2fs can be a good choice for a small /boot partition, if you choose to use one, and for small (sub-gibibyte) removable disks. On such small partitions, the size of the journal used by more advanced filesystems can be a real problem, so the non-journaling ext2fs is a better choice. (Journaling is a feature that enables quicker recovery after a power outage, system crash, or other uncontrolled disconnection of the hard disk from the computer.) The ext2 filesystem type code is ext2.
Ext3fs The Third Extended File System (ext3fs or ext3) is basically ext2fs with a journal added. The result is a filesystem that's as reliable as ext2fs but that recovers from power outages and system crashes much more quickly. The ext3 filesystem type code is ext3.
Ext4fs The Fourth Extended File System (ext4fs or ext4) is the next-generation version of this filesystem family. It adds the ability to work with very large disks (those over 32 tebibytes) or very large files (those over 2 tebibytes), as well as extensions intended to improve performance. Its filesystem type code is ext4.
ReiserFS This filesystem was designed from scratch as a journaling filesystem for Linux and is a popular choice in this role. It's particularly good at handling filesystems with large numbers of small files (say, smaller than about 32KiB) because ReiserFS uses various tricks to squeeze the ends of files into each other's unused spaces. This small savings can add up to a large percentage of file sizes when files are small. You should use reiserfs as the type code for this filesystem.
![]() As of Linux kernel version 2.6.35.4, ReiserFS version 3.x is current. A from-scratch rewrite of ReiserFS, known as Reiser4, is being developed but has not yet been integrated into the mainstream kernel.
As of Linux kernel version 2.6.35.4, ReiserFS version 3.x is current. A from-scratch rewrite of ReiserFS, known as Reiser4, is being developed but has not yet been integrated into the mainstream kernel.
JFS IBM developed the Journaled File System (JFS) for its AIX OS and later re-implemented it on OS/2. The OS/2 version was subsequently donated to Linux. JFS is a technically sophisticated journaling filesystem that may be of particular interest if you're familiar with AIX or OS/2 or want an advanced filesystem to use on a dual-boot system with one of these OSs. As you might expect, this filesystem's type code is jfs.
XFS Silicon Graphics (SGI) created its Extents File System (XFS) for its IRIX OS and, like IBM, later donated the code to Linux. Like JFS, XFS is a very technically sophisticated filesystem. XFS has gained a reputation for robustness, speed, and flexibility on IRIX, but some of the XFS features that make it so flexible on IRIX aren't supported well under Linux. Use xfs as the type code for this filesystem.
Btrfs This filesystem (pronounced “butter eff ess” or “bee tree eff ess”) is an advanced filesystem with features inspired by those of Sun's Zettabyte File System (ZFS). Like ext4fs, JFS, and XFS, Btrfs is a fast performer and is able to handle very large disks and files. As of the 2.6.35.4 kernel, Btrfs is considered experimental; however, its advanced features make it a likely successor to the current popular filesystems.
In practice, most administrators choose ext3fs, ext4fs, or ReiserFS as their primary filesystems; however, JFS and XFS also work well, and some administrators prefer them, particularly on large disks that store large files. (Ext4fs also handles large files, but it's newer and therefore less trusted than JFS and XFS.) Hard data on the merits and problems with each filesystem are difficult to come by, and even when they do exist, they're suspect because filesystem performance interacts with so many other factors. For instance, as just noted, ReiserFS can cram more small files into a small space than can other filesystems, but this advantage isn't very important if you'll be storing mostly larger files.
![]() If you're using a non-x86 or non-x86-64 platform, be sure to check filesystem development on that platform. A filesystem may be speedy and reliable on one CPU but sluggish and unreliable on another.
If you're using a non-x86 or non-x86-64 platform, be sure to check filesystem development on that platform. A filesystem may be speedy and reliable on one CPU but sluggish and unreliable on another.
In addition to these Linux-native filesystems, you may need to deal with some others from time to time, including the following:
FAT The File Allocation Table (FAT) filesystem is old and primitive—but ubiquitous. It's the only hard disk filesystem supported by DOS and Windows 9x/Me. For this reason, every major OS understands FAT, making it an excellent filesystem for exchanging data on removable disks. FAT varies on two major orthogonal dimensions: the size of the FAT data structure after which the filesystem is named (12-, 16-, or 32-bit pointers), and support (or lack thereof) for long filenames. Linux automatically detects the FAT size, so you shouldn't need to worry about this. To use the original FAT filenames, which are limited to eight characters with an optional three-character extension (the so-called 8.3 filenames), use the Linux filesystem type code of msdos. To use Windows-style long filenames, use the filesystem type code of vfat. A Linux-only long filename system, known as umsdos, supports additional Linux features—enough that you can install Linux on a FAT partition. The umsdos driver was removed from the Linux kernel with version 2.6.11 because of lack of maintenance.
NTFS The New Technology File System (NTFS) is the preferred filesystem for Windows NT/200x/XP/Vista. Unfortunately, Linux's NTFS support is rather rudimentary. As of the 2.6.x kernel series, Linux can reliably read NTFS and can overwrite existing files, but the Linux kernel can't write new files to an NTFS partition.
![]() If you must have good NTFS read/write support for a dual-boot system, look into NTFS-3G, which is available in both proprietary and open source (“community edition”) versions from Tuxera (http://www.tuxera.com). This is a read/write NTFS driver that resides in user space rather than in kernel space. It's used as the default NTFS driver by some Linux distributions.
If you must have good NTFS read/write support for a dual-boot system, look into NTFS-3G, which is available in both proprietary and open source (“community edition”) versions from Tuxera (http://www.tuxera.com). This is a read/write NTFS driver that resides in user space rather than in kernel space. It's used as the default NTFS driver by some Linux distributions.
HFS and HFS+ Apple has long used the Hierarchical File System (HFS) with its Mac OS, and Linux provides full read/write HFS support. This support isn't as reliable as Linux's read/write FAT support, though, so you may want to use FAT when exchanging files with Mac users. Apple has extended HFS to better support large hard disks and many Unix-like features with its HFS+ (a.k.a. Extended HFS), which is the default filesystem on Mac OS X systems. Linux 2.6.x adds limited HFS+ support; but write support works only with the HFS+ journal disabled.
ISO-9660 The standard filesystem for CD-ROMs has long been ISO-9660. This filesystem comes in several levels. Level 1 is similar to the original FAT in that it supports only 8.3 filenames. Levels 2 and 3 add support for longer 32-character filenames. Linux supports ISO-9660 using its iso9660 filesystem type code. Linux's ISO-9660 support also works with the Rock Ridge extensions, which are a series of extensions to ISO-9660 to enable it to support Unix-style long filenames, permissions, symbolic links, and so on. If a disc includes Rock Ridge extensions, Linux will automatically detect and use them.
Joliet This filesystem is used much like Rock Ridge, as an extension to ISO-9660. Joliet was created by Microsoft for use by Windows, so it emphasizes Windows filesystem features rather than Unix/Linux filesystem features. Linux supports Joliet as part of its iso9660 driver; if a disc contains Joliet but not Rock Ridge, Linux uses the Joliet filesystem.
UDF The Universal Disc Format (UDF) is the next-generation filesystem for optical discs. It's commonly used on DVD-ROMs and recordable optical discs. Linux supports it, but read/write UDF support is still in its infancy.
As a practical matter, if you're preparing a hard disk for use with Linux, you should probably use Linux filesystems only. If you're preparing a disk that will be used for a dual-boot configuration, you may want to set aside some partitions for other filesystem types. For removable disks, you'll have to be the judge of what's most appropriate. You might use ext2fs for a Linux-only removable disk, FAT for a cross-platform disk, or ISO-9660 (perhaps with Rock Ridge and Joliet) for a CD-R or recordable DVD.
![]() ISO-9660 and other optical disc filesystems are created with special tools intended for this purpose, as described in the upcoming section “Managing Optical Discs.”
ISO-9660 and other optical disc filesystems are created with special tools intended for this purpose, as described in the upcoming section “Managing Optical Discs.”
In addition to these disk filesystem types, several other filesystem types exist. Network filesystems, such as the Server Message Block/Common Internet Filesystem (SMB/CIFS) and the Network Filesystem (NFS), enable one computer to access another's disks. These protocols are described in Chapter 8, “Configuring File Servers.” Virtual filesystems give file-like access to kernel features or hardware. The udev filesystem, described in the section “Managing Devices with udev,” is an important example of a virtual filesystem.
Mounting a Filesystem Once
Linux provides the mount command to mount a filesystem to a mount point. In practice, using this command is usually fairly simple, but it supports a large number of options.
Understanding mount
The syntax for mount is as follows:
mount [-alrsvw] [-t fstype] [-o options] [device] [mountpoint]
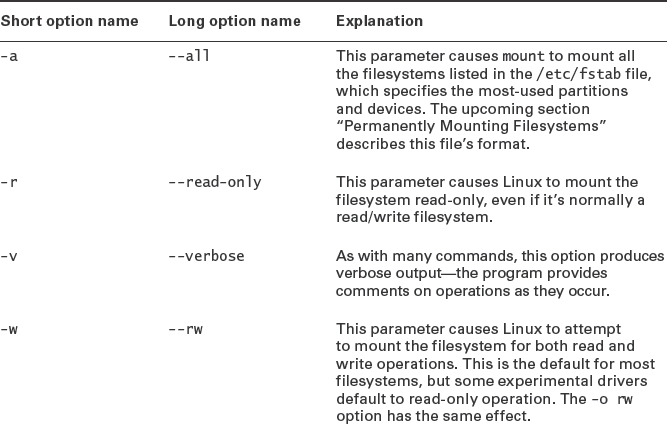
Common parameters for mount support a number of features, as outlined in Table 3.1. Ordinarily, a device filename (such as /dev/sda5) and a mount point (such as /mnt/somedisk) are required when you use mount. As described shortly, though, there are exceptions to this rule. The list of mount parameters in Table 3.1 isn't comprehensive; consult mount's man page for some of the more obscure options.

![]() Linux requires support in the kernel or as a kernel module to mount a filesystem of a given type. If this support is missing, Linux will refuse to mount the filesystem in question.
Linux requires support in the kernel or as a kernel module to mount a filesystem of a given type. If this support is missing, Linux will refuse to mount the filesystem in question.
The most common applications of mount use few parameters because Linux generally does a good job of detecting the filesystem type and the default parameters work reasonably well. For instance, consider this example:
# mount /dev/sdb7 /mnt/shared
This command mounts the contents of /dev/sdb7 on /mnt/shared, auto-detecting the filesystem type and using the default options. Ordinarily, only root may issue a mount command; however, if /etc/fstab specifies the user, users, or owner option, an ordinary user may mount a filesystem using a simplified syntax in which only the device or mount point is specified, but not both. For instance, a user may type mount /mnt/cdrom to mount a CD-ROM if /etc/fstab specifies /mnt/cdrom as its mount point and uses the user, users, or owner option.
![]() Most Linux distributions ship with auto-mounter support, which causes the OS to automatically mount removable media when they're inserted. In GUI environments, a file browser may also open on the inserted disk. In order to eject the disk, the user will need to unmount the filesystem by using umount, as described shortly, or by selecting an option in the desktop environment.
Most Linux distributions ship with auto-mounter support, which causes the OS to automatically mount removable media when they're inserted. In GUI environments, a file browser may also open on the inserted disk. In order to eject the disk, the user will need to unmount the filesystem by using umount, as described shortly, or by selecting an option in the desktop environment.
The mount point is ordinarily an empty directory. If you specify a directory with files as the mount point, those files will seem to disappear when you mount the filesystem on the directory. Those files will still exist, though; they'll just be hidden by the mounted filesystems. To access the hidden files, you must unmount the filesystem that obscures them.
Knowing mount Options
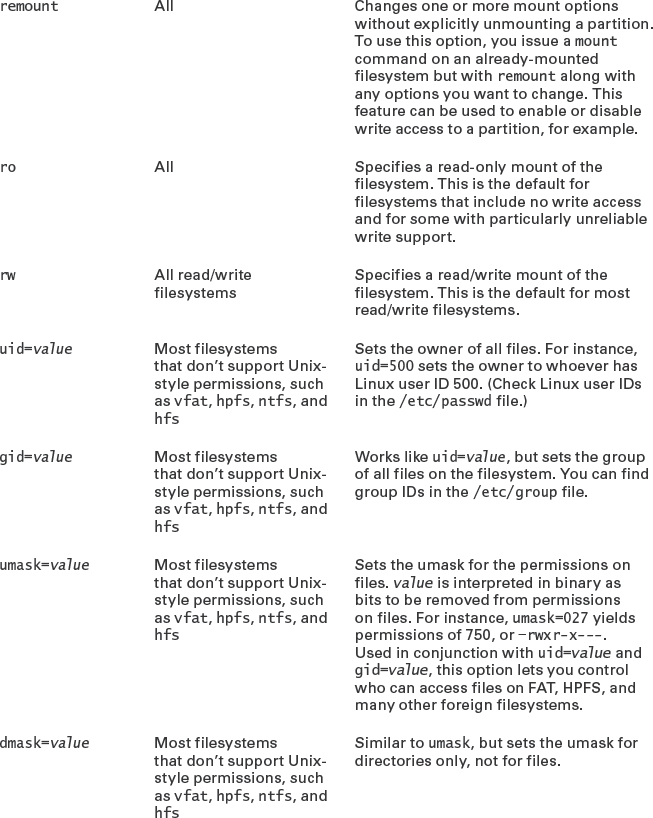
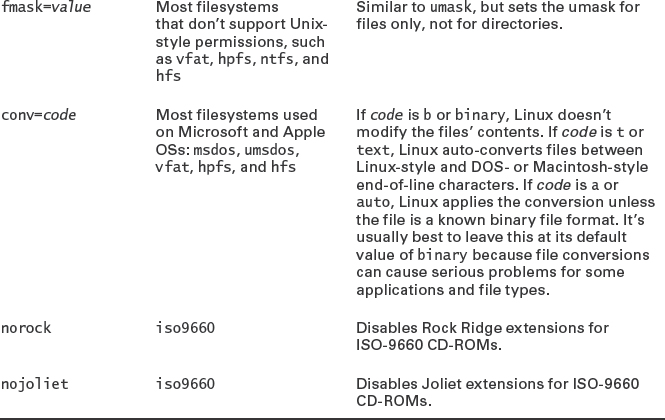
When you need to use special parameters, it's usually to add filesystem-specific options. Table 3.2 summarizes the most important filesystem options. Some of these are meaningful only in the /etc/fstab file, which is described later in “Permanently Mounting Filesystems.”
TABLE 3.2 Important filesystem options for the mount command
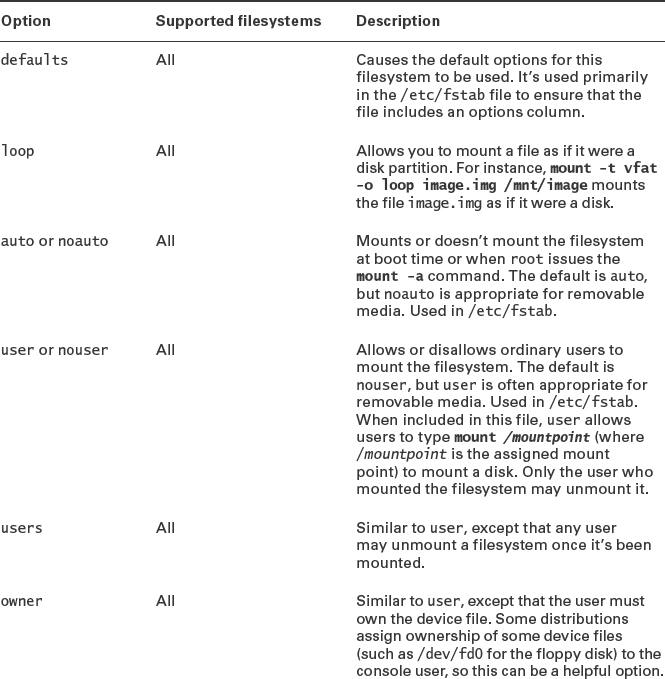
Some filesystems support additional options that aren't described here. The man page for mount covers some of these, but you may need to look at the filesystem's documentation for some filesystems and options. This documentation may appear in /usr/src/linux/Documentation/filesystems or /usr/src/linux/fs/fsname, where fsname is the name of the filesystem.
Permanently Mounting Filesystems
The /etc/fstab file controls how Linux provides access to disk partitions and removable media devices. Linux supports a unified directory structure in which every disk device (partition or removable disk) is mounted at a particular point in the directory tree. For instance, you might access a USB flash drive at /media/usb. The root of this tree is accessed from /. Directories off this root may be other partitions or disks, or they may be ordinary directories. For instance, /etc should be on the same partition as /, but many other directories, such as /home, may correspond to separate partitions. The /etc/fstab file describes how these filesystems are laid out. (The filename fstab is an abbreviation for filesystem table.)
The /etc/fstab file consists of a series of lines that contain six fields each; the fields are separated by one or more spaces or tabs. A line that begins with a hash mark (#) is a comment and is ignored. Listing 3.1 shows a sample /etc/fstab file.
Listing 3.1: Sample /etc/fstab file
#device mount point filesystem options dump fsck /dev/sda1 / ext3 defaults 1 1 UUID=3631a288-673e-40f5-9e96-6539fec468e9The meaning of each field in this file is as follows:
Device The first column specifies the mount device. These are usually device filenames that reference hard disks, floppy drives, and so on. Most distributions now specify partitions by their labels or Universally Unique Identifiers (UUIDs), as in the LABEL=/home and UUID=3631a288-673e-40f5-9e96-6539fec468e9 entries in Listing 3.1. When Linux encounters such an entry, it tries to find the partition whose filesystem has the specified name or UUID and mount it. This practice can help reduce problems if partition numbers change, but some filesystems lack these labels. It's also possible to list a network drive, as in server:/home, which is the /home export on the computer called server; or //winsrv/shr, which is the shr share on the Windows or Samba server called winsrv.
![]() Each filesystem's UUID is theoretically unique in the world and so makes a good identifier for use in /etc/fstab. Device filenames, by contrast, can change if you repartition the disk, add a disk, or remove a disk. The blkid program returns the UUID and filesystem type of a partition, which can be useful if you want to use the UUID specification yourself. Type blkid device, where device is a device specification such as /dev/sda1.
Each filesystem's UUID is theoretically unique in the world and so makes a good identifier for use in /etc/fstab. Device filenames, by contrast, can change if you repartition the disk, add a disk, or remove a disk. The blkid program returns the UUID and filesystem type of a partition, which can be useful if you want to use the UUID specification yourself. Type blkid device, where device is a device specification such as /dev/sda1.
Mount Point The second column specifies the mount point; in the unified Linux filesystem, this is where the partition or disk will be mounted. This should usually be an empty directory in another filesystem. The root (/) filesystem is an exception. So is swap space, which is indicated by an entry of swap.
Filesystem Type The filesystem type code is the same as the type code used to mount a filesystem with the mount command. You can use any filesystem type code you can use directly with the mount command. A filesystem type code of auto lets the kernel auto-detect the filesystem type, which can be a convenient option for removable media devices. Auto-detection doesn't work with all filesystems, though.
Mount Options Most filesystems support several mount options, which modify how the kernel treats the filesystem. You may specify multiple mount options, separated by commas, as in the users,noauto options for /media/cdrom and /media/usb in Listing 3.1. Table 3.2 summarizes the most common mount options. Type man mount or consult filesystem-specific documentation to learn more.
Backup Operation The next-to-last field contains a 1 if the dump utility should back up a partition or a 0 if it shouldn't. If you never use the dump backup program, this option is essentially meaningless. (The dump program was once a common backup tool, but it is much less popular today.)
Filesystem Check Order At boot time, Linux uses the fsck program to check filesystem integrity. The final column specifies the order in which this check occurs. A 0 means that fsck should not check a filesystem. Higher numbers represent the check order. The root partition should have a value of 1, and all others that should be checked should have a value of 2. Some filesystems, such as ReiserFS, shouldn't be automatically checked and so should have values of 0.
If you add a new hard disk or have to repartition the one you have, you may need to modify /etc/fstab, particularly if you use device filenames to refer to partitions. (Using LABEL and UUID codes can obviate the need for such changes, which is why many modern distributions use these methods of specifying partitions today.) You may also need to edit /etc/fstab to alter some of its options. For instance, setting the user ID or umask on Windows partitions mounted in Linux may be necessary to let ordinary users write to the partition.

Managing User-Mountable Media
You may want to give ordinary users the ability to mount certain partitions or removable media, such as floppies, CD-ROMs, and USB flash drives. To do so, create an ordinary /etc/fstab entry for the filesystem, but be sure to add the user, users, or owner option to the options column. Table 3.2 describes the differences between these three options. Listing 3.1 shows some examples of user-mountable media: /media/cdrom, /media/usb, /other/home, and /other/win. The first two of these are designed for removable media and include the noauto option, which prevents Linux from wasting time trying to mount them when the OS first boots. The second pair of mount points are network file shares that are mounted automatically at boot time; the users option on these lines enables ordinary users to unmount and then remount the filesystem, which might be handy if, say, ordinary users have the ability to shut down the server.
As with any filesystems you want to mount, you must provide mount points—that is, create empty directories—for user-mountable media. Removable media are usually mounted in subdirectories of /mnt or /media.
Many modern distributions include auto-mount facilities that automatically mount removable media when they're inserted. The upcoming section “Using an Automounter” describes automounter configuration in more detail.
The credentials option for the /other/win mount point in Listing 3.1 deserves greater elaboration. Ordinarily, most SMB/CIFS shares require a username and password as a means of access control. Although you can use the username=name and password=pass options to smbfs or cifs, these options are undesirable, particularly in /etc/fstab, because they leave the password vulnerable to discovery—anybody who can read /etc/fstab can read the password. The credentials=file option provides an alternative—you can use it to point Linux at a file that holds the username and password. This file has labeled lines:
username=hschmidt
password=yiW7t9Td
Of course, the file you specify (/etc/creds in Listing 3.1) must be well protected—it must be readable only to root and perhaps to the user whose share it describes.
Using an Automounter
Several automounters exist for Linux. These are programs that automatically mount a filesystem when certain conditions are met. Broadly speaking, automounters fall into two categories: those that mount local storage when it's inserted into the computer and those that mount filesystems (typically network filesystems) when a user accesses their mount points. These two types of automounter are described in the following pages.
Using a File Manager's Automounter
When you insert a physical medium, such as a DVD or USB flash drive, into a Linux computer that's running a desktop environment, the computer is likely to create a desktop icon, mount the disk and display its contents in a file browser, or pop up a notification with options for the user. This seemingly simple response actually involves several software components. On a low level, a system utility must monitor for hardware changes, such as the insertion of a disk, and can take actions or notify other programs of hardware changes. On a higher level, the desktop environment (or more precisely, the file manager that's part of the desktop environment) receives messages relating to hardware changes and mounts filesystems when its configuration files dictate that it do so.
The low-level software in this stack has traditionally been the Hardware Abstraction Layer (HAL) Daemon (HALD). This software is configured through files in the /etc/hal and /usr/share/hal/fdi/policy/10osvendor/ directories. You can sometimes edit these files to effect changes in how removable media are treated. Unfortunately, the relevant files vary from one distribution to another, although they usually include the string storage in their filenames.
In 2009, distributions began shifting away from HAL. The intent is to use udev more directly for triggering automounter and other responses to hardware changes. The upcoming section “Managing Devices with udev” describes udev in more detail.
Once HAL or udev has notified a file manager about an inserted disk, the user's file manager settings take over. Details vary greatly from one file manager to another. As an illustration, consider Thunar, which is the default file manager for Xfce. (Other file managers have similar adjustment options, but Thunar provides more automounter options than most, which is why I'm describing Thunar here.) To adjust Thunar's settings, select Edit ![]() Preferences from a Thunar window. This action produces the File Manager Preferences dialog box. Click the Advanced tab, and check the Enable Volume Management check box. (If you want to disable the automounter, you can uncheck this box.) You can then click Configure to bring up the main configuration options, which are shown in Figure 3.1.
Preferences from a Thunar window. This action produces the File Manager Preferences dialog box. Click the Advanced tab, and check the Enable Volume Management check box. (If you want to disable the automounter, you can uncheck this box.) You can then click Configure to bring up the main configuration options, which are shown in Figure 3.1.
FIGURE 3.1 File managers provide options to enable you to fine-tune how removable disk insertions are handled.
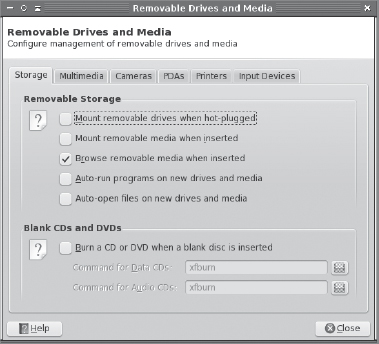
You can check or uncheck specific options to adjust how Thunar handles particular events. For instance, if you want CD-ROMs or DVDs to be automatically mounted, be sure the Mount Removable Media When Inserted option is checked. You can use this same dialog box to specify applications to use when audio CDs, cameras, and some other devices are attached to the computer; click the relevant tabs to adjust these settings.
![]() In Thunar's terms, removable media are media, such as floppy disks, CD-ROMs, and DVDs, that can be inserted into and removed from drives. Removable disks, by contrast, are hard disks or similar devices that can be attached or detached from the computer while it's running. Examples include USB flash drives and external hard disks.
In Thunar's terms, removable media are media, such as floppy disks, CD-ROMs, and DVDs, that can be inserted into and removed from drives. Removable disks, by contrast, are hard disks or similar devices that can be attached or detached from the computer while it's running. Examples include USB flash drives and external hard disks.
Broadly speaking, Thunar and KDE's file manager, Konqueror, provide the most options for configuring automount options. GNOME's default file manager, Nautilus, automatically mounts all media, including both removable and non-removable disks; that is, if you use GNOME, you're likely to see hard disk partitions you don't configure in GNOME appear on your desktop.
File manager automounters typically create mount points in the /media directory. These mount points may be named after the media type, such as /media/cdrom; after the filesystem's label; or after the filesystem's UUID.
![]() If you see UUIDs or other unhelpful names for filesystems that are auto-mounted, consider adding a filesystem label to the device. This task is most easily accomplished when creating a filesystem; however, it's sometimes possible to alter the filesystem's label after the fact with tools such as tune2fs.
If you see UUIDs or other unhelpful names for filesystems that are auto-mounted, consider adding a filesystem label to the device. This task is most easily accomplished when creating a filesystem; however, it's sometimes possible to alter the filesystem's label after the fact with tools such as tune2fs.
Filesystems mounted by a file manager's automounter can usually be unmounted by an ordinary user, as described shortly, in “Unmounting a Filesystem.” The file manager also usually provides some way to unmount the filesystems it has mounted, typically by right-clicking an icon for the filesystem and selecting an option to unmount, eject, or remove the filesystem.
Using autofs
Network filesystems, such as SMB/CIFS and NFS, enable users of one computer to access files stored on another computer. This is a very useful ability, but there are certain risks and problems associated with it. One of these problems is that, if you mount a remote filesystem as soon as the computer boots and leave it mounted all the time, you may experience strange problems if the server becomes unavailable—certain tools, such as df, may pause for extended periods as they repeatedly try and fail to poll the server. Keeping remote filesystems mounted permanently also consumes some network bandwidth, which may be unacceptable if a server has a large number of clients.
The autofs automounter exists to resolve, or at least minimize, such problems. Unlike a GUI file manager's automounter, autofs is a purely system-level tool with no user-level configuration. It's not always installed by default, so you should first ensure that you've installed it on your system. (Unsurprisingly, it usually has the package name autofs.)
The /etc/auto.master file is the main configuration file for autofs. Your distribution will have a default file that probably doesn't define any mount points, although it may include lines that point to script files (/etc/auto.smb and /etc/auto.net) that come with the package. These scripts set up /smb and /net directory trees that can work on a variety of networks, as described shortly. To define directories that autofs should monitor for user activity, you should specify a base directory and a configuration file for that directory at the end of /etc/auto.master:
/remote /etc/auto.servers --timeout=60
In this example, the /etc/auto.servers file controls the /remote mount point. After a server is mounted, it will be unmounted after 60 seconds (the timeout value). You must now create the /etc/auto.servers file, which specifies subdirectories (relative to the mount point in /etc/auto.master—/remote in this example) and the servers to which they connect:
music                  louis.example.com:/home/armstrong/music
research  -fstype=nfs4 albert.example.com:/home/einstein/data
These examples, in conjunction with the /etc/auto.master entry shown earlier, enable access to the /home/armstrong/music directory on louis.example.com via /remote/music, and to the /home/einstein/data directory on albert.example.com via /remote/research. The first line uses NFS defaults, but the second adds an option that forces use of NFSv4.
The /etc/auto.net and /etc/auto.smb files are scripts that can be called like other autofs configuration files. They provide dynamic configurations that enable access to servers via their hostnames and export names. For instance, suppose you include the following line in /etc/auto.master:
/network /etc/auto.net
If your local network includes a server called multi that exports the directories /opt and /home via NFS, those directories could then be accessed as /network/multi/opt and /network/multi/home, respectively, without further configuration. The /etc/auto.smb file theoretically provides similar functionality for SMB/CIFS shares; however, the SMB/CIFS security model requires a username and a password, and the auto.smb file delivered with most distributions lacks support for this basic SMB/CIFS requirement. A variant of auto.smb, called auto.cifs, is available at http://www.howtoforge.com/accessing_windows_or_samba_shares_using_autofs and provides better username and password support.
Although autofs is intended primarily to manage network filesystems, you can also configure it to mount local hardware devices. The /etc/auto.misc file on most distributions provides some examples, such as:
boot      -fstype=ext2   :/dev/hda1
floppy    -fstype=auto   :/dev/fd0
To use such configurations, you would reference /etc/auto.misc in /etc/auto.master. These two lines would then cause /dev/hda1 to be mounted at the boot subdirectory, and /dev/fd0 to be mounted at the floppy subdirectory of the directory specified in /etc/auto.master. Although a file browser's automount features are probably more convenient for most users, this type of autofs configuration could be useful for purely text-mode users or to enable automounting for non-login programs such as servers.
With your configuration files in place, you can launch autofs, typically via a SysV or Upstart script, as described in Chapter 1. You can then begin testing it by accessing the directories that autofs manages. Once autofs is running, you can change its configuration without restarting it; the tool will detect the changes and implement them immediately.
When you begin experimenting with autofs, you'll discover one of the features of the tool: After a period of inactivity (specified by the --timeout parameter in /etc/auto.master), the filesystem is unmounted. This feature can minimize problems such as those noted at the beginning of the section.
Determining What Is Mounted
When Linux mounts a filesystem, it ordinarily records this fact in /etc/mtab. This file has a format similar to that of /etc/fstab and is stored in /etc, but it's not a configuration file that you should edit. You might examine this file to determine what filesystems are mounted, though. The /proc/mounts virtual file serves a role that's similar to /etc/mstab, although the two files differ in certain ways. Prior to the 2.6.26 kernel, /proc/mounts included less information than /etc/mtab; but with 2.6.26 and later kernels, /proc/mounts contains more information. In principle, /etc/mtab can be a symbolic link to /proc/mounts, at least with recent kernels.
The df command is another way to learn what filesystems are mounted. This command shows additional information, such as how large each filesystem is and how much of that space is in use:
$ df
Filesystem     1K-blocks     Used Available  Use%  Mounted on
/dev/sda2       20642428  9945008   9648844   51%  /
udev             1479784      668   1479116    1%  /dev
/dev/sda3         198337    94543     93554   51%  /boot
/dev/sdb2       29931580 26075996   2335440   92%  /home
Unmounting a Filesystem
The umount command unmounts a filesystem. (Yes, it's spelled correctly; the command is missing the first n.) This command is simpler than mount. The basic umount syntax is as follows:
umount [-afnrv] [-t fstype] [device | mountpoint]
Most of these parameters have meanings similar to their meanings in mount, but some differences deserve mention:
Unmount All Rather than unmount partitions listed in /etc/fstab, the -a option causes the system to attempt to unmount all the partitions listed in /etc/mtab. On a normally running system, this operation is likely to succeed only partly because it won't be able to unmount some key filesystems, such as the root partition.
Force Unmount You can use the -f option to tell Linux to force an unmount operation that might otherwise fail. This feature is sometimes helpful when unmounting NFS mounts shared by servers that have become unreachable.
Fall Back to Read-Only The -r option tells umount that if it can't unmount a filesystem, it should attempt to remount it in read-only mode.
Unmount Partitions of a Specific Filesystem Type The -t fstype option tells the system to unmount only partitions of the specified type. You can list multiple filesystem types by separating them with commas.
The Device and Mount Point You need to specify only the device or only the mountpoint, not both.
As with mount, normal users can't ordinarily use umount. The exception is if the partition or device is listed in /etc/fstab and specifies the user, users, or owner option, in which case normal users can unmount the device. (In the case of user, only the user who mounted the partition may unmount it; in the case of owner, the user issuing the command must also own the device file, as with mount.) These options are most useful for removable-media devices.
![]() Be cautious when removing floppy disks or unplugging USB disk-like devices (USB flash drives or external hard disks). Linux caches accesses to most filesystems, which means that data may not be written to the disk until some time after a write command. Because of this, it's possible to corrupt a disk by ejecting or unplugging it, even when the drive isn't active. You must always issue a umount command before ejecting a mounted disk. (GUI unmount tools do this behind the scenes, so using a desktop's unmount or eject option is equivalent to using umount.) After issuing the umount command, wait for the command to return, and if the disk has activity indicators, wait for them to stop blinking to be sure Linux has finished using the device. This isn't an issue for most internal removable media, such as DVD drives, because Linux can lock their eject mechanisms, preventing this sort of problem. Another way to write the cache to disk is to use the sync command; but because this command does not fully unmount a filesystem, it's not a substitute for umount.
Be cautious when removing floppy disks or unplugging USB disk-like devices (USB flash drives or external hard disks). Linux caches accesses to most filesystems, which means that data may not be written to the disk until some time after a write command. Because of this, it's possible to corrupt a disk by ejecting or unplugging it, even when the drive isn't active. You must always issue a umount command before ejecting a mounted disk. (GUI unmount tools do this behind the scenes, so using a desktop's unmount or eject option is equivalent to using umount.) After issuing the umount command, wait for the command to return, and if the disk has activity indicators, wait for them to stop blinking to be sure Linux has finished using the device. This isn't an issue for most internal removable media, such as DVD drives, because Linux can lock their eject mechanisms, preventing this sort of problem. Another way to write the cache to disk is to use the sync command; but because this command does not fully unmount a filesystem, it's not a substitute for umount.
You can't always unmount a filesystem. Most notably, if any files are open on the filesystem, your umount command will fail:
# umount /home
umount: /home: device is busy.
        (In some cases useful info about processes that use
         the device is found by lsof(8) or fuser(1))
If you want to unmount the filesystem, you should track down whatever process is using it and terminate that process. As the error message notes, the lsof and fuser commands can sometimes be useful in this task; they list open files and list processes that use files, respectively. If it's impossible to unmount a filesystem, you can sometimes remount it read-only using the remount option to mount:
# mount -o remount,ro /home
If successful, this action will make it safe to use some filesystem check utilities and will make it less likely that the disk will suffer damage should you be forced to shut down without unmounting.
Maintaining Filesystems
Filesystems don't just spring into being and maintain themselves by magic; these tasks must be performed by utility programs, and you must know how to operate these programs. The following pages describe these tasks, including filesystem creation, checking for and repairing filesystem errors, and fine-tuning filesystem performance parameters. I also describe the creation and use of swap space, which isn't technically a filesystem but is an important data structure that can be stored on a partition much like a filesystem.
Creating Filesystems
Most filesystems, including all Linux-native filesystems, have Linux tools that can create the filesystem on a partition. Typically, these tools have filenames of the form mkfs.fstype, where fstype is the filesystem type code. These tools can also be called from a front-end tool called mkfs; you pass the filesystem type code to mkfs using its -t option:
# mkfs -t ext3 /dev/sda6
![]() For ext2, ext3, and ext4 filesystems, the mke2fs program is often used instead of mkfs. The mke2fs program is just another name for mkfs.ext2.
For ext2, ext3, and ext4 filesystems, the mke2fs program is often used instead of mkfs. The mke2fs program is just another name for mkfs.ext2.
This command creates an ext3 filesystem on /dev/sda6. Depending on the filesystem, the speed of the disk, and the size of the partition, this process can take anywhere from a fraction of a second to more than a minute. Most filesystem-build tools support additional options, some of which can greatly increase the time required to build a filesystem. In particular, the -c option is supported by several filesystems. This option causes the tool to perform a bad-block check by using the badblocks program—every sector in the partition is checked to be sure it can reliably hold data. If it can't, the sector is marked as bad and isn't used.
![]() If you perform a bad-block check and find that some sectors are bad, chances are the entire hard disk doesn't have long to live. Sometimes this sort of problem can result from other issues, though, such as bad cables.
If you perform a bad-block check and find that some sectors are bad, chances are the entire hard disk doesn't have long to live. Sometimes this sort of problem can result from other issues, though, such as bad cables.
Of the common Linux filesystems, ext2fs, ext3fs, and ext4fs provide the most options in their mkfs tools. (In fact, these tools are one and the same; the program simply creates a filesystem with the appropriate features for the name that's used to call it.) You can type man mkfs.ext2 to learn about these options, most of which deal with obscure or unimportant features. One option that does deserve mention is -m percent, which sets the reserved-space percentage. The idea is that you don't want the disk to completely fill up with user files; if the disk starts getting close to full, Linux should report that the disk is full before it really is, at least for ordinary users. This gives the root user the ability to log in and create new files, if necessary, to recover the system.
The ext2fs/ext3fs/ext4fs reserved-space percentage defaults to 5 percent, which translates to quite a lot of space on large disks. You may want to reduce this value (say, by passing -m 2 to reduce it to 2 percent) on your root (/) filesystem and perhaps even lower (1 percent or 0 percent) on some, such as /home. Setting -m 0 also makes sense on removable disks, which aren't likely to be critical for system recovery and may be a bit cramped to begin with.
If a filesystem is to be used on removable media, you may want to give it a descriptive label so that automounters can use the label as the mount point, as described earlier in “Using a File Manager's Automounter.” Most filesystem-specific filesystem creation tools use -L label to set the filesystem's label. ReiserFS and FAT are exceptions to this rule; mkreiserfs (aka mkfs.reiserfs) uses a lowercase option, as in -l label, while mkdosfs (aka mkfs.msdos or mkfs.vfat) uses -n label.
In addition to providing filesystem-creation tools for Linux-native filesystems, Linux distributions usually provide such tools for various non-Linux filesystems. The most important of these may be for FAT. The main tool for this task is called mkdosfs, but it's often linked to the mkfs.msdos and mkfs.vfat names, as well. This program automatically adjusts the size of the FAT data structure to 12, 16, or 32 bits depending on the device size. No special options are required to create a FAT filesystem that can handle Windows-style (VFAT) long filenames; these are created by the OS. The mkfs.msdos and mkfs.vfat variant names for the utility have no effect on the long filename capabilities of the created filesystem.
In Exercise 3.1, you'll practice creating filesystems using mkfs and related utilities.
Creating Filesystems
Try creating some filesystems on a spare partition or a removable disk. Even a floppy disk will do, although you won't be able to create journaling filesystems on a floppy disk. The following steps assume you're using a USB flash drive with at least one partition, /dev/sdc1; change the device specification as necessary. Be sure to use an empty partition! Accidentally entering the wrong device filename could wipe out your entire system!
This exercise uses a few commands that are described in more detail later in this chapter. To create some filesystems, follow these steps:
- Log in as root.
- Use parted to verify the partitions on your target disk by typing parted /dev/sdc print. You should see a list of partitions, including the one you'll use for your tests.
- Verify that your test partition is not currently mounted. Type df to see the currently mounted partitions and verify that /dev/sdc1 is not among them.
- Type mkfs -t ext2 /dev/sdc1. You should see several lines of status information appear.
- Type mount /dev/sdc1 /mnt to mount the new filesystem to /mnt. (You may use another mount point, if you like.)
- Type df /mnt to see basic accounting information for the filesystem. Note the values in the Size, Used, and Avail columns. Given the default values for ext2fs, the Avail column's value will be slightly less than 95% of the Size column's value. Most of this difference is a result of the 5% reserved blocks percentage; but some of it is because of space allocated to low-level filesystem data structures.
- Type umount /mnt to unmount the filesystem.
- Type mkfs -t ext2 -m 0 /dev/sdc1 to create a new ext2 filesystem on the device, but without any reserved space.
- Repeat steps 5–7. Note that the available space has increased. The available space plus the used space should now equal the total space.
- Repeat steps 4–7, but use a filesystem type code of ext3 to create a journaling filesystem. (This won't be possible if you use a floppy disk.) Note how much space is consumed by the journal.
- Repeat steps 4–7, but use another filesystem, such as JFS or ReiserFS. Note how the filesystem-creation tools differ in the information they present and in their stated amounts of available space.
Be aware that, because of differences in how filesystems store files and allocate space, a greater amount of available space when a filesystem is created may not translate into a greater capacity to store files.
Checking Filesystems for Errors
Human error, bugs, power outages, cats playfully yanking external hard drive cables, and other events can all cause errors to creep into the complex data structures that are filesystems. When this happens, the result can be data loss. In some cases, Linux will refuse to mount a damaged filesystem. To minimize data lost to damaged filesystems and to enable Linux to mount a filesystem after it's been damaged, filesystem check tools exist. The main tool you'll use for this purpose is called fsck. This program is actually a front end to other tools, such as e2fsck or XFS's xfs_check (which checks for problems) and xfs_repair (which repairs problems). Filesystem-specific helper programs can also be called by the name fsck.fstype, where fstype is the filesystem type code. The syntax for fsck is as follows:
fsck [-sACVRTNP] [-t fstype] [--] [fsck-options] filesystems
The more common parameters to fsck enable you to perform useful actions, as summarized in Table 3.3. Normally, you run fsck with only the filesystem device name, as in fsck /dev/sda6. You can add options as needed, however. Check fsck's man page for less common options.
TABLE 3.3 Common options to fsck
| Option name | Explanation |
| -A | This option causes fsck to check all the filesystems marked to be checked in /etc/fstab. This option is normally used in system startup scripts. |
| -C | This option displays a text-mode progress indicator of the check process. Most filesystem check programs don't support this feature, but e2fsck does. |
| -V | You can obtain a verbose progress summary by using this option. |
| -N | This option tells fsck to display what it would normally do without actually doing it. |
| -t fstype | Normally, fsck determines the filesystem type automatically. You can force the type with the -t fstype flag, though. Used in conjunction with -A, this causes the program to check only the specified filesystem types, even if others are marked to be checked. If fstype is prefixed with no, then all filesystems except the specified type are checked. |
| fsck-options | Filesystem check programs for specific filesystems often have their own options. The fsck command passes options it doesn't understand or those that follow a double dash (--) to the underlying check program. Common options include -a or -p (perform an automatic check), -r (perform an interactive check), and -f (force a full filesystem check even if the filesystem initially appears to be clean). |
| filesystems | The final parameter is usually the name of the filesystem or filesystems being checked, such as /dev/sda6. |
![]() Run fsckonly on filesystems that are not currently mounted or that are mounted in read-only mode. Changes written to disk during normal read/write operations can confuse fsck and result in filesystem corruption.
Run fsckonly on filesystems that are not currently mounted or that are mounted in read-only mode. Changes written to disk during normal read/write operations can confuse fsck and result in filesystem corruption.
Linux runs fsck automatically at startup on partitions that are marked for this in /etc/fstab, as described earlier in “Permanently Mounting Filesystems.” The normal behavior of e2fsck causes it to perform just a quick cursory examination of a partition if it's been unmounted cleanly. The result is that the Linux boot process isn't delayed because of a filesystem check unless the system wasn't shut down properly. This rule has a couple of exceptions, though: e2fsck forces a check if the disk has gone longer than a certain amount of time without checks (normally six months) or if the filesystem has been mounted more than a certain number of times since the last check (normally 20). You can change these options using tune2fs, as described later in “Adjusting Tunable Filesystem Parameters.” Therefore, you'll occasionally see automatic filesystem checks of ext2fs and ext3fs partitions even if the system was shut down correctly.
Journaling filesystems do away with full filesystem checks at system startup even if the computer wasn't shut down correctly. Nonetheless, these filesystems still require check programs to correct problems introduced by undetected write failures, bugs, hardware problems, and the like. If you encounter odd behavior with a journaling filesystem, you might consider unmounting it and performing a filesystem check—but be sure to read the documentation first. Some Linux distributions do odd things with some journaling filesystem check programs. For instance, Mandriva uses a symbolic link from /sbin/fsck.reiserfs to /bin/true. This configuration speeds system boot times should ReiserFS partitions be marked for automatic checks, but it can be confusing if you need to manually check the filesystem. If this is the case, run /sbin/reiserfsck to do the job. Similarly, /sbin/fsck.xfs is usually nothing but a script that advises the user to run xfs_check or xfs_repair.
Tuning Filesystems
Filesystems are basically just big data structures—they're a means of storing data on disk in a way that makes it easy to locate the data later. Like all data structures, filesystems include design compromises. For instance, a design feature might speed up disk checks but consume disk space. In many cases, you have no choice concerning these compromises, but some filesystems include tools that enable you to set filesystem options that affect performance. This is particularly true of ext2fs and the related ext3fs and ext4fs, although tools for XFS, ReiserFS, and others are also available. The following pages describe tools that you can use to obtain information about filesystems, tune filesystem performance, and interactively debug filesystems.
Obtaining Filesystem Information
Before you begin tuning filesystem parameters, it's often important to learn about the current state of your filesystems. Various utilities can help accomplish this goal, particularly for the ext2fs/ext3fs/ext4fs family, XFS, and ReiserFS.
Learning About Ext2, Ext3, or Ext4 Filesystems
You can learn a lot about your ext2, ext3, or ext4 filesystem with the dumpe2fs command. This command's syntax is fairly straightforward:
dumpe2fs [options] device
The device is the filesystem device file. This command accepts several options, most of which are rather obscure. The most important option is probably -h, which causes the utility to omit information about group descriptors. (This information is helpful in very advanced filesystem debugging but not for basic filesystem tuning.) For information about additional options, consult the man page for dumpe2fs.
Unless you're a filesystem expert and need to debug a corrupted filesystem, you will likely want to use dumpe2fs with the -h option. The result is about three dozen lines of output, each specifying a particular filesystem option, like these:
Filesystem volume name:   <none>
Last mounted on:          <not available>
Filesystem UUID:          2e53147d-16ea-4e69-b6d3-07e897ab7ed1
Filesystem features:      has_journal ext_attr resize_inode dir_index filetype
extent flex_bg sparse_super huge_file uninit_bg dir_nlink extra_isize
Filesystem state:         clean
Inode count:              128016
Block count:              512000
Last checked:             Mon Sep 20 21:30:42 2010
Check interval:           15552000 (6 months)
Next check after:         Sat Mar 19 21:30:42 2011
Some of these options' meanings are fairly self-explanatory; for instance, the filesystem was last checked (with fsck, described in “Checking Filesystems”) on September 20. Other options aren't so obvious; for instance, the Inode count line may be puzzling. (It's a count of the number of inodes supported by the filesystem. Each inode contains information for one file, so the number of inodes effectively limits the number of files you can store.)
Later sections of this chapter describe some of the options you may want to change. For now, you should know that you can retrieve information about how your filesystems are currently configured using dumpe2fs. You can then use this information when modifying the configuration; if your current settings seem reasonable, you can leave them alone, but if they seem ill adapted to your configuration, you can change them.
Unlike many low-level disk utilities, you can safely run dumpe2fs on a filesystem that's currently mounted. This can be handy when you're studying your configuration to decide what to modify.
Learning About XFS
Most other filesystems lack an equivalent to dumpe2fs, but XFS provides something with at least some surface similarities: xfs_info. To invoke it, pass the command the name of the partition that holds the filesystem you want to check:
# xfs_info /dev/sda7
meta-data=/dev/sda7    isize=256  agcount=88, agsize=1032192 blks
         =             sectsz=512 attr=0
data     =             bsize=4096 blocks=89915392, imaxpct=25
         =             sunit=0 swidth=0 blks, unwritten=1
naming   =version 2    bsize=4096
log      =internal     bsize=4096 blocks=8064, version=1
         =             sectsz=512 sunit=0 blks
realtime =none         extsz=65536 blocks=0, rtextents=0
Instead of the partition name, you can pass the mount point, such as /home or /usr/local. Unlike most filesystem tools, xfs_info requires that the filesystem be mounted. The information returned by xfs_info is fairly technical, mostly related to block sizes, sector sizes, and so on.
Another XFS tool is xfs_metadump. This program copies the filesystem's metadata (filenames, file sizes, and so on) to a file. For instance, xfs_metadump /dev/sda7 ~/dump-file copies the metadata to ~/dump-file. This command doesn't copy actual file contents and so isn't useful as a backup tool. Instead, it's intended as a debugging tool; if the filesystem is behaving strangely, you can use this command and send the resulting file to XFS developers for study.
Learning About ReiserFS
ReiserFS provides a tool known as debugreiserfs that can display critical ReiserFS data. The program's syntax is:
debugreiserfs [ -JpuqS ] [ -B file ] [ -1 blocknum ] device
Table 3.4 summarizes the debugreiserfs options. The -J option is likely to be the most useful to system administrators; however, if you encounter a problem and need help debugging it, -p can be a good way to get that help. By sending the filesystem metadata (filenames, date stamps, and so on, without the actual file contents), a programmer can reproduce your filesystem's structure to study any problem you might have.
TABLE 3.4 Common options to debugreiserfs
Adjusting Tunable Filesystem Parameters
Several filesystems provide tools that enable you to adjust their performance parameters. Although the defaults work well enough for many purposes, you may want to adjust these options if you have particular needs.
Tuning Ext2fs, Ext3fs, or Ext4fs
The tune2fs program enables you to change many of the filesystem parameters that are reported by dumpe2fs. This program's syntax is fairly simple, but it hides a great deal of complexity:
tune2fs [options] device
The complexity arises because of the large number of options that the program accepts. Each feature that tune2fs enables you to adjust requires its own option, as summarized in Table 3.5. The options described here are the ones that are most likely to be useful. Several other options are available; consult tune2fs's man page for details.
TABLE 3.5 Common options to tune2fs
As with most low-level disk utilities, you shouldn't use tune2fs to adjust a mounted filesystem. If you want to adjust a key mounted filesystem, such as your root (/) filesystem, you may need to boot up an emergency disk system, such as SystemRescueCd (http://www.sysresccd.org). Many distributions' install discs can be used in this capacity, as well.
Tuning XFS
If you use XFS, the xfs_admin command is the rough equivalent of tune2fs. Table 3.6 summarizes some of the xfs_admin options you may want to adjust.
TABLE 3.6 Common options to xfs_admin
In use, xfs_admin might look something like this:
# xfs_admin -L av_data /dev/sda7
writing all SBs
new label = “av_data”
This example sets the name of the filesystem on /dev/sda7 to av_data. As with tune2fs, xfs_admin should be used only on unmounted filesystems.
Tuning ReiserFS
The utility for tuning ReiserFS features is called reiserfstune. It is used much like tune2fs or xfs_admin, by passing one or more options and a device filename. Table 3.7 summarizes the more useful reiserfstune options. Consult its man page for more obscure options.
TABLE 3.7 Common options to reiserfstune


Interactively Debugging a Filesystem
The debugfs program is an interactive tool for ext2, ext3, and ext4 filesystems that provides the features of many other filesystem tools rolled into one. To use the program, type its name followed by the device filename corresponding to the filesystem you want to manipulate. You'll then see the debugfs prompt:
# debugfs /dev/hda11
debugfs:
![]() Despite their similar names, debugfs and debugreiserfs are very different programs. As described earlier, debugreiserfs is a tool that provides some basic ReiserFS data and can extract ReiserFS metadata to a file for delivery to ReiserFS developers.
Despite their similar names, debugfs and debugreiserfs are very different programs. As described earlier, debugreiserfs is a tool that provides some basic ReiserFS data and can extract ReiserFS metadata to a file for delivery to ReiserFS developers.
You can type commands at this prompt to achieve specific goals:
Display Filesystem Superblock Information The show_super_stats or stats command produces superblock information, similar to what dumpe2fs displays.
Display Inode Information You can display the inode data on a file or directory by typing stat filename, where filename is the name of the file.
Undelete a File You can use debugfs to undelete a file by typing undelete inode name, where inode is the inode number of the deleted file and name is the filename you want to give to it. (You can use undel in place of undelete if you like.) This facility is of limited utility because you must know the inode number associated with the deleted file. You can obtain a list of deleted inodes by typing lsdel or list_deleted_inodes, but the list may not provide enough clues to let you zero in on the file you want to recover.
Extract a File You can extract a file from the filesystem by typing write internal-file external-file, where internal-file is the name of a file in the filesystem you're manipulating and external-file is a filename on your main Linux system. This facility can be handy if a filesystem is badly damaged and you want to extract a critical file without mounting the filesystem.
Manipulate Files Most of the commands described in Chapter 4, “Advanced Disk Management,” work within debugfs. You can change your directory with cd, create links with ln, remove a file with rm, and so on.
Obtain Help Typing list_requests, lr, help, or ? produces a summary of available commands.
Exit Typing quit exits from the program.
This summary just scratches the surface of debugfs's capabilities. In the hands of an expert, this program can help rescue a badly damaged filesystem or at least extract critical data from it. To learn more, consult the program's man page.
![]() Although debugfs is a useful tool, it's potentially dangerous. Don't use it on a mounted filesystem, don't use it unless you have to, and be very careful when using it. If in doubt, leave the adjustments to the experts. Be aware that the LPIC 201 exam objectives do include debugfs, though.
Although debugfs is a useful tool, it's potentially dangerous. Don't use it on a mounted filesystem, don't use it unless you have to, and be very careful when using it. If in doubt, leave the adjustments to the experts. Be aware that the LPIC 201 exam objectives do include debugfs, though.
The closest XFS equivalent to debugfs is called xfs_db. Like debugfs, xfs_db provides an interactive tool to access and manipulate a filesystem; but xfs_db provides fewer tools that are amenable to novice or intermediate use. Instead, xfs_db is a tool for XFS experts.
Manipulating Swap Space
Some partitions don't hold files. Most notably, Linux can use a swap partition, which is a partition that Linux treats as an extension of memory. (Linux can also use a swap file, which is a file that works in the same way. Both are examples of swap space.) If you run enough programs that your computer's memory fills up, Linux copies some memory contents to the swap space, thus enabling you to run more programs than you could otherwise. Sometimes Linux does this even if you have enough memory to hold all your programs in order to free up memory for use in disk buffers, which can improve disk access time. A secondary use for swap space is to hold an image of system memory if you use a suspend-to-disk (aka hibernate) mode, which is a way of powering off the computer without going through the normal shutdown sequence. To use this feature, your swap space must be at least as large as your system's memory.
![]() Linux swap partitions normally use an MBR type code of 0x82. Unfortunately, Solaris for x86 also uses an MBR partition type code of 0x82, but in Solaris, this code refers to a Solaris partition. If you dual-boot between Solaris and Linux, this double meaning of the 0x82 partition type code can cause confusion. This is particularly true when installing the OSs. You may need to use Linux's fdisk to temporarily change the partition type codes to keep Linux from trying to use a Solaris partition as swap space or to keep Solaris from trying to interpret Linux swap space as a data partition.
Linux swap partitions normally use an MBR type code of 0x82. Unfortunately, Solaris for x86 also uses an MBR partition type code of 0x82, but in Solaris, this code refers to a Solaris partition. If you dual-boot between Solaris and Linux, this double meaning of the 0x82 partition type code can cause confusion. This is particularly true when installing the OSs. You may need to use Linux's fdisk to temporarily change the partition type codes to keep Linux from trying to use a Solaris partition as swap space or to keep Solaris from trying to interpret Linux swap space as a data partition.
Although swap space doesn't hold a filesystem per se and isn't mounted in the way that filesystem partitions are mounted, swap space does require preparation similar to that for creation of a filesystem. This task is accomplished with the mkswap command, which you can generally use by passing it nothing but the device identifier:
# mkswap /dev/sda7
This example turns /dev/sda7 into swap space. Several options to mkswap exist, but most are very obscure or dangerous. The -L label and -U uuid options are the ones you're most likely to use; these options enable you to set the label and UUID of the swap space so that you can reference swap space by label or UUID in /etc/fstab or elsewhere. If you don't use the -U option, mkswap generates a UUID itself. You can find a swap partition's UUID using blkid.
Although swap space is often created on partitions, you can turn an ordinary file into swap space using mkswap. You can then reference the file in /etc/fstab or enable it with swapon, as described shortly. A swap file can be convenient if you run out of swap space; you can create a swap file quickly and without adjusting your system's partitions. Swap files can be created on most Linux-native filesystems, but some filesystems aren't suitable for holding swap files. NFS, for instance, can't hold a swap file. (Even if it could, placing swap on a network mount would produce very poor performance.)
![]() If you create a swap file and subsequently back up the partition on which it resides, try to avoid backing up the swap file; it will be a waste of space on the backup medium. Likewise, there's no point in backing up swap partitions.
If you create a swap file and subsequently back up the partition on which it resides, try to avoid backing up the swap file; it will be a waste of space on the backup medium. Likewise, there's no point in backing up swap partitions.
To use the swap space, you must activate it with the swapon command:
# swapon /dev/sda7
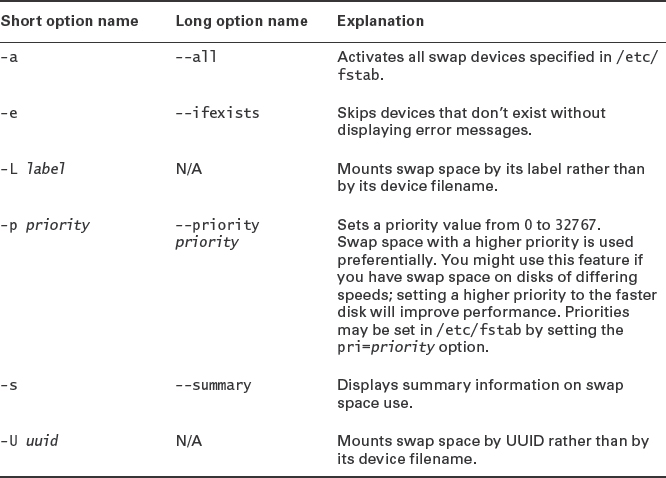
Table 3.8 summarizes several swapon options. To permanently activate swap space, you must create an entry for it in /etc/fstab, as described previously in “Permanently Mounting Filesystems.”
TABLE 3.8 Common options to swapon
To deactivate swap space, you can use swapoff:
# swapoff /dev/sda7
You can use the -a option with swapoff to have it deactivate all swap space. If you deactivate a swap file and intend to never use it again, remember to delete it to save disk space.
Managing Optical Discs
Optical media are a popular means of exchanging moderately large files. Most CD-R and CD-RW media hold 700MB of files (older discs held 650MB), recordable DVD formats have capacities of 4.7–8.5GB, and Blu-ray discs hold 25–50GB. Plain write-once CDs and DVDs cost $0.10 to $1 and are likely to remain readable for several years to decades, given proper storage. You don't normally mount an optical disc and write files to it as you would a floppy disk, though; you must create a complete filesystem and then copy (or “burn”) that filesystem to the disc. (The upcoming section “Reading and Writing UDF Discs” describes an exception to this rule.) This process requires using two tools, mkisofs and cdrecord, or requires variants of or front-ends to these tools.
Linux Optical Disc Tools
The Linux optical disc creation process involves three steps:
- Collect source files. You must first collect source files in one location, typically a single subdirectory of your home directory.
- Create a filesystem. You point a filesystem-creation program, mkisofs, at your source directory. This program generates an ISO-9660 filesystem in an image file. Recently, mkisofs has been renamed genisofs; however, the mkisofs name is retained as a symbolic link to genisofs. Because the LPIC 201 objectives refer to mkisofs, I use that command name in this chapter.
- Burn the disc. You use an optical disc–burning program, such as cdrecord, to copy the image file to the optical device.
![]() Recent Linux distributions provide both mkisofs and cdrecord in a single package called cdrtools or cdrkit; or they may be split into the genisoimage and wodim packages, respectively.
Recent Linux distributions provide both mkisofs and cdrecord in a single package called cdrtools or cdrkit; or they may be split into the genisoimage and wodim packages, respectively.
The growisofs program (typically installed in the dvd+rw-tools package) combines the functionality of mkisofs and cdrecord, but growisofs works only with DVDs and Blu-ray discs, not with the smaller CD-Rs. In turn, many versions of cdrecord won't work with the larger DVDs and Blu-ray discs!
Another approach to optical disc creation is to use GUI front-ends to the text-mode tools. These GUI tools provide a point-and-click interface, eliminating the need to remember obscure command-line parameters. Popular GUI Linux optical disc creation tools include X-CD-Roast (http://www.xcdroast.org), GNOME Toaster (http://freshmeat.net/projects/gnometoaster/), and K3B (http://k3b.sourceforge.net).
All of these optical disc tools provide a dizzying array of options. For the most part, the default options work quite well, although you may need to provide information to identify your drive and burn speed, as described in the next section. Some mkisofs options can also be important in generating image files that can be read on a wide variety of OSs, as described later in “Creating Cross-Platform Discs.”
A Linux Optical Disc Example
To begin creating optical discs, starting with mkisofs makes sense:
$ mkisofs -J -r -V “volume name” -o ../image.iso ./
This command creates an image file called image.iso in the parent of the current directory, placing files from the current working directory (./) in the resultant image file. The -J and -r options enable Joliet and Rock Ridge extensions, respectively, and the -V option sets the volume name to whatever you specify. Dozens of other options and variants on these are available; check mkisofs's man page for details.
Once you've created an image file, you can burn it with a command such as the following:
$ cdrecord dev=/dev/dvdrw speed=4 ../image.iso
The device (dev=/dev/dvdrw) must exist and be your optical drive. (This may be /dev/dvdrw or something similar even if you're burning a CD-R. Details vary depending on your distribution and hardware.) The write speed is set using the speed option, and the final parameter specifies the source of the file to be burned. As with mkisofs, cdrecord supports many additional options; consult its man page for details. If the SUID bit isn't set on this program, with ownership set to root, you must run it as root.
![]() You can mount an image file using the loopback option to verify its contents before burning it. For instance, typing mount -t iso9660 -o loop image.iso /mnt/cdrom mounts the image.iso file to /mnt/cdrom. You can then check that all the files that should be present are present. You must be root to use this option, or you must have created an appropriate /etc/fstab entry.
You can mount an image file using the loopback option to verify its contents before burning it. For instance, typing mount -t iso9660 -o loop image.iso /mnt/cdrom mounts the image.iso file to /mnt/cdrom. You can then check that all the files that should be present are present. You must be root to use this option, or you must have created an appropriate /etc/fstab entry.
When burning DVDs or Blu-ray discs, you may need to use growisofs, which combines the features of both mkisofs and cdrecord:
$ growisofs -speed=4 -Z/dev/dvdrw -J -r -V “volume name” ./
The -speed option of growisofs is equivalent to the speed option of cdrecord. You specify the target device using -Z rather than dev=. Options following the device are the same as those used by mkisofs. The growisofs approach eliminates the need for a temporary image file, which is particularly helpful with larger discs. If you prefer, though, you can create such a file with mkisofs or some other utility and then burn it with growisofs by adding the source file to the -Z option:
$ growisofs -speed=4 -Z /dev/dvdrw=source-file.iso
This form of growisofs is also useful for burning a DVD image file you've obtained from another source, such as a Linux installation DVD image you've downloaded from the Internet.
Creating Cross-Platform Discs
You may want to create a disc that works on many different OSs. If so, you may want to use a wide range of filesystems and filesystem extensions. Such discs contain just one copy of each file; the filesystems are written in such a way that they all point their unique directory structures at the same files. Thus, the extra space required by such a multiplatform disc is minimal. Features you may want to use on such a disc include the following:
Following Symbolic Links The -f option to mkisofs causes the tool to read the files that symbolic links point to and include them on the CD-R, rather than to write symbolic links as such using Rock Ridge extensions. Following symbolic links can increase the disk space used on a CD-R, but this option is required if you want symbolic links to produce reasonable results on OSs that don't understand Rock Ridge, such as Windows.
Long ISO-9660 Filenames Normally, mkisofs creates only short filenames for the base ISO-9660 filesystem. Long filenames are stored in Rock Ridge, Joliet, or other filesystem extensions. You can increase the raw ISO-9660 name length to 31 characters with the -l (that's a lowercase L) option.
Joliet Support The -J option to mkisofs, as noted earlier, creates an image with Joliet extensions. These extensions do not interfere with reading the disc from OSs that don't understand Joliet.
Rock Ridge Support The -R and -r options both add Rock Ridge extensions. The -R option adds the extensions, but files are stored using their original ownership and permissions, which might be inappropriate on another computer. Using -r works the same, except that it changes ownership of all files to root, gives all users read access to the files, and removes write permissions. These features are usually desirable on a disc that's to be used on any but the original author's computer.
UDF Support You can add support for the UDF filesystem by including the -udf option. UDF is the “up and coming” optical disc filesystem and is the preferred filesystem for DVDs. Most modern OSs, including recent versions of Linux, Windows, and Mac OS, understand UDF.
HFS Support To create a disc that includes Mac OS HFS support, add the -hfs option. When you insert the resulting disc into a Macintosh, the computer will read the HFS filenames. A slew of options are related to this one.
Bootable Discs Although it's not really a cross-platform issue, bootable discs can be important. The standard for bootable discs is known as the El Torito specification. To create an El Torito disc, you must pass a bootable image to mkisofs using the -b image-file option, where image-file is the filename of a bootable disk image, relative to the directory that's used to create the disc image. Typically the disk image is a floppy disk image; when the computer boots, it acts as if it were booting from a floppy disk. If the boot image is of a complete hard disk, add the -hard-disk-boot parameter; if it's of a disk partition, use the -no-emul-boot parameter. You can create a disk image file by copying from the original source using dd, as in dd if=/dev/fd0 of=floppy.img to create an image of a floppy disk.
Reading and Writing UDF Discs
You can create a UDF disc using the -udf option to mkisofs, as just described; however, mkisofs creates UDF as an addition to the ISO-9660 filesystem, and the disc must be created using the same basic process as an ISO-9660 disc. A disc created in this way may be mounted as UDF, but it will be a read-only filesystem.
Full random read/write access to an optical disc, similar to the access you have to USB flash drives or other disks, is referred to as packet writing. To obtain this support, you may use the Linux kernel driver for UDF, the kernel's packet writing support, and the udftools package. This combination gives you access to DVD+RW drives as if they were regular hard disks. CD-RW media cannot be mounted in a read/write manner using these tools, although you can mount CD-RW UDF media for read-only access.
To begin using packet writing features, you should first ensure that you have the relevant kernel drivers and udftools package installed. (The kernel drivers are included with most distributions' standard kernels.) You can then create a UDF filesystem on your DVD+RW disc:
# mkudffs /dev/dvdrw
Change the device filename as necessary. You can then mount the disc, copy files to it, delete files from it, and otherwise use it much as you'd use a hard disk. Writing to UDF discs tends to be quite slow, so be prepared to wait if you're copying many or large files to the disc. Like ISO-9660 with Rock Ridge, UDF supports Linux-style ownership and permissions, so you should bear this in mind and set ownership and permissions appropriately if the disc will be read on other Linux or UNIX computers.
![]() Unlike discs created with mkisofs or growisofs, discs created with mkudffs contain no ISO-9660 filesystem. Therefore, older OSs that have no UDF support won't be able to read mkudffs-created discs. Likewise, if you specify an optical disc mount point in /etc/fstab with a filesystem type of iso9660, you won't be able to mount such discs in Linux unless you manually specify the filesystem type or mount the disc in some other location. You can use a filesystem specification of udf or auto in /etc/fstab to ensure that UDF-only discs can be mounted.
Unlike discs created with mkisofs or growisofs, discs created with mkudffs contain no ISO-9660 filesystem. Therefore, older OSs that have no UDF support won't be able to read mkudffs-created discs. Likewise, if you specify an optical disc mount point in /etc/fstab with a filesystem type of iso9660, you won't be able to mount such discs in Linux unless you manually specify the filesystem type or mount the disc in some other location. You can use a filesystem specification of udf or auto in /etc/fstab to ensure that UDF-only discs can be mounted.
Managing Devices with udev
Most filesystems provide access to files stored on physical media—hard disks, optical discs, USB flash drives, and so on. A few filesystems, however, are virtual—they provide access to information or non-disk data in file-like form. One virtual filesystem that you may need to configure is udev, which controls the device files in the /dev directory tree. These files give programs access to the computer's hardware—the keyboard, mouse, printer, and even hard disks and partitions in a “raw” form.
Configuring udev requires understanding what it does. You can then create rules that modify how udev operates. If you have problems, you may need to use utilities to monitor udev's operation as you attach and detach devices or load and unload relevant kernel modules.
Understanding udev
When a Linux computer boots, the kernel scans the hardware to see what is available. The udev subsystem then creates entries in the /dev virtual filesystem for most hardware devices. This approach to device file maintenance enables the system to adapt to a wide variety of hardware and keeps the /dev directory uncluttered—prior to udev, Linux systems frequently had a fixed set of /dev directory entries for all common hardware devices, even if those devices did not exist on the computer.
![]() Not all hardware devices get /dev directory entries. Network devices, such as Ethernet and WiFi ports, are notable exceptions. Nonetheless, udev handles these devices; you can use it to rename network devices or ensure consistent naming of network devices across boots.
Not all hardware devices get /dev directory entries. Network devices, such as Ethernet and WiFi ports, are notable exceptions. Nonetheless, udev handles these devices; you can use it to rename network devices or ensure consistent naming of network devices across boots.
Standards exist for naming devices in /dev. For instance, most hard disks take names of the form /dev/sdA, where A is a letter. Partitions on hard disks take the same name with a number added. Thus, /dev/sda is the first hard disk, /dev/sdb is the second hard disk, /dev/sda1 is the first partition on the first hard disk, and so on. The /dev directory also holds subdirectories, which are used to hold entire categories of device files. Table 3.9 presents some important Linux device filenames. In this table, A refers to a letter, # refers to a number, and * refers to whole filenames or subdirectories. Table 3.9 is incomplete; many other devices are available. There are also variations from one distribution to another in what device nodes are created, even on identical hardware.
TABLE 3.9 Common Linux device filenames
Most devices in /dev are character devices, which means you can read or write data one character (byte) at a time. Examples include printer ports, mice, and consoles. Some devices, however, are block devices, which means you must read or write data in multi-byte chunks. The most common block devices are disk devices. Most disks have 512-byte blocks, but some use larger block sizes.
Like all files in Linux, the files in /dev have owners, group owners, and permissions. These features control who may access a device. In most cases, you don't want ordinary users to have full read/write access to the raw disk devices; however, ordinary users may require access to the sound hardware devices. One of the key features of udev is that you can alter the default ownership and permissions associated with device files, thus giving access to the hardware to those users who require it.
Preparing to Create udev Rules
The /etc/udev/rules.d directory holds one or more files that contain udev rules. These files normally have names of the form ##-description.rules, where ## is a sequence number and description is a short description of what type of rules reside in the file. The sequence number controls the order in which the udev rules are executed when the system boots or when a device is attached to or detached from the computer.
To control udev, you must know the names for various kernel attributes related to your hardware. One way to learn the relevant attribute names is with the udevadm command, which has various subcommands that can be used to examine or manipulate the udev subsystem. Of particular relevance to start with is the info subcommand, which can be used with various parameters to reveal the attributes associated with any given device file. The following command demonstrates this use, producing the attributes associated with /dev/input/mouse1:
$ udevadm info -a -p $(udevadm info -q path -n /dev/input/mouse1)
Udevadm info starts with the device specified by the devpath and then
walks up the chain of parent devices. It prints for every device
found, all possible attributes in the udev rules key format.
A rule to match, can be composed by the attributes of the device
and the attributes from one single parent device.

looking at device ‘/class/input/input6/mouse1’:
  KERNEL==“mouse1”
  SUBSYSTEM==“input”
  DRIVER==“”

looking at parent device ‘/class/input/input6’:
  KERNELS==“input6”
  SUBSYSTEMS==“input”
  DRIVERS==“”
  ATTRS{name}==“Logitech Trackball”
  ATTRS{phys}==“usb-0000:00:13.0-3/input0”
  ATTRS{uniq}==“”
  ATTRS{modalias}==“input:b0003v046DpC404e0110-e0,1,2,4,k110,111,112,r0,1,8,am4,lsfw”

looking at parent device ‘/class/input’:
  KERNELS==“input”
  SUBSYSTEMS==“subsystem”
  DRIVERS==“”
![]() Older versions of the udev utilities employed a separate program for each udevadm action. The udevinfo command took the place of udevadm info. If you're using an older distribution, you might have to make this substitution.
Older versions of the udev utilities employed a separate program for each udevadm action. The udevinfo command took the place of udevadm info. If you're using an older distribution, you might have to make this substitution.
If you want to tweak a udev rule, you should locate features that distinguish the device you want to affect from other devices. For instance, in the preceding output, the ATTRS{name} field might be unique on your system. Some devices report serial numbers, driver names, vendor ID codes, or other features that can help you uniquely identify a device.
Rules in a udev rules file consist of a series of comma-separated key/value pairs, with the key and value separated by an operator, as specified in Table 3.10. Operators come in two types: matching and assignment. Matching operators are used to specify conditions for the assignment operators to be applied—that is, the assignment operators in a rule are activated if and only if all the matching operators evaluate as true.

![]() Pay careful attention to the difference between the == matching operator and the = assignment operator! This single-character difference is easy to overlook, and if you get it wrong, your udev rules will not work as you intended.
Pay careful attention to the difference between the == matching operator and the = assignment operator! This single-character difference is easy to overlook, and if you get it wrong, your udev rules will not work as you intended.
Table 3.11 specifies some common udev keys. (Consult udev's man page for additional options.) Some of these appear in the preceding example output. When you specify a key in a matching operator, you can use wildcards, such as * to match any string, ? to match any single character, or [abc] to match any one character in the set abc.
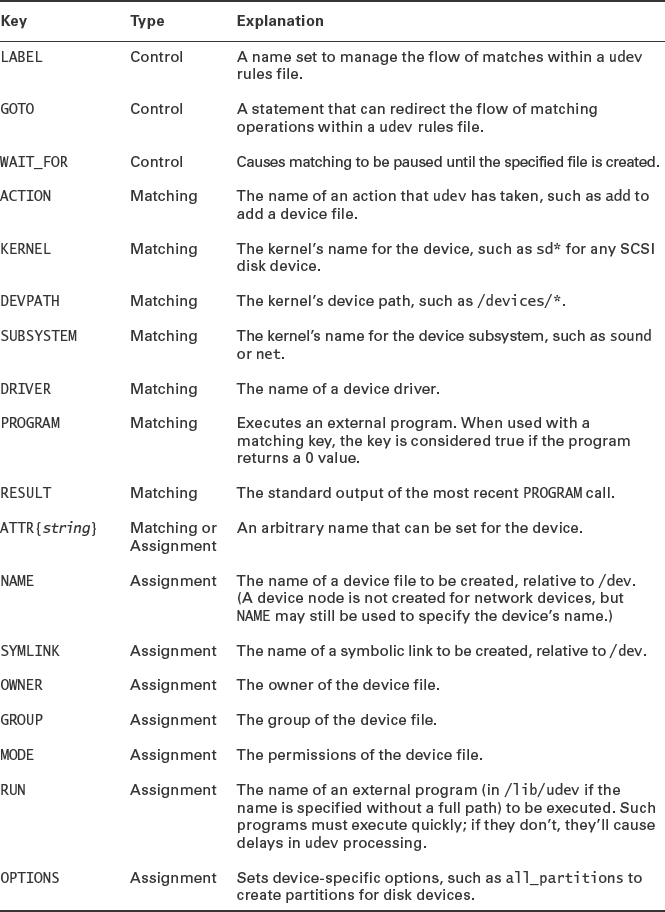
![]() Earlier versions of udev used SYSFS{string} rather than ATTR{string}. Many of the keys used for matching can be turned into plural forms (such as SUBSYSTEM to SUBSYSTEMS or ATTR{string} to ATTRS{string}) to search in multiple layers of the device path. That is, in the udevadm info output you'll find keys associated with several levels of drivers. Using the singular matching rules matches only one layer, whereas the plural form matches all devices higher in the tree from the match.
Earlier versions of udev used SYSFS{string} rather than ATTR{string}. Many of the keys used for matching can be turned into plural forms (such as SUBSYSTEM to SUBSYSTEMS or ATTR{string} to ATTRS{string}) to search in multiple layers of the device path. That is, in the udevadm info output you'll find keys associated with several levels of drivers. Using the singular matching rules matches only one layer, whereas the plural form matches all devices higher in the tree from the match.
Creating udev Rules
A simple example, shown in Listing 3.2, demonstrates how udev may be used to adjust several device nodes. You might create such a file as /etc/udev/rules.d/99-my.rules. In most cases, you should not modify the standard udev rules files, since they're likely to be replaced by system upgrades.
Listing 3.2: Sample udev rules file
SUBSYSTEM!=“usb_device”, ACTION!=“add”, GOTO=“minolta_rules_end” # Minolta|DiMAGE Scan Elite 5400 ATTR{idVendor}==“0686”, ATTR{idProduct}==“400e”, SYMLINK+=“scan5400”The first line in Listing 3.2, which includes a GOTO statement, is designed to keep the first rule from executing except when USB devices are added. This line is not very important in this example, but you use a similar configuration to bypass many or slow-executing rules to improve udev speed. If a USB device is not being added, everything between the first line and the LABEL=“minolta_rules_end” line is ignored.
The first rule in Listing 3.2 adjusts permissions and sets up a symbolic link for a specific device, identified in the comment line (denoted by a leading hash mark, #) as a Minolta DiMAGE Scan Elite 5400 film scanner. This device can be identified by its unique ATTR{idVendor} and ATTR{idProduct} keys. The main purpose of this rule is to adjust the ownership, group ownership, and permissions of the device node, enabling the user lisa and members of the scanner group to access the device. The rule also creates a symbolic link, /dev/scan5400, to point to the original device node. Note that the MODE, OWNER, and GROUP keys all use the = operator, since files can have but one mode, owner, and group; but the SYMLINK key uses the += operator, since multiple symbolic links can point to a single device node, and if you used =, your rule would override any other symbolic links that might be created by other rules—something you probably don't want to do.
The next two rules are similar to one another; they both specify names for particular Ethernet devices, using their hardware addresses as keys. Rules like this are common on computers with multiple devices of the same type. Without these rules, there's no guarantee that a given device will have the same identifier each time the computer boots—that is, eth0 today might become eth1 if you reboot the computer tomorrow. Although such inconsistency isn't a big problem for some devices, it can be disastrous for others. A computer with two Ethernet interfaces might be used as a router, for instance, and you might configure the system with a specific address on each interface. Other devices you might need to distinguish in this way include optical discs, hard disks, printers, television tuners, and scanners.
![]() Modern Linux distributions often create rules similar to the last two rules in Listing 3.2 for network devices and optical discs. These rules typically appear in the 70-persistent-net.rules and 70-persistent-cd.rules files in /etc/udev/rules.d. If you swap hardware, you can end up with new Ethernet device names or optical disc device nodes, which may not be a desirable effect. If this happens, you should be able to edit these files to produce the desired node naming. (Editing these files is an exception to the rule of not editing your distribution's pre-existing udev rules files.) These files may be updated again in the future, but your changes will normally persist.
Modern Linux distributions often create rules similar to the last two rules in Listing 3.2 for network devices and optical discs. These rules typically appear in the 70-persistent-net.rules and 70-persistent-cd.rules files in /etc/udev/rules.d. If you swap hardware, you can end up with new Ethernet device names or optical disc device nodes, which may not be a desirable effect. If this happens, you should be able to edit these files to produce the desired node naming. (Editing these files is an exception to the rule of not editing your distribution's pre-existing udev rules files.) These files may be updated again in the future, but your changes will normally persist.
Sometimes you might prefer to create a symbolic link with a distinctive name rather than specify a conventional name for a device. Such a configuration would closely resemble the Minolta scanner example in Listing 3.2. You could then refer to the device by a distinctive name, such as /dev/scan5400, in software.
Monitoring udev Activity
Once you've created new udev rules, you'll want to test them. You don't need to reboot or even restart any programs to enable your rules; just save the new rules file. You will, however, have to reload the device to have your rule take effect. If the device is hot-pluggable (that is, if it can be safely disconnected and reconnected), like a USB device, you can unplug it and plug it back in again, or perhaps power it off and then back on again. If the device is not hot-pluggable, you may be able to cause the udev rules to be re-interpreted by unloading and reloading a relevant kernel module, as described in Chapter 2, “Linux Kernel Configuration.” If this is impossible, you may have to enter runlevel S or s, or even reboot the computer, to test the new udev configuration.
If you have problems, you may find some clues by using udevadm, this time with its monitor option. (This action used to be enabled via the separate udevmonitor program; the LPI objectives refer to it as such.) The result is likely to be a series of lines like the following when you activate a device:
KERNEL[1285302053.747736] add    /class/input/input7 (input)
KERNEL[1285302053.747891] add    /class/input/input7/mouse1 (input)
KERNEL[1285302053.748003] add    /class/input/input7/event5 (input)
KERNEL[1285302053.748089] add    /class/hidraw/hidraw1 (hidraw)
These lines summarize the information files (in /class and /devices, but not in /dev) that are being created for each device. When a device is removed, a similar line, but with remove rather than add, is displayed.
Summary
Proper management of a Linux computer's filesystems is necessary for the computer's ongoing utility. The most basic aspect of this management is making filesystems available, which is usually done by mounting them. The mount command mounts a filesystem to a mount point, while the umount command undoes this association. You can also permanently mount a filesystem by editing the /etc/fstab file, which controls how filesystems are mounted when the computer boots.
Of course, you can't mount a filesystem if it hasn't been created or if it's been badly damaged, and Linux provides tools to enable you to create and repair filesystems. Specifically, mkfs creates filesystems, while fsck checks them for errors and repairs any errors it finds. (Both programs are actually front-ends; the real work is done by filesystem-specific tools, which you can call directly if you prefer.) Various filesystem-specific tools enable you to fine-tune filesystem operations, such as adjusting the amount of space reserved for root or altering journal functioning. The filesystems used on optical discs (ISO-9660 and its extensions, as well as the newer UDF) require special attention because they're created using special tools, such as mkisofs. These filesystems are also written to optical discs in a special way, using cdrecord or growisofs, although once they're prepared, optical discs are mounted and used much like other filesystems. Although it isn't a filesystem, swap space is managed in a similar way, and you should be familiar with the mkswap, swapon, and swapoff tools that handle swap space.
One special filesystem deserves special attention: udev. This tool creates device nodes, which provide programs with access to hardware—text-mode consoles, printers, scanners, and even raw disk devices. Although Linux distributions ship with basically functional udev configurations, you may need to tweak the standard configuration to ensure consistent naming of devices, to adjust ownership or permissions so that users can access hardware, or for other reasons.
Exam Essentials
Describe the command that's used to mount a filesystem. The mount command mounts a filesystem. Normally, it's passed a device node and mount point, as in mount /dev/sda2 /mnt/data to mount the filesystem on /dev/sda2 on /mnt/data. You can pass additional options to fine-tune its operation. If a filesystem is defined in /etc/fstab with the user, users, or owner options, ordinary users may use mount, passing only the device node or mount point, as in mount /mnt/data.
Summarize the /etc/fstab file format. The /etc/fstab file consists of lines, each of which defines a single mount. (Comment lines may also be present; they begin with hash marks, #.) Each line consists of six fields separated by spaces or tabs: the device filename, the mount point, the filesystem type code, the mount options, the dump code, and the filesystem check order.
Explain how filesystems may be unmounted. The umount command unmounts filesystems. This command takes a device name or mount point of a mounted filesystem as an argument. Various options can modify its behavior. Ordinarily, only root may use this command, although if /etc/fstab contains a relevant entry, ordinary users may unmount a filesystem.
Describe how filesystems are created. The mkfs utility is used to create filesystems. At a minimum, you pass the filesystem type code using the -t option and the device filename. For instance, mkfs -t ext4 /dev/sda8 creates an ext4 filesystem on /dev/sda8. The mkfs program relies on helper programs for each filesystem, and you may call the helper programs directly if you prefer, as in mkfs.ext4 /dev/sda8. Although mkfs and its helpers may be used by ordinary users, normally only root has write access to the device files, so in practice only root may use these programs on most disk devices.
Describe how filesystems are checked for errors. The fsck utility checks a filesystem for errors and repairs any errors that are found. At a minimum, you pass fsck the name of a device that should be checked, as in fsck /dev/sda8. (That device should not be mounted!) Like mkfs, fsck actually relies on helper programs that you can call directly. Both fsck and its helper programs support options that modify how the check proceeds; for instance, you might force a more complete check even if a quick check suggests the filesystem is clean.
Summarize how swap space is created and managed. The mkswap program creates swap space, as in mkswap /dev/sda9. Once created, swap space can be activated with swapon or deactivated with swapoff. To permanently add swap space to a system, you can create an entry in /etc/fstab, using a filesystem type code of swap and a mount point of swap.
Describe the tools used to create optical discs. The mkisofs (aka genisoimage) program creates an ISO-9660 filesystem in a file, optionally including the Rock Ridge or Joliet filesystem extensions or an HFS or UDF filesystem. The image file may then be written to an optical disc using the cdrecord or wodim programs (for CD media) or the growisofs program (for DVD and Blu-ray media). Alternatively, growisofs incorporates mkisofs features, which can streamline creation of optical discs; or you can use any of several GUI front-ends that enable point-and-click optical disc creation.
Explain how udev is configured You can find udev configuration files in /etc/udev/rules.d; each file has a filename that ends in .rules. These files contain key/value pairs separated by operators. The operators can perform matching tasks (which collectively determine whether a rule is applied) or can signify assignment (in which a device node is created or modified or some other action is taken). Using these rules, you can adjust permissions of nodes, create symbolic links, run external helper scripts, or perform other tasks to help manage your system's device nodes.
Review Questions
- What mount point should you associate with swap partitions?
A. /
B. /swap
C. /boot
D. None
- To access files on a USB pen drive, you type mount /dev/sdc1 /media/pen as root. Which types of filesystems will this command mount, provided the filesystem support exists in the kernel?
A. Ext2fs
B. FAT
C. HFS
D. All of the above
- Which of the following /etc/fstab entries will mount /dev/sdb2 as the /home directory at boot time?
A. /dev/sdb2 reiserfs /home defaults 0 0
B. /dev/sdb2 /home reiserfs defaults 0 0
C. /home reiserfs /dev/sdb2 noauto 0 0
D. /home /dev/sdb2 reiserfs noauto 0 0
- What filesystem options might you specify in /etc/fstab to make a removable disk (USB pen drive, Zip disk, floppy disk, and so on) user-mountable? (Select all that apply.)
A. user
B. users
C. owner
D. owners
- Your /etc/fstab file contains the following entry:
/dev/sdc5 / ext4 defaults 1 1
Unfortunately, the order in which your three hard disks is detected varies randomly from one boot to another, which makes this entry problematic. How might you change the entry to fix this problem?
A. Replace /dev/sdc5 with a drive letter specification, such as DRIVE=D:, obtaining the drive letter from GNOME's file browser, Nautilus.
B. Replace /dev/sdc5 with a UUID specification, such as UUID=8b4cdbdd-b9b3-404a-9a54-c1691f1f1483, obtaining the UUID value using blkid.
C. Replace the mount point, /, with the drive-independent mount point specification of //rootdevice//; and change defaults to rootdrive.
D. Replace the mount point, /, with an appropriate LABEL= specification, such as LABEL=root, obtaining the LABEL value using dumpe2fs.
- You've just repartitioned a non-boot disk, added a swap partition to it (/dev/sdb7), created swap space on the partition, and added a suitable entry to /etc/fstab for the new swap partition. How can you activate the new swap partition? (Select all that apply.)
A. mount /dev/sdb7
B. mkswap /dev/sdb7
C. swapon /dev/sdb7
D. swapon -a
- What is the purpose of the /etc/mtab file?
A. It describes the filesystems that are currently mounted, using syntax similar to that of /etc/fstab.
B. It controls the filesystems that the automounter mounts in response to attempts to access empty subdirectories.
C. It provides information on the UUID values and filesystem types contained in all partitions.
D. It summarizes the filesystems currently available to the Linux kernel—that is, those you can mount.
- A network file server has become unavailable while your Linux computer was accessing it at /mnt/remote. Now you want to unmount that share, but because the server has disappeared, umount complains. Which of the following commands is most likely to successfully unmount this unresponsive mount?
A. umount -f /mnt/remote
B. umount -a
C. mount -o remount,ro /mnt/remote
D. umount --kill /mnt/remote
- What does the following command accomplish?
# mkfs.ext2 /dev/sda4A. It sets the partition table type code for /dev/sda4 to ext2.
B. It converts a FAT partition into an ext2fs partition without damaging the partition's existing files.
C. It creates a new ext2 filesystem on /dev/sda4, overwriting any existing filesystem and data.
D. It checks the ext2 filesystem on /dev/sda4 for errors, correcting any that it finds.
- Which of the following options is used with fsck to force it to use a particular filesystem type?
A. -A
B. -N
C. -t
D. -C
- What is an advantage of a journaling filesystem over a conventional (non-journaling) filesystem?
A. Journaling filesystems are older and better tested than non-journaling filesystems.
B. Journaling filesystems never need to have their filesystems checked with fsck.
C. Journaling filesystems support Linux ownership and permissions; non-journaling filesystems don't.
D. Journaling filesystems require shorter disk checks after a power failure or system crash.
- Which of the following features can you adjust with tune2fs? (Select all that apply.)
A. The presence of a journal
B. The size of the filesystem
C. The filesystem's UUID value
D. The owner of all the files on the filesystem
- You have accidentally deleted a file on an ext3fs partition. To recover it, you first enter debugfs, specifying the partition's device node. How can you recover the file?
A. Type restore and then select the file from the list that appears.
B. Type undelete inode, where inode is the file's inode number.
C. Type restore /path/filename, where path is the complete path to the file and filename is its filename.
D. Type undeletepath/filename, where path is the complete path to the file and filename is its filename.
- An ext4 filesystem on /dev/sda3 is being checked every time you reboot your computer. You suspect it may have an incorrect value set that's causing the system to check it after every mount operation. How can you test this hypothesis?
A. Type dumpe2fs -h /dev/sda3 and examine the maximum mount count and maximum check interval values.
B. Type tune2fs -c 26 /dev/sda3 and examine the filesystem check values.
C. Type tune4fs -c 26 /dev/sda3 and examine the filesystem check values.
D. Type resize2fs /dev/sda3 and examine the inode count and disk percentage values.
- What option to mkisofs would you use if you want a computer running Microsoft Windows 7 to be able to read long filenames on a CD-R or DVD created with Linux? (Choose all that apply.)
A. -J
B. -r
C. -hfs
D. -udf
- You've downloaded the latest version of your Linux distribution as a 4 GB DVD image file (distrib.iso). Which of the following commands will burn this file to a blank DVD, assuming your DVD drive can be accessed as /dev/dvdrw?
A. growisofs -Z /dev/dvdrw distrib.iso
B. cdrecord -Z /dev/dvdrw distrib.iso
C. growisofs -Z /dev/dvdrw=distrib.iso
D. mkisofs -o /dev/dvdrw -i distrib.iso
- You want to write files to a DVD+RW disc over a period of several days, retaining the ability to read the disc on another computer at a moment's notice. How can you accomplish this task?
A. Use mke2fs to create an ext2 filesystem on the disc, mount it as if it were a hard disk, and write files to it.
B. Use growisofs with its -J option to create a Joliet filesystem on the disc, mount it as if it were a hard disk, and write files to it.
C. Use growisofs with its -udf option to create a UDF filesystem on the disc, mount it as if it were a hard disk, and write files to it.
D. Use mkudffs to create a UDF filesystem on the disc, mount it as if it were a hard disk, and write files to it.
- The /etc/auto.master file on ganymede.example.com contains the following line:
/mnt/net /etc/auto.servers
The /etc/auto.servers file includes the following line:
templates europa.example.com:/data/templates
What file should a user on ganymede.example.com access to read the /data/templates/iceflow.txt file on europa.example.com?
A. /mnt/net/iceflow.txt
B. /mnt/net/templates/iceflow.txt
C. /data/templates/iceflow.txt
D. /data/templates/mnt/net/iceflow.txt
- What is the effect of the following udev rule, when placed in the /etc/udev/rules.d/99-my.rules file?
KERNEL==“video*”, DRIVER==“saa7134”, SYMLINK+=“video-A180”
A. It forces loading of the saa7134 driver for a video device for which a symbolic link called /dev/video-A180 exists.
B. It creates a symbolic link called /dev/video-A180 that points to the primary device file for a video device that has a driver called saa7134.
C. It registers the name of a driver as saa7134 for all video devices.
D. It links the existing /dev/video-A180 device file to the hardware that's managed by the saa7134 driver.
- You're using a third-party Linux driver that creates device files called /dev/pd-c0-ain, /dev/pd-c0-aout, /dev/pd-c0-din, and several more of this form. You want to give users in the exper group full read/write access to these devices, while keeping other users from accessing them. What udev rule can accomplish this goal?
A. KERNEL==“pd-c?-*”, GROUP=“exper”, MODE=“0660”
B. KERNEL==“pd-c?-*”, GROUP==“exper”, MODE=“0660”
C. KERNEL==“pd-c0-*”, GROUP==“exper”, MODE==“0660”
D. KERNEL==“pd-c0-*”, GROUP==“exper”, MODE=“0666”
Answers to Review Questions
- D. Swap partitions aren't mounted in the way filesystems are, so they have no associated mount points.
- D. When typed without a filesystem type specification, mount attempts to auto-detect the filesystem type. If the media contains any of the specified filesystems, it should be detected and the disk mounted.
- B. The /etc/fstab file consists of lines that contain the device identifier, the mount point, the filesystem type code, filesystem mount options, the dump flag, and the filesystem check frequency, in that order. Option B provides this information in the correct order and so will work. Option A reverses the second and third fields but is otherwise correct. Options C and D both scramble the order of the first three fields and also specify the noauto mount option, which causes the filesystem to not mount automatically at boot time.
- A, B, C. The user, users, and owner options in /etc/fstab all enable ordinary users to mount a filesystem, but with slightly different implications: user enables anybody to mount a filesystem, and only that user may unmount it; users enables anybody to mount a filesystem, and anybody may unmount it; and owner enables only the owner of the mount point to mount or unmount a filesystem. Any of these is likely to be accompanied by noauto, which prevents Linux from attempting to mount the filesystem at boot time. The owners parameter of option D doesn't exist.
- B. The UUID method of specifying a filesystem can protect against changes in device node names such as those described in the question. Option B correctly describes an appropriate change, although of course the exact UUID value you use will depend on your system. Linux doesn't recognize drive letters as described in option A; those are DOS and Windows constructs. Thus, option A is incorrect. Option C is a completely fictitious solution with no correct elements. Option D is a distortion of a possible correct solution; however, to be correct you would need to replace the device specification (/dev/sdc5), not the mount point. Thus, option D is incorrect.
- C, D. The swapon command is the usual way to activate swap space. Option C's use of the command activates a single swap partition, /dev/sdb7, and so satisfies the question's requirements. Option D's use of swapon activates all the swap spaces that are defined in /etc/fstab. Since the question specifies that such an entry has been created, option D will also work. Option A's mount command is used to mount filesystems; it's useless with swap space, and so is incorrect. Option B's mkswap command creates swap space, which the question specifies has already been done. Therefore, this option is unnecessary, and since it doesn't activate the swap space, it's incorrect.
- A. Option A correctly describes the purpose of /etc/mtab. Option B describes the purpose of /etc/auto.master and other autofs configuration files, so this option is incorrect. Option C describes information that can be obtained from the blkid utility, but /etc/mtab will contain, at best, partial information of this type (it will specify filesystems used on mounted partitions, not all of them, and it won't have UUID information). Thus, option C is incorrect. Option D doesn't describe information contained in any Linux configuration file; however, typing lsmod will show loaded kernel filesystem modules (among other modules). In any event, option D is incorrect.
- A. The -f option to umount forces an unmount operation when a remote server is inaccessible, so it's the appropriate response to the condition described in the question. Option B's command will unmount all filesystems in /etc/fstab, but it's no more likely to work at unmounting /mnt/remote than umount /mnt/remote. Unmounting all filesystems is also likely to have undesirable side effects. Option C's command will remount the network filesystem in read-only mode. If successful, this might be better than leaving it as-is, but it won't unmount the filesystem. Option D is fictitious; there is no --kill option to umount.
- C. The mkfs command creates a new filesystem, overwriting any existing data and therefore making existing files inaccessible. This command doesn't set the partition type code in the partition table. The fsck utility and its helpers check filesystems for errors.
- C. The –t option is used to tell fsck what filesystem to use. Normally, fsck determines the filesystem type automatically. The –A option causes fsck to check all the filesystems marked to be checked in /etc/fstab. The –N option tells fsck to take no action and to display what it would normally do without doing it. The –C option displays a text-mode progress indicator of the check process.
- D. The journal of a journaling filesystem records pending operations, resulting in quicker disk checks after an uncontrolled shutdown. Contrary to option A, journaling filesystems are, as a class, newer than non-journaling filesystems; in fact, the journaling ext3fs is built upon the non-journaling ext2fs. Although disk checks are quicker with journaling filesystems than with non-journaling filesystems, journaling filesystems do have fsck utilities, and these may still need to be run from time to time. All Linux native filesystems support Linux ownership and permissions; this isn't an advantage of journaling filesystems, contrary to option C.
- A, C. The tune2fs utility enables you to adjust various filesystem metadata, such as journal parameters (including the journal's presence, as option A indicates), mount count options, and the UUID value (as option C specifies). You cannot adjust the filesystem's size with tune2fs, though; that task requires resize2fs, so option B is incorrect. Because file ownership is a characteristic of individual files, not of the filesystem itself, option D is incorrect. (File ownership for all files can be adjusted by mount options for some non-Linux filesystems, though.)
- B. Unfortunately, the undelete feature of debugfs requires you to know the inode number of a file in order to restore it; option B is correct. Although options A, C, and D would all be easier to perform, none of them can accomplish the stated task.
- A. The dumpe2fs program displays various filesystem metadata, including maximum mount count and maximum check interval values, so option A is correct. (The -h option to dumpe2fs suppresses some lengthy information that's irrelevant to the question at hand.) Option B's command will change the maximum mount count value to 26, which might correct the problem if the hypothesis is correct; but it won't report the current value, so it won't enable you to test your hypothesis. Option C is like option B, but it specifies the fictitious tune4fs program; despite the 2 in the names, dumpe2fs, tune2fs, resize2fs, and other *2fs programs work with ext2fs, ext3fs, and ext4fs. Option D will resize the filesystem to fill its current partition, but it won't change or display the maximum mount count value.
- A, D. The -J option creates a disc with Joliet extensions, and -udf creates one with the UDF filesystem. Recent versions of Windows understand both of these extensions. The -r option creates a disc with Rock Ridge extensions, while -hfs creates one with Apple's HFS. Windows won't understand either of these without special drivers, although Windows will still be able to read the underlying ISO-9660 filesystem (with 8.3 filenames).
- C. The growisofs program is generally used to burn DVDs, since many versions of cdrecord lack DVD support. Of the two growisofs command options, C presents the correct syntax; option B is missing a critical equal sign (=) between the device filename and the image filename. Even if your version of cdrecord supports DVDs, option B's syntax is incorrect; cdrecord uses dev= rather than -Z to specify the target device. The mkisofs command is used to create an image file, not to burn one to disc; and option D's syntax is incorrect in any event.
- D. Producing full random-access read/write features on a DVD+RW disc requires using mkudffs to create a pure UDF filesystem on the disc, as option D specifies. Because of hardware differences between hard disks and optical discs, ext2fs cannot be used as a full read/write filesystem on optical discs, so option A won't work. Options B and C won't work because growisofs creates read-only filesystems, not read/write filesystems. Option B's Joliet is inherently read-only, and even though the UDF filesystem created by option C can be read/write (as it is when created by mkudffs), growisofs creates a read-only UDF filesystem (along with a read-only ISO-9660 filesystem).
- B. The first column in the /etc/auto.master files' lines specifies the main directory where the automounter will mount specific subdirectories corresponding to its managed mounts. The specific configuration file (/etc/auto.servers in this case) includes the subdirectories within the specific directories that will be used as mount points. Thus, given the specified files, /mnt/net/templates will be the mount point. This mount point corresponds to the NFS export corresponding to /data/templates on europa.example.com. Thus, /data/templates/iceflow.txt on that server can be read from /mnt/net/templates/iceflow.txt on the client, as option B specifies.
- B. The udev rule includes two matching conditions (KERNEL==“video*”, which matches drivers with generic names that begin with video; and DRIVER==“saa7134”, which matches devices that use the saa7134 driver) and one assignment operator (SYMLINK+=“video-A180”, which creates a symbolic link). Option B correctly describes this configuration. Options A, C, and D all confuse matching and assignment actions in the udev rules.
- A. Option A's udev rule will accomplish the stated goal. Option B looks almost identical, but it mistakenly uses the matching operator == rather than the assignment operator = in the GROUP==“exper” portion of its rule. Option C makes the same mistake and compounds it by replicating this mistake in its MODE==“0660” option. Option D is like option B, but it uses 0666 as the mode. Even if it weren't for the error in the GROUP comparison, option D would set the mode incorrectly, enabling all users to access the hardware.