
Chapter 9
Configuring Web and Email Servers
THE FOLLOWING LINUX PROFESSIONAL INSTITUTE OBJECTIVES ARE COVERED IN THIS CHAPTER:
- 208.1 Implementing a Web server (weight: 3)
- 208.2 Maintaining a Web server (weight: 2)
- 208.3 Implementing a proxy server (weight: 1)
- 211.1 Using email servers (weight: 3)
- 211.2 Managing local email delivery (weight: 2)
- 211.3 Managing remote email delivery (weight: 2)
 Two of the most important parts of the Internet are email and the World Wide Web (WWW or Web for short). In fact, Linux plays a role in both of these Internet subsystems; email and Web server software exists for Linux, and both Linux and the common Linux server programs are important in today's implementation of these tools.
Web server configuration can involve multiple protocols and programs, sometimes on multiple computers. You may be asked to set up a Web server and help maintain the documents on that server. You should also be aware of proxy servers, which sit between users and outside Web servers in order to filter content or improve performance.
Email is delivered through several protocols, as described later in “Understanding Email,” so configuring Linux as a mail server computer may require you to set up several different server programs. Additional programs help to “glue” everything together, enabling local delivery, access to junk mail filters, and so on. It's critical that you understand how these protocols and software interact, as well as the basics of how to configure the individual programs.
Understanding Web Servers
Web servers implement the Hypertext Transfer Protocol (HTTP) and are extremely important to today's Internet. Even local networks often employ Web servers for purely local purposes. Web servers are similar to file servers (described in Chapter 8, “Configuring File Servers”) in that they provide more or less direct access to files stored on the server computer; but Web servers are designed to quickly deliver one or a few files at a time, typically without requiring authentication, and then terminate a connection. Although uploading files to a Web site is possible, a simple configuration typically disallows such access; such simple Web sites are read-only in nature.
These features are ideal for the Web, which enables users to read information on a wide variety of Web sites from around the globe with minimal fuss. Some critical features of Web sites, such as the hyperlinks that enable moving from one site to another by clicking a link, are implemented in the main type of document delivered by Web servers. This document type is known as the Hypertext Markup Language (HTML). It provides document formatting features to enable setting fonts, creating lists, and so on; embedding certain related files, such as graphics, in the Web page; and linking to other documents on the same or other sites. HTTP and HTML are distinct; it's possible to run a Web site (using HTTP) that hosts no HTML files, and it's possible to use HTML files without a Web server. As a practical matter, though, the two are usually linked; a Web server exists to deliver HTML files to clients, and those files are created with a Web server as delivery mechanism in mind. Neither the LPIC-2 exam nor this chapter covers HTML in any detail; you should merely be aware of how HTML fits in with HTTP.
Web sites today often employ more complex document types, such as scripts and other dynamic content. Web sites built on such documents can be much more interactive than the traditional static HTML files that dominated the Web a decade ago. Several types of dynamic content exist, and each has its own configuration options. This chapter covers the basics of PHP: Hypertext Preprocessor (PHP) and Perl scripts on Web sites in the “Configuring Scripts” section.
In principle, any computer can run a Web server. On the Internet at large, most Web server computers have the hostname www in their respective domains or subdomains. This is only a convention, though; many sites employ other names or run multiple Web servers on a single domain for one reason or another.
Many Web server programs are available, both for Linux and for other platforms. The most popular, however, is Apache (http://httpd.apache.org). This chapter describes how to configure this software for common Web server duties. If you need to run another server, you should consult its documentation.
![]() Apache 2.2.17 is the newest version available as I write. Some configuration options changed between the 1.3.x series and the 2.x series. This chapter emphasizes the more recent software. If you're using an older 1.3.x version, you may need to deviate from the descriptions in this chapter. (The 1.3.x series is still being maintained, but most new installations should use a 2.2.x version.)
Apache 2.2.17 is the newest version available as I write. Some configuration options changed between the 1.3.x series and the 2.x series. This chapter emphasizes the more recent software. If you're using an older 1.3.x version, you may need to deviate from the descriptions in this chapter. (The 1.3.x series is still being maintained, but most new installations should use a 2.2.x version.)
Setting Basic Apache Options
The primary Apache configuration file is called apache.conf, httpd.conf, or (for Apache 2.x on some Linux distributions) apache2.conf or httpd2.conf. This file is usually located in /etc/apache, /etc/apache2, /etc/httpd, or /etc/httpd/conf. Whatever the filename or location, most of the lines in this file are either comments that begin with hash marks (#) or option lines that take the following form:
Directive Value
The Directive is the name of a parameter you want to adjust, and the Value is the value given to the parameter. The Value may be a number, a filename, or an arbitrary string. Some directives appear in named blocks that begin and end with codes enclosed in angle brackets, such as this:
<IfDefine APACHEPROXIED>
    Listen 8080
</IfDefine>
This particular example sets the Listen directive to 8080 if the APACHEPROXIED variable is defined. Note that the final line uses the name specified in the first line but is preceded by a slash (/). This arrangement signifies the start and end of a block of options albeit one that contains just one option in this example.
Apache is designed in a modular way—many of its features can be compiled as separate modules that can be loaded at run time or left unloaded. Precisely which features are compiled as modules and which are compiled into the main Apache executable (typically called apache, apache2, httpd, or httpd2) varies from one distribution to another. To load a module, you use the LoadModule directive, and many Apache configuration files have a large number of these directives early in the file. With Apache 1.3.x (but not for Apache 2.x), you may need to use the AddModule directive to activate the features of a module that's compiled into the main binary. You may want to peruse these modules to see what features are enabled by default.
![]() Commenting out the LoadModule directives for unused features can be a good security measure. For instance, if you have no need to deliver dynamic content, commenting out the cgi_module can reduce the chance that an accidental misconfiguration or intentional cracking will cause damage. Unfortunately, it's hard to know what each module does, so I recommend caution in commenting out module definitions.
Commenting out the LoadModule directives for unused features can be a good security measure. For instance, if you have no need to deliver dynamic content, commenting out the cgi_module can reduce the chance that an accidental misconfiguration or intentional cracking will cause damage. Unfortunately, it's hard to know what each module does, so I recommend caution in commenting out module definitions.
The Include directive loads additional files as if they were part of the main configuration file. Some distributions take advantage of this feature to place module support in separate files, typically in the mods-available and mods-enabled subdirectories. The files in mods-enabled are loaded via an Include statement. These files are actually symbolic links to equivalent files in mods-available. The result is that system configuration scripts can enable or disable modules by creating or removing appropriate symbolic links in these directories.
In addition to the main configuration file, a handful of additional files are important:
access.conf Not all Apache configurations use this file, which is essentially a supplemental file that tells Apache how to treat specific directories. Many systems roll this information into the main configuration file. For those that don't, an AccessConfig directive in the main file points to the access.conf file.
mime.types or apache-mime.types This file defines assorted Multipurpose Internet Mail Extension (MIME) types, which are codes that help identify the type of a file. HTTP transfers identify files by MIME type, but Linux filesystems don't store MIME type information natively. Therefore, Apache uses this file to map filename extensions (such as .html or .txt) to MIME types. The default file handles most common files you're likely to deliver on your Web server, but you may need to add MIME types if you place exotic file types on the server.
magic This file exists in support of a second method of determining a file's MIME type. Rather than rely on filename extensions, this file includes “fingerprints” for many file types based on the files' contents. You shouldn't try to adjust this file unless you have precise instructions on doing so for a particular file type or if you possess a deep understanding of the file's internal format.
These files typically reside in the same directory that holds the main Apache configuration file. You're most likely to need to adjust access.conf, but only on systems that use it by default or if you choose to use this configuration option. If you deliver unusual file types, the best way to associate MIME types with those files is usually by adjusting the mime.types or apache-mime.types file; modifying the magic file is much trickier.
Users or Web site maintainers can override some Apache configuration options using the .htaccess files in the directories that Apache serves. The format of the .htaccess file is just like that of the main Apache configuration file, but the options set in this file affect only the directory tree in which the .htaccess file resides. Normally, this file is used only by users whose personal Web pages are shared with a global UserDir directive or by Web site maintainers who may edit one or more subdirectories of the server's main Web space directory but who don't have full administrative access to edit the main Apache configuration file.
Configuring Apache to Host Your Site
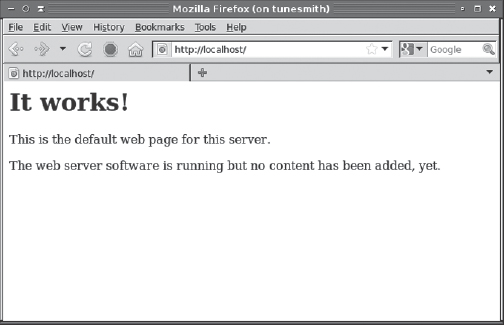
A default Apache configuration file usually works at least minimally. You can test your installation after installing it by entering http://localhost as the location in a Web browser running on the same computer. You should see a generic page appear, as shown in Figure 9.1, which depicts the default page on an Ubuntu 10.10 system. Details vary from one distribution to another, so don't be surprised if your default page looks different from Figure 9.1. You should also test access to the server from other computers to be sure firewall rules (described in Chapter 7, “Advanced Network Configuration”) or other problems aren't blocking access to the server. If you can't access the server, check that it's running. It should appear as apache, apache2, httpd, or httpd2 in a ps listing. Apache 1.3 can also be run from a super server, although this configuration is not common.
FIGURE 9.1 Once installed and run, a default Apache configuration displays a generic Apache Web page or a page for your distribution.
Once the server is running, you may want to adjust some of its defaults. Some common features you might want to change include the server's user and group, the location of Web pages the server delivers, and virtual domains. Two still more advanced options—delivering secure Web pages and serving dynamic content—may also need adjustment.
Setting the Apache User and Group
Like most servers that start with SysV, Upstart, or local startup scripts, Apache starts running as root. Apache supports two directives that adjust the username and group name under which the server runs after it's started. These directives are User and Group. For instance, you might include the following lines to have Apache run as the user apache in the group called agroup:
User apache
Group agroup
After you've set these options, a check of these features using ps (as in ps aux | grep apache or ps aux | grep httpd) should reveal that most instances of Apache are running as the specified user and group. The first instance, though, will continue to run as root. This instance doesn't directly respond to incoming requests, though.

Running Apache in a chroot Jail
Ensuring that Apache runs in a low-privilege account is a good security measure; however, you can go further. As with the Berkeley Internet Name Domain (BIND) server described in Chapter 6, “DNS Server Configuration,” you can run Apache in a chroot jail. Doing so limits the damage that Apache can do should it be compromised or should poorly written scripts run amok. You'll need to take some extra configuration to do this, though.
Much of the task of running Apache in a chroot jail is similar to that described in Chapter 6 for BIND. Broadly speaking, you must create a directory tree to house Apache, copy configuration files and support libraries to that directory tree, and modify your Apache startup script to launch the server using the chroot command. (Unlike BIND, Apache doesn't have an option to do this itself.)
If you need more information, numerous Web pages describe this configuration in more detail; doing a Web search on Apache chroot will find them. You may want to check your distribution's documentation first, though; it may provide a streamlined setup method.
Changing Web Page Locations
As a general rule, Apache supports two types of static Web pages: a site's Web pages and individual users' Web pages. A site's Web pages are maintained by the system administrator or a designated Web master; most ordinary users can't modify these pages. Multiuser systems sometimes provide users with Web space. These pages are typically served from subdirectories of the users' home directories. Naturally, Apache provides tools for changing the locations of both site Web pages and individuals' Web pages.
Understanding Web Addresses
To understand how Apache returns Web pages, it's helpful to look at how an HTTP request is structured. The usual form of this request, as typed by a person in the Address or Location field of a Web browser, is as a Uniform Resource Identifier (URI), which looks like this:
![]() The URI acronym is the official replacement for another acronym, Uniform Resource Locator (URL). Although URL is still in common use, it's officially an “informal” term.
The URI acronym is the official replacement for another acronym, Uniform Resource Locator (URL). Although URL is still in common use, it's officially an “informal” term.
This URI consists of four components:
The Protocol The first few characters of a URI specify the protocol—http in this case. The protocol is terminated by a colon (:), and in many cases (including URIs for HTTP transfers) two slashes follow it. Other common protocols in URIs include https (secure HTTP), ftp, and email.
The Hostname The hostname follows the protocol name in HTTP URIs, as well as some other types of URIs, such as FTP URIs. In this example, the hostname is www.example.com.
The Filename After the hostname in HTTP URIs comes the filename that's to be retrieved—/products/biggie.html in this example. The filename can be a single file or a complete path to a file, as in this example. Normally, the filename is specified relative to the server's document root, as described next, in “Changing the Site's Web Page.” If a tilde (~) leads the filename, though, it's relative to a specified user's Web storage area, as described in the upcoming section “Enabling User Web Pages.”
Additional Information Some URIs include additional information. The preceding example specifies #orig after the filename, meaning that the browser should locate a tag called orig within the page and display the text at that point. Dynamic content uses this part of the URI to enable browsers to pass data to the Web server for processing.
Many of these components can be omitted or abbreviated. For instance, most Web browsers assume an HTTP transfer if you start the URI with the hostname. If you omit the filename, the Web server assumes a default filename. In Apache, you can set this default with the DirectoryIndex directive. If you provide more than one value for this directive, Apache searches for them all. Most installations create a default that searches for one or more of index.htm, index.html, or index.shtml. If you're moving an existing set of Web pages to Apache and that set includes a different default index filename, you may want to change the default.
Changing the Site's Web Page
One of the earliest directives in the Apache configuration file is probably a DocumentRoot directive, which tells Apache where to look for the Web pages it delivers. You'll find the default Web pages, such as the one displayed in Figure 9.1, in this location. To use Apache to deliver your own site's pages, you can do one of two things:
- Change the DocumentRoot directive to point to another directory in which you've stored your Web site's pages.
- Replace the files in the default DocumentRoot directory with ones you create.
![]() As with module configurations, some Apache installations place Web site configuration data, including DocumentRoot, in a separate configuration file, typically in the sites-available/default file (with a symbolic link in sites-enabled/default).
As with module configurations, some Apache installations place Web site configuration data, including DocumentRoot, in a separate configuration file, typically in the sites-available/default file (with a symbolic link in sites-enabled/default).
Changing the DocumentRoot directive is slightly preferable because it reduces the odds that your Web pages will be accidentally overwritten when you upgrade your Web server installation. Using an unusual location for the server's home page can also reduce the risk of a scripted attack that uses some other system vulnerability to overwrite your site's files; if the attacker doesn't know where your files reside, they can't be overwritten. When you create a new directory to house your site, you should be sure that it's readable to the user under whose name Apache runs. This username is often specified with the User directive in the main Apache configuration file. The group may also be important; that's set via the Group directive. Because public Web sites seldom contain sensitive data, it's not uncommon to make the directories and the files within them readable to the world.
Typically, the Web master is responsible for maintaining the Web site. The Web master may also be the system administrator, but this isn't always the case. The Web master normally has full write access to the site's Web page directory, and the Web master may in fact be the owner of this directory tree and all the files within it. The default document root directory isn't normally the Web master's home directory, though; configuring the system in this way would enable anybody to download files such as the Web master's .bashrc file.
Enabling User Web Pages
In addition to a site's main Web pages, Apache can deliver Web pages belonging to individual users. To activate this feature, you must set the UserDir directive, which takes the name of a directory within a user's home directory as an argument. (This directive may appear in the mods-available/userdir.conf file, which must be activated by symbolically linking it to a file in the mods-enabled directory.) For instance, you might use the following definition:
UserDir public_html
Once this directive is set, users can create subdirectories called public_html and store their personal Web pages in that directory. For instance, suppose a remote user enters http://www.example.com/~charlotte/apage.html as a URI. If the server is configured with UserDir set to public_html and if the user charlotte has a home directory of /home/charlotte, then Apache will attempt to return /home/charlotte/public_html/apage.html to the client.
The directories leading to the one specified by UserDir, including that directory, must be accessible to the account used to run Apache. This includes both the read bit and the execute bit (which in the case of directories means the ability to traverse the directory tree). Typically, setting world permissions on these directories is appropriate; however, setting group permissions is adequate if the Apache process is run using a suitable group.
![]() Be sure when you set up the UserDir directive and the root user's home directory (typically /root), that outsiders can't retrieve files from root's home directory. Such a configuration is a potential security threat.
Be sure when you set up the UserDir directive and the root user's home directory (typically /root), that outsiders can't retrieve files from root's home directory. Such a configuration is a potential security threat.
The delivery of user Web pages relies on the userdir_module module. If your site shouldn't deliver user Web pages, you may want to remove the LoadModule directive that loads this module. If you remove this directive, an attempt to use the UserDir directive will cause Apache to fail at startup, unless it's surrounded by an <IfModule mod_userdir.c> directive to test for the module's presence. If your installation uses separate directories with per-module configuration files, enabling or disabling the relevant file will automatically enable or disable both the module and the UserDir directive.
Serving Virtual Domains
A single Apache Web server can deliver pages for multiple domains. This configuration is extremely important for Web-hosting ISPs, which run Web servers that respond differently to requests for each client. For instance, one ISP might deliver Web pages for www.example.com, www.pangaea.edu, and many more. To do this without devoting an entire computer and IP address to each domain, the ISP must configure the Web server to respond differently depending on the hostname part of the URI. This practice is known as configuring virtual domains. Of course, if you're an ISP hosting virtual domains, this chapter is inadequate for your job; you should read several books on Apache or hire a system administrator with substantial experience running Apache or some other Web server. Nonetheless, virtual domains can be useful even on some smaller sites. For instance, a small company might change its name and want its Web server to respond differently to two hostnames. An individual or small business might also partner with another individual or small business to set up Web sites on a broadband connection, minimizing the costs associated with running their Web sites in this way. Two methods of delivering virtual domains are common: VirtualDocumentRoot and VirtualHost.
Using VirtualDocumentRoot
The idea behind the VirtualDocumentRoot directive is to tell Apache which directory to use as the document root directory based on the hostname used by the client. VirtualDocumentRoot works much like the standard DocumentRoot directive, except that you include variables, as specified in Table 9.1, in the directive's value.
TABLE 9.1 Variables used in conjunction with VirtualDocumentRoot
| Variable | Meaning |
| %% | A single % in the directory name. |
| %N.M | Parts of the name. N is a number that refers to the dot-separated name component. For instance, if the name is www.example.com, %1 means www, %2 means example, and so on. Negative numbers count from the end; 1 means com, %-2 is example, and so on. An N of 0 refers to the entire hostname. The optional M refers to the number of characters within the name. For instance, %2.4 would be exam. Negative M values count from the end of the component, so %2.-4 would be mple. |
![]() If you want to set up virtual domains based on the IP address of the server (for servers with multiple IP addresses), you can use VirtualDocumentRootIP, which works much like VirtualDocumentRoot but uses IP addresses rather than hostnames.
If you want to set up virtual domains based on the IP address of the server (for servers with multiple IP addresses), you can use VirtualDocumentRootIP, which works much like VirtualDocumentRoot but uses IP addresses rather than hostnames.
The VirtualDocumentRoot directive is most useful when you want to host a large number of domains or when the domains change frequently. You can set up a domain merely by creating a new subdirectory. For instance, suppose you want to create a directory structure of the form /home/httpd/tld/domain, as in /home/httpd/com/example as the document root directory for www.example.com. A configuration accommodating this layout would look like this:
VirtualDocumentRoot /home/httpd/%-1/%-2
Alternatively, suppose you want to alphabetize your domains so that www.example.com's document root directory would be in /home/httpd/e/example. This arrangement could be achieved using the following entry:
VirtualDocumentRoot /home/httpd/%-2.1/%-2
![]() Some configurations could create duplicate entries. For instance, the preceding entry will try to place both example.com's and example.org's document roots in the same directory. To avoid the problem, use the %0 variable in the path, which uses the entire hostname.
Some configurations could create duplicate entries. For instance, the preceding entry will try to place both example.com's and example.org's document roots in the same directory. To avoid the problem, use the %0 variable in the path, which uses the entire hostname.
Whenever you use VirtualDocumentRoot, you should set the following line in your Apache configuration file:
UseCanonicalNames Off
Ordinarily (or when UseCanonicalNames is set to On), Apache tries to use the hostname of the machine on which it runs when performing relative accesses within a Web site—that is, when a Web page omits the protocol and hostname portions of a URI in a link and provides only the document filename. This practice is likely to lead to “file not found” errors or incorrect pages returned, because Apache will look up the wrong site's documents. Setting UseCanonicalNames to Off, though, tells Apache to instead use the hostname provided by the client with the original access, which results in a correct lookup.
Using VirtualHost
Another approach to defining virtual domains is to create VirtualHost directive blocks. These blocks must be preceded in the file with a line that defines the interfaces on which you want to define virtual hosts:
NameVirtualHost *
This example tells the system to create virtual hosts on all interfaces. If the system has multiple interfaces and you only want to create virtual hosts on one interface, you can specify the IP address rather than an asterisk as the value of this directive. At some point after the NameVirtualHost directive in the Apache configuration file are VirtualHost directive blocks for each hostname:
<VirtualHost *>
   ServerName www.example.com
   DocumentRoot /home/httpd/business
</VirtualHost>

<VirtualHost *>
   ServerName www.luna.edu
   DocumentRoot /home/httpd/loonie/html
   ScriptAlias /cgi-bin/ “/home/httpd/loonie/cgi-bin/”
</VirtualHost>
As with a VirtualDocumentRoot configuration, you should be sure to set UseCanonicalNames to Off in the main Apache configuration file. Failure to do so is likely to result in spurious “document not found” errors and possibly failures to retrieve documents when Web pages use relative document references in URIs.
One of the big advantages of VirtualHost definitions over VirtualDocumentRoot is that you can customize each server to respond differently. For instance, the preceding example uses document root filenames that are unique but that aren't systematically related to the hostnames. The definition for www.luna.edu also activates a dynamic content directory via the ScriptAlias directive, which is described in more detail in the upcoming section “Serving Dynamic Content with CGI Scripts.” These advantages can be very important for many servers that handle just a few domains. The drawback to this approach is that you must change the configuration file every time you add or delete a domain, which can be a hassle if you change the domains you handle on a regular basis.
Configuring Scripts
Many sites run a Web server merely to deliver static content—that is, pages whose content doesn't change. Web servers can also run dynamic content, though, such as Common Gateway Interface (CGI) scripts, PHP: Hypertext Preprocessor (PHP; a recursive acronym, formerly expanded as Personal Home Page) scripts, or mod_perl scripts. These scripts can extend the functionality of a Web server, enabling it to provide dynamic content or perform computing functions on behalf of clients. Each of these technologies is extremely complex, and this section provides only enough information for you to activate support for it in Apache. If you need to maintain a site that relies on scripting technology, you should consult additional documentation on the topic.
![]() Enabling scripting features on a Web server can be risky, because an incorrect configuration with buggy scripts can give an attacker a way to compromise the computer's security as a whole. Thus, I strongly recommend you not attempt this unless you learn far more about Web servers and their scripting capabilities than I can present in this brief introduction to this topic.
Enabling scripting features on a Web server can be risky, because an incorrect configuration with buggy scripts can give an attacker a way to compromise the computer's security as a whole. Thus, I strongly recommend you not attempt this unless you learn far more about Web servers and their scripting capabilities than I can present in this brief introduction to this topic.
CGI scripts are scripts or programs that run on the Web server at the request of a client. CGI scripts can be written in any language—C, C++, Perl, Bash, Python, or others. CGI scripts may be actual scripts or compiled programs, but because they're usually true scripts, the term CGI script applies to any sort of CGI program, even if it's compiled. The script must be written in such a way that it generates a valid Web page for users, but that topic is far too complex to cover here.
To activate CGI script support in Apache, you typically point to a special CGI directory using the ScriptAlias directive:
ScriptAlias /cgi-bin /usr/www/cgi-bin
This line tells Apache to look in /usr/www/cgi-bin for scripts. This directory may be a subdirectory of the parent of the DocumentRoot directory, but their locations can be quite different if you prefer.
PHP, by contrast, is a scripting language that's designed explicitly for building Web pages. As with CGI scripts, writing PHP scripts is a complex topic that's not covered on the LPIC-2 exams. You should, however, know how to activate PHP support in Apache. To begin this task, ensure that you've installed the necessary PHP packages. Chances are you'll need one called php, and perhaps various support or ancillary packages, too.
With PHP installed, you can configure Apache to support it. This is done via Apache configuration lines like the following:
# Use for PHP 5.x:
LoadModule php5_module        modules/libphp5.so
AddHandler php5-script php

# Add index.php to your DirectoryIndex line:
DirectoryIndex index.html index.php
AddType text/html       php
![]() The preceding configuration works for PHP version 5. If you're using another PHP version, you may need to change the filenames.
The preceding configuration works for PHP version 5. If you're using another PHP version, you may need to change the filenames.
The first couple of lines in this configuration simply load the PHP module and handler. The DirectoryIndex and AddType lines help Apache manage the PHP files. The DirectoryIndex line will replace existing lines in your configuration—or more precisely, you should ensure that index.php appears on the DirectoryIndex line along with any other filenames you use for index files.
In addition to these global options, directories that hold PHP scripts may include files called php.ini, which set various PHP interpreter options. There are quite a few options, such as user_dir, include_path, and extension. If you need to tweak your PHP settings, I recommend starting from a sample file, such as the global php.ini file in /etc.
The mod_perl scripting solution enables Apache to run Perl scripts directly, rather than relying on the normal CGI tools to do so. You may need to install a package called apache-mod_perl, libapache2-mod-perl2, or something similar to enable this support.
With the mod_perl support installed, you must activate it. In most cases, this is done by including a configuration file that ships with the package, such as mods-available/perl.load or modules.d/75_mod_perl.conf. If such a file isn't available, the following line, added to your main Apache configuration file, will do the job:
LoadModule perl_module /usr/lib/apache2/modules/mod_perl.so
You may need to modify the path to the mod_perl.so file for your installation. You will also need to define a directory to hold the site's Perl scripts:
<Directory /var/www/perl>
    AllowOverride All
    SetHandler perl-script
    PerlResponseHandler ModPerl::Registry
    PerlOptions +ParseHeaders
    Options -Indexes FollowSymLinks MultiViews ExecCGI
    Order allow,deny
    Allow from all
</Directory>
Typically, this directory will be a subdirectory of the main site's directory (/var/www in this example). When a user accesses a Perl script file, the result will then be that the script runs. Normally, the script will generate dynamic content.
Whatever scripting tool you use, you can restart Apache via its SysV startup script to have it enable scripting support. It's then up to you or your Web developers to create appropriate scripts to manage dynamic content on your site. This is a complex topic that's not covered on the LPIC-2 exams.
Enabling Encryption
Secure HTTP is denoted by an https:// header in the URI. This protocol is an HTTP variant that uses encryption to keep data transfers private. Apache supports secure HTTP transfers, but configuring it to do so is a three-step process:
- You must install a special version of Apache or add-on package that enables encryption.
- You must obtain or create a certificate, which is an encryption key.
- You must configure Apache to listen on the secure HTTP port and respond to requests on that port using encryption.
Installing Secure Apache
Secure HTTP relies on an encryption protocol known as the Secure Sockets Layer (SSL). To implement SSL, your system needs an SSL library. Today, OpenSSL (http://www.openssl.org) is the most common choice for this job. OpenSSL ships with many Linux distributions, so you can probably install it from your main installation medium.
In addition to SSL, you must install an SSL-enabled version of Apache or an SSL module for Apache. Modern distributions typically ship with a suitable module package for Apache 2.x, with a name such as apache-mod_ssl. Sometimes the appropriate module is installed along with the main Apache package or in a generic support package. If you're using an older Apache 1.3 installation, you may need to use a special version of Apache, such as Apache-SSL (http://www.apache-ssl.org).
Obtaining or Creating a Certificate
Just as with a virtual private network (VPN), as described in Chapter 5, “Networking Configuration,” HTTPS relies on keys and certificates to authenticate each side to the other. In the case of HTTPS, though, it's typically important that the server be able to prove its identity to the client, with no previous contact between the two systems. Consider a Web merchant who asks for a credit card number, for instance; the user wants to be sure that the server belongs to a legitimate merchant and not an imposter. The true identity of the client is typically less important in this situation.
![]() If you do need to establish two-way trust between the Web server and the Web client, you can do so. You must acquire keys for both systems (you may be able to generate the client's key yourself) and use the SSLRequire directive to point the server to the public keys for the clients who should be allowed to connect. Consult the Apache documentation for more details about this type of configuration.
If you do need to establish two-way trust between the Web server and the Web client, you can do so. You must acquire keys for both systems (you may be able to generate the client's key yourself) and use the SSLRequire directive to point the server to the public keys for the clients who should be allowed to connect. Consult the Apache documentation for more details about this type of configuration.
To provide this level of trust, HTTPS relies on certificates and keys that are signed by any of a handful of publicly known certificate authorities (CAs). Every modern Web browser has a list of CA signatures and so can verify that a Web site's keys have been signed by an appropriate CA and that the Web site is, therefore, what it claims to be. This system isn't absolutely perfect, but it's reasonably reliable.
To deliver secure content, you need a certificate. For many purposes, the best way to do this is to buy one from a CA. A list of about two dozen CAs is available at http://www.apache-ssl.org/#Digital_Certificates. Before obtaining a certificate from a CA, you should research the companies' policies and determine how widely recognized their certificate signatures are. There's no point in buying a cut-rate certificate if your users' browsers generate alerts about unknown signatures. You could create your own certificate that would produce the same result.
Creating your own certificate makes sense if you don't care about authenticating the identity of the server or if this authentication is required on only a few systems. For instance, if you want to encrypt certain Web server accesses on a small local network, or even between offices that are geographically separated, you don't need to go to a CA. You can tell your Web browsers to accept your own locally generated certificate. Of course, telling your users to accept your personal certificate but not to accept suspicious certificates from other sites may be confusing.
Whether you obtain your certificate from a CA or generate it locally, you must make it available to Apache. Typically, this is done by copying the certificate to a special certificate directory somewhere in /etc, such as /etc/ssl/apache. If you use a script to generate a certificate, the script may do this automatically, or it may place the certificate in another directory, such as the main Apache configuration directory. The certificate consists of two files: a certificate file (which often has a .crt extension) and a key (which often has a .key extension).
![]() Be sure you protect the certificate and key from prying eyes. The default configuration when utilities create these files uses root ownership and 0600 permissions to accomplish this task. If you copy the files, be sure these features are preserved. A miscreant who copies these files can impersonate your (formerly) secure web server!
Be sure you protect the certificate and key from prying eyes. The default configuration when utilities create these files uses root ownership and 0600 permissions to accomplish this task. If you copy the files, be sure these features are preserved. A miscreant who copies these files can impersonate your (formerly) secure web server!
Configuring Apache to Use Encryption
Apache 2.x systems tend to need only very minimal configuration file changes to support SSL. With these systems, you may only need to load the SSL module with a line like this:
LoadModule ssl_module /usr/lib/apache2/modules/mod_ssl.so
You may need to adjust the location of the SSL module for your system. If your installation uses module loading and configuration files, you should be able to activate SSL support by creating an appropriate symbolic link to use the SSL file. Once activated in this way, an Apache 2.x system will respond both to ordinary HTTP and secure HTTP requests. Table 9.2 summarizes some of the Apache configuration options that affect SSL operation. The SSLRequireSSL directive is particularly noteworthy, because it can help keep your Web server from inadvertently delivering sensitive data over an unencrypted link.
TABLE 9.2 Directives that affect SSL operation
Limiting Access to Apache
Web servers are frequently targets of attack. Several Apache features are designed to address this problem. Most notably, you can limit the number and types of connections that Apache will accept, and you can configure Apache to require user authentication.
Limiting Connections to Apache
Apache enables you to limit the absolute number of connections handled by the server. This is typically done through a block of options like this:
<IfModule mpm_prefork_module>
    StartServers          5
    MinSpareServers       5
    MaxSpareServers      10
    MaxClients          150
    MaxRequestsPerChild   0
</IfModule>
These options tell Apache to launch five servers initially (StartServers), to keep between 5 and 10 servers available to respond to requests at all times (MinSpareServers and MaxSpareServers), to launch at most 150 server instances (MaxClients), and to impose no limit on the number of requests the server handles (MaxRequestsPerChild; a value of 0 means no limit). Setting these options appropriately can limit the potential for abuse. The MaxClients value is particularly important; without such a restriction, an attacker need only orchestrate a huge number of requests on the server to force it to launch enough processes to bring the server computer to its knees. Under the weight of such an attack, you might find it difficult to shut down Apache, much less deal with the attack in a more targeted way. By using MaxClients, you at least stand a chance of retaining control of the computer, which will enable you to read log files and track the attack as it proceeds.
Unfortunately, suitable values for MaxClients and the other options can be hard to ascertain; they depend on factors such as the normal load on the server, the quality of your network connection, the amount of RAM in the computer, and the speed of your hard disk. You may need to monitor the Apache log files and perform experiments to determine how to set these options.
Setting User Authentication Options
Although many Web sites are intended for free access without an account or password, some sites require authentication. Web forums, for instance, typically require you to enter a username and password before you can post. Such logins are handled by Apache user authentication tools. To begin using these tools, you must first load the mod_auth module. You can do this directly in the main configuration file:
LoadModule auth_module /usr/lib/apache2/modules/mod_auth.so
![]() The mod_auth module is available in Apache versions prior to 2.1. More recent versions employ similar functionality via more specialized modules, such as mod_auth_basic (which is similar to the earlier mod_auth), mod_auth_pam (which works via the Pluggable Authentication Modules system), and mod_auth_ldap (which uses an LDAP server for authentication).
The mod_auth module is available in Apache versions prior to 2.1. More recent versions employ similar functionality via more specialized modules, such as mod_auth_basic (which is similar to the earlier mod_auth), mod_auth_pam (which works via the Pluggable Authentication Modules system), and mod_auth_ldap (which uses an LDAP server for authentication).
Alternatively, if your installation loads modules using a separate directory with module configuration files, you can create appropriate links to load the relevant module.
With the appropriate module loaded, you can then generate a password file. Be sure that the file you generate resides outside of the directories that the Web server makes available to clients; you don't want users to be able to retrieve the password file. To create the file, use htpasswd, telling it to create a new file via its -c option, specifying the password file, and terminating the command with the name of the user with which to associate the password:
# htpasswd -c /etc/apache/passwd/passwords charlotte
New password:
Re-type new password:
Adding password for user charlotte
To require a password, you must specify several options in your Apache configuration file. These options can reside in a suitable directory definition within the main configuration file, or they can go in a .htaccess file within the directory you want to protect:
AuthType Basic
AuthName “Restricted Files”
# (Following line optional)
AuthBasicProvider file
AuthUserFile /etc/apache/passwd/passwords
Require user charlotte
If you want to enable more than one user to access files in the password-protected directory, you must modify your configuration. One way of doing this is by specifying a group. This is done in a group definition file (say, /etc/apache/passwd/group), which contains just one line that holds the relevant usernames:
GroupName: charlotte wilbur fern
You can then add the additional users to the password file by repeating the same htpasswd command, but be sure to omit the -c option, since this option creates a new password file; and change the username for each user. You then modify the Apache configuration for the directory to:
AuthType Basic
AuthName “Restricted Files”
# (Following line optional)
AuthBasicProvider file
AuthUserFile /etc/apache/passwd/passwords
AuthGroupFile /etc/apache/passwd/groups
Require group GroupName
A somewhat simpler way to accomplish this goal is to add users to your password file and then change the Require line:
Require valid-user
This configuration bypasses the need to create a group; instead, any user listed in the password file may access the restricted files.
Controlling Apache
You can start, stop, and restart Apache via its SysV or Upstart startup script, just as you can control many other services. Another tool, apachectl or apache2ctl, provides similar capabilities, plus some more. In fact, Apache startup scripts often work by invoking apache2ctl. With Apache running, you may need to check its log files for information on how it's working.
Using apache2ctl
Typically, you'll call apache2ctl by typing apachectl or apache2ctl along with an option, the most common of which are summarized in Table 9.3.
TABLE 9.3 Common apache2ctl commands
| Command name | Effect |
| start | Launches Apache. |
| stop | Terminates Apache. |
| graceful-stop | Similar to stop, but requests that are currently being serviced are permitted to complete. |
| restart | Restarts Apache. If it's not running, restart is identical to start. |
| graceful | Similar to restart, but requests that are currently being serviced are permitted to complete. |
| fullstatus | Displays a status report, including a list of requests being serviced. This option requires the mod_status module be enabled. |
| status | Similar to fullstatus but omits the list of requests being serviced. |
| configtest | Performs a test of the configuration file syntax and reports any errors. |
You might use apache2ctl rather than the Apache SysV startup script if you need to get a status report or check the syntax of your configuration file. You may want to check your SysV startup script to see whether it uses the normal or graceful options for stopping and restarting.
In Exercise 9.1, you will set up and test a basic Apache server.
Configuring Apache
This exercise guides you through the process of configuring an Apache server, including making a minor change to its configuration file and controlling the running server. Before beginning, you should use your distribution's package manager to install Apache. The package is likely to be called apache, apache2, httpd, or httpd2. Be aware that your configuration file and default Web site names and locations may vary from those described in this exercise. (This exercise is based on an Ubuntu 10.10 installation.)
Once you've installed Apache, follow these steps:
- Log in as root, acquire root privileges via su, or be prepared to use sudo to perform most of the remaining steps in this exercise.
- Load the main Apache configuration file (/etc/apache2/apache2.conf for Ubuntu) into your favorite text editor.
- If the main Apache configuration file doesn't include a DocumentRoot option, use grep to locate the file that does, as in grep -r DocumentRoot /etc/apache2/*. Load the file you find into a text editor. (If multiple files contain this directive, you'll need to scan the main configuration file to determine which file to load.) In the case of Ubuntu 10.10, you should load the /etc/apache2/sites-available/default file.
- Locate the DocumentRoot directive, and change it to point to a new location, such as /var/mywww.
- At your bash shell, type apache2ctl configtest. The program should respond with Syntax OK. If it doesn't, review your Apache configuration file changes; chances are you accidentally changed something you should not have changed.
- Create the directory you specified in step 4.
- Ensure that the permissions on the directory you created in step 6 grant write access to just one user (you can use root for the moment, but in the long run a Web master account might be more appropriate) but that all users, or at least the account used to run Apache, can read the directory.
- Type cp /var/www/index.html /var/mywww to copy the server's default home page to the new location. Alternatively, obtain a valid HTML file that doesn't rely too heavily on other files, and copy it to /var/mywww.
- Load /var/mywww/index.html into a text editor.
- Make changes to /var/mywww/index.html so you can easily identify it. You don't need much understanding of HTML to do this; just locate something that's clearly English text rather than HTML control tags and change it.
- Type apache2ctl restart. This will start the server, or restart it if it was already running.
- As a non-root user, launch a Web browser.
- Type http://localhost into the Web browser's URI field. You should see your modified Web page appear. If it doesn't, you'll have to debug the configuration to determine whether the server is running, is running but isn't responding to a localhost connection, is pointing to the wrong directory, or has some other problem.
- If your computer is on a network, try accessing it from another computer by typing http://servername in the URI field of a Web browser on another computer, where servername is the hostname or IP address of the computer you're configuring. If you see your modified Web page, everything is fine. If not, you'll have to debug the problem.
- Type apache2ctl stop. Verify that the server has stopped by refreshing your Web browser's page. (If you're using a proxy server, as described in the upcoming section “Implementing a Proxy Server,” your browser may continue to show the page even though the Apache server has stopped.)
At this point, you could continue adding HTML files to the /var/mywww directory to create a full Web site; however, because running a Web server unnecessarily is a security risk, it's best to completely uninstall Apache from your computer, or at least ensure that it doesn't run when you reboot your computer. You can do this by checking and, if necessary, changing your SysV or Upstart configuration, as described in Chapter 1.
Managing Apache Log Files
Many Apache installations create a log directory, called /var/log/apache2, /var/log/httpd, or something similar, to hold Apache's log files. Typically, error.log holds both error messages and notifications of routine server start and stop actions, access.log holds information on Web page accesses, and other_vhosts_access.log holds virtual host access information. There are variants on the filenames, though, so check your server to see what the files are called. Also, log files are likely to be automatically rotated and archived, so if the server has been running for a while, you're likely to see old log files as well as the current ones.
You can use error.log to help diagnose problems with the server that prevent it from starting or that negatively impact it in a less drastic manner. You should treat this file much as you would entries from any other server in their server-specific or general-purpose log files.
The access.log file, by contrast, details routine server accesses. Its entries resemble the following:
This entry is loaded with information, much of which (such as the date) is self-explanatory. Some information is less clear, though. Each entry begins with an IP address or hostname, enabling you to identify the server's clients. In the preceding example, HEAD / specifies the retrieved document—in this case, the root of the Web site was requested. The last two lines in this example contain information identifying the browser, OS, and platform used to access the server—Chromium running on an i686 Ubuntu installation in this example.
You can peruse the log files manually if you like, and if you're looking for some specific piece of information, direct examination can make a great deal of sense. Frequently, though, you'll want to rely on a log file analysis tool, such as Webalizer (http://www.webalizer.org) or AWStats (http://awstats.sourceforge.net/). Such tools can summarize how many visitors a site has had over given periods of time, identify when the server is busiest, locate the most popular files served, and so on. Most such tools can generate graphs to help you visualize the data.
Implementing a Proxy Server
A proxy server is a program that accepts network access requests on behalf of a client, accesses the target server, and relays the results back to the client. In some respects, a proxy server is similar to a firewall computer; however, a proxy processes access requests at a higher level. For instance, a Web proxy server parses the URIs sent by clients and can fully assemble the Web pages sent in response. This enables a proxy server to use high-level rules to block undesirable Web pages, to cache data for quicker subsequent accesses, or to perform other high-level tasks.
Selecting a Proxy Server
Proxy servers exist for many purposes, and different proxy servers exist to meet a variety of needs:
Squid This proxy server, which is described in more detail shortly, exists mainly to cache data for speedy access. If you have an office with users who tend to access the same Web sites, Squid can cache recent accesses, thus improving browsing speeds for your entire office. You can learn more at http://www.squid-cache.org.
Privoxy Instead of improving speed, this server aims to filter ads and improve privacy by removing some types of Web browser tracking features from some Web sites. It's headquartered at http://www.privoxy.org.
Tinyproxy This proxy, based at https://banu.com/tinyproxy/, is intended to be a lightweight proxy server that performs some minimal filtering operations.
A Web search will turn up many more proxy servers for Linux. Many of these are actually implemented using Squid, since Squid is an extremely flexible tool. The following pages describe Squid in greater detail, because it's unusually flexible and is covered on the LPIC 202 exam.
Using an Anonymizing or Tunneling Proxy Server
An anonymizing proxy server is a proxy server whose purpose is to keep your identity confidential. A similar service is a tunneling proxy server, which exists to help users work around blocks imposed by Web sites, ISPs, or national censors. Whether a proxy server is called anonymizing or tunneling depends largely on its purpose; the two work in a very similar fashion.
You don't run such a proxy server locally (unless you intend to make the anonymizing or tunneling service available to others); instead, you configure your Web browser to access a server run by somebody else. When you do this, the ultimate Web server sees your Web accesses as coming from the anonymizing or tunneling server, rather than from your own IP address; and your accesses can be directed to an IP address other than the ultimate destination (namely, the proxy server), thus working around blocks that might otherwise prevent you from accessing the site.
Anonymizing and tunneling proxy servers are sometimes abused to aid in piracy; however, they can also be used simply to help protect your privacy or to work around intentional or unintentional network problems or censorship.
Configuring Squid
Squid's emphasis is on caching data for speed, rather than providing security or other features. If you install Squid and then immediately launch it, the program will work in this capacity immediately; however, its configuration file, /etc/squid/squid.conf, provides a dizzying array of options. If you need to adjust Squid's configuration, you can peruse this configuration file, preferably in conjunction with Squid's documentation.
You can install Squid on an individual client computer to gain some benefits; however, Squid works best when it runs on a central server computer and caches requests from multiple clients. For instance, if Fred accesses a Web page from his desktop system, a Squid proxy running on a different but nearby system can cache that page locally. If Mary then accesses the same page from her computer, Squid can deliver the cached page. If Squid were installed separately on Fred's and Mary's computers, it wouldn't be able to deliver the cached copy to Mary, thus eliminating Squid's benefits.
Squid is a proxy server, and as a server it must be run in one of the ways appropriate to servers. Typically, this means that Squid is run from a SysV startup script. If you've just installed Squid, you should be sure to launch it manually the first time and ensure that it's configured to run automatically when you reboot the computer.
Adjusting Access Rules
Squid implements optional security rules that enable setting access control policies based on the client's IP address, port number, number of connections, username and password, or many other features. These access control lists (ACLs) can be used to fine-tune proxy access. For instance, you could use firewall rules to block outgoing Web access except via Squid and then use Squid's rules to enable only certain computers or users to access the Web. To implement such a configuration, you use three commands in the Squid configuration file: auth_param, acl, and http_access. You're likely to call each of these commands multiple times to set various options.
![]() Squid's authentication mechanism causes passwords to be relayed in unencrypted form. This might be acceptable on a local network, but you should be aware of the risks. Disgruntled local users or intruders who gain access to a local machine might be able to intercept passwords and wreak havoc. Wi-Fi users' data can be easily intercepted unless it's properly encrypted. For best safety, use different passwords on the proxy server than on other computers on the network.
Squid's authentication mechanism causes passwords to be relayed in unencrypted form. This might be acceptable on a local network, but you should be aware of the risks. Disgruntled local users or intruders who gain access to a local machine might be able to intercept passwords and wreak havoc. Wi-Fi users' data can be easily intercepted unless it's properly encrypted. For best safety, use different passwords on the proxy server than on other computers on the network.
The auth_param command tells Squid what mechanism to use for authenticating users—local Pluggable Authentication Modules (PAM), a Samba or Windows domain controller, a Lightweight Directory Access Protocol (LDAP) server, or what have you. A typical configuration might resemble the following:
auth_param basic program /usr/lib/squid/pam_auth
auth_param basic children 5
auth_param basic realm Squid proxy-caching Web server
auth_param basic credentialsttl 2 hours
This example tells Squid to use the /usr/lib/squid/pam_auth program as a helper for authentication, to spawn five authentication processes to handle initial authentication requests, to deliver Squid proxy-caching Web server as part of the authentication prompt, and to retain users' credentials for two hours. Many other options to auth_param are available; consult the Squid documentation (including extensive comments in its configuration file) for further information.
With auth_param set up, you must now use the acl command to define an ACL:
acl myacl proxy_auth REQUIRED
This ACL is called myacl, it is required, and it's defined as a proxy_auth ACL, meaning that it relies on the authentication mechanisms defined with auth_param. You can further adjust this configuration; again, consult the Squid documentation for details.
Finally, you must use http_access to define access rules that use myacl (or other rules):
http_access deny !myacl
http_access allow localnet
http_access deny all
This configuration tells Squid to deny any user that does not pass the myacl test (the exclamation mark, !, serves as a negation symbol), to allow access to any user who passes the first test and who is on the local network, and to deny all other users. Once again, many variants on this configuration are possible; consult the Squid documentation for details.
![]() If your current configuration file has existing auth_param or http_access options, you should comment them out to be sure that your new ones are applied correctly. Existing acl commands can coexist with your new ones provided you use a unique name for your new ACL (myacl in these examples).
If your current configuration file has existing auth_param or http_access options, you should comment them out to be sure that your new ones are applied correctly. Existing acl commands can coexist with your new ones provided you use a unique name for your new ACL (myacl in these examples).
Configuring Clients to Use a Proxy Server
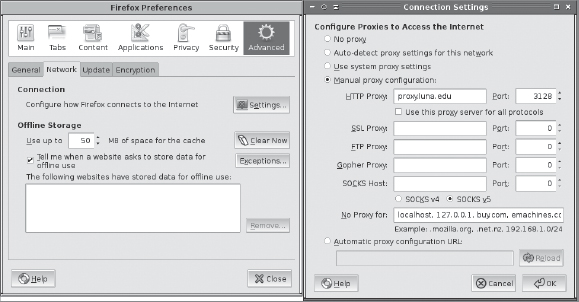
In addition to installing and running Squid (or any other proxy server) on its host system, you must configure clients to use it. This is typically done by selecting appropriate options in your clients' Web servers. For instance, in Mozilla Firefox on Linux, you should select Edit ![]() Preferences to reveal the Firefox Preferences dialog box. Select the Advanced option, click the Network tab, and click the Settings button. The result will be the Connection Settings dialog box, shown in Figure 9.2 along with the Firefox Preferences dialog box. Select Manual Proxy Configuration, and enter the hostname or IP address of the proxy server computer, along with the port number it's using. (Squid defaults to port 3128.)
Preferences to reveal the Firefox Preferences dialog box. Select the Advanced option, click the Network tab, and click the Settings button. The result will be the Connection Settings dialog box, shown in Figure 9.2 along with the Firefox Preferences dialog box. Select Manual Proxy Configuration, and enter the hostname or IP address of the proxy server computer, along with the port number it's using. (Squid defaults to port 3128.)
FIGURE 9.2 You must configure Web browsers to use a proxy server such as Squid
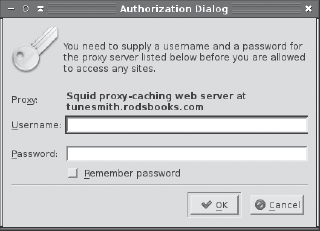
If you configure Squid to require authentication, your next attempt to access the Internet after configuring your browser to use Squid will produce an authentication dialog box, such as the one shown in Figure 9.3, which shows the dialog box produced by Konqueror. Once you enter a username and password, you'll be able to browse the Internet normally until the password expires (as determined by the credentialsttl option set via auth_param).
FIGURE 9.3 When Squid is configured to require authentication, it causes the browser to display an authentication dialog box
Another way to use a proxy server is to use an iptables firewall configuration on your network's router to redirect all outgoing Web traffic to the proxy server. (Chapter 7 describes iptables.) This configuration obviates the need to configure each client individually; however, it also means that if the proxy server corrupts data, your users will have no recourse. Authentication may not work via this mechanism, either. If you attempt such a configuration, be sure to exempt the proxy server computer from the rule, lest you set up an infinite loop in which the proxy server's traffic is redirected to itself!
Understanding Email
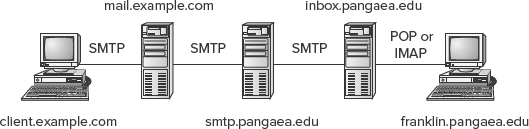
Internet mail delivery today is dominated by a protocol known as the Simple Mail Transfer Protocol (SMTP). This protocol is an example of a push protocol, meaning that the sending system initiates the transfer. A user writes a message using a mail reader and then tells the mail reader to send the mail. The mail reader contacts a local SMTP server, which may run on the same or another computer. The SMTP server accepts the message for delivery, looks up the recipient address, and delivers the message to the recipient system. In some cases, the recipient system may forward the mail to another system, which handles the mail account for the addressee. Depending on how the recipient reads mail, that person may use the destination mail server computer directly or run a mail client on another computer. In the latter case, the mail client uses a protocol such as the Post Office Protocol (POP) or the Internet Message Access Protocol (IMAP) to retrieve the mail from the local mail server. POP and IMAP are both examples of pull protocols, in which the recipient, rather than the sender, initiates the data transfer. Figure 9.4 outlines this configuration. The Internet's mail system is flexible enough that the total number of links between the sender and recipient may be more or less than the number depicted in Figure 9.4, though.
FIGURE 9.4 Email typically traverses several links between sender and recipient
![]() Although POP and IMAP are often used as the final link in the email delivery chain, as depicted in Figure 9.4, this doesn't need to be the case. The Fetchmail program (http://fetchmail.berlios.de) functions as a POP or IMAP client and then injects the retrieved messages into a local mail queue, effectively enabling these protocols to function at other points in the chain. Fetchmail is handy if you rely on an outside ISP to manage your Internet domain, including its Internet-accessible email addresses, but want to run your own mail system (perhaps even including your own POP or IMAP server) internally.
Although POP and IMAP are often used as the final link in the email delivery chain, as depicted in Figure 9.4, this doesn't need to be the case. The Fetchmail program (http://fetchmail.berlios.de) functions as a POP or IMAP client and then injects the retrieved messages into a local mail queue, effectively enabling these protocols to function at other points in the chain. Fetchmail is handy if you rely on an outside ISP to manage your Internet domain, including its Internet-accessible email addresses, but want to run your own mail system (perhaps even including your own POP or IMAP server) internally.
Three of the computers in Figure 9.4—mail.example.com, smtp.pangaea.edu, and inbox.pangaea.edu—must run SMTP servers. These servers can be entirely different products running on different platforms. In addition to running an SMTP server, Figure 9.4's inbox.pangaea.edu must run a POP or IMAP server. The two end-point computers—client.example.com and franklin.pangaea.edu—need not run mail servers. Instead, client.example.com connects to the SMTP server on mail.example.com to send mail, and franklin.pangaea.edu connects to the POP or IMAP server on inbox.pangaea.edu to retrieve mail.
Configuring a Push Mail Server
SMTP's importance in the email delivery chain means that the vast majority of email server computers will run an SMTP server (also known as a mail transfer agent, or MTA). Before you begin installing software, though, you must understand email addressing and domain email issues. With this task in hand, you must decide which email server program to run, since several are available for Linux. This chapter covers two SMTP servers, sendmail and Postfix, in the sections “Running Sendmail” and “Running Postfix,” in enough detail to enable you to perform basic mail server configuration tasks.
![]() Email servers are complex enough that entire books have been written about the major servers. You should consult a title such as Costales, Assmann, Jansen, and Shapiro's sendmail, 4th Edition (O'Reilly, 2007) or Dent's Postfix: The Definitive Guide (O'Reilly, 2003) if you need to do more than basic mail server configuration.
Email servers are complex enough that entire books have been written about the major servers. You should consult a title such as Costales, Assmann, Jansen, and Shapiro's sendmail, 4th Edition (O'Reilly, 2007) or Dent's Postfix: The Definitive Guide (O'Reilly, 2003) if you need to do more than basic mail server configuration.
Configuring a Domain to Accept Mail
Internet email addresses can take one of two forms:
- [email protected], where username is the recipient's username and host.name is a computer's hostname. (The address can also use an IP address, typically surrounded by square brackets, in place of a hostname.) For instance, mail might be addressed to [email protected]. This form of addressing is likely to work so long as the target computer is configured to accept mail addressed to it.
- [email protected], where username is the recipient's username and domain.name is the domain name. For instance, mail might be addressed to [email protected]. Such addressing is usually shorter than an address that includes the mail server computer's full hostname, and it can be more reliable, depending on the domain's configuration.
For the second sort of address to work, the domain requires a special Domain Name System (DNS) entry. This entry is known as a mail exchanger (MX) record, and it points sending mail servers to a specific mail server computer. For instance, the MX record for pangaea.edu might point to smtp.pangaea.edu. Therefore, mail addressed to [email protected] is delivered to the smtp.pangaea.edu server, which may process it locally or forward it to another computer.
Chapter 6, “DNS Server Configuration,” describes configuring the Berkeley Internet Name Domain (BIND) DNS server. In brief, an MX record belongs in the domain's control file, which is usually in /var/named and is usually named after the domain, such as named.pangaea.edu for pangaea.edu. (The exact name is arbitrary, though.) An MX record for pangaea.edu, pointing external SMTP servers to smtp.pangaea.edu for mail delivery, would look like this:
@ IN MX 5 smtp.pangaea.edu.
If another system administrator runs your domain's DNS server, consult that individual about MX record administration. If you use an outside provider, such as a domain registrar's DNS server, you may need to enter the MX record information in a Web-based form. These forms may attempt to mirror the layout of information you'd find in a DNS server's configuration, as just described, but they may not allow you to change fixed information. Alternatively, the form may present simplified data entry fields, such as fields for the server priority code and hostname alone.
It's possible for a computer on one domain to function as a mail server for an entirely different domain. For instance, mail.example.com could be the mail server for pangaea.edu. This configuration requires setting up the server to accept mail addressed to the domain in question and of course entering the full path to the mail server in the target domain's MX record.
Choosing an Email Server
A wide variety of SMTP servers can run on Linux. The most popular Linux mail servers are all very powerful programs that are capable of handling large domains' mail needs, when paired with sufficiently powerful hardware. The most popular servers are:
Sendmail This server, headquartered at http://www.sendmail.org, has long dominated Internet mail delivery. Although not as dominant as it once was, surveys suggest that sendmail remains the most popular open source mail server. Unfortunately, sendmail has also earned a reputation for a difficult-to-master configuration file format. Fortunately, tools to create a configuration file from a simpler file are common.
Postfix This server is comparable to sendmail in popularity. Postfix uses a series of small programs to handle mail delivery tasks, as opposed to the monolithic approach used by sendmail. The result is greater speed and, at least in theory, less chance of serious security flaws. (In practice, Postfix has a good security record.) Its configuration is much easier to handle than is sendmail's. You can learn more at http://www.postfix.org.
Exim This mail server, described at http://www.exim.org, is not quite as popular as sendmail or Postfix, but it is still a popular Linux mail server. Like sendmail, Exim uses a monolithic design, but Exim's configuration file is much more intelligible. This server includes extensive pattern-matching tools that are very useful in fighting spam.
qmail This server's popularity is roughly equal to or a bit lower than Exim's, depending on the survey. Most major distributions don't ship with qmail because its license terms are peculiar—they don't permit distribution of binaries except under limited conditions. Like Postfix, qmail uses a modular design that emphasizes speed and security. Check http://www.qmail.org for more information.
For light duty—say, for a small business or personal mail server—any of these programs will work quite well. For such cases, I recommend sticking with whatever software is the standard for your distribution. For larger installations or if you need advanced features, you may want to investigate alternatives to your distribution's default server more closely. You may find particular features, such as Exim's pattern-matching tools or the modular design of Postfix and qmail, appealing. All of these servers are capable of handling large or busy domains, although sendmail may require speedier hardware than the others to handle a given volume of mail. For small sites, even sendmail won't stress any but the weakest computers.
The following sections describe the configuration of sendmail and Postfix in more detail. I've not included sections on Exim and qmail because they're less popular and aren't included in the LPI objectives, except for a brief mention of Exim, but they're certainly worth considering if you want to change your mail server.
Running Sendmail
Most Linux distributions provide a sendmail package, although many install Postfix or Exim as the default mail server. If you want to run sendmail with a distribution that normally uses another mail server, you must remove the standard mail server and install sendmail. Unfortunately, sendmail configuration file locations and names vary somewhat from one distribution to another, so you must know where to look to find these files. Once found, you can change many sendmail options, such as the addresses the server considers local and relay options.
![]() Many programs rely on the presence of an executable file called sendmail. For this reason, mail servers other than sendmail usually include an executable called sendmail, which is often a link to the equivalent program file for the other mail server.
Many programs rely on the presence of an executable file called sendmail. For this reason, mail servers other than sendmail usually include an executable called sendmail, which is often a link to the equivalent program file for the other mail server.
Using Sendmail Configuration Files
The main sendmail configuration file is called sendmail.cf, and it's typically located in /etc/mail. Unfortunately, this file is both very long and difficult to understand. You should not attempt to edit this file directly; instead, you should edit a configuration file that can be used to generate a sendmail.cf file. This source configuration file is written using the m4 macro processing language, which is more intelligible than the raw sendmail configuration file format. To edit and compile an m4 configuration file for sendmail, you might need to install additional packages:
The m4 Macro Language You must install the m4 macro language. This software usually comes in a package called m4. Look for a program file called m4 (often stored in /usr/bin) to ascertain whether it's already installed on your system. If it isn't, look for and install the package that came with your Linux distribution.
Sendmail m4 Configuration Files You need a set of m4 configuration files for sendmail in order to modify your configuration. These files are usually installed from the sendmail-cf package.
Most distributions ship with default m4 configuration files that can be used to rebuild the standard sendmail.cf file that ships with the distribution. (If you rebuild the default file, a few comments differ, but the rebuilt file is functionally identical to the original.) The default configuration file's name varies, but it could be called sendmail.mc, linux.smtp.mc, or something else. It might reside in /etc/mail, /usr/share/sendmail/cf, or elsewhere. For Red Hat, the default file is /etc/mail/sendmail.mc. (This file actually ships with the sendmail package rather than sendmail-cf.) Slackware's default file is /usr/share/sendmail/cf/cf/linux.smtp.mc.
To make changes to your configuration, follow these steps as root:
- Back up your default /etc/mail/sendmail.cf file.
- Change to the directory in which the original m4 configuration file resides.
- Copy the original file to a new name; for instance, you might call it myconfig.mc.
- Edit the configuration file as described in the next few sections or to achieve other ends.
- Type the following command to create a new /etc/mail/sendmail.cf file:
# m4 < myconfig.mc > /etc/mail/sendmail.cf
If all goes well, the m4 command won't display any messages in your command shell, but if you check, you should find that the /etc/mail/sendmail.cf file is new. You can then tell sendmail to read the new configuration file:
# killall -HUP sendmail
This command tells all running sendmail instances to reread their configuration files and implement any changes. You can then test those changes in whatever way is appropriate—by sending or receiving mail and checking whether the changes you set are implemented.
In addition to the main sendmail.cf file, several other files are important in sendmail's configuration. Most of these files reside in /etc/mail, but some may reside in /etc. Two of the most important of these files are:
access.db This file, which usually resides in /etc/mail, controls access to the sendmail server. By listing or not listing particular systems in this file in specific ways, you can adjust which systems can use sendmail to relay mail to other systems. This file is a binary database built from the plain-text access file using the makemap program.
aliases.db Like access.db, this file is a binary database file built from a plain-text file (aliases) using newaliases. This file appears in /etc or /etc/mail, depending on your distribution. This file lists aliases for particular usernames or addresses. For instance, if you set up an alias linking the name postmaster to root, all mail addressed to postmaster is delivered to root. Aliases are described in more detail later in “Setting Up Aliases and Forwarding.”
Configuring the Hostname in Sendmail
Email messages have names embedded in them. These names identify the computer, so in theory they should be the same as the computer's hostname. Sometimes, though, the names in the header may need to be changed. For instance, you might want outgoing mail to be associated with your domain name rather than with the mail server name. Configuring your mail server in this way can head off problems down the road—say, if you change your mail server system. If your outgoing mail had used the mail server's true hostname, replies to old messages might continue to be addressed to this system and, therefore, bounce. To set the name that's used in the From: headers in mail messages, you should add lines such as the following to the m4 configuration file and rebuild your main configuration file:
MASQUERADE_AS(‘target-address')
FEATURE(masquerade_envelope)
![]() The MASQUERADE_AS line includes two types of single quote characters. The lead character is a back-tick, accessible on most keyboards on the key to the left of the 1 key. The close quote is an ordinary single quote character, which is on the key to the left of the Enter key on most keyboards. If you use the wrong characters, these lines won't work.
The MASQUERADE_AS line includes two types of single quote characters. The lead character is a back-tick, accessible on most keyboards on the key to the left of the 1 key. The close quote is an ordinary single quote character, which is on the key to the left of the Enter key on most keyboards. If you use the wrong characters, these lines won't work.
Of course, you should change the target-address in the first of these sample lines to the address you want to use, such as pangaea.edu. The MASQUERADE_AS line changes only the address displayed in the From: mail header line. It also changes this configuration only if the mail reader doesn't specify a different address. Many clients enable users to set arbitrary return addresses, and these values override whatever option you set in sendmail. The FEATURE(masquerade_envelope) line goes further; it overrides the settings users enter in their mail clients. You might use this option if you want to limit users' ability to set bogus return addresses in their mail readers.
Configuring Sendmail to Accept Incoming Mail
To accept incoming mail, sendmail must be configured to accept incoming network connections. Many distributions ship with configurations that block connections from anything but the local computer. This configuration is good for workstations that may need to send outgoing mail or send mail between local users but that shouldn't receive mail from outside systems. If you want to receive mail from other computers, you must modify this configuration. To do so, edit the m4 configuration file (such as /etc/mail/sendmail.mc). Look for the following line:
DAEMON_OPTIONS(‘Port=smtp,Addr=127.0.0.1, Name=MTA')dnl
Comment out this line by adding the string dnl and a space to the start of the line. (Unlike most configuration files, sendmail m4 files use dnl as a comment indicator.) You can then create a new sendmail.cf file, as described in the earlier section “Using Sendmail Configuration Files.” Restart the server by typing killall -HUP sendmail or by passing restart to the server's SysV startup script, and the server should accept connections from remote systems.
Another aspect of accepting remote connections is telling sendmail what hostnames to recognize as local. For instance, consider Figure 9.4. If smtp.pangaea.edu is the computer to which the pangaea.edu domain's MX record points, then smtp.pangaea.edu must know to accept mail addressed to user@pangaea.edu. Ordinarily, sendmail rejects messages addressed to anything but the computer's own hostname. You can change this behavior by adding any aliases for the mail server computer itself to a special configuration file. This file is called /etc/mail/local-host-names, and its use is enabled by default in some distributions' sendmail configurations. In others, you must first add a line to the sendmail m4 configuration file and create a new sendmail.cf file, as described previously in “Using Sendmail Configuration Files.” The line you need to add is:
FEATURE(use_cw_file)
Be sure this line appears before the two MAILER lines at the bottom of the default file. After you've rebuilt the sendmail.cf file, create or edit /etc/mail/local-host-names and add the names you want sendmail to recognize as local. For instance, you might add lines such as the following:
pangaea.edu
mail.pangaea.edu
Once this task is done, the server will accept mail to these domains as local mail, even if the server's hostname doesn't bear any resemblance to these names. For instance, entering these two lines on mail.example.com's local-host-names file will cause it to deliver mail addressed to [email protected] to any local account with a username of sue.
Setting Sendmail Relay Configuration Options
Mail servers must often be set up as relays. In such a configuration, the server accepts mail from one system and passes it to another. One common relay configuration is that of a departmental mail server, which accepts mail from many clients and passes the mail on to destination systems. For instance, Figure 9.4's mail.example.com must be configured in this way. Another relay configuration involves telling sendmail to use another system as a relay. For instance, if Figure 9.4's client.example.com were a Linux system, you might configure it to use mail.example.com as an outgoing relay. Using outgoing relays enables you to use the relay computer as a control point for mail. In some cases, you must configure your system in this way. For instance, your LAN or ISP might be configured to block outgoing SMTP connections except to the authorized mail server.
Configuring Sendmail to Relay Mail
Sendmail provides many relaying options. The most common configuration involves a feature that can be defined in the sendmail m4 file using a line such as this:
FEATURE(‘access_db')
Some sendmail configurations add extra options to this definition. Some distributions' standard configurations don't define this option; therefore, if you want to use it, you must add it to the m4 configuration file and rebuild the sendmail.cf file, as described earlier in “Using Sendmail Configuration Files.” Once the option is present, you can edit the /etc/mail/access file. A typical file might resemble the one shown in Listing 9.1, except that such default files lack the final entry.
Listing 9.1: A typical access file for controlling mail relaying
# Allow relaying from localhost…
localhost.localdomain     RELAY
localhost                 RELAY
127.0.0.1                 RELAY
# Relay for the local network
172.25.98                 RELAY
Listing 9.1 first approves relaying for the local computer, using three methods of identifying that computer—by two names (localhost.localdomain and localhost) and by IP address (127.0.0.1). If you activate the access_db feature, your /etc/mail/access file must contain these entries if your system is to reliably handle mail from the local computer. (Some programs call sendmail in such a way that these entries aren't necessary, but others use the loopback network interface, which requires that sendmail relay for localhost or its aliases.) To relay for more systems, you must add them to the list, as Listing 9.1 does. That example relays for the 172.25.98.0/24 network. If you prefer, you can specify individual computers or list them by domain name or hostname, but using IP addresses ensures that an attacker won't be able to abuse your system's relaying abilities by compromising a DNS server.
Because this section is about relaying, all the examples in Listing 9.1 specify the RELAY option. You can provide other words, though, to achieve different effects:
OK You can tell sendmail to accept mail for delivery even if another rule would cause it to be rejected. For instance, you might override a block on a network for specific hosts using OK.
RELAY This option enables relaying. This option is actually bidirectional. For instance, Listing 9.1 enables outside systems to relay mail to servers in the 172.25.98.0/24 network.
REJECT This option blocks mail coming from or addressed to the specified hostname or network. Sendmail generates a bounce reply when an attempt is made to send to or from the forbidden systems. You might use it to block a known spammer's domain, for example.
DISCARD This option works much like REJECT, but sendmail won't generate a bounce message.
ERROR:nnn text This option also works like REJECT, but instead of generating a standard bounce message, it replies with the error code number (nnn) and message (text) that you define.
After you modify the /etc/mail/access file, you must create a binary database file from the plain-text file. To do so, you use the makemap command:
# makemap hash /etc/mail/access.db < /etc/mail/access
Some configurations include this command in their sendmail SysV startup scripts, so you can skip this step if you restart the server using these scripts. When you're done, restart sendmail, and test the new relaying configuration.
In addition to the access_db feature, sendmail supports a variety of additional relaying options. Most of these options include the word relay in their names, such as relay_entire_domain or relay_local_from. Most of these options implement relay rules that can be configured through the /etc/mail/access file, though, so chances are you won't need them.
![]() One relay option you should avoid is called promiscuous_relay. This option configures the system to relay from any host to any server. Such a configuration is dangerous because spammers can easily abuse it. In fact, you should be cautious when configuring relaying to prevent your system from relaying from any untrusted source.
One relay option you should avoid is called promiscuous_relay. This option configures the system to relay from any host to any server. Such a configuration is dangerous because spammers can easily abuse it. In fact, you should be cautious when configuring relaying to prevent your system from relaying from any untrusted source.
Configuring Sendmail to Use a Relay
If your server must relay mail through another computer, you can configure sendmail to accommodate this requirement. To do so, add the following line to the sendmail m4 configuration file and recompile the sendmail.cf file:
FEATURE(‘nullclient', ‘relay.mail.server')
The procedure to modify the m4 configuration file is described previously, in “Using Sendmail Configuration Files.” Replace relay.mail.server with the hostname of the mail server that's to function as a relay, such as your departmental or ISP's mail server. You may also need to delete a couple of lines or comment them out by preceding the lines with dnl:
MAILER(local)dnl
MAILER(smtp)dnl
These lines duplicate the functionality included in the relay configuration, so including them along with the relay configuration may cause m4 to complain when you try to build a new sendmail.cf file. Not all configurations use these lines in their default files, though.
Running Postfix
Compared to sendmail, Postfix is simple to configure. Postfix uses a primary configuration file, /etc/postfix/main.cf, that has a relatively straightforward syntax. The default version of this file is also usually very well commented, so you can learn a lot about your configuration by perusing it. One problem with Postfix configuration is that it relies heavily on variables, such as myhostname. One variable may be used to set another, which may be used to set another, and so on. Therefore, you may need to trace your way back through several layers of variable assignments to learn how an important variable is set. Postfix variable names are preceded by a dollar sign ($) when accessed, but not when you assign values to them. As with sendmail, some default settings may need to be changed, even on a fairly simple configuration.
Configuring the Hostname in Postfix
Several Postfix parameters affect the name of the Postfix server computer or the hostname that appears in mail headers. The most common of these options are summarized in Table 9.4. In a simple configuration, you needn't adjust anything; Postfix acquires its hostname automatically and builds everything else from there. You can override the configuration if necessary, though—for example, if your computer has multiple hostnames and you want to use the one that Postfix doesn't auto-detect on the mail server, or if obtaining your domain name requires stripping more than one component from the hostname. The masquerade_domains option requires special explanation: This option strips away hostname components if and only if they'll match the specified reduced name. For instance, consider a case in which you've set masquerade_domains = pangaea.edu. If the server is told to send mail with an address of [email protected], it will reduce this address to [email protected]. If the system is told to send mail with an address of [email protected], it won't change the address.
TABLE 9.4 Common Postfix hostname options

The ultimate in address remapping is accomplished through the sender_canonical_maps option. Point this option at a file using a line such as the following:
sender_canonical_maps = hash:/etc/postfix/sender_canonical
You can then specify hostnames you want changed in the /etc/postfix/sender_canonical file. For instance, to change localhost and the misspelled pangea.edu to pangaea.edu on outgoing addresses, use the following two lines:
@pangea.edu @pangaea.edu
@localhost @pangaea.edu
You can also include usernames in order to make changes only for particular users' mail. After creating this file and referencing it in /etc/postfix/main.cf, you must convert the file to a binary format. Type postmap sender_canonical from the /etc/postfix directory to do this job. You can then tell Postfix to reload its configuration files by typing postfix reload.
Accepting Incoming Mail
Ordinarily, Postfix accepts local mail addressed to $myhostname or localhost.$myhostname, where $myhostname is your hostname or whatever value you've set for this variable. You can broaden or narrow the range of accepted local addresses by changing the mydestination setting. For instance, you might set this value as follows for a domain's mail server:
mydestination = $myhostname, localhost.$myhostname, localhost, $mydomain
You can add more names if you like, and in fact such a change may be required if the server should handle several domains or mail addressed to many specific clients on the network. If you specify many target destinations, you can break them across lines without using backslashes. Instead, indent the second and subsequent lines with one or more spaces or tabs. Postfix uses such indentation as a signal that the line is a continuation of the previous line's configuration.
Another option you may need to change is the inet_interfaces setting. This option sets the interfaces to which Postfix listens. For instance, setting it to $myhostname tells the server to listen on the network interfaces associated with the primary hostname—or whatever value $myhostname uses. If you change this value or if you want Postfix to listen more broadly, you can set the option to all to have the server listen to all network interfaces.
Postfix Relay Configuration Options
Naturally, you can configure Postfix to relay mail in various ways or to send mail through an outgoing relay. Most distributions ship with a fairly restrictive relay configuration that prevents the server from relaying mail from any but local programs. You should check this configuration to be sure how it's set. If you need to use an outgoing mail relay, you must adjust that configuration, as well.
Configuring Postfix to Relay Mail
Several options influence how Postfix treats an attempt to relay mail. Table 9.5 summarizes these options. Postfix's relay configuration is built on the concept of trust; the server relays mail for machines that it trusts. Defining relay authorization, therefore, becomes a matter of defining what systems to trust.
TABLE 9.5 Common postfix relay options

When run from Linux, the default mynetworks_style setting means that Postfix will relay mail from any computer with an IP address in the same subnet as the server itself. Typically, Linux distributions ship with mynetworks = 127.0.0.1/8 or something similar, which restricts relaying to the local computer only, overriding the default mynetworks_style setting. You must expand this option, or delete it and rely on a mynetworks_style setting, if the computer should relay mail for other computers. In addition, the relay_domains default means that the server will relay mail from any computer specified in the mydestination option or in computers within the specified domain. For instance, if you have a mydestination specification that includes pangaea.edu, Postfix will relay from any computer in the pangaea.edu domain.
![]() If your computer uses a dial-up or most types of broadband Internet connection, using mynetworks_style = subnet or specifying your subnet using mynetworks enables Postfix to relay for all users of the ISP's subnet. This configuration is a spam risk, so you may want to tighten your Postfix settings.
If your computer uses a dial-up or most types of broadband Internet connection, using mynetworks_style = subnet or specifying your subnet using mynetworks enables Postfix to relay for all users of the ISP's subnet. This configuration is a spam risk, so you may want to tighten your Postfix settings.
As an antispam measure, you might want to limit Postfix's relaying capabilities. This might be particularly important if you've set mydestination to include a domain for which the server shouldn't serve as a relay or if that domain's systems are already covered by IP address in the mynetworks or mynetworks_style options. To do so, you might provide a restrictive relay_domains configuration, such as this example:
relay_domains = $myhostname, localhost, localhost.localdomain
If you're running Postfix on a workstation, you might want to prevent the server from relaying mail for anything but the workstation computer itself. (This configuration accepts mail both from the local computer to anywhere and from anywhere to the local computer.) For this configuration, you must combine the tight relay_domains limit with a tight mynetworks_style definition:
mynetworks_style = host
If Postfix is running on a larger mail server and you want to expand the computers for which it will relay, the simplest way is usually to create an expanded relay_domains definition. For instance, to relay mail for the default systems plus example.org's systems, you might use the following line:
relay_domains = $mydestination, example.org
Configuring Postfix to Use a Relay
If you're configuring Postfix on a workstation or other system that should relay mail through another mail server, the configuration is fairly straightforward. Typically, you need to set the relayhost option to the name of the mail server you should use. For instance, to set your system to use mail.example.com as the mail relay, you would use the following line:
relayhost = mail.example.com
Alternatively, if you want to use the computer to which a domain's MX record points, you can provide the domain name rather than the hostname. Postfix then does an MX record lookup and sends mail to the domain's mail server. This configuration may be preferable if the name of the outgoing mail server is likely to change; you needn't adjust your Postfix configuration when this happens.
Managing Email
Once your mail server is set up, you will probably want to test it and monitor its activities. I therefore describe some common administrative tasks involving testing an SMTP server, managing email queues, configuring aliases, and forwarding email.
Testing an SMTP Server
You can perform low-level tests of an SMTP server by using the telnet program. To do this, you access the email server and issue the SMTP commands involved in sending mail. These commands include HELO (to identify the sending computer), MAIL FROM (to identify the sending user), RCPT TO (to identify the recipient), DATA (to begin the message text), and QUIT (to terminate the session). An example might look like this:
$ telnet localhost 25
Trying 127.0.0.1…
Connected to localhost.
Escape character is ‘^]'.
220 mail.example.com ESMTP Postfix
HELO localhost
250 mail.example.com
MAIL FROM:<[email protected]>
250 2.1.0 Ok
RCPT TO:<[email protected]>
250 2.1.5 Ok
DATA
354 End data with <CR><LF>.<CR><LF>
This is a test message.
.
250 2.0.0 Ok: queued as C5E9DD9761
QUIT
221 2.0.0 Bye
Connection closed by foreign host.
Most of these commands include options, such as email addresses. The server replies to most successful commands with a code 250. This and other codes may optionally include explanatory text. When you get around to entering the actual message text, you can enter one or more lines of text, terminated by a single line that contains a single period (.).
You may want to test the mail server in various ways—attempt to connect from the server system itself (as in this example), from systems for which it should relay, and from systems from which it should not relay. Also attempt to send email to recipients on the local computer and elsewhere. Testing these possibilities will help ensure that the server is properly configured.
Checking the Email Queue
An email server manages a queue of email messages that it must deliver. This task may sound simple, but it can be surprisingly complex. The server may be asked to deliver many messages in a very short period of time, and thus it may need to delay delivery of some messages while it works on others. Furthermore, problems can lead to a temporary or permanent inability to deliver messages. When a problem seems to be temporary, such as a network routing failure, the email server must store the message and try to deliver it again later. Thus, a Linux computer's email queue may contain undelivered messages. Knowing how to identify these messages and manage the queue can help you keep your Linux computer's email subsystem working smoothly.
The mailq program is the main tool to help in email queue management. This program was originally part of the sendmail package, but Postfix, Exim, qmail, and other Linux SMTP servers have all implemented compatible commands. Unfortunately, command options differ between implementations. The basic command, without any options, shows the contents of the email queue on all systems:
$ mailq
-Queue ID- --Size-- ----Arrival Time---- -Sender/Recipient-------
5B42F963F*      440 Tue Aug 23 13:58:19 [email protected]
                                        [email protected]
-- 0 Kbytes in 1 Request.
This example, taken from a system running Postfix, shows one message in the queue, along with relevant identifying information. The exact display format varies from one SMTP server to another. In most cases, typing mailq is equivalent to typing sendmail -bp.
If a network failure occurs, email messages can pile up in the queue. Your SMTP server will ordinarily attempt redelivery at a later date, but if your network connection has come up again and you want to clear the queue immediately, you can do so. Typing sendmail -q will do the job with most SMTP servers, and some have other equivalent commands, such as postqueue in Postfix or runq in Exim.
All email servers offer a wide variety of advanced options to prioritize email delivery, accept messages on the command line, delete specific messages from the queue, debug email connections, and so on. Unfortunately, commands and procedures to use these features vary from one email server to another. Thus, you should consult your server's documentation to learn how to use these features.
Setting Up Aliases and Forwarding
Email aliases enable one address to stand in for another one. For instance, all email servers are supposed to maintain an account called postmaster. Email to this account should be read by somebody who's responsible for maintaining the system. One way to do this is to set up an alias linking the postmaster name to the name of a real account. You can do this by editing the aliases file, which usually resides in /etc or sometimes in /etc/mail.
The aliases file format is fairly straightforward. Comment lines begin with hash marks (#), and other lines take the following form:
name: addr1[,addr2[,…]]
The name that leads the line is a local name, such as postmaster. Each address (addr1, addr2, and so on) can be a local account name to which the messages are forwarded, the name of a local file in which messages are stored (denoted by a leading slash), a command through which messages are piped (denoted by a leading vertical bar character), the name of a file whose contents are treated as a series of addresses (denoted by a leading :include: string), or a full email address (such as [email protected]).
A typical default configuration includes a few useful aliases for accounts such as postmaster. Most such configurations map most of these aliases to root. Reading mail as root is inadvisable, though—doing so increases the odds of a security breach or other problem because of a typo or bug in the mail reader. Thus, you may want to set up an alias line like the following:
root: yourusername
This example redirects all of root's mail, including mail directed to root via another alias, to yourusername, which can take any of the forms just described. Some mail servers, including sendmail, Postfix, and qmail, require you to compile /etc/aliases into a binary file that can be processed more quickly. To do so, use the newaliases command:
# newaliases
Another approach to redirecting mail is to do so at the user level. In particular, you can edit the ~/.forward file in a user's home directory to send mail for that user to another address. Specifically, the ~/.forward file should contain the new address. This approach has the advantage that it can be employed by individual users. A drawback is that it can't be used to set up aliases for nonexistent accounts or for accounts that lack home directories. The ~/.forward file can also be changed or deleted by the account owner, which might not be desirable if you want to enforce a forwarding rule that the user shouldn't be able to override.
Checking Log Files
Like most servers, mail servers log their activities in files within the /var/log directory tree. Details depend on the distribution, the mail server, and any changes you've made to the mail server or system logger that affect how information is logged. On some systems, you'll find files with names beginning with mail, such as /var/log/mail.log and /var/log/mail.err. On other systems, mail logs are stored in a general-purpose log file, such as /var/log/messages or /var/log/syslog.
![]() Try using grep to search for your mail server's name in all the files in /var/log in order to locate where your system logs its mail-related messages.
Try using grep to search for your mail server's name in all the files in /var/log in order to locate where your system logs its mail-related messages.
A single email delivery might generate several entries in your log file, as in this example, taken from a computer running Postfix:
Each line relates information about a particular stage in the mail delivery process. If an error occurs, the messages may provide a clue about what went wrong—for instance, there might be a mention of a DNS failure or a remote server that was unresponsive.
Configuring Procmail
In principal, an email server such as sendmail or Postfix can store incoming mail directly in a mail spool, which is a file or directory that holds email messages. In practice, however, many systems employ an additional tool, Procmail, to do this job. The reason is that Procmail can be configured using complex rules to adjust how mail is delivered. You can use Procmail to filter spam, redirect mail, copy mail, and much more.
Understanding Mail Storage Formats
From a user's point of view, email messages may be organized in email folders. Even if a user doesn't employ email folders, that user's incoming mail must be stored in some format. Most of the major mail servers for Linux (sendmail, Postfix, and Exim) use a format known as mbox, in which messages in a mail folder are stored in a single file. Typically, SMTP servers or their helper programs store users' files in /var/spool/mail/username. When users employ folders with software that uses the mbox format, each one consists of a single file.
The qmail server, by contrast, stores its incoming mail in another format: a maildir. The maildir format devotes one directory to each mail folder and puts each message in its own file. Typically, incoming maildirs are stored in users' home directories. Although qmail uses maildirs by default, it can be configured to use the mbox format. Similarly, Postfix and Exim can both be configured to use maildirs.
The choice of mail format has consequences for other software, such as users' mail readers (also known as mail user agents, or MUAs), POP or IMAP servers, and Procmail. Many programs support both mbox and maildir formats, but some support just one. As described shortly, Procmail rules may need to be adjusted for the mail format.
![]() The maildir format is often claimed to produce better speed than mbox, particularly when a mail folder contains hundreds of messages. This is most likely to be important if you use IMAP rather than POP and if your users collect many email messages in their IMAP-mediated mail folders.
The maildir format is often claimed to produce better speed than mbox, particularly when a mail folder contains hundreds of messages. This is most likely to be important if you use IMAP rather than POP and if your users collect many email messages in their IMAP-mediated mail folders.
Writing Procmail Rules
Most Linux mail servers either use Procmail by default or can be configured to do so by setting a configuration file option. If you follow the instructions outlined in the next few paragraphs and find that Procmail isn't working, you can try creating a .forward file in your home directory that contains the following line:
“|/path/to/procmail”
Replace /path/to with the name of the directory in which the procmail binary resides. If even this doesn't work, you may need to consult the documentation for Procmail or for your mail server. Once Procmail is in the picture, the system reads the global /etc/procmailrc configuration file and the .procmailrc file in users' home directories. These files contain Procmail recipes, which take the following form:
:0 [flags] [:[lockfile]]
[conditions]
action
![]() The system-wide /etc/procmailrc file is usually read and processed as root. This fact means that a poorly designed recipe in that file could do serious damage. For instance, a typo could cause Procmail to overwrite an important system binary rather than use that binary to process a message. For this reason, you should keep system-wide Procmail processing to a minimum and instead focus on using ~/.procmailrc to process mail using individuals' accounts.
The system-wide /etc/procmailrc file is usually read and processed as root. This fact means that a poorly designed recipe in that file could do serious damage. For instance, a typo could cause Procmail to overwrite an important system binary rather than use that binary to process a message. For this reason, you should keep system-wide Procmail processing to a minimum and instead focus on using ~/.procmailrc to process mail using individuals' accounts.
Each recipe begins with the string :0. Various flags may follow, as summarized in Table 9.6. You can combine these flags to produce more complex effects. For instance, using flags of HB causes matching to be done on both the message headers and the body. The lockfile is the name of a file that Procmail uses to signal that it's working with a file. If Procmail sees a lockfile, it delays work on the affected file until the lockfile disappears. Ordinarily, a single colon (:) suffices for this function; Procmail then picks a lockfile name itself. You can specify a filename if you prefer, though.
TABLE 9.6 Common Procmail recipe flags
The conditions in a Procmail recipe are essentially ordinary regular expressions, but each conditions line begins with an asterisk. Most characters in a regular expression match against the same characters in the message, but there are exceptions. For instance, a carat (^) denotes the start of a line, a dot (.) matches any single character except for a new line, and the combination of a dot and an asterisk (.*) denotes a string of any length. A regular expression may include a string in parentheses, often with a vertical bar (|) within it. This condition denotes a match against the string on either side of the vertical bar. A backslash () effectively undoes special formatting in the following character; for instance, to match an asterisk, you would specify the string *. An exclamation mark (!) reverses the sense of a match so that a recipe matches any message that does not meet the specified criteria. Each recipe can have no, one, or more conditions. (Using no conditions is usually done within nesting blocks or for backing up messages when you experiment with new recipes.) If a recipe includes several conditions, all must match for the recipe to apply. The Procmail man page describes these regular expressions in more detail.
Finally, a Procmail recipe ends with a single line that tells it what to do—the action. An action line may be any of several things:
A Filename Reference Procmail stores the message in the named file in mbox format. To store messages in the maildir format, append a slash (/) to the end of the filename. For spam fighting, one effective but drastic measure is to store spam in /dev/null, which effectively deletes the spam.
An External Program If the action line begins with a vertical bar (|), Procmail treats the line as a program to be executed. You can use this feature to pass processing on to another tool.
An Email Address An exclamation mark (!) at the start of a line denotes an email address; Procmail sends the message to the specified address instead of delivering it locally.
A Nesting Block An action line that begins with an open curly brace ({) denotes a nested recipe. The nested recipe takes the same form as any other recipe, but it is used only if the surrounding recipe matches the message. The nested recipe ends with a close curly brace (}).
Seeing Procmail in Action
As an example, consider Listing 9.2, which demonstrates many of the features of Procmail recipes. These particular recipes are designed to filter spam; however, many other uses of Procmail are possible. For instance, you could use it to forward mail that meets certain criteria, send a duplicate of mail addressed to one person to another user, or send it through a program to detect viruses and worms.
Listing 9.2: Sample Procmail recipes
# Don't apply recipes to postmaster
:0
*!^To:.*postmaster@(pangaea.edu|smtp.pangaea.edu)
{
   # Block mail with more than five spaces in the Subject: header,
   # unless it's from the local fax subsystem
   :0
   *^Subject:.* .*
   *!^From: [email protected] (Fax Getty)
   /dev/null

   # Pass mail with bright red text through a custom spam blocking script
   :0 B
   *^.*<html
   *^.*<font color.*ff0000
   |/usr/local/bin/spam-block “mail with bright red text”

   # Stuff that's not to me.
   :0
   *!^(To|Cc):.*(pangaea.edu|[email protected])
   [email protected]
}
![]() Listing 9.2 indents recipes within the nesting block. This practice improves readability but isn't required.
Listing 9.2 indents recipes within the nesting block. This practice improves readability but isn't required.
Listing 9.2 includes four recipes. Three of them are embedded within the fourth:
- The surrounding recipe matches any To: header that does not include the string [email protected] or [email protected]. This recipe uses the open curly brace ({) character to cause the included recipes to be applied only if the mail is not addressed to postmaster. The intent is to protect the postmaster's mail from the antispam rules. After all, users might forward spam to the postmaster account to complain about it, and such complaints should not be ignored.
- Some spam includes five or more consecutive spaces in the Subject: header. The first true spam rule discards such messages. This rule matches all messages with five or more spaces in the Subject: header except for messages that are from the fax subsystem on the fax.pangaea.edu computer, which presumably generates nonspam fax delivery reports that would otherwise match this criterion. This recipe discards the spam by sending it to /dev/null.
- The second spam rule matches all messages that contain HTML text that sets the font color to ff0000—that is, bright red. A great deal of spam uses this technique to catch readers' eyes, but in my experience, no legitimate mail uses this technique. This recipe passes the spam through a special program, /usr/local/bin/spam-block, which is not a standard program. I use it in Listing 9.2 as an example of using Procmail to pass a message through an outside program.
- The final spam rule matches messages that do not contain the local domain name (pangaea.edu) or a special exception username ([email protected]) in the From: or Cc: headers. A rule like this one can be very effective at catching spam, but it can be dangerous when applied system-wide. The problem is that mailing lists, newsletters, and the like may not include the recipients' names in these headers, so the rule needs to be customized for all the mailing lists and other subscription email a recipient receives. Doing this for a large site is a virtual impossibility. This rule will also discard most mail sent to a recipient using a mailer's blind carbon copy (BCC) feature, which causes the recipient name not to appear in any header. This rule uses the exclamation mark action to email the suspected spam to [email protected]. In practice, you're unlikely to email your spam to any site, though; this use in Listing 9.2 is meant as a demonstration of what Procmail can do, not as a practical suggestion of what you should do with spam.
![]() Some spam-fighting tools include provisions to send “bounce” messages to the spam's sender. This practice is reasonably safe when applied in a mail server; the bounce message is generated while the sender is still connected, so the bounce message's recipient is likely to be the correct recipient. You should not attempt to bounce spam from a Procmail recipe or a mail reader, though. Doing so will usually send the bounce message to the wrong address, since spammers usually forge their return addresses.
Some spam-fighting tools include provisions to send “bounce” messages to the spam's sender. This practice is reasonably safe when applied in a mail server; the bounce message is generated while the sender is still connected, so the bounce message's recipient is likely to be the correct recipient. You should not attempt to bounce spam from a Procmail recipe or a mail reader, though. Doing so will usually send the bounce message to the wrong address, since spammers usually forge their return addresses.
Overall, Procmail is an extremely useful and powerful tool for filtering the mail that the mail server handles. I recommend you begin Procmail experimentation by examining your system's default /etc/procmailrc file and then creating a custom ~/.procmailrc file in a test account. You can then see how your rules affect test messages you generate locally or remotely. Once you're confident of the effect of your rules, you can deploy them on a real account, and then system-wide, if necessary.
Configuring POP and IMAP Servers
Today, users typically run email client programs on desktop or workstation systems. These clients connect to the mail server computer using a pull protocol such as POP or IMAP. A POP or IMAP server can handle clients that run under almost any OS.
If you choose to run POP or IMAP, your first decision regards the POP or IMAP server. You must pick which protocol you want to support as well as the specific server package. Once that's done, you must install and configure the pull mail server and test it to be sure it works as intended. This chapter covers two common servers for Linux, Courier and Dovecot.
Selecting a POP or IMAP Server
Before rushing to install a pull mail server, you must understand the differences between the major pull mail server protocols and the individual products that are available in this arena. In some cases, it doesn't much matter which protocol or server you select, but in others, the differences can be quite important.
POP versus IMAP
Most modern mail clients support one or both of the POP and IMAP protocols, and a few support more exotic protocols. Both POP and IMAP perform basically the same task: Client programs connect, retrieve email, and disconnect. The client programs display a list of available messages and enable users to read these messages, archive them, reply to them, and so on.
![]() POP and IMAP are both pull mail protocols, so a mail client can retrieve mail from the POP or IMAP server. To send mail, a mail client uses another protocol—typically SMTP. Small networks are often configured such that mail clients use the same computer for an outgoing SMTP server that they use for incoming POP or IMAP mail. Larger networks sometimes use physically separate computers for these two functions in order to better spread the mail-delivery load.
POP and IMAP are both pull mail protocols, so a mail client can retrieve mail from the POP or IMAP server. To send mail, a mail client uses another protocol—typically SMTP. Small networks are often configured such that mail clients use the same computer for an outgoing SMTP server that they use for incoming POP or IMAP mail. Larger networks sometimes use physically separate computers for these two functions in order to better spread the mail-delivery load.
Although they fill roughly the same role, POP and IMAP aren't identical protocols. Some of their important differences include:
Mail Storage POP users typically retrieve their messages from the server and then immediately delete the messages from the server. Long-term archival of messages occurs on client systems. IMAP, on the other hand, was designed to enable users to store messages in folders on the IMAP server computer. As a result, an IMAP server may need to devote more disk space to user mail directories than a POP server. IMAP may also require more network bandwidth in the long run, although IMAP's partial retrieval options (which are described next) can mitigate this need or even give IMAP an advantage, depending on how your users interact with their mail systems. One big advantage to IMAP's system is that it enables users to access mail using different mail client programs or even different computers, without having to copy mail files between systems.
Partial Retrieval Options POP mail retrieval is all-or-none. Clients can either retrieve a message in its entirety or leave the message on the server. IMAP is more flexible; it supports retrieving various parts of a message, such as its header separately from its body. Therefore, with IMAP, users can delete messages they know they don't want without retrieving the bulk of the message text. With obvious spams and worms, this feature can save your network substantial amounts of bandwidth.
Client Support Although POP and IMAP are both widely supported, POP support is more common than that for IMAP. If your users already have preferred mail clients, you may want to check their configuration options to learn what pull mail protocols they support.
Your decision of whether to support POP, IMAP, or both will boil down to a study of these factors. As a general rule, IMAP is the more flexible protocol, but you may prefer to force mail off the mail server and onto clients as quickly as possible. In that case, using POP makes sense. If your users frequently use multiple computers, IMAP has a certain advantage in convenience for users.
Both POP and IMAP are available in several different versions. In 2011, the latest versions are POP3 and IMAP4. Earlier versions of both are still in use at some sites, and you may need to support earlier versions for some older clients. In the case of IMAP, support for earlier versions is usually automatic. POP2, though, uses a different port (109) than does POP3 (110). IMAP uses port 143.
Picking the Right Package
Pull mail servers tend to be much simpler than push mail servers. Essentially, pull mail servers are local mail clients; they read the mail queue directly. They then deliver mail to another computer using their own pull protocols. As a result, pull mail servers tend to attract little attention. Nonetheless, several different pull mail servers are available for Linux:
UW IMAP Despite its name, the University of Washington IMAP server (http://www.washington.edu/imap/) supports POP2, POP3, and IMAP. The POP servers use the IMAP server behind the scenes. This set of servers usually ships in a package called imap or uw-imapd. The IMAP server stores user mail folders in users' home directories, which can be awkward if users also log into their accounts and store nonmail files there.
Cyrus IMAP Like UW IMAP, Cyrus IMAP (http://www.cyrusimap.org) supports more than just IMAP. Specifically, Cyrus IMAP supports IMAP, POP3, and a Kerberos-enabled POP3 variant (KPOP). This server stores IMAP mail folders in a proprietary file format in its own directory tree, so it can be a good choice if users store nonmail files in their home directories.
Courier The Courier mail server (http://www.courier-mta.org) is an integrated set of SMTP, POP, and IMAP servers. Although the Courier SMTP server isn't very popular in Linux, the IMAP server can be installed separately, and it has a modest following.
Dovecot This server, headquartered at http://www.dovecot.org, is another server that handles both POP and IMAP. Its Web page emphasizes the server's speed, security, and ease of configuration.
One critical consideration when picking a pull mail server is the message file formats the server supports. As noted earlier in this chapter, most Linux SMTP servers use the mbox format by default. UW IMAP and Dovecot both favor mbox format, although Dovecot can be configured to use maildir instead. Courier uses maildir by default. Cyrus IMAP, as noted earlier, uses its own proprietary format. If a given pull server looks appealing but uses the “wrong” mail storage format compared to your SMTP server, you'll have to replace your SMTP server, reconfigure your SMTP server, pick a different pull mail server, or translate between formats with Procmail.
![]() Compatibility is required only for the main incoming mail directory. An IMAP server can use any format for the mail folders that users create, since the SMTP server doesn't interact with these folders.
Compatibility is required only for the main incoming mail directory. An IMAP server can use any format for the mail folders that users create, since the SMTP server doesn't interact with these folders.
One issue you should consider when installing and configuring a pull mail server is password security. The basic protocols deliver usernames and passwords for authentication over an unencrypted link. As a consequence, a miscreant with the appropriate access can sniff the password. Some servers support encrypted variants of the standard protocols, but these variants require support in the mail clients. Another approach is to use the Secure Shell (SSH) to tunnel the pull mail protocol over an encrypted link—that is, to encrypt the pull mail data and pass it over an encrypted connection. This approach requires configuring SSH on the server and on all the clients, as described in Chapter 7. If you don't want to go to this effort, you may want to consider setting aside special mail-only accounts and instruct users to create unique passwords for these accounts. Ideally, you can create these accounts on a dedicated pull mail server computer. This practice will at least minimize the damage that a miscreant might do if pull mail passwords are compromised. You may also want to restrict access to your POP or IMAP ports using firewall rules, TCP Wrappers, or xinetd access restrictions.
The following pages describe basic configuration of Courier and Dovecot because these servers are flexible, popular, and covered in the LPIC-2 objectives. If you want to use UW IMAP, Cyrus IMAP, or some other server, you should consult its documentation to learn how to use it.
Configuring Courier
Courier is administered through files stored in /etc/courier. Specifically, authdaemonrc controls aspects of an authentication daemon that comes with the package, and imapd controls most of the server's settings. Both files include comments, which begin with hash marks (#), and configuration lines, which take the form option=value. Table 9.7 summarizes options you're most likely to want to adjust. Peruse the file or consult the documentation at http://www.courier-mta.org/imap/ for information on additional options.
TABLE 9.7 Common Courier IMAP configuration settings
| Option | Meaning |
| ADDRESS | Sets the IP address on which the server listens. A value of 0 causes the server to listen on all available ports. |
| PORT | Sets the port number (or numbers, separated by commas) on which the server listens. The default value is 143. |
| MAXDAEMONS | Limits the number of daemons (and therefore simultaneous connections) supported by the server. |
| MAXPERIP | Limits the number of simultaneous connections from a single client IP address. |
| IMAP_CAPABILITY | Specifies the capabilities of the IMAP server. Chances are you won't need to adjust this option, but it could be handy if an important client has problems with a specific IMAP feature supported by Courier IMAP. |
| MAILDIRPATH | Sets the name of the directory in which the server stores emails. |
Once you've tweaked your configuration, you can restart the Courier IMAP server using its SysV or Upstart startup script. If all goes well, you should then be able to access the server using a POP- or IMAP-enabled email client to read your mail. Keep in mind that Courier supports maildir format, whereas most Linux SMTP servers store their mail in mbox format by default. Thus, you may need to adjust your SMTP server configuration or even switch to a different SMTP server before you can use Courier IMAP.
Configuring Dovecot
Dovecot supports both mbox and maildir formats, so you may prefer using it to Courier IMAP if your system uses the mbox format and you don't want to change email format. Dovecot's main configuration file is /etc/dovecot/dovecot.conf. Like Courier's configuration file, this file contains comments and settings taking the form option=value. Table 9.8 summarizes some of the important options you might want to check and adjust. The default configuration file is usually well-commented, so peruse it or check the Dovecot documentation at http://wiki2.dovecot.org for more information.
TABLE 9.8 Common Dovecot configuration settings
| Option | Meaning |
| protocols | Specifies the protocols Dovecot should support. (Separate multiple protocols with spaces.) Common choices include imap, imaps, pop3, and pop3s. (Values ending in s support encryption, which is further adjusted via options beginning with ssl.) |
| listen | Specifies the IP address, and optionally the port, on which to listen. An asterisk (*) refers to all IPv4 addresses, while two colons (::) refers to all IPv6 addresses. |
| login_process_per_connection | Specifies whether each login launches its own process (yes, the default) or whether each process can handle multiple logins (no). |
| login_max_processes_count | Sets the maximum number of Dovecot login processes (and hence the maximum number of logins, if login_process_per_connection is yes) supported. |
| login_max_connections | Sets the maximum number of connections per process if login_process_per_connection is set to no. |
| mail_location | Specifies the location of the mbox files or maildir directories to be used for mail storage. The value typically begins with mbox: or maildir: and continues with a pathname, which may include the variables %u (the local username), %n (the user part in the mail address), %d (the domain part in the mail address), or %h (the home directory). A separate inbox may be specified by using a colon and INBOX after the user-manageable mail location. |
As a practical matter, the configuration option you're most likely to have to adjust is mail_location, since this can vary from one site to another. The default configuration file is likely to contain several commented-out examples, such as these:
# mail_location = maildir:~/Maildir
# mail_location = mbox:~/mail:INBOX=/var/mail/%u
# mail_location = mbox:/var/mail/%d/%1n/%n:INDEX=/var/indexes/%d/%1n/%n
Locate the example that's closest to what your system already uses or what you want to use and tweak it as necessary. On a busy mail server, you may need to adjust the options that control the maximum number of simultaneous connections. You may also want to specify the protocols that the server supports or peruse the configuration file for more exotic options on a complex or unusual server.
Summary
Two of the most important services on the Internet today are Web sites and email. Linux provides a variety of servers to fill both roles. The most popular Web server for Linux is Apache, which is a full-featured server that handles both the unencrypted HTTP and the encrypted HTTPS protocols. A default Apache configuration works well enough for many simple purposes, although of course you must add your site's own unique Web pages. If you need to enable encryption, dynamic content, user-specific Web pages, or other features, you must adjust the default configuration by editing the Apache configuration files. Most such changes involve modifying just a few lines, but Apache is complex enough that an unusual site can require extensive configuration file changes. You may also need to configure another type of Web server, known as a proxy server, which functions as a go-between linking clients to servers. Proxy servers can improve performance, add security features, block unwanted content, and otherwise modify the Web browsing experience. In Linux, Squid is a popular proxy server with a default configuration that's designed to improve performance. Changing the configuration enables it to do many other things, though.
Email is handled through a variety of protocols, the most important of these being SMTP, which requires the client to initiate an email transfer. Several SMTP servers for Linux exist, two of the most popular being sendmail and Postfix. Both servers can run on workstations as local mail delivery tools or as the first step in the mail delivery chain; or they can receive mail from outside systems, perhaps functioning as mail hubs for an entire domain. Except for limited workstation use, chances are you'll need to tweak your SMTP server configuration for your domain and specific needs. Two other important email protocols are POP and IMAP, both of which require the client to connect to the server to retrieve email stored on the server. POP and IMAP are implemented by ISPs and on large mail server computers in businesses as a tool to enable users to read their mail from their desktop and workstation computers. Several POP and IMAP servers exist, including Dovecot and Courier. These servers may require some minor configuration tweaks to properly handle mail for a domain.
Exam Essentials
Describe the main Apache configuration files. Apache uses a configuration file called httpd.conf, httpd2.conf, apache.conf, or apache2.conf, which is located somewhere in the /etc/httpd, /etc/httpd2, /etc/apache, or /etc/apache2 directory tree. (There's considerable distribution-to-distribution variability in the file's name and location.) This file sometimes loads ancillary configuration files from the same directory tree. A file called .htaccess, located in a directory that's served by the server, can contain options related to that directory alone.
Distinguish between static and dynamic Web content. Static Web content consists of HTML or other files that are delivered directly from the Web server to the client without modification or other processing by the Web server computer. Dynamic Web content consists of scripts or programs that the Web server runs in order to generate content for a specific client, such as a Web forum or a Web merchant's “shopping cart” page.
Summarize Apache's access restriction tools. Apache supports username- and password-based access restrictions. You use the htpasswd program to create a password file using a name that you specify, which you then refer to using the AuthUserFile configuration file option. Additional configuration file options, such as AuthType and Require, tell Apache how to implement access controls for a specific directory.
Explain the purpose of virtual hosts in Apache. A single Web server computer can host the Web sites for multiple domains. Depending on the name used in the URI or the IP address used to access the server, it can deliver Web pages stored in different directories. You can use the Apache VirtualDocumentRoot or VirtualHost directive to configure this feature.
Summarize the process of configuring SSL support in Apache. To enable encryption in Apache, you must first install a suitable SSL module, typically from a package called apache-mod_ssl or from a package with Apache modules for many purposes. You must also obtain a certificate from a certificate authority (CA). Alternatively, you can generate your own certificate; however, without a certificate from a recognized CA, clients will see a warning about a suspicious certificate when they browse to your site. With these items installed, you can activate SSL support by loading the module called ssl_module.
Describe some common reasons to run a Web proxy. By caching Web accesses, as Squid does by default, a Web proxy can improve Web performance for an office or other group of clients. Security features can include limiting Web access to authorized users and filtering Web content to block access to suspicious Web sites. More unusual or obscure needs include using an off-site proxy to work around network access problems or to help maintain your privacy.
Explain how email is relayed from source to destination. Email is written using an email client (a mail user agent, or MUA), which today often exists on a desktop computer that may lack a mail server. The MUA connects to an SMTP server (a mail transfer agent, or MTA), which parses the To: address and contacts the SMTP server associated with that address in the global DNS. Depending on the configuration of this server, it may hold the mail locally or forward it to another computer. Such forwarding operations can continue an arbitrary number of steps. The ultimate recipient will either read the mail locally on a mail server computer or use an MUA that supports a pull mail protocol (such as POP or IMAP) to retrieve and read the email.
Describe how to configure sendmail. The sendmail program uses a configuration file called sendmail.cf, typically located in /etc/mail. This file is difficult to edit directly, though, so you typically edit an m4 configuration file (sendmail.mc or some other name) and compile that file into the final sendmail.cf form.
Summarize commands to view and clear the email queue. The sendmail command can do both of these tasks, and other commands often work, too. Typing sendmail -bp or mailq displays emails that are currently in the queue. Typing sendmail -q causes the server to attempt redelivery of all the mail in the queue. Some servers have other commands that can do this, too, such as postqueue in Postfix or runq in Exim.
Explain the difference between mbox and maildir formats. These are both formats for storing email. The mbox format stores all mail in a mail folder (including the main incoming queue) in a single file, whereas maildir stores each message in its own file within a directory on the server. By default, sendmail, Postfix, and Exim use mbox, whereas qmail uses maildir; but most servers can be configured to use either format.
Describe the role of Procmail in mail delivery. You can configure most mail servers to send mail to Procmail as part of the local mail delivery process. Procmail can be configured to filter mail in various ways—to delete obvious spams, to pass mail through additional programs, to forward mail from one account to another, and so on. System-wide and user Procmail configurations exist, giving both the system administrator and individual users the ability to use these features.
Explain the major differences between POP and IMAP Both of these protocols enable clients to connect to a mail server to read their email. POP is a relatively simple protocol that enables users to retrieve their email, typically to be immediately discarded or stored on the client computer. IMAP can be used in the same way, but IMAP supports server-side mail folders and more sophisticated mail retrieval options, which are useful if users want to store their email on the server for access from a variety of clients.
Review Questions
- You want your Apache server to use /var/mywww as the directory from which to serve your Web site. What Apache configuration option must you set to make this so?
A. Root /var/mywww/
B. DocumentRoot /var/mywww/
C. set root /var/mywww/
D. Base=/var/www
- What type of information about HTTP transfers can you recover from an Apache server's log files? (Select all that apply.)
A. The IP address or hostname of the client computer
B. The name of the browser claimed by the client
C. The route of network packets during the transfer
D. The size of the client's Web browser window
- You've made extensive changes to your Apache configuration files, and you want to check for egregious errors before you restart the server. What command might you type to do so?
A. apachectl testconfig
B. apache2ctl teststat
C. apachectl configstatus
D. apache2ctl configtest
- You want to modify some Apache settings for a single directory in your Web site's directory tree. You enter the relevant changes in a file and save that file in the relevant directory. What name should you give this file?
A. .apache
B. .httpd
C. .htaccess
D. .apache-config
- What program can you use to add users to a database of authorized users when you configure Apache to require authentication?
A. passdb
B. htaccess
C. apacheadd
D. htpasswd
- An Apache server includes the following configuration line. Assuming the rest of the configuration is in order, what file will the server deliver if a user type http://www.luna.edu/index.htm in a Web browser and the server receives this request?
VirtualDocumentRoot /var/httpd/%-2/%-1
A. /var/httpd/www/luna/index.htm
B. /var/httpd/www/luna/edu/index.htm
C. /var/httpd/luna/www/index.htm
D. /var/httpd/luna/edu/index.htm
- You want to use the VirtualHost directive to define a limited number of virtual hosts on an Apache server. Furthermore, this server has two network interfaces, one for your local network (eth0, 172.24.21.78) and one for the Internet (eth1, 10.203.17.26). What directive can you include to ensure that your virtual hosts are defined only on your local network?
A. VirtualHostOnly eth0
B. Bind eth0
C. NameVirtualHost 172.24.21.78
D. ExcludeVirtualHosts 10.203.17.26
- Which of the following is the best mode for a secure Apache server's private key files?
A. 0600
B. 0640
C. 0644
D. 0660
- Which of the following tools caches Web (HTTP) accesses by clients, thus improving performance on subsequent accesses to the same popular sites?
A. Squid
B. PHP
C. lynx
D. CGI
- How can you ensure that all access to normal Web sites (on port 80) from your local network passes through a proxy server? (Select all that apply.)
A. Use iptables on your router to redirect all traffic to the proxy server to go to the Internet directly.
B. Use iptables on your proxy server to redirect all incoming port-80 traffic to the proxy server's default port.
C. Use iptables on your router to block all outgoing port-80 traffic except from the proxy server.
D. Use iptables on your router to redirect all outgoing port-80 traffic to the proxy server, except from the proxy server itself.
- Your SMTP email server, mail.luna.edu, receives a message addressed to [email protected]. There is no postmaster account on this computer. Assuming the system is properly configured, how should the email server respond?
A. Deliver the email to another account, either locally or on another computer.
B. Bounce the message so that the recipient knows the account doesn't exist.
C. Hold the message in the local mail queue until the postmaster account is created.
D. Delete the message without bouncing it so as to reduce email clutter.
- Which of the following is not a popular SMTP server for Linux?
A. Postfix
B. Sendmail
C. Fetchmail
D. Exim
- Your Internet connection has gone down for several hours. What is true of email sent by your users to off-site recipients via a properly configured local SMTP server?
A. The SMTP server will refuse to accept email from local clients during the outage.
B. Email will be neither delayed nor lost.
C. All email sent during the outage will be lost.
D. Email will be delayed by a few hours but not lost.
- You examine your /etc/aliases file and find it contains the following line:
root: jody
What can you conclude from this?
A. Email addressed to jody on this system will be sent to the local user root.
B. Email addressed to root on this system will be sent to the local user jody.
C. The local user jody has broken into the system and acquired root privileges.
D. The local user jody has permission to read email directly from root's mail queue.
- Which of the following is a commonly claimed advantage of maildir over mbox email format?
A. Support for nested subdirectories of email folders
B. Support for IMAP, rather than just the POP that mbox supports
C. Faster authentication of users when first connecting to the server
D. Faster access to messages in folders that hold many messages
- What is an advantage of configuring Procmail rules in users' ~/.procmailrc files rather than in the global /etc/procmailrc file?
A. Rules in ~/.procmailrc execute as ordinary users vs. as root for /etc/procmailrc, making ~/.procmailrc safer.
B. Rules in ~/.procmailrc have access to users' own local email files vs. only the global files for /etc/procmailrc.
C. Users' ~/.procmailrc files can be set with restrictive permissions, preventing other users from maliciously modifying those files.
D. Several powerful options are available in ~/.procmailrc files that are not valid in the global /etc/procmailrc file.
- Describe the effect of the following Procmail recipe:
# CPUload = 0.5
:0
*^From: [email protected]
/dev/null
A. Mail from [email protected] is delayed until the CPU load drops below 0.5.
B. Mail from [email protected] is discarded.
C. Mail from [email protected] passes through unaffected by subsequent recipes.
D. None of the above; this recipe is malformed.
- What option would you set in the Courier configuration file to limit the number of simultaneous connections the server will accept?
A. NUMCON
B. MAXCONNECTIONS
C. MAXDAEMONS
D. NUMUSERS
- What is wrong with the following line, which appears in a Dovecot configuration file?
protocols = pop3, pop3s
A. The protocol list must be enclosed in curly braces ({}).
B. Dovecot doesn't support a protocol called pop3s, although pops is valid.
C. Dovecot requires imap or imaps as one of the supported protocols.
D. The protocol list should be space-separated; there should be no comma (,).
- Your site's email users frequently use random computers in your office, so you want to run a pull mail server that enables them to store their messages on the server computer itself. What protocol would be best for this purpose?
A. SMTP
B. IMAP
C. Procmail
D. POP
Answers to Review Questions
- B. The DocumentRoot directive sets the directory in which Apache looks for files to serve, by default. (Other commands set the roots for virtual domain hosting and for users' sites.) The Root directive of option A is fictitious. Apache does not use a set keyword, so option C is incorrect; and it doesn't use an equal sign (=), so option D is incorrect. (Both these options also specify incorrect directive names.)
- A, B. The Apache server's logs include the IP address or hostname of the client as well as an identification string provided by the client, which identifies the client program and platform. (This string is not entirely reliable, though.) Thus, options A and B are both correct. Packet routes (option C) are not normally included in this data, but you could apply traceroute to the IP address or hostname if you need this data. Web browsers' window sizes (option D) are not normally logged by Apache.
- D. The apachectl or apache2ctl program (both names usually work, but sometimes only one is valid) can manage the Apache server process, report on connections, and test the configuration file for correct syntax. To do this last, pass it the configtest parameter, as in option D. The parameters specified in the remaining options are all fictitious.
- C. The .htaccess file is a configuration file for a single directory in a Web site's directory tree, so option C is correct. Although Apache's main configuration file is normally called apache.conf or httpd.conf, neither option A nor B is correct for the single-directory configuration file described. Option D is entirely fictitious.
- D. The htpasswd program (option D) manages Apache's own password database. Options A, B, and C are all fictitious, although the .htaccess file can be used to set options for an individual directory.
- D. The numbers preceded by percent signs (%) in VirtualDocumentRoot are variables that refer to the dot-separated hostname components. Positive numbers count components from the start, and negative numbers count components from the end. Thus, given a hostname of www.luna.edu, %-2 refers to luna and %-1 refers to edu, making option D correct. The remaining options are all distortions of this correct answer.
- C. The NameVirtualHost directive is required when using VirtualHost. It often takes an asterisk (*) as an option, but passing it an IP address instead causes virtual hosting to apply only to requests directed to the network interface associated with that IP address. Thus, option C is correct. The remaining options are all fictitious.
- A. Permissions on the Apache private key file should be as restrictive as possible, which normally means 0600 (read and write for the owner, no access to anybody else) or even 0400 (read-only for the owner, no access to anybody else). Thus, option A is correct. In addition to this access, options B, C, and D all provide read access to members of the file's group; option C provides read access to all users; and option D provides write access to the file's group. These additions all constitute unnecessary security risks, making these options incorrect.
- A. The Squid program is a caching proxy server, meaning that it provides the features described in the question, so option A is correct. PHP is a tool for running Web-centric scripts, so option B is incorrect. lynx is a text-based Web browser, so option C is incorrect. CGI is the Common Gateway Interface, a tool for running scripts from a Web server, so option D is incorrect.
- C, D. Doing as option C suggests will block normal clients from accessing the Internet, forcing them to use their Web browsers' proxy settings to use your network's proxy server computer. Option D will use the proxy server more seamlessly, which requires less configuring but may not work well with some proxy configurations. Either option will do as the question asks. Option A makes little sense, because you can't redirect traffic aimed at a specific machine to go to the Internet at large; and if you could, this would do the opposite of what's requested. Option B would effectively make the proxy server run on two ports, port 80 and its native port, but this isn't what's specified by the question.
- A. All SMTP email servers are supposed to accept email to postmaster. Linux systems typically do so by using an alias to forward the email to another local user or occasionally to a user on another computer. Thus, option A is correct. Options B and D both describe non-delivery of the message, in violation of proper email server configuration. Option C is effectively the same as option D unless creation of the postmaster account is imminent, and an email server would have no way of knowing this.
- C. The Fetchmail program is a tool for retrieving email from remote POP or IMAP servers and injecting it into a local (or remote) SMTP email queue. As such, it's not an SMTP server, so option C is correct. Postfix, sendmail, and Exim are all popular SMTP email servers for Linux, so options A, B, and D are incorrect.
- D. SMTP servers accept local email for delivery even if their Internet connections are down. If the SMTP server can't contact recipient servers, the SMTP server holds the email and attempts delivery later, so option D is correct. Because SMTP servers don't check on the availability of remote servers until after email is accepted for delivery, option A is incorrect. Option B can't possibly be correct unless the server has a backup Internet connection, which wasn't specified in the question. Option C isn't correct because the SMTP server will hold the mail and attempt delivery later.
- B. The /etc/aliases file configures system-wide email forwarding. The specified line does as option B describes. A configuration like this one is common. Option A has things reversed. Option C is not a valid conclusion from this evidence alone, although an intruder may conceivably be interested in redirecting root's email; so if jody shouldn't be receiving root's email, this should be investigated further. Although the effect of option D (jody reading root's email) is nearly identical to the correct answer's effect, they are different; jody cannot directly access the file or directory that is root's email queue. Instead, the described configuration redirects root's email into jody's email queue. Thus, option D is incorrect.
- D. By placing individual messages in files, maildir can theoretically provide faster access to individual messages than can mbox, which requires the server to read through all the messages in the mail folder. Thus, option D is correct. Both mbox and maildir support nested subdirectories of folders and IMAP, making options A and B incorrect. Option C is incorrect because authentication isn't affected by the email storage format.
- A. Option A's statement is correct; an error in a global /etc/procmailrc recipe can be disastrous because the recipe runs as root. No matter which file is used, users' mail files can be accessed, so option B is incorrect. Although ~/.procmailrc can be protected from malicious changes, the same is true of /etc/procmailrc, making option C incorrect. Both files support the same commands, so option D is incorrect.
- B. This Procmail rule uses the regular expression on its third line, which matches mail from [email protected]. Matched messages' dispositions are determined by the final line, which in this case redirects mail to /dev/null—in other words, it's discarded, as option B states. Option A is incorrect because this rule does nothing to test the CPU load; the comment on the first line is intentionally misleading. Because the recipe discards mail, option C is obviously incorrect. The recipe is properly formed, so option D is incorrect.
- C. Option C specifies the correct variable name to limit the number of daemons, and hence the number of simultaneous connections, that Courier will accept. The remaining options are all fictitious.
- D. Option D correctly describes the problem with this Dovecot configuration line. Dovecot doesn't require curly braces in this configuration option, so option A is incorrect. Dovecot supports protocols of imap, imaps, pop3, and pop3s, so option B is incorrect. Dovecot can run with support for POP only; there's no need to add IMAP support, so option C is incorrect.
- B. The IMAP protocol supports directories and email organization on the server computer, making it a good choice for storing mail on the server in the long term. SMTP is a push mail protocol; it's used to send mail from the originator and down a delivery chain. Clients don't use SMTP to retrieve their mail, so option A is incorrect. Although Procmail might be part of your mail server's configuration, it's not a protocol that's used by clients to retrieve mail, so option C is incorrect. POP, like IMAP, is a pull mail protocol, but it doesn't support mail organization on the server, making it an inferior choice to IMAP for the specified purpose, so Option D is incorrect.