Before we get into how to use each of the ruler tools, we need to learn about the snapping options. When a ruler isn't working as expected, most of the time, it is because snapping is turned on or off. So, when getting undesired results with the ruler tools, it is best to check these options first.
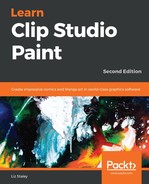
The three snapping options can be found in the Command Bar above the area where the currently active document is displayed. They are shown in the following screenshot:
![]()
From left to right, these options are: Snap to Ruler, Snap to Special Ruler, Snap to Grid. In the preceding screenshot, the Snap to Ruler option is the only one currently turned on and is marked by a slightly darker box around the icon than the other two options.
Snap to Ruler constricts the marks made by the current tools to any active basic ruler (Linear ruler, Figure ruler, Ruler pen, and so on). If the active ruler is a special ruler, such as a Perspective ruler, this option will not force the drawing tool to follow that ruler.
Snap to Special Ruler forces tools to restrict their marks to any currently active special ruler, such as Symmetry, Focus Line, and Perspective Rulers.
Snap to Grid forces tools to stay within the confines of the grid, when it is visible. More on the grid later in this chapter.
To turn a snap option on or off, simply click on it. Multiple snapping options can be active at one time. Remember that the snapping options will force your tools to constrain themselves to any currently active ruler that fits their criteria, so if you have a drawing tool that isn't drawing where you want it to, and you have a ruler in your image, check the snapping option first to see if that is the issue!
Now that we've discussed snapping, let's move on to the basic rulers and their functions.