Chapter 6. Query Development and Derived Structures
A problem in SQL—and in all programming, for that matter—is the development of long queries or statements. One way to create long queries is to begin modestly and to incrementally build or develop the query of interest. This is the approach described in this chapter, which we will illustrate by developing a few queries. And, as you’ll find out, often the appropriate placement of parentheses within the query is required to get the right answer to a question.
Another way to develop queries is to use derived structures—a pseudo-table, of sorts. In Server SQL 2005, derived structures include such things as views (both real and inline views) and temporary tables (both temporary and global), both of which enable us to easily manipulate partial displays of tables. The partial displays can then be connected to answer a complicated database query. This chapter discusses derived structures, focusing specifically on views and temporary tables, and how query development can be aided with the use of derived structures.
Query Development
Queries are sometimes developed after some initial experimentation, yet other times they are the result of modifying previously stored queries. The best way to understand how the query building process works is to look at an example. Suppose we want to find the names of all students in the Student_course database who major in computer science (COSC) and have earned a grade of B in some course. To do so, we can follow these steps:
Type the following query to find students who major in computer science:
    SELECT *
    FROM   Student
    WHERE  major = 'COSC'
This query produces the following 10 rows of output:
    STNO   SNAME                MAJOR CLASS  BDATE
    ------ -------------------- ----- ------ -----------------------
    3      Mary                 COSC  4      1978-07-16 00:00:00
    5      Zelda                COSC  NULL   1978-02-12 00:00:00
    8      Brenda               COSC  2      1977-08-13 00:00:00
    14     Lujack               COSC  1      1977-02-12 00:00:00
    17     Elainie              COSC  1      1976-08-12 00:00:00
    31     Jake                 COSC  4      1978-02-12 00:00:00
    121    Hillary              COSC  1      1977-07-16 00:00:00
    128    Brad                 COSC  1      1977-09-10 00:00:00
    130    Alan                 COSC  2      1977-07-16 00:00:00
    142    Jerry                COSC  4      1978-03-12 00:00:00

    (10 row(s) affected)
To find the student rows in the preceding output who have earned a B in a course, we first need to add the
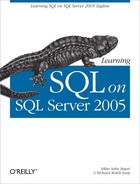
Grade_reporttable, shown in Figure 6-1, with a join (to get the grades of those students who are computer science majors).The join query now looks like (note the choice of columns in the
SELECTstatement, so that we can see the student names, majors, sections and grades):SELECT stu.sname, stu.major, g.section_id, g.grade FROM Student stu, Grade_report g WHERE stu.major = 'COSC' AND stu.stno = g.student_number
This query produces 48 rows of output (of which we show the first 20 rows):
sname                major section_id grade
-------------------- ----- ---------- -----
Mary                 COSC  85         A
Mary                 COSC  87         B
Mary                 COSC  90         B
Mary                 COSC  91         B
Mary                 COSC  92         B
Mary                 COSC  96         B
Mary                 COSC  101        NULL
Mary                 COSC  133        NULL
Mary                 COSC  134        NULL
Mary                 COSC  135        NULL
Zelda                COSC  90         C
Zelda                COSC  94         C
Zelda                COSC  95         B
Brenda               COSC  85         A
Brenda               COSC  92         A
Brenda               COSC  94         C
Brenda               COSC  95         B
Brenda               COSC  96         C
Brenda               COSC  102        B
Brenda               COSC  133        NULL
.
.
.
(48 row(s) affected)
To add the condition for Bs, we need to add another
ANDclause in theWHEREcondition, by adding a fifth line to the query:SELECT stu.sname, major, section_id, grade FROM Student stu, Grade_report g WHERE stu.major = 'COSC' AND stu.stno = g.student_number AND g.grade = 'B'
This query produces the following 14 rows of output:
sname                major section_id grade
-------------------- ----- ---------- -----
Mary                 COSC  87         B
Mary                 COSC  90         B
Mary                 COSC  91         B
Mary                 COSC  92         B
Mary                 COSC  96         B
Zelda                COSC  95         B
Brenda               COSC  95         B
Brenda               COSC  102        B
Lujack               COSC  102        B
Lujack               COSC  145        B
Lujack               COSC  158        B
Hillary              COSC  90         B
Hillary              COSC  94         B
Hillary              COSC  95         B

(14 row(s) affected)
To get only the student names from the preceding output, we reduce the result set by typing:
SELECT  stu.sname
FROM    Student stu, Grade_report g
WHERE   stu.major = 'COSC'
  AND      stu.stno = g.student_number
  AND      g.grade = 'B'
This query produces the following output, a list of all the students who are majoring in COSC and received a grade of B:
sname
--------------------
Mary
Mary
Mary
Mary
Mary
Zelda
Brenda
Brenda
Lujack
Lujack
Lujack
Hillary
Hillary
Hillary

(14 row(s) affected)
The point of this process is that it allows us to test as we go, verify that the query works up to that point, and ensure that we have a reasonable result before we move to the next enhancement.
To get the answer in a more reasonable “easy-to-read” orderly manner, a final presentation using
DISTINCT(to find the distinct names) andORDER BY(to order by names) could be added to the query, as follows:SELECT DISTINCT(stu.sname) FROM Student stu, Grade_report g WHERE stu.major = 'COSC' AND stu.stno = g.student_number AND g.grade = 'B' ORDER BY stu.sname
which would give:
sname
--------------------
Brenda
Hillary
Lujack
Mary
Zelda

(5 row(s) affected)
But note that the
DISTINCTandORDER BYdo not have to be used together. When theDISTINCTis used, theORDER BYis not necessary.DISTINCTautomatically orders the result set. So writing the previous query without theORDER BYclause would give you the same output. Try it.
Parentheses in SQL Expressions
As queries get longer, they can become very ambiguous to humans without the appropriate use of parentheses. In programming languages like C, you can write a statement like this:
x = y + z * w
How is this statement computed? The answer depends on precedence rules. Usually in programming languages (and in SQL), clauses in parentheses have the highest precedence. The authors of this book advocate fully parenthesized expressions for three reasons:
It makes the expression easier to debug.
It tells anyone else who looks at your expression that it is written as you intended, because you explicitly and unambiguously wrote the expression in a fully parenthesized way.
There is no guarantee that another SQL language will behave like the one you learned.
In SQL, the precedence problem occurs when AND and OR are used in the same query. For example, what does the following query request? Does AND or OR have precedence or is the rule “left to right”?
    SELECT  *
    FROM    Student
    WHERE   class = 3 OR class = 4 AND stno < 100
This query produces the following 12 rows of output:
    STNO   SNAME                MAJOR CLASS  BDATE
    ------ -------------------- ----- ------ -----------------------
    3      Mary                 COSC  4      1978-07-16 00:00:00
    13     Kelly                MATH  4      1980-08-12 00:00:00
    20     Donald               ACCT  4      1977-10-15 00:00:00
    24     Chris                ACCT  4      1978-02-12 00:00:00
    31     Jake                 COSC  4      1978-02-12 00:00:00
    49     Susan                ENGL  3      1980-03-11 00:00:00
    62     Monica               MATH  3      1980-10-14 00:00:00
    122    Phoebe               ENGL  3      1980-04-15 00:00:00
    131    Rachel               ENGL  3      1980-04-15 00:00:00
    143    Cramer               ENGL  3      1980-04-15 00:00:00
    151    Losmith              CHEM  3      1981-01-15 00:00:00
    160    Gus                  ART   3      1978-10-15 00:00:00

    (12 row(s) affected)
The point is that you do not have to know the precedence rules to write an unambiguous expression. If you use parentheses appropriately, you make the expression clear and unambiguous. Consider the following examples. If we type the following:
    SELECT  *
    FROM    Student
    WHERE   class = 3 OR (class = 4 AND stno < 100)
we get the following 12 rows of output:
    STNO   SNAME                MAJOR CLASS  BDATE
    ------ -------------------- ----- ------ -----------------------
    3      Mary                 COSC  4      1978-07-16 00:00:00
    13     Kelly                MATH  4      1980-08-12 00:00:00
    20     Donald               ACCT  4      1977-10-15 00:00:00
    24     Chris                ACCT  4      1978-02-12 00:00:00
    31     Jake                 COSC  4      1978-02-12 00:00:00
    49     Susan                ENGL  3      1980-03-11 00:00:00
    62     Monica               MATH  3      1980-10-14 00:00:00
    122    Phoebe               ENGL  3      1980-04-15 00:00:00
    131    Rachel               ENGL  3      1980-04-15 00:00:00
    143    Cramer               ENGL  3      1980-04-15 00:00:00
    151    Losmith              CHEM  3      1981-01-15 00:00:00
    160    Gus                  ART   3      1978-10-15 00:00:00

    (12 row(s) affected)
The preceding query has the parentheses around the AND clause, the result of which is that the AND is performed first. The following query has the parentheses around the OR clause, meaning that the OR is performed first:
    SELECT  *
    FROM    Student
    WHERE   (class = 3 OR class = 4) AND stno < 100
This query results in the following seven rows of output:
    STNO   SNAME                MAJOR CLASS  BDATE
    ------ -------------------- ----- ------ -----------------------
    3      Mary                 COSC  4      1978-07-16 00:00:00
    13     Kelly                MATH  4      1980-08-12 00:00:00
    20     Donald               ACCT  4      1977-10-15 00:00:00
    24     Chris                ACCT  4      1978-02-12 00:00:00
    31     Jake                 COSC  4      1978-02-12 00:00:00
    49     Susan                ENGL  3      1980-03-11 00:00:00
    62     Monica               MATH  3      1980-10-14 00:00:00

    (7 row(s) affected)
As the preceding two query statements demonstrate, appropriate placement of parentheses eliminates any ambiguity in queries that contain both AND and OR.
Operator Precedence
In SQL Server 2005, when complex expressions use multiple operators, precedence rules determine the sequence in which the operations are performed. The order of execution can significantly affect the resulting value (as you saw in the example in the preceding section). Although we can usually control precedence with parentheses, it is important to learn, or have at least a reference, to the order of precedence.
Operators have the following precedence (the following list is shown from the highest level of precedence to the lowest level of precedence):
    * (multiply), / (divide), % (modulo)
    + (add), + (concatenate), - (subtract)
    =, >, <, >=, <=, != (not equal to), !>, !<
    NOT
    AND
    BETWEEN, IN, LIKE, OR
    = (assignment)
Data Type Precedence
When an operator combines two expressions of different data types, the data type precedence rules specify which data type is converted to the other. The data type with the lower precedence is converted to the data type with the higher precedence. Here we list the precedence order for SQL Server 2005 data types (again shown from the highest level of precedence to the lowest level of precedence):
SQL_VARIANTDATETIMESMALLDATETIMEFLOATREALDECIMALMONEYSMALLMONEYBIGINTINTSMALLINTTINYINTBITNTEXTTEXTIMAGEUNIQUEIDENTIFIERNVARCHARNCHARVARCHARCHARBINARY
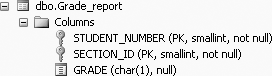
This order means that if a number of an INT data type is multiplied to a number that is of a FLOAT data type, the result would be a FLOAT data type. To illustrate something like this, we will use the Employee table that we created in the last chapter. The design of the Employee table is shown in Figure 6-2.
Note that the data type of the hours column is SMALLINT. If we multiply this column (hours) by 0.75 (a FLOAT), we get a FLOAT data type in the result set, as shown here:
    SELECT  names, hours, 'Hours * .75' = hours *  .75
    FROM    Employee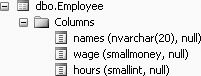
This query gives us:
    names                hours  Hours * .75
    -------------------- ------ --------------------------------------
    Sumon Bagui          40     30.00
    Sudip Bagui          30     22.50
    Priyashi Saha        NULL   NULL
    Ed Evans             10     7.50
    Genny George         40     30.00

    (5 row(s) affected)
Derived Structures
Derived structures may become necessary as the queries we build get larger and we have to use a more step-by-step approach to find a result. Derived structures help us to build queries on top of other queries. In this section, we discuss two of the most commonly used derived structures—views and temporary tables.
Views
In SQL, a view (also called a virtual table) is a mechanism to procure a restricted subset of data that is accessible in ways akin to ordinary tables. We use the word “akin” because some operations on views (such as some updates and deletes) may be restricted which otherwise would be allowed if performed on the underlying structure itself.
A view serves several purposes:
It helps to develop a query step by step.
It can be used to restrict a set of users from seeing part of the database in a multiuser system—this can be considered a security feature.
Views provide a layer of abstraction to data, facilitating backward compatibility and horizontal and vertical partitioning of data.
Views provide a seamless way to combine data from multiple sources.
Views do not occupy much disk space, as they have no data of their own.
When you use a view for queries, you use it just as you would use the underlying table(s).
Views can be used to create other views or queries.
Creating views
A view can be regarded as a named SELECT statement that produces a result set (a view) that you can further work on. The SELECT statement that is used to create a view can be from one or more underlying tables or from other views in the current or other databases.
The general SQL syntax used to create a view is:
    CREATE VIEW view_name AS
    SELECT ...
The following example creates a view called namemaj, which is a view of students’ names and majors from the Student table. To create the view namemaj, type the following in the SQL query editor screen:
    CREATE VIEW namemaj AS
    SELECT      sname, major
    FROM        Student
And then execute this query in the regular way. A view will be created.
You will get the following message:
Command(s) completed successfully.
To view namemaj, click on Views in the Object Explorer, and then click dbo.namemaj and then Columns, as shown in Figure 6-3.
A view is a stored SELECT statement. Each time a view is accessed, the SELECT statement in the view is run.
Using views
The new view can be used just like a table in the FROM clause of any SELECT statement, as shown here:
    SELECT  *
    FROM    namemaj
This query will give 48 rows of output, of which we show the first 10 rows:
sname major
    -------------------- -----
    Lineas               ENGL
    Mary                 COSC
    Zelda                COSC
    Ken                  POLY
    Mario                MATH
    Brenda               COSC
    Romona               ENGL
    Richard              ENGL
    Kelly                MATH
    Lujack               COSC
    .
    .
    .
    (48 row(s) affected
Just like an ordinary table, a view can be filtered and used in a SELECT. For example, type the following query:
    SELECT  n.major AS [Major], n.sname AS [Student Name]
    FROM    namemaj AS n, Department_to_major AS d
    WHERE   n.major = d.dcode
    AND     d.dname LIKE 'COMP%'
which produces the following output:
    Major Student Name
    ----- --------------------
    COSC  Mary
    COSC  Zelda
    COSC  Brenda
    COSC  Lujack
    COSC  Elainie
    COSC  Jake
    COSC  Hillary
    COSC  Brad
    COSC  Alan
    COSC  Jerry

    (10 row(s) affected)
ORDER BY in views
SQL Server 2005 does not allow you to use an ORDER BY when creating views
. For example, if we try to create an ordered view called namemaj1, as follows:
    CREATE VIEW namemaj1 AS
    SELECT      sname, major
    FROM        Student
    ORDER BY    sname
we will get the following error message:
    Msg 1033, Level 15, State 1, Procedure namemaj1, Line 4
    The ORDER BY clause
 is invalid in views, inline functions, derived tables,
subqueries, and common table expressions, unless TOP or FOR XML is also specified.But an ORDER BY can be used in the FROM clause after the view has been created, as shown:
    SELECT   *
    FROM     namemaj
    ORDER BY major
This query produces 48 rows, of which we show the first 10 rows here:
    sname                major
    -------------------- -----
    Smith                NULL
    Thornton             NULL
    Lionel               NULL
    Sebastian            ACCT
    Harrison             ACCT
    Francis              ACCT
    Donald               ACCT
    Chris                ACCT
    Gus                  ART
    Benny                CHEM
    .
    .
    .
    (48 row(s) affected)
SELECT INTO in views
You cannot use a SELECT INTO statement when creating a view, because it is a combined data definition language (DDL) and data manipulation language (DML) statement, as shown here:
    CREATE VIEW new_view AS
    SELECT      * INTO new_view
    FROM        Employee
You will get the following error message:
    Msg 156, Level 15, State 1, Procedure new_view, Line 2
    Incorrect syntax near the keyword 'INTO'.
You can, however, issue a SELECT INTO statement when the view is used in the FROM clause, as shown:
    CREATE VIEW new_view AS
    SELECT      *
    FROM        namemaj
    WHERE       major = 'MATH'
You will get:
Command(s) completed successfully.
And now if you type:
    SELECT * INTO copy_of_new_view
    FROM   new_view
You will get:
(7 row(s) affected)
Now if you type:
    SELECT *
    FROM   copy_of_new_view
You will get the following 7 rows:
    sname                major
    -------------------- -----
    Mario                MATH
    Kelly                MATH
    Reva                 MATH
    Monica               MATH
    Sadie                MATH
    Stephanie            MATH
    Jake                 MATH

    (7 row(s) affected)
Column aliases in views
Column aliases can be used instead of column names in views. For example, type the following to create a view called namemaj2 with column aliases
:
    CREATE VIEW namemaj2 AS
    SELECT      sname AS [name], major AS [maj]
    FROM        Student
    WHERE       major = 'COSC'
You will get:
Command(s) completed successfully.
Then type:
    SELECT *
    FROM   namemaj2
This query produces the following 10 rows of output, with the column aliases in the column headings:
    name                 maj
    -------------------- ----
    Mary                 COSC
    Zelda                COSC
    Brenda               COSC
    Lujack               COSC
    Elainie              COSC
    Jake                 COSC
    Hillary              COSC
    Brad                 COSC
    Alan                 COSC
    Jerry                COSC

    (10 row(s) affected)
To use the column aliases in a query, the name of the view or table alias (in this case, a view alias) has to precede the column alias, as shown in this query:
    SELECT  namemaj2.[name], namemaj2.[maj]
    FROM    namemaj2
    WHERE   namemaj2.[name] LIKE 'J%'
This query produces the following output:
    name                 maj
    -------------------- ----
    Jake                 COSC
    Jerry                COSC

    (2 row(s) affected)
The same query could also be written as follows, where n is the table (view) alias:
    SELECT  n.[name], n.[maj]
    FROM    namemaj2 AS n
    WHERE   n.[name] LIKE 'J%'
Data in views
A view consists of a set of named columns and rows of data, just like a real table; however, a view has no data of its own. Data is stored only in the underlying table used to create the view, and not in the view. The view stores only the SELECT statement (rather than the actual data), and data is dynamically produced from the underlying table when the view is used. Therefore, views depend on the underlying tables and act like a filter on the underlying tables.
When data in the original table is changed, the view is automatically updated. Therefore, the view is always up to date. And, when data is changed through a view, the original (underlying) table is also automatically updated.
Changing data in views
To demonstrate how changing data through a view automatically updates the original table, begin with the following Employee table, which we created and used in Chapter 5:
    names           wage         hours
    --------------- ------------ -----------
    Sumon Bagui     10.0000      40
    Sudip Bagui     15.0000      30
    Priyashi Saha   18.0000      NULL
    Ed Evans        NULL         10
    Genny George    20.0000      40

    (5 row(s) affected)
Create a view called
Employee_viewfrom theEmployeetable, as follows:CREATE VIEW Employee_view AS SELECT names FROM EmployeeTo output the entire contents of the view, type the following query:
    SELECT *
    FROM   Employee_view
which produces the following output:
    names
    --------------------
    Sumon Bagui
    Sudip Bagui
    Priyashi Saha
    Ed Evans
    Genny George

    (5 row(s) affected)
To update the data in the view,
Employee_view, type the followingUPDATEquery:UPDATE Employee_view SET names = 'Mala Saha' WHERE names LIKE 'Priya%'
You will get:
(1 row(s) affected)
Now, to view the contents of the view,
Employee_view, type:SELECT * FROM Employee_viewThis query now produces the following output (the third name has changed):
    names
    --------------------
    Sumon Bagui
    Sudip Bagui
    Mala Saha
    Ed Evans
    Genny George

    (5 row(s) affected)
Then, view the contents of the underlying table by typing the following (and note that the third name of this table has changed too):
    SELECT *
    FROM   Employee
This now gives:
    names           wage         hours
    --------------- ------------ -----------
    Sumon Bagui     10.0000      40
    Sudip Bagui     15.0000      30
    Mala  Saha      18.0000      NULL
    Ed Evans        NULL         10
    Genny George    20.0000      40

    (5 row(s) affected)
If a row were added or deleted from the view,
Employee_view, the same change would also appear in the underlying table.Therefore, when adding, changing, or deleting data in views, you should always be very careful, because you do not want to unintentionally change the original underlying table. Remember that a view may sometimes be only a partial section of a table.
Changing data in tables
If data is changed in the original table, such as our Employee table, the same data in all the views related to this underlying table also gets changed.
Temporary Tables
In SQL Server 2005, temporary
tables reside in SQL Server 2005’s default temporary database, tempdb. Every time that SQL Server 2005 is stopped and restarted, a brand new copy of tempdb is built. So temporary tables are automatically destroyed when the user who created them disconnects from SQL Server 2005.
Though temporary tables involve extra storage as well as extra programming effort, temporary tables are useful for doing work that requires multiple passes to avoid doing repetitive work. Temporary tables are useful for doing work on a “picture of the data” in the database. As the name implies, no permanent storage of the temporary structure is anticipated; when the use of the temporary data is over, the table is deleted. Data in temporary tables is static and not reflective of updates to the original table(s). As with views, temporary tables may also allow you to develop SQL queries in a step-by-step manner and may be used to simplify complex queries.
Creating temporary tables
In SQL Server 2005, temporary tables are created in the same way that permanent tables are created; that is, with a CREATE TABLE or a SELECT INTO statement; however, temporary table names must begin with either # or ##.
Creating local temporary tables
Local temporary tables are created with # in front of the table name and are visible only to the user who is currently connected to the database. They are deleted when the user disconnects from this instance of SQL Server. They are local to the session in which they are created. Thus they are not visible in any other session, not even to one from the same host or login.
You cannot have foreign key constraints on a temporary table.
Tip
We discuss foreign key constraints in Chapter 11.
The general SQL Server 2005 syntax for creating a local temporary table is:
    SELECT column_name, ..., column_name INTO #local_temporary_tablename
    FROM permanent_tablename
    WHERE...
As an example of how to create a local temporary table, #Temp1, type the following SELECT query:
    SELECT s.sname, s.stno, d.dname, s.class INTO #Temp1
    FROM   Student s, Department_to_major d
    WHERE  s.major = d.dcode
    AND       (s.class = 1 or s.class = 2)
    AND       s.major = 'COSC';
You will get:
(6 row(s) affected)
This query creates a local temporary table called #Temp1. You can use #Temp1 as a regular table for this session. To view the data in #Temp1, type the following:
    SELECT *
    FROM   #Temp1
This query produces the following six rows of output:
    sname                stno  dname             class
    -------------------- ----- ----------------  -----
    Brenda               8     Computer Science  2
    Lujack               14    Computer Science  1
    Elainie              17    Computer Science  1
    Hillary              121   Computer Science  1
    Brad                 128   Computer Science  1
    Alan                 130   Computer Science  2

    (6 row(s) affected)
You can view the local temporary table from the tempdb under Object Explorer. From the Object Explorer, click Databases, System Databases, tempdb, and then Temporary Tables. You will see the temporary table, #Temp1, as shown in Figure 6-4.
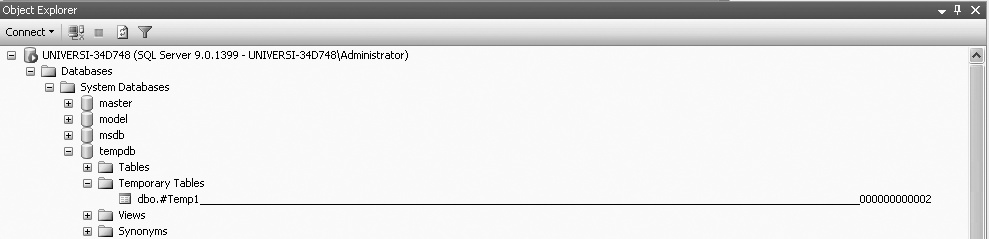
As in Figure 6-4, in SQL Server 2005, the local temporary table that you create is appended by a system generated suffix—a 12-digit number with leading zeros. The local temporary table name that you provide cannot be more than 116 characters, allowing 128 characters for the name of the local temporary table. This is done by SQL Server because SQL Server allows a number of sessions to create a local temporary table with the same name without the names colliding with each other.
Creating global temporary tables
Global temporary tables are created with a prefix of ##. Global temporary tables can be accessed by anyone who logs onto the database, as long as the creator of the global temporary table is still logged on. The global temporary table will be dropped automatically when the session that created it ends and when all other processes that reference it have stopped referencing it. Therefore, even though the process that created the table may have ended, if another process is still using it, then it will still be alive.
The general SQL Server syntax for creating a global temporary table is:
    SELECT column_name, ..., column_name INTO ##global_temporary_tablename
    FROM permanent_tablename
    WHERE...
As an example of how to create a global temporary table, type the following SELECT query:
    SELECT s.sname, s.stno, d.dname, s.class INTO ##Temp1
    FROM   Student s, Department_to_major d
    WHERE  s.major = d.dcode
    AND       (s.class = 1 or s.class = 2)
    AND       s.major = 'COSC';
You will get:
(6 row(s) affected)
This query creates a global temporary table called ##Temp1. You can use ##Temp1 as a regular table for this session. To view the data in ##Temp1, type the following:
    SELECT *
    FROM   ##Temp1
You will get the same output given previously (for the local temporary table).
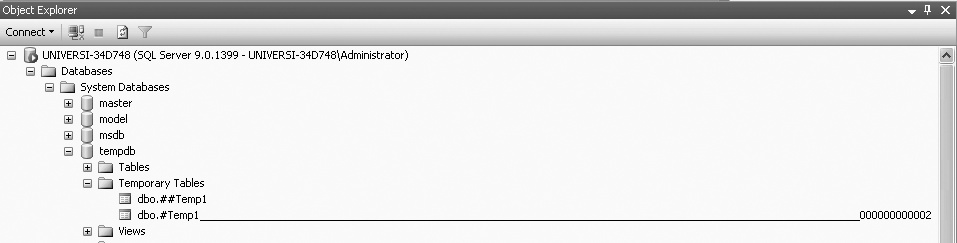
A global temporary table can also be viewed from the tempdb option of the Object Explorer. From the Object Explorer, click Databases, System Databases, tempdb, and then Temporary Tables, and you will see the global temporary table, ##Temp1, as shown in Figure 6-5.
Tip
Unlike with views, updating data in local or global temporary tables does not change the data in the underlying original table.
You will note that, unlike the local temporary table, the global temporary table does not have a system generated suffix attached to the name of the global temporary table. In fact, when creating global temporary tables, you have to be careful that one with the same name does not already exist, so as to prevent collisions between tables in any one session. There can be only one instance of a global temporary table with any particular name.
For example, if you type the following query and try to create another global temporary called ##Temp1:
    SELECT s.sname, s.stno, d.dname, s.class INTO ##Temp1
    FROM   Student s, Department_to_major d
    WHERE  s.major = d.dcode
    AND       (s.class = 1 or s.class = 2)
    AND       s.major = 'MATH';
You will get the following error message:
    Msg 2714, Level 16, State 6, Line 1
    There is already an object named '##Temp1' in the database.
Deleting temporary tables
If you want to delete a temporary table (local or global) before ending the session, you can use the DROP TABLE statement, just as you would to delete a permanent table.
For example, with the following query
DROP TABLE ##Temp1
you will get this message:
Command(s) completed successfully.
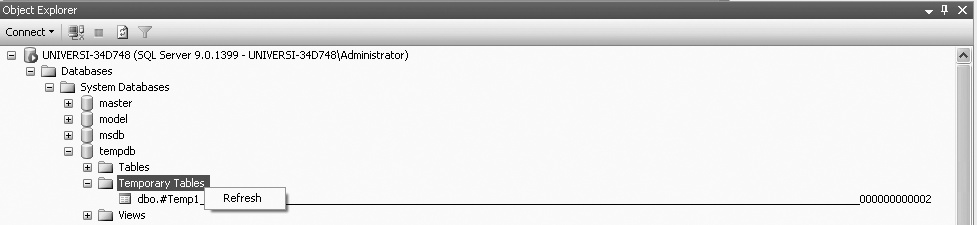
To view this change (drop), click on select Temporary Tables and then select Refresh, and you will see that the temporary table ##Temp1 no longer exists, as shown in Figure 6-6.
Query Development with Derived Structures
In this section, we discuss how derived structures such as views and temporary tables can be used in query development.
To illustrate this process, we will list from our standard database, Student_course, the name, student number, and department name of students who are freshman or sophomores and computer science majors.
In Step 1, we will develop a query, and in Step 2, we will show how to use this query with derived structures. In Step 2, Option 1 shows how the query can be turned into a view, Option 2 shows how the query can be turned into an inline view, and Option 3 shows how the query can be used to create a temporary table.
Step 1: Develop a Query Step by Step
The first step is to see which columns we need and in which tables these columns are found. We need student names (
sname) and numbers (stno), which are found in theStudenttable. Department names (dname) are found in theDepartment_to_majortable. To find the department names that correspond to the student majors, we have to combine theStudentandDepartment_to_majortables. To combine these two tables, we will join the tables wheremajorfrom theStudenttable joins with thedcodefrom theDepartment_to_majortable as follows (because the statements eventually will be filtered byclass, we includeclassin the result set):SELECT s.sname, s.stno, d.dname, s.class FROM Student s, Department_to_major d WHERE s.major = d.dcodeAfter you type the query and run it, you will get the following 45 rows of output:
sname stno dname class -------------------- ------ -------------------- ------ Lineas 2 English 1 Mary 3 Computer Science 4 Zelda 5 Computer Science NULL Ken 6 Political Science NULL Mario 7 Mathematics NULL Brenda 8 Computer Science 2 Romona 9 English NULL Richard 10 English 1 Kelly 13 Mathematics 4 Lujack 14 Computer Science 1 Reva 15 Mathematics 2 Elainie 17 Computer Science 1 Harley 19 Political Science 2 Donald 20 Accounting 4 Chris 24 Accounting 4 Jake 31 Computer Science 4 Lynette 34 Political Science 1 Susan 49 English 3 Monica 62 Mathematics 3 Bill 70 Political Science NULL Hillary 121 Computer Science 1 Phoebe 122 English 3 Holly 123 Political Science 4 Sadie 125 Mathematics 2 Jessica 126 Political Science 2 Steve 127 English 1 Brad 128 Computer Science 1 Cedric 129 English 2 Alan 130 Computer Science 2 Rachel 131 English 3 George 132 Political Science 1 Jerry 142 Computer Science 4 Cramer 143 English 3 Fraiser 144 Political Science 1 Harrison 145 Accounting 4 Francis 146 Accounting 4 Smithly 147 English 2 Sebastian 148 Accounting 2 Losmith 151 Chemistry 3 Genevieve 153 NULL NULL Lindsay 155 NULL 1 Stephanie 157 Mathematics NULL Gus 160 Art 3 Benny 161 Chemistry 4 Jake 191 Mathematics 2 (45 row(s) affected)To find all the freshmen and sophomores (class 1 and 2) from the
Studenttable, addAND (s.class = 1 or s.class = 2)to the end of the previous query, as follows:SELECT s.sname, s.stno, d.dname, s.class FROM Student s, Department_to_major d WHERE s.major = d.dcode AND (s.class = 1 or s.class = 2)Running this query produces the following 21 rows of output:
sname stno dname class -------------------- ------ -------------------- ------ Lineas 2 English 1 Brenda 8 Computer Science 2 Richard 10 English 1 Lujack 14 Computer Science 1 Reva 15 Mathematics 2 Elainie 17 Computer Science 1 Harley 19 Political Science 2 Lynette 34 Political Science 1 Hillary 121 Computer Science 1 Sadie 125 Mathematics 2 Jessica 126 Political Science 2 Steve 127 English 1 Brad 128 Computer Science 1 Cedric 129 English 2 Alan 130 Computer Science 2 George 132 Political Science 1 Fraiser 144 Political Science 1 Smithly 147 English 2 Sebastian 148 Accounting 2 Lindsay 155 NULL 1 Jake 191 Mathematics 2 (21 row(s) affected)Now that we have the department names of all the freshmen and sophomores, we need to find the computer science majors from this group, so we add
AND s.major = 'COSC'to the previous query as follows:SELECT s.sname, s.stno, d.dname, s.class FROM Student s, Department_to_major d WHERE s.major = d.dcode AND (s.class = 1 or s.class = 2) AND s.major = 'COSC'This query produces the following output (six rows), which finally gives us the student name, student number, and department name of students who are freshman or sophomores and computer science majors:
sname stno dname class -------------------- ------ -------------------- ------ Brenda 8 Computer Science 2 Lujack 14 Computer Science 1 Elainie 17 Computer Science 1 Hillary 121 Computer Science 1 Brad 128 Computer Science 1 Alan 130 Computer Science 2 (6 row(s) affected)Note that in each case where we add more filtering in the
WHEREclause, the number of rows declines. If the number of rows does not decline, that could represent a problem.
Step 2: Using a Derived Structure
This step shows how the previous query (developed in Step 1) can be turned into a view (Option 1), inline view (Option 2), or temporary table (Option 3). Each one of these derived structures will produce the same end results, so as you develop your own queries, you may use whichever derived structure you become most comfortable with and/or is most appropriate.
Option 1: Turning your query into a view
To create a view (called stu_view) using the previous example query, type:
CREATE VIEW stu_view AS
    SELECT s.sname, s.stno, d.dname, s.class
    FROM   Student s, Department_to_major d
    WHERE  s.major = d.dcode
AND (s.class = 1 or s.class = 2)
AND s.major = 'COSC'You can now SELECT from the view by typing:
SELECT *
FROM stu_view
WHERE sname LIKE 'BR%'This query produces the following output, which includes all the names in the view stu_view that start with “Br”:
sname stno dname class
-------------------- ------ -------------------- ------
Brenda 8 Computer Science 2
Brad 128 Computer Science 1
(2 row(s) affected)Remember that the view always reflects the database as it is, and a view takes up no extra storage in the database, because no data is stored in a view.
Option 2: Using an inline view
You can also place a query in the FROM clause of a SELECT statement and thereby create what is called an inline view. An inline view exists only during the execution of a query. The main purpose of an inline view is to simplify the development of a one-time query. In a typical development scenario, a person would probably devise a SELECT statement, test it, examine the result, wrap it in parentheses, and continue with the development by using the inline view.
Follow these general steps to develop an inline view:
Develop a query:
SELECT column1, column2, ... FROM TableName WHERE ...Wrap the results into parentheses and make it into an inline view:
SELECT * FROM (SELECT column1, column2, ... FROM TableName WHERE ...)Display the columns in the inline view:
SELECT v.column1, v.column2, ... FROM (SELECT column1, column2, ... FROM TableName WHERE ...) v
You could then proceed to make the previous query an inline view and add more complexity as needed. The beauty of creating a query in steps is that you can examine each step using counts and TOP qualifiers to see whether you’re heading in the right direction.
Let’s look at an example of an inline view for our sample problem. In this example, we create the same view as previously inline -- that is, we create the view on the fly, give it an alias of v, and use it just as we would use a stored table or view, as follows:
SELECT v.sname, v.dname, v.class
FROM (SELECT s.sname, s.stno, d.dname, s.class
FROM Student AS s, Department_to_major AS d
WHERE s.major = d.dcode
AND (s.class = 1 or s.class = 2)
AND s.major = 'COSC') AS vThis query produces the following six rows of output:
sname dname class
-------------------- -------------------- ------
Brenda Computer Science 2
Lujack Computer Science 1
Elainie Computer Science 1
Hillary Computer Science 1
Brad Computer Science 1
Alan Computer Science 2
(6 row(s) affected)In the final result set of the outer query, the column names reference the names used in the inline view result set.
Option 3: Using a global temporary table
To create a global temporary table (called ##Temp2) using the query developed in Step 1, type:
SELECT s.sname, s.stno, d.dname, s.class INTO ##Temp2
FROM Student s, Department_to_major d
WHERE s.major = d.dcode
AND (s.class = 1 or s.class = 2)
AND s.major = 'COSC'Once you run or execute your query, you have created a temporary table called ##Temp2.
Now if you type:
SELECT *
FROM ##Temp2You should get the following six rows of output, which should be exactly the same as you received in the other options:
    sname                stno   dname                class
    -------------------- ------ -------------------- ------
    Brenda               8      Computer Science     2
    Lujack               14     Computer Science     1
    Elainie              17     Computer Science     1
    Hillary              121    Computer Science     1
    Brad                 128    Computer Science     1
    Alan                 130    Computer Science     2

(6 row(s) affected)In all the examples of views and temporary tables, the SQL programmer weighs programming effort (individual and team), storage costs, and query efficiency to choose which structure is appropriate.
Summary
In this chapter, we provided you with an overview of different derived structures available in SQL Server. Each of these derived structures has its own advantages and disadvantages, and once you have knowledge of the different derived structures, it is up to you to select the derived structure that you wish to use to make your work easier or more efficient. Oftentimes it is not easy to formulate a query all at once. The derived structures will help you formulate your queries in a more systematic step-by-step manner.
Review Questions
Which has precedence,
ANDorOR?Why do we need derived structures?
What is a view?
List some advantages of using views.
List some advantages of using temporary tables.
Can temporary tables replace views in all cases?
What is the difference between a view and temporary table?
What is the difference between a local temporary table and global temporary table?
If data is changed in a view, is it changed in the original table?
If data is changed in a temporary table, does it automatically change data in the original table?
What happens to local temporary tables after the session has been ended?
What happens to global temporary table after the session has been ended?
Which type of temporary table has a system-generated suffix attached to it? What does this suffix mean?
Why are inline views helpful?
In SQL Server, is the
ORDER BYclause allowed during the creation of a view?Is
SELECT INTOallowed in a view? Why or why not?Where is the data stored in a view?
How do you delete views?
How do you delete a temporary table?
Do you need to delete a local temporary table? Why or why not?
Which operators have the highest/lowest precedence?
In SQL Server, if a column of
FLOATdata type were divided by a column ofREALdata type, what data type would the resulting column have? (Hint: refer to the section on Data Type Preference.)Is an
ORDER BYclause necessary when you use aDISTINCT? Why or why not?
Exercises
Unless specified otherwise, use the Student_course database to answer the following questions. Also, use appropriate column headings when displaying your output.
Develop and execute a query to find the names of students who had
HERMANOas an instructor and earned a grade of B or better in the class. Develop the query by first finding sections whereHERMANOwas the instructor. Save this query. Edit the query and modify it to join theSectiontable with theGrade_reporttable. Add thegradeconstraint.Using the
Studenttable, create a duplicate table calledStutabthat contains all rows from theStudenttable. Hint: Look at the design of theStudenttable to see the columns and their definitions. Create theStutabtable with aCREATE TABLEcommand. Insert data intoStutabusing theINSERT INTO .. SELECToption.Using the newly created
Stutabtable:List student names and majors of the juniors and seniors.
List student names of the COSC majors.
Create a view (call it
vstu) that contains student names and majors for the COSC majors.List the student names and majors from
vstuin descending order by name.Modify a row in your view of your table so that a student changes his or her major.
Display of the view. Did modifying the view,
vstu, also change the parent table,Stutab?Try to modify the view again, but this time, change the major to
COMPSC--an obviously invalid column in theStutabtable, because the column was defined as four characters. Can you do it? What happens?Using
Stutab, create a local temporary table (call it#stutemp) that contains student names and majors for the COSC majors.List the student names and majors from
#stutempin ascending order by name.Modify a row in
#stutempso that a student changes his or her major.Display the local temporary table. Did modifying your temporary table,
#stutemp, also change the parent table,Stutab.Try to modify the local temporary table again, but this time change the major to
COMPSC--again, an obviously invalid field inStutab, because the field was defined as four characters. Can you do it? What happens?Using
Stutab, create a global temporary table (call it##gstutemp) that contains student names and majors for the COSC majors.List the student names and majors from
##gstutempin ascending order by name.Modify a row in
##gstutempso that a student changes his or her major.Display the global temporary table. Did modifying your temporary table,
##gstutemp, also change the parent table,Stutab.Try to modify the global temporary table again, but this time change the major to
COMPSC--again, an obviously invalid field inStutab, because the field was defined as four characters. Can you do it? What happens?Create an inline view (call it
invstu) that contains student names and majors for COSC majors.
Perform an experiment to determine the precedence in a query with three conditions linked by
ANDandOR. Which precedence is followed:AND,OR, or left-to-right?Run this query:
    SELECT *
    FROM   Student
    WHERE  stno < 100 AND major = 'COSC' OR major = 'ACCT'
Then run the following two queries and determine which one gives you the same output as the preceding non parenthesized statement:
    SELECT *
    FROM   Student
    WHERE  (stno < 100 AND major = 'COSC') OR major = 'ACCT'
or:
    SELECT *
    FROM   Student
    WHERE  stno < 100 AND (major = 'COSC' OR major = 'ACCT')
What happens if you put the
ORfirst instead of theANDand run the query without parentheses?Develop a query to find the instructor name and course name for computer science courses (use the
Sectiontable).Convert your query into a view.
Convert the query into an inline view with column aliases and test it.
Include an
ORDER BYclause outside of the inline view in the main query and run your query again.