
Chapter 11. Indexes and Constraints on Tables
In previous chapters, we concentrated primarily on retrieving information from existing tables. This chapter revisits the creation of tables, but focuses on how indexes and constraints can be added to tables to make the tables more efficient and to increase the integrity of the data in the tables (and hence in the database). Referential integrity constraints and other constraints are also discussed.
SQL Server 2005 does not need indexes to successfully retrieve results for a SELECT statement. But, an index may speed up queries and searches on the indexed columns and may facilitate sorting and grouping operations. As tables get larger, the value of using proper indexes becomes more of an issue. Indexes can be used to find data quickly that satisfy conditions in a WHERE clause, find matching rows in a JOIN clause, or to efficiently maintain uniqueness of the key columns during INSERTs and UPDATEs.
Constraints are a very powerful ways to increase the data integrity in a database. Integrity implies believability and correctness. Any data that destroys the sense of correctness is said to lack integrity. For example, a constraint is used to establish relationships with other tables. A violation of integrity would be, for instance, if a nonexistent referenced row were included in the relationship. The CONSTRAINT clause can be used with the CREATE TABLE and the ALTER TABLE statements to create constraints or delete constraints, respectively.
The “Simple” CREATE TABLE
You have seen a “simple” CREATE TABLE statement in Chapter 3. To refresh your memory, here is an example:
CREATE TABLE Test1
  (name            VARCHAR(20),
   ssn             CHAR(9),
   dept_number     INT,
   acct_balance    SMALLMONEY)
The following are the elements of this CREATE TABLE command:
We created a table called
Test1.nameis a variable-length character string with maximum length of 20ssn(Social Security number) is a fixed-length character string of length 9dept_numberis an integer (which in SQL Server 2005 simply means no decimals allowed)acct_balanceis a currency column
Beyond choosing data types for columns in tables, you may need to make other choices to create an effective database. You can create indexes
on tables, which then can be used to aid in the enforcement of certain validation rules. You also can use other “add-ons” called CONSTRAINTs, which make you enter good data (or, prevents you from entering invalid data into the database) and hence maintain the integrity of a database. In the following sections, we explore indexes and then CONSTRAINTs.
Indexes
SQL Server 2005 allows you to create several indexes on a table. In SQL Server 2005, it is the job of the query optimizer to determine which indexes will be the most useful in processing a specific query. Although indexes may speed up queries in large tables, indexes will slow update operations (insert, delete, update), because every update causes a rebuild of the index. We begin by introducing the “simple” CREATE INDEX statement.
The “Simple” CREATE INDEX
The CREATE INDEX statement is used to create a new index on some column in an existing table. The following is the general syntax for the CREATE INDEX statement:
CREATE INDEX index_name
ON Tablename (column [ASC | DESC])
For example, if we wanted to create an index called ssn_ndx on the ssn column, in descending order of ssn, for the Test1 table, we would type the following:
CREATE INDEX ssn_ndx
ON Test1 (ssn DESC)
You will get:
Command(s) completed successfully.
This result means that the index was successfully created. Although the user has the option of setting the column in ascending (ASC) or descending (DESC) order, if DESC is not included, the index will be created in ascending order, because ASC is the default order for indexes
.
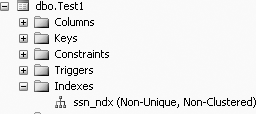
To view the index that you just created, click on the + sign beside the newly created table, Test1, and then click on the + sign beside the Indexes node, and you will be able to see that index that we just created, ssn_ndx, and you will get Figure 11-1.
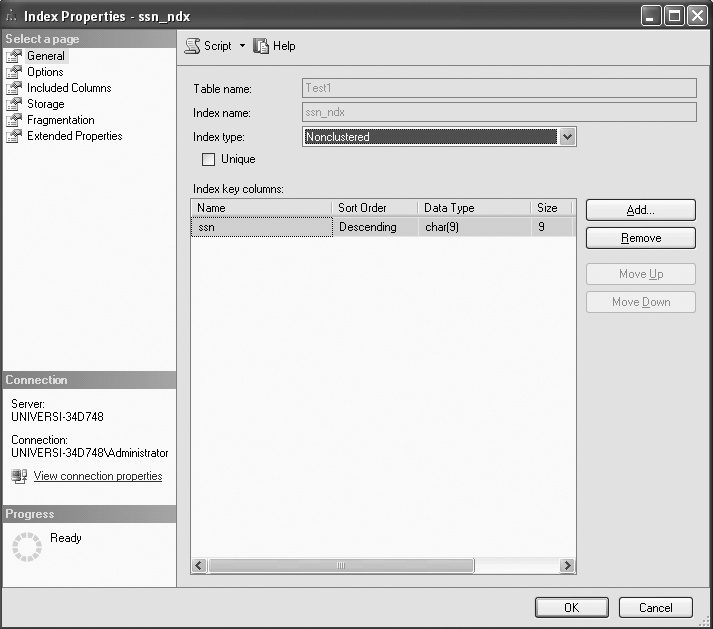
Now, to see if this index, ssn_ndx, is in ascending order or descending order, right-click on the index, ssn_ndx and select Properties, and you will get Figure 11-2. Figure 11-2 shows that this index, ssn_ndx, is in descending order, indexed by the ssn column.
Also from Figure 11-2, to add more columns to the index key, we can click Add; to remove columns from the index key, we can select the key and then click Remove.
To prevent duplicate values in indexed columns, you must use the UNIQUE option in the CREATE INDEX statement, as follows:
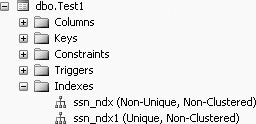
CREATE UNIQUE INDEX ssn_ndx1
ON Test1 (ssn DESC)
This query will create the unique index, ssn_ndx1, as shown in Figure 11-3.
The UNIQUE option can be used on columns that will not be a primary key in a table. A primary key is a key or field that uniquely identifies a row in a table.
The UNIQUE option will disallow duplicate entries for a column even though the column is not a primary key in a table. NULLs are allowed in nonprimary key indexes.
Deleting Indexes Using SQL
You can use a DROP INDEX statement to delete an index in SQL. The general format of the DROP INDEX statement is as follows:
DROP INDEX Table_name.index_name
For example, to delete the index ssn_ndx1 created on Test1, you would type the following:
DROP INDEX Test1.ssn_ndx1
Unused indexes slow data modification without helping retrieval. So, if you have indexes that are not being used, you should delete (drop) them. All indexes will automatically get deleted (dropped) if the table is deleted.
Constraints
As with indexes, constraints can be added to tables. As explained previously, constraints are added to give tables more integrity. In this section, we discuss some of the constraints available in SQL Server 2005: the NOT NULL
constraint, the PRIMARY KEY constraint, the UNIQUE constraint, the CHECK constraint, and a few referential constraints.
The NOT NULL Constraint
The NOT NULL constraint is an integrity CONSTRAINT that allows the database creator to deny the creation of a row where a column would have a null value. Usually, a null signifies a missing data item. As discussed in previous chapters, nulls in databases present an interpretation problem—do they mean not applicable, not available, unknown, or what? If a situation in which a null is present could affect the integrity of the database, then the table creator can deny anyone the ability to insert nulls into the table for that column. To deny nulls, we can create a table with the NOT NULL constraint on a column(s) after the data type. The following example shows how to include the NOT NULL constraint using a CREATE TABLE statement:
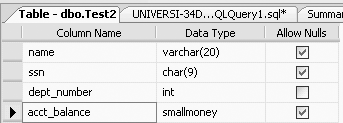
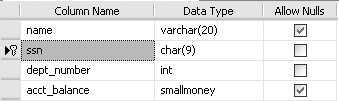
CREATE TABLE Test2
 (name                 VARCHAR(20),
  ssn                  CHAR(9),
  dept_number          INT NOT NULL,
  acct_balance         SMALLMONEY)
In this newly created table, Test2, the dept_number column, now has a NOT NULL constraint included (and the Allow Nulls option is unchecked, as shown in Figure 11-4).
The NOT NULL constraint can also be added to the column after the table has been created. You can check the Allow Nulls option of the dept_number column in Figure 11-4, or you can use SQL to do this. To do this in SQL, you will have to use the ALTER TABLE command, as we illustrate in the following example.
Suppose that we created the Test2 table as follows:
CREATE TABLE Test2
  (name             VARCHAR(20),
   ssn              CHAR(9),
   dept_number      INT,
   acct_balance     SMALLMONEY)
Now, we want to add a NOT NULL constraint (using SQL) after the table has been created. To do so, we must use the ALTER COLUMN option within the ALTER TABLE statement, with the following general syntax:
ALTER TABLETablenameALTER COLUMNcolumn_name column_type(size) NOT NULL
So, to set the dept_number column in the Test2 table to NOT NULL, we would type the following:
ALTER table Test2
ALTER COLUMN dept_number INTEGER NOT NULL
This query will give us the same table definition that we got in Figure 11-4.
But you need to understand the following three things about the ALTER COLUMN extension of the ALTER TABLE statement:
You will get following error message:
Msg 156, Level 15, State 1, Line 2
Incorrect syntax near the keyword 'NOT'.
If you type only the column
type, without the columnsize, the columnsizewill reset to the default maximum size of the data type.You cannot put a
NOT NULLconstraint on a column that already contains nulls.
The PRIMARY KEY Constraint
When creating a table, a PRIMARY KEY constraint will prevent duplicate values for the column(s) defined as a primary key. Internally, the designation of a primary key also creates a primary key index.
Designation of a primary key will be necessary for the referential integrity constraints that follow. The designation of a primary key also automatically puts the NOT NULL constraint in the definition of the column(s), as you will see in an example later in the chapter. A fundamental rule of relational database is that primary keys cannot be null.
One of the following three options can be used to set the primary key.
Option 1
The first option is to declare the primary key while creating the table, in the CREATE TABLE statement. Here, the PRIMARY KEY constraint is added to the column upon creation:
CREATE TABLE Test2a
  (ssn    CHAR(9)       CONSTRAINT ssn_pk PRIMARY KEY,
   name   VARCHAR2(20),  etc.
ssn_pk is the name of the PRIMARY KEY constraint for the ssn column. It is conventional to name all CONSTRAINTs (although most people often do not bother to name NOT NULL constraints).
The following two options of setting the primary key are preferable because they provide greater flexibility.
Option 2
The second option available to create a primary key is called the table format, in which the CREATE TABLE looks like the following:
CREATE TABLE Test2a
  (ssn              CHAR(9),
    blah blah ..,
    acct_balance    NUMBER,
    CONSTRAINT ssn_pk PRIMARY KEY (ssn))
Option 3
The third option available to create a primary key is to add the stipulation of the PRIMARY KEY post hoc by using the ALTER TABLE command. The syntax for the PRIMARY KEY in the ALTER TABLE command would be as follows:
ALTER TABLE Tablename
ADD CONSTRAINT constraint_name PRIMARY KEY (column_name(s))
So, to make ssn a primary key column in Test2, we could type the following:
ALTER TABLE Test2
ADD CONSTRAINT ssn_pk PRIMARY KEY (ssn)
But, once you type in that syntax, you will receive the following error message:
Msg 8111, Level 16, State 1, Line 1
Cannot define PRIMARY KEY constraint on nullable column in table 'Test2'.
Msg 1750, Level 16, State 0, Line 1
Could not create constraint. See previous errors.
This error occurs because SQL Server 2005 does not allow you to define a primary key on a column that has not been specified as NOT NULL. So, we need to first make ssn a column that will not accept nulls as follows:
ALTER TABLE Test2
ALTER COLUMN ssn CHAR(9) NOT NULL
The design of the Test2 table will now be as in shown in Figure 11-5.

Now we can type the following command to create the primary key:
ALTER TABLE Test2
ADD CONSTRAINT ssn_pk PRIMARY KEY (ssn)
Figure 11-6 shows the primary key constraint that we just created (note the key icon on the left of the ssn column).
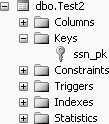
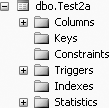
You can view this ssn_pk constraint by clicking the + sign beside Test2, and then clicking the + sign beside the Keys node. You will get the results shown in Figure 11-7.
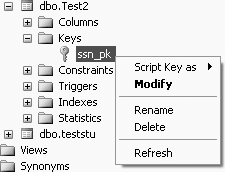
You can modify, rename, delete, or refresh this ssn_pk constraint by right-clicking ssn_pk, as shown in Figure 11-8.
Concatenated primary keys
In relational databases, it is sometimes necessary to define more than one column as the primary key. When more than one column makes up a primary key, it is called a concatenated primary key. In SQL Server 2005, however, you cannot directly designate a concatenated primary key with a statement like the following:
CREATE TABLE Test2a
  (ssn      CHAR(9)       PRIMARY KEY,
   salary   INT           PRIMARY KEY)
This query will give the following error message:
Msg 8110, Level 16, State 0, Line 1
Cannot add multiple PRIMARY KEY constraints to table 'Test2a'.
In SQL Server 2005, you can define the concatenated primary key in the following way:
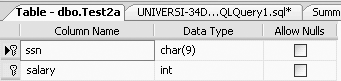
CREATE TABLE Test2a
  (ssn       CHAR(9),
   salary    INT,
   CONSTRAINT ssn_salary_pk      PRIMARY KEY  (ssn, salary))
The table definition of the Test2a table will now be as shown in Figure 11-9.
Or, you can create the concatenated primary key in two separate statements, first with a CREATE TABLE:
CREATE TABLE Test2b
  (ssn      CHAR(9)     NOT NULL,
   salary   INT         NOT NULL)
Then, with an ALTER TABLE:
ALTER TABLE Test2b
ADD CONSTRAINT ssn_salary_pk1 PRIMARY KEY (ssn, salary)
This query will produce the same table definition as was shown in Figure 11-9.
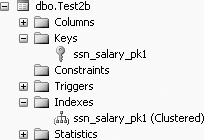
We called this latter constraint ssn_salary_pk1, because you cannot have another constraint called ssn_salary_pk (which was a constraint created for table Test2a). Figure 11-10 shows the constraints created for table Test2b. Note that the constraint shows up not only as a key constraint, but also as an index.
Another example of a concatenated primary key. Suppose that we have a new table in our database, Grade1, which has columns student_number, section_id, and grade. Further suppose that a grade cannot be determined by either the student_number or section_id alone. Because both these columns (together) are required to uniquely identify a grade, the student_number and section_id will have to be the concatenated primary key of the Grade1 table.
The CREATE TABLE and ALTER TABLE sequence for creating the Grade1 table with the concatenated primary key as is shown next. First we create the Grade1 table:
CREATE TABLE Grade1
  (student_number    CHAR(9) NOT NULL,
   section_id        CHAR(9) NOT NULL,
   grade             CHAR(1))
Then we define the concatenated primary key:
ALTER TABLE Grade1 ADD CONSTRAINT snum_section_pk
     PRIMARY KEY (student_number, section_id)
Figure 11-11 gives the table definition of table Grade1.
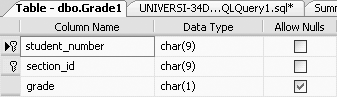
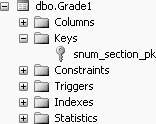
Figure 11-12 shows the constraint snum_section_pk.
The UNIQUE Constraint
Like PRIMARY KEY, UNIQUE is another column integrity constraint. UNIQUE is different from PRIMARY KEY in three ways:
UNIQUEkeys can exist in addition to (or without) thePRIMARY KEY.UNIQUEdoes not necessitateNOT NULL, whereasPRIMARY KEYdoes.There can be more than one
UNIQUEkey, but only onePRIMARY KEY.
As an example of using the UNIQUE constraint, suppose that we created a table of names and occupational titles in which everyone was supposed to have a unique title. Further suppose that the table had an employee number as a primary key. The statement to create the table might look like the following:
CREATE TABLE Emp
 (empno      INT,
  name       VARCHAR(20),
  title      VARCHAR(20),
  CONSTRAINT   empno_pk     PRIMARY KEY (empno),
  CONSTRAINT   title_uk     UNIQUE (title))
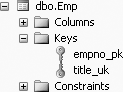
Figure 11-13 shows the table definition of the newly created Emp table.
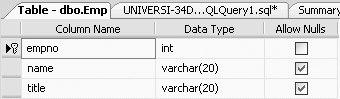
From Figure 11-13, we can see that both the empno and title fields will not allow nulls, as empno is defined as a primary key and title is defined as unique.
Figure 11-14 shows the empno_pk and title_uk constraints of the Emp table.
In SQL Server 2005, when you declare a PRIMARY KEY
or UNIQUE constraint, internally a unique index is created just as if you had used the CREATE INDEX command. In terms of internal storage and maintenance of indexes in SQL Server 2005, there is no difference between unique indexes created using the CREATE INDEX command and indexes created using the UNIQUE constraint. In fact, an index is a type of a constraint. When it comes to the query optimizer, how the index was created is irrelevant to the query optimizer. The query optimizer makes decisions based on the presence of a unique index.
The CHECK Constraint
In addition to the NOT NULL, PRIMARY KEY and UNIQUE constraints, we can also include a CHECK constraint on our column definitions in SQL Server 2005. A CHECK constraint will disallow a value that is outside the bounds of the CHECK. Consider the following example:
CREATE TABLE StudentA
(ssn CHAR(9),
class INT
CONSTRAINT class_ck CHECK (class BETWEEN 1 AND 4),
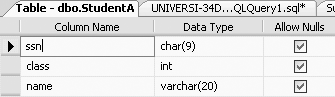
name VARCHAR(20))This query will give the table definition of table StudentA as shown in Figure 11-15.
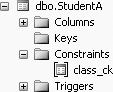
To view the CHECK constraint, click the + sign beside table StudentA, and then click the + sign beside Constraints, and you will get Figure 11-16.
Once the CHECK constraint has been added, we could not, for example, successfully execute the following INSERT:
INSERT INTO StudentA VALUES ('123456789', 5, 'Smith')We would get the following error message:
Msg 547, Level 16, State 0, Line 1
The INSERT statement conflicted with the CHECK constraint "class_ck". The conflict
occurred in database "Student_course", table "dbo.StudentA", column 'class'.
The statement has been terminated.
This error occurs because the values of the column class have to be between 1 and 4 (and we tried to insert 5). We could however, enter a null value for class, which technically does not violate the integrity constraint (unless we specify so by making class also NOT NULL).
Deleting a Constraint
The following is the general SQL syntax to delete any named constraint:
ALTER TABLE Tablename
DROP CONSTRAINT constraint_name
For example, in table Test2a we created a constraint called ssn_salary_pk, which made both the ssn and salary columns primary keys of Test2a. If we want to delete this constraint, which means making both the ssn and salary columns just regular columns (and not primary keys), we would type the following:
ALTER TABLE Test2a
DROP CONSTRAINT ssn_salary_pk
Now the table definition of table Test2a will appear as shown in Figure 11-17. As can be seen from Figure 11-17, the primary keys are no longer marked, as was shown in Figure 11-9.
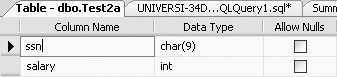
Figure 11-18 also shows no constraints
for table Test2a.
Referential Integrity Constraints
A relational database consists of relations (tables) and relationships between tables. To define a relationship between two tables, we create a referential integrity constraint. A referential integrity constraint is one in which a row in one table (with a foreign key) cannot exist unless a value (column) in that row refers to a primary key value (column) in another table. This is a primary key-foreign key relationship between two tables. For example, suppose we have the following two tables:
Tip
A foreign key is a column in one table that is used to link that table to another table in which that column is a primary key. Relationships are implemented in relational databases through foreign keys/primary key relationships.
To maintain referential integrity, it would be inappropriate to enter a row (tuple) in the Employee table that did not have an existing department number already defined in the Department table. To try to insert the following row into the Employee table would be a violation of the integrity of the database, because department number 4 does not exist (that is, it has no integrity):
<105,'Walsh',4>
Likewise, it would be invalid to try to change a value in an existing row (that is, perform an UPDATE) to make it equal to a value that does not exist. If, for example, we tried to change:
<100,'Jones',2>
to:
<100,'Jones',5>
This operation would violate database integrity, because there is no department 5.
Finally, it would be invalid to delete a row in the Department table that contains a value for a department number that is already in the Employee table. For example, if:
<2,'Personnel'>
were deleted from the Department table, then the row:
<100,'Jones',2>
would refer to a nonexistent department. It therefore would be a reference or relationship with no integrity.
In each case (INSERT, UPDATE, and DELETE), we say that there needs to be a referential integrity constraint on the dept column in the Employee table referencing deptno in the Department table. When this primary key (deptno in the Department table)-foreign key (dept in the Employee table) relationship is defined, we have defined the relationship of the Employee table to the Department table.
In the INSERT and UPDATE cases discussed earlier, you would expect (correctly) that the usual action of the system would be to deny the action. In SQL Server 2005, in the case of the DELETE and UPDATE commands, there is an option available that will allow us to CASCADE the DELETE or UPDATE operations respectively. Whereas an “ordinary” referential integrity constraint would simply disallow the deletion of a row where the referenced row would be orphaned, a CASCADEd delete would delete the referencing row as well. If, for example, in the previous data we deleted department 3, in a CASCADEd delete situation, the referencing row in the Employee table, <104,Harris,3>, would be deleted as well.
Defining the referential integrity constraint
To enable a referential integrity constraint, it is necessary for the column that is being referenced to be first defined as a primary key. In the preceding Employee-Department example, we have to first create the Department table with a primary key. The CREATE TABLE statement for the Department table (the referenced table) could look like this:
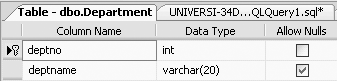
CREATE TABLE Department
 (deptno       INT,
  deptname     VARCHAR(20),
  CONSTRAINT   deptno_pk   PRIMARY KEY (deptno))
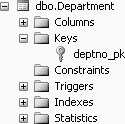
The table definition of the Department table would then be as shown in Figure 11-19.
The constraints for the Department table would be as shown in Figure 11-20.
The Employee table (the referencing table containing the foreign key) would then be created using this statement:
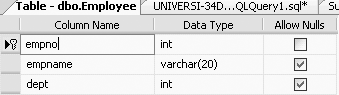
CREATE TABLE Employee
  (empno   INT CONSTRAINT   empno_pk1 PRIMARY KEY,
   empname VARCHAR(20),
   dept    INT CONSTRAINT   dept_fk     REFERENCES   Department(deptno))
The table definition of the Employee table would then be as shown in Figure 11-21.
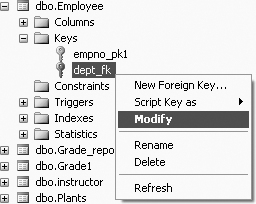
Now, to view the referential integrity constraints of the Employee table, click the + sign beside Employee and then click the + sign beside Keys, you will get Figure 11-22.
To modify the foreign key, right-click dept_fk and select Modify, as shown in Figure 11-23.
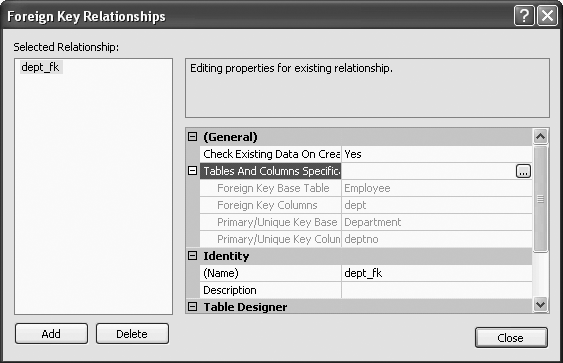
You will get the results shown in Figure 11-24. You can expand the Table And Columns Specification option (under General), and you will be able to see what the foreign key base table is (that is, the table with the foreign key, which in this case is the Employee table), what the foreign key columns are (in this case, dept), what the primary/unique key base table is (that is, the table with the primary key, which in this case is Department), the primary/unique key column (which in this case is deptno). You can change these options by clicking on the ... icon on the right of General.

The CREATE TABLE Employee... statement defines a column, dept, to be of type INT, but the statement goes further in defining dept to be a foreign key that references another table, Department. Again, within the Department table, the referenced column, deptno, has to be an already-defined primary key.
Also note that the Department table has to be created first. If we tried to create the Employee table before the Department table with the referential CONSTRAINT, we would be trying to reference a nonexistent table and this would also cause an error.
Adding the foreign key after tables are created
As we have seen with other constraints, the foreign key can be added after tables are created. To do so, we must first have set up the primary key of the referenced table. The syntax of the ALTER TABLE command to add a foreign key to a referencing table would look like this:
ALTER TABLE xxx
  ADD CONSTRAINT dept_fk
  FOREIGN KEY (dept)
  REFERENCES Department(deptno)
The (optional) name of the CONSTRAINT is dept_fk. Note that the column’s data types in the references clause must agree with the column’s data types in the referenced table.
DELETE and the referential CONSTRAINT
There are a couple of options in the DELETE option of a foreign key referential constraint in SQL Server 2005--CASCADE and NO ACTION. Both of these options specify what action takes place on a row if that row has a referential relationship and the referenced row is deleted from the parent table. First we discuss the default, which is NO ACTION, and then we look at the CASCADE option.
ON DELETE NO ACTION. If the NO ACTION alternative is used in the ON DELETE option of the CREATE TABLE command, and we try to delete a row from the parent table (in this case, the Department table) that has a referencing row in the dependent table (in this case, the Employee table), then SQL Server 2005 will raise an error and the delete action on the row in the parent table will be undone. The NO ACTION option on the ON DELETE option is the default.
The ON DELETE NO ACTION option is added after the REFERENCES clause of a CREATE TABLE command. The CREATE TABLE command with the ON DELETE NO ACTION would be as shown in the next example.
CREATE TABLE Employee
  (empno     INT     CONSTRAINT   empno_pk2 PRIMARY KEY,
   empname   VARCHAR(20),
   dept      INT      REFERENCES   Department(deptno)
            ON DELETE NO ACTION)
Tip
Make sure that you have created the Department table first before you attempt to create this Employee table.
The design of the Employee table will now be as shown in Figure 11-25.
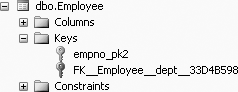
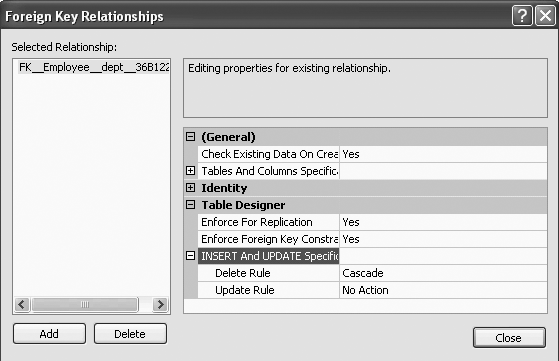
Then, to view the ON DELETE NO ACTION, from Figure 11-25, right-click on EFK_Employee_dept_33D4B598 and select Modify, similar to what is shown in Figure 11-23. You will get Figure 11-26, the Foreign Key Relationships screen. On this screen, under Table Designer, expand the “INSERT And UPDATE Specification” option, and you will see the Delete Rule as No Action, shown in Figure 11-26.
ON DELETE CASCADE. The ON DELETE CASCADE option may be added after the REFERENCES clause of a CREATE TABLE command, as shown here:
CREATE TABLE Employee
  (empno     INT     CONSTRAINT   empno_pk3 PRIMARY KEY,
   empname   VARCHAR(20),
   dept      INT      REFERENCES   Department(deptno)
             ON DELETE CASCADE)
The table definition of the Employee table will be similar to what was shown in Figure 11-21.

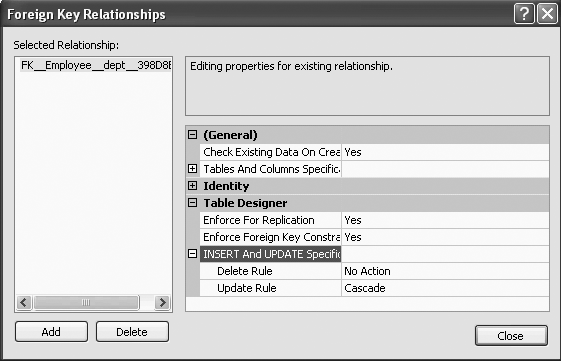
The ON DELETE CASCADE option will be included in the referential integrity constraint. To view the ON DELETE CASCADE, from the Foreign Key Relationships screen, once again expand the “INSERT And UPDATE Specification” option, and you will see the Delete Rule as Cascade, shown in Figure 11-27.
CASCADE will allow the deletions in the dependent table (in this case, the Employee table) that are affected by the deletions of the tuples in the referenced table (in this case, the Department table). Suppose, for example, that we had deptno = 3 in the Department table. Also suppose that we had employees in department 3. If we deleted department 3 in the Department table, then with CASCADE we would also delete all employees in the Employee table with dept = 3.
UPDATE and the referential CONSTRAINT
Both the CASCADE and NO ACTION options are also available with the ON UPDATE option of a foreign key referential constraint enforcement in SQL Server 2005. Both these options specify what action takes place on a row if that row has a referential relationship and the referenced row is updated in the parent table. In the following discussion, we show the syntax of these two options.
ON UPDATE NO ACTION. Just as with the ON DELETE option, if the NO ACTION option is used with the ON UPDATE option of the CREATE TABLE command, and we try to update a row from the parent table (in this case, the Department table) that has a referencing row in the dependent table (in this case, the Employee table), then SQL Server 2005 will raise an error and the update action on the row in the parent table will be rolled back. The NO ACTION option on the ON UPDATE option is the default.
Just as in the ON DELETE NO ACTION option, the ON UPDATE NO ACTION option is added after the REFERENCES clause of a CREATE TABLE command. The CREATE TABLE command with the ON UPDATE NO ACTION would be as shown here:
CREATE TABLE Employee
  (empno     INT     CONSTRAINT   empno_pk4 PRIMARY KEY,
   empname   VARCHAR(20),
   dept      INT      REFERENCES   Department(deptno)
             ON UPDATE NO ACTION)
Tip
Make sure you have created the Department table first before you attempt to create this Employee table.
Once again, the design of the Employee table will be similar to what was shown in Figure 11-21.
The ON UPDATE NO ACTION option will be included in the referential integrity constraint. View the ON UPDATE NO ACTION as shown in Figure 11-27. Figure 11-27 also shows the Update Rule.
ON UPDATE CASCADE. The ON UPDATE CASCADE option is also added after the REFERENCES clause of a CREATE TABLE command, as shown here:
CREATE TABLE Employee
  (empno     INT     CONSTRAINT   empno_pk5 PRIMARY KEY,
   empname   VARCHAR(20),
   dept      INT      REFERENCES   Department(deptno)
             ON UPDATE CASCADE)
The design of the Employee table will be similar to what was shown in Figure 11-21.
The ON UPDATE CASCADE option will be included in the referential integrity constraint. To view the ON UPDATE CASCADE, from the Foreign Key Relationships screen, once again expand the “INSERT And UPDATE Specification” option, and you will see the Update Rule as Cascade, shown in Figure 11-28.
When CASCADE is included in the ON UPDATE option, the row is updated in the referencing table (in this case, the Employee table) if that row is updated in the parent table (in this case, the Department table).
Using the ON DELETE and ON UPDATE together
You can also use the ON DELETE and ON UPDATE options together if needed. Both the ON DELETE and ON UPDATE do not necessarily have to be set to the same option. That is, both of them do not have to be set to NO ACTION or CASCADE at the same time. You can have a NO ACTION option set for one option and a CASCADE set for the other option. For example, you may create the Employee table as follows:
CREATE TABLE Employee
  (empno     INT     CONSTRAINT   empno_pk6 PRIMARY KEY,
   empname   VARCHAR(20),
   dept      INT      REFERENCES   Department(deptno)
             ON UPDATE CASCADE
             ON DELETE NO ACTION)
Once again, the table definition of the Employee table would then be as shown in Figure 11-21.
Both the ON UPDATE CASCADE option and the ON DELETE NO ACTION option will be included in the referential integrity constraint. Once again, from the Foreign Key Relationships screen, expand the “INSERT And UPDATE Specification” option, and you will see the Delete Rule as well as Update Rule.
The foreign key relationships figure will be as shown in Figure 11-29.

So, in summary, SQL Server 2005 gives you quite a bit of flexibility in setting up your referential integrity constraints.
Summary
In this chapter, we showed you how to create indexes and constraints using different options. We also showed you how to view, edit, and delete indexes and constraints. We explained referential integrity constraints, and also showed you how to create, view and edit them.
Review Questions
What is an index?
Does an index slow down updates on indexed columns?
What is a constraint?
How many indexes does SQL Server 2005 allow you to have on a table?
What command would you use to create an index?
Is there a difference between an index and a constraint?
What is the default ordering that will be created by an index (ascending or descending)?
When can the
UNIQUEoption be used?What does the
IGNORE NULLoption do?How do you delete an index?
What does the
NOT NULLconstraint do?What command must you use to include the
NOT NULLconstraint after a table has already been created?When a
PRIMARY KEYconstraint is included in a table, what other constraints does this imply?What is a concatenated primary key?
How are the
UNIQUEandPRIMARY KEYconstraints different?What is a referential integrity constraint? What two keys does the referential integrity constraint usually include?
What is a foreign key?
What does the
ON DELETE CASCADEoption do?What does the
ON UPDATE NO ACTIONdo?Can you use the
ON DELETEandON UPDATEin the same constraint?
Exercises
Unless specified otherwise, use the Student_course database to answer the following questions. Unless otherwise directed, name all CONSTRAINTs.
To test choices of data types, create a table with various data types like this:
CREATE TABLE Test3
  (name                VARCHAR(20),
   ssn                 CHAR(9),
   dept_number         INTEGER,
   acct_balance        SMALLMONEY)
Then insert values into the table to see what will and will not be accepted. The following data may or may not be acceptable. You are welcome to try other choices.
'xx','yy',2,5
'xx','yyy',2000000000,5
'xx','yyyy',2,1234567.89
Create an index of
ssnin ascending order ofssn. Try to insert some new data in thessncolumn. Does yourssncolumn take nulls?Does your
ssncolumn take duplicates? If so, how can you prevent this column from taking duplicates?Include a
NOT NULLconstraint on thessncolumn. Now try to insert some new data in thessncolumn with nulls in thessncolumn. What happens?With this
NOT NULLconstraint, is it necessary to include thePRIMARY KEYconstraint? Why or why not? Now include thePRIMARY KEYconstraint and see whether there is any difference in the types of values it accepts.Include some data with null values in the
dept_numberandacct_balancecolumns. Now include theNOT NULLconstraint in theacct_balancecolumn. What happens?Include the
NOT NULLconstraint in theacct_balancecolumn. What happens?
Delete
Test3.To test the errors generated when
NOT NULLis used, create a table calledTest4, which looks like this:CREATE TABLE Test4 (a CHAR(2) NOT NULL, b CHAR(3))
Input some data and try to enter a null value for
A. Acceptable input data for a null is “null.”Create or recreate, if necessary,
Test3, which does not specify a primary key. Populate the table with at least one duplicatessn. Then, try to impose thePRIMARY KEYconstraint with anALTER TABLEcommand. What happens?Recreate the
Test3table, but this time add a primary key ofssn. If you still have theTest3table from Exercise 4, you may be able to delete offending rows and add thePRIMARY KEYconstraint. Enter two more rows to your table—one containing a newssnand one with a duplicatessn. What happens?
Create the
DepartmentandEmployeetables, as per the examples earlier in the chapter, with all the constraints (PRIMARY KEYs, referential andUNIQUEconstraints). You can add the constraints at create time or you can useALTER TABLEto add the constraints. Populate theDepartmenttable first with departments 1, 2, and 3. Then populate theEmployeetable.Note: before doing the next few exercises, it is prudent to create two tables, called
DeptbakandEmpbak, to contain the data you load, because you will be deleting, inserting, dropping, recreating, and so on. You can createDeptbakandEmpbaktables (as temporary tables) with the data we have been using with a query like:SELECT * INTO Deptbak FROM Dept
Then, when you have added, deleted, updated, and so on and you want the original table from the start of this problem, you simply run the following commands:
DROP TABLE Dept
SELECT *
INTO Dept
FROM  Deptbak
Create a violation of insertion integrity by adding an employee to a nonexistent department. What happens?
Create an
UPDATEviolation by trying to change an existing employee to a nonexistent department, and then by trying to change a referenced department number.Try to delete a department for which there is an employee. What happens? What happens if you try to
DELETEa department to which no employee has yet been assigned?Redo this entire experiment (starting with Exercise 5a), except that this time create the
Employeetable with theON DELETE CASCADE. View the table definition of theEmployeetable.Redo exercises 5a-5c, except that this time, create the
Employeetable with theON DELETE NO ACTION.Redo exercises 5a-5c, except that this time, create the
Employeetable with theON UPDATE CASCADE.Redo exercises 5a-5c, except that this time, create the
Employeetable with theON UPDATE NO ACTION.Redo exercises 5a-5c, except that this time, create the
Employeetable with theON UPDATE NO ACTIONandON DELETE CASCADEtogether.
Create a table (your choice) with a
PRIMARY KEYand aUNIQUEconstraint. Insert data into the table and, as you do, enter a good row and a bad row (the bad row violates a constraint). Demonstrate a violation of each of your constraints one at a time. Show the successes and the errors as you receive them.In this chapter, the
Employeetable was referenced to (depended on) theDepartmenttable. Suppose that there were another table that depended on theEmployeetable, such asDependent, where theDependenttable contained the columnsnameandempnum. Create theDependenttable. Then add the referential constraint whereempnumreferences theEmployeetable, withON DELETE CASCADE(and note that theEmployeetable also has anON DELETE CASCADEoption). You are creating a situation in which theDependenttable references theEmployeetable, which references theDepartmenttable. Will SQL Server let you do this? If so, and if you delete a tuple from theDepartmenttable, will it cascade through theEmployeetable and on to theDependenttable?