Chapter 13
Following Groups, Companies, and Influencers
IN THIS CHAPTER
![]() Handpicking the groups on your profile
Handpicking the groups on your profile
![]() Following the right influencers and news topics
Following the right influencers and news topics
![]() Showing allegiance to companies and schools
Showing allegiance to companies and schools
Your LinkedIn activity is reflected on your profile. The LinkedIn Groups you join and the influencers and news topics you follow all show up at the bottom of your LinkedIn profile. Rather than ignore this area, build up your brand and online persona by following the right groups, influencers, news topics, companies, and schools to align with your LinkedIn goals.
In this chapter, you learn the importance of joining LinkedIn Groups (and it’s not just for the discussion value) and how to choose the best groups. I also show you how to optimize the Following section by choosing the right influencers, news topics, companies, and schools to complete the construction of your profile to your desired brand vision.
Lastly, I show you how to blog on LinkedIn to further develop your professional presence and showcase yourself as a thought leader. Let’s get started!
Understanding the Importance of Groups
The groups you join on LinkedIn are listed toward the bottom of your profile in the Interests section. By clicking See All, and selecting the Groups tab, the group logos appear, showing your reader your online involvement in your industry and community (see Figure 13-1).

FIGURE 13-1: The LinkedIn Groups you belong to appear near the bottom of your profile.
LinkedIn Groups are forums devoted to discussions around a single topic. When reading your LinkedIn newsfeed, you see status updates with discussions, quotes, and links to articles about a myriad of topics. With such a wide range of topics taking place, some people find it overwhelming. On the flip side, when you visit a LinkedIn Group, the discussions are focused on the Group topic, ensuring your interest in the discussions taking place.
When you join the groups that interest you, and you engage successfully, LinkedIn Groups provide you the ability to forge new business relationships with like-minded professionals. Within the group, you can post news, participate in discussions, and network. It is a great way to add value and learn from others.
The only issue when it comes to LinkedIn Groups is your own time limitation. There are a slew of LinkedIn experts and professionals who claim to use LinkedIn Groups to find amazing business opportunity. There is certainly business to be mined, but it takes time and energy that not all of us have in abundance. If you have the time and enjoy interacting in group discussions, do it and reap the rewards. On the other hand, if you are a busy person and do not have the time nor inclination to engage in group discussions, I have another way for you to take advantage of LinkedIn Groups in a passive way that provides real results.
It is not a well-known fact, but LinkedIn Groups expand your LinkedIn network. Your LinkedIn network is comprised of connections within three degrees. The people you are directly connected to by exchanging and accepting a LinkedIn invite are considered your first-degree connections. The people directly connected to your first-degree connections are considered your second-degree connections. The connections of your second-degree connections are considered your third-degree connections. Your LinkedIn network is also comprised of the members of groups you have joined.
When you perform keyword-based searches on LinkedIn, you are only searching your LinkedIn network. In order to find people and get found, you need to have an extensive network. The fastest and easiest way to expand your network is through joining LinkedIn Groups. People in the same LinkedIn Groups as you are considered part of your LinkedIn network even if they aren’t first-, second-, or third-degree connections.
 You can join up to 100 LinkedIn Groups. My suggestion is to join 100 groups so you can strengthen and expand your network as wide as possible.
Simply by joining groups, you receive the massive benefit of expanding your LinkedIn network. When you have a strong, large network, you get more views to your profile and collide with more opportunities. You do not have to participate in every single group you join. The only thing you need to ensure is that you join groups that contain your target audience.
Determining the types of groups to join
The LinkedIn Groups you join should contain your target audience — not your competitors. Most people join only groups that reflect their interests and careers. As an example, let’s say you are an insurance broker. You may find yourself tempted to join only groups for insurance brokers. When you do that, you are filling your LinkedIn network with your competitors. You don’t want to find or be found only by insurance brokers. Instead, think in terms of your target audience. You want to find and be found by prospective customers. Your prospective customers probably belong to LinkedIn Groups for business owners and human resource professionals. Figure out what LinkedIn Groups attract your target audience and join those groups.
Jobseekers should join groups that contain recruiters and human resources professionals. They should research the companies where they want to work and join groups where the employees of their dream companies are members.
Those who are using LinkedIn for executive branding and thought leadership should join groups that contain their target audience. Do you want to be found by reporters and journalists? Join groups for media professionals. Do you want to be asked to speak at conferences? Join groups that cater to conference and event planners. Do you want to be asked for radio interviews? Join groups for radio broadcasters and podcasters.
One of the easiest ways to determine which groups attract your target audience is to visit the profiles of your current customers or target audience members. Scroll to the bottom of their profiles and look at the groups they have listed on the bottom of their LinkedIn profile. After viewing a number of their profiles, you may start to see certain groups repeated across their profiles. Those are the groups you should join.
The other thing to consider when joining LinkedIn Groups is the number of members within the group. Your network grows by the number of people in the group, so choose LinkedIn Groups with the most members. The bigger your network, the more people you find and the more people who find you.
In addition to the groups that fill your network with your target audience, consider joining groups that demonstrate your expertise and industry knowledge. These groups may contain more of your competition than target audience, but that’s okay as long as you don’t join too many of them.
Another type of groups to join are the groups I like to call “Glory Days.” Your university alumni group falls into this category as well as any groups devoted to old companies at which you worked in the past. By joining these groups where old colleagues, schoolmates, and friends are, you are making sure that if you are not directly connected to them yet, they are still in your network. You never know when one of these old relationships may need your new expertise.
Lastly, join a couple groups that are strictly fun. Do you love martial arts? There are a number of great groups devoted to discussions on martial arts. Do you enjoy technology or history or professional development? There are groups related to all of those topics. It’s important to have fun on LinkedIn, and it’s okay to delve into things you enjoy even if they aren’t pertinent to your career. LinkedIn is all about networking, and networking with people who share common interests is a great way to forge real relationships.
Check out Figure 13-2 to see the ideal breakdown of groups you should join on LinkedIn.
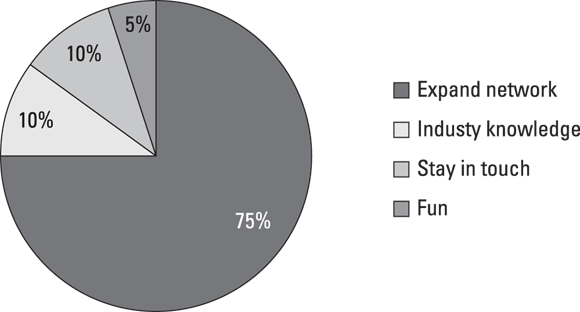
FIGURE 13-2: A breakdown of the LinkedIn Groups you should join.
If you are so inclined to participate in LinkedIn Groups, choose two or three LinkedIn Groups for your focus. Get into the habit of checking out the group discussions once a week. Participate as you can. Add discussions and comment on already occurring discussions. And guess what? If you simply don’t have enough time to keep up with a few groups, don’t worry about it. You can still find amazing benefit from LinkedIn Groups without any true participation.
If you love participating in groups, LinkedIn has a LinkedIn Group mobile app. As of 2016, it is available only for the iPhone, but it is slated for release on the Android soon. This mobile app makes it easy to interact with your LinkedIn Groups wherever you are … watching TV, in a coffee shop, or trying to look busy during a boring meeting.
Turning off group notifications
Before you start joining groups, especially if you are a currently employed job seeker, it’s best to update your notification settings so LinkedIn doesn’t notify your network whenever you join a new group. Here’s how:
- Go to
LinkedIn.com. Hover your mouse pointer over the thumbnail image of yourself in the upper-right corner of your screen and click Settings & Privacy.
LinkedIn's settings page opens.
- Along the top of the settings page, click Communications.
Under Groups, click Group notifications.
This setting expands to show more information
If “Would you like to publish an update to your network whenever you join a group?” is switched to Yes, click it to select No.
By selecting No, when you join a LinkedIn Group your network is not alerted. See Figure 13-3.

FIGURE 13-3: Stop LinkedIn from notifying your network when you join a group.
Joining recommended groups
There are over two million groups on LinkedIn. Search LinkedIn to find groups that match your target audience and interests or allow LinkedIn to recommend groups to you. LinkedIn looks at commonalities you share with members of different groups such as companies, schools, or industries. Those groups with members that share the most attributes with you are presented as groups you might want to join.
Here’s how to discover groups that align with your goals and target audience:
- Go to
LinkedIn.com. Click the waffle (More or Work) icon on the menu bar at the top of the screen and then select the Groups icon from the pop-up menu.
The highlights page displays. This page offers brief summaries of the most popular and trending discussions from all of your groups.
Click the Discover tab in the upper menu bar.
The Discover page opens. This is where LinkedIn recommends groups to you.
Scroll through LinkedIn’s recommended groups, and if you see a group you would like to join, click the Ask to Join button.
Notice the total number of people in the group. The larger the number, the more your network expands when you join. Also, LinkedIn shows you the number of people you know within the group. Are these people your target audience or are they competitors? If they are competitors, you may choose not to join the group. See Figure 13-4.

FIGURE 13-4:LinkedIn recommends groups you might be interested in.
Searching for groups
Rather than just accepting groups that LinkedIn deems worthy of you, search for groups. LinkedIn has two types of groups: standard and unlisted. When searching for groups, you only see standard groups. Unlisted groups are unlisted and do not turn up in Search. The only way to join an unlisted group is to be invited to join.
Here’s how to search for groups that match your interests, goals, and target audience:
From any LinkedIn page, enter a group topic that would attract your target audience in the search bar at the top of the page.
Some keyword topic ideas include: Executives, Real Estate, B2B Marketing, CAD, CRM, Sales, Cloud Computing, Supply Chain, Retail, Fashion, Maritime, Military, and so on.
 When entering your keywords, LinkedIn offers numerous filters as you type. You can choose from the suggested results, or you can click the search button to be presented with a page of search results. By clicking the Group filter at the top, you are filtering results so only Groups appear.
Click the search button.
Search results display, as shown in Figure 13-5.
Scroll through the list.
The name of the group displays, followed by the total number of members in the group.
If the group looks interesting, click the hyperlinked name of the Group to visit the group overview page.
The group overview page shows you the admins of the group and who within your connections are members. If you wish to join, click the Ask to Join button, otherwise click your browser’s back button to go to the previous screen of search results.
- If you decide to join the Group, click the Join button to immediately become a member, or if the Group’s membership is moderated, click Ask to Join.

FIGURE 13-5: Going through group search results.
Deleting groups
Now that you understand the strategy behind LinkedIn Groups, you may want to delete some groups that aren’t providing the value you need. Here’s how to delete groups you have already joined:
From any LinkedIn page, click the waffle (More or Work) icon located in the menu bar at the top of the screen and click Groups.
The highlights page displays. This page offers brief summaries of the most popular and trending discussions from all of your groups.
Click the My Groups tab in the upper menu bar.
The list of groups you belong to appears. If you manage any groups, they appear at the top of the list.
- Scroll through the list until you find the group you want to remove.
- Click the gear icon that appears to the right of each group listing and select Leave Group, as shown in Figure 13-6.

FIGURE 13-6: Leaving a LinkedIn Group.
Turning off group communication email
You’ve joined 100 groups and suddenly you are beginning to see more views to your LinkedIn profile. As wonderful as that is, you are also seeing your email inbox fill up with LinkedIn Group update email. LinkedIn sure does love to fill our inboxes up with notifications, don’t they? No worries! It’s easy to turn off the LinkedIn Group communication email. Here’s how:
- Go to
LinkedIn.com. Hover your mouse pointer over the thumbnail image of yourself in the upper-right corner of your screen and click Settings & Privacy.
LinkedIn's settings page opens.
- Along the top of the settings page, click Communications.
Under Basics, click Change to the left of Email frequency.
The page expands to include different options. This is where you choose what email notifications you want to receive from LinkedIn.
Scroll down to Group updates and click Details.
The top five groups you belong to display with the ability to toggle off their email updates.
Click All Group Email Settings to see options for all of the groups you belong to.
A page displays with the ability to toggle off communication from all of your groups.
To turn off all group email communication, click the top option, “Receive email about group notifications” from On to Off.
If you only want to turn off some group email updates, go through the list toggling from On to Off the groups you no longer want to receive email updates from.
If you want to receive a weekly digest rather than daily email from some of the groups, toggle the option from Off to On and the menu expands to choose between daily or weekly digest options. You are also given the option to turn off alerts on new discussions and group announcements. See Figure 13-7.

FIGURE 13-7: Stopping all those group emails from deluging your inbox.
Choosing which groups to highlight on your profile
Your profile displays group logos on your profile with the option to expand to show the complete list. Although LinkedIn lists the groups on your profile randomly, you can determine the to exclude a Group from appearing.
Instead of leaving it to LinkedIn to showcase your group membership, it’s important you take control and determine the best groups to populate your profile to impress your target audience. Remember, it’s a Google world, and people are looking you up. They want to learn more about you. You control how they perceive you. As a reader scrolls through your profile, you want to make sure that the groups you are associated with build your brand and won’t turn anyone off.
In the section, “Determining the types of groups to join,” I suggest adding a few groups that showcase your industry knowledge. These groups are great to add to the top of your profile. Always think of your target audience. What group memberships might impress them? Which might make them feel confident in you?
Once you have an idea of the groups to spotlight on your profile, here’s how to display the logo on your profile:
From any LinkedIn page, click the waffle (More or Work) icon located in the menu bar at the top of the screen and click Groups.
The highlights page displays.
Click the My Groups tab in the upper menu bar.
The list of groups you belong to appears.
- To hide groups on your profile, click the gear icon to the right of the group name, as shown in Figure 13-8.
- Click Group settings.
- Remove the checkmark from “Display the group logo.”
- Click Save Changes.

FIGURE 13-8: Changing the visibility of group logos on your profile.
The Group’s logo will not appear on your profile.
Cultivating Your Following Section
When you first log in to LinkedIn, you land on the LinkedIn home page, which is where you post status updates that are potentially seen by your network of connections. It’s also where you read your network’s status updates. Think of this newsfeed as your own customized newspaper, curated by all of your direct, first-degree LinkedIn connections. You are not limited to just status updates from first-degree connections, however. You can also subscribe to news topics of interest to you, company and school updates, and original content from influencers. To tap into this stream of information, all you have to do is follow companies, news topics, influencers, and schools that interest you.
By following companies, news topics, influencers, and schools, you get their status updates delivered to your LinkedIn home page’s newsfeed. You show your interest and allegiance to them on your LinkedIn profile in the Following section, which appears at the very bottom of your profile. Within this section, logos of the companies, news topics, influencers, and news you follow are displayed. To populate this section, you must follow some companies, news topics, influencers, and schools, otherwise the Following section does not appear on your profile, and the opportunity to showcase potential commonality is lost.
You can follow as many as 1,000 companies and an unlimited number of news sources or industries.
Choosing the right companies to follow
Just as individuals have LinkedIn profiles, companies have LinkedIn company pages. A company page is where a company tells its story, mission, and goals on LinkedIn and posts open positions. When employees and past employees list the company in their LinkedIn profiles’ experience sections, the logo that is displayed on their profiles comes from this company page. A link is also created from the employees’ profiles to the company page.
In addition to providing a digital outpost for the company on LinkedIn, the company page provides the ability to post status updates as the company rather than as an individual. When you visit a company page, you have the ability to follow that page and receive the updates it posts. Some company pages have showcase pages. Most companies post statuses on a large variety of topics, but not all followers want to read such a wide range of topics. Showcase pages are for the different topics a company page might broadcast. Visitors can then subscribe to the showcase page of the topic they are most interested in reading. When you subscribe to a showcase page, that logo is displayed on your profile as a company.
Follow at least 10 companies and/or showcase pages to demonstrate you are using LinkedIn as a way to get information and updates. These company logos also show your allegiance and interest in the company.
Not sure what companies to follow? No worries; here are some ideas to get you started:
- Your current company
- The companies where you worked in the past
- Your dream company(ies)
- Companies that are current or prospective customers
- Companies in the news
- Companies that are leaders within your industry or customers’ industries
- The companies where your friends and family members work
Unlike with groups, you cannot control the order companies are displayed on your profile. If you are not comfortable potentially showcasing a certain company on your profile, don’t follow it!
Following companies
It’s easy to follow companies on LinkedIn. Here’s how:
From any LinkedIn page, click in the search bar and start typing the name of a company you’d like to follow.
As you type, LinkedIn recommends matching company pages.
If the page you are searching for appears, click it to open the company page.
If LinkedIn doesn’t recommend the correct company page, click the search button to display the search results.
Scroll through the results and click the company page you’d like to follow.
The company page opens.
Click the Follow button.
The button text changes to Following and the company appears in the Following section on your profile.
Unfollowing companies
If you go overboard and follow more companies than you are able to keep up with, or if you’ve changed your mind about showing allegiance to a certain company, simply stop following a company and its updates.
To unfollow a company, follow these steps:
- Go to your LinkedIn profile.
Scroll to the bottom of your profile to the Interests section and click See All.
The list of companies you follow appears. You may need to click the Companies tab at the top of the page.
Click the Following link next to the Company you wish to unfollow.
Once clicked, you no longer follow that company and it is removed from your profile’s Interests section and you will no longer receive their broadcasted status updates.
Following News
LinkedIn’s home page also contains a summary of news items found on LinkedIn Pulse. LinkedIn Pulse is content curated by LinkedIn. These are the top business stories of the day. By following a news source or industry on LinkedIn Pulse, you are customizing the content based upon your preferences.
Here’s how to follow different news topics:
Navigate to the Discover page:
www.linkedin.com/pulse/discover.LinkedIn currently does not link to it directly, so you must be provided with the direct link. (You are very welcome!) This page provides a list of recommendations LinkedIn has chosen for you as well as a list of popular Influencers, Publishers, and Channels. Channels are the different news topics you are able to follow to truly customize and personalize the news LinkedIn provides to you via Pulse.
Hover your mouse pointer over a topic, Influencer, or Publisher that interests you.
The plus ( + ) sign that appears in the upper-right corner of the topic image changes to Follow.
Click Follow.
The plus ( + ) sign becomes a green check mark, showing that you are following this news topic.
Showcasing Influencers on Your Profile
Not only does LinkedIn provide curated content from around the web, you can also tap into original content by big-name thought leaders. These influencers share their knowledge and insights through original articles found exclusively on LinkedIn. When you follow an influencer, you receive their latest articles via your LinkedIn home page’s newsfeed. Not only do you get to read their latest missives, but also you get to show your admiration and interest in them on your profile.
When people check out another person’s LinkedIn profile, they often scroll to the bottom to check out whether they have any influencers in common. Seeing an admired thought leader on another person’s profile shows more than just a common interest; it shows a common philosophy and thought pattern. By following certain influencers, you raise your reputation and viewpoint.
There is a difference between following and connecting. When you connect, you are sharing your connections with that person and that person is added to your LinkedIn network. As part of your LinkedIn network, when you search LinkedIn, that person potentially shows up in searches as does his or her first- and second-degree network. By following a person, they are not added to your LinkedIn network. You are simply subscribing to their updates and long-form posts. You approve connections; you don’t approve followers.
Deciding which influencers to showcase
Unlike with groups, you cannot control the order influencers are displayed on your profile. Just because you adore a certain influencer, consider if that person is a polarizing individual, especially within your industry. Rather than choosing influencers you truly love and want to follow, you may decide to choose influencers who showcase you as you want to be seen.
If you want to be seen as a conservative, traditional leader, you may decide to follow Jack Welch rather than Mark Cuban. Although LinkedIn includes a number of politicians as influencers, you may decide not to follow them and alienate half your audience.
LinkedIn doesn’t provide a list of influencers beyond a small list of recommended influencers listed on the Discover page. Rather than have you blindly search for influencers, I’ve compiled a list of the most popular and prolific (see Table 13-1). See if any strike a chord with you. If they influence you, go ahead and follow them.
TABLE 13-1 List of Interesting Influencers
Sallie Krawcheck |
CEO and Co-Founder of Ellevest |
B2B/Leadership |
|
Meg Whitman |
CEO of Hewlett-Packard |
B2B/Leadership |
|
Beth Comstock |
Vice Chair at General Electric (GE) |
B2B/Leadership |
|
Jonathan Becher |
Chief Digital Officer at SAP |
B2B/Leadership |
|
Dr. Marla Gottschalk |
Director of Organizational Development, Allied Talent |
Human Resources |
|
Josh Bersin |
Principal and Founder, Bersin by Deloitte |
Human Resources |
|
Laszlo Bock |
SVP, People Operations at Google and author of Work Rules! |
Human Resources |
|
Lou Adler |
CEO, Adler Group & author of The Essential Guide For Hiring and Being Hired |
Job Search |
|
Liz Ryan |
Founder & CEO of Human Workplace |
Job Search |
|
Ann Handley |
Chief Content Officer of MarketingProfs |
Marketing |
|
Brian Solis |
Principal Analyst, Altimeter Group |
Marketing |
|
Jonah Berger |
Wharton Professor and author of Contagious and Invisible Influence |
Marketing |
|
Daniel Burrus |
Founder and CEO Burrus Research, Inc |
Marketing |
Finding specific influencers
Not all big names are influencers. Check to see if a person you admire is an influencer by following these steps:
From any LinkedIn page, enter the person’s name in the search bar at the top of the page.
As you type, LinkedIn presents you with name matches.
- If the person’s name appears, click it to open his or her profile.
If the person’s name doesn’t appear, click the search button and review the search results, clicking the person’s name to open his or her profile.
If the person is an influencer, in the top-left corner of the profile, it says Influencer. Although you can connect with influencers, the Follow button is highlighted, as shown in Figure 13-9.
You may see 1st, 2nd, or 3rd next to the person’s name, meaning that not only is the person an influencer, but also you are connected to that person and that person is in your LinkedIn network.
- Click the Follow button to subscribe to the person’s long-form posts and status updates.

FIGURE 13-9: Connecting with an influencer.
Discovering recommended influencers
LinkedIn provides you with a partial list of recommended influencers. Here’s how to access that list and follow those influencers LinkedIn recommends for you:
- Navigate to the Discover page:
www.linkedin.com/pulse/discover. Scroll down to the Influencer's section and hover your mouse pointer over an Influencer that interests you.
The plus ( + ) sign that appears in the upper-right corner of the topic image changes to Follow.
Click Follow.
The plus ( + ) sign becomes a green check mark, showing that you are following this news topic, see Figure 13-10.
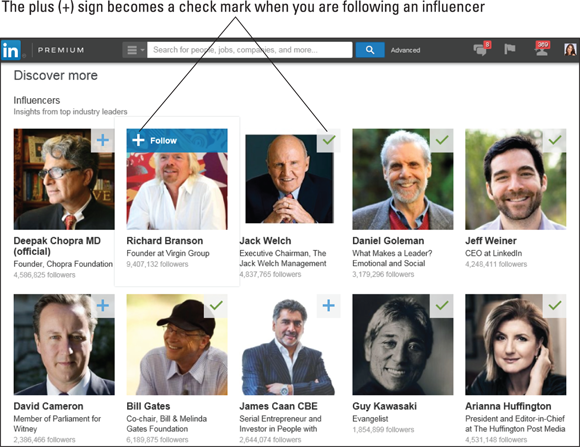
FIGURE 13-10: Following Influencers is as easy as clicking a plus ( + ) sign.
Removing influencers
It’s a good idea to audit and edit your list of influencers every few months. Not only does LinkedIn add influencers, but also some influencers you follow may lose their luster, and it’s best to remove them. Remember, nothing on LinkedIn is written in stone. Not only are you developing as a professional within your career, so are your interests and future vision of yourself. Make sure that you are always keeping your profile updated as to who you are right now in time.
Here’s how to remove influencers from your profile:
- Go to your LinkedIn profile.
Scroll down to the Interests section and click See More.
A list of Influencers you are following appears. You may need to click the Influencers tab at the top.
Click the Following button to the right of the Influencer.
Once you click, that influencer is removed from the Following section of your profile. You will no longer receive their status updates or long-form posts on your newsfeed.
Publishing on LinkedIn
Publishing on LinkedIn isn’t relegated to only influencers. LinkedIn’s Publishing Platform gives everyone with a LinkedIn profile the ability to publish long-form articles. When you publish a long-form article, the article is listed on your profile under Your Articles & Activity section. Articles that you write are searchable on LinkedIn and outside of LinkedIn via any search engine.
Check out Figure 13-11 to see how the articles you write on LinkedIn’s Publishing Platform are displayed on your profile. If your article gets enough traction through views and likes, it may even be featured on LinkedIn’s Pulse. Pulse is a standalone smartphone app, but it’s also integrated into LinkedIn’s newsfeed. Pulse collects articles and displays them to you in an easy-to-digest content stream.

FIGURE 13-11: Your most recent article and three most recent status update activities are displayed on your profile.
The types of information on your LinkedIn Homepage Feed include:
- Articles from around the web
- Articles shared by your connections on LinkedIn’s newsfeed
- Popular long-form posts on LinkedIn’s Publishing Platform
- Articles written by LinkedIn influencers
Think of your LinkedIn Homepage as a super smart digital newspaper that only displays articles that interest you. How does LinkedIn know what interests you? You tell it by following news topics, influencers, companies, schools, and people. LinkedIn also utilizes a complex algorithm to determine which articles pertain to your interests.
LinkedIn’s goal is to provide tailored and relevant content that interests the reader. When reading articles on your LinkedIn Homepage Feed (on your mobile phone app or via LinkedIn’s desktop newsfeed) everything you see is customized specifically to you. LinkedIn wants to make sure what you are reading is meaningful to you. If you were to log in as someone else, the information you see would be completely different.
Although all long-form posts can be viewed on LinkedIn, only popular posts are featured as recommended articles despite whether you are following the writer and have the ability to truly be seen by thousands of professionals in and out of your LinkedIn network.
Showcasing yourself as a thought leader
At one time, only academics were held to the paradigm of “publish or perish.” Now, in the world of rampant social media, professionals who wish to be seen as thought leaders must also publish or perish. By blogging on LinkedIn, you establish yourself as an authority in your specialized field by sharing your expertise, insights, opinions, and professional background. With each share, like, comment, and view, your post is seen, shared, and promoted to your network and beyond.
It’s easy to say you are an expert; it’s much harder to prove it. Imagine you are on the shortlist for your dream job. The hiring manager visits your profile and the profiles of the other people being considered. Your profile showcases a number of articles you’ve written on your specialized field; the other candidates have none. Immediately you have differentiated yourself from the other candidates and have proven your knowledge and authority.
Creating your first article
The longest journey begins with a single step! Before you create your first long-form article, it’s best to consider the topic channels on LinkedIn. By knowing the different channels people subscribe to, it’s easier to choose your topic.
Here is a list of LinkedIn’s topic channels:
- Leadership & Management
- Big Ideas & Innovation
- Technology
- Entrepreneurship
- Social Media
- Economy
- Professional Women
- Marketing & Advertising
- Green Business
- Banking & Finance
- Best Advice
- Your Career
- Healthcare
- Customer Experience
- What Inspires Me
- Big Data
- Software Engineering
- Social Impact
- Recruiting & Hiring
- Law & Government
- Business Travel
- Careers: Getting Started
- Productivity
- India
- Editor’s Picks
- Retail & E-Commerce
- Accounting
- Design
- Sales Strategies
- Entertainment
- Mobile
- Media
- Food & Beverages
- Apparel & Fashion
- Careers: The Next Level
- Automotive
- Oil & Energy
- Construction
- Public Relations
- Travel & Leisure
- Management Consulting
- Real Estate
- Product Management
- Logistics & Supply Chain
- Airlines & Aviation
- Company Culture
- Information Technology
- VC & Private Equity
- Pulse
- Europe
- Asia Pacific
- Insurance
- Operations
- Pharmaceutical
- LinkedIn Tips
- Human Resources
- Cloud Computing
- Public Speaking & Presenting
- Writing and Editing
- Freelance and Self Employment
- Hospitality
- Business Strategies
- United Kingdom
- Global Trade
- Information Privacy & Security
- Space
- US Politics
- Student Voices
- Law Practice
- Manufacturing
- Australia & New Zealand
- Top Videos
- Daily Digest
- Millennials
- Africa
- The Weekend Essay
- Middle East
- Latin America
You want to choose a topic that resonates with your target audience. Concentrate first and foremost on making the content high quality and meaningful to your audience.
Articles on LinkedIn shouldn’t be overwhelmingly long. Aim for 800 to 2,000 words. If you have a larger vision, break it into a series of articles. Keep yourself focused on your topic and write using a conversational tone. Rather than write for views, write for engagement. A successful post receives feedback in likes, comments, and shares.
Unlike your profile, LinkedIn supports formatting of long-form posts. Make sure your article is thoughtfully formatted. Use headings to outline your overarching points. Add interesting pictures that illustrate your thoughts. Call attention to your important points by using lists and formatting your text in bold and italics.
You can also include links to other websites, and you can embed videos as well as HTML. Here are some items you can embed into your blog post:
- Charts
- Images
- Podcasts
- Polls
- Presentations
- Tweets
- Videos
By adding multimedia to your article, you are making it visually appealing and providing concrete examples that support your opinion.
Publishing on LinkedIn isn’t a once and done exercise. Publishing is a long-term commitment with no end date. The idea is to commit to a schedule and keep at it. Determine what works for you, and make it a habit whether it’s once a week, once a month, or once every three months.
If you are wondering the best days to publish your post to achieve the most views, research points to Thursdays and Sundays. Some of the most successful posts I’ve written were posted on Fridays and Mondays, so even though research points to Thursday and Sunday, the real differentiator is simply good content.
Now that you have an idea of topic, tone, length, and frequency, follow these steps to create your very first article on LinkedIn:
- Go to
LinkedIn.com. At the top of your home page, click Write an Article (see Figure 13-12).
A page opens where you write your long-form post, as shown in Figure 13-13. At the top of the page is an area to add a hero image. This image also acts as a thumbnail and proceeds your long-form post on your profile and on status updates and on Pulse, if you are featured.
Click anywhere within the image area to add an image.
An Open dialog box appears.
Select your image on your hard drive and click Open.
The image opens and you can preview how it looks. Hovering your mouse pointer over the image, click at the top to credit the person who made the image.
Click in the area where it says, “Headline,” and type in a headline.
The headline is the title of your article. Make sure it is intriguing and compelling. This field may only contain 150 characters or fewer.
The next area is the body of the post. Click where it says, “Write here. Add images or a video for visual impact.”
This is where you write your article.
Highlight the text you want formatted, and then in the format bar at the top of the screen above the image area, click the Normal drop-down list to expand the text formatting options:
- H1: This is the main heading and produces the largest font size.
- H2: This is a subheading and produces the second largest font size.
- Normal: This is unformatted body text.
There are other options as well. Click the matching icon to apply the following formatting:
- B: This sets the text in bold.
- I: This sets the text in italics.
- U: This underlines the text. Use this sparingly as most people associate underlined text with hyperlinks.
- Numbered list: This creates a numbered list.
- Bulleted list: This creates an unnumbered list.
- Block quote: This is for a direct quotation. The text is center justified and the font is italics and slightly larger than the normal body text.
- Link: This creates a hyperlink to another page on the web.
- Once you have finished writing your article, proofread to make sure it’s ready to be published.
Click the Publish button in the upper-right corner of the page to publish your article.
A pop up window appears.
In the open text field, provide context around your article so your network knows what it is about, and then click the Publish button.
Tell your network what your article is about. Use #tags (hashtags) to help others find it.
To create a hashtag, all you do is take a word or phrase, remove any spaces, special characters, or punctuation and begin it with a hash mark ( # ). For example, #LinkedIn #B2B #Leadership #ProfessionalDevelopment.People search by hashtags to find content that corresponds to subjects they are interested in. By searching for hashtags or just clicking on a hashtag (as long as you are accessing LinkedIn on your mobile device), you are presented with a results page of articles written on that subject utilizing those hashtags.

FIGURE 13-12: Click to start writing an article.

FIGURE 13-13: Publishing a long-form post.
What happens after you publish?
Take a deep breath, whisper a little prayer to your favorite benevolent god, and hit the Publish button. What happens now? Your post is published to your LinkedIn profile under the Your Articles & Activity section in the top part of your profile. Your profile shows the most recent article you’ve written. Anyone who views your profile can click to see all the articles you’ve written on LinkedIn’s publishing platform.
Now that your article is published, it’s important to create a status update letting your network know that you published a new article. As newer status updates and long-form posts are published by others, this little update of yours gets pushed down lower and lower on the newsfeed. Depending on the size of your network and how active your connections are on LinkedIn, some people will see it and some will not.
LinkedIn runs your post through a spam and low-quality filter. If your post passes as quality content, LinkedIn may individually notify your network. Rather than alert every single connection you have, LinkedIn alerts only the strongest connections that you interact with regularly. This alert appears in the Notifications section of LinkedIn.
Every day LinkedIn sends out a Highlight email filled with excerpts of articles and status updates that are recommended as relevant or from members you are connected to. As long as your connections and followers are subscribed to this email, they may get a link to your post in their inbox.
And if your article is truly compelling and engaging, you may find that it is chosen for a topic channel. When this happens, you’ll receive an email alerting you, but most likely you will already know because you’ll receive more views, likes, and comments than ever before.
Marketing your blog post
Although LinkedIn does a fair amount of marketing for you, you should also market your post yourself. Use social media as well as email to alert your audience.
Once your article is published, share the link on Facebook, Twitter, and/or Pinterest. Don’t just send it out once; send it out a bunch of times on each network. Either schedule a reminder in your calendar to resend the link or use a tool like Hootsuite that allows you to create multiple updates that are scheduled out into the future.
Don’t just post a link — provide some context and include hashtags in the status as well.
Bad:
Read my article:
www.linkedin.com/today/author/todonna
Good:
Just posted a new article detailing the #Microsoft acquisition of #LinkedIn and what it means to LinkedIn users. Read it here:
www.linkedin.com/today/author/todonna
Email is another great way to get views to your long-form post. If you are a marketer with a double opt-in email list numbering in the thousands, you’ll have no difficulty getting word out. But even without a marketing email list you can still send an email out to your friends and colleagues, letting them know you posted an article and providing a link so that they can read it.
When sending email to more than a few people, don’t use the To or CC address fields of your email header; instead use BCC. BCC stands for Blind Carbon Copy. When you add email addresses to the To or CC fields, everyone can see those email addresses and reply to them. When you use the BCC field, those email addresses aren’t visible to others. This is helpful because often people reply not just to you, the person writing the email, but to everyone included as recipients. When this happens, the person replying is unknowingly spamming all of the email recipients. By using BCC, you are stopping people from seeing the other email addresses and mistakenly “replying all.”
In the next chapter, it’s time for you to review your profile and get ready for the final reveal!