
Job scheduling is a key part of database automation. You can configure SQL Server jobs to handle almost any database task.
You create jobs as a series of steps that contain actions in the sequence in which you want to execute them. When you schedule jobs in conjunction with other SQL Server facilities, such as database backups or data transformation, the necessary commands are configured for you. Normally these commands are set as step 1, and all you need to do is set a run schedule for the job. You can add extra steps to these jobs and thus perform other tasks. For example, after importing data, you may want to back up the related database. In the SQL Server Import And Export Wizard, you would schedule the import, and then you would edit the associated job in SQL Server Management Studio to add an additional step for backing up the database. By coordinating the two processes, you ensure that the import operation is completed before starting the backup.
Another reason for editing a job created by another SQL Server facility is to add notifications based on success, failure, and completion of the job. In this way, you can notify operators of certain conditions, and you do not have to search through logs to determine if the job executed properly.
When you schedule jobs to execute for alerts, you configure the entire job process from start to finish by performing the following tasks:
Create a job definition.
Set steps to execute.
Configure a job schedule.
Handle completion, success, and failure notification messages.
Whether you are creating a new job or editing an existing job, the steps for working with job definitions are the same:
In SQL Server Management Studio, access the Management folder on the server running SQL Server Agent.
Expand the SQL Server Agent and Jobs folders.
Existing jobs are shown in the right pane. Double-click a job to access its related properties dialog box, which is essentially the same as the New Job dialog box shown in Figure 15-7.
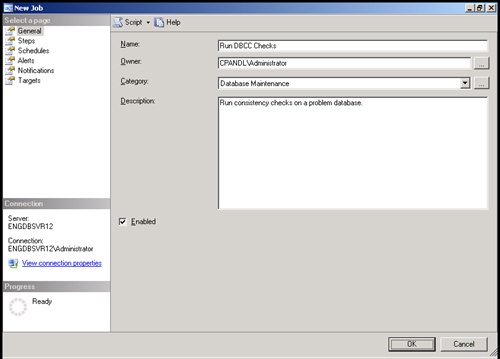
To create a new job, right-click the Jobs entry and, from the shortcut menu, choose New Job to display the New Job dialog box shown in Figure 15-7.
In the Name text box, type a descriptive name for the job. The name can be up to 128 characters long. If you change the name of an existing job, the job is displayed with the new name. Any references to the old job name in logs or history files remain the same and are not modified.
Job categories allow you to organize jobs so they can be easily searched and differentiated. The default category is Uncategorized (Local). Use the Category selection list to choose a different category for the job.
Note
Job categories are created and managed through a separate process. To create a new job category or update an existing category, use the techniques described in the subsection titled "Managing Job Categories" later in this chapter.
By default, the current user owns the job. Administrators can reassign jobs to other users. To do this, use the Owner selection list. You can use only predefined logons. If the logon you want to use is not available, you will need to create a logon for the account.
Type a description of the job in the Description text box. You can use up to 512 characters.
If job scheduling across multiple servers is configured, select the Targets page, and then designate the target server. The target server is the server on which the job runs. To run on the currently selected server, select Target Local Server. To run on multiple servers, select Target Multiple Servers, and then choose the target servers.
Set Steps, Schedules, and Notifications as explained in the following subsections.
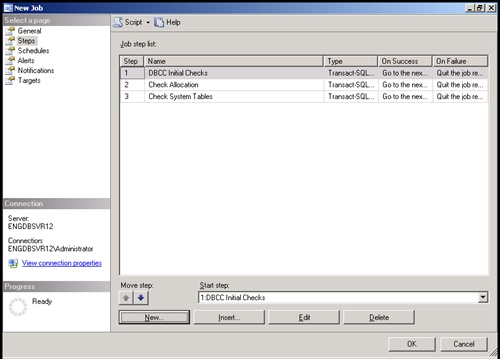
Jobs can have one or more steps. SQL Server Agent always attempts to execute the Start step, but additional steps can be executed conditionally, such as only when the Start step succeeds or fails. You work with steps using the Steps page in the New Job dialog box, as shown in Figure 15-8. The page displays any existing steps for the job. You can use the boxes and buttons in this dialog box as follows:
New. Creates a new step.
Insert. Inserts a step before the currently selected step.
Edit. Allows edits to the selected step.
Delete. Deletes the selected step.
Move Step Up/Down. Changes the order of the selected step.
Start Step. Sets which step is executed first. The green flag icon highlights the start step in the step list.
When you create or edit a step, you see a dialog box similar to the one shown in Figure 15-9. To configure this dialog box, complete the following steps:
Type a short but descriptive name for the step in the Step Name text box.
Use the Type drop-down list to choose a step type from the following choices:
Transact-SQL Commands. Execute Transact-SQL commands. Type Transact-SQL commands in the Command area or load the statements from a Transact SQL script. To load commands from a script, click Open, and then select the Transact-SQL script you want to use. The entire contents of the script are then stored with this step.
ActiveX Scripts. Run ActiveX scripts. You can write ActiveX scripts in VBScript, JScript, or another active scripting language configured for use on the system. Enter script statements directly into the Command area or load the statements from a script file. Again, the entire contents of the script are then stored with this step, and later changes to the script file are not updated automatically.
Operating System Commands. Execute Operating System commands. Enter the operating system commands on a separate line, making sure that you specify the full path to commands and in command parameters. Commands can run batch scripts, Windows scripts, command-line utilities, or applications.
Replication [Agent Name]. Pass Transact-SQL commands to designated replication agents. You can script the Distributor, Snapshot, Merge, Queue Reader, and Transaction–Log Reader agents with Transact-SQL commands. To see examples, refer to the existing jobs that are configured to handle replication, distribution, and subscription processes on the server (if available).
SQL Server Analysis Services Command/Query. Pass commands or queries to SQL Server Analysis Services. Type commands and queries in the Command area or load the commands and queries from an Analysis Server file. To load from a file, click Open, and then select the Analysis Server Command (.xmla) or Analysis Server Query (.mdx) file to use. The entire contents of the file will be stored with this step.
SQL Server Integration Services Package. Execute SQL Server Integration Services packages stored on a specific server.
Tip
Subsequent changes to scripts are not updated automatically. You will need to edit the step properties and reload the script file. Additionally, you should not edit existing replication jobs. Instead, modify the replication process as described in Chapter 12.
When executing Transact-SQL commands or scripts, use the Database drop-down list to set the database on which the commands are executed.
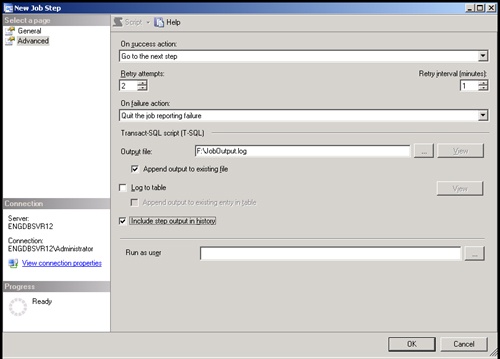
Select the Advanced page as shown in Figure 15-10.
Use the On Success Action drop-down list to set the action to take when the step succeeds. You can:
Go to the next step to continue sequential execution of the job.
Go to a different step to continue execution of the job on a different step.
Quit the job and report success or failure.
By default, Retry Attempts is set to zero and SQL Server Agent does not try to execute steps again. You can change this behavior by setting the number of retry attempts and a retry interval. You do this by using the Retry Attempts and Retry Interval (Minutes) boxes, respectively. The retry interval is the delay in minutes between retries.
If the job fails on all retry attempts (if any), the action set in the On Failure Action drop-down list is executed. The available options are the same as those for success.
If desired, configure a file for logging output from Transact-SQL and CmdExec commands. Type the file name and path in the Output File text box or use the find file button (...) to search for an existing file.
Tip
You may want to create a central log file for the output of all jobs or only all jobs in a particular category. If you do this, be sure to select the Append Output To Existing File option rather than allowing the file to be overwritten. This ensures that the output file does not get overwritten. An alternative is to include the step output in the job history.
Click the Run As User Properties (...) button to set the login to use when executing commands. By default, commands are run using the current login ID.
Choose OK to complete the step configuration.

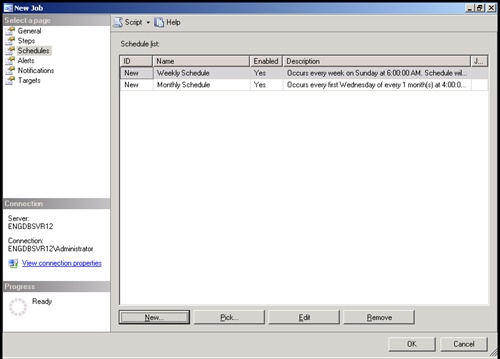
You track schedules on the Schedules page of the New Job dialog box, as shown in Figure 15-11. Jobs can have one or more schedules associated with them, and just as you can enable or disable jobs and their individual steps, you can enable or disable individual schedules. This makes the job scheduling process very flexible. For example, you could set one schedule to execute the job on weekdays at 2 A.M., another to execute the job every Sunday at 8 A.M., and another for execution at 10 P.M. only when needed.
Whether you are creating a new job or editing an existing job, you work with schedules on the Schedules page as follows:
Create a new schedule. Click New to configure a new schedule.
Edit a schedule. Select an existing schedule, and then click Edit to view or modify its properties.
Delete a schedule. Select an existing schedule, and then click Delete to remove the schedule.
You create or edit schedules by completing the following steps:
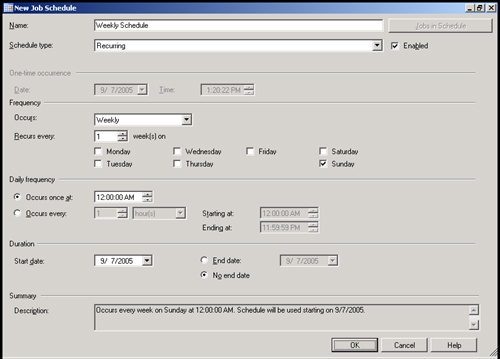
Click New to open the New Job Schedule dialog box, or click Edit to open the Edit Job Schedule dialog box. These dialog boxes are essentially the same except for the title. Figure 15-12 shows the New Job Schedule dialog box.
Type a name for the schedule, and then select one of the following schedule types:
Start Automatically When SQL Server Agent Starts. Runs the job automatically whenever SQL Server Agent starts.
Start Whenever The CPUs Become Idle. Runs the job whenever the CPU is idle. CPU idle time is specified on the Advanced page of the SQL Server Agent Properties dialog box.
One Time. Runs the job once at the date and time specified in the Date and Time boxes.
Recurring. Runs the job according to the recurring schedule displayed.
Recurring jobs are the ones that need the most explanation. You can schedule recurring jobs to run on a daily, weekly, or monthly basis. To run the job on a daily basis, set Occurs to Daily. Then use the Recurs Every box to set the run interval. Daily recurring jobs can run every day, every other day, or every Nth day.
To run the job on a weekly basis, set Occurs to Weekly. Then configure the job using these boxes:
Recurs Every Nth Week(s). Allows you to run the task every week, every other week, or every Nth week.
Day of Week. Sets the day(s) of the week when the task runs, such as on Monday or on Monday, Wednesday, and Friday.
To run the job on a monthly basis, set Occurs to Monthly. Then configure the job using these boxes:
Day N of Every Nth Month. Sets the day of the month and on which months the job runs. For example, if you select Day 15 of every second month, the job runs on the 15th day of alternating months.
The Nth Day of Every Nth Month. Sets the job to run on the Nth occurrence of a day in a given month, such as the second Monday of every month or the third Sunday of every other month.
Set the Daily Frequency for the daily, weekly, or monthly job. You can configure jobs to run one or more times on their scheduled run date. To run the job once on a given date, select Occurs Once At, and then set a time. To run the job several times on a given date, select Occurs Every, and then set a time interval in hours or minutes. Afterward, set a start and end time, such as from 7:30 A.M. to 5:30 P.M.
By default, schedules begin on the current date and do not have a designated end date. To change this behavior, select the End Date option, and then use the Start Date and End Date boxes to set a new duration for the schedule.
Click OK again to complete the schedule process.
Alerts can be generated when jobs are run. You can define and manage job-specific alerts using the Alerts page of the New Job dialog box. To configure alerts, complete the following steps:
Access the Alerts page of the job you want to configure.
Any current alerts are listed by name and type. You can:
Edit an alert by selecting it and clicking Edit.
Add an alert by clicking Add to display the New Alert dialog box, and then using the dialog box features to define the alert as discussed previously.
Remove an alert by selecting it and clicking Remove.
Notification messages are generated when a job succeeds, fails, or completes. You can handle these messages in several ways. You can notify operators, log the related event, automatically delete the job, or do all three. To configure notification, complete the following steps:
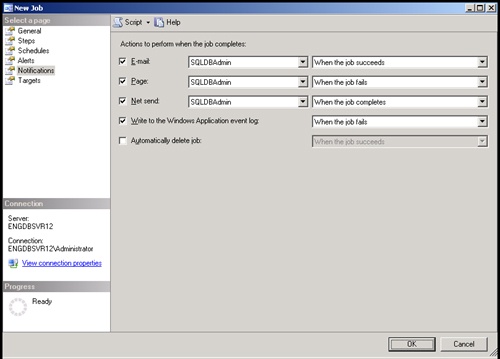
Access the Notifications page of the job you want to configure. This page is shown in Figure 15-13.
You can notify operators by e-mail, pager, or Net Send message. Select the check box for the technique you want to use. Choose an operator to handle the notification. Then choose a notification type. Repeat this process to configure other notification methods.
To log a particular type of notification message in the event log, select Write To The Windows Application Event Log, and then select the notification type to log. Usually, you will want to log failure, so select When The Job Fails.
To delete a job upon notification, select Automatically Delete Job, and then choose the notification type that triggers the deletion.
Click OK.
In SQL Server Management Studio, you manage jobs with the SQL Server Agent. To do that, complete the following steps:
In SQL Server Management Studio, access the Management folder on the server running SQL Server Agent.
Expand the SQL Server Agent and Jobs folders.
You can now double-click a job entry to access its related properties dialog box or right-click a job entry to display a shortcut menu. The following commands are available on the shortcut menu:
Delete. Deletes the job definition. Before deleting a complex job, you may want to create a script that can be used to recreate the job.
Disable. Disables the job so it will not run.
Enable. Enables the job so it will run.
Rename. Allows you to rename the job. Type the new name, and then press Enter or Tab.
Script Job As. Choose Create To, and then select File to generate a Transact-SQL script file that you can use to recreate the job.
Start Job. Starts the selected job if it is not already running.
Stop Job. Stops the selected job if it is running.
View History. Displays the Log File Viewer dialog box. This dialog box enables you to view summary or detail information on the job execution.
You use job categories to organize jobs into topical folders. When you install SQL Server, default job categories are created automatically. You can add new job categories and change the existing categories at any time.
To create a new job category or update an existing category, complete the following steps:
In SQL Server Management Studio, access the Management folder on the server running SQL Server Agent.
Expand the SQL Server Agent. Right-click Jobs, and then choose Manage Job Categories. This displays the Manage Job Categories dialog box.
You can delete a category by selecting it and clicking Delete.
You can view the jobs associated with a category by selecting it and clicking View Jobs.
To add categories or to change the properties of a category, follow the steps outlined in the following subsections, "Creating Job Categories" or "Updating Job Categories," respectively.
You can create a new job category by completing the following steps:
Access the Manage Job Categories dialog box as explained previously. Click Add to display a properties dialog box.
Type a name for the category in the Name text box, and then select Show All Jobs.
All jobs defined on the current server should now be listed. Add a job to the new category by selecting the corresponding check box in the Select column. Remove a job from the new category by clearing the corresponding check box in the Select column.
Click OK when you are finished.
You can update an existing job category by completing the following steps:
Access the Manage Job Categories dialog box as explained previously. Click View Jobs to display a properties dialog box.
Select Show All Jobs. All jobs defined on the current server should now be listed.
Add a job to a new category by selecting the corresponding check box in the Select column. Remove a job from the category by clearing the corresponding check box in the Select column.
Click OK when you are finished.