Print management has always commanded a disproportionate share of system administration time. This is due both to the large number of documents that are printed in the typical organization, and to the fact that many printer administration tools are designed for monitoring and managing single printers rather than multiple printers located throughout the enterprise. Scripting can facilitate enterprise-wide print management in your organization.
In This Chapter
Print management is one of the most time-consuming of all system administration tasks in an enterprise. This is due to a number of factors:
In large organizations, the number of pages printed each day might number in the tens of thousands. In addition, these print jobs take place on multiple printers located throughout the enterprise, complicating the logistics involved in monitoring and managing these devices.
Printers, unlike many other peripheral devices, require daily maintenance: replenishing the paper trays, installing new toner cartridges, and carrying out other maintenance activities. Printers can also encounter problems, such as paper jams, that require a visit from a service technician.
Unlike other services, the print service is typically engaged all day long, even during the so-called off hours. Administrators often schedule large print jobs to take place when most users have left for the day. As a result, the printers are continually busy, even when few users are physically present in the building.
When a printer breaks down, a domino effect can occur. If not immediately fixed, this breakdown can create a huge backlog of stalled print jobs. This can place an enormous burden on Help desk personnel, who must not only fix the problem but also deal with user complaints and questions.
In addition to these challenges, print management has traditionally been carried out on a printer-by-printer basis and has required administrators to rely on the graphical user interface (GUI) to monitor printer status and modify printer configurations. While this approach is adequate in small organizations, it is far less effective in organizations with hundreds of printers, many at remote sites.
Microsoft® Windows® 2000 provides a number of scripting tools for managing printers, print queues, print jobs, and printer drivers. Enhancements to the Windows Management Instrumentation (WMI) and Active Directory Service Interfaces (ADSI) scripting technologies make it possible for administrators to write scripts that can automate much of the print management process.
Note
There are times when WMI and ADSI offer similar functionality for managing printers, print queues, or print jobs. When the functionality overlaps, the WMI method is demonstrated. This is because WMI is the preferred method for managing computers, while ADSI is the preferred method for managing directory service objects. ADSI scripts are used only when there is no WMI equivalent.
Working with Multiple Printers
In large organizations, a single print server is likely to be responsible for scores of printers. Accessing all the printers managed by a print server, or all the print jobs currently in print queues on that print server, is easy when using WMI. By default, WMI retrieves collections consisting of multiple printers or print jobs; for example, the following query returns a collection consisting of all the printers managed by a print server:
SELECT * FROM Win32_Printer
If you want to access only a single printer, you need to include the printer name as part of your query:
SELECT * FROM Win32_Printer WHERE Name = 'ArtDepartmentPrinter'
ADSI, by comparison, requires you to individually bind to each printer on a print server. For example, to bind to the printer named ArtDepartmentPrinter on the print server atl-ps-01, you would use a code statement similar to the following:
Set objPrinter = GetObject("WinNT://atl-ps-01/ArtDepartmentprinter")
However, it is still possible to return a collection of all the printers on a print server, and without knowing the names of those printers. To do this, a script must:
Connect to the print server and return a list of all objects on that server.
Use an ADSI filter to limit the working data set to printQueue items.
For each printQueue item, use a GetObject call and the ADsPath property to individually bind to the printer.
For example, the script in Listing 13.1 returns a list of all the printers managed by the print server atl-ps-01, individually binds to each printer, and then echoes the printer name.
Example 13.1. Using ADSI to Enumerate All the Printers on a Print Server
1 Set objComputer = GetObject("WinNT://atl-win2k-01,computer")
2 objComputer.Filter = Array("printQueue")
3 For Each objPrinter In objComputer
4     Set objPrintQueue = GetObject(objPrinter.ADsPath)
5     Wscript.Echo objPrintQueue.Name
6 Next
For educational purposes, the scripts in this chapter typically use ADSI to bind to a single printer on a print server. However, you can use the code shown in Listing 13.1 to modify those scripts and thus work with all the printers managed by a print server.
The terminology used when discussing printing with Windows 2000–based systems sometimes differs from the terminology used when discussing printing in regular conversation. Table 13.1 lists some of the key terms, along with a brief definition of each term as it is used in this chapter.
Table 13.1. Print Terminology
Term | Definition |
|---|---|
Print device | Also referred to as the physical printer, the print device is the physical device that produces printed pages. In Windows 2000, the term printer specifically refers to the logical printer, the software interface between a print device and the computers submitting documents for printing. In this chapter, the term print device is used only when there is possible confusion between the logical printer and the physical printer. Most of the time, the term printer or physical printer is used instead. |
Printer | Also referred to as a logical printer, this is the software interface between a print device and computers submitting documents for printing. |
Print server | The computer responsible for managing the print queues for a printer or group of printers. In a large organization, a single computer might manage 200 or more printers. |
Printer driver | The software that allows applications to communicate with specific printers. Printer drivers translate print commands sent to a computer into the print language understood by a particular printer. Because printers vary in their capabilities and print language, separate printer drivers might be needed for each printer installed on a computer. |
Print job | Any document sent to a printer. Print jobs are assigned both a unique job ID and a priority (0–99). Higher-priority jobs are printed before lower-priority jobs. |
Print queue | The collection of print jobs waiting to be printed by a specified printer. |
Printer port | The interface through which the logical printer communicates with the physical printer. For physical printers directly attached to computers, the port will typically be a parallel port such as LPT1 or a Universal Serial Bus (USB) port. For printers directly attached to the network (that is, using their own network adapter), the port will typically be a TCP/IP port. Printers can be attached directly to a print server using a local printer port. However, local ports such as LPT1 are much slower than TCP/IP printer ports. |
Print spooler | Software that accepts a document sent to a printer and then stores it on disk or in memory until the printer is ready for it. The spooler receives, processes, schedules, and distributes documents for printing. In Windows 2000, spooling is carried out by the Print Spooler service (usually called the print service). If this service is stopped, you cannot print until the service has restarted. |
Monitoring is an important part of print management: It allows you to be notified of problems as soon as they occur and enables you to spot potential problems before they occur (for example, noticing that one printer is receiving all the print jobs while other printers sit idle).
In addition to the administrative benefits, monitoring also helps minimize disruptions for users. With an effective monitoring strategy, printing problems (such as paper jams and low toner) can often be identified and corrected before they have an adverse effect on users. Monitoring enables you to better distribute print resources, ensuring that some printers do not sit idle while others are unable to keep up with the printing demands made on them.
Monitoring can even be important for economic reasons. If invoices cannot be printed, customers cannot be billed and revenue cannot be collected. If proposals cannot be printed, deadlines might be missed and job opportunities lost. Because printed documents are a crucial component in day-to-day business transactions, it is important for administrators to ensure that printers are available and that those printers are being used appropriately.
In Windows 2000, several WMI classes, such as Win32_Printer and Win32_PrintJob, can be used to monitor various aspects of the printing infrastructure.
Even the most mechanically sound printer stops working or needs maintenance from time to time: Printers run low on toner, run out of paper, or get jammed — unavoidable situations that prevent users from printing their documents.
Unfortunately, when a printer stops working, no notice is sent to users; in addition, users can still send print jobs to the printer. If the problem is not identified and corrected, those jobs will continue to accumulate as long as the printer is unavailable.
For these reasons, monitoring the printers in your organization is an important part of print management. With a well-designed monitoring strategy in place, you can receive timely notification whenever a printer stops functioning and take immediate steps to either get the printer back online or transfer print jobs to a different printer.
Printer status can be monitored by using the Win32_Printer class. A number of the Win32_Printer class properties relevant to status monitoring are shown in Table 13.2.
Table 13.2. Win32_Printer Properties
Property | Description |
|---|---|
Availability | Availability and status of the printer. Values are returned as integers and indicate the following conditions:
|
Description | Description of the printer. |
Location | Physical location of the printer. |
Name | Label by which the printer is known. |
PrinterStatus | Status information for a printer beyond that specified in the Availability property. Values are returned as numbers and indicate conditions as follows:
|
ServerName | Name of the server that controls the printer. |
Note
Not all printers support each of the properties listed in Table 13.2. If a printer does not support a particular property, the value Null will be returned as the value of that property.
The best way to minimize the impact of a printer that is no longer working or accessible is to identify the problem and restore the printer functionality as quickly as possible. Even if this functionality cannot be restored (for example, the printer might have experienced a hardware problem that you are unable to repair), it is still important that printer problems be identified as quickly as possible; at the very least, this allows you to notify users that they should reroute their documents and not print anything to the “broken” printer.
You can use the Win32_Printer class to retrieve a status report for all the printers managed by a given print server.
Scripting Steps
Listing 13.2 contains a script that monitors the status of all the printers on a computer. To carry out this task, the script must perform the following steps:
Create a variable to specify the computer name.
Use a GetObject call to connect to the WMI namespace rootcimv2, and set the impersonation level to “impersonate.”
Use the ExecQuery method to query the Win32_Printer class.
This query returns a collection consisting of all the printers installed on the computer.
For each printer in the collection, echo values such as printer share name, printer location, and the current printer status.
Because printer status is returned as an integer, a series of Select Case statements is used to convert the integer to a recognizable text string. For example, if PrinterStatus is 4, the value “Printing” is echoed to the screen.
Example 13.2. Monitoring the Status of All the Printers on a Computer
 1 strComputer = "."
 2 Set objWMIService = GetObject("winmgmts:" _
 3     & "{impersonationLevel=impersonate}!\" & strComputer & "
ootcimv2")
 4 Set colInstalledPrinters =  objWMIService.ExecQuery _
 5     ("SELECT * FROM Win32_Printer")
 6 For Each objPrinter in colInstalledPrinters
 7     Wscript.Echo "Name: " & objPrinter.Name
 8     Wscript.Echo "Location: " & objPrinter.Location
 9     Select Case objPrinter.PrinterStatus
10         Case 1
11             strPrinterStatus = "Other"
12         Case 2
13             strPrinterStatus = "Unknown"
14         Case 3
15             strPrinterStatus = "Idle"
16         Case 4
17             strPrinterStatus = "Printing"
18         Case 5
19             strPrinterStatus = "Warmup"
20     End Select
21     Wscript.Echo  "Printer Status: " & strPrinterStatus
22     Wscript.Echo  "Server Name: " & objPrinter.ServerName
23     Wscript.Echo  "Share Name: " & objPrinter.ShareName
24     Wscript.Echo
25 Next
The script shown in Listing 13.2 is probably best run as a scheduled task; otherwise, it will simply run once and then stop; it will not display the most current status unless you manually rerun it. By scheduling the script to run on a periodic basis (for example, every 15–20 minutes), you will be able to routinely view the current printer status in a command window. After you have viewed these results, you can close the command window and wait for the script to run again.
This script is less useful, however, if you want to have a real-time display of printer status, with a single window that periodically updates itself and shows the current printer status. This is due in large part to limitations on displaying output within a command window. Because there is no way to clear the command window programmatically, you cannot simply replace an old data set with a new data set. Instead, any updated printer status must be appended to the bottom of the old data set, resulting in a confusing display, particularly for print servers that manage scores of printers.
If you prefer to have a real-time display of printer status, you can display status information in a Web page rather than in a command window. There are several advantages to displaying results in a Web page:
It is easy to print or save the results: Simply use the Save or Print function built into your Web browser. The command window does not provide such a straightforward method for saving or printing data.
It is possible to create formatted output that provides visual cues regarding printer status. For example, you might use a green icon for a running printer and a red icon for a stopped printer. Formatting of this kind is impossible inside a command window.
It is easy to update the results. At the end of five minutes, the script can erase the previous status information and write the update status information in its place.
You can create a Web page to display printer status by combining WMI methods and VBScript functions with HTML tags. The best way to do this is by creating a Hypertext Application (HTA), a Web page saved with the .HTA file name extension rather than the more standard .HTM file name extension.
Although functionally equivalent to a Web page, HTAs are not bound by the tight security restrictions imposed by Microsoft® Internet Explorer. For example, if you attempt to run a WMI query from a standard .HTM Web page, you will receive a message informing you that WMI has not been marked as “safe for scripting” and asking whether you want to proceed. You can avoid this message and run the query without any problem simply by changing the file name extension from .HTM to .HTA.
Scripting Steps
Listing 13.3 contains the HTML tags and script code required to display printer status in a Web page. The code shown in this listing should be typed in Notepad or another text editor and then saved with the .HTA file name extension.
To carry out its task, the HTA must perform the following steps:
Create a <SCRIPT> tag specifying VBScript as the scripting language.
Create a window_onLoad procedure.
Code in the window_onLoad procedure will automatically run whenever the window is loaded (either through initial startup, or by clicking the browser Refresh button).
Use the setInterval method to create a timer that will update printer status every 60 seconds.
The setInterval method requires three parameters:
GetInfo. The name of the procedure called by the timer.
60000. Number of milliseconds between calls (60,000 milliseconds equals 60 seconds). The timer will call the GetInfo subroutine, wait 60 seconds, and then call the procedure again.
VBScript. Scripting language used by the GetInfo script.
The setInterval method provides functionality similar to Wscript.Sleep: It allows the script to pause for a specified amount of time and then resume processing. This method must be used instead of Wscript.Sleep because Windows Script Host (WSH) methods cannot be called from within Internet Explorer.
Create a subroutine named GetInfo that retrieves the current list of installed printers and displays status information in a table.
To do this, the GetInfo subroutine must first delete the current version of the table (if one exists), re-create the table header, retrieve the list of printers, and then display the printer status in the table. It is easier to delete and re-create the table than to update individual rows within the table.
Create a loop that deletes all the rows in the existing table (with the Table ID of objTable).
Deleting the current table has the effect of wiping the page clean, allowing the latest status information to be displayed.
The loop works backward from the last row in the table (Rows.Length — 1) to the first row in the table (row 0). If there are three rows in the table, row 2 will be deleted first, then row 1, and then row 0.
Create the table header. To do this, the script must:
Use the InsertRow method to insert a new row in the table.
Use the InsertCell method to insert a new cell in the table.
Use the InnerText method to set the contents of the new cell to Name.
Use the same procedures to insert cells labeled Location and Status.
Create a variable to specify the computer name.
Use a GetObject call to connect to the WMI namespace rootcimv2, and set the impersonation level to “impersonate.”
Use the ExecQuery method to query the Win32_Printer class.
This query returns a collection consisting of all the printers installed on the computer.
For each printer in the collection, create a new table row with three cells:
one cell to display the printer name
one cell to display the printer location
one cell to display the printer status
Because printer status is returned as an integer, a Select Case statement is used to convert the value to a recognizable text string. For example, if the printer status is returned as 3, the word Idle will be displayed in the Web page.
Use a <TABLE> tag with the ID objTable; this tag indicates the location of the table on the Web page. The Border = 1 parameter is included to place a border around each cell in the table.
Use a <TBODY> tag with the ID objTableBody to represent the body of the table.
Use the </TBODY> and </TABLE> tags to mark the end of the table.
Example 13.3. Displaying Printer Status in a Web Page
 1 <SCRIPT LANGUAGE = "VBScript">
 2 Sub window_onLoad
 3     GetInfo
 4     iTimerID = window.setInterval("GetInfo", 60000, "VBScript")
 5 End Sub
 6 Sub GetInfo
 7     For i = (objTable.Rows.Length - 1) to 0 Step -1
 8         myNewRow = Document.All.objTable.deleteRow(i)
 9     Next
10     Set objRow = objTableBody.InsertRow()
11     objRow.Style.fontWeight = "bold"
12     Set objCell = objRow.InsertCell()
13     objCell.InnerText = "Name"
14     Set objCell = objRow.InsertCell()
15     objCell.InnerText = "Location"
16     Set objCell = objRow.InsertCell()
17     objCell.InnerText = "Status"
18     strComputer = "."
19     Set objWMIService = GetObject("winmgmts:" _
20         & "{impersonationLevel=impersonate}!\" & _
21             strComputer & "
ootcimv2")
22     Set colPrinters =  objWMIService.ExecQuery _
23         ("SELECT * FROM Win32_Printer")
24     For Each objPrinter in colPrinters
25         Set objRow = objTableBody.InsertRow()
26         Set objCell = objRow.InsertCell()
27         objCell.InnerText = objPrinter.Name
28         Set objCell = objRow.InsertCell()
29         objCell.InnerText = objPrinter.Location
30         Set objCell = objRow.InsertCell()
31         Select Case objPrinter.PrinterStatus
32             Case 1
33                 strPrinterStatus = "Other"
34             Case 2
35                 strPrinterStatus = "Unknown"
36             Case 3
37                 strPrinterStatus = "Idle"
38             Case 4
39                 strPrinterStatus = "Printing"
40             Case 5
41                 strPrinterStatus = "Warming up"
42         End Select
43         objCell.InnerText = strPrinterStatus
44     Next
45 End Sub
46 </SCRIPT>
47 <TABLE ID = "objTable" border = "1" >
48 <TBODY ID = "objTableBody">
49 </TBODY>
50 </TABLE>
When carrying out routine printer monitoring, you are likely to be concerned only with printers that are experiencing problems. Because of this, you might want to write a script that displays only printers that are not functioning correctly. For example, a print server in a large organization might handle 100 or more printers. If you return the status of every printer, you might have to search through 99 printers that are working in order to identify the single printer that has stopped responding. This not only wastes a considerable amount of time, but also increases the odds that you will overlook the one printer that is not working and thus not take immediate steps to correct the problem.
One of the prime benefits of WMI is that you can fine-tune the information returned. Instead of returning a list of all 100 printers, you can create a query that returns only a list of printers that are not responding. This makes it much faster and easier to identify the printers that are in need of immediate attention.
Listing 13.4 contains a script that issues a notification when a printer stops responding. To carry out this task, the script must perform the following steps:
Create a variable to specify the computer name.
Use a GetObject call to connect to the WMI namespace rootcimv2, and set the impersonation level to “impersonate.”
Use the ExecQuery method to query the Win32_Printer class.
To limit data retrieval to printers that have stopped, use a Where clause to restrict the collection to printers with a printer status equal to 1 (Other) or 2 (Unknown).
Use the Count property to check for the number of printers in the collection.
If the Count is 0, that means no stopped printers were discovered. In that case, echo a message stating that all printers are functioning correctly.
If the Count is greater than 0, then for each printer in the collection echo the name of the printer along with the message that the printer has stopped responding.
Example 13.4. Receiving Notification When a Printer Stops
 1 strComputer = "."
 2 Set objWMIService = GetObject("winmgmts:" _
 3     & "{impersonationLevel=impersonate}!\" & strComputer & "
ootcimv2")
 4 Set colInstalledPrinters =  objWMIService.ExecQuery _
 5     ("SELECT * FROM Win32_Printer WHERE PrinterStatus = 1" _
 6         & "OR PrinterStatus = 2")
 7 If colInstalledPrinters.Count = 0 Then
 8     Wscript.Echo "All printers are functioning correctly."
 9 Else
10     For Each objPrinter in colInstalledPrinters
11         Wscript.Echo "Printer " & objprinter.Name & " is not responding."
12     Next
13 End If
Monitoring scripts typically check printer status, pause for a predetermined interval (for example, 10 minutes), and then check printer status again. This is done to minimize the processing power and network bandwidth required to monitor printers, and is usually based on an acceptable response time (as determined by your organization) for responding to printer problems. If your users are not severely impacted by a printer that might be out of commission for 10 minutes before support personnel are notified of the problem, then using a standard monitoring script that verifies printer status every 10 minutes is an acceptable approach.
However, for high-volume printers or for printers that print critical business documents (such as invoices), administrators might want immediate notification of any printer problem. For these printers, you can use a temporary event subscription that constantly monitors their status and immediately notifies you the moment one of these printers changes status (for example, a printer that was printing but is now jammed).
Scripting Steps
Listing 13.5 contains a script that monitors printer status by using a temporary event subscription. To carry out this task the script must perform the following steps:
Create a variable to specify the computer name.
Use a GetObject call to connect to the WMI namespace rootcimv2, and set the impersonation level to “impersonate.”
Use an ExecNotificationQuery to register for notification each time there is an instance modification (that is, each time an instance within the namespace changes in some way).
Because the script monitors only changes to printers, include a Where clause that limits data retrieval to instance modifications involving the Win32_Printer class. The additional clause (within 30) causes the script to check every 30 seconds to see whether there has been a change in status. Therefore, status changes will not last longer than 30 seconds before being reported. In theory, a printer could stop and restart in less than 30 seconds. If that happened, the instance modification would go unreported.
Use a loop that allows the script to run indefinitely.
To stop monitoring, terminate the process the script is running in.
se the NextEvent method to retrieve the properties of each event when it occurs.
These properties are retrieved from an event object known as the TargetInstance. Each time a printer is modified in some way, the script checks to see whether the current printer status differs from the previous printer status. If it does not, the script resumes looping. This check is performed by comparing the status property of the TargetInstance with the status property of the PreviousInstance, an event object representing the state of the printer prior to the last instance modification.
Comparing the previous state with the current state enables you to identify whether the modification involved a change in printer status (for example, going from Idle to Printing). If the previous and current states are the same, the modification did not involve printer status but instead reflects a change to some other property of the printer (for example, a change in the printer location).
Because printer status is returned as an integer, a pair of Select Case statements is used to convert the current status and the previous status to a more recognizable text string. For example, if the printer status is returned as 3, the word Idle will be displayed as part of the event notification message.
If the printer states differ, echo the printer name, its current state, and its previous state.
Example 13.5. Monitoring Printer Status Using a Temporary Event Subscription
 1 strComputer = "."
 2 Set objWMIService = GetObject("winmgmts:" _
 3     & "{impersonationLevel=impersonate}!\" & strComputer & "
ootcimv2")
 4 Set colPrinters = objWMIService. _
 5     ExecNotificationQuery("SELECT * FROM __instancemodificationevent " _
 6         & "WITHIN 30 WHERE TargetInstance ISA 'Win32_Printer'")
 7 i = 0
 8 Do While i = 0
 9     Set objPrinter = colPrinters.NextEvent
10     If objPrinter.TargetInstance.PrinterStatus <> _
11         objPrinter.PreviousInstance.PrinterStatus Then
12         Select Case objPrinter.TargetInstance.PrinterStatus
13             Case 1 strCurrentState = "Other"
14             Case 2 strCurrentState = "Unknown"
15             Case 3 strCurrentState = "Idle"
16             Case 4 strCurrentState = "Printing"
17             Case 5 strCurrentState = "Warming Up"
18         End Select
19         Select Case objPrinter.PreviousInstance.PrinterStatus
20             Case 1 strPreviousState = "Other"
21             Case 2 strPreviousState = "Unknown"
22             Case 3 strPreviousState = "Idle"
23             Case 4 strPreviousState = "Printing"
24             Case 5 strPreviousState = "Warming Up"
25         End Select
26         Wscript.Echo objPrinter.TargetInstance.Name _
27             &  " is " & strCurrentState _
28                 & ". The printer previously was " & strPreviousState & "."
29     End If
30 Loop
In Windows 2000, printing is controlled by the Print Spooler service (usually called the print service). If this service is stopped, printing cannot take place. Because printing requires the Print Spooler service, any attempt to diagnose printer problems should include a check to ensure that this service is still running.
Checking the status of the Print Spooler service is especially important because the error messages presented to users when a printing problem occurs can be misleading. For example, if the Print Spooler service stops on the local computer, a user attempting to print a document receives this message:
Before you can perform printer-related tasks such as page setup or printing a
document, you need to install a printer. Do you want to install a printer now?
If the user clicks Yes, this message is displayed:
Operation could not be completed.
Needless to say, this will leave the typical user helpless, and the problem might even be difficult for a support technician to initially diagnose and correct.
Likewise, if the Print Spooler service stops on a remote print server, a user attempting to print a document receives this cryptic message:
The RPC server is unavailable.
To programmatically check the status of the Print Spooler service, use the Win32_Service class.
Scripting Steps
Listing 13.6 contains a script that verifies the status of the print service. To carry out this task, the script must perform the following steps:
Create a variable to specify the computer name.
Use a GetObject call to connect to the WMI namespace rootcimv2, and set the impersonation level to “impersonate.”
Use the ExecQuery method to query the Win32_Service class.
To limit data retrieval to the print service, use a Where clause that targets only the service with the name Spooler.
For each service in the collection, echo the service name and the current service status.
Example 13.6. Verifying the Status of the Print Service
1 strComputer = "."
2 Set objWMIService = GetObject("winmgmts:" _
3     & "{impersonationLevel=impersonate}!\" & strComputer & "
ootcimv2")
4 Set colRunningServices = objWMIService.ExecQuery _
5     ("SELECT * FROM Win32_Service WHERE Name = 'Spooler'")
6 For Each objService in colRunningServices
7     Wscript.Echo objService.DisplayName & ": " & objService.State
8 Next
This script only returns the status of the Print Spooler service. In a production script, you might first check the status of the Print Spooler service and then attempt to restart the service if it has stopped. If the script is unable to restart the service, an administrative alert of some kind can then be issued. For more information about starting services by using WMI, see “Services” in this book.
It is as important to monitor the workloads on print servers as it is to simply ensure that these print servers are running. By monitoring individual print queues, you can gain a better understanding of how the printing load is being distributed among your printers. In turn, this allows you to make better decisions regarding the distribution of printing resources. For example, if you know that a printer in one department is being underutilized, you might transfer that device to a department where the only printer is experiencing an extremely heavy workload.
Printer workloads are monitored by checking individual print queues for such things as:
Number of print jobs in the queue.
Size of the print jobs in the queue.
Amount of time print jobs spend in the queue before being printed.
These items can be monitored by using WMI and the Win32_PrintJob class.
Monitoring the number of jobs in a print queue can provide a rough estimate of the printer workload. However, the number of jobs in a print queue can be misleading. For example, a single document of 250 pages ties up a printer longer than 100 single-page documents. Likewise, a pair of 10-page documents filled with intricate graphics might take longer to print than that same 250-page, all-text print job.
Unless your users tend to print the same type of document over and over (for example, an all-text document no more than a few pages long), you might need to use a more precise metric when monitoring print queues. In a situation such as that, you can use the Win32_PrintJob class to tally not only the number of jobs in the queue but also the number of pages scheduled to be printed or the total number of bytes still in the queue.
Neither the total number of pages to be printed nor the total number of bytes in the queue is provided as a Win32_PrintJob property. Instead, you must retrieve the number of pages and number of bytes for each print job and then add these values to determine the total number of pages and total number of bytes to be printed. This provides more comprehensive data than merely reporting the number of jobs in a queue. For example, the script can also calculate such values as the largest print job in the queue and the average number of pages per print job.
Scripting Steps
Listing 13.7 contains a script that reports cumulative print queue statistics for a specific print server. To carry out this task, the script must perform the following steps:
Create a variable to specify the computer name.
Use a GetObject call to connect to the WMI namespace rootcimv2, and set the impersonation level to “impersonate.”
Use the ExecQuery method to query the Win32_PrintJob class.
This query returns a collection consisting of all the print jobs on the computer.
For each print job in the collection, do the following:
Increment the total number of print jobs (intTotalJobs) by 1. Print jobs are incremented in this fashion to illustrate how calculations can be performed within a script. However, you can also use the WMI Count property to report the number of print jobs in the collection.
Add the number of pages in the print job to the total number of pages for all the active print jobs (intTotalPages).
If the total number of pages in the print job is greater than the value intMaxPrintJob, replace the value of intMaxPrintJob with the number of pages in the current print job. The variable intMaxPrintJob will thus store the size of the largest print job in the queue (based on page count).
Echo the values for total print jobs, total number of pages for the print jobs in the print queues, and the largest print job in the queue.
Example 13.7. Reporting Print Queue Statistics
 1 strComputer = "."
 2 Set objWMIService = GetObject("winmgmts:" _
 3     & "{impersonationLevel=impersonate}!\" & strComputer & "
ootcimv2")
 4 Set colPrintJobs =  objWMIService.ExecQuery _
 5     ("SELECT * FROM Win32_PrintJob")
 6 For Each objPrintJob in colPrintJobs
 7     intTotalJobs = intTotalJobs + 1
 8     intTotalPages = intTotalPages + objPrintJob.TotalPages
 9     If objPrintJob.TotalPages > intMaxPrintJob Then
10         intMaxPrintJob = objPrintJob.TotalPages
11     End If
12 Next
13 Wscript.Echo "Total print jobs in queue: " & intTotalJobs
14 Wscript.Echo "Total pages in queue: " & intTotalPages
15 Wscript.Echo "Largest print job in queue: " & intMaxPrintJob
Note
The TotalPages property does not always reflect the number of pages to be printed. Most software applications (including the Microsoft® Office applications) correctly report the number of pages to be printed. However, some applications do not. For example, Notepad always reports a document as being a single page in length, regardless of the actual number of printed pages that will result from printing that document. If your organization uses software that does not correctly report total pages, you might want to measure the size of the print jobs instead.
In general, monitoring is limited to printers and print queues; as an administrator, your primary concerns are that printers remain available and that print queues are up and running. Sometimes, however, it is useful to monitor each print job sent to a printer. This kind of monitoring can catch conditions such as:
Documents that get stuck in a print queue — that is, documents that for some reason do not get printed, even though other documents in the queue do get printed.
Large documents that monopolize printer time. Depending on the size, a single document can delay the printing of scores of other documents.
Workload that is inequitably distributed among printers. For example, Printer A might print 100 documents each hour, while Printers B and C, with the same capabilities and located in the same room, print only 5 or 10 documents an hour.
Print jobs can be monitored using the Win32_PrintJob class. Some of the Win32_PrintJob properties useful in monitoring print jobs are shown in Table 13.3.
Table 13.3. Win32_PrintJob Properties for Monitoring Print Jobs
Property | Description |
|---|---|
Caption | Short description of the printer. Typically, the caption is the name of the printer followed by the print job ID. For example: |
Document | Name of the print job; equivalent to the file name of the document being printed. The user sees this name when viewing the set of documents in a print queue. |
HostPrintQueue | Name of the computer on which the print job was created. |
JobId | Identifier assigned to the print job. |
JobStatus | String representing the job’s status. Common status values include:
|
Notify | User to be notified upon job completion or failure. |
Owner | User that submitted the job. |
PagesPrinted | Number of pages that have been printed. This value might be 0 if the print job does not contain page-delimiting information. |
Priority | Urgency or importance of execution of a job, with a range of 0 to 99. Higher-priority jobs are printed before lower-priority jobs. |
Size | Size of the print job (in bytes). |
StatusMask | Bitmap of the possible status conditions relating to this print job. Values include the following:
For more information about working with bitmap values, see “Script Runtime Primer” in this book. |
TimeSubmitted | Time that the job was submitted. |
TotalPages | Number of pages in the job. This value might be 0 if the print job does not contain page-delimiting information. |
UntilTime | Time after which the job is invalid or should be stopped. For example, you can specify that if the document is not printed by 5:00 P.M., it should not be printed at all. |
A comparison of Win32_PrintJob properties and the print job properties seen in the GUI is shown in Figure 13.1.

In addition to the Win32_PrintJob class, the IADsPrintJob interface can be used to monitor print jobs. Properties available through the IADsPrintJob interface are shown in Table 13.4. Many of these properties can be configured by using scripts; those that cannot be are denoted as read-only.
Table 13.4. IADsPrintJob Properties
Property | Description |
|---|---|
Description | Name of the document and the application used to print that document. For example, the description for the document Budget.xls printed using Excel would be “Budget — Excel”. |
HostPrintQueue (read-only) | ADsPath of the print queue (for example, WinNT://atl-ps-01/ArtDepartmentPrinter). |
Notify | Logon name of the user to be notified when the print job has finished printing. |
Priority | Priority assigned to the print job, ranging from 1–99. Print jobs with higher priorities are printed before those with lower priorities. |
Size (read-only) | Size of the print job, in bytes. |
StartTime | Earliest time when the print job can begin printing. |
Date and time that the print job was submitted. | |
TotalPages (read-only) | Total number of pages in the print job. |
UntilTime | Latest time that the print job can be printed. |
User (read-only) | Logon name of the user who submitted the print job. |
Monitoring individual print jobs allows you to retrieve detailed information about each print job on a print server. In turn, this information allows you to:
Verify that documents are moving through the print queue at the expected rate.
Identify unusually large documents that might monopolize the printer.
Identify users who print an excessive number of documents.
Assist users with printing problems.
For example, a user might call the Help desk complaining that a document has not been printed. By examining the print job status, a technician might notice that the document has been paused or that it has a low priority compared with other documents in the queue. In the latter case, this means that the document will not be printed until all the higher-priority jobs have completed.
You can use the Win32_PrintJob class to retrieve detailed information about every print job on a print server.
Scripting Steps
Listing 13.8 contains a script that monitors print job status. To carry out this task, the script must perform the following steps:
Create a variable to specify the computer name.
Use a GetObject call to connect to the WMI namespace rootcimv2, and set the impersonation level to “impersonate.”
Use the ExecQuery method to query the Win32_PrintJob class.
This query returns a collection consisting of all the print jobs on the computer.
Echo the column headers Print Queue, Job ID, Owner, and Total Pages.
For each print job in the collection, echo the name of the printer where the job is queued, the job ID number, the person who submitted the print job, and the total number of pages in the print job.
The Name property is a combination of the name of the printer where the job is queued and the ID number assigned to the print job. For example, a print job assigned ID number 522 on the printer ColorPrinter would have the following name:
ColorPrinter, 522
The VBScript Split function is used to split the printer name and the print job ID into an array. In this script, the Split function uses the following parameters:
objPrintJob.Name —. Print job name (for example, ColorPrinter, 522). This is the value being split into the array.
, —. Delimiter used to separate fields in the string.
–1 —. Indicates that all substrings of the array should be returned.
1 —. Indicates that a text comparison should be performed. To perform a binary comparison, enter 0 as the parameter.
When the Split function is called, the print job name will be split into an array with two elements: Element 0 will contain the name of the printer, and element 1 will contain the job ID. To reference the printer name, simply specify element 0 in the array. For example:
Wscript.Echo strPrinter(0)
Example 13.8. Monitoring Print Job Status
 1 strComputer = "."
 2 Set objWMIService = GetObject("winmgmts:" _
 3     & "{impersonationLevel=impersonate}!\" & strComputer & "
ootcimv2")
 4 Set colPrintJobs =  objWMIService.ExecQuery _
 5     ("SELECT * FROM Win32_PrintJob")
 6 Wscript.Echo "Print Queue, Job ID, Owner, Total Pages"
 7 For Each objPrintJob in colPrintJobs
 8     strPrinter = Split(objPrintJob.Name,",",-1,1)
 9     Wscript.Echo strPrinter(0) & ", " & _
10         objPrintJob.JobID & ", " &  objPrintJob.Owner & ", " _
11             & objPrintJob.TotalPages
12 Next
One way to measure how well the workload is distributed among your printers is to track the amount of time documents spend in the print queue. Users can generally expect to receive their printed output within minutes after submitting a print job. If they do not, this could be the result of a single large job monopolizing the printer or of an extremely large print queue.
To help ensure that print jobs are being printed at the expected rate, you can periodically check to see whether any documents have been in the queue longer than a baseline rate established for a particular printer. For example, you might determine that all documents sent to printer A should be printed no later than 15 minutes after they have been submitted. If documents take longer than that to print, then:
Users might be printing too many documents to the printer.
Users might be printing large documents not intended for that printer.
The printer might be experiencing problems.
To determine the amount of time a print job has been in the print queue, use the IADsPrintJob property TimeSubmitted. This property indicates the time the print job was sent to the printer. You can subtract the submitted time from the current time to determine how long a document has been in the print queue.
Scripting Steps
Listing 13.9 contains a script that lists print jobs that have spent 15 minutes or more in the print queue. To carry out this task, the script must perform the following steps:
Use a GetObject call to bind to the printer ArtDepartmentPrinter on the print server atl-ps-01.
Use the PrintJobs method to assign a value to the variable colPrintJobs.
This variable will now contain a collection consisting of all the print jobs in the ArtDepartmentPrinter print queue.
For each print job in the collection, use the DateDiff function to determine the number of minutes that the job has been in the print queue and assign this value to the variable dtmTimeInQueue.
The DateDiff function requires the following three parameters:
“n” —. Used by DateDiff to indicate that the time differential should be returned in minutes.
objPrintJob.TimeSubmitted —. Date and time that the print job was submitted.
Now —. Current date and time. The difference between the current date and time and the time the print job was submitted represents the amount of time that the job has been in the print queue.
If dtmTimeInQueue is greater than 15, echo a message indicating the name of the document being printed and the number of minutes that this document has been in the print queue.
Example 13.9. Monitoring the Time Print Jobs Spend in a Print Queue
1 Set objPrinter = GetObject("WinNT://atl-ps-01/ArtDepartmentPrinter")
2 Set colPrintJobs = objPrinter.PrintJobs
3 For Each objPrintJob in colPrintJobs
4     dtmTimeInQueue = DateDiff("n", objPrintJob.TimeSubmitted, Now)
5     If dtmTimeInQueue > 15 Then
6         Wscript.Echo objPrintJob.Description, dtmTimeInQueue
7     End If
8 Next
For the most part, print management is a hands-off activity. Other than routine maintenance, such as adding paper and replacing toner cartridges, not much management work is usually required. From time to time, however, you do have to carry out tasks such as:
Taking inventory of your printers and their capabilities.
Pausing and resuming printers to do routine maintenance.
Pausing and resuming individual print jobs.
You can use a combination of WMI and ADSI scripting to help you manage printers, print queues, and print jobs across the enterprise.
Like most management activities, print management requires a detailed understanding of the capabilities of each element in the infrastructure. As an administrator, you must ensure that users have access to printers, and to the right kind of printers. Graphic artists, for example, have very different printing needs than word processor operators. Users who prepare large monthly reports likely require a much faster printer than users who occasionally print a memo or two.
When planning the distribution of print resources to meet these needs, you must take into account the capabilities of those resources. For example, printers that cannot collate and staple documents should not be placed in locations where collating and stapling are required.
You can use two WMI classes, Win32_Printer and Win32_PrinterConfiguration, to return information about all the printers installed on a given print server. This information includes the subset of Win32_Printer properties shown in Table 13.5.
Table 13.5. Win32_Printer Properties
Property | Description |
|---|---|
Capabilities | Array of printer capabilities. Values include the following:
|
CapabilityDescriptions | Array of free-form strings providing more detailed explanations for any of the printer features indicated in the Capabilities array. Each entry in this array is related to the entry in the Capabilities array that is located at the same index. |
Description | Description of the printer. |
DeviceID | Unique identifier of the printer, used to distinguish it from other devices on the system. |
DriverName | Name of the printer driver. |
Location | Physical location of the printer. |
Label by which the printer is known. | |
PortName | Port that can be used to transmit data to the printer. If a printer is connected to more than one port, the names of the ports are separated by commas. |
SeparatorFile | Name of the file used to create a separator page. |
ServerName | Name of the server that controls the printer. |
ShareName | Share name of the printer. |
StartTime | Earliest date and time the printer can print a job (if the printer has been configured to print only at certain times). This value is expressed as time elapsed since 12:00 A.M. GMT (Greenwich mean time). |
TimeOfLastReset | Date and time this printer was last reset. |
UntilTime | Latest date and time the printer can print a job (if the printer has been limited to print only at certain times). This value is expressed as time elapsed since 12:00 A.M. GMT (Greenwich mean time). |
Additional properties available through the Win32_PrinterConfiguration class are listed in Table 13.6. Many of these properties represent the default values that are assigned to all print jobs sent to the printer. For example, if the Copies property is set to 2, by default the printer will print two copies of each print job. Users can override these default values by changing the appropriate options in the Print dialog box each time they print a document.
Table 13.6. Win32_PrinterConfiguration Properties
Property | Description |
|---|---|
Collate | Boolean value indicating whether the pages that are printed should be collated. This property is ignored if the printer driver does not support collation. |
Color | Method used by a color printer to print a black-and-white document. Some color printers have the capability to print using true black instead of a combination of cyan, magenta, and yellow (CMY). This usually creates darker and sharper text for documents. This option is useful only for color printers that support true black printing. Values include the following:
|
Copies | Number of copies to be printed. |
DeviceName | Friendly name of the printer. |
DriverVersion | Version number of the printer driver. Version numbers are created and maintained by the driver manufacturer. |
Duplex | Boolean value indicating whether printing is done on both sides (True) or only one side of the medium (False). |
HorizontalResolution | Print resolution in dots per inch for the width of the print job. This value is set only when the PrintQuality property is positive. |
Name | Name of the printer. |
Orientation | Printing orientation of the paper. Values include the following:
|
PaperLength | Length of the paper (in tenths of a millimeter). To determine the size of the paper in inches, divide this value by 254. |
PaperSize | Size of the paper. |
PaperWidth | Width of the paper (in tenths of a millimeter). To determine the size of the paper in inches, divide this value by 254. |
PrintQuality | One of four quality levels of the print job. If a positive value is specified, the quality is measured in dots per inch. Values include the following:
|
Scale | Factor by which the printed output is to be scaled. For example, a scale of 75 reduces the print output to 3/4 its original height and width. |
SpecificationVersion | Version number of the initialization data for the device associated with the printer. |
TTOption | Indicates the manner in which TrueType fonts should be printed. Values include the following:
|
VerticalResolution | Print resolution for the height of the print job. This value is set only when the PrintQuality property is positive. |
The IADsPrintQueue interface can also return information about a printer. Selected properties, all of which are read/write, available through this interface are shown in Table 13.7.
Table 13.7. IADsPrintQueue Properties
Property | Description |
|---|---|
BannerPage | Local path to the page used to separate print jobs. If this value is Null, a separator page is not used for this printer. |
Description | Description of the printer. This description is available to anyone accessing the printer over the network. |
Location | Physical location of the printer. |
Model | Model name of the printer (for example, HP LaserJet 6). |
Priority | Priority assigned to the printer (and to print jobs). |
StartTime | Earliest time that the printer can begin printing documents. |
UntilTime | Latest time that the printer can continue printing documents. |
Before you can determine how to best distribute and use your printing resources, you must have a detailed knowledge of those resources. For example, Department A might have only three printers compared with five printers in Department B. However, if the printers in Department A can print 20 pages per minute and the printers in Department B can print only 5 pages per minute, users in Department A actually have more printing capacity. Without knowing the detailed capabilities of these printers, you might erroneously conclude that Department A is short on printing capacity and thus purchase additional printers that end up going unused.
WMI includes two classes, Win32_Printer and Win32_PrinterConfiguration, which can be used to return detailed information about all the printers installed on a computer.
Scripting Steps
Listing 13.10 contains a script that retrieves printer information. To carry out this task, the script must perform the following steps:
Create a variable to specify the computer name.
Use a GetObject call to connect to the WMI namespace rootcimv2, and set the impersonation level to “impersonate.”
Use the ExecQuery method to query the Win32_PrinterConfiguration class.
This query returns a collection consisting of configuration information for all the printers installed on the computer.
For each printer in the collection, echo the specified properties.
Many of these property values are returned as integers or as other values that might be difficult to interpret. Because of this, the script converts the following property values to recognizable values:
Orientation. If the value 1 is returned, the orientation is Portrait mode. Otherwise, the orientation is Landscape mode.
Paper length. Paper length is returned in tenths of a millimeter. To convert the value to inches, divide the length by 254. For example, if the value 2,794 is returned, the length is divided by 254, converting 2,794 tenths of a millimeter to 11 inches.
Paper width. Paper width is returned in tenths of a millimeter. To convert the value to inches, divide the width by 254. For example, if the value 2,159 is returned, width length is divided by 254, converting 2,159 tenths of a millimeter to 8.5 inches.
TrueType option. If the value is 1, the string “Print TrueType fonts as graphics” is echoed. If the value is 2, the string “Download TrueType fonts as soft fonts” is echoed. If the value is anything other than 1 or 2, the string “Substitute device fonts for TrueType fonts” is echoed.
Example 13.10. Enumerating Printers and Printer Capabilities
 1 strComputer = "."
 2 Set objWMIService = GetObject("winmgmts:" _
 3     & "{impersonationLevel=impersonate}!\" & strComputer & "
ootcimv2")
 4 Set colInstalledPrinters =  objWMIService.ExecQuery _
 5     ("SELECT * FROM Win32_PrinterConfiguration")
 6 For Each objPrinter in colInstalledPrinters
 7     Wscript.Echo "Name: " & objPrinter.Name
 8     Wscript.Echo "Collate: " & objPrinter.Collate
 9     Wscript.Echo "Copies: " & objPrinter.Copies
10     Wscript.Echo "Driver Version: " & objPrinter.DriverVersion
11     Wscript.Echo "Duplex: " & objPrinter.Duplex
12     Wscript.Echo "Horizontal Resolution: " & _
13         objPrinter.HorizontalResolution
14     If objPrinter.Orientation = 1 Then
15         strOrientation =  "Portrait"
16     Else
17         strOrientation = "Landscape"
18     End If
19     Wscript.Echo "Orientation : " & strOrientation
20     Wscript.Echo "Paper Length: " & objPrinter.PaperLength / 254
21     Wscript.Echo "Paper Width: " & objPrinter.PaperWidth / 254
22     Wscript.Echo "Print Quality: " & objPrinter.PrintQuality
23     Wscript.Echo "Scale: " & objPrinter.Scale
24     Wscript.Echo "Specification Version: " & _
25         objPrinter.SpecificationVersion
26     If objPrinter.TTOption = 1 Then
27         strTTOption = "Print TrueType fonts as graphics."
28     ElseIf objPrinter.TTOption = 2 Then
29         strTTOption = "Download TrueType fonts as soft fonts."
30     Else
31         strTTOption = "Substitute device fonts for TrueType fonts."
32     End If
33     Wscript.Echo "True Type Option: " & strTTOption
34     Wscript.Echo "Vertical Resolution: " & objPrinter.VerticalResolution
35 Next
Physical printers and logical printers are not irrevocably tied to one another. If you turn off the physical printer, this will not affect the logical printer in any way. Instead, the logical printer will still appear to be functioning, even though the physical printer is no longer available.
Among other things, this means that anytime a physical printer is removed from the network (for example, to undergo routine maintenance), the logical printer representing that device should be paused. If the physical printer is removed from the network and the logical printer is not paused, the print server will periodically attempt to print the first job in the print queue, even though the printer is no longer available. As a result, the print server uses up processing power in an attempt to complete a task that cannot be completed. When the logical printer is paused, print jobs simply remain in the queue, and no attempt is made to print them until the logical printer is resumed.
Logical printers can be paused by using the Pause method of the IADsPrintQueueOperations interface.
Scripting Steps
Listing 13.11 contains a script that pauses a printer. To carry out this task, the script must perform the following steps:
After a printer has been paused, it must be resumed. This is because the paused state is a property of the logical printer and is controlled by the print server. You cannot resume a logical printer simply by turning the physical printer on and off.
Instead, printers must be resumed manually by using the Printers control panel or programmatically by using the Resume method of the IADsPrintQueueOperations interface. Until a printer has been resumed, no documents can be printed using that printer. Users will be able to submit print jobs, but those jobs will remain in the queue until the printer has been resumed.
Scripting Steps
Listing 13.12 contains a script that resumes a printer. To carry out this task, the script must perform the following steps:
Print queues are nothing more than the documents waiting to be printed by a specified printer. Although print queues require little management activity other than routine monitoring, sometimes a printer breaks down or becomes inaccessible while there are documents in its print queue. When this occurs, documents remain in the print queue until the physical printer is restored to the network. This can create problems for the users who submitted the print jobs: The print queue will still show their documents as being in line to be printed, even though it might be days before the printer is restored to the network.
In these cases, you might need to delete all the documents from the print queue, a process typically referred to as purging the print queue. (If you do this, you might also want to notify users that their documents have been deleted and must be reprinted.)
Purging a print queue provides a fast and easy way to remove all the print jobs from a specified print queue.
For example, if you need to remove a printer from the network, you can purge the print queue and thus delete all the existing print jobs. If you do not, users will assume their documents are still in line to be printed because they will still see them in the print queue. This is because the existence of a logical printer is not dependent on the availability of a physical printer: Removing the physical printer will not also remove the logical printer. Because the logical printer still exists, the print queue, and any documents in it, continue to exist as well.
The IADsPrintQueueOperations interface includes a method, Purge, that can be used to purge print jobs on a printer or group of printers.
Scripting Steps
Listing 13.13 contains a script that purges a print queue. To carry out this task, the script must perform the following steps:
There might be times when you need to pause a print job after it has been sent to a printer. For example, a user might accidentally click the Print button and send a 300-page job to the printer that he or she does not want to be printed at the moment. You might allow such large print jobs but prefer that documents like this be printed when there is less demand for the printer and fewer users will be inconvenienced by waiting for the job to finish. In this case, you might want to monitor the print queue and then temporarily pause the printing of any large documents.
The IADsPrintJob interface includes two methods, Pause and Resume, that enable you to manage the printing of individual documents within a print queue.
On occasion, you might need to pause a print job or set of print jobs and then resume printing those documents later. For example, if you have one document that needs to be printed immediately, you can pause all the other print jobs on a printer. As soon as that document begins to print, you can resume the paused print jobs.
Alternatively, you might have a very large document that takes a long time to print. In that case, you can pause the large document and wait until the print queue is empty before printing it.
In practice, you can pause only print jobs that are waiting in the queue. Although you can pause the document currently being printed, this usually has no practical benefit. Except for extremely large documents, the entire print job is sent to the printer buffer. Because the printer continues printing until the buffer is empty, the pause command might have no effect. If the entire print job is in the buffer, the entire print job will print. If you pause all the print jobs in the queue, those jobs will not print. However, any new documents sent to the printer will print as expected.
You can pause print jobs by using the Pause method of the IADsPrintJobOperations interface.
Note
The Pause method is best used for pausing only those documents in the queue that meet a specified condition. If you want to pause all the print jobs on a specific printer, you can pause the printer rather than pausing each individual print job. For more information, see “Pausing Printers” earlier in this chapter.
Scripting Steps
Listing 13.14 contains a script that pauses all the print jobs in a print queue that are over 400,000 bytes in size. To carry out this task, the script must perform the following steps:
Use a GetObject call to bind to the printer ArtDepartmentPrinter on the print server atl-ps-01.
Use the PrintJobs method to set the value of the variable colPrintJobs.
This variable will now contain a collection consisting of all the print jobs in the ArtDepartmentPrinter print queue.
For each print job in the collection, check to see whether the size of the document being printed is greater than 400,000 bytes.
For each print job larger than 400,000 bytes, use the Pause method to pause the job.
After a print job has been paused, that job must be resumed before the document will be printed. You can resume the print job programmatically by using the Resume method of the IADsPrintJobOperations interface.
For the most part, the Resume method works only on print jobs that were paused before they started printing. If you pause a print job while it is printing, it is likely that the document will not actually be paused but will continue printing. If the document is larger than the print buffer, however, it is possible that only part of the document will be printed and then the print job will be paused. If a document has printed partway and then paused, resuming the print job will not cause printing to pick up where it left off. Instead, the entire document will be reprinted.
Scripting Steps
Listing 13.15 contains a script that resumes all the print jobs on a computer. To carry out this task, the script must perform the following steps:
Use a GetObject call to bind to the printer ArtDepartmentPrinter on the print server atl-ps-01.
Use the PrintJobs method to set the value of the variable colPrintJobs.
This variable will now contain a collection consisting of all the print jobs in the ArtDepartmentPrinter print queue.
For each print job in the collection, use the Resume method to resume printing the document.
Both printers and print jobs expose a number of properties that can be configured by using scripts. For example, after a printer has been installed, you can use scripting to change printer properties such as Location and Priority or to schedule the hours when a printer actually processes print jobs. This allows you to dynamically manage the printing infrastructure, thus making the printing process easier for both you and your users.
You can use ADSI to change the properties of print jobs already in the print queue. These properties include such things as the job priority and the time at which the job is printed. In turn, this provides you with the ability to print specific documents as needed. For example, large documents can be rescheduled to print after hours, while important documents can be reassigned a higher priority and printed immediately, even if other documents are in the queue ahead of them.
Most of the IADsPrintQueue properties can be configured by using ADSI. These configurable properties provide a way for you to dynamically change your printing infrastructure as needed. For example, you can assign a higher priority to a particular printer, thereby ensuring that documents sent to that printer are printed first. Alternatively, you might want to share a printer over the network or use a script to modify the location or the availability of a printer.
Scripting Steps
Listing 13.16 contains a script that configures the priority of a printer. To carry out this task, the script must perform the following steps:
Use a GetObject call to bind to the printer ArtDepartmentPrinter on the print server atl-ps-01.
Set the Priority to 2.
Use the SetInfo method to apply the new priority to the logical printer.
Example 13.16. Configuring Printer Priority
1 Set objPrinter = GetObject("WinNT://atl-ps-01/ArtDepartmentPrinter")
2 objPrinter.Priority = 2
3 objPrinter.SetInfo
Note that changing the priority of a printer is meaningless unless multiple logical printers are targeted to the same physical printer. For example, you might have a single physical printer that has two logical printers configured as follows:
Printer A, with a priority of 2
Printer B, with a priority of 1
In this case, any documents sent to Printer A print before documents sent to Printer B. Why? Because Printer A has a higher priority. If the physical printer has only one logical printer, documents will print in the order in which they are submitted, regardless of the priority assigned to the printer. This is because all print jobs will have the same priority.
Print management commonly includes the scheduling of printer availability. For example, many organizations limit the hours during which print jobs can be printed. This is often done to prevent users from printing personal documents after the close of regular business hours. It also provides an opportunity for support personnel to perform routine maintenance without the fear of interrupting a submitted print job.
Alternatively, printer scheduling might be used to allow users to submit print jobs during business hours and have those print jobs automatically printed late at night, when the printing will not interfere with other documents.
For example, suppose a user routinely prints a 300-page document for use the next day. You can create a logical printer for that user and schedule the printer to print only between the hours of 2:00 A.M. and 6:00 A.M. The user sends the print job to this custom printer each time the document is printed. The job queues but does not begin printing until 2:00 A.M. Therefore, it does not monopolize the printer during regular working hours.
Printer availability can be configured by modifying the IADsPrintQueue properties StartTime and UntilTime.
Scripting Steps
Listing 13.17 contains a script that configures the availability of a printer. To carry out this task, the script must perform the following steps:
Use a GetObject call to bind to the printer ArtDepartmentPrinter on the print server atl-ps-01.
Set the value of the StartTime property to 6:00 A.M. To ensure that the correct data type is used when setting StartTime, use the VBScript TimeValue function.
Set the value of the UntilTime property to 1:00 A.M. To ensure that the correct data type is used when setting StartTime, use the VBScript TimeValue function.
Use the SetInfo method to apply the changes to the logical printer.
The printer location tracking mechanism introduced in Windows 2000 helps users find hardware devices by allowing you to store the location of these devices in the Active Directory® directory service.
Among other things, this makes it easy for users to locate printers that are within close physical proximity (that is, in the same building, on the same floor, in the same wing, and so forth). When printer location tracking is enabled, a user who opens the Find Printers dialog box finds the location of his or her computer automatically inserted into the Location box, as shown in Figure 13.2.
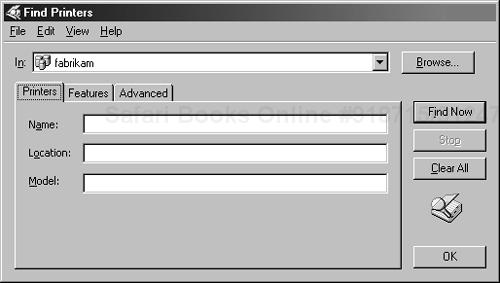
A user who clicks the Find Now button can then view a list of all the printers available in that location.
Alternatively, the user can click Browse and then choose any other location to search for printers (Figure 13.3). This is especially useful for mobile users who routinely log on from various locations within the organization. Rather than having to know the names of the printers located in each building, users can allow printer location tracking to locate nearby printers for them.

To enable printer location tracking, you must do the following:
Develop a naming scheme for your organization.
Typically, naming schemes in large organizations use the format Country/City/Building/Floor: for example, USA/Redmond/Building 37/Floor 3. Although you can use any naming scheme, the scheme must match the physical layout of your subnets. If a particular subnet spans two floors in your building (for example, floors 3 and 4), your naming scheme must reflect this: USA/Redmond/Building 37/Floors 3 and 4.
Associate each subnet in your organization with a location, using your chosen naming scheme.
For example, suppose you have two subnets (192.168.1 and 192.168.2) and two locations (Building 1/Floor 1 and Building 1/Floor2). In Active Directory Sites and Services, set the location of subnet 192.168.1 to Building 1/Floor 1 and the location of subnet 192.168.2 to Building 1/Floor 2.
Set the location attribute for your printers and your computers using the naming scheme previously developed.
You must use the same naming scheme to set the locations for both printers and computers. If you do not, printer location tracking either fails completely or provides misleading results.
Enable (at the domain level) the Group Policy setting Pre-populate printer search location text.
This is located under Computer ConfigurationAdministrative TemplatesPrinters.
When developing a naming scheme, keep the following in mind:
You must use the forward slash (/) character to divide the sections of a name. USA/Redmond/Building 37/Floor 3 is a valid name; USA-Redmond-Building 37-Floor 3 is not.
Each name section is limited to 32 characters, and a location is limited to a total of 260 characters. Each name section represents the portion of a name between the / characters. For example, the name USA/Redmond/Building 37 has three name sections:
USA
Redmond
Building 37
Searches are based on the locations given to subnets. For example, if you have a subnet with the location USA/Redmond/Building 37, your searches can resolve only to the Building level. In a situation such as this, you cannot search for printers on individual floors within a building. These searches are possible only if your subnet locations map to floor numbers.
To make the process of finding a printer easier for your users, however, you can include additional information as part of a printer location, even if that information is ignored when a search is performed. For example, if the subnet location is USA/Redmond/Building 37/Floor 3, you can make it easier for users to pinpoint the location of a printer by adding extra identifying information to the location string for those devices. Thus, you might have a printer with the location USA/Redmond/Building 37/Floor 3/Mail Room or USA/Redmond/Building 37/Floor 3/Room 351 near the back wall. Although you can only search for a particular building, users finding all the printers in Building 37 will be able to view the full description and can then manually select the nearest printer.
Printer location tracking requires printer locations to reflect the actual physical location of the printer in question. If a printer moves from one building to another, the location attribute must be changed to reflect this move. If the naming scheme is changed, printer locations must be changed accordingly. If a building is renamed, printer locations must, again, be modified to reflect the change.
You can modify printer locations by binding to the printer object in Active Directory and then changing the Location attribute. This is useful if you need to change the location for an entire group of printers, such as all the printers in the Finance organizational unit.
You can use printer location configuration in several ways:
Configuring initial printer locations.
Updating a set of printer locations.
Configuring initial printer locations
Listing 13.18 contains a script that configures printer locations. To carry out this task, the script must perform the following steps:
Use a GetObject call to bind to the Finance organizational unit in Active Directory.
Set the Filter property to “printQueue” to ensure that only printer objects are returned.
This prevents you from inadvertently changing the location for a computer or a user account.
For each printer in the Finance organizational unit (OU), use the Put_ method to specify the location. This method requires two parameters:
Location —. The attribute to be changed.
USA/Redmond/Finance Building —. The new value for the attribute.
Use the SetInfo method to apply the changes to each printer object.
Example 13.18. Configuring Printer Locations
1 Set objOU = GetObject("LDAP://OU = Finance, DC = fabrikam, DC = com")
2 objOU.Filter = Array("printQueue")
3 For Each objPrintQueue In objOU
4     objPrintQueue.Put "Location" , "USA/Redmond/Finance Building"
5     objPrintQueue.SetInfo
6 Next
Updating a set of printer locations
If you are configuring the location of a single printer only, there is no need to write a script; it is probably faster and easier to make this change using the graphical user interface. In other cases, however, you might need to make a similar change to a large number of printers. In those situations, a script will prove faster and more efficient.
For example, suppose your initial naming scheme includes only the building number and the floor number (such as Building 37/Floor 2). As your organization expands, a branch office might be opened in a new city. In that case, you should modify your naming scheme to reflect the fact that different buildings are in different cities.
Listing 13.19 contains a script that updates printer locations. To carry out this task, the script must perform the following steps:
Use a GetObject call to bind to the Finance organizational unit in Active Directory.
Set the Filter property to “printQueue” to ensure that only printer objects are returned.
This prevents you from inadvertently changing the location for a computer or user account.
Set the variable strNewLocation to Redmond/ plus the current printer location. For example, if the printer is currently in Building 37/Room 4, the new location will be Redmond/Building 37/Room 4.
For each printer in the Finance OU, use the Put_ method to specify the location. This method requires two parameters:
Location —. The attribute to be changed.
StrNewLocation —. The new value for the attribute.
Use the SetInfo method to apply the changes to each printer object.
Example 13.19. Updating Printer Locations
1 Set objOU = GetObject("LDAP://OU=Finance, DC=fabrikam, DC=com")
2 objOU.Filter = Array("printQueue")
3 For Each objPrintQueue In objOU
4     strNewLocation = "Redmond/" & objPrintQueue.Location
5     objPrintQueue.Put "Location" , strNewLocation
6     objPrintQueue.SetInfo
7 Next
From time to time you might need to modify the properties of a print job after it is in the print queue. For example, you might want to reschedule a print job to print at a specified time. This enables you to print a large print job after hours, when it will not prevent other documents from being printed. Furthermore, you can do this while the print job is in the print queue, without requiring the user to cancel and then resubmit the print job.
To configure print jobs, you can use ADSI and the IADsPrintJob interface (available through the WinNT provider). Some of the print job properties available through this interface are shown in Table 13.8. Properties that cannot be configured using a script are denoted as read-only.
Table 13.8. IADsPrintJob Properties
Property | Description |
|---|---|
Description | Name of the document (for example, Readme.doc). |
Priority | Priority placed on the print jobs. Jobs with a higher priority are always printed first, regardless of the time they were sent to the print queue. |
StartTime | Earliest time that the document can begin printing. Regardless of the document’s position in the print queue, it will not begin printing until the StartTime. |
Sets the time after which the document will not be printed. For example, suppose you set the UntilTime to 9:00 A.M. If the document has not been printed by 9:00 A.M., it will be suspended and will not be resumed (and thus will not move up in the queue) until the StartTime has been reached again. | |
Notify | User name of the user to be notified when the print job is finished. |
NotifyPath | ADsPath value for the user to be notified when the job is finished. |
HostPrintQueue (read only) | AdsPath name for the print queue processing the print job. Because you must use the WinNT provider (the IADSPrintJob interface is not supported by the LDAP provider), path names will look similar to this: |
User (read-only) | User name of the user who submitted the print job. |
Userpath (read-only) | ADsPath name for the user who submitted the print job. |
TimeSubmitted (read-only) | Date and time the print job was submitted. The date and time will look similar to this: |
TotalPages (read-only) | Total number of pages in the print job. |
Size (read-only) | Size of the print job in bytes. To determine the size of the print job in kilobytes, divide this number by 1,024. |
The IADsPrintJob interface can be used to configure print job properties while those print jobs are in the print queue. Typically, this is done to control the order in which documents, especially large documents that might monopolize printer time, are printed.
For example, suppose you have several large (more than 400 KB) print jobs in the print queue, along with a number of smaller print jobs. You might want the small print jobs to print first so that those users do not have to wait for the larger jobs to finish. In this scenario, you want jobs to print in this order:
Any existing jobs less than 400 KB.
Any existing jobs greater than 400 KB.
Any new jobs added to the queue.
In this case, pausing the larger print jobs will not suffice. After all, while those jobs are paused, any new jobs added to the print queue will move ahead of them in the queue.
Instead, you can change the priority of each print job. For example, jobs less than 400 KB can be given a priority of 3. Because higher-priority jobs print first, these jobs will immediately move to the head of the print queue. Print jobs greater than 400 KB can be given a priority of 2. Any new jobs that are sent to the print queue will have the default priority of 1. As a result, they will not be printed until after the larger print jobs have finished.
You must use the WinNT provider to bind to and configure print jobs; the LDAP provider does not support the IADsPrintJob interface. This means your script has to bind to a specific printer on a specific print server using a format similar to the following:
Set objPrinter = GetObject("WinNT://printserver1/financeprinter")
Scripting Steps
You can control the order in which a job prints in several ways. For example:
You can change the priority of a print job.
You can change the start time of a print job.
Changing the priority of a print job
Listing 13.20 contains a script that changes the priority of a print job. To carry out this task, the script must perform the following steps:
Use a GetObject call to bind to the printQueue object on the print server.
Because the LDAP provider does not support binding to print jobs, you must use the WinNT provider and bind to a specific printer on a specific print server.
For each print job in the print queue, check the size of the print job. If the size is greater than 400,000 bytes, set the job priority to 2. If the job size is less than this, set the job priority to 3.
Job priorities are set using the Put method and the following two parameters:
The name of the attribute to be configured (Priority).
The value to be assigned the attribute (either 2 or 3).
After configuring the priority, use the SetInfo method to write the changes to the print job.
Example 13.20. Changing Print Job Priority
 1 Set objPrinter = GetObject _
 2     ("WinNT://atl-ps-01/ArtDepartmentPrinter ")
 3 For each objPrintJob in objPrinter.PrintJobs
 4     If objPrintJob.Size > 400000 Then
 5         objPrintJob.Put "Priority" , 2
 6         objPrintJob.SetInfo
 7     Else
 8         objPrintJob.Put "Priority" , 3
 9         objPrintJob.SetInfo
10     End If
11 Next
Changing the start time of a print job
Another way to postpone the printing of large documents is to change the start time for that print job. For example, the script shown in Listing 13.21 changes the start time for all documents greater than 400,000 bytes to 2:00 A.M. To carry out this task, the script must perform the following steps:
Use a GetObject call to bind to the printQueue object on the print server.
Because the LDAP provider does not support binding to print jobs, you must use the WinNT provider and bind to a specific printer on a specific print server.
For each print job in the print queue, check the size of the print job. If the size is greater than 400,000 bytes, set the start time to 2:00 A.M. If the job size is less than this, do nothing.
Job priorities are set by using the Put method and the following two parameters:
The name of the attribute to be configured (StartTime).
The value to be assigned the attribute (2:00:00 AM). To ensure that the start time is passed in the correct date and time format, use the VBScript TimeValue function, which converts a string expression (such as 2:00:00 AM) to a datetime value.
After configuring the start time, use the SetInfo method to write the changes to the print job.
Example 13.21. Changing the Start Time of a Print Job
1 Set objPrinter = GetObject _
2     ("WinNT://atl-ps-01/ArtDepartmentPrinter")
3 For each objPrintQueue in objPrinter.PrintJobs
4 If objPrintQueue.Size > 400000 Then
5     objPrintQueue.Put "StartTime" , TimeValue("2:00:00 AM")
6     objPrintQueue.SetInfo
7 End If
8 Next
In addition to monitoring and managing print servers and the printers they host, it is important to keep track of print resources on client computers. For example, adding new printers can reduce the load on existing printers, but only if users actually print to these new devices. Because of this, it is very useful to know which users have created connections to which printers, and which of these printers has been configured as the default print device. It is also useful to be able to reconfigure printer connections as needed.
WSH and WMI allow you to manage print resources on client computers by:
Enumerating printer connections
Adding and deleting printer connections
Configuring the default printer
Enumerating the printer connections on client computers can help you better understand why print resources are (or are not) being used. For example, there could be a number of reasons why Printer A attracts twice the workload of Printer B:
Printer A might be faster than Printer B.
Printer A might be more reliable than Printer B.
Printer A might be more conveniently located than Printer B.
On the other hand, Printer A might receive a disproportionate amount of the workload simply because twice as many users have configured Printer A to be their default printer. In a case such as this, you can facilitate the printing process by changing the default printer for some of your users. Before you can do this, however, you must know which printers have been connected to which computers. This information can be obtained by using the Win32_Printer class.
Note
The WSH method EnumPrinterConnections can also be used to enumerate the printer connections on a computer. However, any script using EnumPrinterConnections must be run on the local computer. By contrast, WMI can be used to enumerate printer connections on remote computers.
Scripting Steps
Listing 13.22 contains a script that enumerates printer connections. To carry out this task, the script must perform the following steps:
Create a variable to specify the computer name.
Use a GetObject call to connect to the WMI namespace rootcimv2, and set the impersonation level to “impersonate.”
Use the ExecQuery method to query the Win32_Printer class.
This query returns a collection consisting of all the printers installed on the computer.
For each printer in the collection, echo the printer name and location, and whether the printer is the default printer.
Example 13.22. Enumerating Printer Connections
1 strComputer = "."
2 Set objWMIService = GetObject("winmgmts:" _
3     & "{impersonationLevel=impersonate}!\" & strComputer & "
ootcimv2")
4 Set colInstalledPrinters =  objWMIService.ExecQuery _
5     ("SELECT * FROM Win32_Printer")
6 For Each objPrinter in colInstalledPrinters
7     Wscript.Echo "Name: " & objPrinter.Name
8     Wscript.Echo "Location: " & objPrinter.Location
9 Next
Using WSH methods as part of a logon script can ensure that the printer connections are properly configured for each user. Several WSH methods, including AddWindowsPrinterConnection and RemovePrinterConnection, can be used to manage printer connections on client computers.
These methods are typically used in logon scripts, and for two reasons:
WSH methods do not normally work against remote computers (although you can use the WshController object to run scripts remotely). To manage printer connections by using these methods, the script must be run locally.
Printers are configured independently for each user and are stored in the user profile. When you enumerate printers using WSH or WMI, you actually enumerate them on a per-user basis rather than a per-computer basis. Using the WSH methods as part of a logon script ensures that the printer connections are properly configured for each user.
Including the methods in a logon script enables you to dynamically adjust printer connections each time a user logs on. For example, if you install a new printer for a department, you can add code to the logon script for each user in the department that creates a new connection to a printer. If you delete a printer, you can add code that automatically removes any connections to that printer. This prevents the problems that can arise from users attempting to print to a printer that no longer exists.
The WSH AddWindowsPrinterConnection method provides a quick and easy way to add a printer connection to the local computer. (To add a printer connection to a remote computer, you will need to run the WSH script using the WSHController object.)
The AddWindowsPrinterConnection method requires only a single parameter: the UNC path to the network printer. For example, this line of code adds a connection to the printer named ColorPrinter managed by the print server atl-ps-001:
objNetwork.AddWindowsPrinterConnection "\atl-ps-001ColorPrinter"
After a printer connection has been created, you can optionally use the SetDefaultPrinter method to configure the new connection to be the default printer. SetDefaultPrinter also requires only one parameter: the UNC path to the network printer.
Scripting Steps
Listing 13.23 contains a script that adds a printer connection on the local computer. To carry out this task, the script must perform the following steps:
To remove a printer connection, use the RemovePrinterConnection method, along with the Universal Naming Convention (UNC) path to the printer. RemovePrinterConnection can be used only to remove printer connections from the local computer. If you want to remove a printer connection on a remote computer, you will need to run the script using the WSHController object.
Scripting Steps
Listing 13.24 contains a script that removes a printer connection. To carry out this task, the script must perform the following steps:
The print service and Active Directory are closely integrated. By default, shared printers hosted by a print server are published in Active Directory. When a printer is published, a printQueue object is placed in the print server’s computer object in Active Directory.
Administrators can use Active Directory Users and Computers to identify the printers managed by a print server and to access information regarding each of these printers. Equally important, administrators (and users) can search for these printQueue objects.
Because of this, users can easily locate printers within close physical proximity or printers that meet specific criteria (for example, color printers). At the same time, administrators can easily enumerate all the shared printers within their domain and compile a list of properties for each of those printers.
Publishing printers in Active Directory is a convenience for users: They can easily locate printers, especially if printer location tracking is enabled. However, publishing printers in Active Directory can also be a convenience for administrators: Administrators can retrieve a list of shared printers simply by searching for these printers in Active Directory, by using GUI tools or by using a script that searches Active Directory.
To enumerate all the published printers, you can search Active Directory by using the Active Directory OLE DB provider.
Scripting Steps
Listing 13.25 contains a script that enumerates all the printers published in Active Directory. To carry out this task, the script must perform the following steps:
Insert an On Error Resume Next Statement. This prevents the script from failing if no printers can be found in Active Directory.
Create a constant named ADS_SCOPE_SUBTREE and set the value to 2. This will be used to specify a search that begins in the Active Directory root and proceeds to search all the child containers as well.
Create an instance of the Active Directory connection object (ADODB.Connection).
This allows you to connect to Active Directory.
Set the provider property of the connection object to the Active Directory provider (ADsDSOObject). This is the OLE database provider for ADSI.
Set the active connection to the Active Directory connection.
Set the command text for the Active Directory command object to the SQL query that retrieves all the printers from fabrikam.com.
To ensure a quicker search, include only the attributes printerName and serverName in the SQL query.
Specify values for page size, time-out, search scope, and caching.
Execute the SQL query.
When the set of printers is returned, use the MoveFirst method to move to the first printer in the recordset.
For each printer in the recordset, echo the printer name and the print server name.
Example 13.25. Enumerating All the Published Printers in Active Directory
 1 On Error Resume Next
 2 Const ADS_SCOPE_SUBTREE = 2
 3 Set objConnection = CreateObject("ADODB.Connection")
 4 Set objCommand = CreateObject("ADODB.Command")
 5 objConnection.Provider = "ADsDSOObject"
 6 objConnection.Open "Active Directory Provider"
 7 Set objCommand.ActiveConnection = objConnection
 8 objCommand.CommandText = "SELECT printerName, serverName FROM " _
 9     & " 'LDAP://DC=fabrikam,DC=com'  WHERE objectClass='printQueue'"
10 objCommand.Properties("Page Size") = 1000
11 objCommand.Properties("Timeout") = 30
12 objCommand.Properties("Searchscope") = ADS_SCOPE_SUBTREE
13 objCommand.Properties("Cache Results") = False
14 Set objRecordSet = objCommand.Execute
15 objRecordSet.MoveFirst
16 Do Until objRecordSet.EOF
17     Wscript.Echo "Printer Name: " & objRecordSet.Fields("printerName").Value
18     Wscript.Echo "Server Name: " & objRecordSet.Fields("serverName").Value
19     objRecordSet.MoveNext
20 Loop
In addition to enumerating all the printers in a domain, you can search for specific printers. To do this, you simply search for printers that have one or more of the attributes of the printQueue object in Active Directory.
For example, to find all the color printers in the domain, you would search for all printers for which the printsColor attribute is True. To find printers that support stapling, you would search for all printers for which the printStaplingSupported attribute is True.
The printQueue object attributes are shown in Table 13.9.
Table 13.9. Attributes for the printQueue Object
Attribute | Friendly Name | Description |
|---|---|---|
cn | Directory Service Name | Name of the printer as viewed in Active Directory Users and Computers. |
uNCName | Network Name | UNC path of the printer. This attribute is populated by the print spooler when the printQueue object is created. |
assetNumber | Asset Number | Asset number assigned to the printer. This attribute can be configured by using ADSI. |
contactName | Contact | Name of the person to contact regarding the printer. This attribute can be configured by using ADSI. |
description | Comment | Description of the printer. This is derived from the printer object at the time the printQueue object is created. |
driverName | Model | Model of the printer. This is derived from the printer driver at the time the printQueue object is created. |
location | Location | Physical location of the printer. This attribute can be configured by using ADSI. |
portName | Port | Name of the port(s) supporting this printer. This attribute is populated by the print spooler when the printQueue object is created. |
printBinNames | Input Trays | Input tray names. This attribute is populated by the printer driver when the printQueue object is created. |
printCollate | Supports Collation | Indicates whether or not the printer supports collation. This attribute is populated by the printer driver when the printQueue object is created. |
printColor | Supports Color Printing | Indicates whether or not this is a color device. This attribute is populated by the printer driver when the printQueue object is created. |
printDuplexSupported | Supports Double-sided Printing | Indicates whether or not this device can print on both sides of the paper. This attribute is populated by the printer driver when the printQueue object is created. |
printerName | Name | Name of the printer. This attribute is populated by the print object when the printQueue object is created. |
printLanguage | Printer Language | Page description language used by the printer. This attribute is populated by the printer driver when the printQueue object is created. |
printMaxResolutionSupported | Maximum Resolution | Maximum resolution (in DPI). This attribute is populated by the printer driver when the printQueue object is created. |
printMediaReady | Paper Available | Paper types loaded in the device at the present time. This attribute is populated by the printer driver when the printQueue object is created. |
printMediaSupported | Paper Types Supported | Media types that the printer supports. This attribute is populated by the printer driver when the printQueue object is created. |
printMemory | Installed Memory | Amount of installed memory. This attribute is populated by the printer driver when the printQueue object is created. |
printOwner | Owner Name | Name of the person or group that owns the printer. This attribute can be configured by using ADSI. |
printRate | Speed | Speed of the device. This attribute is populated by the printer driver when the printQueue object is created. |
printRateUnit | Speed Units | Units that the printer speed is measured in. This attribute is populated by the printer driver when the printQueue object is created. |
printPagesPerMinute | Pages per Minute | Printer speed normalized to pages per minute. This attribute is populated by the printer driver when the printQueue object is created. |
printShareName | Share Name | Share name of the printer. This attribute is populated by the print object when the printQueue object is created. |
printStaplingSupported | Supports Stapling | Indicates whether or not the device can staple. This attribute is populated by the printer driver when the printQueue object is created. |
Server Name | Name of the server supporting the printer. This attribute is populated by the print spooler when the printQueue object is created. | |
url | Web Page Address | URL of the printer’s Web page. This attribute is populated by the print spooler when the printQueue object is created. |
versionNumber | Object Version | Internal version number of the printer object. This attribute is populated by the print spooler when the printQueue object is created. |
Scripting Steps
Listing 13.26 contains a script that searches for specific printers in Active Directory. To carry out this task, the script must perform the following steps:
Insert an On Error Resume Next statement. This prevents the script from failing if no printers can be found in Active Directory.
Create a constant named ADS_SCOPE_SUBTREE and set the value to 2. This will be used to specify a search that begins in the Active Directory root and proceeds to search all the child containers as well.
Create an instance of the Active Directory connection object (ADODB.Connection).
The connection object allows you to connect to Active Directory.
Create an instance of the Active Directory command object (ADODB.Command).
The command object allows you to issue queries and other database commands using the Active Directory connection.
Set the provider property of the connection object to the Active Directory provider (ADsDSOObject). This is the OLE database provider for ADSI.
Set the active connection to the Active Directory connection.
Set the command text for the Active Directory command object to the SQL query that retrieves printer data from fabrikam.com.
To limit data retrieval to printers with a priority of 2, add the statement “and Priority = 2” to the Where clause. To ensure a quicker search, include only the attributes printerName and serverName in the SQL query.
Specify values for page size, time-out, search scope, and caching.
Run the SQL query.
When the set of printers is returned, use the MoveFirst method to move to the first printer in the recordset.
For each printer in the recordset, echo the printer name and the print server name.
Example 13.26. Searching for Specific Printers in Active Directory
 1 On Error Resume Next
 2 Const ADS_SCOPE_SUBTREE = 2
 3 Set objConnection = CreateObject("ADODB.Connection")
 4 Set objCommand = CreateObject("ADODB.Command")
 5 objConnection.Provider = "ADsDSOObject"
 6 objConnection.Open "Active Directory Provider"
 7 Set objCOmmand.ActiveConnection = objConnection
 8 objCommand.CommandText = "SELECT printerName, serverName FROM " _
 9     & "'LDAP://DC=fabrikam,DC=com'  WHERE objectClass='printQueue' AND " _
10         & " Priority = 2 "
11 objCommand.Properties("Page Size") = 1000
12 objCommand.Properties("Timeout") = 30
13 objCommand.Properties("Searchscope") = ADS_SCOPE_SUBTREE
14 objCommand.Properties("Cache Results") = False
15 Set objRecordSet = objCommand.Execute
16 objRecordSet.MoveFirst
17 Do Until objRecordSet.EOF
18     Wscript.Echo "Printer Name: " & objRecordSet.Fields("printerName").Value
19     Wscript.Echo "Server Name: " & objRecordSet.Fields("serverName").Value
20     objRecordSet.MoveNext
21 Loop