Windows Management Instrumentation (WMI) is the primary management technology for Microsoft® Windows® operating systems. It enables consistent and uniform management, control, and monitoring of systems throughout your enterprise. Based on industry standards, WMI allows system administrators to query, change, and monitor configuration settings on desktop and server systems, applications, networks, and other enterprise components. System administrators can write scripts that use the WMI Scripting Library to work with WMI and create a wide range of systems management and monitoring scripts.
In This Chapter
Windows Management Instrumentation (WMI) makes managing Windows-based computers much more convenient than it has been in the past. WMI provides you with a consistent way to access comprehensive system management information and was designed, from the beginning, to work across networks. For system administrators managing Windows-based computers, understanding WMI is as important and useful as understanding the Active Directory® directory service.
WMI provides a consistent model of the managed environment. For each manageable resource, there is a corresponding WMI class. You can think of a WMI class as a succinct description of the properties of a managed resource and the actions that WMI can perform to manage that resource.
Note
What is a managed resource? For the purposes of this chapter, a managed resource is any object – computer hardware, computer software, a service, a user account, and so on – that can be managed by using WMI.
Consider how you had to manage and monitor Windows-based workstations and servers in the past. You had to use a number of different administrative tools to administer various resources, including disk drives, event logs, files, folders, file systems, networking components, operating system settings, performance data, printers, processes, registry settings, security, services, shares, users, and groups.
With WMI, instead of learning how to use all of these different administrative tools, you need to learn only how to write scripts that use the WMI scripting library. The scripting library lets you work with WMI classes that correspond to managed resources. After you understand this model and how to make use of it, you can apply what you have learned to manage any resource that has a corresponding WMI class. This is one of the primary benefits of using WMI: You can use the same approach to manage resources as disparate as disk drives, event logs, and installed software.
WMI conforms to industry standards overseen by the Distributed Management Task Force (DMTF). The DMTF is an industry organization that works with key technology vendors, including Microsoft, as well as affiliated standards groups to define interoperable management solutions. The architecture of WMI is based on ideas described in the DMTF Web-Based Enterprise Management (WBEM) initiative.
WMI was originally released in 1998 as an add-on component with Microsoft® Windows NT® 4.0 with Service Pack 4. WMI is now an integral part of the Windows family of operating systems, including Microsoft Windows 2000 and Microsoft® Windows® XP.
Using Windows Script Host (WSH) and Microsoft® Visual Basic® Scripting Edition (VBScript), Microsoft® JScript®, or any scripting language that supports COM Automation (for example, ActivePerl from ActiveState Corporation), you can write WMI scripts that automate the management of the following aspects of your enterprise:
Computers based on Windows XP Professional and Windows 2000
You can write scripts to manage event logs, file systems, printers, processes, registry settings, scheduled tasks, security, services, shared folders, and numerous other operating system components and configuration settings.
Networks
You can create WMI-based scripts to manage network services such as Domain Name System (DNS), client-side network settings (for example, configuring a computer to use a static IP address or to obtain an IP address from a Dynamic Host Configuration Protocol [DHCP] server), and Simple Network Management Protocol (SNMP)–enabled devices.
Real-time health monitoring
You can write scripts that use WMI event subscriptions to monitor and respond to the creation of event log entries, modifications to the file system or the registry, and other realtime operating system changes. Conceptually, event subscriptions and notifications perform the same function in WMI as traps do in SNMP.
Windows .NET enterprise server applications
You can write scripts to manage Microsoft Application Center, Operations Manager, Systems Management Server, Exchange Server, and SQL Server.
In some cases, the capabilities found in WMI replicate capabilities found in command-line tools or GUI applications. In other cases, however, WMI provides management capabilities not readily available anywhere else. For example, before WMI the seemingly trivial task of retrieving the total amount of physical memory installed in a remote Windows-based computer could not be scripted, at least not without using a third-party tool. In fact, prior to WMI the only operating system tool that enabled you to determine the amount of memory installed in a computer was the System Properties dialog box. Although this approach works fine for manually retrieving the memory configuration on the local computer, it cannot be used to automatically retrieve the memory configuration, or to obtain memory information from a remote computer.
Using WMI, however, you can retrieve the amount of physical memory installed on any computer (or at least any computer you have administrator rights to) by using the simple WMI script in Listing 6.1.
Note
Admittedly, the script might not look all that simple at first glance. As you will discover, however, much of the script is boilerplate code that can be used, unchanged, in any WMI script that retrieves information about a managed resource.
Example 6.1. Retrieving and Displaying Total Physical Memory
 1 strComputer = "."
 2
 3 Set objSWbemServices = GetObject("winmgmts:\" & strComputer)
 4 Set colSWbemObjectSet = _
 5     objSWbemServices.InstancesOf(" Win32_LogicalMemoryConfiguration")
 6
 7 For Each objSWbemObject In colSWbemObjectSet
 8     Wscript.Echo "Total Physical Memory (kb): " & _
 9         objSWbemObject. TotalPhysicalMemory
10 Next
If you run this script under CScript, you should see the number of kilobytes of physical memory installed on the target computer displayed in the command window. The following is typical output from the script:
Total Physical Memory (kb): 261676
So how did the script determine the amount of memory installed on the computer? If you look at the boldfaced items in the code, you will see that the script performed two tasks:
It connected to a WMI class named Win32_LogicalMemoryConfiguration.
WMI classes represent the managed resources on a computer. As the name implies, Win32_LogicalMemoryConfiguration allows you to retrieve information about the memory configuration on a computer.
It echoed the value of a property named TotalPhysicalMemory.
WMI classes — which are typically virtual representations of real, live items — have properties that mimic the properties of the real, live item. By looking at the memory configuration on a computer, you can determine the total amount of memory installed. Likewise, the Win32_LogicalMemoryConfiguration class has a property that can be used to determine the total amount of memory installed on a computer. The properties of a WMI class are typically the same as the properties of the actual item. Disk drives have properties such as heads, sectors, and cylinders. The Win32_DiskDrive class has properties such as TotalHeads, TotalSectors, and TotalCylinders.
In addition to physical memory, Windows-based computers also support the concept of virtual memory. Not too surprisingly, the Win32_LogicalMemoryConfiguration class also has a property that corresponds to the virtual memory on a computer: TotalVirtualMemory. If you want to know the total amount of virtual memory on a computer, you can use the script shown in Listing 6.2. The single item in boldface (the property name) is the only real difference between this script and the script that returned the total physical memory installed on a computer. (The script also echoes the phrase, “Total Virtual Memory (kb)” as opposed to “Total Physical Memory (kb).”)
Example 6.2. Retrieving and Displaying Total Virtual Memory
 1 strComputer = "."
 2
 3 Set objSWbemServices = GetObject("winmgmts:\" & strComputer)
 4 Set colSWbemObjectSet = _
 5     objSWbemServices.InstancesOf("Win32_LogicalMemoryConfiguration")
 6
 7 For Each objSWbemObject In colSWbemObjectSet
 8     Wscript.Echo "Total Virtual Memory (kb): " & _
 9         objSWbemObject. TotalVirtualMemory
10 Next
Of course, WMI can be used to do more than just return information about the memory configuration on a computer, For example, the script in Listing 6.3 retrieves and displays the name, state, and startup type for all of the services installed on a computer.
Example 6.3. Retrieving and Displaying Information About Services
 1 strComputer = "."
 2
 3 Set objSWbemServices = GetObject("winmgmts:\" & strComputer)
 4 Set colSWbemObjectSet = objSWbemServices.InstancesOf(" Win32_Service")
 5
 6 For Each objSWbemObject In colSWbemObjectSet
 7     Wscript.Echo "Display Name: " & objSWbemObject.DisplayName & vbCrLf & _
 8                  "   State:      " & objSWbemObject.State       & vbCrLf & _
 9                  "   Start Mode: " & objSWbemObject.StartMode
10 Next
Running this script under CScript produces output similar to the following (only partial output is shown):
Display Name: MSSQLServerADHelper
   State:      Stopped
   Start Mode: Manual
Display Name: Network DDE
   State:      Stopped
   Start Mode: Disabled
Display Name: Network DDE DSDM
   State:      Stopped
   Start Mode: Disabled
Display Name: Net Logon
   State:      Running
   Start Mode: Auto
If you look closely at the script in Listing 6.3, you should notice two things:
Instead of using the class Win32_LogicalMemoryConfiguration, this script uses a class named Win32_Service. Why? Because it is returning information about services, not about memory configuration. If the script was returning information about a computer monitor, it would use the class Win32_DesktopMonitor. The class name will always change to reflect the managed resource.
The properties echoed in this script differ from the properties echoed in the previous scripts. Why? Because services have properties that differ from memory configuration properties. Services have properties such as display name and start mode; memory does not. The properties will always change to reflect the managed resource.
If you are beginning to detect a pattern here, you have already taken a big step toward learning how to write WMI scripts. WMI scripts that retrieve information about managed resources are almost identical; you can take a basic script template, type the appropriate class name and class properties, and retrieve information for nearly all managed resources. (In fact, a template that lets you do this is provided later in this chapter.)
As you will see throughout this chapter, WMI scripts typically involve three steps:
They connect to the WMI service.
They retrieve some information about WMI classes.
They do something with that information (for example, echo it to the screen).
To a large extent, all WMI scripts follow this same pattern. For example, suppose you want to write a script to retrieve and display records from the Windows event logs. Reusing some of the code from Listing 6.1, you can easily create a script that carries out this task, as demonstrated in Listing 6.4. In this listing, the starting point for each of the three steps of a typical WMI script is denoted by the boldfaced numerals 1, 2, and 3: 1) Connect to the WMI service; 2) retrieve information; 3) display that information.
Note
Before you run Listing 6.4, be aware that this script can take a long time to run if your event logs contain thousands of records.
Example 6.4. Retrieving and Displaying Windows Event Log Records
 1 strComputer = "."
 2
 3 Set objSWbemServices = GetObject("winmgmts:\" & strComputer)
 4 Set colSWbemObjectSet = objSWbemServices.InstancesOf("Win32_NTLogEvent")
 5 For Each objSWbemObject In colSWbemObjectSet
 6    Wscript.Echo "Log File:        " & objSWbemObject.LogFile        & vbCrLf & _
 7                 "Record Number:   " & objSWbemObject.RecordNumber   & vbCrLf & _
 8                 "Type:            " & objSWbemObject.Type           & vbCrLf & _
 9                  "Time Generated: " & objSWbemObject.TimeGenerated & vbCrLf & _
10                 "Source:          " & objSWbemObject.SourceName     & vbCrLf & _
11                 "Category:        " & objSWbemObject.Category       & vbCrLf & _
12                 "Category String: " & objSWbemObject.CategoryString & vbCrLf & _
13                 "Event:           " & objSWbemObject.EventCode      & vbCrLf & _
14                 "User:            " & objSWbemObject.User           & vbCrLf & _
15                 "Computer:        " & objSWbemObject.ComputerName   & vbCrLf & _
16                 "Message:         " & objSWbemObject.Message        & vbCrLf
17 Next
The first few pages of this chapter were designed to drive home one important point: WMI scripting does not have to be hard. In fact, WMI scripting can be very easy: As you have seen, you can take a basic script template and, by making only minor changes here and there, create hundreds of scripts that can retrieve information about any managed object on a computer.
All of this is true. However, it is also true that the opening section of this chapter sidestepped some important issues. For example, everyone appreciates the fact that WMI provides the Win32_NTLogEvent class, enabling you to retrieve events from event logs. However, how are you supposed to know that there is such a class as Win32_NTLogEvent? No one denies the value of having the Win32_Service class include properties such as Name, Description, and State, but how are you supposed to know these properties are included in the class? The fact that you can write hundreds of scripts using the same basic template is extremely useful, but only if you know what elements to plug in to that template.
In fact, in many respects scripting is the easy part of managing computers with WMI; the hard part involves figuring out what can and cannot be managed. The task-based chapters in this book can help you in that respect; if you want to manage files and folders, the “Files and Folders” chapter will provide detailed information about the appropriate WMI classes (and their methods and properties). But what if you want to manage video cards, desktop monitors, or network adapters? Although these items can be managed by using WMI, there is no handy reference to the appropriate classes (and their methods and properties) in this book.
Does this mean you can manage only the items referenced in this book? Of course not; in fact, you can manage anything WMI can manage, provided you understand how WMI works. After you understand how, and where, WMI stores information, you can easily determine the answer to such questions as 1) Which classes are available to me, 2) What are the names of these classes, and 3) Which properties and methods can be used with each class?
This section and the following section regarding the Common Information Model (CIM) provide in-depth coverage of the WMI architecture, starting you on your way toward a better understanding of this powerful administration tool. This section begins by examining the three primary layers of WMI (shown in Figure 6.1):

The section concludes by introducing the topic of WMI security. Although security is not an architectural layer like consumers, the WMI infrastructure, and managed resources, it is important to understand how WMI handles security before you begin writing and deploying scripts.
Managed resources are the fundamental layer in the WMI architecture. A managed resource is any logical or physical component that can be accessed and managed by using WMI. Windows resources that can be managed by using WMI include the computer system, disks, peripheral devices, event logs, files, folders, file systems, networking components, operating system subsystems, performance counters, printers, processes, registry settings, security, services, shared folders, SAM users and groups, Active Directory, Windows Installer, Windows Driver Model (WDM) device drivers, and SNMP Management Information Base (MIB) data.
A WMI-managed resource communicates with WMI through a provider. As you begin to write scripts to interact with WMI-managed resources, you will often see the term instance used to refer to a virtual representation of the managed resource in the running script. According to the WMI SDK, an instance is “a representation of a real-world managed object that belongs to a particular class.”
In more concrete terms, an instance represents an actual implementation of something WMI can manage. For example, suppose you run the script shown in Listing 6.5, which returns the drive letter for each logical disk drive on a computer.
Example 6.5. Retrieving and Displaying Logical Disk Drive Information
1 strComputer = "."
2
3 Set objSWbemServices = GetObject("winmgmts:\" & strComputer)
4 Set colSWbemObjectSet = objSWbemServices.InstancesOf("Win32_LogicalDisk")
5
6 For Each objSWbemObject In colSWbemObjectSet
7     Wscript.Echo objSWbemObject.DeviceID
8 Next
Depending on the logical disk drives on your computer, the script will return output similar to this:
A:
C:
D:
E:
Each of these drive letters represents two things: 1) a real, live logical disk drive installed (or mapped) on the computer and 2) an instance of the Win32_LogicalDiskDrive class.
Note
But what if there are no instances of a class? For example, suppose you run a script that returns information about all the tape drives on a computer, only no tape drives are on the computer. Will that generate an error? No; after all, Win32_TapeDrive is a valid WMI class. It just happens that no actual tape drives (no instances of the class) are installed on the computer.
The WMI infrastructure is the middle layer in the architectural model. WMI consists of three primary components: the Common Information Model Object Manager (CIMOM), also known as the WMI service; the Common Information Model (CIM) repository, also known as the WMI repository; and WMI providers. Together these three components provide the infrastructure through which configuration and management data is defined, exposed, accessed, and retrieved.
WMI Providers
WMI providers act as an intermediary between the CIMOM and a managed resource. Providers request information from and send instructions to WMI-managed resources on behalf of consumer applications and scripts. For example, Listing 6.1 and Listing 6.3 use the built-in Win32® provider to retrieve memory and service-related information. Listing 6.4 uses the built-in Event Log provider to retrieve records from the Windows event logs.
Providers hide the implementation details unique to a particular managed resource by exposing the managed resource to the WMI infrastructure using a standards-based, uniform access model. WMI providers communicate with their respective managed resources by using the native application programming interfaces (APIs) of the managed resource, and communicate with the CIMOM by using WMI programming interfaces. For example, the built-in Event Log provider calls Win32 Event Log APIs to access event logs.
Why does this matter to you? To create an application that manages Windows subsystems, you typically use the Win32 APIs. Without WMI, you would need to call these APIs yourself. This creates at least two problems. First, Win32 APIs cannot be called from a script; as a result, you must use a programming language such as C++ or Visual Basic to manage these resources. Having to use a programming language such as C++ eliminates the benefits available through scripting:
Scripts can be written in a matter of minutes.
Scripts can be written using nothing more powerful than Notepad.
Scripts can be written without requiring header files, compilers, and other items more commonly used by developers than by system administrators.
Second, the Win32 APIs do not necessarily work in a consistent manner; just because you learn how to program the Event Log APIs does not mean you have a head start in learning how to program the Win32 Service APIs. One of the difficulties in programming management applications in Windows is that different APIs must be accessed and used in different ways.
WMI providers help solve both of these problems. For one thing, you do not have to worry about calling the Win32 APIs; WMI will do that for you. Likewise, you do not have to worry about differences between various APIs; again, you use a standard set of WMI commands, and WMI will translate those commands into commands that the APIs understand. The WMI providers give you a simple and consistent way to access the Win32 APIs, even if you never realize that you are accessing the Win32 APIs.
Of course, WMI is not just for system administrators. Software developers can leverage the extensible architecture of WMI to develop and integrate add-on providers that expose the management functions unique to their products. The Exchange Server 2000 provider, which monitors Exchange connector status, is one such example. Likewise, Application Center, Operations Manager, Systems Management Server, Internet Information Server, and SQL Server all include WMI providers.
Providers are generally implemented as dynamic-link libraries (DLLs) residing in the systemrootSystem32Wbem directory. WMI includes many built-in providers for the Windows 2000 and Windows XP operating systems. The built-in providers, also known as standard providers, supply data and management functions from well-known operating system sources such as the Win32 subsystem, event logs, performance counters, and the registry. Table 6.1 lists several of the standard WMI providers included with Windows 2000 and Windows XP.
Table 6.1. Partial List of Standard WMI Providers
Provider | DLL | Namespace | Description |
|---|---|---|---|
Active Directory | dsprov.dll | rootdirectoryldap | Maps Active Directory objects to WMI |
Event Log | ntevt.dll | rootcimv2 | Manages Windows event logs (for example, reads, backs up, clears, copies, deletes, monitors, renames, compresses, and uncompresses event log files and changes event log settings) |
Performance Counter | wbemperf.dll | rootcimv2 | Provides access to raw performance data |
Registry | stdprov.dll | rootdefault | Reads, writes, enumerates, monitors, creates, and deletes registry keys and values |
SNMP | snmpincl.dll | rootsnmp | Provides access to SNMP MIB data and traps from SNMP-managed devices |
wmiprov.dll | rootwmi | Provides access to information about WDM device drivers | |
Win32 | cimwin32.dll | rootcimv2 | Provides information about the computer, disks, peripheral devices, files, folders, file systems, networking components, operating system, printers, processes, security, services, shares, SAM users and groups, and more |
Windows Installer | msiprov.dll | rootcimv2 | Provides access to information about installed software |
Windows XP includes many additional standard providers. For a complete list of standard providers, see the WMI Providers reference in the WMI Software Developers Kit (SDK) documentation. For information about downloading WMI SDK, see the Microsoft Windows Management Instrumentation (WMI) SDK link on the Web Resources page at http://www.microsoft.com/windows/reskits/webresources.
CIMOM
The CIMOM (pronounced see-mom) handles the interaction between consumers and providers. The term comes from the Web-Based Enterprise Management (WBEM) initiative and the Common Information Model (CIM) specification maintained by the Distributed Management Task Force (DMTF).
The CIMOM acts as the WMI information broker. All WMI requests and data flow through the CIMOM. When you write a WMI script, the script is directed to the CIMOM. However, the CIMOM does not directly handle your request. For example, suppose you request a list of all the services installed on a computer. The CIMOM will not actually retrieve the list of services for you. Instead, it will locate the appropriate WMI provider and ask the provider to retrieve the list. When the list has been retrieved, it will be handed back to the CIMOM, and the CIMOM will then return the information to you.
The WMI service (winmgmt.exe) provides the role of the CIMOM on Windows XP. It runs under the control of the generic services host process, svchost.exe.
Note
On computers running Windows 2000 or Windows NT 4.0 with Service Pack 4 (SP4), the WMI service runs as a separate service process. On computers running Microsoft® Windows® Millennium Edition (ME), Windows® 98, or Windows® 95 OSR 2.5, WMI runs as a standard executable process.
The WMI service is similar to most operating system services; for example, it can be stopped and started using these commands:
net stop winmgmt

net start winmgmt
One interesting note: Suppose the WMI service is stopped, and you run a script or an application that requires WMI. In that case, the service will automatically restart itself.
In addition to providing the common interface through which consumers access WMI, the CIMOM provides the following core services to the WMI infrastructure:
Provider registration. WMI providers register location and capability information with the CIMOM. The CIMOM stores this information in the CIM repository.
Request routing. The CIMOM uses the provider registration information to route consumer requests to the appropriate provider. When a script requests information from a CIM class (such as Win32_Service or Win32_LogicalMemoryConfiguration), the CIMOM takes the query and forwards it to the provider capable of filling the request.
Remote access. Consumers access remote WMI-enabled systems by connecting to the CIMOM on the remote system. After a connection is established, consumers can perform the same operations that can be performed locally. This is a key point: With only a few minor exceptions, anything WMI can do on the local computer it can do just as easily on a remote computer.
Security. The CIMOM controls access to WMI-managed resources by validating each user access token before the user is permitted to connect to WMI on either the local computer or a remote computer.
Query processing. Allows a consumer to issue queries against any WMI-managed resource by using the WMI Query Language (WQL). For example, you can query the event logs for all events matching a specific Event ID that occurred during the past 24 hours. The CIMOM performs the evaluation of the query in cases where providers do not natively support query operations.
Event processing. Allows a consumer to subscribe to events that represent a change to a WMI-managed resource. For example, you can subscribe to an event that fires when the amount of space on a logical disk drive drops below an acceptable threshold. The CIMOM polls the managed resource at an interval you specify and generates an event notification when the subscription is satisfied.
Management applications, administrative tools, and scripts make requests to the CIMOM to retrieve data, subscribe to events, or to perform some other management-related task. The CIMOM retrieves the provider and class information necessary to service consumer requests from the CIM repository. The CIMOM uses the information obtained from the CIM repository to hand off consumer requests to the appropriate WMI provider.
WMI is based on the idea that configuration and management information from different sources can be uniformly represented with a schema. The CIM repository holds the schema, also called the object repository or class store, that models the managed environment and defines every piece of data exposed by WMI. The schema is based on the DMTF Common Information Model standard.
Similar to the Active Directory schema, the CIM is built on the concept of classes. A class is a blueprint of a WMI-manageable resource. However, unlike Active Directory classes, which represent static objects that can be created and stored in the directory, CIM classes usually represent dynamic resources. Instances of resources are not stored in the CIM repository but are dynamically retrieved by a provider based on a consumer request. This means that the term repository is somewhat misleading in the context of the CIM. Although the CIM is a repository and is capable of storing static data, its primary role is storing the blueprints for managed resources.
The reason for this is simple: The operational state for most WMI-managed resources changes frequently and therefore must be read on demand to ensure that the most up-to-date information is retrieved. For example, WMI classes can be used to retrieve all the events from all the event logs on a computer and information about all the files stored on a computer. Storing all this information and keeping track of all the changes made to it would not be the most effective use of computer resources. Instead, it is faster and more efficient to dynamically retrieve the information each time it is needed.
Note
Admittedly, retrieving information each time it is needed will occasionally cause queries to run slowly. For example, if you did need to enumerate all the files on a computer, this would take some time, simply because WMI would have to locate every file and retrieve information about it. However, the fact that a query such as this might run a bit slowly must be balanced against the computing resources required for and the complications involved in keeping an up-to-date copy of every managed object in the repository.
Even though most instances must be retrieved dynamically, a typical WMI query will still be completed in a matter of seconds. (For example, it typically takes 1 to 2 seconds to return a list of all the services installed on a computer.)
Like Active Directory classes, CIM classes are organized hierarchically and child classes inherit from parent classes. The DMTF maintains the set of core and common base classes from which system and application software developers, such as those at Microsoft Corporation, derive and create system-specific or application-specific extension classes. For example, the Win32_Process class is derived from the CIM_Process class (which, in turn, is derived from CIM_LogicalElement and CIM_ManagedSystemElement).
Classes are grouped into namespaces, logical groups representing a specific area of management. For example, the rootcimv2 namespace includes most of the classes that represent resources commonly associated with a computer and an operating system. The classes used in the preceding scripts (Win32_LogicalMemoryConfiguration, Win32_Service, and Win32_NTLogEvent) reside in the rootcimv2 namespace and are just three of hundreds of classes defined in the various CIM namespaces.
CIM classes include both properties and methods. Properties describe the configuration and state of a WMI-managed resource; methods are executable functions that perform actions on the WMI-managed resource associated with the corresponding class.
In Windows 2000 and Windows NT 4.0 with SP4, the CIM is stored in systemrootSystem32WbemRespositorycim.rep. In Windows Millennium Edition (ME), Windows 98, and Windows 95 OSR 2.5 operating systems, the CIM repository is stored in %windir%SystemWbemRepositorycim.rep.
In Windows XP, the CIM repository resides in the systemrootSystem32WbemRepositoryFS directory and consists of the following four files:
Index.btr. Binary-tree (btree) index file.
Index.map. Transaction control file.
Objects.data. CIM repository where managed resource definitions are stored.
Objects.map. Transaction control file.
Although the CIM is based on object-oriented design principles, you do not need to become an expert on information modeling or schema design to be productive using WMI and writing WMI-based scripts. However, it is important that you understand the basic structure and organization of the CIM repository and how to navigate and interpret its contents.
WMI consumers are the final layer in the WMI infrastructure. A consumer can be a script, an enterprise management application, a Web-based application, or some other administrative tool that accesses and controls management information available through the WMI infrastructure.
WMI consumers do not have to be complicated. The following three-line script, which returns the amount of free disk space on drive C, is an example of a WMI consumer:
Set objSWbemServices = GetObject("winmgmts:")
Set objDisk = objSWbemServices.Get("Win32_LogicalDisk.DeviceID='C:'")
Wscript.Echo objDisk.FreeSpace
WMI is an extremely powerful technology for system administration. It is also a versatile technology: It is just as easy to run scripts against remote computers as it is to run scripts against the local computer. Furthermore, WMI scripts can be written using nothing more powerful (or expensive) than Notepad. This makes WMI the perfect technology for system administrators. It would also appear to make WMI the perfect technology for someone else: hackers. After all, how hard would it be to create a script that methodically shuts down each computer in your organization, one by one?
In truth, it would be easy to write such a script; however, successfully running this script would be far more difficult. This is because security is an important part of the WMI infrastructure; in fact, WMI has been specifically designed to prevent people from carrying out activities such as this (either inadvertently or otherwise).
For example, suppose a hacker tried to shut down one of your computers using WMI. This attempt will fail. Why? Because only an administrator can run a script against a remote computer. Unless the hacker is an administrator on the computer, he or she will not be able to shut it down by using WMI. (And of course, if the hacker is an administrator, he or she can cause plenty of trouble without bothering to write a script.)
But what if the hacker e-mails a shutdown script to users and somehow tricks these users into shutting down their local computers? Even this is likely to fail: For the most part, running a WMI script that actually does something requires you to be an administrator and to have specific privileges. In most organizations, users do not have the right to shut down a computer; therefore, if they inadvertently run a script that tries to shut down their computer, the script will fail. Why? Because, by default, WMI can carry out only those tasks that the person running the script can carry out.
WMI security is an extension of the security subsystem built into Windows operating systems. WMI security includes:
WMI namespace-level security.
Distributed COM (DCOM) security.
Standard Windows NT–based Windows operating system security.
Before a user is allowed to connect to WMI, on either the local computer or a remote computer, the access token for the user account is validated against permissions applied to and stored in the CIM repository.
By default, the built-in Administrators security group is granted full control of WMI and the entire CIM repository on both local and remote computers. All other users, by way of the Everyone group, are granted Enable Account, Execute Methods, and Provider Write on the local computer only. Table 6.2 lists the available WMI permissions, which are configured on the Security tab in the WMI Control MMC Snap-in, systemrootSystem32Wmimgmt.msc.
Table 6.2. WMI Namespace Permissions
Permission | Description | Administrators | Everyone |
|---|---|---|---|
Execute Methods | Lets a user call methods in the specific namespace. However, the provider checks to ensure that the user has the right to perform these tasks. For example, a user cannot run a script that stops a service unless the user has the right to stop that service. |
|
|
Full Write | Lets users create or modify a namespace, a system class, or an instance. |
| |
Lets users create or modify any static class or any instance of non-system classes. |
| ||
Provider Write | Lets users write classes and instances to WMI providers. |
|
|
Enable Account | Grants read permissions to a WMI namespace. This allows users to run scripts that retrieve data, but only on the local computer. |
|
|
Remote Enable | Lets a user access a WMI namespace from a remote computer. By default, this right is granted only to administrators; regular users cannot retrieve any WMI-related information from a remote computer. |
| |
Read Security | Lets the user read (but not modify) the security descriptor for a WMI namespace. |
| |
Edit Security | Lets the user modify the security descriptor for a WMI namespace. |
|
Note
On computers running Windows NT 4.0 SP4, Windows 98, and Windows 95 OSR 2.5, the WMI Control application is named Wbemcntl.exe. Wbemcntl.exe is located in the systemrootSystem32Wbem directory on Windows NT 4.0 SP4.
WMI permissions are applied at the namespace level and apply to all classes within the namespace. These permissions also apply — potentially — to child namespaces based on inheritance. By default, permissions are explicitly applied to the root namespace only and inherited by all other child namespaces.
Security is checked only when a user connects to the CIMOM. As a result, any changes made to the WMI permissions while a user is connected will not affect that user until he or she establishes a new connection. If you have the Full Write permission when you begin running a script, you (in the context of that script) will continue to have that permission until the script completes. However, if you start a new script, any new permissions will be applied to that particular script.
By default, WMI scripts run in the security context of the user running the script.
DCOM, the architecture underlying the interaction of the WMI scripting library with the WMI service, provides a mechanism known as impersonation. Impersonation enables you to specify whom the WMI service should act as when carrying out a task.
The default, and the recommended, impersonation level is Impersonate. This enables the WMI service to act on your behalf, using your credentials. You can also give the WMI service the right to contact other DCOM-based services and enable them to use your credentials. This level of impersonation is known as Delegate and has some security risks associated with it.
What kind of security risks? By default, DCOM supports only single-hop impersonation. Suppose you run a script on Computer A, and that script needs to retrieve information from Computer B. The script can impersonate you on the “single hop” between computers A and B. But what if Computer B needs to retrieve information from a third computer? By default, the script cannot impersonate you on this “double hop” from Computer A to Computer B to Computer C. Because of this, the script will fail.
It is possible to allow Computer B to also use your credentials; for that matter, you can also allow computers C, D, and E to use your credentials. This is where the security risk occurs. With single-hop security, you are limited to working with at most two computers. As a result, any problems can be confined to computers A and B. With delegation, and with multi-hop security, problems can spread to many computers.
The different DCOM security levels are discussed in more detail in the “Writing WMI Scripts” section of this chapter. That section will also discuss additional safeguards that help reduce the potential risks associated with delegation.
In addition to WMI and DCOM-specific security settings, WMI also respects standard operating system settings. For example, suppose someone has set NTFS permissions on a folder that prohibit you from writing to that folder. If you run a WMI script that attempts to copy a file to that folder, the script will fail with an “Access denied” error because you (and therefore WMI, which is impersonating you) do not have write access to the folder. WMI will not override operating system security in any way.
If you are going to build a house, you need to know how to read and interpret an architectural drawing. If you are going to build an electronic device, you need to know how to read and interpret a schematic diagram. And if you are going to write WMI scripts, you need to know how to interpret the WMI blueprint for management: the CIM repository.
The CIM repository is the WMI schema that stores the class definitions that model WMI-managed resources.
To emphasize the importance of the CIM and CIM classes, consider the scripts in Listing 6.6 and Listing 6.7. Listing 6.6, a slightly enhanced version of Listing 6.3, returns information about the services installed on a computer.
Example 6.6. Retrieving Service Information Using WMI and VBScript
 1 strComputer = "."
 2
 3 Set objSWbemServices = GetObject("winmgmts:\" & strComputer)
 4 Set colServices = objSWbemServices.InstancesOf("Win32_Service")
 5
 6 For Each objService In colServices
 7     Wscript.Echo "Name: " & objService.Name & vbCrLf & _
 8                  "Display Name: " & objService.DisplayName & vbCrLf & _
 9                  "Description: " & objService.Description & vbCrLf & _
10                  "Path Name: " & objService.PathName & vbCrLf & _
11                  "Start Mode: " & objService.StartMode & vbCrLf & _
12                  "State: " & objService.State & vbCrLf
13 Next
Listing 6.7, meanwhile, is another variation of the same basic script, this time using the Win32_OperatingSystem class. As you might expect, it returns information about the operating system currently in use on a computer.
Example 6.7. Retrieving Operating System Information Using WMI and VBScript
 1 strComputer = "."
 2
 3 Set objSWbemServices = GetObject("winmgmts:\" & strComputer)
 4 Set colOperatingSystems = objSWbemServices.InstancesOf("Win32_OperatingSystem")
 5
 6 For Each objOperatingSystem In colOperatingSystems
 7     Wscript.Echo "Name:              " & objOperatingSystem.Name   & vbCrLf & _
 8         "Caption:           " & objOperatingSystem.Caption         & vbCrLf & _
 9         "CurrentTimeZone:   " & objOperatingSystem.CurrentTimeZone & vbCrLf & _
10         "LastBootUpTime:    " & objOperatingSystem.LastBootUpTime & vbCrLf & _
11         "LocalDateTime:     " & objOperatingSystem.LocalDateTime   & vbCrLf & _
12         "Locale:            " & objOperatingSystem.Locale          & vbCrLf & _
13         "Manufacturer:      " & objOperatingSystem.Manufacturer    & vbCrLf & _
14         "OSType:            " & objOperatingSystem. OSType         & vbCrLf & _
15         "Version:           " & objOperatingSystem.Version         & vbCrLf & _
16         "Service Pack:      " & objOperatingSystem.ServicePackMajorVersion & _
17         "." & objOperatingSystem.ServicePackMinorVersion           & vbCrLf & _
18         "Windows Directory: " & objOperatingSystem.WindowsDirectory
19 Next
There are only two differences between these scripts: the class name identifying the WMI-managed resource and the property values reported for each class. For example, the services script reports values for properties such as DisplayName, StartMode, and State; the operating system script reports values for properties such as LastBootUpTime, Version, and ServicePackMajorVersion.
The fact that the same script template can be used to retrieve total physical memory, services, event log records, processes, and operating system information demonstrates the important role CIM classes play in WMI scripting. After you know how to write a script to manage one type of WMI-managed resource, you can use the same basic technique to manage other resources.
Of course, knowing a managed resource class name and its corresponding properties is only part of the story. Before you can tap the full power of WMI scripting, you need to know a little bit more about the structure of the CIM repository and WMI classes for two important reasons:
Understanding how to navigate the CIM repository will help you determine the computer and software resources exposed through WMI.
Understanding how to interpret a managed resource blueprint (class definition) will help you understand the tasks that can be performed on the managed resource.
Both points are true regardless of the WMI tool you use: Whether you use the WMI scripting library or an enterprise management application, you need to know how to navigate the CIM repository and interpret WMI classes.
A less obvious yet equally important reason to learn about the CIM repository is that the CIM repository is an excellent source of documentation for WMI-managed resources. If you need detailed information about a WMI class, you can use the WMI SDK. But what if you do not need detailed information about a WMI class? Suppose you want to know only whether a specific class, method, or property is supported on the version of Windows you are managing. You can check the CIM repository of the target computer.
For example, suppose you see this script in the Script Center on Microsoft TechNet:
Const JOIN_DOMAIN = 1
Const ACCT_CREATE = 2
Set objNetwork = CreateObject("Wscript.Network")
strComputer = objNetwork.ComputerName
Set objComputerSystem = GetObject _
    ("winmgmts:{impersonationLevel=Impersonate}!\" & strComputer & _
        "
ootcimv2:Win32_ComputerSystem.Name='" & strComputer & "'")
ReturnValue = objComputerSystem.JoinDomainOrWorkGroup _
    ("FABRIKAM", "password", "FABRIKAMshenalan", NULL, JOIN_DOMAIN+ACCT_CREATE)
You want to know whether the script will run on Windows 2000–based computers. As it turns out, it does not, because the Win32_ComputerSystem class does not support the JoinDomainOrWorkGroup method on Windows 2000. The JoinDomainOrWorkGroup method was added to the Win32_ComputerSystem class in the version of WMI included with Windows XP.
But how would you find this out, other than trying the script and having it fail? One way is by using the collection of WMI tools described in “Exploring the CIM Repository” later in this chapter. A more powerful and flexible approach is to use the WMI scripting library. One useful property of WMI is the fact that you can use the WMI scripting library to learn about WMI itself. In the same way you write WMI scripts to retrieve information about managed resources, you can write WMI scripts to learn many interesting details about WMI itself. For instance, you can write WMI scripts that list all of the namespaces and classes in the CIM repository. You can write scripts to list all of the providers installed on a WMI-enabled computer. You can even write WMI scripts to retrieve managed resource class definitions.
Whether you choose to use existing tools or create your own, you need a basic understanding of the structure of the CIM repository and its contents, as well as knowledge of how to interpret managed resource class definitions. The next section takes a closer look at the WMI blueprint for management — the CIM repository.
WMI is based on the idea that configuration and management information from different sources can be uniformly represented with a schema, and that the CIM repository is the schema for WMI. Think of a schema as a blueprint or model that represents something that exists in the real world. Much like an architectural drawing models a physical structure such as a house, the CIM models the hardware, operating system, and software that make up a computer. The CIM is the data model for WMI.
Note
As noted previously, although the CIM repository stores some data, its primary purpose is to model the managed environment. The CIM is not designed to store the volumes of management information it defines. Instead, most of the data is dynamically retrieved, on demand, from a WMI provider. The exception is WMI operational data. WMI operational data, such as namespace information, provider registration information, managed resource class definitions, and permanent event subscriptions, is stored in the CIM repository.
Figure 6.2 provides a conceptual view of the internal structure and organization of the CIM repository. As illustrated in Figure 6.2, the CIM uses classes to create the data model. The CIM contains far more classes than the eleven shown in the diagram. It is important to understand that the CIM repository is the class store that defines the WMI managed environment and every manageable resource exposed through WMI.

There are three important CIM concepts illustrated in Figure 6.2 that help explain how to successfully navigate and interpret the WMI schema:
The CIM repository is divided into multiple namespaces.
Each namespace can contain one or more of the following groups of classes:
System classes
Core and common classes
Extension classes
There are three primary class types: abstract, static, and dynamic. A fourth class type, known as an association class, is also supported.
An abstract class is a template used to derive (define) new abstract and nonabstract classes and cannot be used to retrieve instances of managed resources.
A static class defines data physically stored in the CIM repository — the most common of which is WMI configuration and operational data.
A dynamic class is a class that models a WMI-managed resource that is dynamically retrieved from a provider.
An association class is an abstract, static, or dynamic class that describes a relationship between two classes or managed resources.
The next section of this chapter examines each of these concepts in more detail.
CIM classes are organized into namespaces. Namespaces are the partitioning mechanism employed by the CIM to control the scope and visibility of managed resource class definitions. Each namespace in the CIM contains a logical group of related classes representing a specific technology or area of management.
Namespaces are roughly equivalent to folders on a disk drive. Like folders, namespaces provide a place to store related information; a folder named Scripts is likely to contain scripts and a namespace named MicrosoftActiveDirectory is likely to contains WMI classes used to manage Active Directory. Both folders and namespaces help you to uniquely identify an item. You can have only one file on a computer named C:ScriptsWMI_Script.vbs; likewise, you can have only one WMI class named rootcimv2:Win32_Process.
Note
One difference between folders and WMI namespaces is that folders are often deeply nested; for example, it is common to have folders such as C:Program FilesMicrosoft OfficeOfficeOffice10. By contrast, namespaces rarely go more than three levels deep; the vast majority of classes useful in system administration scripts reside in the rootcimv2 namespace, a namespace nested only two levels deep.
All classes within a namespace must have a unique class name, and classes in one namespace cannot be derived from classes in another namespace. This is why you will find identical system, core, and common classes defined in multiple namespaces.
Most of the classes that model Windows-managed resources reside in the rootcimv2 namespace. However, rootcimv2 is not the only namespace you need to be aware of, as suggested in Figure 6.2. Although the Event Log, Performance Counter, Windows Installer, and Win32 providers all store their managed resource class definitions in the rootcimv2 namespace, the Registry provider stores its class definitions in the rootdefault namespace. This means that scripts that use the Registry provider will differ from scripts that use the Event Log provider, if only because the scripts must connect to different namespaces.
Every WMI script connects to a namespace as part of the initial connection step. For example, the following line of code connects to the rootcimv2 namespace on the local computer. (The connection is made on the local computer because no computer name is specified in the connection string.)
Set objSWbemServices = GetObject("winmgmts:rootcimv2")
A connection is made even when a namespace is not included in the connection string. For example, no namespace is included in the following line of code.
Set objSWbemServices = GetObject("winmgmts:")
If the target namespace is not specified, the script connects to the default scripting namespace. The default namespace is defined by the following registry entry:
HKEY_LOCAL_MACHINESOFTWAREMicrosoftWBEMScriptingDefault Namespace
The default namespace setting is to WMI scripting what the %PATH% environment variable is to the operating system. When you issue a command at the command prompt without specifying the fully qualified path of the command, the operating system uses the %PATH% environment variable to locate the corresponding executable file. For example, you do not have to type C:WindowsSystem32calc.exe to start Calculator. Why? Because the System32 folder is in the path. You can simply type Calc.exe, and the operating system will check the path, find the program, and start Calculator.
If the operating system cannot find the file, an error is generated.
Similarly, when you retrieve a managed resource in a WMI script, the WMI Service (winmgmts) searches for the managed resource blueprint (class definition) in the default namespace if no namespace is specified. If the WMI service cannot find the managed resource class definition in the default namespace, it generates a WBEM_E_INVALID_CLASS (0x80041010) error.
Note
Don’t confuse the Default Namespace setting with the rootDEFAULT namespace. They are unrelated unless, of course, you set rootDEFAULT as your default namespace.
There is at least one difference between %PATH% and namespaces, however. The path can include multiple locations, even folders on different drives. The default namespace, by contrast, refers to a single location.
The rootcimv2 namespace is initially configured as the default namespace for scripting; however, the default scripting namespace can easily be changed. Because of this, you should always identify the namespace of a managed resource in your WMI scripts rather than assume that the default is rootcimv2. The following code snippet shows how to specify a namespace when connecting to WMI. In addition to specifying the namespace, the script also uses a variable, strComputer, to represent the name of the computer that the script should run against.
strComputer = "."
Set objSWbemServices = GetObject("winmgmts:\" & strComputer & "
ootcimv2")
Note
Why was strComputer set to the value dot (“.”)? In WMI scripting, the first part of the object path is always the name of the computer. If no computer name is specified or if a dot is found, the script runs against the local computer. Setting strComputer to dot does two things: 1) It causes the script to run against the local computer, and 2) it provides a placeholder that makes it easy to modify the script to run against a remote computer. For example, to run the script against a computer named WebServer, simply set the value of strComputer to WebServer:
strComputer = "WebServer"
Adding the target namespace to the connection string tells the CIMOM where to look for the managed resource class definition in the CIM, much as a fully qualified path tells the operating system exactly where to look for a file. When you specify the target namespace, the script does not first check the default namespace setting in the registry. Instead, it connects directly to the specified location.
You can use the WMI scripting library in combination with the Win32_WMISetting class to read and change the default namespace for scripting, as demonstrated in Listing 6.8 and Listing 6.9. Win32_WMISetting is a dynamic class that models operational parameters for the WMI service. The writable property representing the default namespace for scripting is ASPScriptDefaultNamespace.
Listing 6.8 uses the same three WMI scripting steps — connect, retrieve, and display — that have been used all along, with one noticeable change. As recommended earlier, it specifies the fully qualified namespace for the Win32_WMISetting class in the WMI connection string passed to the VBScript GetObject function. Not only does this example follow the namespace recommendation in Listing 6.8, but this chapter will use qualified namespaces from this point forward. Doing this will help you avoid invalid class errors in your WMI scripts.
Example 6.8. Retrieving the Default Namespace for Scripting Using WMI and VBScript
 1 strComputer = "."
 2
 3 Set objSWbemServices = _
 4     GetObject("winmgmts:\" & strComputer & "
ootcimv2")
 5 Set colWMISettings = objSWbemServices.InstancesOf("Win32_WMISetting")
 6
 7 For Each objWMISetting in colWMISettings
 8     Wscript.Echo "Default namespace for scripting: " & _
 9                  objWMISetting.ASPScriptDefaultNamespace
10 Next
If you run this script under CScript on your local computer, you should see the default namespace of the local computer displayed in the command window, as in the following output.
Default namespace for scripting: rootcimv2
To set the default namespace for scripting, you can perform the same scripting steps as in Listing 6.8 with one important change: Rather than use the WMI to read a property of a managed object, you use WMI to:
Set the property value.
Call the SWbemObject Put_ method to commit the change to the WMI-managed resource.
The set and commit operations are performed inside the For Each loop because the InstancesOf method always returns an SWbemObjectSet collection. This is true even when there is only one instance of the target WMI-managed resource, as is the case with Win32_WMISetting.
Example 6.9. Setting the Default Namespace for Scripting
 1 strComputer = "."
 2
 3 Set objSWbemServices = _
 4     GetObject("winmgmts:\" & strComputer & "
ootcimv2")
 5 Set colWMISettings = objSWbemServices.InstancesOf("Win32_WMISetting")
 6
 7 For Each objWMISetting in colWMISettings
 8         objWMISetting.ASPScriptDefaultNamespace = "rootcimv2"
 9         objWMISetting.Put_
10 Next
Thus far the scripts in this chapter have used the same WMI scripting technique to retrieve instances of dynamic WMI-managed resources. For example, the same script template was used to retrieve total physical memory, services, and event log records. In Listing 6.6 through Listing 6.8, the same template was used to retrieve services, operating system information, and the default namespace for scripting. As it turns out, you can use the same WMI scripting technique to retrieve namespace information from the CIM. The only change you need to make to the script is the target class name.
Namespace information is stored inside the CIM as static instances of the __NAMESPACE class. The __NAMESPACE class is an example of the static class type defined earlier. Unlike dynamic managed resources that are retrieved on demand from a provider, static class instances are stored in and retrieved directly from the CIM without the use of a WMI provider. Listing 6.10 uses the __NAMESPACE class to retrieve and echo all of the namespaces directly beneath the root namespace.
Example 6.10. Retrieving CIM Namespaces Using WMI and VBScript
1 strComputer = "."
2
3 Set objSWbemServices = GetObject("winmgmts:\" & strComputer & "
oot")
4 Set colNameSpaces = objSwbemServices.InstancesOf("__NAMESPACE")
5
6 For Each objNameSpace In colNameSpaces
7     Wscript.Echo objNameSpace.Name
8 Next
The following output is the result of running the script on a Windows 2000–based computer:
DEFAULT
SECURITY
CIMV2
WMI
directory
The list of namespaces will vary based on the versions of both Windows and WMI installed on the target computer, and any WMI-enabled applications installed on the computer. For example, these namespaces are found on Windows XP with Microsoft® Office XP and the .NET Framework installed:
SECURITY
RSOP
Cli
WMI
CIMV2
MSAPPS10
Policy
Microsoft
DEFAULT
directory
subscription
NetFrameworkv1
Listing 6.10 does not provide a complete picture of all of the namespaces available on the target computer. It retrieves and displays only the namespaces beneath a single specified namespace (in this case, root). To display all of the namespaces on a local or remote WMI-enabled computer, you need to modify Listing 6.10 to recursively connect to and enumerate each namespace. Fortunately, this is not as difficult as you might think, as shown in Listing 6.11.
Changing Listing 6.10 into a recursive namespace script primarily involves implementing the body of the original script inside a subroutine and providing a mechanism to call the subroutine for each namespace instance retrieved from the CIM. Listing 6.11 accomplishes this by performing the following steps:
Initializes the variable strComputer with the name of the target computer.
Calls the recursive subroutine, EnumNameSpaces, and passes the subroutine a string identifying the initial namespace as “root”. The body of the EnumNameSpaces subroutine is identical to Listing 6.10 with one important change. The subroutine:
Begins by echoing the value of the subroutine’s single argument, strNameSpace.
The variable strNameSpace identifies the namespace used in the connection string each time the subroutine is called. The first time the subroutine is called, strNameSpace is equal to “root”.
Uses the VBScript GetObject function to connect to the namespace identified by the subroutine’s strNameSpace argument.
After establishing a connection to the WMI service and namespace on the target computer, the subroutine retrieves all namespace instances immediately beneath the namespace referenced by strNameSpace.
Using a For Each loop, the subroutine enumerates the namespace instances immediately beneath the currently connected namespace. However, instead of the script simply echoing the names of the child (or sub) namespaces, each child (or sub) namespace name is concatenated with the current namespace name. This name is then passed to a new invocation of the EnumNameSpaces subroutine.
Substeps a through d are repeated until all namespace instances are enumerated.
Example 6.11. Retrieving All CIM Namespaces
 1 strComputer = "."
 2 Call EnumNameSpaces("root")
 3
 4 Sub EnumNameSpaces(strNameSpace)
 5     Wscript.Echo strNameSpace
 6     Set objSWbemServices = _
 7         GetObject("winmgmts:\" & strComputer & "" & strNameSpace)
 8     Set colNameSpaces = objSWbemServices.InstancesOf("__NAMESPACE")
 9     For Each objNameSpace In colNameSpaces
10         Call EnumNameSpaces(strNameSpace & "" & objNameSpace.Name)
11     Next
12 End Sub
The following is output generated from running the script on a Windows 2000 Advanced Server computer:
root
rootDEFAULT
rootSECURITY
rootCIMV2
rootCIMV2Applications
rootCIMV2ApplicationsMicrosoftIE
rootCIMV2ms_409
rootWMI
rootdirectory
rootdirectoryLDAP
rootdirectoryLDAPms_409
rootMicrosoftNLB
rootMicrosoftNLBms_409
As illustrated earlier in Figure 6.2, three general categories of classes are used to construct the CIM: system, core and common, and extension.
System classes are classes that support internal WMI configuration and operations, such as namespace configuration, namespace security, provider registration, and event subscriptions and notifications. When browsing the CIM, you can easily identify system classes by the two underscores prefacing each system class name. For example, the __SystemClass, __Provider, and __Win32Provider classes shown in Figure 6.2 are system classes. The __NAMESPACE class examined in the preceding section is another example of a system class.
System classes are either abstract or static. Abstract system classes are templates used to derive (define) other abstract or static system classes. Static system classes define WMI configuration and operational data that is physically stored in the CIM repository. For example, the __Win32Provider system class defines provider registration information stored in the CIM. The CIMOM uses the provider registration information stored in the CIM to map requests for dynamic managed resources to the appropriate provider.
As demonstrated with the __NAMESPACE system class earlier, you can use the same WMI scripting technique to retrieve static instances of system classes stored in the CIM. Listing 6.12, for example, retrieves and displays all of the __Win32Provider instances registered in the rootcimv2 namespace.
Example 6.12. Retrieving Win32 Providers Registered in the rootcimv2 Namespace
1 strComputer = "."
2
3 Set objSWbemServices = _
4     GetObject("winmgmts:\" & strComputer & "
ootcimv2")
5 Set colWin32Providers = objSWbemServices.InstancesOf("__Win32Provider")
6
7 For Each objWin32Provider In colWin32Providers
8     Wscript.Echo objWin32Provider.Name
9 Next
When the script runs on a Windows 2000–based computer, it returns the following provider names:
CIMWin32
WBEMCORE
MS_Power_Management_Event_Provider
MS_NT_EVENTLOG_PROVIDER
MS_NT_EVENTLOG_EVENT_PROVIDER
SECRCW32
MSIProv
NT5_GenericPerfProvider_V1
It is unlikely you will use system classes in your WMI scripts, with one exception: WMI monitoring scripts. WMI monitoring scripts are scripts that subscribe to WMI events and provide real-time notification that something of interest has happened with a WMI-managed resource. WMI event subscriptions and notifications are covered later in this chapter.
It is useful to know what system classes are, however, if for no other reason than the fact that tools that browse the CIM repository will return these classes. Understanding the difference between system classes and other classes helps you determine which classes are likely to be useful to you and which ones are not.
The core and common classes serve two roles. First, they represent the abstract classes from which system and application software developers can derive and create technology-specific extension classes. Second, they define resources common to particular management areas, but independent of a particular technology or implementation; in theory, these are resources that any operating system (not just Windows) is likely to support. The DMTF defines and maintains the set of core and common classes, which can be identified by the CIM_ prefix. The four classes prefaced with CIM_ in Figure 6.2 are core and common classes.
Of the approximately 275 core and common classes defined in the rootcimv2 namespace, all are abstract classes, with a few exceptions. You will rarely use core and common classes (classes prefaced with CIM_) in your WMI scripts because you cannot retrieve instances of abstract classes; abstract classes can be used only as a basis for new classes. Because 271 of the core and common classes are abstract, these classes are used primarily by software developers to create technology-specific extension classes. These classes serve as the basis for the scores of Win32_ classes used to manage computers running the Windows operating system.
Just four of the 275 core and common classes are dynamic classes rather than abstract classes. These four classes, which use the Win32 Provider (cimwin32.dll) to retrieve instances of managed resources, are CIM_DataFile, CIM_DirectoryContainsFile, CIM_ProcessExecutable, and CIM_VideoControllerResolution. This means you can actually use these classes to retrieve information about managed resources. For example, this script returns information about all the possible video modes supported by the video controllers on a computer:
strComputer = "."
Set objSWbemServices = GetObject("winmgmts:\" & strComputer & "
ootcimv2")
Set colVideoControllers = _
    objSWbemServices.InstancesOf("CIM_VideoControllerResolution")
For Each objVideoController In colVideoControllers
    Wscript.Echo objVideoController.HorizontalResolution
    Wscript.Echo objVideoController.VerticalResolution
    Wscript.Echo objVideoController.NumberOfColors
    Wscript.Echo objVideoController.RefreshRate
Next
Extension classes are technology-specific classes created by system and application software developers. The Win32_BaseService, Win32_Service, Win32_SystemServices, and Win32_ComputerSystem classes shown in Figure 6.2 are Microsoft extension classes. Microsoft extension classes in the rootcimv2 namespace can be identified by the Win32_ prefix.
However, you should not conclude that all Microsoft extension class names begin with Win32_; they do not. For example, the StdRegProv class defined in the rootDEFAULT namespace is not prefaced with Win32_, even though the StdRegProv class is a Microsoft extension class for registry management tasks.
In the latest version of WMI, about 463 Win32 extension classes are defined in the rootcimv2 namespace. Of the 463 Win32 classes, 68 are abstract classes and the remaining 395 are dynamic. Extension classes are the primary category of classes you will use in your WMI scripts.
In addition to listing namespaces, you can write a script to retrieve all of the classes defined within a namespace. Listing 6.13, for example, lists all classes defined in the rootcimv2 namespace. However, unlike the previous scripts that used the SWbemServices InstancesOf method, Listing 6.13 uses a different method, SubclassesOf, which is also provided by the SWbemServices object.
As the name suggests, SubclassesOf returns all of the child (or sub) classes of a specified parent (super) class, or of a specified namespace when no parent class is provided. Like InstancesOf, SubclassesOf returns all of the subclasses in the form of an SWbemObjectSet collection, where each item in the collection is an SWbemObject representing a single class.
A new element is introduced in Listing 6.13: the objClass.Path_.Path property echoed in the body of the For Each loop. Like other For Each loops used in this chapter, this one enumerates each object in the collection returned by the SubclassesOf method. In this case, each object represents a discrete class in the rootcimv2 namespace.
However, in contrast with previous scripts that displayed properties defined by a managed resource blueprint (class definition), Path_ is a property provided by the SWbemObject. To understand this, you have to think about the context in which the script is using SWbemObject. In this case, you are not accessing an instance of a managed resource (for example, a service named Alerter or a process named Notepad.exe). Instead, you are accessing the managed resource class definition.
When you use SWbemObject to access an instance of a managed resource, you are more likely to access properties and methods defined by the blueprint for the managed resource (the class definition). When you use SWbemObject to get detailed class information, such as supported properties, methods, and qualifiers, you use properties and methods provided by SWbemObject itself. Path_ is one such property.
Path_ actually references another WMI scripting library object named SWbemObjectPath, which provides the Path property. The SWbemObjectPath Path property contains the fully qualified path to the class referenced by SWbemObject (objClass in Listing 6.13).
Example 6.13. Retrieving All Classes Defined in the rootcimv2 Namespace
1 strComputer = "."
2
3 Set objSWbemServices = _
4     GetObject("winmgmts:\" & strComputer & "
ootcimv2")
5 Set colClasses = objSWbemServices.SubclassesOf()
6
7 For Each objClass In colClasses
8     Wscript.Echo objClass.Path_.Path
9 Next
Running Listing 6.13 on a Windows 2000-based computer displays a long list of 636 classes, some of which are shown in the following output.
\ATL-WIN2K-01ROOTCIMV2:Win32_NTEventlogFile
\ATL-WIN2K-01ROOTCIMV2:Win32_NTLogEvent
\ATL-WIN2K-01ROOTCIMV2:Win32_NTLogEventLog
\ATL-WIN2K-01ROOTCIMV2:Win32_NTLogEventUser
\ATL-WIN2K-01ROOTCIMV2:Win32_NTLogEventComputer
\ATL-WIN2K-01ROOTCIMV2:Win32_SID
\ATL-WIN2K-01ROOTCIMV2:Win32_AccountSID
\ATL-WIN2K-01ROOTCIMV2:Win32_SecuritySetting
\ATL-WIN2K-01ROOTCIMV2:Win32_SecuritySettingOfObject
\ATL-WIN2K-01ROOTCIMV2:Win32_SecuritySettingOwner
\ATL-WIN2K-01ROOTCIMV2:Win32_SecuritySettingGroup
\ATL-WIN2K-01ROOTCIMV2:Win32_SecuritySettingAccess
\ATL-WIN2K-01ROOTCIMV2:Win32_SecuritySettingAuditing
\ATL-WIN2K-01ROOTCIMV2:Win32_Trustee
\ATL-WIN2K-01ROOTCIMV2:Win32_ACE
\ATL-WIN2K-01ROOTCIMV2:Win32_SecurityDescriptor
\ATL-WIN2K-01ROOTCIMV2:Win32_LogicalFileSecuritySetting
You can modify Listing 6.13 to list classes in other namespaces by changing the target namespace of the script. You can also use Listing 6.13 in combination with the findstr.exe command to search for classes. The Findstr.exe command is a command-line tool that searches for strings in files.
Suppose, for example, you need to know whether the new Windows XP Win32_TSSessionSetting class is supported on the version of Windows you are running. You can use the following command to determine whether this class exists in the rootcimv2 namespace. This command retrieves the classes found in the rootcimv2 namespace and “pipes” that output to Findstr.exe. Findstr.exe then searches the output and reports any instances of the string “Win32_TSSessionSetting”.
cscript GetClasses.vbs |findstr /I "win32_tssessionsetting"
When the command runs on a Windows XP-based computer, the following output is returned:
\ATL-WINXP-01ROOTcimv2:Win32_TSSessionSettingError
\ATL-WINXP-01ROOTcimv2:Win32_TSSessionSetting
When the command runs on a Windows 2000-based computer, no data is returned. This means that the Win32_TSSessionSetting class is not supported in Windows 2000.
Here are a few additional scenarios you can try.
List all system classes in the rootcimv2 namespace:
cscript GetClasses.vbs |findstr /I "__"
List all core and common classes in the rootcimv2 namespace:
cscript GetClasses.vbs |findstr /I "CIM_"
List all Win32 extension classes in the rootcimv2 namespace:
cscript GetClasses.vbs |findstr /I "Win32_"
List all classes in the rootcimv2 namespace that contain the string “process”:
cscript GetClasses.vbs |findstr /I "process"
It should be obvious at this point that classes are the basic building blocks in the CIM repository. WMI configuration information and WMI-managed resources are defined by one or more classes. Similar to the Active Directory schema, CIM classes are organized hierarchically such that child classes inherit properties, methods, and qualifiers from parent classes. (Properties, methods, and qualifiers will be covered in the next section of this chapter.)
For example, the Win32_Service dynamic class is inherited from the Win32_BaseService abstract class, which is inherited from the CIM_Service abstract class, which is inherited from the CIM_LogicalElement abstract class, which is inherited from the CIM_ManagedSystemElement abstract class, as illustrated in Figure 6.2. It is the sum of the classes in a class hierarchy that ultimately defines a managed resource.
Table 6.3 compares the non-system properties found in each of these classes. As you can see, child classes inherit all the properties from their parent class and typically include additional properties as well. Of course, this is why a software developer creates a new child class in the first place: because an existing class has many of the properties needed but not all of the properties needed. Rather than modify an existing class, the developer creates a new child class and adds properties to that child class.
Table 6.3. Comparing Parent and Child Class Properties
CIM_ManagedSystemElement and CIM_LogicalElement | CIM_Service | Win32_BaseService | Win32_Service |
|---|---|---|---|
Caption | Caption | Caption | Caption |
Description | Description | Description | Description |
InstallDate | InstallDate | InstallDate | InstallDate |
Name | Name | Name | Name |
Status | Status | Status | Status |
CreationClassName | CreationClassName | CreationClassName | |
Description | Description | Description | |
Name | Name | Name | |
Started | Started | Started | |
StartMode | StartMode | StartMode | |
Status | Status | Status | |
SystemCreationClassName | SystemCreationClassName | SystemCreationClassName | |
SystemName | SystemName | SystemName | |
AcceptPause | AcceptPause | ||
AcceptStop | AcceptStop | ||
DesktopInteract | DesktopInteract | ||
DisplayName | DisplayName | ||
ErrorControl | ErrorControl | ||
ExitCode | ExitCode | ||
PathName | PathName | ||
ServiceSpecificExitCode | ServiceSpecificExitCode | ||
ServiceType | ServiceType | ||
StartName | StartName | ||
State | State | ||
TagID | |||
Checkpoint | |||
ProcessID | |||
WaitHint |
Does this mean that you can use Win32_BaseService to return information about services? No; Win32_BaseService is an abstract class, meaning that it is designed to serve as a template for other classes, not to return data.
An abstract class is a template used to define new classes. Like abstract classes in the Active Directory schema, CIM abstract classes serve as base classes for other abstract, static, and dynamic classes. Most WMI-managed resource class definitions are built (or derived) from one or more abstract classes.
You can identify an abstract class by examining the Abstract qualifier. An abstract class must define the Abstract qualifier and set the Abstract qualifier value to true.
The most common use of the abstract class type is to define core and common classes. Abstract classes are rarely used in WMI scripts because you cannot retrieve instances of abstract classes.
A static class defines data that is physically stored in the CIM repository. Static classes have instances just like dynamic classes; however, instances of static classes are stored in the CIM repository. Likewise, static class instances are retrieved directly from the CIM. They do not use a provider.
You can identify a static class by examining the class qualifiers. However, unlike abstract and dynamic class types that are identified by the presence of a specific qualifier, static classes are identified by the absence of the Abstract and Dynamic qualifiers. In other words, if a class has neither an Abstract nor a Dynamic qualifier, the class is a static class.
The most common use of the static class type is in the definition of system classes. Static classes are rarely used in WMI scripts.
A dynamic class is a class that models a WMI-managed resource that is dynamically retrieved from a provider.
You can identify a dynamic class by examining the Dynamic qualifier. A dynamic class must define the Dynamic qualifier and set the Dynamic qualifier value to true.
The dynamic class type is typically used to define extension classes. Dynamic classes are the most common type of classes used in WMI scripts.
A fourth class type, known as an association class, is also supported. An association class is an abstract, static, or dynamic class that describes a relationship between two classes or managed resources. The Win32_SystemServices class, shown in Figure 6.2, is an example of a dynamic association class that describes the relationship between a computer and the services running on the computer.
You can identify an association class by examining the Association qualifier. An abstract, static, or dynamic association class must define the Association qualifier and set the Association qualifier value to true.
Every hardware and software resource that is manageable through WMI is defined by a class. A class is a blueprint (or template) for a discrete WMI-managed resource, and all instances of the resource use the blueprint. These means, for example, that all services (which are instances of the Win32_Service class) will have the same properties. This does not mean that they will have the same property values; for example, Alerter has the Name Alerter, while the WMI service has the Name Winmgmt. However, all services have a Name property.
Note
This is true even if no value has been configured for a property. For example, all services have the Description property, although there is no requirement that all services actually have a description. If a property is valid but has not been configured, WMI will return the value Null. This prevents a script from crashing should it encounter a property with no configured value.
Classes represent the things computers have. Because computers have disks, event logs, files, folders, memory, printers, processes, processors, services, and so on, WMI has classes for disks, event logs, files, folders, memory, printers, processes, processors, services, and so on. Although there are exceptions (such as __Event abstract system classes), most classes that are used in scripting can be directly tied to real things.
These blueprints consist of properties, methods, and qualifiers. Before examining properties, methods, and qualifiers, it is useful to learn where managed resource class definitions originate.
Suppose Microsoft decides to create a new WMI provider that system administrators can use to manage and monitor Microsoft DNS servers. At a minimum, the DNS provider development team would need to create two files: a provider and something called a Managed Object Format (MOF) file.
The provider is the dynamic-link library (DLL) that acts as the intermediary between the WMI infrastructure and the underlying managed resource — the Microsoft DNS server in this case. The provider services WMI requests by calling the native APIs of the managed resource.
The MOF file contains the class definitions that describe the capabilities provided by the DNS provider. The MOF file describes the capabilities of the DNS provider, using classes that model resources commonly associated with a DNS server. DNS servers have such things as zones and resource records; thus, you might expect to see classes such as MicrosoftDNS_Zone and MicrosoftDNS_ResourceRecord defined in the MOF file. Each class defined in the DNS MOF file defines the data (properties) associated with a specific DNS-related resource and the actions (methods) you can perform on that resource. For example, a resource record has a time-to-live (TTL) property. Therefore, you might expect the MicrosoftDNS_ResourceRecord class to have a property such as TTL.
When the DNS provider is installed, the DNS provider DLL is registered with the operating system and WMI, and the DNS MOF file undergoes a compilation process. This loads the DNS provider class definitions into the CIM repository. At this point, the DNS provider can be used by any WMI-enabled consumer, including scripts.
As it turns out, this story is true: Microsoft developed a new DNS provider that can be downloaded for Windows 2000. However, the story is not as important as the fact that managed resource class definitions originate in MOF files. MOF files are to WMI what MIB files are to SNMP.
MOF files are text files based on the MOF language created and maintained by the DMTF. The class definition of every managed resource follows a well-defined structure and syntax, as illustrated in Figure 6.3.

Every managed resource class definition consists of properties, methods, and qualifiers. This definition is applied to all instances of a class and determines what can and cannot be done to an instance. For example, with services you can specify actions that will be taken should the service fail (restart the service, restart the computer, run a program, or take no action). These recovery options are not specified anywhere with the class definition. That means that they cannot be managed by using a script.
Properties are like nouns that describe a managed resource. Classes use properties to describe things such as the identity, configuration, and state of a managed resource. Services, for example, have a name, display name, description, startup type, and status. The Win32_Service class has the same properties.
Each property has a name, a type, and optional property qualifiers. You use the property name in combination with the WMI scripting library SWbemObject to access a property, as demonstrated in Listing 6.1. For example, assuming that objService represents an instance of an installed service, these lines of code echo the service name and the description:
Wscript.Echo objService.Name
Wscript.Echo objService.Description
In the MOF file itself, a property definition looks similar to this, with the name, data type, and qualifier (in this case, the Read qualifier) indicated in boldface:
[read: ToSubclass,MappingStrings{"Win32API|Service
Structures|SERVICE_STATUS|dwControlsAccepted|SERVICE_ACCEPT_PAUSE_CONTINUE"}:
ToSubclass] boolean AcceptPause;
Methods are like verbs that perform an action on a managed resource. Think of the methods of the Win32_Service class in these terms: What can you do with services? You can start services, stop services, pause services, and resume services. As it turns out, there are methods that allow you to start, stop, pause, and resume services.
Each method has a name, a return type, optional parameters, and optional method qualifiers. As with properties, you use the method name in combination with SWbemObject to call a method. For example, this line of code stops the service represented by objService. The error code of the operation will be stored in the variable errReturn and then echoed to the screen (in general, the value 0 means that an operation succeeded, and anything else means the script failed):
errReturn = obService.StopService()
Wscript.Echo errReturn
Not all classes define methods. In Windows 2000, you will find methods implemented in classes such as Win32_Service, Win32_NTEventLogFile, and Win32_Process. In Windows XP, methods are implemented in a number of additional classes, including both new (Win32_DiskQuota) and existing (Win32_Printer) classes.
In the MOF file, a method definition looks similar to this one. The boldface items indicate the fact that the method is implemented (meaning it can be used in scripts), the return codes (ValueMap) used by the method, and the name of the method.
[Implemented, ValueMap{"0", "1", "2", "3", "4", "5", "6", "7", "8", "9", "10",
"11", "12", "13", "14", "15", "16", "17", "18", "19", "20", "21", "22", "23",
"24", ".."} : ToSubclass,MappingStrings{"Win32API|Service
Functions|ControlService|dwControl|SERVICE_CONTROL_CONTINUE"} : ToSubclass]
uint32 ResumeService();
Qualifiers are like adjectives that provide additional information about the class, property, or method to which they apply. For example, the Dynamic qualifier answers the question, “What type of class is Win32_Service?” As you begin to write WMI scripts that do more than simply retrieve information (such as modify properties or call methods), qualifiers become increasingly important. This is because they define the operational characteristics of the property you are updating or the method you are calling.
So what kind of information do qualifiers provide? As it turns out, there are three types of qualifiers, providing three types of information.
Class qualifiers
Class qualifiers provide operational information about a class:
The Abstract, Dynamic, and Association qualifiers tell you the class type.
The Provider qualifier tells you the provider that services the class. For example, the Provider qualifier for the Win32_Service class tells you that the class uses the CIMWin32 provider (cimwin32.dll). On the other hand, the Win32_NTLogEvent class uses the MS_NT_EVENTLOG_PROVIDER provider (ntevt.dll) as indicated by the Win32_NTLogEvent class Provider qualifier.
The EnumPrivileges qualifier informs you of special privileges required to use the class. For example, the Win32_NTLogEvent class EnumPrivileges qualifier tells you that SeSecurityPrivilege must be enabled before the Win32_NTLogEvent class can be used to manage the Security log. If this privilege is not specified in the script, the script will not be able to manage the Security event log.
The definition for the Win32_NTLogEvent class in ntevt.mof shows the class type (dynamic), the provider name, and required privileges, all shown in boldface:
[Dynamic, Provider("MS_NT_EVENTLOG_PROVIDER"):
ToInstance, EnumPrivileges{"SeSecurityPrivilege"}:
ToSubclass,Locale(1033) :
ToInstance,UUID("{8502C57C-5FBB-11D2-AAC1-006008C78BC7}"):
ToInstance]
class Win32_NTLogEvent
Property qualifiers
Property qualifiers provide information about each property. For example:
The CIMType qualifier tells you the property data type. WMI supports a number of data types, including strings, integers, dates and times, arrays, and Boolean values.
Does it really matter which data type a property is? In the simple examples presented thus far in this chapter, no. However, suppose you connect to the Win32_Printer class and retrieve the value of the Capabilities property. This property stores values as an array; consequently, simply echoing the property value (like this) results in a “Type mismatch” error:
Wscript.Echo objPrinter.Capabilities
Instead, you have to loop through the individual elements in the array, like this:
For Each intCapability in objPrinter.Capabilities
    Wscript.Echo intCapability
Next
The Read qualifier indicates whether the property is readable.
The Write qualifier indicates whether you can modify the property value. For example, the Win32_WMISetting ASPScriptDefaultNamespace property modified in Listing 6.9 is marked as writable. This means that you can change the value of the property. On the other hand, all of the Win32_Service properties shown in previous scripts are defined as readonly; that is, they do not define the Write qualifier. In general, this means that these properties cannot be configured using a script. (The only exceptions are those properties where the class provides a method that can configure the values. For example, you can use the ChangeStartMode method to change the start mode for a service, even though the StartMode property is read-only.)
The Key qualifier indicates that the property is the class key and is used to identify unique instances of a managed resource in a collection of identical resources. DeviceID is a key property in the Win32_LogicalDisk class. Why? Because device IDs must be unique; a computer can have no more than one C drive. Size is not a key property, because there is no reason why a single computer cannot have multiple drives all the same size.
Method qualifiers
Method qualifiers provide information about each method. For example:
The Implemented qualifier indicates that the method has an implementation supplied by a provider. This is important because WMI classes often include methods that are valid but do not actually work (because they have not been implemented). For example, a number of hardware classes include a method named SetPowerState that is a valid method but has not been implemented. Therefore, it cannot actually be used to set the power state of an object.
The ValueMap qualifier defines a set of permissible values for a method parameter or return type.
The Privileges qualifier informs you of special privileges required to call the method.
Note
There are many more qualifiers than those mentioned here. For a complete list, see the WMI Qualifiers topic in the WMI SDK. For information about how to download the WMI SDK, see the Microsoft Windows Management Instrumentation (WMI) SDK link on the Web Resources page at http://www.microsoft.com/windows/reskits/webresources.
Classes determine what you can and cannot do with WMI. If you have a class for services, you can manage services; if you do not have a class for services, you cannot. Consequently, it is important to know which classes are available on a given computer.
Properties and methods are important because the versions of WMI differ among operating systems; the Win32_ComputerSystem class in Windows XP has many new properties and methods not supported by the Win32_ComputerSystem class in Windows 2000. You have to know these details because, unlike Active Directory Service Interfaces (ADSI), the WMI properties and methods must be available on the target computer in order for a script to work.
Note
ADSI works as long as ADSI is installed on your computer. The target computer does not have to have the same version of ADSI as you do; in fact, it does not have to have ADSI at all. With WMI, however, this is different. You cannot retrieve information from a remote computer unless both your computer and the remote computer have WMI installed. Similarly, the methods and properties defined in a managed resource’s class definition must exist on the remote computer for a script to work. For example, the Win32_Printer class in Windows XP has a method named CancelAllJobs that can purge a print queue. However, this method cannot be used against a Windows 2000-based computer because the Win32_Printer class in Windows 2000 does not support CancelAllJobs. The method must be present on the target computer.
How do you determine whether a property or a method is supported on a remote Windows-based computer? You examine the class definition.
You can use the WMI scripting library to retrieve managed resource class definitions in two different ways:
You can use the SWbemObject Qualifiers_, Properties_, and Methods_ properties to retrieve class information.
You can use the SWbemObject GetObjectText_ method to retrieve the class definition formatted in MOF syntax.
Using the SWbemObject Properties_, Methods_, and Qualifiers_ properties
Listing 6.14, Listing 6.15, and Listing 6.16 demonstrate how to use the Properties_, Methods_, and Qualifiers_ properties of SWbemObject to retrieve information about the Win32_Service class. All three scripts employ the same basic approach, although there are some differences.
Listing 6.14 begins by initializing three variables: strComputer, strNameSpace, and strClass. The value assigned to strComputer is the target computer. The value assigned to strNameSpace is the namespace to connect to, and the value assigned to strClass is the name of the class whose properties are to be retrieved and displayed.
Separating the three values into multiple variables makes it easy to reuse the script for other computers, namespaces, and classes. In fact, you can easily turn these scripts into command-line scripts by using the WSH Arguments collection. This allows a user to retrieve information about any computer, namespace, or class simply by specifying the appropriate information as a command-line argument. For more information about WSH arguments, see “WSH Primer” in this book.
Next the script uses the VBScript GetObject function to connect to the WMI Service on the target computer. You might have noticed something different about the connection string passed to GetObject. In addition to the target namespace, the class name is also specified. This has a profound impact on what GetObject and the WMI scripting library return. Rather than return a reference to an SWbemServices object, as was the case in the previous scripts, GetObject returns a reference to an SWbemObject representing the target class. How? The answer lies in something called an object path. Although object paths are covered in detail later in this chapter, a quick explanation will help you understand what is going on in these scripts.
Every WMI class and every instance of a WMI-managed resource has an object path. An object path is very similar to the file paths associated with files and folders. A file has a fully qualified path that consists of a device name, followed by zero or more directory names, followed by the file name. Likewise, every class and managed resource has an object path that consists of the computer name, followed by the namespace, followed by the managed resource class name, followed by the class key property and the key property value, as shown here. (Note that the square brackets serve only to delimit the four permissible parts of an object path; they are not part of the object path.)
[\ComputerName][Namespace][:ClassName][.KeyProperty='Value']
When you use all or part of an object path in the connection string passed to GetObject, the object path you use determines the type of reference returned. For example, if you include only the computer name portion of an object path, you get back an SWbemServices object reference connected to the default namespace. If you include the computer name or the namespace or both, you also get a reference to an SWbemServices object. If you include the computer name, namespace, and class name, you get back a reference to an SWbemObject representing the class. And if you include all four parts, you get back an SWbemObject representing the managed resource instance identified by the class, key, and value.
The object path elements and the objects returned are summarized in Table 6.4.
Table 6.4. Object Path Elements and Objects Returned
The remainder of the script is reasonably straightforward. After echoing a simple header identifying the class name whose properties are going to be displayed, the script uses the SWbemObject reference (objClass) to access the SWbemObject Properties_ property (objClass.Properties_). The Properties_ property references an SWbemPropertySet, which is the collection of properties for the class. Each property in the collection is an SWbemProperty (objClassProperty) object, which is used to read and echo each property name.
Example 6.14. Using SWbemObject Properties_ to Retrieve Win32_Service Properties
 1 strComputer = "."
 2 strNameSpace = "rootcimv2"
 3 strClass = "Win32_Service"
 4
 5 Set objClass = GetObject("winmgmts:\" & strComputer & _
 6                          "" & strNameSpace & ":" & strClass)
 7
 8 Wscript.Echo strClass & " Class Properties"
 9 Wscript.Echo " - - - - - - - - - - - - - - - ; "
10
11 For Each objClassProperty In objClass.Properties_
12     Wscript.Echo objClassProperty.Name
13 Next
The following is output displaying the names of the 25 properties defined (or inherited) by the Win32_Service class.
Win32_Service Class Properties
- - - - - - - - - - - - - - -
AcceptPause
AcceptStop
Caption
CheckPoint
CreationClassName
Description
DesktopInteract
DisplayName
ErrorControl
ExitCode
InstallDate
Name
PathName
ProcessId
ServiceSpecificExitCode
ServiceType
Started
StartMode
StartName
State
Status
SystemCreationClassName
SystemName
TagId
WaitHint
Listing 6.15 is identical to Listing 6.14, with one exception: The For Each loop enumerates the SWbemMethodSet collection and displays the Name property for each SWbemMethod (objClassMethod) in the SWbemMethodSet collection.
Example 6.15. Using SWbemObject Methods_ to Retrieve Win32_Service Methods
 1 strComputer = "."
 2 strNameSpace = "rootcimv2"
 3 strClass = "Win32_Service"
 4
 5 Set objClass = GetObject("winmgmts:\" & strComputer & _
 6                          "" & strNameSpace & ":" & strClass)
 7
 8 Wscript.Echo strClass & " Class Methods"
 9 Wscript.Echo " - - - - - - - - - - - - - -"
10
11 For Each objClassMethod In objClass.Methods_
12     Wscript.Echo objClassMethod.Name
13 Next
The following output displays the names of the 10 methods defined (or inherited) by the Win32_Service class.
Win32_Service Class Methods
- - - - - - - - - - - - - -
StartService
StopService
PauseService
ResumeService
InterrogateService
UserControlService
Create
Change
ChangeStartMode
Delete
Listing 6.16 is identical to Listing 6.14 and Listing 6.15, with three exceptions:
The For Each loop enumerates the SWbemQualifierSet collection (by way of the Qualifiers_ property) and echoes the Name property for each SWbemQualifier (objClassQualifier) in the collection.
Because class qualifiers are part of the class definition and qualifiers have values, Listing 6.16 also retrieves and echoes the Value property for each SWbemQualifier in the collection.
Because a qualifier can have multiple values stored in an array, Listing 6.16 must account for this prior to reading the value of a qualifier. Not doing so would result in a run-time error if the script tried to read an array-based qualifier as a “regular” variable. The Win32_NTLogEvent EnumPrivileges qualifier is an example of an array-based qualifier (although only one value, the privilege SeSecurityPrivilege, is stored in the array).
This checking is done by using the VBScript function VarType to determine the data type of the variable.
Example 6.16. Using SWbemObject Qualifiers_ to Retrieve Win32_Service Class Qualifiers
 1 strComputer = "."
 2 strNameSpace = "rootcimv2"
 3 strClass = "Win32_Service"
 4
 5 Set objClass = GetObject("winmgmts:\" & strComputer & _
 6                          "" & strNameSpace & ":" & strClass)
 7
 8 Wscript.Echo strClass & " Class Qualifiers"
 9 Wscript.Echo " - - - - - - - - - - - - - - - "
10
11 For Each objClassQualifier In objClass.Qualifiers_
12     If VarType(objClassQualifier.Value) = (vbVariant + vbArray) Then
13         strQualifier = objClassQualifier.Name & " = " & _
14                        Join(objClassQualifier.Value, ",")
15     Else
16         strQualifier = objClassQualifier.Name & " = " & _
17                        objClassQualifier.Value
18     End If
19     Wscript.Echo strQualifier
20     strQualifier = ""
21 Next
The following output displays the names and values of the five class qualifiers defined (or inherited) by the Win32_Service class.
Win32_Service Class Qualifiers
- - - - - - - - - - - - - - -
dynamic = True
Locale = 1033
provider = CIMWin32
SupportsUpdate = True
UUID = {8502C4D9-5FBB-11D2-AAC1-006008C78BC7}
As you might have noticed, Listing 6.14 and Listing 6.15 do not show you the property and method qualifiers. This was done to keep the scripts to a size that could be easily explained.
Using the SWbemObject GetObjectText_ method
Earlier it was noted that you can retrieve managed resource class definitions directly from the MOF file in which the class is defined. For example, if you want to look up the Win32_Service class, look in the systemrootSystem32WbemCimwin32.mof file. However, using MOF files directly comes with a price. You must examine every class in a class hierarchy to obtain the complete blueprint for the managed resource.
For example, if you want to look up Win32_Service, you have to examine all five classes in the Win32_Service class hierarchy to get the complete picture. This is tedious at best. An easier approach to obtaining the MOF representation of a class is to use the WMI scripting library SWbemObject GetObjectText_ method, as demonstrated in Listing 6.17.
Unlike Listing 6.14 through Listing 6.16, Listing 6.17 uses the SWbemServices Get method rather than GetObject to retrieve the class. The Get method must be used so the wbemFlagUseAmendedQuailifiers flag can be enabled. Enabling this flag tells WMI to return the entire managed resource blueprint (class definition) rather than just the local definition. In other words, the information returned includes only the three properties unique to Win32_Service, and no information is returned for all the properties and methods inherited from other classes.
The Get method returns a reference to an SWbemObject (objClass) representing the target class, which is used to call the GetObjectText_ method. The GetObjectText_ method returns the MOF representation for the class. Had GetObjectText_ been used without enabling the wbemFlagUseAmendedQuailifiers flag, the method would have only returned those properties, methods, and qualifiers defined by Win32_Service; inherited properties and methods would have been omitted.
Example 6.17. Using SWbemObject GetObjectText_ to Retrieve the MOF Representation of the Win32_Service Class
 1 strComputer = "."
 2 strNameSpace = "rootcimv2"
 3 strClass = "Win32_Service"
 4
 5 Const wbemFlagUseAmendedQualifiers = &h20000
 6
 7 Set objSWbemServices = _
 8     GetObject("winmgmts:\" & strComputer & "" & strNameSpace)
 9 Set objClass = objSWbemServices.Get(strClass, wbemFlagUseAmendedQualifiers)
10 strMOF = objClass.GetObjectText_
11
12 Wscript.Echo strMOF
The output from the script will be similar to this partial output:
[dynamic: ToInstance, provider("CIMWin32"): ToInstance, Locale(1033): Amended,
UUID("{8502C4D9-5FBB-11D2-AAC1-006008C78BC7}"): ToInstance, Description("The
Win32_Service class represents a service on a Win32 computer system. A service
application conforms to the interface rules of the Service Control Manager (SCM)
and can be started by a user automatically at system boot through the Services
control panel utility, or by an application that uses the service functions
included in the Win32 API. Services can execute even when no user is logged on to
the system."): ToSubClass Amended]
class Win32_Service : Win32_BaseService
{
   [Description("The Caption property is a short textual description (one-line
string) of the object."): ToSubClass Amended] string Caption;
There is a caveat to using GetObjectText_, however: The method does not return information about inherited qualifiers included in the MOF file. This can present a problem if you want to use GetObjectText_ to determine a Key property when the Key qualifier is defined in a parent class.
Browsing the CIM repository is probably the best way to learn about the available classes and about the methods and properties available through those classes. As you have seen, you can use scripts to explore the CIM repository. However, you are not limited to using scripts to carry out this task; in fact, you can use a number of different tools to browse the WMI classes in the CIM repository that correspond to WMI-managed resources.
WMI Tester
WMI Tester (Wbemtest.exe) is a general-purpose graphical tool you can use to interact with the WMI infrastructure. You can use WMI Tester to browse the CIM schema and examine managed resource class definitions. WMI Tester can also be used to perform the same actions your WMI-based scripts perform, such as retrieving instances of managed resources and running queries. Because WMI Tester is part of the default WMI installation on all WMI-enabled computers, Wbemtest.exe is an excellent and readily available WMI learning and troubleshooting tool.
CIM Studio
CIM Studio, part of the WMI SDK and WMI Administrative Tools, provides a Web-based interface you can use to interact with the WMI infrastructure. As with WMI Tester, you can use CIM Studio to browse the CIM schema, view class definitions, and retrieve instances of managed resources. The superior user interface of CIM Studio makes it easy to view class relationships and associations, and CIM Studio provides a rudimentary search facility — two features not available with the WMI Tester tool. To use CIM Studio, you must download and install the WMI SDK or the WMI Administrative Tools. The WMI Administrative Tools can be obtained from the Microsoft.com Download Center.
Resource Kit scripts
The Microsoft Windows 2000 Server Resource Kit includes dozens of scripts that leverage the power of WMI. Three of those scripts, EnumClasses.vbs, EnumInstances.vbs, and EnumNamespaces.vbs, are general-purpose scripts that can be used to browse the CIM schema, view class definitions, and retrieve instances of managed resources.
The WMI scripting library provides the set of automation objects through which scripting languages, such as VBScript, JScript, and ActiveState ActivePerl access the WMI infrastructure. The WMI scripting library is implemented in a single automation component named wbemdisp.dll that physically resides in the systemrootSystem32Wbem directory.
The WMI scripting library consists of 19 Automation objects, 16 of which are illustrated in the WMI scripting library object model diagram shown in Figure 6.4. In many ways, you can compare the Automation objects in the WMI scripting library with the core interfaces provided by ADSI. The ADSI core interfaces, IADs and IADsContainer, provide a consistent approach to managing objects in Active Directory, irrespective of the object class and attributes. Similarly, the Automation objects in the WMI scripting library provide a consistent and uniform scripting model for WMI-managed resources.
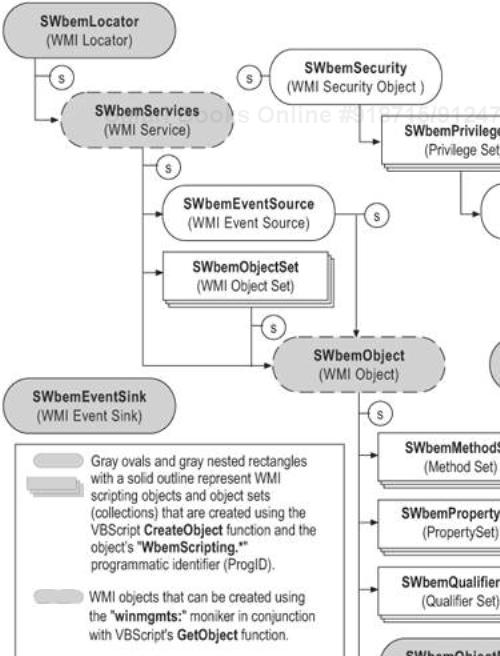
It is important to understand the relationship between the Automation objects in the WMI scripting library (wbemdisp.dll) and the managed resource class definitions that reside in the CIM repository (cim.rep). As previously explained, managed resource class definitions are the blueprints for the computer resources exposed through WMI. In addition to defining the resources that can be managed, the blueprints define the methods and properties unique to each managed resource.
The WMI scripting library, on the other hand, provides a general-purpose set of Automation objects that scripts can use to authenticate and connect to WMI, giving the scripts to access instances of WMI-managed resources. After you obtain an instance of a WMI-managed resource using the WMI scripting library, you can access the methods and properties defined by the class definition of the managed resource — as if the methods and properties were part of the WMI scripting library itself.
Note
The lines in Figure 6.4 point to the object that is obtained by calling a method (or accessing a property) of the originating object. For example, calling the SWbemLocator ConnectServer method returns an SWbemServices object. Calling the SWbemServices InstancesOf method returns an SWbemObjectSet collection. On the other hand, calling the SWbemServices Get method returns an SWbemObject.
The WMI scripting library object model diagram provides a great deal of insight into the mechanics of how WMI scripting works. For example, consider all of the WMI scripts presented thus far. Each script performs three basic steps common to many WMI scripts.
Each script starts by connecting to the WMI service on a target computer. The scripts use the VBScript GetObject function combined with a WMI connection string consisting of the WMI moniker “winmgmts:” followed by a WMI object path to the target computer and a namespace.
strComputer = "."
Set objSWbemServices = GetObject("winmgmts:\" & strComputer &
"
ootcimv2")
Connecting to WMI in this way returns a reference to the SWbemServices object shown in Figure 6.4. After you obtain a reference to an SWbemServices object, you can call one of the object methods. The method you call depends on the type of WMI script you are creating. For more information about WMI script types, see “Creating Scripts Based on WMI Templates” later in this chapter.
Each script retrieves instances of a WMI-managed resource using the InstancesOf method.
Set colSWbemObjectSet = objSWbemServices.InstancesOf("Win32_Service")InstancesOf always returns an SWbemObjectSet collection. As shown by the line between the SWbemServices and SWbemObjectSet objects in Figure 6.4, this is one of the three WMI scripting library object types SWbemServices can return. (The other two are SWbemObject and SWbemEventSource.)
Each script accesses properties of a WMI-managed resource by enumerating the instances in the SWbemObjectSet.
For Each objSWbemObject In colSWbemObjectSet
    Wscript.Echo "Name: " & objSWbemObject.Name
Next
As illustrated in Figure 6.4, each managed resource instance in an SWbemObjectSet collection is represented by an SWbemObject. For example, if your SWbemObjectSet consists of a collection of all the services installed on a computer, two things will be true:
Each item in the collection will be an SWbemObject. (This is true for any SWbemObjectSet.)
Each object in the collection will be an instance of an installed service.
You can think of the WMI scripting library object model as your road map to WMI scripting. As you become more proficient with WMI scripting, you will learn that WMI provides multiple ways to script the same task. For example, you have seen the SWbemServices InstancesOf method used a number of times to retrieve instances of WMI-managed resources. You can use the SWbemServices ExecQuery method to do the same thing, as you will see later in this chapter.
Interpreting the WMI Scripting Library Object Model
What else does the WMI scripting library object model tell you? The object model tells you that the SWbemLocator, SWbemSink, SWbemObjectPath, SWbemNamedValueSet, and SWbemLastError objects are created using the CreateObject function. On the other hand, SWbemServices and SWbemObject can be created using the GetObject function combined with the WMI moniker and a WMI object path.
The object model also tells you that seven of the objects in the WMI scripting library expose an SWbemSecurity object, as indicated by the circle S call-out immediately beneath or to the right of the object.
Of the nineteen Automation objects in the WMI scripting library, the two most important WMI scripting objects are SWbemServices and SWbemObject. SWbemServices represents an authenticated connection to a WMI namespace on a local or remote computer. Additionally, SWbemServices plays an important role in two of the most powerful scripting features found in WMI: query and event processing.
SWbemObject is the multiple-identity object that masquerades as the managed resource you have requested. For example, if you retrieve instances of the Win32_Process managed resource, SWbemObject takes on an identity modeled after the Win32_Process class definition. In other words, each returned object will have the properties of an actual process currently running on the computer. Likewise, if you retrieve instances of the Win32_Service managed resource, SWbemObject takes on an identity modeled after the Win32_Service class. You use SWbemObject to call the methods and access the properties defined in the managed resource class definition.
The discussion that follows examines the role that the primary WMI scripting library Automation objects play in WMI scripting. As you read about each WMI scripting object and review the accompanying scripts, take a moment to examine the relationship of each object with adjacent objects in the object model diagram. After you have a basic understanding of the role of each object and how it interacts with other objects in the WMI scripting library, you will be well on your way to becoming proficient in WMI scripting.
Variable Naming Conventions
In the example scripts that accompany the WMI scripting library object descriptions, the variable names used to reference each WMI automation object follow a consistent naming convention. Each variable is named according to the Automation object name in the WMI scripting library and is prefaced with “obj” (to indicate an object reference) or “col” (to indicate a collection object reference). For example, a variable that references an SWbemServices object is named objSWbemServices. A variable that references an SWbemObject is named objSWbemObject. And a variable that references an SWbemObjectSet is named colSWbemObjectSet.
This information is important because it helps you understand the type of WMI object you are working with at any given point in a WMI script. In addition, following a consistent naming convention makes your code easier to read and to maintain. However, the object reference variable names can be whatever you choose. If you prefer variable names such as x and y, that is fine. There is no requirement stating that you must name a reference to an SWbemServices object objSWbemServices. For example, these two script snippets are functionally identical; they simply use different variable names:
strComputer = "."
Set objSWbemServices = GetObject("winmgmts:\" & strComputer & "
ootcimv2")
strComputer = "."
Set x = GetObject("winmgmts:\" & strComputer & "
ootcimv2")
Note
The following discussion does not attempt to cover every method and property provided by each Automation object in the WMI scripting library. However, this information can be found in the WMI Software Development Kit. For information about how to download the WMI SDK, see the Microsoft Windows Management Instrumentation (WMI) SDK link on the Web Resources page at http://www.microsoft.com/windows/reskits/webresources.
At the top of the WMI scripting library object model is the SWbemLocator object. SWbemLocator is used to establish an authenticated connection to a WMI namespace, much as the VBScript GetObject function and the WMI moniker “winmgmts:” are used to establish an authenticated connection to WMI. However, SWbemLocator is designed to address two specific scripting scenarios that cannot be performed using GetObject and the WMI moniker. You must use SWbemLocator if you need to:
Provide user and password credentials to connect to WMI on a remote computer. The WMI moniker used with the GetObject function does not include a mechanism for specifying credentials. Most WMI activities (including all of those carried out on remote computers) require administrator rights. If you typically log on using a regular user account instead of an administrator account, you will not be able to perform most WMI tasks unless you run the script under alternate credentials.
Connect to WMI if you are running a WMI script from within a Web page. You cannot use the GetObject function when running scripts embedded within an HTML page because Internet Explorer disallows the use of GetObject for security reasons.
In addition, you might want to use SWbemLocator to connect to WMI if you find the WMI connection string used with GetObject confusing or difficult.
You use CreateObject rather than GetObject to create a reference to SWbemLocator. To create the reference, you must pass the CreateObject function the SWbemLocator programmatic identifier (ProgID) “WbemScripting.SWbemLocator”, as shown on line 2 in the following script sample. After you obtain a reference to an SWbemLocator object, you call the ConnectServer method to connect to WMI and obtain a reference to an SWbemServices object. This is demonstrated on line 3 of the following script.
strComputer = "."
Set objSWbemLocator = CreateObject("WbemScripting.SWbemLocator")
Set objSWbemServices = objSWbemLocator.ConnectServer(strComputer, "rootcimv2")
Set colSWbemObjectSet = objSWbemServices.InstancesOf("Win32_Service")
For Each objSWbemObject In colSWbemObjectSet
    Wscript.Echo "Name: " & objSWbemObject.Name
Next
Lines 2 and 3 in the previous example are functionally identical to all of the GetObject examples you have seen thus far. ConnectServer is the only method provided by the SWbemLocator object.
To run a script under alternate credentials, include the user name and password as additional parameters passed to ConnectServer. For example, this script runs under the credentials of a user named kenmyer, with the password homerj.
strComputer = "atl-dc-01"
Set objSWbemLocator = CreateObject("WbemScripting.SWbemLocator")
Set objSWbemServices = objSWbemLocator.ConnectServer _
    (strComputer, "rootcimv2", "kenmyer", "homerj")
Set colSWbemObjectSet = objSWbemServices.InstancesOf("Win32_Service")
For Each objSWbemObject In colSWbemObjectSet
    Wscript.Echo "Name: " & objSWbemObject.Name
Next
You can also use the DomainUser Name format to specify a user name. For example:
"fabrikamkenmyer"
WMI scripts that connect to the WMI service on the local computer always connect using the security context of the logged on user. You cannot use the SWbemLocator ConnectServer method to specify user and password credentials for a local connection.
You should avoid hard-coding passwords in scripts. Instead, you can use the WScript StdOut and StdIn properties to prompt for and retrieve the password just before it is needed. If you are running Windows XP Professional, you can mask password input by using the ScriptPW object.
For example, this script uses StdOut to prompt the user for the administrator password, and then uses StdIn to read the value typed by the user and assign it to the variable strPassword. Because this script uses StdIn and StdOut, it must be run under CScript.
strComputer = "atl-dc-01"
Wscript.StdOut.Write "Please enter the administrator password: "
strPassword = Wscript.StdIn.ReadLine
Set objSWbemLocator = CreateObject("WbemScripting.SWbemLocator")
Set objSWbemServices = objSWbemLocator.ConnectServer _
    (strComputer, "rootcimv2", "administrator", strPassword)
Set colSWbemObjectSet = objSWbemServices.InstancesOf("Win32_Service")
For Each objSWbemObject In colSWbemObjectSet
    Wscript.Echo "Name: " & objSWbemObject.Name
Next
SWbemServices serves two primary roles. First, the SWbemServices object represents an authenticated connection to a WMI namespace on a target computer. Second, SWbemServices is the Automation object you use to retrieve WMI-managed resources. You can obtain a reference to an SWbemServices object in either of two ways:
As demonstrated in most of the WMI scripts presented thus far, you can use the VBScript GetObject function in combination with the WMI moniker “winmgmts:”. The following example is the simplest form of a WMI connection. The example connects to the default namespace (typically rootcimv2) on the local computer:
Set objSWbemServices = GetObject("winmgmts:")You can also use the SWbemLocator object ConnectServer method to obtain a reference to an SWbemServices object. For more information, see “SWbemLocator” earlier in this section.
After you obtain a reference to an SWbemServices object, you use the object reference to call 1 of 18 methods available using SWbemServices. SWbemServices can return one of three different WMI scripting library objects (SWbemObjectSet, SWbemObject, or SWbemEventSource), depending on the method you call. Knowing the type of object each method returns will help you determine the next step your script must take. For example, if you get back an SWbemObjectSet, you must enumerate the collection to access each SWbemObject in the collection. If you get back an SWbemObject, you can immediately access the object methods and properties without enumerating the collection first.
SWbemServices methods and their return types are described in Table 6.5.
Table 6.5. SWbemServices Methods
Method Name | Default Mode | Return Type | Description |
|---|---|---|---|
AssociatorsOf | Semisynchronous | SWbemObjectSet | Retrieves the instances of managed resources that are associated with a specified resource through one or more association classes. You provide the object path for the originating endpoint, and AssociatorsOf returns the managed resources at the opposite endpoint. The AssociatorsOf method performs the same function that the ASSOCIATORS OF WQL query performs. |
Delete | Synchronous (cannot be changed) | None | Deletes an instance of a managed resource (or a class definition from the CIM repository). |
ExecMethod | Synchronous (cannot be changed) | SWbemObject | Provides an alternative way to execute a method defined by a managed resource class definition. Primarily used in situations in which the scripting language does not support out parameters. For example, JScript does not support out parameters. |
ExecNotificationQuery | Semisynchronous | SWbemEventSource | Executes an event subscription query to receive events. An event subscription query is a query that defines a change to the managed environment that you want to monitor. When the change occurs, the WMI infrastructure delivers an event describing the change to the calling script. |
ExecQuery | Semisynchronous | SWbemObjectSet | Executes a query to retrieve a collection of instances of WMI-managed resources (or class definitions). ExecQuery can be used to retrieve a filtered collection of instances that match criteria you define in the query passed to ExecQuery. |
Get | Synchronous (cannot be changed) | SWbemObject | Retrieves a single instance of a managed resource (or class definition) based on an object path. |
Semisynchronous | SWbemObjectSet | Retrieves all the instances of a managed resource based on a class name. By default, InstancesOf performs a deep retrieval. That is, InstancesOf retrieves the instances of the resource identified by the class name passed to the method and also retrieves all the instances of all the resources that are subclasses (defined beneath) of the target class. | |
ReferencesTo | Semisynchronous | SWbemObjectSet | Returns all of the associations that reference a specified resource. The best way to understand ReferencesTo is to compare it with the AssociatorsOf method. AssociatorsOf returns the dynamic resources that are at the opposite end of an association. ReferencesTo returns the association itself. The ReferencesTo method performs the same function that the REFERENCES OF WQL query performs. |
SubclassesOf | Semisynchronous | SWbemObjectSet | Retrieves all the subclasses of a specified class from the CIM repository. |
Table 6.5 lists only 9 of the 18 methods of SWbemServices; the remaining 9 methods are the asynchronous counterparts. The asynchronous methods have similar names; however, each asynchronous method name is appended with the suffix Async. For example, the asynchronous version of ExecNotificationQuery is named ExecNotificationQueryAsync.
SWbemServices modes of operation
SWbemServices supports three modes of operation: synchronous, asynchronous, and semisynchronous.
Synchronous. In synchronous mode, your script blocks (pauses) until the SWbemServices method completes. Not only does your script wait, but in cases in which WMI retrieves instances of managed resources, WMI builds the entire SWbemObjectSet in memory before the first byte of data is returned to the calling script. This can have an adverse effect on the script performance and on the computer running the script. For example, synchronously retrieving thousands of events from the Windows 2000 Event Logs can take a long time and use a lot of memory. For these reasons, synchronous operations are not recommended except for the three methods (Delete, ExecMethod, and Get) that are synchronous by default. These methods do not return large data sets, so semisynchronous operation is not required.
Note
Changing the run-time behavior of a semisynchronous method to synchronous is possible but not recommended. Doing so can result in WMI scripts that appear to hang when retrieving large data sets such as all the instances of CIM_DataFile or Win32_NTLogEvent.
Asynchronous. In asynchronous mode, your script calls one of the nine asynchronous methods and returns immediately. That is, as soon as the asynchronous method is called, your script resumes running the next line of code. To use an asynchronous method, your script must first create an SWbemSink object and a special subroutine called an event handler. WMI performs the asynchronous operation and notifies the script by calling the event handler subroutine when the operation is complete.
Semisynchronous. Semisynchronous mode is a compromise between synchronous and asynchronous. Semisynchronous operations offer better performance than synchronous operations, yet they do not require the extra knowledge and scripting steps necessary to handle asynchronous operations. This is the default operation type for most WMI queries.
In semisynchronous mode, your script calls one of the six data retrieval methods and returns immediately. WMI retrieves the managed resources in the background as your script continues to run. As the resources are retrieved, they are immediately returned to your script by way of an SWbemObjectSet. You can begin to access the managed resources without waiting for the entire collection to be assembled.
There is a caveat to semisynchronous operations when you are working with managed resources that have many instances (many meaning greater than 1,000), such as CIM_DataFile and Win32_NTLogEvent. The caveat is a result of how WMI handles instances of managed resources. For each instance of a managed resource, WMI creates and caches an SWbemObject object. When a large number of instances exist for a managed resource, instance retrieval can monopolize available resources, reducing the performance of both the script and the computer.
To work around the problem, you can optimize semisynchronous method calls using the wbemFlagForwardOnly flag. The wbemFlagForwardOnly flag, combined with the wbemFlagReturnImmediately flag (the default semisynchronous flag), tells WMI to return a forward-only SWbemObjectSet, which eliminates the large data set performance problem. However, using the wbemFlagForwardOnly flag comes with a cost. A forward-only SWbemObjectSet can be enumerated only once. After each SWbemObject in a forward-only SWbemObjectSet is accessed, the memory allocated to the instance is released.
With the exception of the Delete, ExecMethod, Get, and nine asynchronous methods, semisynchronous is the default and recommended mode of operation.
The methods most often used in system administration scripts are InstancesOf, ExecQuery, Get, and ExecNotificationQuery. Although often used, InstancesOf is not necessarily the recommended way to retrieve information (although it is arguably the easiest way). This will be discussed in more detail later in this chapter.
InstancesOf
You have already seen the InstancesOf method used numerous times throughout this chapter. At this time, it is important to clarify something said earlier. Earlier it was stated that you cannot retrieve instances of abstract classes, such as CIM_Service. And while that is true, the default behavior of InstancesOf might lead you to think otherwise.
By default, InstancesOf performs a deep retrieval. That is, InstancesOf retrieves all instances of the managed resource you identify and all instances of all the subclasses defined beneath the target class. For example, the following script retrieves all of the resources modeled by all of the dynamic classes defined beneath the CIM_Service abstract class.
strComputer = "."
Set objSWbemServices = GetObject("winmgmts:\" & strComputer & "
ootcimv2")
Set colSWbemObjectSet = objSWbemServices.InstancesOf("CIM_Service")
For Each objSWbemObject In colSWbemObjectSet
    Wscript.Echo "Object Path: " & objSWbemObject.Path_.Path
Next
If you run this script, you will get information back. However, this information will not be limited to the services installed on a computer. Instead, it will include information from all child classes of CIM_Service, including Win32_SystemDriver and Win32_ApplicationService.
ExecQuery
Like the InstancesOf method, the ExecQuery method always returns an SWbemObjectSet collection. Thus your WMI script must enumerate the collection ExecQuery returns in order to access each managed resource instance in the collection, as shown here:
strComputer = "."
Set objSWbemServices = GetObject("winmgmts:\" & strComputer & "
ootcimv2")
Set colSWbemObjectSet = objSWbemServices.ExecQuery _
    ("SELECT * FROM Win32_Service")
For Each objSWbemObject In colSWbemObjectSet
    Wscript.Echo "Name: " & objSWbemObject.Name
Next
Other SWbemServices methods that return an SWbemObjectSet include AssociatorsOf, ReferencesTo, and SubclassesOf.
Unlike the ExecQuery and InstancesOf methods, the Get method always returns an SWbemObject representing a specific instance of a WMI-managed resource (or single class definition, as shown earlier). To obtain a specific instance of a WMI-managed resource using the Get method, you must tell Get the instance to retrieve by passing the method the object path, as shown in the following script.
strComputer = "."
Set objSWbemServices = GetObject("winmgmts:\" & strComputer & "
ootcimv2")

Set objSWbemObject = objSWbemServices.Get("Win32_Service.Name='Messenger'")

Wscript.Echo "Name:         " & objSWbemObject.Name        & vbCrLf & _
             "Display Name: " & objSWbemObject.DisplayName & vbCrLf & _
             "Start Mode:   " & objSWbemObject.StartMode   & vbCrLf & _
             "State:        " & objSWbemObject.State
An SWbemObjectSet is a collection of zero or more SWbemObject objects. Each SWbemObject in a SWbemObjectSet can represent one of two things:
An instance of a WMI-managed resource.
An instance of a class definition.
For the most part, the only thing you will ever do with an SWbemObjectSet is enumerate all the objects contained within the collection itself. However, SWbemObjectSet does include a property — Count — that can be useful in system administration scripting. As the name implies, Count tells you the number of items in the collection. For example, this script retrieves a collection of all the services installed on a computer and then echoes the total number of services found:
strComputer = "."
Set objSWbemServices = GetObject("winmgmts:\" & strComputer & "
ootcimv2")
Set colSWbemObjectSet = objSWbemServices.InstancesOf("Win32_Service")
Wscript.Echo "Services installed on target computer: " & colSWbemObjectSet.Count
What makes Count useful is that it can tell you whether a specific instance is available on a computer. For example, this script retrieves a collection of all the services on a computer that have the Name W3SVC. If the Count is 0 (and it is valid for collections to have no instances), that means the W3SVC service is not installed on the computer.
strComputer = "."
Set objSWbemServices = GetObject("winmgmts:\" & strComputer & "
ootcimv2")
Set colSWbemObjectSet = objSWbemServices.ExecQuery _
    ("SELECT * FROM Win32_Service WHERE Name='w3svc'")
If colSWbemObjectSet.Count = 0 Then
    Wscript.Echo "W3SVC service is not installed on target computer."
Else
    For Each objSWbemObject In colSWbemObjectSet
        ' Perform task on World Wide Web Publishing service.
    Next
End If
One thing to be careful of when using Count is that WMI does not keep a running tally of the number of items in a collection. If you request Count for a collection, WMI cannot instantly respond with a number; instead, it must literally count the items, enumerating the entire collection. For a collection that has relatively few items, such as services, this enumeration likely takes less than a second. Counting the number of events in an event log collection, however, can take considerably longer.
And then suppose you want to display the property values for every event in the collection. If so, WMI will have to enumerate the entire collection a second time.
One point that has been reiterated throughout this chapter is that most WMI scripts follow a simple three-step pattern. In general, WMI scripts:
Connect to the WMI service.
Retrieve a WMI object or collection of objects.
Perform some sort of task on the object or objects. Until now, this task has largely been confined to reporting property values. However, you can also do such things as run methods, configure property values, and create or delete instances.
To become proficient in writing WMI scripts, you need to understand the nuances of these three steps. The preceding section of this chapter was a bit more theoretical in nature: It provided useful background information for understanding what WMI is and what it can do. This portion of the chapter takes a more practical approach; in particular, it provides a detailed look at the three steps used in most WMI scripts. This is done by:
Explaining the use of the WMI moniker, a versatile method for connecting to the WMI service.
Explaining the use of ExecQuery, an SWbemServices method that provides an alternative (and typically better and faster) way to retrieve WMI data.
Providing a series of templates that can serve as the basis for scripts that carry out common tasks such as retrieving information, configuring property values, executing methods, and creating or deleting instances.
In addition to detailing the three steps in a typical WMI script, this section also looks at two other important elements in script writing: working with WMI dates and times, and monitoring events.
The WMI scripting library provides two distinct mechanisms you can use to establish a connection to WMI on a local or remote computer: the SWbemLocator object (part of the WMI scripting library) and the WMI moniker, “winmgmts:”. Other than general usage and syntax differences, the capability that separates the two connection mechanisms is that SWbemLocator lets you specify user and password credentials to be used to establish the connection, and the WMI moniker does not. SWbemLocator is discussed in more detail in the “WMI Scripting Library” section of this chapter.
The WMI moniker enables you use just one line of code to concisely describe a WMI object or collection of WMI objects to manage. However, with power comes the difficulty of constructing complex WMI moniker strings. The following sections of this chapter decipher the components you can use to construct WMI monikers and look at some best practices for writing WMI scripts that use WMI monikers.
WMI monikers can consist of three parts: one mandatory component and two optional components. The mandatory component is the “winmgmts:” prefix. All WMI monikers must begin with "winmgmts:" as shown here:
Set objSWbemServices = GetObject("winmgmts:")
The moniker in this code is the string “winmgmts:”, which is passed to the GetObject function. Although in this example the string is entered using all lowercase letters, you can use whatever case you like; that is, “WinMgmts:”, “WINMGMTS:”, and “winmgmts:” all produce the same result.
Specifying a moniker that consists only of the “winmgmts:” prefix is the most basic form of WMI moniker you can use. The result is always a reference to an SWbemServices object, which represents a connection to the Windows Management Instrumentation service on the local computer. Under the covers, the “winmgmts:” moniker:
Retrieves the WMI CLSID from the registry subkey HKCRWINMGMTSCLSID. The CLSID ({172BDDF8-CEEA-11D1-8B05-00600806D9B6}) is the identifier used by the operating system to map WMI to the appropriate COM object.
Retrieves the value from a second registry entry, HKCRCLSID {172BDDF8-CEEA-11D1-8B05-00600806D9B6}InProcServer32. This value (typically C:WindowsSystem32wbemwbemdisp.dll) indicates the path to the COM object that exposes the SWbemServices object.
Loads Wbemdisp.dll, the DLL containing the WMI scripting library that exposes SWbemServices.
After you have obtained a reference to SWbemServices, you can then invoke one of the object methods as shown here:
Set objSWbemServices = GetObject("winmgmts:")
Set colSWbemObjectSet = objSWbemServices.InstancesOf("Win32_LogicalDisk")
In this example, a reference variable named objSWbemServices is initialized using the “winmgmts:” moniker. This reference variable is subsequently used to invoke the InstancesOf method provided by the SWbemServices object.
Although the preceding example is perfectly acceptable, you do not have to use two lines of code to retrieve all Win32_LogicalDisk instances. This can also be done with the following single line of script:
Set colSWbemObjectSet = GetObject("winmgmts:").InstancesOf("Win32_LogicalDisk")
In this case, a user-defined variable (objSWbemServices in the example preceding this one) is not used to explicitly reference the SWbemServices object commonly returned by GetObject and the WMI moniker. Instead, the “winmgmts:” moniker creates an SWbemServices reference in memory and immediately uses the unnamed, memory based reference to call the SWbemServices InstancesOf method.
In the end, both examples produce identical results in the form of an SWbemObjectSet collection containing all instances of the Win32_LogicalDisk class on the local computer. You can also call the ExecQuery method or any other method provided by the SWbemServices object. In fact, if the objective of your script is to simply enumerate and echo all Win32_LogicalDisk instances, you can get by with as little as the following:
For Each objDisk In GetObject("winmgmts:").InstancesOf("Win32_LogicalDisk")
    Wscript.Echo objDisk.DeviceID
Next
In this case, user-defined variables are not used to reference SWbemServices or SWbemObjectSet. Both objects are still created, but only in memory and without an explicit object reference. By using the most basic WMI moniker, and by understanding the relationship of the moniker with the WMI scripting library, you can begin to construct concise yet powerful WMI statements.
The second, and typically optional, part of WMI monikers is the security settings component. The security settings component has been a source of confusion for many system administrators. This is primarily because of the impersonationLevel setting, which behaves differently depending on the version of WMI installed on a target computer.
The optional security settings component lets you specify several different security settings that are used to connect to and communicate with WMI. The security settings you can control as part of the moniker string include:
Impersonation level, expressed as “winmgmts:{impersonationLevel=Value}”.
Authentication level, expressed as “winmgmts:{authenticationLevel=Value}”.
Authenticating authority, expressed as “winmgmts:{authority=ntlmdomain:DomainName}” or “winmgmts:{authority=kerberos:DomainNameServerName}”.
Privileges to grant or deny, expressed as “winmgmts:{(Security, !RemoteShutdown)}”.
The first two settings, impersonationLevel and authenticationLevel, are not specific to WMI but rather are derived from DCOM, which WMI uses to access the WMI infrastructure on remote computers. In the context of WMI, impersonation governs the degree to which your script will allow a remote WMI service to carry out tasks on your behalf. DCOM supports four levels of impersonation: Anonymous, Identify, Impersonate, and Delegate. These levels are defined in Table 6.6.
Table 6.6. DCOM Impersonation Levels
Value | Description |
|---|---|
Anonymous | Hides the credentials of the caller. WMI does not actually support this impersonation level; if a script specifies impersonationLevel=Anonymous, WMI will silently upgrade the impersonation level to Identify. This is in some ways a meaningless exercise, however, because scripts using the Identify level are likely to fail. |
Identify | Enables objects to query the credentials of the caller. Scripts using this impersonation level are likely to fail; the Identify level typically lets you do no more than check access control lists. You will not be able to run scripts against remote computers using Identify. |
Impersonate | Enables objects to use the credentials of the caller. It is recommended that you use this impersonation level with WMI scripts. When you do so, the WMI script will use your user credentials; as a result, it will be able to perform any tasks that you are able to perform. |
Delegate | Enables objects to permit other objects to use the credentials of the caller. Delegation allows a script to use your credentials on a remote computer and then enables that remote computer to use your credentials on another remote computer. While you can use this impersonation level within WMI scripts, you should do so only if necessary because it might pose a security risk. You cannot use the Delegate impersonation level unless all the user accounts and computer accounts involved in the transaction have all been marked as Trusted for delegation in Active Directory. This helps minimize the security risks. Although a remote computer can use your credentials, it can do so only if both it and any other computers involved in the transaction are trusted for delegation. |
As noted, Anonymous impersonation hides your credentials and Identify permits a remote object to query your credentials, but the remote object cannot impersonate your security context. (In other words, although the remote object knows who you are, it cannot “pretend” to be you.) WMI scripts accessing remote computers using one of these two settings will generally fail. In fact, most scripts run on the local computer using one of these two settings will also fail.
Impersonate permits the remote WMI service to use your security context to perform the requested operation. A remote WMI request that uses the Impersonate setting typically succeeds, provided your credentials have sufficient privileges to perform the intended operation. In other words, you cannot use WMI to perform an action (remotely or otherwise) that you do not have permission to perform outside WMI.
Setting impersonationLevel to Delegate permits the remote WMI service to pass your credentials on to other objects and is generally considered a security risk.
The confusion surrounding the impersonationLevel setting has to do with the default impersonation behavior, which differs based on the version of WMI installed on the target computer. WMI versions prior to version 1.5 use Identify as the default impersonationLevel setting. This forces WMI scripts that connect to remote computers to include impersonationLevel=Impersonate as part of any moniker string. With the release of WMI version 1.5 in Windows 2000, Microsoft changed the default impersonationLevel setting to Impersonate. This is a registry-based setting that can be managed by means of the following entry:
HKEY_LOCAL_MACHINESOFTWAREMicrosoftWBEMScriptingDefault Impersonation Level
If your WMI scripts connect only to computers with WMI version 1.5 or later, the change eliminates the need to explicitly set impersonationLevel. However, by omitting impersonationLevel=Impersonate, scripts accessing computers with an earlier release of WMI fail. For backward and — potentially — forward compatibility, you should always explicitly set impersonationLevel.
The authenticationLevel setting enables you to request the level of DCOM authentication and privacy to be used throughout a connection. Settings range from no authentication to per-packet encrypted authentication. The seven permissible moniker settings include Default, None, Connect, Call, Pkt, PktIntegrity, and PktPrivacy, each described in Table 6.7. Specifying an authenticationLevel is more of a request than a command because there is no guarantee that the setting will be honored. For example, local connections always use authenticationLevel=PktPrivacy.
Table 6.7. DCOM Authentication Levels
Value | Description |
|---|---|
None | Does not use any authentication. All security settings are ignored. |
Default | Uses a standard security negotiation to select an authentication level. This is the recommended setting because the client involved in the transaction will be negotiated to the authentication level specified by the server. DCOM will not select the value None during a negotiation session. |
Connect | Authenticates the credentials of the client only when the client tries to connect to the server. After a connection has been made, no additional authentication checks take place. |
Authenticates the credentials of the client only at the beginning of each call, when the server receives the request. The packet headers are signed, but the data packets exchanged between the client and the server are neither signed nor encrypted. | |
Pkt | Authenticates that all data packets are received from the expected client. Similar to Call; packet headers are signed but not encrypted. Packets themselves are neither signed nor encrypted. |
PktIntegrity | Authenticates and verifies that none of the data packets transferred between the client and the server have been modified. Every data packet is signed, ensuring that the packets have not been modified during transit. None of the data packets are encrypted. |
PktPrivacy | Authenticates all previous impersonation levels and signs and encrypts each data packet. This ensures that all communication between the client and the server is confidential. |
The authority setting allows you to specify the security package that is used to authenticate your WMI connection. You can specify standard NTLM or Kerberos authentication. To use NTLM, set the authority setting to “authority=ntlmdomain:DomainName” where DomainName identifies a valid NTLM domain name. To use Kerberos, specify “authority=kerberos:DomainNameServerName”. You cannot include the authority setting in WMI monikers that access the local computer.
The final security setting is privilege overrides. This setting allows you to grant or revoke privileges as part of a WMI moniker string. For example, you might grant yourself the Security privilege to successfully query the Windows NT/2000 Security Log. Privileges you can grant or revoke are shown in Table 6.8.
Table 6.8. Privileges and Descriptions
Privilege | Description |
|---|---|
CreateToken | Required to create a primary token. |
AssignPrimaryToken | Required to assign the primary token of a process. |
LockMemory | Required to lock physical pages in memory. |
IncreaseQuota | Required to increase the quota assigned to a process. |
MachineAccount | Required to create a computer account. |
Tcb | Identifies its holder as part of the trusted computer base. Some trusted, protected subsystems are granted this privilege. |
Security | Required to perform a number of security-related functions, such as controlling and viewing audit messages. This privilege identifies its holder as a security operator. |
TakeOwnership | Required to take ownership of an object without being granted discretionary access. This privilege allows the owner value to be set only to those values that the holder might legitimately assign as the owner of an object. |
LoadDriver | Required to load or unload a device driver. |
SystemProfile | Required to gather profiling information for the entire system. |
SystemTime | Required to modify the system time. |
ProfileSingleProcess | Required to gather profiling information for a single process. |
IncreaseBasePriority | Required to increase the base priority of a process. |
CreatePagefile | Required to create a paging file. |
CreatePermanent | Required to create a permanent object. |
Backup | Required to perform backup operations. |
Restore | Required to perform restore operations. This privilege lets you set any valid user or group SID as the owner of an object. |
Shutdown | Required to shut down a local computer. |
Debug | Required to debug a process. |
Audit | Required to generate audit-log entries. |
SystemEnvironment | Required to modify the nonvolatile RAM of systems that use this type of memory to store configuration information. |
ChangeNotify | Required to receive notifications of changes to files or directories. This privilege also causes the system to skip all traversal access checks. It is enabled by default for all users. |
RemoteShutdown | Required to shut down a computer using a network request. |
Undock | Required to remove a computer from its docking station. |
SyncAgent | Required to synchronize directory service data. |
EnableDelegation | Required to enable computer and user accounts to be trusted for delegation. |
In addition to granting privileges, you can also disable privileges by prefacing the privilege name with an exclamation mark (!).
Note
Disabling a privilege means that the script, or anything running in the script process, cannot carry out a particular action. For example, if you disable the Shutdown privilege, neither the script nor any anything running in the script process can shut down the computer. This provides an additional layer of security: It prevents the script from doing anything you do not want it to do.
The privileges to be enabled on a connection are specified by including the name of the privilege within parentheses. If the privilege is to be disabled, it is preceded by an exclamation mark. The following moniker string enables the LockMemory privilege and disables the IncreaseQuota privilege:
Set objSWbemServices = GetObject _
    ("winmgmts:{impersonationLevel=impersonate,(LockMemory, !IncreaseQuota)}")
Granting privileges within a script does not confer those privileges upon the user. For example, suppose you try to run a script that includes the Shutdown privilege. If you do not already have the Shutdown privilege, the script will fail; as is always the case with WMI, you are not allowed to use a script to carry out a task that you would otherwise not be able to perform. To carry out a task that requires a privilege such as Shutdown or Backup, two things must be true:
The script must specify the privilege in the connection string.
You must already possess the privilege.
The general format you use when including security settings in WMI monikers is as follows:
Set objSWbemServices = GetObject("winmgmts:"                  & _
                                 "{SecuritySetting1=Value,"   & _
                                 "SecuritySetting2=Value,"    & _
                                 "(Privilege1,!Privilege2)}")
Here you can see that the security settings component immediately follows the colon in the “winmgmts:” prefix and is enclosed inside braces. Multiple settings must be comma delimited, and override privileges are further separated inside parentheses and also comma delimited.
The third component of WMI monikers is the WMI object path. Like the security settings component, the object path component is optional. However, the object path provides a great deal of flexibility, including the ability to identify remote computers. Because of this, chances are good you will use WMI object paths whether or not you realize it. You use the WMI object path to uniquely identify one or more of the following target resources:
Remote computer. If the computer is not specified in the object path, the script will connect to the WMI service on the local computer. For example, this moniker does not include a computer name, so it runs on the local computer:
Set objSWbemServices = GetObject("winmgmts:")This moniker connects to the WMI service on a remote computer named atl-dc-01:
Set objSWbemServices = GetObject("winmgmts:\atl-dc-01")Computer names are typically specified using the NetBIOS name of the computer. However, computer names can also be specified using a DNS name (for example, atl-dc- 01.fabrikam.com) or an IP address (for example, 192.168.1.1).
WMI namespace. If not specified, the default namespace is used. This moniker connects to the default namespace on a remote computer named atl-dc-01:
Set objSWbemServices = GetObject("winmgmts:\atl-dc-01")This moniker connects to the rootdefault namespace on atl-dc-01:
Set objSWbemServices = GetObject("winmgmts:\atl-dc-01
ootdefault")
WMI class within a namespace. If a class is specified within a moniker, it must be separated from the computer name and the namespace by a colon. For example, this moniker binds directly to the Win32_OperatingSystem class:
Set objSWbemObject = GetObject _
    ("winmgmts:\atl-dc-01
ootcimv2:Win32_OperatingSystem")
Specific instance or instances of a WMI class within a namespace. This moniker connects directly to the WMI instance representing drive C. To bind directly to an instance, you must include the key property (defined in the “Key properties” section of this chapter) in the object path:
Set objSWbemObject = GetObject _
    ("winmgmts:\atl-dc-01
ootcimv2:Win32_LogicalDisk.DeviceID='C:'")
In an object path, the computer name and the WMI namespace are separated using either forward slashes or back slashes. Both of these are valid object paths:
\WebServer
ootcimv2

//WebServer/root/cimv2
Note
In fact, you can even mix forward and back slashes within the same object path. This is not recommended because the code will likely confuse anyone reading or editing it. However, this is a valid object path:
\Webserver/root/cimv2.
If a WMI class is to be included in the object path, the class name must be separated from the namespace by a colon (:). For example, this object path connects to the Win32_Printer class:
\WebServer
ootcimv2:Win32_Printer
Note
You will rarely use an object path like the preceding one within a system administration script. This is because the path binds you to the class itself and not instances of the class. In the preceding example, you cannot return information about any printers installed on the computer; you can only return information about the Win32_Printer class. However, this type of binding is occasionally used to create new objects — for example, to create a new shared folder, you connect directly to the Win32_Share class and then call the Create method.
To bind directly to an instance of a class (for example, to bind to a particular service), you must include the class name, a dot (.), the key property of the class, and the value of that property. This object path returns only one object, representing the Alerter service:
\WebServer
ootcimv2:Win32_Service.Name='Alerter'
Key properties
A key property is a property that can be used to uniquely identify an instance. Name is a key property of Win32_Service because all services must have unique names. StartMode is not a unique property of a service because all services could, at least in theory, have the same start mode.
In other words, a connection string such as the following will fail because StartMode is not a key property of the Win32_Service class:
Set colServices = GetObject _
    ("winmgmts:\.
ootcimv2Win32_Service.StartMode='Auto'")
If you attempt to run the preceding script, you will receive an “Invalid syntax” error.
Note
But what if you only need to return a list of services that have a StartMode of Auto? To do this, you can use the ExecQuery method, explained in the “Retrieving Managed Resources Using WMI Query Language” section of this chapter.
Classes typically have only one key property, although there are some exceptions. The Win32_NTLogEvent class has two key properties: Logfile and RecordNumber. This is because RecordNumber alone does not uniquely identify an event recorded in the event logs: Both the Application event log and the Security event log can have a record with a RecordNumber of 555. To uniquely identify an event log record, you need to specify both key properties in the object path:
\WebServer
ootcimv2:Win32_NTLogEvent.Logfile='Application',RecordNumber=555
Querying WMI is the process of issuing a request for data or events that match some predefined criteria. For example, a WMI data query can request all services with a StartMode of Auto that are in a Stopped state. A WMI event query can request to be notified when a running service stops or a stopped service starts. Because the WMI query processor is an integral part of the WMI service, system administrators can query WMI for any piece of data defined in the CIM.
WMI queries provide a more efficient mechanism for retrieving object instances and instance data than the InstancesOf method. WMI queries return only those instances and data that match the query, whereas InstancesOf always returns all object instances of a specified class. Also, queries are processed on the target computer identified in the object path rather than on the source computer running the WMI script. Therefore, WMI queries can significantly reduce the amount of network traffic that would otherwise be encountered by less efficient data retrieval mechanisms such as InstancesOf.
To query WMI, a system administrator constructs a query string using the WMI Query Language (WQL). The query string defines the criteria that must be satisfied to result in a successful match. After the query string is defined, the query is submitted to the WMI service using one of several methods provided by the SWbemServices object. Object instances that satisfy the query are returned to the script in the form of an SWbemObjectSet collection.
WQL is a subset of the ANSI Structured Query Language (SQL) commonly used in database applications. For the most part, WQL can be used only to retrieve information; WQL does not support such SQL functions as UPDATE and DELETE. In addition, WQL does not let you specify a sort order for the data that is returned; you are limited to the sort order imposed on the data by WMI. (However, there are workarounds for this limitation. For examples, see “Creating Enterprise Scripts” in this book.)
Using WQL (and the ExecQuery method) rather than InstancesOf provides you with the flexibility to create scripts that return only the items that are of interest to you. For example, you can use a basic WQL query to return all properties of all instances of a given class; this is the same information that is returned by the InstancesOf method. However, you can also create targeted queries using WQL, queries that do such things as:
Return only selected properties of all the instances of a class.
Return all the properties of selected instances of a class.
Return selected properties of selected instances of a class.
Creating targeted queries will sometimes noticeably increase the speed with which data is returned. (It is obviously much faster to return only those events in the Application event log that have EventCode 0 than to return all the events in all the event logs.) Targeted queries also make it easier to work with the returned data. For example, suppose you want only events from the Application event log with EventCode 0. Using a targeted query will return only those items. By contrast, InstancesOf would return all the events, and you would have to individually examine each one and determine whether it 1) came from the Application event log and 2) has EventCode 0. Although this can be done, it is less efficient and requires additional coding on your part.
Targeted queries can also cut down on the amount of data that is returned, an important consideration for scripts that run over the network. Table 6.9 shows some relative figures for different query types. (These different types are explained in subsequent sections of this chapter.) As you can see, there can be a considerable difference in the amount of data returned by the various query types.
Table 6.9. Comparing WMI Data Queries
Note
This does not necessarily mean that the queries that return the least amount of data represent the best approach. These queries return smaller amounts of data because they either do not return all the properties of the services or they do not return the properties of all of the services (or both). If you need all of the properties of all of the services, most of these queries will not serve your needs. The point is that you can create faster and more efficient queries if you do not need all of the properties of all of the instances of a given class.
The simplest WQL query is one that retrieves all properties of all instances of a class. This is done simply by:
Using the asterisk (*) to indicate that all properties should be retrieved.
Specifying the name of the class.
For example, this query returns all properties of all services installed on a computer:
"SELECT * FROM Win32_Service"
The advantage of using a SELECT * query is that it is quick and easy; the disadvantage is that it might return far more data than you need. In some cases, the difference might be negligible. For example, a query that returns all properties of all physical disk drives installed on a computer returned 808 bytes of data; a query that specified only the Name property returned 145 bytes of data. The SELECT * query completed in less than 2 seconds; the SELECT Name query completed in less than 1 second. In practical terms, there is no real difference between the scripts.
In other cases, however, the difference can be more dramatic. A script that returned all properties of all threads running on a computer required approximately 7 seconds to complete and returned 105 kilobytes (KB) of data. A script that returned only the thread handle required less than 1 second to complete and returned 6 KB of data. Although the time difference is not substantial, the difference in the amount of data might be important, particularly if you are running the script across the network.
The script in Listing 6.18 includes a standard WQL query that returns all properties of all services installed on a computer.
Example 6.18. Returning All Properties of All Instances of a Class
1 strComputer = "."
2 Set objSWbemServices = _
3     GetObject("winmgmts:\" & strComputer & "
ootcimv2")
4
5 Set colServices = _
6     objSWbemServices.ExecQuery("SELECT * FROM Win32_Service")
7
8 For Each objService In colServices
9     Wscript.Echo objService.Name
10 Next
As noted in the preceding section, you can create a script that runs faster and returns less extraneous data (that is, data that is not needed by the script) by using a query that requests only specific properties from a class. To do this, you replace the asterisk in a standard WQL query with the names of the properties to be returned. For example, this query returns only the Name property for all the instances of the Win32_Service class:
"SELECT Name FROM Win32_Service"
If you want to return multiple properties, separate the property names with commas. This query returns the Name and State properties from Win32_Service:
"SELECT Name, State FROM Win32_Service"
What does it mean to return only selected properties? Consider this script, which requests only the Name property from Win32_Service but then attempts to echo the value of the State property as well:
strComputer = "."
Set objSWbemServices = GetObject("winmgmts:\" & strComputer & "
ootcimv2")

Set colServices = objSWbemServices.ExecQuery("SELECT Name FROM Win32_Service")

For Each objService In colServices
    Wscript.Echo objService.Name, objService.State
Next
If you try to run this script under CScript, the following error message will appear in the command window:
Microsoft VBScript runtime error: Object doesn't support this property or method:
'objService.State'
Why? State is indeed a valid property of the Win32_Service class, but you did not ask for it. Therefore, State is not included within the collection of services and properties returned to you. The script acts against the returned collection, not against the Win32_Service class.
There is one exception to this: The key property for a class is always returned, even if it is not specified in the WQL query. For example, Name is the key property for the Win32_Service class. The following script retrieves only the State property from the Win32_Service class, but then attempts to display Name as well as State.
strComputer = "."
Set objSWbemServices = GetObject("winmgmts:\" & strComputer & "
ootcimv2")

Set colServices = objSWbemServices.ExecQuery("SELECT State FROM Win32_Service")

For Each objService In colServices
    Wscript.Echo objService.Name, objService.State
Next
If you run this script under Cscript, it will not fail. Instead, output similar to the following appears in the command window:
Alerter Stopped
ALG Stopped
AppMgmt Stopped
Ati HotKey Poller Stopped
AudioSrv Running
BITS Running
The two WQL query types demonstrated so far return information for each instance of the specified class. However, you will often want to work with only a subset of instances. For example, you might want information only about services that are stopped, or only about hard disks (and not floppy disk drives or CD-ROM drives). In a situation like this, it can be inconvenient to return all the instances of a class. If you returned a list of all the services, you would need to individually check each one to see whether it was stopped before you echoed information about the service. Although this kind of checking can be included within a script, you never want to write more code than absolutely required. More code means more chances for making a mistake.
At other times, returning all instances of a class rather than selected instances of a class can make a significant difference. For example, consider a Windows 2000–based test computer with approximately 48,000 events recorded in its three event logs (Application, System, and Security). A script designed to return only the 4,000 events recorded in the System event log completed its task in 18 seconds.
And how long did it take to return all the events from all the event logs? No one knows. After 14 minutes, and after returning 41,592 events, the script exhausted available memory and crashed.
Note
It is bad enough that the script could not complete its task. Even worse, however, is the fact that, although the script stops, WMI continues running the query. In this case, that brought the entire system to a near-standstill. The only way to stop a “runaway” query such as this is to stop and then restart the WMI service.
In this case, returning only the events in the System event log made a dramatic difference. Likewise, a script that returned only those instances in the System event log that had EventCode 532 completed in just a few seconds.
To return a selected set of instances, you need to append a WHERE clause to the SELECT query. The generic representation of such a query looks like this:
"SELECT * FROM ClassName WHERE PropertyName = PropertyValue"
Note
This generic representation is not entirely accurate. You are not restricted to using only the equals sign (=). You can also use other operators, such as less than (<), greater than (>), and not equal to (<>).
For example, this query returns only events recorded in the System event log:
"SELECT * FROM Win32_NTLogEvent WHERE Logfile = 'System'"
In the preceding query:
Win32_NTLogEvent is the WMI class being queried.
Logfile is the class property.
System is the value of the Logfile property. Only events that have a Logfile property equal to System are returned by the query.
When writing queries that use WHERE clauses, you must correctly format the property value. The formatting you use will vary depending on whether the value is a string, a number, a Boolean value, or a variable.
You might have noticed that, in the preceding query, the value (System) was enclosed within single quote marks. This is required anytime the value of the WHERE clause is a string. For example, the following script returns the names of all of the services on a computer that are stopped. In this query:
Win32_Service is the WMI class being queried.
State is the class property.
Stopped is the value of the State property. Because Stopped is a string value, it is enclosed in single quote marks.
strComputer = "."
Set objSWbemServices = GetObject("winmgmts:\" & strComputer & "
ootcimv2")

Set colServices = objSWbemServices.ExecQuery _
    ("SELECT * FROM Win32_Service WHERE State = 'Stopped'")

For Each objService In colServices
    Wscript.Echo objService.Name
Next
When you use numbers or Boolean values (such as True or False) in a WHERE clause, these values should not be enclosed in single quote marks. For example, the following script returns the names of all of the services on a computer that are capable of being paused. In this query:
Win32_Service is the WMI class being queried.
AcceptPause is the class property.
True is the value of the AcceptPause property. Because True is a Boolean value, it is not enclosed in quotation marks.
strComputer = "."
Set objSWbemServices = GetObject("winmgmts:\" & strComputer & "
ootcimv2")

Set colServices = objSWbemServices.ExecQuery _
    ("SELECT * FROM Win32_Service WHERE AcceptPause = True")

For Each objService In colServices
    Wscript.Echo objService.Name
Next
One approach to writing scripts is to hard-code values as needed. For example, if you want to return a list of all the services that are stopped, you can hard-code the query into the script:
Set colServices = objSWbemServices.ExecQuery _
    ("SELECT * FROM Win32_Service WHERE State = 'Stopped'")
But what if you there are times when want to see a list of all the services that are running or a list of all the services that are paused? One way to handle this problem is to create separate scripts to return each data set. If services can be running, stopped, paused, or resuming, you need four scripts, one for each state.
Alternatively, you can create a single script that returns information about services based on service state. When the user runs the script, he or she simply supplies the desired state, perhaps as a command-line argument, and the script does the rest.
The most efficient way to do this is to store the supplied value in a variable and then reference the variable within the WQL query. Essentially, you need the query to do this:
Select all the properties from the Win32_Service class where the State is equal
to the value stored in this variable.
This is easy enough to write in pseudo code. But how do you translate the pseudo code into an actual WQL query?
Here is how:
Write the query in the usual fashion, stopping where the variable must be inserted. For example, suppose you are modifying the following query:
"SELECT * FROM Win32_Service WHERE State = 'Stopped'".You write the first part of the query up to the word Stopped, including the single quotation mark. (Why write the query up to the word Stopped? Because, in this example, you want to replace the hard-coded value with the variable name.) Your query will look like this:
"SELECT * FROM Win32_Service WHERE State = 'Insert a set of quotation marks to indicate that the string is being cut off at this point, and then insert a space and an ampersand (&). The ampersand indicates that you are appending something to the string. Your query will now look like this:
"SELECT * FROM Win32_Service WHERE State ='" &Insert the name of the variable (in this example, strState), and then add an ampersand, a space, and a second set of quotation marks. This indicates that there is additional text to be appended after the variable name. Your query should look like this:
"SELECT * FROM Win32_Service WHERE State = '" &strState & "Add the rest of the query string. If you recall, the original query string was:
"SELECT * FROM Win32_Service WHERE State = 'Stopped'"You have now replaced the word Stopped with the variable name and have only the last single quotation mark and the last quotation mark remaining. Add these to the end of the string, making the final query look like this:
"SELECT * FROM Win32_Service WHERE State ='" & strState & "'"
This is what the query looks like within a script that lets you specify a service state as a command-line argument. Assuming that you named the script ServiceState.vbs and you wanted a list of running services, you start the script using this command:
cscript servicestate.vbs running
strState = Wscript.Arguments.Item(0)

strComputer = "."
Set objSWbemServices = GetObject("winmgmts:\" & strComputer & "
ootcimv2")

Set colServices = objSWbemServices.ExecQuery _
    ("SELECT * FROM Win32_Service WHERE State = '" & strState & "'")

For Each objService In colServices
    Wscript.Echo objService.Name
Next
Admittedly, this can be a little confusing. You will likely find it easier if you follow the same approach each time: Start by creating a query with a hard-coded value, and then replace the hard-coded value with the variable name and the appropriate quotation marks and ampersands.
You can use the following pattern (with a space following each element):
Quotation marks — Ampersand — Variable name — Ampersand — Quotation marks
Or:
" & strVariableName & "
By using the AND and OR keywords, you can create more complex queries, queries that either narrow or expand the range of a query that uses a WHERE clause.
The AND keyword lets you limit the scope of a query. For example, suppose you want a list of autostart services that are stopped. This query requires two parameters in the WHERE clause: the State property, which must be equal to Stopped, and the StartMode, which must be equal to Auto. To create a query such as this, include both parameters, separating them with the AND keyword. In this query, an instance will be returned only if it meets both criteria.
strComputer = "."
Set objSWbemServices = GetObject("winmgmts:\" & strComputer & "
ootcimv2")

Set colServices = objSWbemServices.ExecQuery _
  ("SELECT * FROM Win32_Service WHERE State = 'Stopped' AND StartMode = 'Auto'")

For Each objService In colServices
    Wscript.Echo objService.Name
Next
The OR keyword, by contrast, allows you to expand the scope of a query. For example, suppose you need a list of services that are either stopped or paused. In this case there are two criteria, but a service needs to meet only one of these to qualify: Either it needs to be stopped or it needs to be paused.
To create a query such as this, separate the two parameters with the OR keyword. In this query, an instance will be returned as long as it is either stopped or paused.
strComputer = "."
Set objSWbemServices = GetObject("winmgmts:\" & strComputer & "
ootcimv2")

Set colServices = objSWbemServices.ExecQuery _
    ("SELECT * FROM Win32_Service WHERE State = 'Stopped' OR State = 'Paused'")

For Each objService In colServices
    Wscript.Echo objService.Name
Next
You also have the option of returning only selected properties of selected classes. To do this, you must:
Specify the properties to be returned.
Include a WHERE clause to limit the instances returned.
In other words, this type of query combines two query types — returning selected properties and returning selected instances — explored earlier in this chapter.
For example, this script returns only the name and the state of services that can be paused:
strComputer = "."
Set objSWbemServices = GetObject("winmgmts:\" & strComputer & "
ootcimv2")

Set colServices = objSWbemServices.ExecQuery _
    ("SELECT Name, State FROM Win32_Service WHERE AcceptPause = True")

For Each objService In colServices
    Wscript.Echo objService.Name, objService.State
Next
In some cases, you can speed up a query by using a forward-only enumerator. For example, on a Windows 2000–based test computer, a script that returned 10,000 events from the event logs required 47 seconds to complete. A script using a forward-only enumerator required just 28 seconds to complete. Admittedly, the time differential (19 seconds) might not appear that large. However, suppose the script had to perform the same task on all 50 of your domain controllers. In a situation like that, 19 seconds times 50 domain controllers results in a large difference between the two scripts.
A forward-only enumerator requires you to provide three parameters to ExecQuery. The first parameter is the WQL query. The second parameter represents the query language; this should either be left blank or set to “WQL”. (At this point in time, WQL is the only query language that can be used with WMI.) The third parameter is the value 48. This value represents the combination of two “flags,” numbers that can be combined to act as a single parameter to a method. These flags are:
wbemFlagReturnImmediately (decimal value 16). This is the default setting that causes ExecQuery to run semisynchronously. As explained earlier in this chapter, in semisynchronous mode, the script starts the query and can immediately begin working with the SWbemObjectSet that is returned while instances are still being retrieved. This is the default behavior for most WMI queries (in other words, although you do not have to specify it in the script, wbemFlagReturnImmediately is enabled on most queries).
wbemFlagForwardOnly (decimal value 32). This flag causes the script to use a forward-only enumerator.
Forward-only enumerators typically run faster than other queries and use less memory. However, with a forward-only enumerator, as soon as an object is enumerated it is released from memory. This frees memory and enables the query to run faster, but the objects can be enumerated only once; after that, they are no longer available. This means that you can use a forward-only enumerator to return instances and echo their values to the screen only once. As soon as the enumeration is finished (that is, as soon as the For Each loop completes), no instances remain in memory. As a result, an error occurs if you try to enumerate the instances a second time.
The following script uses a forward-only enumerator to return events from the event logs. Notice that the parameter following the SELECT query is left blank.
Const wbemFlagReturnImmediately = 16
Const wbemFlagForwardOnly = 32

strComputer = "."
Set objSWbemServices = _
    GetObject("winmgmts:{(Security)}\" & strComputer & "
ootcimv2")

Set colNTLogEvents = objSWbemServices.ExecQuery _
    ("SELECT * FROM Win32_NTLogEvent", , _
    wbemFlagReturnImmediately + wbemFlagForwardOnly)

For Each objNTLogEvent In colNTLogEvents
    Wscript.Echo "Log File:        " & objNTLogEvent.LogFile        & vbCrLf & _
                 "Record Number:   " & objNTLogEvent.RecordNumber   & vbCrLf & _
                 "Type:            " & objNTLogEvent.Type           & vbCrLf & _
                 "Time Generated:  " & objNTLogEvent.TimeGenerated  & vbCrLf & _
                 "Source:          " & objNTLogEvent.SourceName     & vbCrLf & _
                 "Category:        " & objNTLogEvent.Category       & vbCrLf & _
                 "Category String: " & objNTLogEvent.CategoryString & vbCrLf & _
                 "Event:           " & objNTLogEvent.EventCode      & vbCrLf & _
                 "User:            " & objNTLogEvent.User           & vbCrLf & _
                 "Computer:        " & objNTLogEvent.ComputerName   & vbCrLf & _
                 "Message:         " & objNTLogEvent.Message        & vbCrLf
Next
You cannot use the SWbemObjectSet Count property when using a forward-only enumerator. For example, suppose you inserted the following statement after the ExecQuery call in the previous script.
Wscript.Echo colNTLogEvents.Count
If you try to run the revised script, the following error message will appear in the command window:
SWbemObjectSet: Unspecified error
Why? The answer lies in the way Count works. Because Count performs an enumeration to determine the number of items in the collection, reading the Count property would exhaust your one-time enumeration of the forward-only enumerator. As such, Count is not a supported property for any SWbemObjectSet that is returned using the forward only flag.
One of the more confusing aspects of WMI is the way WMI handles dates and times. For example, consider this simple script, which returns the date that the operating system was installed on a computer:
strComputer = "."
Set objSWbemServices = GetObject("winmgmts:\" & strComputer & "
ootcimv2")
Set colOS = objSWbemServices.ExecQuery("SELECT * FROM Win32_OperatingSystem")
For Each objOS in colOS
    Wscript.Echo objOS.InstallDate
Next
When this script is run under CScript, output similar to the following appears in the command window:
20011224113047.000000-480
This is not a misprint; 20011224113047.000000–480 really is the date that the operating system was installed on the computer. In fact, this value indicates that the operating system was installed on December 24, 2001. The date is correct; the problem lies not with the date but with the fact that the date is displayed in the Universal Time Coordinate (UTC) format.
In the UTC format, dates are displayed as yyyymmddHHMMSS.xxxxxx±UUU, where:
yyyy represents the year.
mm represents the month.
dd represents the day.
HH represents the hour (in 24-hour format).
MM represents the minutes.
SS represents the seconds.
xxxxxx represents the milliseconds.
± UUU represents the difference, in minutes, between the local time zone and Greenwich Mean Time (GMT).
Consequently, the value 20011224113047.000000–480 is translated like this:
2001 is the year.
12 is the month (December).
24 is the day.
11 is the hour of the day (in 24-hour format).
30 is the minutes.
47 is the seconds.
000000 is the milliseconds.
–480 is the number of minutes different from Greenwich Mean Time.
Needless to say, the UTC format creates a number of problems for both script writers and script users. For one thing, it is difficult to determine dates and times at a glance. For another, it is not exactly a straightforward process to query for items based on date-time values. Suppose you want to retrieve a list of all the folders on a computer that were created after September 3, 2002. This seems like a simple enough task; after all, the Win32_Directory class includes a CreationDate property that specifies the date the folder was created.
Unfortunately, you cannot simply ask WMI to return a list of folders created after 9/3/2002. This script, which attempts to do just that, will run, but will not return any data.
dtmTargetDate = #9/3/2002#

strComputer = "."
Set objSWbemServices = GetObject("winmgmts:\" & strComputer & "
ootcimv2")

Set colDirectories = objSWbemServices.ExecQuery _
  ("SELECT * FROM Win32_Directory WHERE CreationDate > '" & dtmTargetDate & "'")

For Each objDirectory In colDirectories
    Wscript.Echo objDirectory.Name
Next
Instead, you have to pass WMI the date using UTC format:
dtmTargetDate = "20020903000000.000000-480"

strComputer = "."
Set objSWbemServices = GetObject("winmgmts:\" & strComputer & "
ootcimv2")

Set colDirectories = objSWBemServices.ExecQuery _
  ("SELECT * FROM Win32_Directory WHERE CreationDate > '" & dtmTargetDate & "'")

For Each objDirectory In colDirectories
    Wscript.Echo objDirectory.Name
Next
Because dates are very important in system administration, and because WMI is the technology of choice for most system administration tasks, it is important for script writers to be able to carry out two tasks:
Convert WMI dates to a standard date-time format.
Convert a standard date to a WMI date-time format.
Although UTC dates are intimidating at first glance, they are relatively easy to convert to a standard date-time format. This is because 1) VBScript treats UTC dates as strings, meaning that they can be manipulated using VBScript string functions and 2) UTC dates use a standard fixed-width format. The year will always take up the first four character positions in a UTC string, the month will always take up the next two character positions, and so forth. These character positions are described in Table 6.10.
Table 6.10. Character Positions of a UTC Date-Time Value
Character Positions | Description | Sample Value |
|---|---|---|
1–4 | Four digits representing the year (such as 2001 or 2002). | 2002 |
5–6 | Two digits representing the month. For example, January is represented by the digits 01; November, by the digits 11. | 10 |
7–8 | Two digits representing the day of the month. For example, the 5th day is represented by the digits 05; the 23rd day by the digits 23. | 18 |
9–14 | Six zeros representing the hours, minutes, and seconds of the day (in 24-hour format). If you prefer, you can specify values other than 0 to create more finely targeted searches. For example, to search for folders created after 1:47 P.M. on a given day, set these characters to 134700, where 13 represents the hours (1:00 P.M. in 24-hour format), 47 represents the minutes, and 00 represents the seconds. | 000000 |
15 | A period (.). | . |
16–21 | Six zeros representing the milliseconds. | 000000 |
22–25 | The number of minutes difference between your local time and Greenwich mean time. | –480 |
To convert a UTC date to a standard date-time format, you simply select the desired date-time components (such a month, day, and year) and construct a date-time string of your own. For example, with the UTC value 20020710113047.000000–420, you need to:
Extract the month (07).
Extract the day (10).
Extract the year (2002).
Combine them into a standard date format: 07/10/2002.
You can extract the individual date components using VBScript functions such as Left and Mid. (These functions are explained in more detail in “VBScript Primer” in this book.) For example, to extract the day (character positions 7 and 8), you use code similar to this, in which dtmInstallDate is a variable used to represent the date being converted:
Mid(dtmInstallDate, 7 ,2)
VBScript interprets this line of code as follows: Take the string dtmInstallDate, start in the seventh character position, and return two values (characters 7 and 8). In the date 20020710113047.000000–420, characters 7 and 8 are 10, the tenth day of the month.
The following function converts a UTC date to a standard date by:
Extracting the month.
Appending a backslash (/).
Extracting the day.
Appending a backslash.
Extracting the year.
Adding a space.
Extracting the hour.
Appending a colon (:).
Extracting the minutes.
Appending a colon.
Extracting the seconds.
Converting the resultant string to a date using the CDate function.
WMIDateStringToDate = CDate(Mid(dtmInstallDate, 5, 2) & "/" & _
     Mid(dtmInstallDate, 7, 2) & "/" & Left(dtmInstallDate, 4) _
         & " " & Mid (dtmInstallDate, 9, 2) & ":" & _
             Mid(dtmInstallDate, 11, 2) & ":" & Mid(dtmInstallDate, _
                 13, 2))
If passed the UTC value 20020219145216.000000–480, the function returns this date:
2/19/02 2:52:16 PM
The script shown in Listing 6.19 retrieves the date that the operating system was installed on a computer. This value is not echoed in UTC format; instead, it is passed to a function named WMIDateStringToDate. This function converts the UTC value to a standard date-time format. This standard date is then echoed to the screen.
Example 6.19. Converting a UTC Value to a Standard Date-Time Value
 1 strComputer = "."
 2 Set objSWbemServices = GetObject("winmgmts:\" & strComputer & "
ootcimv2")
 3 Set objOS = objSWbemServices.ExecQuery("SELECT * FROM Win32_OperatingSystem")
 4 For Each strOS in objOS
 5     dtmInstallDate = strOS.InstallDate
 6     strReturn = WMIDateStringToDate(dtmInstallDate)
 7     Wscript.Echo strReturn
 8 Next
 9 Function WMIDateStringToDate(dtmInstallDate)
10     WMIDateStringToDate = CDate(Mid(dtmInstallDate, 5, 2) & "/" & _
11          Mid(dtmInstallDate, 7, 2) & "/" & Left(dtmInstallDate, 4) _
12              & " " & Mid (dtmInstallDate, 9, 2) & ":" & _
13                      Mid(dtmInstallDate, 11, 2) & ":" & Mid(dtmInstallDate, _
14                          13, 2))
15 End Function
As noted previously, you cannot use standard date-time formats — such as 10/18/2002 — when writing WMI queries. Instead, you need to convert any dates used in your queries to UTC format. This requires two steps: 1) You must determine the offset (difference in minutes) between your time zone and Greenwich Mean Time, and 2) you must convert 10/18/2002 to a UTC value.
Admittedly, WMI makes it difficult to work with dates and times; fortunately, WMI at least makes it easy to determine the offset between your time zone and Greenwich Mean Time. The WMI class Win32_TimeZone includes a property — Bias — that returns the GMT offset. The script in Listing 6.20 shows how this property is retrieved.
Example 6.20. Determining the Offset from Greenwich Mean Time
1 strComputer = "."
2 Set objSWbemServices = GetObject("winmgmts:" _
3     & "{impersonationLevel=impersonate}!\" & strComputer & "
ootcimv2")
4 Set colTimeZone = objSWbemServices.ExecQuery _
5     ("SELECT * FROM Win32_TimeZone")
6 For Each objTimeZone in colTimeZone
7     Wscript.Echo "Offset: "& objTimeZone.Bias
8 Next
When the preceding script runs under CScript on a computer operating on Pacific daylight time, the following value is echoed to the command window:
Offset: -480
After you determine the GMT offset, you must then convert a standard date such as 10/18/2002 to a UTC date. To convert a standard date to a UTC date, you can use VBScript date functions such as Year, Month, and Day to isolate the individual components that make up a UTC date. (See Table 6.10 for details.) After you have individual values for these components, you can concatenate them in the same manner as you would any other string value.
UTC dates are treated as strings because the GMT offset must be appended to the end. If the date were seen as a number, this value:
20011018113047.000000-480
Would be erroneously treated as a mathematical equation (parentheses added for clarity):
(20011018113047.000000) - (480)
For example, in the date 10/18/2002, the individual components are:
Year: 2002
Month: 10
Day: 18
The script would need to combine these three values, the string “113047.000000” (representing the time, including milliseconds), and the GMT offset to derive a UTC date. For example, (parentheses again added for clarity):
(2002) & (10) & (18) & (113047.000000) & (-480)
Note
You can use the VBScript functions Hour, Minute, and Second to convert the time portion of a UTC date. Thus, a time such as 11:30:47 A.M. would be converted to 113047.
There is one complicating factor. The month must take up positions 5 and 6 in the string; the day must take up positions 7 and 8. This is no problem with month 10 and day 18. But how do you get July 5 (month 7, day 5) to fill up the requisite positions?
The answer is to add a leading zero to each value, thus changing the 7 to 07 and the 5 to 05. To do this, use the VBScript Len function to check the length (number of characters) in the month and the day. If the length is 1 (meaning that there is just one character), add a leading zero. Thus:
If Len(dtmMonth) = 1 Then
    dtmMonth = "0" & dtmMonth
End If
The script shown in Listing 6.21 converts the current date to a UTC date. The script first determines the GMT offset and then converts the date to UTC format. When appending the time value (000000.000000), the script uses the function CStr; this ensures that the value is appended as a string and not as a number.
Example 6.21. Converting the Current Date to a UTC Date
 1 strComputer = "."
 2 Set objSWbemServices = GetObject("winmgmts:" _
 3     & "{impersonationLevel=impersonate}!\" & strComputer & "
ootcimv2")
 4 Set colTimeZone = objSWbemServices.ExecQuery _
 5     ("SELECT * FROM Win32_TimeZone")
 6 For Each objTimeZone in colTimeZone
 7     strBias = objTimeZone.Bias
 8 Next
 9
10 dtmCurrentDate = Date
11 dtmTargetDate = Year(dtmCurrentDate)
12
13 dtmMonth = Month(dtmCurrentDate)
14 If Len(dtmMonth) = 1 Then
15     dtmMonth = "0" & dtmMonth
16 End If
17
18 dtmTargetDate = dtmTargetDate & dtmMonth
19
20 dtmDay = Day(dtmCurrentDate)
21 If Len(dtmDay) = 1 Then
22     dtmDay = "0" & dtmDay
23 End If
24
25 dtmTargetDate = dtmTargetDate & dtmDay & "000000.000000"
26 dtmTargetDate = dtmTargetDate & Cstr(strBias)
The script in Listing 6.22 demonstrates a more practical use of these conversions. The script determines the GMT offset, and then converts a specified current date (in this case, 10/18/2002) to UTC date-time format. After the date has been converted, that value is used to search a computer and returns a list of all the folders that were created after 10/18/2002.
Example 6.22. Retrieving Folders Based on Creation Date
 1 strComputer = "."
 2 Set objSWbemServices = GetObject("winmgmts:" _
 3     & "{impersonationLevel=impersonate}!\" & strComputer & "
ootcimv2")
 4 Set colTimeZone = objSWbemServices.ExecQuery _
 5     ("SELECT * FROM Win32_TimeZone")
 6 For Each objTimeZone in colTimeZone
 7     strBias = objTimeZone.Bias
 8 Next
 9
10 dtmCurrentDate = "10/18/2002"
11 dtmTargetDate = Year(dtmCurrentDate)
12
13 dtmMonth = Month(dtmCurrentDate)
14 If Len(dtmMonth) = 1 Then
15     dtmMonth = "0" & dtmMonth
16 End If
17
18 dtmTargetDate = dtmTargetDate & dtmMonth
19
20 dtmDay = Day(dtmCurrentDate)
21 If Len(dtmDay) = 1 Then
22     dtmDay = "0" & dtmDay
23 End If
24
25 dtmTargetDate = dtmTargetDate & dtmDay & "000000.000000"
26 dtmTargetDate = dtmTargetDate & Cstr(strBias)
27
28 Set colFolders = objSWbemServices.ExecQuery _
29     ("SELECT * FROM Win32_Directory WHERE CreationDate < '" & _
30         dtmtargetDate & "'")
31 For Each objFolder in colFolders
32     Wscript.Echo objFolder.Name
33 Next
WMI has a reputation for being very difficult to learn and even more difficult to use. In many respects, this reputation has been acquired not so much because WMI really is difficult but simply because it is so big. WMI can be used to manage computer hardware, computer software, and nearly everything in between; the assumption is that any technology that encompasses so many different elements must be difficult.
In reality, though, many of the system administration tasks that can be performed by using WMI follow one of a handful of standard approaches. For example, you have already seen how a template can serve as the basis for scripts that return information about almost any managed resource. In the opening pages of this chapter, the same basic script — with one or two minor modifications — was used to return information about items as disparate as installed memory, services, and events recorded in the event logs.
The following sections of this chapter present basic script templates that can be used to:
Retrieve and display the properties of a managed resource.
Configure the property values of a managed resource.
Call the methods of a WMI class.
Create new instances of managed resources.
Delete existing instances of managed resources.
Note
All of the script templates are designed to work on the local computer; this is done by setting the value of the variable strComputer to a dot (“.”). To run a script against a remote computer, simply set the value of strComputer to the name of the remote computer. For example, this line of code causes a script to run against a computer named atl-dc-01:
strComputer = "atl-dc-01"
WMI is perhaps best suited for returning information about a computer; there are literally hundreds of WMI classes that provide information on everything from the services installed on a computer to the events recorded in the event logs to attached peripherals such as printers, monitors, and disk drives.
The amount — and variety — of information that can be returned by using WMI is, in itself, enough to make scripting an important tool for system administration. What makes the technology even more valuable, however, is the fact that the same basic approach can be used to return information regardless of the source. For example, the script template shown in Listing 6.23 returns information about the services installed on a computer. However, this template can easily be adapted to return information about any other managed resource on the computer.
Example 6.23. Template for Retrieving and Displaying Resource Properties
 1 strComputer = "."
 2 strNamespace = "
ootcimv2"
 3 strClassName = "Win32_Service"
 4
 5 Set objSWbemServices = GetObject("winmgmts:" _
 6     & "{impersonationLevel=impersonate}!\" & strComputer & strNamespace)
 7
 8 Set colInstances = objSWbemServices.ExecQuery _
 9     ("SELECT * FROM" & strClassName)
10 For Each objInstance in colInstances
11      Wscript.Echo "Caption "     & objInstance.Caption
12      Wscript.Echo "Description " & objInstance.Description
13 Next
To use this template with other WMI classes:
Set the value of strClassName to the appropriate WMI class.
If necessary, set the value of strNamespace to the appropriate WMI namespace.
Replace the statements within the For Each loop that echo the properties and their values. Remove the following lines and replace them with the appropriate lines of code for the property values being displayed.
Wscript.Echo "Caption "     & objInstance.Caption
Wscript.Echo "Description " & objInstance.Description
One limitation of the script shown in Listing 6.23 is that it requires you to know, in advance, the names of all of the properties that you want to retrieve and display. However, what if you want to display values for all the properties of a class but you either do not know the property names or do not want to type the 40 or 50 lines of code required to display each property value? In that case, you can use the script in Listing 6.24, which automatically retrieves and displays the values of each property found in a class.
Example 6.24. Template for Retrieving and Displaying All Properties of a Resource
 1 strComputer = "."
 2 strNamespace = "
ootcimv2"
 3 strClassName = "Win32_Process"
 4
 5
 6 Set objSWbemServices = _
 7     GetObject("winmgmts:{impersonationLevel=impersonate}!\" &_
 8          strComputer & strNamespace)
 9
10 Set colInstances = objSWbemServices.ExecQuery("SELECT * FROM " &_
11     strClassName)
12
13 Wscript.Echo "Properties of Instances of Class " & strClassName
14 Wscript.Echo "================================================="
15
16 iCount = 0
17 For Each objInstance in colInstances
18      iCount = iCount + 1
19      Set colProperties = objInstance.Properties_
20
21      Wscript.Echo vbCrLf
22      Wscript.Echo "******************"
23      Wscript.Echo "INSTANCE NUMBER: " & iCount
24      Wscript.Echo "******************"
25      Wscript.Echo vbCrLf
26
27      For Each objProperty in colProperties
28           Wscript.Echo objProperty.Name & " : " & objProperty.Value
29      Next
30      Wscript.Sleep(2000)
31 Next
To use this template with other WMI classes:
Set the value of strClassName to the appropriate WMI class.
If necessary, set the value of strNamespace to the appropriate WMI namespace.
In Windows 2000, WMI is primarily a read-only technology; you use it mainly to retrieve information about managed resources. However, some WMI properties are read/write. This means you can use a script not only to retrieve the values of these properties but also to configure those values.
For example, the script in Listing 6.25 retrieves all instances of the Win32_OSRecoveryConfiguration class. (In this case, the class contains only a single instance.) The script provides new values for properties such as DebugInfoType and DebugFilePath and then applies the changes (and thus configures operating system recovery options) by using the Put_ method. If you do not call the Put_ method, the changes will not be applied.
Note
This template works only for properties that are writable. Attempting to change a read-only property will result in an error.
Example 6.25. Template for Writing Resource Properties
 1 strComputer = "."
 2 strClassName = "Win32_OSRecoveryConfiguration"
 3 strNamespace = "
ootcimv2"
 4
 5 Set objSWbemServices = GetObject("winmgmts:" _
 6     & "{impersonationLevel=impersonate}!\" & strComputer & strNamespace)
 7 Set colInstances = objSWbemServices.ExecQuery _
 8     ("SELECT * FROM " & strClassName)
 9 For Each objInstance in colInstances
10     objInstance.DebugInfoType = 1
11     objInstance.DebugFilePath = "c:scriptsmemory.dmp"
12     objInstance.OverWriteExistingDebugFile = False
13     objInstance.Put_
14 Next
To use this template with other WMI classes and to configure other WMI properties:
Set the value of strClassName to the name of the WMI class.
If necessary, set the value of strNamespace to the appropriate WMI namespace.
Replace the statements within the For Each loop that configure new property values. Remove the following lines, and replace them with the appropriate lines of code for the properties being modified:
objInstance.DebugInfoType = 1
objInstance.DebugFilePath = "c:scriptsmemory.dmp"
objInstance.OverWriteExistingDebugFile = False
Methods enable a script to carry out actions. For example, the Win32_Service class includes methods that let you perform such tasks as starting and stopping services; the Win32_NTEventLogfile class includes methods for backing up and clearing event logs; the Win32_OperatingSystem class includes methods for shutting down or rebooting a computer.
Listing 6.26 provides a template that can be used to write scripts that call WMI methods. This particular script uses the StopService method of the Win32_Service class to stop the Alerter service on the local computer.
Example 6.26. Template for Calling Methods
 1 strComputer = "."
 2 strNamespace = "
ootcimv2"
 3 strClassName = "Win32_Service"
 4 strKeyName = "Name"
 5 strKeyValue = "Alerter"
 6
 7 Set objSWbemServices = GetObject("winmgmts:" &_
 8     "{impersonationLevel=impersonate}!\" & strComputer & strNamespace)
 9 Set colInstances = objSWbemServices.ExecQuery _
10     ("SELECT * FROM " & strClassName & " WHERE " & strKeyName & " = '" &_
11      strKeyValue & "'")
12 For Each objInstance in colInstances
13      objInstance.StopService()
14 Next
To use this template with other WMI classes:
Set the value of strClassName to the appropriate WMI class.
If necessary, set the value of strNamespace to the appropriate WMI namespace.
Set the value of strKeyName to the name of the property that forms the basis of the WHERE clause.
Set the value of strKeyValue to the appropriate value for this property.
Replace the statement within the For Each loop that calls the method. Remove the following line, and replace it with the appropriate line of code for the method being called. If necessary, you must also include the appropriate method parameters.
objInstance.StopService()
Some WMI classes (including Win32_Share and Win32_Process) include a Create method. If a class includes the Create method, that method can be used to create such things as a new shared folder or a new process.
Creating a new resource requires you to use the Get method to bind to the actual WMI class (rather than retrieve instances of the class). After you have an object representing the class, use the SpawnInstance_ method to create a new, “blank,” instance of the class. Configure properties for the instance, and then call the Create method.
The script template in Listing 6.27 uses the Create method to create a new shared folder.
Example 6.27. Template for Creating Resources
 1 strComputer = "."
 2 strNamespace = "
ootcimv2"
 3 strClassName = "Win32_Share"
 4
 5 Set objSWbemServices = GetObject("winmgmts:" _
 6     & "{impersonationLevel=impersonate}!\" & strComputer & strNamespace)
 7
 8 Set objNewShare = objSWbemServices.Get(strClassName)
 9 Set objInParams = _ objNewShare.Methods_("Create").InParameters.SpawnInstance_()
10
11 objInParams.Properties_.Item("Description") = "New Share Description"
12 objInParams.Properties_.Item("Name") = "New Share Name"
13 objInParams.Properties_.Item("Path") = "C:scriptsshared"
14 objInParams.Properties_.Item("Type") = 0
15
16 objNewShare.ExecMethod_ "Create", objInParams
To use this template with other WMI classes:
Set the value of strClassName to the appropriate WMI class.
If necessary, set the value of strNamespace to the appropriate WMI namespace.
Replace the statements within the For Each loop that configure the values for the new share. Remove the following lines, and replace them with the appropriate lines of code for the object being created:
objInParams.Properties_.Item("Description") = "New Share Description"
objInParams.Properties_.Item("Name") = "New Share Name"
objInParams.Properties_.Item("Path") = "C:scriptsshared"
objInParams.Properties_.Item("Type") = 0
The Delete method lets you delete instances of a managed resource. Not all WMI classes support the Delete method; those that do include Win32_Directory, CIM_DataFile, Win32_Share, and Win32_ScheduledJob. This means that you can use scripts to delete files, folders, shared folders, or scheduled tasks.
To delete a managed resource, retrieve the instance to be deleted, and then call the Delete method. The script template in Listing 6.28 demonstrates this operation by deleting the shared folder named “New Share Name.”
Example 6.28. Template for Deleting Resources
 1 strComputer = "."
 2 strNamespace = "
ootcimv2"
 3 strClassName = "Win32_Share"
 4 strKeyName = "Name"
 5 strKeyValue = "New Share Name"
 6
 7 Set objSWbemServices = GetObject("winmgmts:" _
 8     & "{impersonationLevel=impersonate}!\" & strComputer & strNamespace)
 9
10 Set objInstance = objSWbemServices.Get(strClassName & "."   &_
11                                        strKeyName   & "='" &_
12                                        strKeyValue & "'")
13 objInstance.Delete
To use this template to delete other managed resources:
System administrators spend a great deal of their time fixing problems. Unfortunately, by the time a system administrator is alerted to a problem, the problem might already be disrupting the work of other employees. In turn, this can cost the organization money, in the form of lost productivity.
By using WMI event notifications, you can monitor the state of any WMI-managed resource and respond to an issue much earlier, perhaps before it is even noticed by your users.
For example, instead of waiting for a problem related to insufficient free disk space on a server to be brought to your attention, you can set up a WMI event notification that notifies you by e-mail when the free disk space on a server falls below a specified value. By knowing about the potential problem before it occurs, you can solve it before any productivity is lost — in this case, perhaps by archiving some of the data on the hard disk or by installing an additional hard disk.
If WMI event notifications did not exist, you could use a WMI script that retrieves the properties of a WMI-managed resource to monitor the state of that resource. In that case, you would need to repeatedly run a script that checks the amount of free space on a hard disk. The script would have to be scheduled to run whenever a given interval of time has elapsed. If you set too short an interval, the script will run very frequently and consume valuable computing resources. If you set too long an interval, the script might notify you of potential trouble only after this has already become an actual problem for users.
The WMI event notification mechanism was designed to overcome these issues, providing you with an efficient way of monitoring WMI-managed resources.
Scripts that monitor WMI-managed resources look similar to other WMI scripts. For example, the script in Listing 6.29 monitors the processes on a computer and displays a message if a process named Notepad.exe is started on that computer. As you can see, the script is only a few lines long and has a number of elements identical to scripts used to this point in the chapter.
If you run this script under CScript, you will likely notice that the script starts running but does not seem to finish; although it appears to have stopped running, you are not returned to the command prompt. This is the expected behavior; the script has started and is simply waiting for an instance of Notepad to be created.
Now start a new instance of Notepad. The script will display the following output and then end:
An instance of notepad.exe just started.
This is exactly what the script was designed to do. It waits until an instance of Notepad is created, it reports the fact that this instance was just created, and then it stops.
Example 6.29. Monitoring the Notepad.exe Process
 1 strComputer = "."
 2 Set objSWbemServices = GetObject("winmgmts:" &_
 3     "{impersonationLevel=impersonate}!" &_
 4     "\" & strComputer & "
ootcimv2")
 5
 6 Set objEventSource = objSWbemServices.ExecNotificationQuery( _
 7     "SELECT * FROM __InstanceCreationEvent " &_
 8     "WITHIN 10 " &_
 9     "WHERE TargetInstance " &_
10     "ISA 'Win32_Process' " &_
11     "AND TargetInstance.Name = 'notepad.exe'")
12
13 Set objEventObject = objEventSource.NextEvent()
14 Wscript.Echo "An instance of notepad.exe just started."
Lines 1 through 4 of the script are typical of most WMI scripts. They establish a connection to the rootcimv2 namespace on the computer specified in the strComputer variable.
In lines 6 through 11, a notification query is made using the ExecNotificationQuery method. The WMI Query Language (WQL) for the query is built up in lines 7 through 11. The WQL is similar to the WQL used to retrieve instances of CIM classes, but two new keywords are used: WITHIN and ISA. These keywords are discussed in more detail later in this chapter.
In line 13, the NextEvent method is used to pause the script and wait for the event described by the notification query to occur.
Line 14 displays a message after the event has occurred. The script then automatically terminates.
The script in Listing 6.29 might look a little complicated, at least at first glance. However, like other WMI scripts in this chapter, this script can be modified to work with a different WMI-managed resource by making only a few modifications.
For example, the script in Listing 6.30 monitors the services on a computer and displays a message if the state of the Alerter service changes. Enter and run the script in the same way you did the script shown in Listing 6.29. Start or stop the Alerter service by typing net start alerter or net stop alerter in a command window. The following message should be displayed:
The status of the alerter service just changed.
Example 6.30. Monitoring the Alerter Service
 1 strComputer = "."
 2 Set objSWbemServices = GetObject("winmgmts:" &_
 3     "{impersonationLevel=impersonate}!" &_
 4     "\" & strComputer & "
ootcimv2")
 5
 6 Set objEventSource = objSWbemServices.ExecNotificationQuery( _
 7     "SELECT * FROM __InstanceModificationEvent " &_
 8     "WITHIN 10 " &_
 9     "WHERE TargetInstance " &_
10     "ISA 'Win32_Service' " &_
11     "AND TargetInstance.Name = 'alerter'")
12
13 Set objEventObject = objEventSource.NextEvent()
14 Wscript.Echo " The status of the alerter service just changed."
Compare this script with the one in Listing 6.29. The elements that differ between the two scripts are highlighted in Listing 6.30. There are four differences between the two scripts:
The type of event monitored.
__InstanceCreationEventwas changed to__InstanceModificationEventon line 7.The script in Listing 6.29 displays a message when a new instance of Notepad is created. To do this, it registers to receive events of type __InstanceCreationEvent. This event occurs whenever a new instance of a managed object is created.
The script in Listing 6.30 displays a message when the state of the Alerter service is modified. To do this, it registers to receive events of type __InstanceModificationEvent. This event occurs whenever an existing instance of a managed object is modified.
The WMI class of the resource being monitored.
Win32_Processwas changed toWin32_Serviceon line 10.The script in Listing 6.29 monitors a process, so it requires a reference to the Win32_Process WMI class. The script in Listing 6.30 monitors a service and therefore requires a reference to Win32_Service.
The value of the Name property specifying the instance of interest.
notepad.exewas changed toalerteron line 11.The Win32_Process and Win32_Service WMI classes each include a Name property. In the script in Listing 6.29, the name of the process monitored is notepad.exe; in Listing 6.30, the name of the service monitored is alerter. The values of properties other than the Name property could have been used instead. For example, suppose you want to know only whether a service that is currently stopped has been modified in some way. In that case, you would use this code:
TargetInstance.State = 'Stopped'
The message displayed when the specified event is received.
"An instance of notepad.exe just started."was changed to"The status of the alerter service just changed."on line 14.
Just as there are three primary steps in a WMI script that retrieves and displays the properties of a managed resource, there are three steps in a WMI monitoring script.
A connection is made to a WMI namespace on a computer.
The first step is the same as the first step in most WMI scripts. A connection is made to the namespace where the WMI class corresponding to the resource being monitored is located.
strComputer = "."
Set objSWbemServices = GetObject("winmgmts:" &_
    "{impersonationLevel=impersonate}!" &_
    "\" & strComputer & "
ootcimv2")
A notification query is issued.
In the second step, a notification query is issued using WQL. The query looks similar to the WQL statements used previously in this chapter, although there are several new elements, such as WITHIN and ISA.
Set objEventSource = objSWbemServices.ExecNotificationQuery( _
    "SELECT * FROM __InstanceModificationEvent " &_
    "WITHIN 10 " &_
    "WHERE TargetInstance " &_
    "ISA 'Win32_Service' " &_
    "AND TargetInstance.Name = 'alerter'")
The event is received and some action performed.
In the third step, the NextEvent method is called, which causes the script to pause and wait for an event before proceeding to the next line. After the event is received, the script proceeds to the next line, which is a message that informs the user that a particular event occurred.
Set objEventObject = objEventSource.NextEvent()
Wscript.Echo "The status of the alerter service was just changed."
Despite the similarities, however, there are some important differences between a standard WMI query and an event notification query.
Event notification queries use event classes
Instead of selecting instances from a WMI class that represents a managed resource, the WQL event query selects instances from an event class. The __InstanceModificationEvent class, as its name makes clear, represents the event that occurs when an instance is modified. There are also event classes that represent the events that occur when an instance is created or deleted: __InstanceDeletionEvent and __InstanceModificationEvent. Each of these three classes derives from the more general __InstanceOperationEvent class, a class containing events generated whenever an instance is created, deleted, or modified.
Event notification queries use the WITHIN keyword
Because the Win32_Service class does not have a corresponding WMI event provider, the WITHIN keyword must be used to signify that the WMI polling mechanism should be used with a polling interval of 10 seconds. In other words, every 10 seconds the CIM repository is checked to see whether any new changes have been made to the Alerter service. At most, you are notified within 10 seconds if the Alerter service is modified.
Theoretically, some events can be missed, depending on the polling interval. For example, suppose you are checking every 30 seconds to see whether a new instance of Notepad has been created. If a user starts Notepad and then immediately closes it, this event will likely not be reported.
This is because of the way the polling mechanism works. Suppose you create an event subscription that checks every 30 seconds to see whether Notepad has been started. WMI will begin by taking a snapshot of the specified class; in this case, it will record the state of all the processes running on the computer. Thirty seconds later, WMI will take a second snapshot of the Win32_Process class and then compare this with the previous snapshot. Suppose the first snapshot had only two processes:
Calc.exe
Word.exe
And suppose the second snapshot has three processes:
Calc.exe
Word.exe
Notepad.exe
In this case, it is obvious that Notepad has been created. However, if Notepad was started and then immediately stopped, it would not appear in the second snapshot. As far as WMI is concerned, the event never occurred.
This snapshot approach also explains why it is not recommended that you use WMI to monitor changes to all the files on a hard disk: The resultant snapshots would be huge, and comparing the two snapshots would require considerable computer resources. Items such as processes and services can be more readily monitored because there are far fewer of them on a computer.
Note
So why can you monitor changes to the event logs, even though event logs typically have thousands of events stored in them? You can do that because there is an event provider for event logs that will watch for and notify you of changes as they happen. WMI does not need to use the snapshot method to monitor event logs. However, no such event provider exists for files or folders.
If you do not include the WITHIN clause when the resource being monitored does not have a corresponding event provider, you will receive the following error message:
'WITHIN' clause must be used in this query due to lack of event providers
Event notification queries use the TargetInstance object
It is unlikely that you will find it useful to be notified of the creation of every instance of every WMI class. Instead, you need a way to request the specific instances you are interested in. Using TargetInstance provides a way to make reference to the instances you would like the query to return.
TargetInstance is an object, created in response to an event, that has the same properties (and values) of the object that triggered the event. For example, if the Alerter service is stopped, the TargetInstance object will be an instance of the Win32_Service class that has the name Alerter and the state Stopped (plus any other properties of the Alerter service).
In addition to TargetInstance, there is also a WMI object known as PreviousInstance. As the name suggests, this object maintains the properties and values of the object before the event occurred. In this example, PreviousInstance would be an instance of the Win32_Service class that has the name Alerter and the state Running.
Note
Where did PreviousInstance come from? Remember that WMI is taking, and comparing, two snapshots of the specified class. PreviousInstance represents objects found in the previous snapshot; TargetInstance, objects found in the current snapshot.
Knowing both the current and the previous state of an instance allows you to tell what changed when an object was modified. As a very simple example, a script can echo the values of all of the PreviousInstance and all of the TargetInstance properties. You can then compare those values to see any and all changes that were made to an object.
Event notification queries use the ISA keyword
The ISA keyword enables you to check whether a particular instance belongs to a certain class. The ISA keyword is roughly equivalent to the equals sign. However, you cannot say that the TargetInstance equals the Win32_Service class; it does not. Instead, the TargetInstance is an instance of the Win32_Service class. Thus, it is a Win32_Service instance.
Just as there is a WMI class that represents each type of system resource that can be managed using WMI, there is a WMI class that represents each type of WMI event. When an event that can be monitored by WMI occurs, an instance of the corresponding WMI event class is created. A WMI event occurs when that instance is created.
There are three major types of WMI event classes, all of which are derived from the __Event WMI class: Intrinsic Events, Extrinsic Events, and Timer Events. Intrinsic Events, in turn, are represented by three distinct classes derived from the __Event class: __NamespaceOperationEvent, __InstanceOperationEvent, and __ClassOperationEvent.
Note
Timer events are seldom, if ever, used in system administration scripts and are not discussed in this chapter.
The __Event-derived classes must be present in each namespace that includes resources that can be monitored using WMI. The hierarchy of __Event-derived classes in the ootdefault namespace is shown in Figure 6.5.

Intrinsic events are used to monitor a resource represented by a class in the CIM repository. Each resource is represented by an instance of a class. This means that monitoring a resource using WMI actually involves monitoring the instances that correspond to the resource.
Intrinsic events can also be used to monitor changes to a namespace or class in the repository. However, monitoring changes to namespaces or classes is of limited value to system administrators.
An intrinsic event is represented by an instance of a class derived from __InstanceOperationEvent, __NamespaceOperationEvent, or __ClassOperationEvent. Any changes to instances in WMI are represented by the __InstanceOperationEvent class and the classes derived from it: __InstanceCreationEvent, __InstanceModificationEvent, and __InstanceDeletionEvent.
Monitoring resources using WMI involves monitoring instances and all changes to instances are represented by __InstanceOperationEvent and the classes derived from it. This means that monitoring resources ultimately involves monitoring instances of __InstanceOperationEventderived classes.
You register interest in instances of one of these classes by issuing a notification query expressed in WQL. The query uses syntax similar to the following:
SELECT * FROM __InstanceOperationEventOrDerivedClass WITHIN PollingInterval WHERE
TargetInstance ISA WMIClassName AND TargetInstance. WMIClassPropertyName = Value
The __InstanceOperationEvent-derived classes you register interest in depend on the event you want to monitor.
Creation of a resource: __InstanceCreationEvent
Suppose you are interested in receiving a notification if Notepad is run on a certain computer. When Notepad runs, a corresponding process is created. Processes can be managed by using WMI and are represented by the Win32_Process class. When Notepad starts running, a corresponding instance of the Win32_Process class becomes available through WMI. If you have registered your interest in this event (by issuing the appropriate event notification query), the availability of this instance results in the creation of an instance of the __InstanceCreationEvent class.
Notification queries that request notification of the creation of a resource and use intrinsic events all use syntax similar to the following:
SELECT * FROM __InstanceCreationEvent WITHIN PollingInterval WHERE TargetInstance
ISA 'Win32_Process' and TargetInstance.Name = 'notepad.exe'
Modification of a resource: __InstanceModificationEvent Suppose you suspect that a management application you are using is erroneously changing the startup type of a service on one of your servers. You want to write a WMI script to monitor any modifications made to the configuration of the service. As soon as a modification is made to a service, its corresponding TargetInstance reflects the modification.
If you register your interest in this event, a modification to the configuration of the service results in the creation of an instance of the __InstanceModificationEvent class.
Notification queries that request notification of the modification of a resource and use intrinsic events all use syntax similar to the following:
SELECT * FROM __InstanceModificationEvent WITHIN PollingInterval WHERE
TargetInstance ISA 'Win32_Service' and TargetInstance.Name = 'alerter'
Deletion of a resource: __InstanceDeletionEvent If you want to ensure that a particular antivirus scanner program continues to run on a computer, you can write a script that monitors the processes on the computer to determine whether any of them stop.
Notification queries that request notification of the deletion of a resource and use intrinsic events all use syntax similar to the following:
SELECT * FROM __InstanceDeletionEvent WHERE TargetInstance ISA 'Win32_Process'
and TargetInstance.Name = 'notepad.exe'
Extrinsic events are used to monitor a resource that is not represented by a class in the CIM repository. For example, to monitor whether a process modifies an entry in the registry, you make use of extrinsic events. There is no WMI class that represents a registry entry, so you cannot use intrinsic events. (If you are interested in learning how to write scripts to monitor registry keys, subkeys, and entries, see “Registry” in this book.)
Scripts that make use of extrinsic events follow the same three steps as scripts that use intrinsic events. However, when you register to receive extrinsic events, you will not refer to an event class derived from __InstanceOperationEvent, __ClassOperationEvent, or __NamespaceOperationEvent in your event notification query. Instead, you will refer to a class derived from the __ExtrinsicEvent class.
Unlike intrinsic events, extrinsic events must have an associated WMI event provider.
As previously explained, the WMI monitoring scripts presented in the introduction to this section can be easily adapted to monitor any WMI-managed resource. However, these scripts do have some limitations. In particular, they can only:
Specify the instance monitored with the value of a single property.
Handle a single event.
Handle a single type of event: creation, modification, or deletion.
Monitor a single type of resource.
Continue monitoring a resource as long as they are running. If the script stops for any reason, monitoring stops as well.
The following example scripts demonstrate how you can change the type of monitoring script presented in the introduction in order to overcome each of these limitations.
You can be more specific about the resource to monitor by enhancing the WHERE clause. The query in Listing 6.31 specifies that the Device ID property must have the value CPU0 and also specifies that the Load Percentage property must have a value greater than 90. You can include additional constraints on the values of any of the properties of the class, making use of the AND and OR keywords to combine the constraints.
Example 6.31. Monitoring the First CPU for 90 Percent Load
 1 Set objSWbemServices = _
 2     GetObject("winmgmts:{impersonationLevel=impersonate}!\.
ootcimv2")
 3
 4 strWQL = "SELECT * FROM __InstanceModificationEvent " &_
 5          "WITHIN 5 " &_
 6          "WHERE TargetInstance ISA 'Win32_Processor' " &_
 7          "AND TargetInstance.DeviceID='CPU0' " &_
 8          "AND TargetInstance.LoadPercentage > 90"
 9
10 Set objEventSource = objSWbemServices.ExecNotificationQuery(strWQL)
11 Set objEventObject = objEventSource.NextEvent()
12 Wscript.Echo "Load Percentage on CPU0 exceeded 90%."
The scripts in Listing 6.29 and Listing 6.30 stop running after receiving a single event. You might want to have a script that continues to receive events even after the first event occurs. This requires only a minor modification to the scripts in Listing 6.29 and Listing 6.30. Simply encapsulate the call to the NextEvent method and the event notification message within an endless loop. Setting the condition statement for the loop to True ensures that the loop will never end.
So how do you stop the script when you no longer need it? If the script is running under CScript, either press CTRL+C or close the command window in which the script is running. If the script is running under WScript, you can terminate the Wscript.exe process by using Task Manager.
Example 6.32. Continually Monitoring the First CPU for 90 Percent Load
 1 strComputer = "."
 2 Set objSWbemServices = _
 3     GetObject("winmgmts:\" & strComputer & "
ootcimv2")
 4
 5 strWQL = "SELECT * FROM __InstanceModificationEvent " & _
 6          "WITHIN 5 " & _
 7          "WHERE TargetInstance ISA 'Win32_Processor' " & _
 8          "AND TargetInstance.DeviceID='CPU0' " & _
 9          "AND TargetInstance.LoadPercentage > 90"
10
11 Set objSWbemEventSource = objSWbemServices.ExecNotificationQuery(strWQL)
12
13 While True
14      Set objSWbemObject = objSWbemEventSource.NextEvent()
15      WScript.Echo "Load Percentage on CPU0 exceeded 90%."
16 Wend
The script in Listing 6.29 handled only instance creation events; the script in Listing 6.30 handled only instance modification events. Suppose you want to know when a new instance of Notepad is started, when the priority of a running instance of Notepad is changed, or when an instance of Notepad is deleted. In other words, suppose you want to be notified when any changes involving Notepad occur. You can write three separate scripts, one for each event type, but there is an easier way to do it.
The __InstanceCreationEvent, __InstanceModificationEvent, and __InstanceDeletionEvent classes are all derived from the __InstanceOperationEvent class. Creation, modification, and deletion are just special cases of the more general action — operation. If you handle instance operation events in your script by specifying the __InstanceOperationEvent class in your WQL notification query (line 7), your script will receive creation, modification, and deletion events.
You can also add code to determine which of the three possibilities actually occurred in a particular case. You do this by examining the class of the event object (line 14) and then deciding how to proceed based on the event that occurred, as shown in Listing 6.33.
Example 6.33. Monitoring the Creation, Modification, and Deletion of Notepad.exe
 1 strComputer = "."
 2 Set objSWbemServices = GetObject("winmgmts:" &_
 3     "{impersonationLevel=impersonate}!" &_
 4     "\" & strComputer & "
ootcimv2")
 5
 6 Set objEventSource = objSWbemServices.ExecNotificationQuery( _
 7     "SELECT * FROM __InstanceOperationEvent " &_
 8     "WITHIN 1 " &_
 9     "WHERE TargetInstance " &_
10     "ISA 'Win32_Process' " &_
11     "AND TargetInstance.Name = 'notepad.exe'")
12
13 Set objEventObject = objEventSource.NextEvent()
14 Select Case objEventObject.Path_.Class
15     Case "__InstanceCreationEvent"
16         Wscript.Echo "An instance of notepad.exe was just started."
17     Case "__InstanceDeletionEvent"
18         Wscript.Echo "An instance of notepad.exe was just stopped."
19     Case "__InstanceModificationEvent"
20         Wscript.Echo "An instance of notepad.exe was just modified."
21 End Select
The script in Listing 6.29 monitors a process and the script in Listing 6.30 monitors a service. It seems that each managed resource requires a separate script. As it turns out, however, you can create a single script that monitors two different types of resources. To do so, you have to make two modifications to scripts like those in Listing 6.29 and Listing 6.30, as shown in Listing 6.34.
First you have to modify the WQL by using logical ORs to register for notifications from each of the different resource types (lines 12–14).
Second you have to add code that examines the class of the TargetInstance, retrieved from the event object, to determine which of the resources the event came from, and then proceed accordingly (lines 17–22).
Example 6.34. Monitoring Both the W3SVC Service and the Notepad.exe Process
 1 strComputer = "."
 2 Set objSWbemServices = _
 3     GetObject("winmgmts:\" & strComputer & "
ootcimv2")
 4
 5 Set objSWbemEventSource = objSWbemServices.ExecNotificationQuery( _
 6     "SELECT * FROM __InstanceModificationEvent " & _
 7     "WITHIN 1 " & _
 8     "WHERE (TargetInstance " & _
 9     "ISA 'Win32_Process' " & _
10     "AND TargetInstance.Name = 'notepad.exe') " & _
11     "OR (TargetInstance " & _
12     "ISA 'Win32_Service' " & _
13     "AND TargetInstance.Name='w3svc')")
14
15 Set objSWbemObject = objSWbemEventSource.NextEvent()
16 Select Case objSWbemObject.TargetInstance.Path_.Class
17     Case "Win32_Process"
18         WScript.Echo "An instance of notepad.exe was just modified."
19     Case "Win32_Service"
20         WScript.Echo "The state of the W3SVC service was just modified."
21 End Select
The WMI monitoring scripts presented to this point use temporary event subscriptions, which exist only as long as the scripts are running. If you want to monitor resources without perpetually running a script, you need to set up a permanent event subscription.
Suppose you want to monitor the free disk space available on the busiest Microsoft Exchange servers in your enterprise. You can write a script with a temporary event subscription. However, what if the process running the script terminates? What if someone reboots one of the servers and the script fails to restart?
Clearly, it would be useful to have a solution that is more permanent (and hence more reliable) than subscriptions tied to a running process. Permanent event subscriptions provide this more permanent solution. These event subscriptions are stored in the CIM repository; canceling a subscription involves deleting it from the CIM repository. There is no associated process that, if stopped, will interrupt the subscription.
The process of handling an event can be divided into two distinct subprocesses: 1) deciding which events to handle and 2) describing the actions to be taken in response to the event. There are WMI classes that correspond to each of these subprocesses. The __EventFilter class represents the process of deciding which events to handle, and the __EventConsumer class represents the process of describing the actions to be taken in response to particular events.
Three steps are involved in setting up a permanent event subscription:
Create an __EventFilter class.
Create a class derived from __EventConsumer.
Associate the two classes with each other by creating a __FilterToConsumerBinding class.
In practice, creating the __EventFilter class is fairly straightforward. However, creating the __EventConsumer class (and the required associated WMI provider) is beyond the scope of this chapter. Fortunately, WMI provides prebuilt __EventConsumer classes that you can use. Before you can use the prebuilt __EventConsumer classes, you must register them in the CIM repository by using the mofcomp.exe tool.
Creating an instance of an __EventFilter class involves retrieving the class itself from the CIM repository by using the Get method and then calling the SpawnInstance_ method to create a “blank” instance of the class and storing a reference to it. After you have a reference to an instance of the class, you need to set the properties of the class and then use the Put_ method to actually store the instance in the CIM repository.
The most important property of __EventFilter class is its Query property. The Query property must be set to the WQL notification query that describes the events for which the instance of the __EventFilter class should filter, as shown in Listing 6.35.
Example 6.35. Creating an Instance of the __EventFilter Class
 1 strComputer = "."
 2 Set objSWbemServices = GetObject("winmgmts:" _
 3     & "{impersonationLevel=impersonate}!\" & strComputer & "
ootcimv2")
 4
 5 Set objEventFilterClass = objSWbemServices.Get("__EventFilter")
 6 Set objEventFilter = objEventFilterClass.SpawnInstance_()
 7
 8 objEventFilter.Name = "WebServiceStateModFilter"
 9 objEventFilter.QueryLanguage = "WQL"
10 objEventFilter.Query = "SELECT * FROM __InstanceModificationEvent " &_
11                        "WITHIN 600 WHERE TargetInstance " &_
12                        "ISA 'Win32_Service' " &_
13                        "AND TargetInstance.Name = 'W3SVC'"
14
15 objEventFilter.Put_()
16
As mentioned previously, creating an __EventConsumer-derived class is beyond the scope of this chapter. However, WMI includes a number of prebuilt consumer classes that you can use. These standard consumer classes are listed and described in Table 6.11.
Table 6.11. Standard Event Consumer Classes
Class | Description |
|---|---|
ActiveScriptEventConsumer | Runs a script when an event is delivered to it |
SMTPEventConsumer | Sends an e-mail message by using SMTP when an event is delivered to it |
CommandLineEventConsumer | Runs a program in the local system context when an event is delivered to it |
NTEventLogEventConsumer | Logs a message to the Windows event log when an event is delivered to it |
LogFileEventConsumer | Writes strings to a text file when an event is delivered to it |
ScriptingStandardConsumerSetting | Provides registration data common to all instances of the ActiveScriptEventConsumer consumer |
The standard consumer classes are not available for use until they have been registered in the CIM repository. For example, you will need to run the following command to register the ActiveScriptEventConsumer, which will be used in Listing 6.36.
mofcomp -N:rootcimv2 %SYSTEMROOT%system32wbemscrcons.mof
Assuming the command completes successfully, you should see output similar to the following:
Parsing MOF file: C:WINNT2system32wbemscrcons.mof
MOF file has been successfully parsed
Storing data in the repository...
Done!
Registration needs to be performed only once unless the information about ActiveScriptEventConsumer that was added to the CIM repository is explicitly removed.
Following registration of a standard consumer class, creating an instance of this class uses code similar to that used in Listing 6.35 (where an instance of the __EventFilter class was created), as shown in Listing 6.36.
Example 6.36. Creating an Instance of the __EventConsumer Class
 1 strComputer = "."
 2 strComputer = "."
 3 Set objSWbemServices = GetObject("winmgmts:" _
 4     & "{impersonationLevel=impersonate}!\" & strComputer & "
ootcimv2")
 5
 6 Set objConsumerClass = objSWbemServices.Get("ActiveScriptEventConsumer")
 7 Set objConsumer = objConsumerClass.SpawnInstance_()
 8
 9 objConsumer.Name = "RunResponseScript"
10 objConsumer.ScriptFileName = "C:scripts
esponse.vbs"
11 objConsumer.ScriptEngine = "VBScript"
12
13 objConsumer.Put_()
The purpose of the __FilterToConsumerBinding class is to associate an __EventFilter with an __EventConsumer. After that association is established, any events that the __EventFilter instance intercepts are handed off to the __EventConsumer instance so that it can act upon them.
Creating an instance of the __FilterToConsumerBinding class requires the same steps as creating instances of the __EventFilter and __EventConsumer classes. The two properties of the class that need to be set are Filter and Consumer, which are the relative object paths of the __EventFilter and __EventConsumer classes being associated, as shown in Listing 6.37.
Example 6.37. Creating an Instance of the __FilterToConsumerBinding Class
 1 strComputer = "."
 2 Set objSWbemServices = GetObject("winmgmts:" _
 3     & "{impersonationLevel=impersonate}!\" & strComputer & "
ootcimv2")
 4
 5 Set objBindingClass = objSWbemServices.Get("__FilterToConsumerBinding")
 6 Set objBindingInstance = objBindingClass.SpawnInstance_()
 7
 8 objBindingInstance.Filter = "WebServiceStateModFilter"
 9 objBindingInstance.Consumer = "RunResponseScript"
10
11 objBindingInstance.Put_()
After the __EventFilter-derived and __EventConsumer-derived instances have been created in the CIM repository and have been bound together by the __FilterToConsumerBinding class, the final step is to create the script that will run in response to a Web service status modification. This can simply be a script that displays a message when invoked by the Active Script Event Consumer.