File system management is a key part of system administration, and yet neither Windows Script Host (WSH) nor Microsoft® Visual Basic® Scripting Edition (VBScript) provides many capabilities in that area. Fortunately, you can use the Script Runtime library to manage such key file system components as disk drives, folders, and files. In addition, the Script Runtime library provides methods for reading from and writing to text files, for creating “dictionaries” (used to manage data within a script), and for encoding scripts.
In This Chapter
The two primary Microsoft scripting languages, Microsoft® Visual Basic® Scripting Edition (VBScript) and Microsoft® JScript®, were originally developed as client-side scripting languages for Microsoft® Internet Explorer. Because of this, a number of limitations were specifically built into each language. For example, neither VBScript nor JScript has inherent methods for performing file management tasks such as copying, moving, or deleting files. This was done to protect consumers: Most visitors to a Web site would not appreciate having a script on a Web page begin deleting files from their hard drives.
However, scripting began to rapidly evolve from a client-side technology used primarily for such things as HTML “rollovers” (for example, changing the color of a font when you pass the mouse over a hyperlink). With the advent of Active Server Pages, Web developers required the ability to perform file management on the server. With the advent of Windows Script Host (WSH), system administrators required the ability to perform file management outside the Web browser.
In response to these needs, Microsoft released the Script Runtime library. The Script Runtime library is a single dynamic-link library (DLL), scrrun.dll, that provides script writers with a number of file system management capabilities, including the ability to:
Retrieve information about the file system, including disk drives, files, and folders.
Copy, move, and delete files and folders.
Create, read from, and write to text files.
In addition to these file management capabilities, the Script Runtime library also features the ability to create dictionaries (data structures that function similar to collections) and to encode scripts, effectively shielding the code from prying eyes.
Note
This chapter discusses the FileSystemObject (used for file management) and the Dictionary object, but not the Script Encoder object.
The Script Runtime library is a part of Windows® 2000. The Script Runtime library is also installed anytime you install or upgrade a number of Microsoft applications, including the following:
Windows Script Host
VBScript
Internet Explorer
Microsoft Office
As the name implies, the FileSystemObject (FSO) is designed to help you manage the file system. The FileSystemObject allows you to retrieve information about essential file system elements, including disk drives, folders, and files; it also includes methods that allow you to perform common administrative tasks, such as copying, deleting, and moving files and folders. In addition, the FileSystemObject enables you to read from and write to text files.
It is worth noting that the name FileSystemObject is a bit of a misnomer, simply because the FileSystemObject actually includes a number of objects, each designed for a specific purpose. The individual objects that make up the FileSystemObject are listed in Table 4.1.
Table 4.1. Objects That Make Up the FileSystemObject
Object | Description |
|---|---|
Drive | Represents a drive or collection of drives on the system. |
File | Represents a file or collection of files in the file system. |
Folder | Represents a folder or collection of folders in the file system. |
TextStream | Represents a stream of text that is read from, written to, or appended to a text file. |
Each of these objects will be examined in detail in this chapter.
Disk drive management is an important part of system administration. As a system administrator, it is important for you to know the disk drives that are installed on a computer; it is equally important for you to know the characteristics of those disk drives, including such things as the drive type (floppy disk, hard disk, CD-ROM), drive size, and the amount of free disk space available on each drive.
As a script writer, you have two primary options for managing disk drives: the FileSystemObject and Windows Management Instrumentation (WMI). In general, WMI is the preferred technology for scripts that manage disk drives, for several reasons:
WMI can return a number of properties that cannot be obtained by using the FileSystemObject, including physical characteristics such as heads, sectors, and cylinders.
WMI can return a targeted set of drives (for example, only hard drives).
The FileSystemObject cannot return a targeted set of drives. Instead, the FileSystemObject requires the script to return a collection of all the drives and then iterate through the collection to pick out the drives of interest. (You can, however, use the FileSystemObject to return an individual drive simply by specifying the appropriate drive letter.)
WMI can be used to return drive information from remote computers.
The FileSystemObject cannot be run on remote computers unless it is used in conjunction with the WshController object.
Although WMI might be the preferred technology for returning disk drive information, there are at least two good reasons to be familiar with the FileSystemObject. First, you might have older computers running an operating system that does not have WMI installed. (For example, Microsoft® Windows® 98 did not ship with WMI, although it is possible to download and install WMI on this operating system.)
Second, and perhaps most important, script writers have typically used the FileSystemObject whenever they wrote a script requiring disk drive information. Because of that, you are likely to encounter the FileSystemObject when reading scripts written by other script writers.
Before you can manage disk drives on a computer, you need to know which disk drives are actually available on that computer. The FileSystemObject allows you to return a collection of all the drives installed on a computer, including removable drives and mapped network drives (in other words, any drive with a drive letter).
To return this collection, create an instance of the FileSystemObject, and then create a reference to the Drives property. After the collection has been returned, you can use a For Each loop to iterate through the collection.
For example, the script in Listing 4.1 returns a collection of all the drives installed on a computer and then echoes the drive letter for each drive in the collection.
Example 4.1. Enumerating All the Drives on a Computer
1 Set objFSO = CreateObject("Scripting.FileSystemObject")
2 Set colDrives = objFSO.Drives
3 For Each objDrive in colDrives
4     Wscript.Echo "Drive letter: " & objDrive.DriveLetter
5 Next
For a complete list of drive properties available using the FileSystemObject, see Table 4.2 later in this chapter.
Table 4.2. Disk Drive Properties Available by Using the FileSystemObject
Property | Description |
|---|---|
AvailableSpace | Reports the amount of free space on the drive, in bytes. To report the amount of available space in kilobytes, divide this value by 1,024. To report the amount of available space in megabytes, divide this value by 1,048,576 (1,024 * 1,024). The AvailableSpace property reports the amount of space available to the user running the script. If disk quotas are in use on the drive, this value might be less than the total amount of free space available on the drive. |
DriveLetter | Drive letter assigned to the drive. The drive letter does not include the trailing colon; thus, a floppy disk drive will be reported as A rather than A:. |
DriveType | Integer value indicating the type of drive. Values include:
|
FreeSpace | Reports the amount of free space on the drive, in bytes. To report the amount of free space in kilobytes, divide this value by 1,024. To report the amount of free space in megabytes, divide this value by 1,048,576 (1,024 * 1,024). Unlike the AvailableSpace property, FreeSpace reports the total amount of free space available on the drive, regardless of whether disk quotas have been enabled. |
FileSystem | Type of file system used on the drive (FAT, FAT 32, NTFS). |
IsReady | Indicates whether a drive is accessible. This value will be False for floppy disk drives or CD-ROM drives where no medium is inserted. |
Path | Path to the drive. For local drives, this will be the drive letter and the trailing colon (for example, A:). For mapped network drives, this will be the Universal Naming Convention (UNC) path for the drive (for example, \Server1SharedFolder). |
RootFolder | Path to the root folder on the drive. |
SerialNumber | Serial number assigned to the drive by the manufacturer. For floppy disk drives or mapped network drives, this value will typically be 0. |
ShareName | Share name assigned to a mapped network drive. |
TotalSize | Reports the total size of the drive, in bytes. To report the total size in kilobytes, divide this value by 1,024. To report the total size in megabytes, divide this value by 1,048,576 (1,024 * 1,024). |
VolumeName | Volume name (if any) assigned to the drive. |
If you know in advance which drive you want to bind to (for example, drive C, or the shared folder \accounting eceivables), you can use the GetDrive method to bind directly to the drive. This allows you to retrieve information for a specific drive, without having to return and iterate through an entire collection.
The GetDrive method requires a single parameter: the driver letter of the drive or the UNC path to the shared folder. To specify a drive letter, you can use any of the following formats:
C
C:
C:
The script shown in Listing 4.2 creates an instance of the FileSystemObject, uses the GetDrive method to bind directly to drive C, and then echoes the amount of available space on the drive.
Example 4.2. Binding to a Single Drive
1 Set objFSO = CreateObject("Scripting.FileSystemObject")
2 Set objDrive = objFSO.GetDrive("C:")
3 Wscript.Echo "Available space: " & objDrive.AvailableSpace
Notice that no For Each loop is required to retrieve the drive properties. This is because the script returns an individual drive object rather than a collection of drive objects. Therefore, there is no collection to iterate through.
The Drives collection is typically used for inventory or monitoring purposes; as a system administrator, you need to know what drives are available on a computer, as well as details such as the drive serial number and the amount of free space on the drive. After you have returned a drives collection or an individual drive object, you can retrieve any of the properties shown in Table 4.2.
To enumerate the drives installed on a computer, create an instance of the FileSystemObject, create a reference to the Drives property, and then use a For Each loop to iterate through the set of drives. For each drive in the collection, you can echo any or all of the individual drive object properties shown in Table 4.2.
The script in Listing 4.3 echoes all the drive properties for every drive installed on a computer.
Example 4.3. Enumerating Disk Drive Properties
 1 Set objFSO = CreateObject("Scripting.FileSystemObject")
 2 Set colDrives = objFSO.Drives
 3 For Each objDrive in colDrives
 4     Wscript.Echo "Available space: " & objDrive.AvailableSpace
 5     Wscript.Echo "Drive letter: " & objDrive.DriveLetter
 6     Wscript.Echo "Drive type: " & objDrive.DriveType
 7     Wscript.Echo "File system: " & objDrive.FileSystem
 8     Wscript.Echo "Is ready: " & objDrive.IsReady
 9     Wscript.Echo "Path: " & objDrive.Path
10     Wscript.Echo "Root folder: " & objDrive.RootFolder
11     Wscript.Echo "Serial number: " & objDrive.SerialNumber
12     Wscript.Echo "Share name: " & objDrive.ShareName
13     Wscript.Echo "Total size: " & objDrive.TotalSize
14     Wscript.Echo "Volume name: " & objDrive.VolumeName
15 Next
When the script in Listing 4.3 runs under CScript, information similar to the following appears in the command window:
Available space: 10234975744
Drive letter: C
Drive type: 2
File system: NTFS
Free space: 10234975744
Is ready: True
Path: C:
Root folder: C:
Serial number: 1343555846
Share name:
Total size: 20398661632
Volume name: Hard Drive
The script in Listing 4.3 has a potential flaw in it: If there is no floppy disk in the floppy disk drive that is being checked or no CD in the CD-ROM drive, the script will fail with a “Drive not ready” error. Drives that are not ready create problems for scripts that use the FileSystemObject; although the FileSystemObject can identify the existence of those drives, your script will fail if it attempts to access disk drive properties such as AvailableSpace or FreeSpace.
If a drive is not ready (which typically means that a disk has not been inserted into a drive that uses removable disks), you can retrieve only the following four drive properties:
DriveLetter
DriveType
IsReady
ShareName
Any attempt to retrieve the properties of another drive will trigger an error. Fortunately, the IsReady property allows the script to check whether a drive is ready before attempting to retrieve any of the properties that can trigger an error. The IsReady property returns a Boolean value; if the value is True, the drive is ready, and you can retrieve all the properties of the drive. If the value is False, the drive is not ready, and you can return only DriveLetter, DriveType, IsReady, and ShareName.
The script in Listing 4.4 returns a collection of disk drives installed on a computer. For each drive, the script uses the IsReady property to ensure that the drive is ready. If it is, the script echoes the drive letter and the amount of free space. If the drive is not ready, the script echoes only the drive letter, one of the four properties that can be accessed even if a drive is not ready.
Example 4.4. Verifying That a Drive is Ready
 1 Set objFSO = CreateObject("Scripting.FileSystemObject")
 2 Set colDrives = objFSO.Drives
 3 For Each objDrive in colDrives
 4     If objDrive.IsReady = True Then
 5         Wscript.Echo "Drive letter: " & objDrive.DriveLetter
 6         Wscript.Echo "Free space: " & objDrive.FreeSpace
 7     Else
 8         Wscript.Echo "Drive letter: " & objDrive.DriveLetter
 9     End If
10 Next
Disk drive properties such as FreeSpace and TotalSize provide global information that is important to system administrators. However, disk drive information is necessary, but not sufficient, for managing a file system. Although it is important to know which drive a file is stored on, you also need to know the folder in which that file is stored. In addition, many other system management tasks take place at the folder level: Folders are copied, folders are moved, folders are deleted, folder contents are enumerated.
The FileSystemObject can return detailed information about the folders on a disk drive. In addition, the FileSystemObject provides a number of methods for carrying out such tasks as copying, moving, and deleting folders, and for enumerating the files and subfolders within a folder.
In the Windows Shell, folders are Component Object Model (COM) objects. This means that, before you can access the properties of an individual folder, you must create an object reference to that folder, a process commonly referred to as binding. You can bind to a folder by creating an instance of the FileSystemObject and then using the GetFolder method to connect to the folder.
When using the GetFolder method, you must:
Specify the path name to the folder. The path can be referenced by either a local path or a UNC path (for example, \accounting eceivables). However, you cannot use wildcards within the path name. In addition, you cannot create a single object reference that binds to multiple folders at the same time. A code statement similar to the following results in a compilation error:
objFSO.GetFolder("C:FSO", "C:Scripts")If you need to work with multiple folders, you either need to use WMI (which can return a collection of folders) or create a separate object reference for each folder.
Use the Set keyword when assigning the path to a variable. The Set keyword is required because it indicates that the variable in question is an object reference.
For example, the script in Listing 4.5 binds to the folder C:FSO.
Example 4.5. Binding to a Folder
1 Set objFSO = CreateObject("Scripting.FileSystemObject")
2 Set objFolder = objFSO.GetFolder("C:FSO")
Although wildcard characters are not allowed, you can use the dot (.) to bind to the current folder, dot-dot (..) to bind to the parent folder of the current folder, and the backslash () to bind to the root folder. For example, the following code statement binds to the current folder:
Set objFolder = objFSO.GetFolder(".")
Most folder operations, including copying, moving, and deleting, require the specified folder to exist before the operation can be carried out; after all, a script cannot copy, move, or delete a folder that does not exist. If the script attempts to bind to a nonexistent folder, the script will fail with a “Path not found” error.
To avoid this problem, you can use the FolderExists method to verify that a folder exists before attempting to bind to it. FolderExists takes a single parameter (the path name to the folder) and returns a Boolean value: True if the folder exists, False if the folder does not.
For example, in the script in Listing 4.6, the FolderExists method is used to verify the existence of the folder C:FSO. If FolderExists equals True, the script uses the GetFolder method to bind to the folder. If FolderExists is False, the script echoes the message “Folder does not exist.”
It is unlikely that you will ever sit down, implement your file system infrastructure (that is, your folders and subfolders), and then never have to touch that infrastructure again. Instead, a file system tends to be dynamic: because of ever-changing needs, existing folders might be deleted and new folders might be created. For example, if your organization provides users with storage space on file servers, you need to create a new folder each time a new user account is created.
The FileSystemObject gives script writers the ability to programmatically create folders, a capability that can make your scripts even more powerful and more useful. For example, the script in Listing 4.6 checks to see whether a specified folder exists. If the folder exists, the script uses the GetFolder method to bind to the folder. If the folder does not exist, the script echoes a message to that effect.
Although this approach prevents the script from crashing, you might prefer that your script create the folder rather than simply report that the folder does not exist. To do this, create an instance of the FileSystemObject, and then call the CreateFolder method, passing the complete path to the new folder as the sole parameter. For example, the script in Listing 4.7 creates a new folder named C:FSO.
Example 4.7. Creating a New Folder
1 Set objFSO = CreateObject("Scripting.FileSystemObject")
2 Set objFolder = objFSO.CreateFolder("C:FSO")
If the folder already exists, a “File exists” error will occur. Because of that, you might want to check for the existence of the folder before trying to create (or, in that case, re-create) it.
Note
The FileSystemObject can only create folders on the local computer. If you need to create folders on a remote computer, you will need to use the WshController object. Alternatively, you can create a folder locally and then use WMI to move that folder to the remote computer. (The folder must be created and then moved because WMI does not have a method for creating folders.)
From time to time, folders need to be deleted. For example, you might have a file server that includes a folder for each individual user. When a user leaves the organization, the folder belonging to that user should be deleted; this helps ensure that the orphaned folder does not use up valuable disk space. Likewise, you might have a script that stores temporary files within a folder. Before the script finishes, you might want to delete that folder and thus remove all the temporary files.
The DeleteFolder method provides a way to delete a folder and all its contents. The DeleteFolder method requires a single parameter: the path of the folder to be deleted. For example, the script in Listing 4.8 deletes the folder C:FSO and everything in it.
Example 4.8. Deleting a Folder
1 Set objFSO = CreateObject("Scripting.FileSystemObject")
2 objFSO.DeleteFolder("C:FSO")
The DeleteFolder method deletes all items immediately; it does not ask for confirmation of any kind or send the items to the Recycle Bin.
One of the main advantages of using scripts as a management tool is that scripts can operate on multiple items at the same time. For example, rather than delete a series of folders one by one, you can use scripts to delete a set of folders in a single operation.
The FileSystemObject allows you to use wildcard characters to delete a specific set of folders. For example, suppose you have the folder structure shown in Figure 4.1 and you want to delete all the subfolders beginning with the letter S.

This can be done by using the following command; when run against the sample folder structure, the command deletes the folders Scripts, Subfolder1, and Subfolder2:
objFSO.DeleteFolder("C:FSOS*")
This command deletes all the subfolders beginning with the letters Su, meaning only Subfolder1 and Subfolder2 will be deleted:
objFSO.DeleteFolder("C:FSOSu*")
Wildcard characters can appear only in the final part of the path parameter. For example, this command, which features a wildcard character in the middle of the path parameter, generates a “Path not found” error:
objFSO.DeleteFolder("C:*Subfolder1")
The ability to copy a folder, and every item contained within that folder, is important in system administration. Sometimes you need to copy folders in order to create backups; by having the same folder on Computer A that you have on Computer B, you are less likely to experience data loss should Computer B unexpectedly fail. At other times, you might want to deploy all the files contained in a particular folder to a large number of computers. Using a script to copy this folder to each computer is far more efficient than performing the task manually.
The CopyFolder method allows you to copy a folder and its contents to another location. When used without any wildcard characters, the CopyFolder method functions like the Xcopy /E command: It copies all the files and all the subfolders, including any empty subfolders. The CopyFolder method requires two parameters:
Source folder (the folder being copied). This folder can be specified either as a local path (C:Scripts) or as a UNC path (\helpdeskscripts).
Destination folder (the folder that will hold the copied information). This folder can also be specified either as a local path or as a UNC path. If the destination folder does not exist, the script automatically creates the folder.
In addition, the CopyFolder method accepts an optional third parameter, Overwrite. When this parameter is set to True, the default setting, the script overwrites any existing folders in the destination folder. For example, if you are copying a folder named Scripts, and the destination already contains a folder by that name, the destination folder will be replaced by the newly copied information. By setting this parameter to False, the script will not overwrite existing information and instead generates a run-time error.
Note
The CopyFolder method stops the moment it encounters an error, even if the script contains an On Error Resume Next statement. For example, suppose the script has 100 subfolders to copy, and CopyFolder successfully copies 3 of those subfolders before encountering an error. At that point, the CopyFolder method ends and the script fails; the script will not even attempt to copy the remaining 97 subfolders.
The script in Listing 4.9 uses the CopyFolder method to copy the contents of C:Scripts to C:FSO, overwriting any existing files in the destination folder. Note that this will not result in a folder named C:FSOScripts; instead, the folder C:FSO will simply contain the same files and folders as C:Scripts. To create a folder named C:FSOScripts, you would need to specify C:FSOScripts as the destination folder.
Example 4.9. Copying a Folder
1 Const OverWriteFiles = True
2 Set objFSO = CreateObject("Scripting.FileSystemObject")
3 objFSO.CopyFolder "C:Scripts" , "C:FSO" , OverWriteFiles
Note
Because CopyFolder is a single operation, there is no way to track its progress; you simply have to wait until the operation has finished. If you want to monitor the progress of the copy command, you should use the Shell Application object instead. This object is discussed in “Files and Folders” in this book.
The CopyFolder command copies the files stored in a folder as well as the files stored in any subfolders of that folder. This can be a problem; after all, what if you want to copy only the files in C:FSO and not all the files stored in C:FSOSubfolder1, C:FSOSubfolder2, and C:FSOSubfolder3?
Unfortunately, there is no straightforward method for copying the files in a parent folder without also copying the files stored in child folders. You can use wildcard characters to limit the set of subfolders that are copied; for example, the following command copies only those folders that start with the letters log. However, when you use wildcard characters, no files other than those in the specified folders will be copied, not even files that begin with the letters log:
objFSO.CopyFolder "C:ScriptsLog*" , "C:Archive", True
When the preceding line of code is run, the folders C:ScriptsLogs and C:ScriptsLogfiles are copied, along with all the files stored within those folders. However, the files within the C:Scripts folder are not copied.
When you use the CopyFolder method, you cannot copy only the files in a folder without also copying the files in any subfolders. To copy only the files and not the subfolders, use the CopyFile method instead. (This method is discussed later in this chapter.)
When you copy a folder from one location to another, you end up with duplicate copies of the information. Sometimes that is exactly what you want. On other occasions, however, you do not want two copies of the information; instead, you want to move the sole copy from Computer A to Computer B, or from hard disk C to hard disk D.
Moves such as this are often done to free disk space on a particular drive; for example, you might periodically move seldom-accessed folders to an archive drive. Alternatively, you might have a monitoring script that logs information to the local computer. When monitoring is complete, you might want that information uploaded to a central monitoring station and then deleted from the local computer. That way, the local computer will be prepared for the next round of monitoring.
The MoveFolder method accepts two parameters:
Source folder (the folder to be moved). This folder can be specified either as a local path or as a UNC path.
Destination folder (the location where the folder is to be moved). This folder can be specified either as a local path or as a UNC path.
If the destination folder does not exist, the source folder will be moved. If the destination folder already exists, however, the move operation will fail. You cannot use MoveFolder to overwrite an existing folder.
The script in Listing 4.10 moves the local folder, C:Scripts, to the shared folder \helpdeskmanagement.
Example 4.10. Moving a Folder
1 Set objFSO = CreateObject("Scripting.FileSystemObject")
2 objFSO.MoveFolder "C:Scripts" , "\helpdeskmanagement"
Note that the MoveFolder method cannot perform any sort of rollback should the script fail. For example, suppose a network connection fails before a script has been able to move all the files from one computer to another. In a case such as that, you will end up with some files on Computer A, some files on Computer B, and possibly even a file or two lost in transit. However, there is no way for MoveFolder to roll back the failed transactions and restore the two computers to their previous states.
Because of that, you might want to use two methods, CopyFolder and DeleteFolder, when transferring folders and their contents across the network. You can use CopyFolder to copy the folder from Computer A to Computer B. If the copy operation succeeds, you can then use DeleteFolder to delete the folder on Computer A. If the operation fails, you can cancel the delete command and rest assured that the folder and all its contents are still safely stored on Computer A.
The FileSystemObject does not include a method, such as RenameFolder, that provides an obvious way to rename a folder. However, you can rename a folder by using the MoveFolder method and maintaining the same relative location. For example, suppose you have a folder with the following path:
C:ScriptsPerformanceMonitoringServersDomain ControllersCurrent Logs
If you rename the folder by using the Rename command in Windows Explorer, the path remains identical except for the endpoint, the folder itself:
C:ScriptsPerformanceMonitoringServersDomain ControllersArchived Logs
The MoveFolder method enables you to achieve the same end result by moving the folder from C:ScriptsPerformanceMonitoringServersDomain ControllersCurrent Logs to C:ScriptsPerformanceMonitoringServersDomain ControllersArchived Logs. The net result is exactly the same as that of using Windows Explorer to rename the folder.
For example, the script in Listing 4.11 uses MoveFolder to rename the folder C:FSOSamples to C:FSOScripts. Before the script runs, Samples is the only subfolder in C:FSO. After the script runs, Scripts is the only subfolder in C:FSO. Furthermore, Scripts contains all the files and subfolders previously contained in Samples.
Because folders are COM objects, they have properties that can be retrieved and enumerated. To retrieve detailed information about a specified folder, you can use the Folder object, one of the components of the FileSystemObject. The properties of the Folder object are listed in Table 4.3.
Table 4.3. Folder Properties
Property | Description |
|---|---|
Attributes | Bitmap containing the attributes for the folder. For more information, see “Managing Folder Attributes” later in this chapter. |
DateCreated | Date that the folder was created. |
DateLastAccessed | Date of the last time a user accessed the contents of the folder. |
DateLastModified | Date of the last time a user modified the properties of the folder. |
Drive | Drive letter and trailing colon (for example, C:) representing the drive on which the folder is stored. |
Files | Collection containing a file object for each file stored in the folder. |
IsRootFolder | Boolean value indicating whether the folder is a root folder (such as C:). |
Name | Folder name, not including path information. For example, the Name of the folder C:WindowsSystem32 is System32. |
ParentFolder | Name of the folder in which this folder is stored. For example, the ParentFolder of C:WindowsSystem32 is Windows; the ParentFolder of C:Scripts is C:. |
Path | Full path of the folder (for example, C:WindowsSystem32). |
ShortName | MS-DOS®–style name of the folder, using the 8.3 naming convention. For example, the folder C:WindowsProgram Files might have the ShortName Progra~1. |
ShortPath | MS-DOS–style path to the folder, using the 8.3 naming convention. For example, the folder C:WindowsProgram Files might have the ShortName C:WindowsProgra~1. |
Size | Total size, in bytes, of the contents of the folder. This includes the files stored within the folder as well as all the files stored within any subfolders of the folder. |
SubFolders | Collection of all the top-level subfolders contained within this folder. Subfolders contained within these subfolders are not included in the collection. |
Type | String describing the folder type. This is almost always “File Folder”. |
To retrieve the properties of a folder, a script must:
Create an instance of the FileSystemObject.
Use the GetFolder method to bind to an individual folder.
Echo (or otherwise manipulate) the properties shown in Table 4.3.
When working with folder properties, note that the Files property and the Subfolders property both return collections rather than a single item. In addition, the Attributes property is returned as a bitmap value. A more detailed explanation of how to work with each of these properties is provided in subsequent sections of this chapter.
The script in Listing 4.12 uses the GetFolder method to bind to the folder C:FSO and then echoes a number of properties for that folder.
Example 4.12. Binding to a Specific Folder Using the GetFolder Method
 1 Set objFSO = CreateObject("Scripting.FileSystemObject")
 2 Set objFolder = objFSO.GetFolder("C:FSO")
 3 Wscript.Echo "Date created: " & objFolder.DateCreated
 4 Wscript.Echo "Date last accessed: " & objFolder.DateLastAccessed
 5 Wscript.Echo "Date last modified: " & objFolder.DateLastModified
 6 Wscript.Echo "Drive: " & objFolder.Drive
 7 Wscript.Echo "Is root folder: " & objFolder.IsRootFolder
 8 Wscript.Echo "Name: " & objFolder.Name
 9 Wscript.Echo "Parent folder: " & objFolder.ParentFolder
10 Wscript.Echo "Path: " & objFolder.Path
11 Wscript.Echo "Short name: " & objFolder.ShortName
12 Wscript.Echo "Short path: " & objFolder.ShortPath
13 Wscript.Echo "Size: " & objFolder.Size
14 Wscript.Echo "Type: " & objFolder.Type
When this script runs under CScript, output similar to the following appears in the command window:
Date created: 2/7/2002 10:27:50 AM
Date last accessed: 2/13/2002 8:57:18 AM
Date last modified: 2/13/2002 8:57:18 AM
Drive: C:
Is root folder: False
Name: FSO
Parent folder: C:
Path: C:FSO
Short name: FSO
Short path: C:FSO
Size: 0
Type: File Folder
File systems typically support the concept of attributes, information about a file or folder that goes beyond the folder name and size. For example, if you right-click a folder in Windows Explorer and then click Properties, you can access the attributes for that folder. Figure 4.2 shows a folder with the following attributes set:
Read-only
Hidden
Ready for archiving
Compressed

The FileSystemObject can be used to return several important attributes of a folder. These attributes, and their FileSystemObject values, are listed in Table 4.4.
Table 4.4. Folder Attributes Used by the FileSystemObject
Value | Description | |
|---|---|---|
Hidden | 2 | Indicates that the folder is hidden, and not visible by default in My Computer or Windows Explorer. |
System | 4 | Indicates that the folder is a System folder. In general, it is a good idea not to modify the properties of a system folder. |
Directory | 16 | Standard value applied to all folders. All folders accessed by the FileSystemObject will have, at a minimum, the bit value 16. |
Archive | 32 | Archive bit used by backup programs to determine the files and folders that need to be backed up. Enabling the archive bit will ensure that the folder is backed up during the next incremental backup. Disabling the archive bit will prevent the folder from being backed up during the next incremental backup. |
Compressed | 2048 | Indicates whether Windows compression has been used on the folder. |
The values listed in Table 4.4 are the only values that can be retrieved or configured by using the FileSystemObject. Although this seems simple enough, the data returned to you by the FileSystemObject can be confusing at first. For example, if you echo the value of the Attributes property for a folder, you might see a value like 20, a value that does not appear in the list of valid attribute values.
In addition, you will receive only a single value, even if a folder has all possible attributes (that is, it is a hidden, compressed system folder ready for archiving). In a case such as this, your script will not display the values 2, 4, 16, 32, and 2048 but instead will display the value 2102. This is because attribute values are always returned in the form of a bitmap.
Note
With attributes, the term bitmap refers to the way data is stored and returned. It should not be confused with bitmap images, such as .BMP files.
Working with Bitmaps
A bitmap is like a set of switches that can be either on or off. If a particular switch is off, that switch has the value 0. If the switch is on, at least in the case of a folder object, it has one of the values shown in Table 4.4. The value of the bitmap is equal to the sum of all the switches.
For example, a highly simplified illustration of a folder object bitmap is shown in Figure 4.3. In this example, only one individual switch, Directory, is on. Directory has the value 16. Because the other switches are off, each has the value 0. The total value for the bitmap is thus 16. If you queried the Attributes value for this folder, the script would return 16.
By comparison, the folder object shown in Figure 4.4 has three switches activated: Hidden (with the value 2), Directory (with the value 16), and Compressed (with the value 2048). The value for this bitmap would thus be 2 + 16 + 2048, or 2066. This is also the value that would be returned by a script querying this folder for its Attributes value.
Bitmaps are designed so that there is only one possible way to achieve a given value. The only way for a folder attribute to return the value 2066 is for it to be a hidden and compressed folder. It is mathematically impossible to return a 2066 with any other combination of attributes.
This design enables you to take the return value and determine which switches have been set and which ones have not; in turn, this allows you to determine the attributes of the folder. If you receive the return value 2066, you know that the only way to receive that value is to have a hidden and compressed folder.
Fortunately, you do not have to perform any sort of mathematical calculations to derive the individual attributes. Instead, you can use the logical AND operator to determine whether an individual switch is on or off. For example, the following code sample checks to see whether the folder is hidden; if it is, the script echoes the message “Hidden folder.”
If objFolder.Attributes AND 2 Then
    Wscript.Echo "Hidden folder."
End If
Although the If Then statement might appear a bit strange, it makes a little more sense when read like this: “If the attributes switch with the value 2 is on, then ....” Likewise, this statement would read, “If the attributes switch with the value 16 is on, then ....”
If objFolder.Attributes AND 16 Then
The script in Listing 4.13 binds to the folder C:FSO and then echoes the folder attributes.
Example 4.13. Enumerating Folder Attributes
 1 Set objFSO = CreateObject("Scripting.FileSystemObject")
 2 Set objFolder = objFSO.GetFolder("C:FSO")
 3 If objFolder.Attributes AND 2 Then
 4     Wscript.Echo "Hidden folder."
 5 End If
 6 If objFolder.Attributes AND 4 Then
 7     Wscript.Echo "System folder."
 8 End If
 9 If objFolder.Attributes AND 16 Then
10    Wscript.Echo "Folder."
11 End If
12 If objFolder.Attributes AND 32 Then
13     Wscript.Echo "Archive bit set."
14 End If
15 If objFolder.Attributes AND 2048 Then
16     Wscript.Echo "Compressed folder."
17 End If
As explained in “Working with Bitmaps,” individual folder attributes can be likened to switches. If the switch for Hidden is on, the folder is a hidden folder. If the switch for Hidden is off, the folder is not a hidden folder.
This analogy can be carried further by noting that light switches are typically under your control: you can choose to turn them on, or you can choose to turn them off. The same thing is true of folder attributes: as with other switches, you can turn these attribute switches on, or you can turn them off.
You can use scripts to toggle these switches on or off (for example, to hide or unhide a folder). The easiest way to change folder attributes is to use the following procedure:
Use the GetFolder method to bind to the folder.
Check for the value of the attribute you want to change.
For example, if you want to unhide a folder, check to see whether the folder is hidden.
If the folder is hidden, use the logical operator XOR to toggle the switch and change it to not hidden. If the folder is not hidden, be careful not to use XOR. If you do, the switch will be toggled, and the folder will end up hidden.
For example, the script in Listing 4.14 uses the AND operator to check whether the switch with the value 2 (hidden folder) has been set on the folder C:FSO. If it has, the script then uses the XOR operator to turn the switch off and unhide the folder.
Except for a few rare cases, folders exist solely to act as storage areas for files. Sometimes these folders are required by the operating system; for example, the operating system expects to find certain files in certain folders. In other cases, folders are created as a way to help system administrators manage their computers, or as a way to help users manage their documents. System administrators might place their scripts in a folder named Scripts and their troubleshooting tools in a folder named Diagnostic Tools; users might place their budget spreadsheets in a folder named Budgets and their payroll information in a folder named Timecards.
Of course, the fact that a folder exists is often of limited use; you must also know what files are stored within that folder. Administrators need to know whether a particular script is stored in C:Scripts; users need to know whether a particular spreadsheet is stored in C:Budgets.
The Folder object includes a Files property that returns a collection of all the files stored in a folder. To retrieve this collection, a script must:
Create an instance of the FileSystemObject.
Use the GetFolder method to bind to the appropriate folder.
Set an object reference to the Files property of the folder.
Use a For Each loop to enumerate all the files and their properties. (File properties available using the FileSystemObject are shown in Table 4.5.) The script does not have to bind to each file individually in order to access the file properties.
Table 4.5. File Object Properties
Property
Description
Attributes
Bitmap containing the attributes for the file.
DateCreated
Date that the file was created.
DateLastAccessed
Date of the last time a user accessed the file.
DateLastModified
Date of the last time a user modified the file.
Drive
Drive letter and trailing colon (for example, C:) representing the drive on which the file is stored.
Name
File name, not including path information. For example, the Name of the file C:WindowsSystem32Scrrun.dll is Scrrun.dll.
ParentFolder
Name of the folder in which the file is stored. For example, the ParentFolder of C:WindowsSystem32Scrrun.dll is Windows.
Path
Full path of the file (for example, C:WindowsSystem32Scrrun.dll).
ShortName
MS-DOS–style name of the file, using the 8.3 naming convention. For example, the file C:MySpreadsheet.xls might have the ShortName MySpre~1.xls.
ShortPath
MS-DOS–style path to the file, using the 8.3 naming convention. For example, the file C:WindowsProgram FilesMyScript.vbs might have the ShortName C:WindowsProgra~1MyScript.vbs.
Size
Total size, in bytes, of the contents of the file.
Type
String describing the file type, as recorded in the registry (for example, “Microsoft Word Document”).
For example, the script in Listing 4.15 retrieves a collection of files found in the folder C:FSO and then echoes the name and size (in bytes) of each file.
Example 4.15. Retrieving Properties for Each File in a Folder
1 Set objFSO = CreateObject("Scripting.FileSystemObject")
2 Set objFolder = objFSO.GetFolder("C:FSO")
3 Set colFiles = objFolder.Files
4 For Each objFile in colFiles
5     Wscript.Echo objFile.Name, objFile.Size
6 Next
As with most collections, you have no control over the order in which information is returned; that is, you cannot specify that files be sorted by name, by size, or by any other criteria. If you want to sort the file collection in a particular way, you need to copy the collection to an array, a Dictionary, or a disconnected recordset and then sort the items. For more information on arrays, see “VBScript Primer” in this book. For information on disconnected recordsets, see “Creating Enterprise Scripts” in this book.
In addition to knowing which files are stored in a folder, you need to know which subfolders are stored in a folder; this allows you to develop a complete picture of the folder infrastructure. The Folder object includes a Subfolders property that returns a collection consisting of the top-level subfolders for a folder.
Top-level subfolders are those folders contained directly within a folder; subfolders contained within those subfolders are not part of the collection. For example, in the sample folder structure shown in Figure 4.5, only Subfolder 1 and Subfolder 2 are top-level subfolders of the folder Scripts. As a result, only Subfolder 1 and Subfolder 2 are returned as part of the Subfolders property.

To obtain a subfolder collection, a script must:
Create an instance of the FileSystemObject.
Use the GetFolder method to bind to a folder.
Create an object reference to the Subfolders property. This is required because collections are considered objects.
After you have obtained the object reference to the collection, you can then use a For Each loop to enumerate each of the subfolders in that collection. The script in Listing 4.16 binds to the folder C:FSO and then echoes the name and size of each subfolder. In addition to the folder name, you can echo any of the folder properties shown in Table 4.3.
Example 4.16. Enumerating Subfolders
1 Set objFSO = CreateObject("Scripting.FileSystemObject")
2 Set objFolder = objFSO.GetFolder("C:FSO")
3 Set colSubfolders = objFolder.Subfolders
4 For Each objSubfolder in colSubfolders
5     Wscript.Echo objSubfolder.Name, objSubfolder.Size
6 Next
Depending on how your file system has been designed, simply knowing the top-level subfolders of a folder might provide sufficient information to map the folder infrastructure. In most file systems, however, folders are nested within folders that are, in turn, nested within other folders. The Subfolders collection can tell you that the folder C:Accounting contains two subfolders: 2001 and 2002. However, it cannot tell which subfolders, if any, are contained within C:Accounting2001 and C:Accounting2002.
Fortunately, you can use recursion to enumerate all the subfolders within a set of subfolders. For example, the Subfolders collection, as shown in Listing 4.16, returns only the two top-level subfolders (Subfolder 1 and Subfolder 2) in the folder structure shown in Figure 4.6.
To return the complete set of subfolders (for example, Subfolder 1A and Subfolder 1B), you need to use a recursive function, a function that can call itself. For more information about recursion, see “VBScript Primer” in this book.
An example of a script that can enumerate all the subfolders of a folder (as well as any subfolders within those subfolders) is shown in Listing 4.17. This script:
Creates an instance of the FileSystemObject.
Uses the GetFolder method to bind to the folder C:Scripts.
GetFolder is used to return a folder object for C:Scripts. In turn, the path C:Scripts is passed as a parameter to the recursive subroutine ShowSubfolders. This subroutine will enumerate all the subfolders of C:Scripts, as well as any subfolders within those subfolders.
Retrieves a collection consisting of all the subfolders of the folder C:Scripts. This collection has two items: Subfolder1 and Subfolder 2.
Echoes the folder path of the first item in the collection, Subfolder 1. The subroutine then uses the name of that folder as a parameter passed to itself. In other words, the script now runs the subroutine ShowSubFolders using Subfolder 1 as the parameter.
Retrieves a collection consisting of all the subfolders of Subfolder 1. This collection has two items: Subfolder1A and Subfolder 1B.
Echoes the folder path of the first item in the collection, Subfolder 1A. The subroutine then uses the name of that folder as a parameter passed to itself. In other words, it now runs the function ShowSubFolders using Subfolder 1A as the parameter.
Passes control to the next item in the collection, Subfolder 1B. This occurs because Subfolder 1A has no subfolders. The subroutine calls itself using Subfolder 1B as the parameter.
Finishes recursing through Subfolder 1. This occurs because Subfolder 1B has no subfolders. The script then returns to the second item (Subfolder 2) in the original collection, and repeats the entire process.
Example 4.17. Recursively Enumerating Subfolders
1 Set FSO = CreateObject("Scripting.FileSystemObject")
2 ShowSubfolders FSO.GetFolder("C:Scripts")
3 Sub ShowSubFolders(Folder)
4     For Each Subfolder in Folder.SubFolders
5         Wscript.Echo Subfolder.Path
6         ShowSubFolders Subfolder
7     Next
8 End Sub
When this script runs under CScript, the following output appears in the command window:
C:scriptsSubfolder 1
C:scriptsSubfolder 1Subfolder 1A
C:scriptsSubfolder 1Subfolder 1B
C:scriptsSubfolder 2
C:scriptsSubfolder 2Subfolder 2A
C:scriptsSubfolder 2Subfolder 2ASubfolder 2A-1
C:scriptsSubfolder 2Subfolder 2B
C:scriptsSubfolder 2Subfolder 2C
To return a complete list of all the folders on a hard disk, begin the search in the root folder of the drive (for example, C:).
Managing a file system ultimately requires managing the individual files stored within that file system. As a system administrator, it is your job to keep track of the files stored on a computer. For example, you need to know whether the correct diagnostic tools have been copied to a server. You need to know whether certain files (such as games or media files) are being stored on a file server, despite an organizational policy that forbids users to store such files. You need to know whether files have been stored on a computer for months without being accessed and thus are serving no purpose other than using up valuable hard disk space.
In addition to keeping track of these files, you must dynamically manage them as well: Files need to be copied, files need to be moved, files need to be renamed, files need to be deleted. The FileSystemObject provides methods that can help you carry out all these administrative tasks.
The FileSystemObject provides a number of methods, such as the CopyFile and DeleteFile methods, that allow a script to act on a file without creating an instance of the File object. Other tasks, however, require the File object. For example, to retrieve a list of file properties, a script must first bind to that file and then retrieve the properties.
The GetFile method allows you to bind to an individual file. To do this, you create an instance of the FileSystemObject and then create an instance of the File object. When using the GetFile method in a script, you must:
Specify the path to the file. The path can be referenced by using either a local path or a UNC path (for example, \accounting eceivablesscriptlog.txt). However, you cannot use wildcards within the path, nor can you specify multiple files. GetFile can bind to only a single file at a time.
Use the Set keyword when assigning the path to a variable. The Set keyword is required because it indicates that the specified variable is an object reference.
For example, the script in Listing 4.18 binds to the file C:FSOScriptLog.txt.
Example 4.18. Binding to a File
1 Set objFSO = CreateObject("Scripting.FileSystemObject")
2 objFSO.GetFile("C:FSOScriptLog.txt")
In general, it is a good idea to pass the absolute path as the GetFile parameter; this ensures that the script will always be able to locate the file in question. However, it is possible to use relative paths. For example, the following code sample will work provided that ScriptLog.txt is in the same folder as the script attempting to bind to it:
objFSO.GetFile("ScriptLog.txt")
Likewise, the next code sample will work if ScriptLog.txt is in the parent folder of the script attempting to bind to it:
objFSO.GetFile(".ScriptLog.txt")
Please note, however, that the FileSystemObject will not use the path environment variable to search for files. For example, you can start Calculator from the command prompt by typing calc.exe, regardless of the current drive or directory, because the operating system searches all folders in the path to locate the file. This does not happen with the GetFile method. The following code sample will fail unless the script is running in the C:WindowsSystem32 folder, the same folder where calc.exe is located:
objFSO.GetFile("calc.exe")
Sometimes it is important simply to know whether a file exists. This might be done as part of a software inventory; for example, you might want to check all your mail servers and see whether a particular script file is present.
Knowing whether a file exists is also important when using scripts to carry out file system management tasks; as you might expect, attempting to copy, move, delete, or otherwise manipulate a file that does not exist will generate a run-time error. To avoid this kind of error, you can use the FileExists method to verify the existence of the file. The FileExists method requires a single parameter (the path to the file) and returns a Boolean value: True if the file exists; False if it does not.
The script in Listing 4.19 uses the FileExists method to verify the existence of the file C:FSOScriptLog.txt. If the file exists, the script uses the GetFile method to bind to the file. If the file does not exist, the script echoes the message, “File does not exist.”
Example 4.19. Verifying the Existence of a File
1 Set objFSO = CreateObject("Scripting.FileSystemObject")
2 If objFSO.FileExists("C:FSOScriptLog.txt") Then
3     Set objFile = objFSO.GetFile("C:FSOScriptLog.txt")
4 Else
5     Wscript.Echo "File does not exist.•
6 End If
You cannot use wildcard characters to verify whether a particular set of files (such as .txt files) exists in a folder, nor can you use wildcards to verify whether any files at all exist in a folder. For example, the following code sample does not result in an error but always returns the value False, regardless of how many files are in the folder:
WScript.Echo objFSO.FileExists("C:FSO*.*")
If you need to verify the existence of a file based on some criteria other than the path, you have two options:
Use the GetFolder object to bind to the folder, retrieve the Files property, and then iterate through the collection of files looking for the files of interest. For example, you could enumerate all the files and file name extensions, and keep track of how many have the .doc extension.
Use WMI. WMI allows you to create more targeted queries, such as selecting all the files with the .doc file name extension. You can then use the Count method to determine the number of items in the collection returned to you. If Count is greater than 0, at least one file was found with the .doc extension.
The ability to delete files by using the FileSystemObject enables you to create scripts that can automatically perform tasks such as disk cleanup operations. For example, you might have a script that periodically searches for and deletes all temporary files (files with the .tmp file name extension). Alternatively, the script might delete files based on some other criteria, such as those that have not been accessed in the past six months, or those with a particular file name extension (such as .bmp or .mp3).
You can delete a file by creating an instance of the FileSystemObject and then calling the DeleteFile method, passing the path to the file as the parameter. For example, the script in Listing 4.20 deletes the file C:FSOScriptLog.txt.
Example 4.20. Deleting a File
1 Set objFSO = CreateObject("Scripting.FileSystemObject")
2 objFSO.DeleteFile("C:FSOScriptLog.txt")
By default, the DeleteFile method will not delete a read-only file; if fact, a run-time error will occur if you attempt to delete such a file. To avoid errors, and to delete read-only files, add the optional Force parameter. When the Force parameter is set to True, the DeleteFile method can delete any file. For example, this line of code deletes the file ScriptLog.txt, even if that file is marked as read-only:
objFSO.DeleteFile("C:FSOScriptLog.txt", True)
There might be occasions when you require a script to delete a single, specified file. More likely, though, you will want to use scripts to delete multiple files. For example, at the end of the week, you might want to delete a set of log files that has been archived or delete all the temporary files that have been created but not removed.
Wildcard characters allow you to delete a set of files within a single folder. However, you cannot use the DeleteFile method to directly delete files from multiple folders. Instead, your script needs to iterate through the folders and use the DeleteFile method to individually delete the files in each folder. To delete files from multiple folders in a single operation (for example, to delete all the .TMP files stored anywhere on a computer), you should use WMI instead of the FileSystemObject.
To delete a set of files, call the DeleteFile method, supplying the path of the folder and the wildcard string required to delete files based on name or file name extension. For example, this line of code deletes all the .doc files in the C:FSO folder:
objFSO.DeleteFile("C:FSO*.doc")
This line of code deletes all the files with the letters log somewhere in the file name:
objFSO.DeleteFile("C:FSO*log.* ")
As noted previously, the DeleteFile method does not delete any documents marked as read-only. If a script attempts to delete a read-only document, a run-time error will occur, and the DeleteFile method will stop, even if the script uses the On Error Resume Next statement. For example, suppose you are trying to delete 1,000 .txt files, and one of those files is marked as read-only. As soon as the script attempts to delete that file, an error will occur, and the DeleteFile method will stop. The script will make no attempt to delete any other files, even though none of them are read-only.
Because of that, you can use an optional second parameter, Force, that can be set to True. When the Force parameter is set to True, the DeleteFile method can delete read-only documents. When the Force parameter is set to False (the default value), the DeleteFile method cannot delete read-only documents.
The script in Listing 4.21 deletes all the .txt files in the folder C:FSO. To ensure that all files, including read-only files, are deleted, the Force parameter is set to True using the constant DeleteReadOnly.
Example 4.21. Deleting a Set of Files
1 Const DeleteReadOnly = True
2 Set objFSO = CreateObject("Scripting.FileSystemObject")
3 objFSO.DeleteFile("C:FSO*.txt"), DeleteReadOnly
Tip
What if you want to delete all files except those marked as read-only? In that case, you can retrieve the complete set of files by using the Folder object Files property. You can then cycle through the collection, check to see whether each individual file is read-only, and, if it is not, delete the file.
Copying files, either from one folder to another on a single computer or from one computer to another, is a common administrative task. For example, you might want to copy a new monitoring script to all your servers or replace an outdated DLL with a newer version. The CopyFile method provides a way to perform these tasks programmatically.
The CopyFile method has two required parameters and one optional parameter:
Source. (required). Path to the file being copied. This can be either a path on the local computer or a UNC path to a remote computer.
Destination. (required). Path to the location where the file is to be copied. This can also be a local path or a UNC path.
To specify that the file keep the same name in its destination location, put a trailing forward slash after the destination folder:
objFSO.CopyFile "C:FSOScriptLog.txt" , "D:Archive"
To give the file a new name in its destination location, specify a full file name as the destination:
objFSO.CopyFile "C:FSOScriptLog.txt" , "D:ArchiveNewFileName.txt"
If the destination folder does not exist, it will automatically be created.
Overwrite (optional). By default, the CopyFile method will not copy a file if a file by that same name exists in the destination location. This can be a problem; among other things, this prevents you from replacing an older version of a file with a newer version. To allow the CopyFile method to copy over existing files, set the optional Overwrite parameter to True.
The script in Listing 4.22 copies C:FSOScriptLog.txt to the folder D:Archive. This operation results in the existence of two files:
The original file, C:FSOScriptLog.txt.
The copied file, D:ArchiveScriptLog.txt.
To ensure that the procedure will be carried out even if D:ArchiveScriptLog.txt exists, the Overwrite parameter is set to True by using the constant OverWriteExisting.
Example 4.22. Copying a File
1 Const OverwriteExisting = True
2 Set objFSO = CreateObject("Scripting.FileSystemObject")
3 objFSO.CopyFile "C:FSOScriptLog.txt" , "D:Archive", OverwriteExisting
When specifying the destination folder, it is important to include the trailing backslash (for example, D:Archive). If the backslash is there, CopyFile will copy the file into the Archive folder. If the backslash is not there, CopyFile will try to create a new file named D:Archive. If the folder D:Archive already exists, a “Permission denied error” will be generated, and the copy procedure will fail.
The CopyFile method will also fail if you attempt to overwrite an existing read-only file, even if you have set the OverWrite parameter to True. To copy over a read-only file, you must first delete the file and then call the CopyFile method.
Wildcard characters provide a way to copy an entire set of files as long as these files are all in the same folder. You can copy a set of files using the same parameters used to copy a single file, but you must include a wildcard as part of the source parameter. For example, the script in Listing 4.23 copies all the .txt files found in C:FSO to D:Archive.
Example 4.23. Copying a Set of Files
1 Const OverwriteExisting = True
2 Set objFSO = CreateObject("Scripting.FileSystemObject")
3 objFSO.CopyFile "C:FSO*.txt" , "D:Archive" , OverwriteExisting
Using wildcards with the CopyFile method allows you to copy all the files in a folder without copying any subfolders in that folder; the CopyFolder method, by contrast, copies both files and subfolders. The following code statement copies all the files in the C:FSO folder without copying any subfolders:
objFSO.CopyFile "C:FSO*.*" , "D:Archive"
Instead of copying a file, you might want to move it. For example, if a disk is running low on space, you might want to move a file to a new location. If a computer is changing roles, you might want to move certain diagnostic tools to its replacement. In either case, you do not want two or more copies of the file; you want one copy of the file, stored in a new place.
The MoveFile method enables you to move a file from one location to another. The MoveFile method works exactly like the CopyFile method: You create an instance of the FileSystemObject, call the MoveFile method, and pass two parameters:
The complete path to the file to be moved.
The complete path to the new location, making sure to include the trailing backslash.
For example, the script in Listing 4.24 moves C:FSOScriptLog.log to the Archive folder on drive D.
Example 4.24. Moving a File
1 Set objFSO = CreateObject("Scripting.FileSystemObject")
2 objFSO.MoveFile "C:FSOScriptLog.log" , "D:Archive"
You can also use wildcard characters to move multiple files in a single operation. For example, to move all the files in the FSO folder that begin with the letters data, use the following parameter:
C:FSOData*.*
Wildcard characters are especially useful for moving all the files of a particular type because file types are usually denoted by file name extensions. For example, the script in Listing 4.25 moves all the log files (with the .log file name extension) from the FSO folder on drive C to the Archive folder on drive D.
The FileSystemObject does not include a direct method for renaming a file. However, in much the same way that a folder can be renamed using the MoveFolder method, files can be renamed using the MoveFile method. To rename a file, call the MoveFile method but leave the file in its current folder.
For example, the script in Listing 4.26 renames ScriptLog.txt to BackupLog.txt. Technically, the script actually moves C:FSOScriptLog.txt to a new path: C:FSOBackupLog.txt. The net result, however, is that the file named ScriptLog.txt is now named BackupLog.txt.
Files have a number of properties that are extremely useful for managing a file system. For example, the DateLastAccessed property tells you the date when someone last opened the file. This property can be used to identify files that are taking up disk space yet are never used. Similarly, the Size property tells you the size of a file in bytes. This helps you to better analyze disk usage; you can tell whether a single file might be using up more than its fair share of storage space.
Traditionally, system administrators have accessed file properties by using either Windows Explorer or command-line tools. Although these tools can return information about the files on a computer, they are not always designed to save this data or to act on it. In addition, many of these tools have only a limited ability to be automated, making it more difficult for system administrators to periodically sweep their hard drives and search for files that meet specific criteria.
Fortunately, detailed information about any file on a computer can also be retrieved by using the FileSystemObject; among other things, this allows you to automate the process of querying the file system for information about a file or group of files. A complete list of properties available through the File object is shown in Table 4.5.
To access file properties, a script must:
Create an instance of the FileSystemObject.
Use the GetFile method to create an object reference to a particular file. The script must pass the path of the file as the GetFile parameter.
Echo (or otherwise manipulate) the appropriate file properties.
For example, the script in Listing 4.27 uses the GetFile method to bind to the file C:WindowsSystem32Scrrun.dll and then echoes a number of the file properties.
Example 4.27. Enumerating File Properties
 1 Set objFSO = CreateObject("Scripting.FileSystemObject")
 2 Set objFile = objFSO.GetFile("c:windowssystem32scrrun.dll")
 3 Wscript.Echo "Date created: " & objFile.DateCreated
 4 Wscript.Echo "Date last accessed: " & objFile.DateLastAccessed
 5 Wscript.Echo "Date last modified: " & objFile.DateLastModified
 6 Wscript.Echo "Drive: " & objFile.Drive
 7 Wscript.Echo "Name: " & objFile.Name
 8 Wscript.Echo "Parent folder: " & objFile.ParentFolder
 9 Wscript.Echo "Path: " & objFile.Path
10 Wscript.Echo "Short name: " & objFile.ShortName
11 Wscript.Echo "Short path: " & objFile.ShortPath
12 Wscript.Echo "Size: " & objFile.Size
13 Wscript.Echo "Type: " & objFile.Type
When this script runs under CScript, output similar to the following appears in the command window:
Date created: 10/29/2001 10:35:36 AM
Date last accessed: 2/14/2002 1:55:44 PM
Date last modified: 8/23/2001 4:00:00 AM
Drive: c:
Name: scrrun.dll
Parent folder: C:Windowssystem32
Path: C:Windowssystem32scrrun.dll
Short name: scrrun.dll
Short path: C:Windowssystem32scrrun.dll
Size: 147483
Type: Application Extension
Like folders, files also have attributes that can be retrieved and configured using the FileSystemObject. Also like folders, file attributes are returned as a bitmap value. (For more information on bitmap values and how to use them, see “Managing Folder Attributes” earlier in this chapter.) File attributes can include any or all of the values shown in Table 4.6.
Table 4.6. File Attributes Used by the FileSystemObject
Constant | Value | Description |
|---|---|---|
Normal | 0 | File with no attributes set. |
Read-only | 1 | File can be read but cannot be modified. |
Hidden | 2 | File is hidden from view in Windows Explorer or My Computer. |
System | 4 | File is needed by the operating system. |
Archive | 32 | File is flagged as requiring backup. |
Alias | 64 | File is a shortcut to another file. |
Compressed | 2048 | File has been compressed. |
To retrieve the attributes of a file, use the GetFile method to bind to the file. After you have created an object reference to the file, you can use the logical AND operator to determine the file attributes. If the file does not have any attributes configured, the Attributes value will be 0.
For example, the script in Listing 4.28 binds to the file C:FSOScriptLog.txt and then checks for the presence of each attribute that can be retrieved using the FileSystemObject.
Example 4.28. Enumerating File Attributes
 1 Set objFSO = CreateObject("Scripting.FileSystemObject")
 2 Set objFile = objFSO.GetFile("C:FSOScriptLog.txt")
 3 If objFile.Attributes AND 0 Then
 4     Wscript.Echo "No attributes set."
 5 End If
 6 If objFile.Attributes AND 1 Then
 7     Wscript.Echo "Read-only."
 8 End If
 9 If objFile.Attributes AND 2 Then
10     Wscript.Echo "Hidden file."
11 End If
12 If objFile.Attributes AND 4 Then
13     Wscript.Echo "System file."
14 End If
15 If objFile.Attributes AND 32 Then
16     Wscript.Echo "Archive bit set."
17 End If
18 If objFile.Attributes AND 64 Then
19     Wscript.Echo "Link or shortcut."
20 End If
21 If objFile.Attributes AND 2048 Then
22     Wscript.Echo "Compressed file."
23 End If
In addition to enumerating file attributes, the FileSystemObject provides a way to configure the following attributes:
ReadOnly
Hidden
System
Archive
To configure a file attribute, the script should use the following procedure:
Use the GetFile method to bind to the file.
Check for the attribute you want to change.
For example, if you want to make a file read-only, check to see whether the file has already been marked read-only.
If the file is not read-only, use the logical operator XOR to toggle the switch. This will mark the file as read-only. If the file is already read-only, be careful not to use XOR. If you do, the switch will be toggled, and the read-only attribute will be removed.
The script in Listing 4.29 uses the AND operator to check whether the switch with the value 1 (read-only) has been set on the file C:FSOTestScript.vbs. If the file is not read-only, the script uses the XOR operator to turn the switch on and mark the file as read-only.
Example 4.29. Configuring File Attributes
1 Set objFSO = CreateObject("Scripting.FileSystemObject")
2 Set objFile = objFSO.GetFile("C:FSOTestScript.vbs")
3 If objFile.Attributes AND 1 Then
4     objFile.Attributes = objFile.Attributes XOR 1
5 End If
You can also simultaneously remove the ReadOnly, Hidden, System, and Archive attributes by using the following code statement:
objFile.Attributes = objFile.Attributes AND 0
A path is a hierarchical series of names that allow you to pinpoint the exact location of a file or folder. In that respect, paths are similar to street addresses: they provide information that tells you precisely where to locate an object. A street address such as One Main Street, Redmond, WA, tells you precisely where to find a particular residence. Likewise, the path C:FSOScriptsScriptLog.txt tells you precisely where to locate a particular file. Just as only one building can be located at One Main Street, Redmond, WA, only one file can be located at C:FSOScriptsScriptLog.txt.
Complete paths such as C:FSOScriptsScriptLog.txt are very important because they provide the only way to uniquely identify a file or folder location. Because of that, there will be times when your script will need the complete path.
At other times, however, you might want only a portion of the path. For example, you might want to extract only the file name or only the file name extension. To allow you to parse paths and extract individual path components, the FileSystemObject provides the methods listed in Table 4.7.
Table 4.7. Methods for Parsing File Paths
Method | Description |
|---|---|
GetAbsolutePathName | Returns the complete path of the file (for example, C:FSOScriptsScriptlog.txt). |
GetParentFolderName | Returns the path of the folder where the file is stored (for example, C:FSOScripts). |
GetFileName | Returns the name of the file, minus any path information (for example, ScriptLog.txt). |
GetBaseName | Returns the base name of the file, the file name minus the file name extension (for example, ScriptLog). |
GetExtensionName | Returns the file name extension (for example, txt). |
The script in Listing 4.30 parses the path for the file ScriptLog.txt. This script works only if ScriptLog.txt is in the same folder as the script doing the parsing. If the two files are stored in different folders, you must pass the complete path to the GetFile method (for example, C:FSOScriptsScriptLog.txt).
Example 4.30. Parsing File Paths
1 Set objFSO = CreateObject("Scripting.FileSystemObject")
2 Set objFile = objFSO.GetFile("ScriptLog.txt")
3 Wscript.Echo "Absolute path: " & objFSO.GetAbsolutePathName(objFile)
4 Wscript.Echo •Parent folder: • & objFSO.GetParentFolderName(objFile)
5 Wscript.Echo "File name: " & objFSO.GetFileName(objFile)
6 Wscript.Echo "Base name: " & objFSO.GetBaseName(objFile)
7 Wscript.Echo "Extension name: " & objFSO.GetExtensionName(objFile)
When this script is run under CScript, output similar to the following appears in the command window:
Absolute path: C:FSOScriptsScriptLog.txt
Parent folder: C:FSOScripts
File name: ScriptLog.txt
Base name: ScriptLog
Extension name: txt
File versions that are incompatible or out-of-date can create considerable problems for system administrators. For example, a script that runs fine on Computer A, where version 2.0 of a particular DLL has been installed, might fail on Computer B, which has version 1.0 of that DLL installed.
These problems can be difficult to troubleshoot, because you are likely to get back an error saying that the object does not support a particular property or method. This is because the version of the object installed on Computer B does not support the new property or method. If you try to debug the script on Computer A, you will have difficulty finding the problem because the version of the object installed on Computer A does support the property or method in question.
The GetFileVersion method allows you to retrieve version information from a file. To use this method, a script must:
Create an instance of the FileSystemObject.
Call the GetFileVersion method, passing the path to the file as the sole parameter.
For example, the script in Listing 4.31 retrieves the file version for Scrrun.dll.
Example 4.31. Retrieving File Versions
1 Set objFSO = CreateObject("Scripting.FileSystemObject")
2 Wscript.Echo objFSO.GetFileVersion("c:windowssystem32scrrun.dll")
When this script runs on a Windows 2000-based computer with WSH 5.6 installed, the message box shown in Figure 4.7 appears.

Version numbers are typically displayed in four parts, such as 5.6.0.6626, rather than a single number (such as version 1 or version 5). Version number 5.6.0.6626 contains the following parts:
5 — The major file part.
6 — The minor file part. The major and minor parts together represent the way a version is typically referred to. In conversation, you would likely refer to version 5.6 rather than version 5.6.0.6626.
0 — The build part. This is typically 0.
6626 — The private file part.
Not all files types support versioning. Executable files and DLLs typically support versioning; plain-text files, including scripts, typically do not.
One of the more powerful tools available to system administrators is the text file. This might seem hard to believe in an age of high-resolution graphics and multi-user databases. Nevertheless, simple text files, such as those created in Notepad, remain a key element in system administration. Text files are lightweight and low maintenance: They use up very little disk space and require no additional software of any kind to be installed on the computer. Text files are easy to work with and are extremely portable: A text file created by using a script can be copied and viewed on almost any computer in the world, including computers that do not run a Windows operating system.
In addition to their convenience, text files provide a quick, easy, and standardized way to get data both into a script and out of a script. Text files can be used to hold arguments that would otherwise need to be typed at the command line or hard-coded into a script; rather than typing 100 server names at the command line, a script can simply read those names from a text file. Likewise, text files provide a quick and easy way to store data retrieved from a script. This data could be written directly to a database; however, that requires additional configuration on the server, additional coding in the script, and additional overhead when the script runs. Instead, data can be saved to a text file and then later imported into a database.
The FileSystemObject provides a number of methods for both reading from and writing to text files.
Creating Text Files
The FileSystemObject allows you to either work with existing text files or create new text files from scratch. To create a brand-new text file, simply create an instance of the FileSystemObject and call the CreateTexFile method, passing the complete path name as the method parameter.
For example, the script in Listing 4.32 creates a new text file named ScriptLog.txt in the C:FSO folder.
Example 4.32. Creating a Text File
1 Set objFSO = CreateObject("Scripting.FileSystemObject")
2 Set objFile = objFSO.CreateTextFile("C:FSOScriptLog.txt")
If the file does not exist, the CreateTextFile method creates it. If the file does exist, the CreateTextFile method will overwrite the existing file and replace it with the new, blank file. If you prefer that the existing file not be overwritten, you can include the optional Overwrite parameter. When this parameter is False, existing files are not overwritten; when this parameter is True (the default value), existing files are overwritten. For example, the following code sample does not overwrite the file C:FSOScriptLog.txt if that file already exists:
Set objFile = objFSO.CreateTextFile("C:FSOScriptLog.txt", False)
If you set the Overwrite parameter to False and the file already exists, a run-time error will occur. Because of that, you might want to check for the existence of the file and then, if the file exists, take some other action, such as allowing the user to specify an alternative file name for the new file.
Creating File Names Within the Script
One way to avoid the problems that can occur if a file already exists is to allow the script to generate a unique file name. Because the file name generator does not create meaningful file names, this is probably not a good approach for naming log files and other files that you might need to refer to in the future. However, it does provide a way to ensure unique file names for scripts that require a temporary file. For example, you might have your script save data in HTML or XML format, have that data displayed in a Web browser, and then have this temporary file deleted as soon as the Web browser is closed. In a situation such as that, you can use the GetTempFile name method to generate a unique file name.
To generate a unique file name, a script must create an instance of the FileSystemObject and then call the GetTempName method (with no parameters). For example, the script in Listing 4.33 uses a For Next loop to create 10 random file names.
Example 4.33. Creating a File Name
1 Set objFSO = CreateObject("Scripting.FileSystemObject")
2 For i = 1 to 10
3     strTempFile = objFSO.GetTempName
4     Wscript.Echo strTempFile
5 Next
When this script is run under Cscript, output similar to the following appears in the command window:
rad646E9.tmp
radEC50C.tmp
rad0C40A.tmp
radE866E.tmp
rad77F3D.tmp
rad19970.tmp
rad7A21A.tmp
radB9DDC.tmp
rad84930.tmp
rad92199.tmp
Note
The file names generated by GetTempName are not guaranteed to be unique, partly because of the algorithm used to generate the names and partly because there are only a finite number of possible names; file names are limited to eight characters, and the first three characters are always rad. For example, in a test script that created 10,000 file names, one right after another, 9,894 names were unique. The remaining 106 were duplicates (53 pairs of duplicated names).
The demonstration script in Listing 4.34 uses the GetTempName method to create a file. The script must:
Create an instance of the FileSystemObject.
Set a variable named strPath to the folder where the file will be created (C:FSO).
Use the GetTempName method to generate a unique file name.
Use the BuildPath method to combine the folder name and file name and create a full path for the temporary file. The full path is stored in the variable strFullName.
Call the CreateTextFile method, using strFullName as the method parameter.
Close the file immediately after creating it. In a production environment, you would most likely write data to the file before closing it.
Example 4.34. Creating and Naming a Text File
1 Set objFSO = CreateObject("Scripting.FileSystemObject")
2 strPath = "C:FSO"
3 strFileName = objFSO.GetTempName
4 strFullName = objFSO.BuildPath(strPath, strFileName)
5 Set objFile = objFSO.CreateTextFile(strFullName)
6 objFile.Close
Opening Text Files
Working with text files is a three-step process. Before you can do anything else, you must open the text file. This can be done either by opening an existing file or by creating a new text file. (When you create a new file, that file is automatically opened and ready for use.) Either approach returns a reference to the TextStream object.
After you have a reference to the TextStream object, you can either read from or write to the file. However, you cannot simultaneously read from and write to the same file. In other words, you cannot open a file, read the contents, and then write additional data to the file, all in the same operation. Instead, you must read the contents, close the file, and then reopen and write the additional data.
When you open an existing text file, the file can be opened either for reading or for writing. When you create a new text file, the file is open only for writing, if for no other reason than that there is no content to read.
Finally, you should always close a text file. Although this is not required (the file will generally be closed as soon as the script terminates), it is good programming practice.
To open a text file:
Create an instance of the FileSystemObject.
Use the OpenTextFile method to open the text file. The OpenTextFile method requires two parameters: the path to the file and one of the following values:
For reading (parameter value = 1, constant = ForReading). Files opened in this mode can only be read from. To write to the file, you must open it a second time by using either the ForWriting or ForAppending mode.
For writing (parameter value 2, constant = ForWriting). Files opened in this mode will have new data replace any existing data. (That is, existing data will be deleted and the new data added.) Use this method to replace an existing file with a new set of data.
For appending (parameter value 8, constant = ForAppending). Files opened in this mode will have new data appended to the end of the file. Use this method to add data to an existing file.
You must use the appropriate parameter when opening the file. For example, if you open a file for reading and then attempt to write to the file, you will receive a “Bad file mode” error. You will also receive this error if you attempt to open anything other than a plain-text file. (It is worth noting that both HTML and XML files are plain-text files.)
You can use either the parameter value (for example, 1 for reading) or you can create a constant and set the value appropriately. For example, both of these methods will open a file for reading:
Const ForReading = 1
Set objFSO = CreateObject("Scripting.FileSystemObject")
Set objFile = objFSO.OpenTextFile("C:FSOScriptLog.txt", ForReading)
Set objFile2 = objFSO.OpenTextFile("C:FSOScriptLog2.txt", 1)
However, you cannot use the constants without first defining them. This is due to the fact that VBScript does not have intrinsic access to COM object constants. The following script sample will fail and return an “Invalid procedure call or argument” error because the ForReading constant has not been explicitly defined. Because it has not been defined, ForReading is automatically assigned the value 0, and 0 is not a valid parameter for OpenTextFile.
Set objFSO = CreateObject("Scripting.FileSystemObject")
Set objFile = objFSO.OpenTextFile("C:FSOScriptLog.txt", ForReading)
The script in Listing 4.35 opens C:FSOScriptLog.txt for reading, using the user-defined constant ForReading to represent the value 1.
Example 4.35. Opening a Text File for Reading
1 Const ForReading = 1
2 Set objFSO = CreateObject("Scripting.FileSystemObject")
3 Set objFile = objFSO.OpenTextFile("C:FSOScriptLog.txt", ForReading)
Any text files opened by a script are automatically closed when the script ends. Because of this, you do not have to explicitly close text files any time you open them. Nevertheless, it is a good idea to always close text files when you are finished with them. Not only is this good programming practice, but problems will occur if you try to do one of the following without first closing the file:
Delete the file. As noted previously in this chapter, you might occasionally write scripts that create a temporary file, use that file for some purpose, and then delete the file before the script terminates. If you attempt to delete an open file, however, you will encounter an “Access denied” error because the operating system will not allow you to delete an open file.
Reread the file. There might be times when you need to read the same file multiple times within a script. For example, you might open a text file, save the entire contents of the file to a string variable, and then search that string for the existence of a particular error code. If the code is found, you might then read the file on a line-by-line basis, extracting each line where the error was recorded.
If you try to read an open file multiple times, however, you either will not receive the expected results or will encounter a run-time error. For example, the following script reads a text file, echoes the contents of that file back to the screen, and then attempts to repeat the procedure:
Set objFSO = CreateObject("Scripting.FileSystemObject")
Set objFile = objFSO.OpenTextFile("C:FSOScriptLog.txt", 1)
Wscript.Echo "Reading file the first time:"
strContents = objFile.ReadAll
Wscript.Echo strContents
Wscript.Echo "Reading file the second time:"
Do While objFile.AtEndOfStream = False
    strLine = objFile.ReadLine
    Wscript.Echo strLine
Loop
When this script is run under Cscript, the following output appears in the command window:
Reading file the first time:
File line 1.
File line 2.
File line 3.
Reading file the second time:
The first time the file was read, the contents were stored in the variable strContents. The second time the file was read, however, no data was echoed to the screen. This is because the end of the file had already been reached, and there was no more data left to read. To reread the file, you must close the file and then reopen it. You cannot read to the end of a file and then jump back to the beginning.
The TextStreamObject Close method is used to close a text file. For example, the script shown in Listing 4.36 creates an instance of the FileSystemObject, opens a text file (C:FSOScriptLog.txt), and then immediately closes the file. To access the file contents, you need to call the OpenTextFile method a second time and reopen the file.
Example 4.36. Opening and Closing a Text File
1 Set objFSO = CreateObject("Scripting.FileSystemObject")
2 Set objFile = objFSO.OpenTextFile("C:FSOScriptLog.txt", 1)
3 objFile.Close
Reading data from a text file is a standard procedure used in many enterprise scripts. You might use this capability to:
Read in command-line arguments. For example, a text file might contain a list of computers, with the script designed to read in the list and then run against each of those computers.
Programmatically search a log file for specified conditions. For example, you might search a log file for any operations marked Error.
Add the contents of a log file to a database. For example, you might have a service or an application that saves information in plain-text format. You could write a script that reads in the text file and then copies the relevant information to a database.
The FileSystemObject can be used to read the contents of a text file. When using the FileSystemObject, keep the following limitations in mind:
The FSO can read only ASCII text files. You cannot use the FSO to read Unicode files or to read binary file formats such as Microsoft Word or Microsoft Excel.
The FileSystemObject reads a text file in one direction: from the beginning to the end of the text file. In addition, the FSO reads only line by line. If you need to go back to a previous line, you must return to the beginning of the file and read forward to the required line.
You cannot open a file for simultaneous reading and writing. If you open a file for reading, you must open the file a second time if you want to modify the contents. If you attempt to read a file after opening it in write mode, you will receive a “bad file mode” error.
The file-reading methods available through the FileSystemObject are listed in Table 4.8. The examples shown in the table are based on a text file of services and service properties that looks similar to this:
Alerter,Share Process,Running,Auto,LocalSystem,
AppMgmt,Share Process,Running,Manual,LocalSystem,
Ati HotKey Poller,Own Process,Stopped,Auto,LocalSystem,
Table 4.8. Read Methods Available to the FileSystemObject
Method | Description |
|---|---|
Read | Reads the specified number of characters and then stops. For example, the following command would read the first 12 characters of the first line (“Alerter,Shar”) into the variable strText and then stop: |
ReadLine | Reads one line from a text file and then stops before reaching the newline character. For example, the following command would read the first line (“Alerter,Share Process,Running,Auto,LocalSystem”) into the variable strText and then stop: To read an entire text file on a line-by-line basis, place the ReadLine function within a loop. |
ReadAll | Reads the entire contents of a text file into a variable. |
Skip | Skips the specified number of characters and then stops. For example, the following command would skip the first 12 characters. Any subsequent read operations would begin with the 13th character and continue from there (“e Process,Running,Auto,LocalSystem”): |
SkipLine | Skips an entire line in a text file. For example, this code reads the first and third lines of a text file, skipping the second line: strText = objTextFile.Readline objTextFile.SkipLine strText = objTextFile.Readline |
Windows will sometimes create text files that are empty — that is, files that contain no characters and have a file size of 0 bytes. This often occurs with log files, which remain empty until a problem is recorded there. For example, if problems occur with a user logon (such as a user attempting to log on with an incorrect password or user account), those problems will be recorded in the Netlogon.log file. Until such a problem occurs, however, the Netlogon.log file remains empty.
Empty files represent a problem for script writers, because a VBScript run-time error will occur if you attempt to read such a file. If you try to read an empty file, an error message similar to the one shown in Figure 4.8 appears.

If there is a chance that a file might be empty, you can avoid errors by checking the file size before attempting to read the file. To do this, the script must:
Create an instance of the FileSystemObject.
Use the GetFile method to bind to the file.
Use the Size property to ensure that the file is not empty before attempting open it.
The script in Listing 4.37 binds to the file C:WindowsNetlogon.log. The script checks the size of the file; if the size is greater than 0, the script opens and reads the file. If the file size is 0, the script echoes the message “The file is empty.”
Example 4.37. Verifying the Size of a File
 1 Set objFSO = CreateObject("Scripting.FileSystemObject")
 2 Set objFile = objFSO.GetFile("C:WindowsNetlogon.log")
 3 If objFile.Size > 0 Then
 4     Set objReadFile = objFSO.OpenTextFile("C:WindowsNetlogon.log", 1)
 5     strContents = objReadFile.ReadAll
 6     Wscript.Echo strContents
 7     objReadFile.Close
 8 Else
 9     Wscript.Echo "The file is empty."
10 End If
The ReadAll method provides the easiest way to read a text file: You simply call the method, and the entire text file is read and stored in a variable. Having the contents of the text file stored in a single variable can be useful in a number of situations. For example, if you want to search the file for a particular item (such as an error code), it is easier to search a single string than to search the file line by line.
Likewise, if you want to concatenate (combine) text files, the ReadAll method provides the quickest and easiest method. For example, suppose you have a set of daily log files that you want to combine into a single weekly log file. To do that, a script can:
Open the text file for Monday and use ReadAll to store the entire contents in a variable.
Open the weekly log file for appending, and write the contents of the variable to the file. This is possible because any formatting (such as line breaks or tabs) that is read in from the Monday file is preserved in the variable.
Repeat steps 1 and 2 until the entire set of daily files has been copied into the weekly log.
Note
Although it is easier to search a single string, it is not necessarily faster. The ReadAll method took less than a second to search a 388-KB test file of approximately 6,000 lines. Reading and searching the file on a line-by-line basis also took less than a second.
To use the ReadAll method, open a text file for reading and then call ReadAll. (No parameters are needed.) For example, the script in Listing 4.38 opens the file C:FSOScriptLog, reads in the contents of the file, and stores that data in the variable strContents. The script then echoes the value of strContents, which happens to be the contents of the text file as well.
For system administration purposes, text files typically serve as flat-file databases, with each line of the file representing a single record in the database. For example, scripts often read in a list of server names and then carry out an action against each of those servers. In those instances, the text will look something like the following:
atl-dc-01
atl-dc-02
atl-dc-03
atl-dc-04
When a text file is being used as a flat-file database, a script will typically read each record (line) individually and then perform some action with that record. For example, a script (using the preceding sample text file) might read in the name of the first computer, connect to it, and carry out some action. The script would then read in the name of the second computer, connect to it, and carry out that same action. This process would continue until all the records (lines) in the text file have been read.
The ReadLine method allows a script to read individual lines in a text file. To use this method, open the text file, and then set up a Do Loop that continues until the AtEndOfStream property is True. (This simply means that you have reached the end of the file.) Within the Do Loop, call the ReadLine method, store the contents of the first line in a variable, and then perform some action. When the script loops around, it will automatically drop down a line and read the second line of the file into the variable. This will continue until each line has been read (or until the script specifically exits the loop).
For example, the script shown in Listing 4.39 opens the file C:FSOServerList.txt and then reads the entire file line by line, echoing the contents of each line to the screen.
As noted previously, the FileSystemObject can read a text file only from the beginning to the end; you cannot start at the end and work your way backwards. This can sometimes be a problem when working with log files. Most log files store data in chronological order: The first line in the log is the first event that was recorded, the second line is the second event that was recorded, and so on. This means that the most recent entries, the ones you are perhaps most interested in, are always located at the very end of the file.
There might be times when you want to display information in reverse chronological order — that is, with the most recent records displayed first and the oldest records displayed last. Although you cannot read a text file from the bottom to the top, you can still display the information in reverse chronological order. To do this, a script must:
Create an array to hold each line of the text file.
Use the ReadLine method to read each line of the text file and store each line as a separate element in the array.
Display the contents of the array on screen, starting with the last element in the array (the most recent record in the log file) and ending with the first element in the array (the oldest log file).
For example, the script in Listing 4.40 reads in the file C:FSOScriptLog.txt, storing each line as an element in the array arrFileLines. After the entire file has been read, the contents are echoed to the screen, beginning with the last element in the array. To do this, the For Loop begins with the last element (the upper bound of the array) and incrementally works down to the first element (the lower bound).
Example 4.40. “Reading” a Text File from the Bottom to the Top
 1 Dim arrFileLines()
 2 i = 0
 3 Set objFSO = CreateObject("Scripting.FileSystemObject")
 4 Set objFile = objFSO.OpenTextFile("C:FSOScriptLog.txt", 1)
 5 Do Until objFile.AtEndOfStream
 6     Redim Preserve arrFileLines(i)
 7     arrFileLines(i) = objFile.ReadLine
 8     i = i + 1
 9 Loop
10 objFile.Close
11 For l = Ubound(arrFileLines) to LBound(arrFileLines) Step -1
12     Wscript.Echo arrFileLines(l)
13 Next
If the contents of C:FSOScriptLog.txt look like this:
6/19/2002    Success
6/20/2002    Failure
6/21/2002    Failure
6/22/2002    Failure
6/23/2002    Success
The following information will be echoed to the screen:
6/23/2002    Success
6/22/2002    Failure
6/21/2002    Failure
6/20/2002    Failure
6/19/2002    Success
In a fixed-width text file, fields are delimited by length: Field 1 might consist of the first 15 characters on a line, Field 2 might consist of the next 10 characters, and so on. Thus a fixed-width text file might look like the following:
Server              Value           Status
atl-dc-01           19345           OK
atl-printserver-02  00042           OK
atl-win2kpro-05     00000           Failed
In some cases, you might want to retrieve only the values, or only the status information. The value information, to pick one, is easy to identify: Values always begin with the 26th character on a line and extend no more than 5 characters. To retrieve these values, you need to read only the 26th, 27th, 28th, 29th, and 30th characters on each line.
The Read method allows you to read only a specified number of characters. Its sole parameter is the number of characters to be read. For example, the following code sample reads the next 7 characters in the text file and stores those 7 characters in the variable strCharacters:
strCharacters = objFile.Read(7)
By using the Skip and SkipLine methods, you can retrieve selected characters from a text file. For example, the script in Listing 4.41 reads only the sixth character in each line of a text file. To do this, the script must:
Skip the first five characters in a line, using Skip(5).
Read the sixth character, using Read(1).
Skip to the next line of the file.
Example 4.41. Reading a Fixed-Width Text File
1 Set objFSO = CreateObject("Scripting.FileSystemObject")
2 Set objFile = objFSO.OpenTextFile("C:FSOScriptLog.txt", 1)
3 Do Until objFile.AtEndOfStream
4     objFile.Skip(5)
5     strCharacters = objFile.Read(1)
6     Wscript.Echo strCharacters
7     objFile.SkipLine
8 Loop
To better illustrate how this script works, suppose the file C:FSOScriptLog.txt looks like the following:
XXXXX1XXXXXXXXXXXXXX
XXXXX2XXXXXXXXXXXXXXXXXXX
XXXXX3XXXXXXXXXXXX
XXXXX4XXXXXXXXXXXXXXXXXXXXXXXXX
For each line in this file, the first five characters are X’s, the sixth character is a number, and the remaining characters are a random number of X’s. When the script in Listing 4.41 runs, the script will:
Open the text file and begin to read the first line.
Skip the first five characters.
Use the Read method to read the sixth character.
Echo that character to the screen.
Skip to the next line and repeat the process until all the lines have been read.
When the script is run under CScript, the following output appears in the command window:
1
2
3
4
Writing data to a text file is another powerful aid in writing system administration scripts. Text files provide a way for you to permanently save data retrieved by a script; this data can be saved either instead of or in addition to being displayed on the screen. Text files also provide a way for you to keep a log of the actions carried out by a script. This can be especially useful when creating and debugging scripts. By having the script record its actions in a text file, you can later review the log to determine which procedures the script actually carried out and which ones it did not.
The FileSystemObject gives you the ability to write data to a text file. To write data using the FSO, a script must do the following:
Create an instance of the FileSystemObject.
Use the OpenTextFile method to open the text file. You can open the text file in one of two ways:
For writing (parameter value 2, constant = ForWriting). Files opened in this mode will have new data replace any existing data in its entirety. (That is, existing data will be deleted and the new data added.) Use this mode to replace an existing file with a new set of data.
For appending (parameter value 8, constant = ForAppending). Files opened in this mode will have new data appended to the end of the file. Use this mode to add data to an existing file.
Use either the Write, WriteLine, or WriteBlankLines method to write to the file.
Close the text file.
The three methods for writing to a text file are shown in Table 4.9.
Table 4.9. Write Methods Available to the FileSystemObject
Description | |
|---|---|
Write | Writes data to a text file without appending a carriage-return/newline character at the end. For example, this code writes two separate strings to a text file: objFile.Write ("This is line 1.")
objFile.Write ("This is line 2.")
The resulting text file looks like this: |
WriteLine | Writes data to a text file, appending a carriage-return/newline character at the end of each operation. For example, this code writes two separate strings to a text file: objFile.WriteLine ("This is line 1.")
objFile.WriteLine ("This is line 2.")
The resulting text file looks like this: This is line 1. This is line 2. |
WriteBlankLines | Writes a blank line to a text file. For example, this code writes two separate strings to a text file, separating the two with one blank line: objFile.Writeline ("This is line 1.")
objFile.WriteBlankLines(1)
objFile.Writeline ("This is line 2.")
The resulting text file looks like this: This is line 1. This is line 2. |
In addition to the methods shown in Table 4.9, the VBScript constant VbTab can be useful in writing data to text files. VbTab inserts a tab between characters. To create a tab-separated data file, use code similar to the following:
objTextFile.WriteLine(objService.DisplayName & vbTab & objService.State)
One weakness with the FileSystemObject is that it cannot be used to directly modify specific lines in a text file; for example, you cannot write code that says, in effect, “Skip down to the fifth line in this file, make a change, and then save the new file.” To modify line 5 in a 10-line text file, a script must instead:
Read in the entire 10-line file.
Write lines 1–4 back to the file.
Write the modified line 5 to the file.
Write lines 6–10 back to the file.
In system administration, simplicity is often a virtue. For example, suppose you have a script that runs every night, retrieving events from the event logs on your domain controllers, writing those events to a database, and recording which computers were successfully contacted and which ones were not. For historical purposes, you might want to keep track of every success and every failure over the next year. This might be especially useful for a new script just being put into use, or for a network with suspect connectivity or other problems that crop up on a recurring basis.
On the other hand, you might simply want to know what happened the last time the script ran. In other words, you do not want a log file that contains data for the past 365 days. Instead, you want a log file that contains only the most recent information. That allows you to open the file and quickly verify whether or not the script ran as expected.
When you open a text file in ForWriting mode, any new data you write to the file replaces all the existing data in that file. For example, suppose you have the complete works of Shakespeare stored in a single text file. Suppose you then run a script that opens the file in ForWriting mode and writes the single letter a to the file. After the file has been written and closed, it will consist only of the letter a. All the previously saved data will be gone.
The script in Listing 4.42 opens the text file C:FSOScriptLog.txt in ForWriting mode and then writes the current date and time to the file. Each time this script is run, the old date and time are replaced by the new date and time. The text file will never contain more than a single date-time value.
Some scripts are designed to run at regularly scheduled intervals and then collect and save a specific kind of data. These scripts are often used to analyze trends and to look for usage over time. In these instances, you typically do not want to overwrite existing data with new data.
For example, suppose you have a script that monitors processor usage. At any given point in time, processor usage could be anywhere from 0 percent to 100 percent by itself, that single data point is meaningless. To get a complete picture of how much a processor is being utilized, you need to repeatedly measure and record processor usage. If you measure processor use every few seconds and get back data like 99 percent, 17 percent, 92 percent, 90 percent, 79 percent, 88 percent, 91 percent, you can assume processor use is very high. However, this can only be determined by comparing processor use over time.
By opening a text file in ForAppending mode, you can ensure that existing data is not overwritten by any new data; instead, that new data is appended to the bottom of the text file. For example, the script in Listing 4.43 opens a text file and writes the current date and time to the file. Because the file is opened for appending, the current date and time is simply added to the bottom of the file. If you run the script several times, you will end up with a text file similar to this:
6/25/2002 8:49:47 AM
6/25/2002 8:49:48 AM
6/25/2002 8:50:33 AM
6/25/2002 8:50:35 AM
Example 4.43. Appending Data to a Text File
1 Const ForAppending = 8
2 Set objFSO = CreateObject("Scripting.FileSystemObject")
3 Set objFile = objFSO.OpenTextFile("C:FSOScriptLog.txt", ForAppending)
4 objFile.WriteLine Now
5 objFile.Close
The script uses the WriteLine method to ensure that each new date and time entry is written to a separate line. If the script used the Write method instead, the entries would run together, and the text file would look like this:
6/25/2002 8:49:47 AM6/25/2002 8:49:48 AM6/25/2002 8:50:33 AM6/25/2002 8:50:35 AM
Scripts often retrieve information from an outside source, such as a text file or a database. After this information has been retrieved, it needs to be stored in memory so that the script can act upon it. Information such as this can be stored in individual variables (one variable for each bit of information) or in an array. Alternatively, information can also be stored in a Dictionary object.
The Dictionary object functions as an associative array; that is, it stores values in key-item pairs. This is different from an array, which uses a numeric index to store values. For example, a one-dimensional array consisting of state capitals might look like this:
0 — Olympia
1 — Salem
2 — Sacramento
By contrast, a Dictionary containing state capitals might look like this:
Washington — Olympia
Oregon — Salem
California — Sacramento
If your command-line arguments consist of single-item entries, such as computer names, you can use an array to hold the item names. However, the Dictionary object does offer several advantages over arrays. In particular, the Dictionary object does not require a script to:
Specify (or modify) the number of elements being stored. With an array, you must specify the size in advance, or repeatedly resize the array as new elements are added.
Know the index number assigned to a particular element. Any element in a Dictionary can be accessed either by key or by item.
This makes Dictionaries an ideal tool for system administration scripts that need to retrieve information such as server names from an outside source and then store that information in memory for later use.
Because the Dictionary is a COM object, it must be instantiated in the same fashion as any other COM Object. The following code statement creates an instance of the Dictionary object:
Set objDictionary = CreateObject("Scripting.Dictionary")
After the Dictionary object has been created, you can then configure Dictionary properties and add elements to the Dictionary.
The Dictionary object has only one configurable property, Compare Mode, which plays an important role in determining which keys can be added and which ones cannot. (It is also important in verifying which keys are present in a Dictionary and which ones are not.) By default, a Dictionary is created in binary mode, which means each key in the Dictionary is based on its ASCII value. This is important because the ASCII value of an uppercase letter is different from the ASCII value of that same lowercase letter. In binary mode, both of these services can be added to the Dictionary as individual keys:
alerter
ALERTER
In other words, with binary mode, you can inadvertently add multiple entries for the same item. Binary mode dictionaries can also be difficult to search. For example, if you try to verify the existence of the key Alerter, you will be told that the key does not exist; that is because no key exists with that same pattern of uppercase and lowercase letters. As a result, you might end up adding yet another key for this same item.
When a Dictionary is configured in text mode, uppercase and lowercase letters are treated identically. This helps eliminate duplicate keys; you cannot add a key for ALERTER if a key for alerter already exists. It is also much easier to verify the existence of a key; searching for either alerter or ALERTer will find the key named Alerter.
To configure the Dictionary mode, create an instance of the Dictionary object and then set the CompareMode property to one of the following values:
0 —. Sets the mode to binary. This is the default value.
1 —. Sets the mode to text.
For example, the script in Listing 4.44 sets the Dictionary to text mode.
Example 4.44. Configuring the Dictionary Object
1 Const TextMode = 1
2 Set objDictionary = CreateObject("Scripting.Dictionary")
3 objDictionary.CompareMode = TextMode
You cannot change the CompareMode property of a Dictionary if that Dictionary contains any elements. This is because the binary mode allows you to differentiate between keys based solely on uppercase and lowercase letters. For example, each of these keys can be in the same Dictionary as long as the Dictionary is in binary mode:
apple
Apple
APPLE
In text mode, however, these three keys are considered identical. If you had these elements in a binary Dictionary and were able to reconfigure that Dictionary in text mode, the Dictionary would suddenly contain three duplicate keys, and it would fail. If you must reconfigure the Dictionary mode, you first need to remove all items from the Dictionary.
After you have created an instance of the Dictionary object, you can use the Add method to add key-item pairs to the dictionary. The Add method requires two parameters, which must be supplied in the following order and separated by a comma:
Key name
Item value
For example, the script in Listing 4.45 creates a Dictionary object and then adds the key-item pairs shown in Table 4.10.
Example 4.45. Adding Key-Item Pairs to a Dictionary
1 Set objDictionary = CreateObject("Scripting.Dictionary")
2 objDictionary.Add "Printer 1", "Printing"
3 objDictionary.Add "Printer 2", "Offline"
4 objDictionary.Add "Printer 3", "Printing"
Dictionary keys must be unique. For example, the following two script statements will generate a run-time error because, after the first line is interpreted, the key “Printer 1” will already be in the Dictionary:
objDictionary.Add "Printer 1", "Printing"
objDictionary.Add "Printer 1", "Offline"
One potential problem in using the Dictionary object is that any attempt to reference an element that is not contained in the Dictionary does not result in an error. Instead, the nonexistent element is added to the Dictionary. Consider the following script sample, which creates a Dictionary, adds three key-item pairs to the Dictionary, and then attempts to echo the value of a nonexistent item, Printer 4:
Set objDictionary = CreateObject("Scripting.Dictionary")
objDictionary.Add "Printer 1", "Printing"
objDictionary.Add "Printer 2", "Offline"
objDictionary.Add "Printer 3", "Printing"
Wscript.Echo objDictionary.Item("Printer 4")
When the script tries to echo the value of the nonexistent item, no run-time error occurs. Instead, the new key, Printer 4, is added to the Dictionary, along with the item value Null. As a result, the message box shown in Figure 4.9 appears.
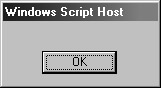
To avoid this problem, check for the existence of a key before trying to access the value of the item.
By itself, a Dictionary is of little use; a Dictionary is valuable only when you can access, enumerate, and modify the keys and items within that Dictionary. After you have created a Dictionary, you will probably want to do such things as:
Determine how many key-item pairs are in that Dictionary.
Enumerate the keys and/or items within the Dictionary.
Determine whether or not a specific key exists in the Dictionary.
Modify the value of a key or an item in the Dictionary.
Remove key-item pairs from the Dictionary.
All of these tasks can be carried out by using the methods and properties provided by the Script Runtime library.
Like most collections, the Dictionary object has a Count property that returns the number of key-item pairs in the collection. The script in Listing 4.46 creates an instance of the Dictionary object, adds three key-item pairs, and then echoes the value of the Count property.
Example 4.46. Determining the Number of Key-Item Pairs in a Dictionary
1 Set objDictionary = CreateObject("Scripting.Dictionary")
2 objDictionary.Add "Printer 1", "Printing"
3 objDictionary.Add "Printer 2", "Offline"
4 objDictionary.Add "Printer 3", "Printing"
5 Wscript.Echo objDictionary.Count
When this script runs, the value 3 (the number of key-item pairs in the collection) will be echoed to the screen.
A Dictionary is designed to serve as a temporary repository for information. Any data placed in a Dictionary is not intended for permanent storage; it is simply placed in the Dictionary temporarily and then later recalled for use within the script. For example, a list of server names might be placed in the Dictionary. Later the script might need to connect to each of these servers and retrieve a specified piece of information. As a result, the information stored in the Dictionary will have to be recalled each time the script needs to connect to a new server.
The Keys and Items methods can be used to return arrays consisting of, respectively, all the keys and all the items in a Dictionary. After you have called one of these methods, you can use a For Each loop to enumerate all the keys or items in the array.
For example, the script in Listing 4.47 creates a simple Dictionary with three keys and three items. After the Dictionary has been created, the script uses the Keys method to enumerate all the keys in the Dictionary and the Items method to enumerate all the items in the Dictionary.
Example 4.47. Enumerating Keys and Items in a Dictionary
 1 Set objDictionary = CreateObject("Scripting.Dictionary")
 2 objDictionary.Add "Printer 1", "Printing"
 3 objDictionary.Add "Printer 2", "Offline"
 4 objDictionary.Add "Printer 3", "Printing"
 5
 6 colKeys = objDictionary.Keys
 7 For Each strKey in colKeys
 8     Wscript.Echo strKey
 9 Next
10
11 colItems = objDictionary.Items
12 For Each strItem in colItems
13     Wscript.Echo strItem
14 Next
When this script is run under CScript, the following output appears in the command window:
Printer 1
Printer 2
Printer 3
Printing
Offline
Printing
To display the value of a specific item, use the Item method. For example, the following code statement displays the item value (Printing) associated with the key Printer 3:
Wscript.Echo objDictionary.Item("Printer 3")
One of the major advantages the Dictionary object has over an array or a standard collection is that you can quickly verify the existence of a particular key. For example, suppose you have a list of files installed on a computer and want to search that list to ensure that a particular set of DLLs has been installed. With either a collection or an array, there is no way to verify the existence of any one file without methodically looping through the entire set and checking each item individually.
With a Dictionary, however, you can use the Exists method to verify the existence of any given key. The Exists method takes a single parameter (the name of the key) and then returns a Boolean value: True if the key is in the Dictionary, False if it is not.
For example, the script in Listing 4.48 creates a Dictionary object and adds three elements: Printer 1, Printer 2, and Printer 3. The script then checks for the existence of a key named Printer 4 and echoes back the results of that check.
Example 4.48. Verifying the Existence of a Dictionary Key
1 Set objDictionary = CreateObject("Scripting.Dictionary")
2 objDictionary.Add "Printer 1", "Printing"
3 objDictionary.Add "Printer 2", "Offline"
4 objDictionary.Add "Printer 3", "Printing"
5 If objDictionary.Exists("Printer 4") Then
6     Wscript.Echo "Printer 4 is in the Dictionary."
7 Else
8     Wscript.Echo "Printer 4 is not in the Dictionary."
9 End If
When this script runs, the message “Printer 4 is not in the Dictionary” is echoed to the screen.
Items added to a Dictionary are not set in stone; in fact, you can modify the value of an item at any time. This allows you to do record keeping within a script. For example, your Dictionary might list the names of servers being targeted by the script. Each time the script is run against a server, the value of that Dictionary item can be changed to indicate whether the script succeeded. Right before the script terminates, it can then print a status report showing you a list of successes and failures.
The script shown in Listing 4.49 creates a Dictionary with three keys: servers atl-dc-01, atl-dc-02, and atl-dc-03. In each case, the item value for the key has been set to “No status.” This is done to indicate that status information on the server has not been obtained. The item values are then echoed to the screen.
After the Dictionary has been created, the item value for each of the three keys is changed by using the Item method, with the key name passed as the parameter. For example, the following code statement sets the item value for the key atl-dc-01 to “Available”:
objDictionary.Item("atl-dc-01") = "Available"
After the three item values have been changed, the new item values are echoed to the screen.
Example 4.49. Modifying the Value of a Dictionary Item
 1 Set objDictionary = CreateObject("Scripting.Dictionary")
 2 objDictionary.Add "atl-dc-01", "No status"
 3 objDictionary.Add "atl-dc-02", "No status"
 4 objDictionary.Add "atl-dc-03", "No status"
 5
 6 colKeys = objDictionary.Keys
 7 For Each strKey in colKeys
 8     Wscript.Echo strKey, objDictionary.Item(strKey)
 9 Next
10
11 objDictionary.Item("atl-dc-01") = "Available"
12 objDictionary.Item("atl-dc-02") = "Available"
13 objDictionary.Item("atl-dc-03") = "Unavailable"
14
15 colKeys = objDictionary.Keys
16 For Each strKey in colKeys
17     Wscript.Echo strKey, objDictionary.Item(strKey)
18 Next
When the script is run under CScript, the following information appears in the command window:
atl-dc-01 No status
atl-dc-02 No status
atl-dc-03 No status
atl-dc-01 Available
atl-dc-02 Available
atl-dc-03 Unavailable
Key-Item pairs can also be removed from a Dictionary. The Script Runtime library provides two methods for removing key-item pairs from a Dictionary:
RemoveAll, which removes all the key-item pairs in a Dictionary.
Remove, which removes a specified key-item pair from the Dictionary.
You might have scripts, particularly monitoring scripts, that perform some action, store the information in a Dictionary, and then either display the data or save the data to a text file or database. At that point, the script might pause for several minutes and then run a second time, gathering updated information. This pattern might continue indefinitely.
If you are using a Dictionary as a temporary storehouse for the gathered data, you will likely want to clear the Dictionary before you begin gathering the next set of data. To do that, you can simply use the RemoveAll method, which removes all the key-item pairs from the specified Dictionary.
For example, the script in Listing 4.50 creates a Dictionary with three elements. After displaying the Dictionary keys, the script deletes each key-item pair in the Dictionary by using the RemoveAll method in the following code statement:
objDictionary.RemoveAll
To verify that the elements were removed, the script then echoes the Dictionary keys again.
Example 4.50. Removing All the Key-Item Pairs in a Dictionary
 1 Set objDictionary = CreateObject("Scripting.Dictionary")
 2 objDictionary.Add "Printer 1", "Printing"
 3 objDictionary.Add "Printer 2", "Offline"
 4 objDictionary.Add "Printer 3", "Printing"
 5 colKeys = objDictionary.Keys
 6 Wscript.Echo "First run: "
 7 For Each strKey in colKeys
 8     Wscript.Echo strKey
 9 Next
10 objDictionary.RemoveAll
11 colKeys = objDictionary.Keys
12 Wscript.Echo VbCrLf & "Second run: "
13 For Each strKey in colKeys
14     Wscript.Echo strKey
15 Next
When this script is run under the WSH CScript host, the following output appears in the command window. As you can see, the second time through the dictionary is empty and contains no keys (this is not an error, because collections are allowed to contain 0 items):
First run:
Printer 1
Printer 2
Printer 3

Second run:
Instead of removing all the key-item pairs from a Dictionary, you might at times want to remove only a single key and item. For example, suppose you have a script that retrieves event-log events from a series of computers. The script is designed to try each computer in succession and to keep track of successes and failures. For each failed attempt to contact a computer, the script tries again, continuing on until all the computers have been contacted and all the event-log events retrieved.
In this scenario, you might have a Dictionary consisting of the following keys:
atl-dc-01
atl-dc-02
atl-dc-03
atl-dc-04
atl-dc-05
When the script runs, it might be unable to contact computers atl-dc-03 and atl-dc-04. In that case, the script must attempt to contact these computers again. However, how will the script know which computers have been contacted and which ones have not?
One way to solve this problem is to simply remove successful contacts from the Dictionary; after the first iteration, the Dictionary will then consist only of the following elements.
atl-dc-03
atl-dc-04
Each time a computer is contacted, the corresponding Dictionary element is removed. When the Dictionary no longer contains any elements, that means that all the computers have been contacted and the script can then complete.
To remove a Dictionary element, use the Remove method, passing the key name as the only parameter. For example, the following code statement removes the key atl-dc-02 (and its associated item):
objDictionary.Remove("atl-dc-02")
The script in Listing 4.51 creates a Dictionary with three elements and then echoes the Dictionary keys. The script then removes the Printer 2 key and echoes the Dictionary keys again.
Example 4.51. Removing a Specified Key-Item Pair from a Dictionary
 1 Set objDictionary = CreateObject("Scripting.Dictionary")
 2 objDictionary.Add "Printer 1", "Printing"
 3 objDictionary.Add "Printer 2", "Offline"
 4 objDictionary.Add "Printer 3", "Printing"
 5 colKeys = objDictionary.Keys
 6 Wscript.Echo "First run: "
 7 For Each strKey in colKeys
 8     Wscript.Echo strKey
 9 Next
10 objDictionary.Remove("Printer 2")
11 colKeys = objDictionary.Keys
12 Wscript.Echo VbCrLf & "Second run: "
13 For Each strKey in colKeys
14     Wscript.Echo strKey
15 Next
When this script is run under CScript, the following output appears in the command window:
First run:
Printer 1
Printer 2
Printer 3

Second run:
Printer 1
Printer 3
At the end of the second iteration, the key Printer 2 is no longer present in the Dictionary.