Files and folders are the lifeblood of any organization; this makes file system administration one of the more important responsibilities assigned to system administrators. Of course, file system administration is also one of the more difficult responsibilities to carry out, simply because files and folders are scattered on multiple hard disks and multiple computers throughout the organization. Scripts can help make file system management much easier, particularly when the files and folders to be managed are located on remote computers.
In This Chapter
Scripts can automate many tasks associated with file and folder management, tasks that system administrators must perform on a regular basis. You can simplify the daily routine of system administrators by creating and running scripts that do such things as:
Manage the folder structure to make files easy for users to locate.
Ensure that the proper versions of specific files are installed and updated when necessary.
Track files and folders, periodically culling files and folders that are no longer being used.
Move files and folders from one location to another as circumstances dictate.
Create and manage shared folders to provide access to files from anywhere within the organization.
Scripts are especially useful for organizations that must carry out file and folder management tasks simultaneously on multiple computers. For example, you can write scripts that copy the same set of templates to 100 different file servers, scripts that check the version of a particular .dll file on all your Domain Name System (DNS) servers, or scripts that delete outdated files from all your shared folders.
Aside from automating tasks, scripts can schedule these tasks to run off-hours, when the shuffling of files and folders does not inconvenience users, and when greater network bandwidth ensures that these tasks run as quickly as possible, without unduly affecting system resources.
Scripts designed to help with file system management typically rely on the FileSystemObject. (For more information about the FileSystemObject, see “Script Runtime Primer” in this book.) For example, a popular Internet scripting site lists more than 100 scripts that carry out file system management tasks using the FileSystemObject, but none that use Windows Management Instrumentation (WMI). Despite the popularity of the FileSystemObject, however, there are several reasons why the primary scripting enabler for file system management should be WMI, and in particular, the Win32_Directory and CIM_Datafile classes.
To a large degree, the FileSystemObject and WMI have overlapping functionality: You can use either one to copy, delete, move, rename, or otherwise manipulate files and folders. However, WMI has two major advantages over the FileSystemObject. First, WMI works as well on remote computers as it does on the local computer. By contrast, the FileSystemObject is designed to work solely on the local computer; to use the FileSystemObject against a remote computer, you typically have to configure both computers to allow remote script execution using the WSHController Object.
Second, WMI can work with collections of files and folders across an entire computer. For example, using WMI you can delete all the .mp3 files on a computer by using a simple script that essentially says, “Locate all the .mp3 files on this computer, and then delete them.” By contrast, the FileSystemObject is designed to work with a single folder at a time. To delete all the .mp3 files on a computer, you need to bind to each folder on the computer, check for the existence of .mp3 files, and then delete each one.
WMI does have some limitations, however. Enumerating files and folders using WMI can be slow, and processor-intensive. For example, on a Microsoft® Windows® 2000–based computer with approximately 80,000 files, the FileSystemObject returned a list of all files in less than 5 minutes. By contrast, WMI required over 30 minutes to return the same list. During that time, processor use averaged about 30 percent, often spiking above 50 percent. Although you would normally not need to retrieve a list of every single file on a computer, it is clearly not advisable to use WMI if you ever do need to perform this task.
Moreover, processor-intensive WMI queries cannot always be stopped simply by terminating the script. Suppose you start a query that returns a list of all the files on the file system. After a few minutes, you change your mind and terminate the script. There is a very good chance that the query will continue to run, using up memory and draining system resources, even though the script has been stopped. This is because the script and its query run on separate threads. To stop a query such as this, you typically have to stop and then restart the WMI service.
In addition, you cannot speed up a file or folder query by requesting only a subset of file or folder properties. On a computer running Windows 2000, this query, which returns all the properties for all the files, took about 30 minutes to complete:
"Select * From CIM_Datafile"
Although this query returns only the name property of the files, it required the same amount of time to complete:
"Select Name From CIM_Datafile"
Administrators who write scripts to manage files and folders typically use the FileSystemObject rather than WMI. This is due more to familiarity than to anything else; most of the same core capabilities are available using either the FileSystemObject or WMI. The leads to an obvious question: when should you use the FileSystemObject, and when should you use WMI? Or does it even matter?
There is no simple answer to that question; instead, the best approach usually depends on what your script needs to accomplish. When choosing a method for managing files and folders, you should consider the impact of:
Speed of execution.
The ability to recover from errors.
The ability to run against remote computers.
Ease of use.
If your goal is to enumerate all the files on a hard disk, the FileSystemObject will be much faster. For example, on a Windows 2000 Server family–based test computer, with a relatively modest 21,963 files, the FileSystemObject required 68 seconds to return a list of all the files on drive C. By contrast, WMI took nearly 10 times as long (661 seconds) to complete the same operation.
With more targeted queries, however, WMI can be both faster and more efficient. For example, the FileSystemObject required 90 seconds to return a list of the 91 .bmp files on the Windows 2000–based test computer. It actually takes longer for the FileSystemObject to return a subset of files than it does to return the entire set of files; this is because the FileSystemObject does not allow you to use SQL-type queries. Instead, it uses recursion to return a list of all the files on the computer and then, in this case, individually checks each file to see whether the extension is .bmp.
Using a filtered query, WMI returned the list of .bmp files in 18 seconds. WMI is faster in this case because it can request a collection of all .bmp files without having to return the entire file set and then check the file name extension of each item in the collection.
The FileSystemObject sometimes provides a faster solution; it rarely, if ever, provides a more robust solution. The FileSystemObject provides no ability to recover from an error, even if your script includes the On Error Resume Next statement.
For example, suppose you have a script designed to delete 1,000 files from a computer. If an error occurs with the very first file, the script fails, and no attempt is made to delete any of the remaining files. If an error condition occurs, the FileSystemObject — and the script — immediately terminates. If an error occurs partway through an operation, you will have to manually determine which portions of the procedure succeeded and which portions did not.
WMI is better able to recover from a failed operation. If WMI is unable to delete the first of the 1,000 files, it simply reports an error condition and then attempts to delete the next file in the collection. By logging any errors that occur, you can easily determine which portions of a procedure succeeded and which ones did not.
Note
You can log these individual errors because WMI treats each file operation separately; if you have 1,000 files, WMI treats this as 1,000 separate deletions. The FileSystemObject, by comparison, treats each file operation as one procedure, regardless of whether you have 1 file, 10 files, or 1,000 files.
WMI is also able to more intelligently deal with file and folder access permissions. For example, suppose you write a script to enumerate all the files on a hard drive. If WMI encounters a folder that you do not have access to, the script simply skips that folder and continues. The FileSystemObject, however, attempts to list the files in that folder. That operation will fail because you do not have access to the folder. In turn, the FileSystemObject, and your script, will also fail. This is a problem with Windows 2000–based computers because they typically include a System Volume Information folder that, by default, grants access only to the operating system. Without taking precautions to work around this folder, any attempt to enumerate all the files on a computer using the FileSystemObject is guaranteed to fail.
One of the major benefits of WMI is that a script originally designed to run on the local computer can be easily modified to run on a remote computer. For example, this script sets the name of the computer (the variable strComputer) to a dot (“.”). In WMI, specifying “.” as the computer name causes the script to run against the local computer.
strComputer = "."
Set objWMIService = GetObject _
    ("winmgmts:" & "!\" & strComputer & "
ootcimv2")
To run the script against a remote computer (for example, atl-dc-01), simply change the value of the variable strComputer:
strComputer = "atl-dc-01"
Set objWMIService = GetObject _
    ("winmgmts:" & "!\" & strComputer & "
ootcimv2")
For most file and folder operations, this is the only change required to make a script work on a remote computer.
Working with remote computers using the FileSystemObject is more complicated. It is easy to access a shared folder using the FileSystemObject; simply connect to the folder using the Universal Naming Convention (UNC) path (for example, \atl-dc-01scripts). However, it is much more difficult to carry out such tasks as searching a remote computer for all files of a specified type. For the most part, there are only two ways to carry out this procedure:
Configure an instance of the WSHController object, which allows you to run a script against a remote computer as if that script was running locally.
Connect to the administrative shared folders of the remote computer (for example, using the path \atl-dc-01C$ to connect to drive C on the remote computer). This approach works, provided the administrative shared folders on the remote machines are not disabled.
Depending on the operation you are attempting, you might also have to determine what disk drives are installed on the remote computer. WMI can return all the files within the file system, regardless of the drive they are stored on. By contrast, the FileSystemObject can work only on a disk-by-disk basis. Before you can search a computer for files, you must first obtain a list of all the disk drives and then individually search each drive.
WMI allows you to work with collections and to create queries that return a targeted set of items. This makes WMI easier to use for tasks that require you to do such things as identify all the read-only folders on a computer or delete all the .mp3 files in a file system; you issue a request, and WMI returns a collection of all those items, regardless of their physical location on the computer. This means that you can accomplish the task in far fewer lines of code than it would take to accomplish the same task using the FileSystemObject.
For example, this WMI query returns a collection of all the .mp3 files installed on all the disks on a computer:
"SELECT * FROM CIM_DataFile WHERE Extension = 'MP3'"
To achieve the same result using the FileSystemObject, you must write a script that:
Returns a list of all the disk drives on the computer.
Verifies that each disk drive is ready for use.
Recursively searches each drive in order to locate all the folders and subfolders.
Recursively searches each folder and subfolder to locate all the files.
Checks each extension to see whether the file is an .mp3 file.
Keeps track of each .mp3 file.
The Windows operating system features another COM object, the Shell object, that includes a number of properties and methods useful in managing file systems. Because the Shell object offers capabilities not available using either the FileSystemObject or WMI, you should also consider it when writing scripts for file system management.
The Shell is the portion of the Windows operating system tasked with managing and providing access to such things as:
Files and folders
Network printers
Other networked computers
Control Panel applications
The Recycle Bin
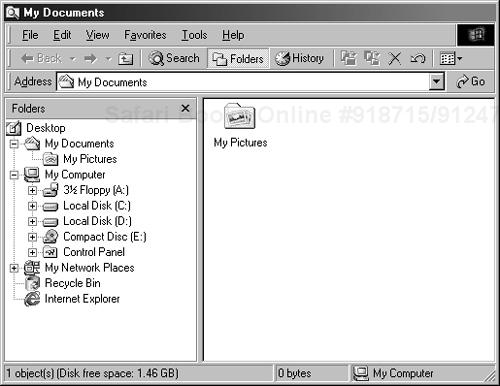
The Shell namespace provides a way to manage these objects in a tree-structured hierarchy. At the top of this hierarchy is the Desktop; directly below the Desktop are virtual folders such as My Computer, My Network Places, and Recycle Bin. Within each of these virtual folders are other items (such as files, folders, and printers) that can also be managed using the Shell. If you start Windows Explorer, you see a visual representation of the Shell, as shown in Figure 11.1.
The Shell itself is composed largely of a series of COM objects, many of which can be accessed using VBScript. Included among these COM objects are folders. Within the Windows operating system, folders are individual COM objects that possess:
Properties, such as a size and a creation date.
Items (typically files stored within the folder).
Methods (known as verbs), which represent actions — such as Copy and Delete — that can be carried out on the folder.
Folder objects — and all the properties, items, and methods belonging to those objects — can be accessed through the Shell object. The Shell object provides a way to programmatically reproduce all the features found in the Windows Shell. This means that file system management tasks — which typically involve working with files and folders — can be carried out using the Shell object.
Scripting the Shell object is not as intuitive as scripting with WMI or the FileSystemObject. For example, to bind to a file using a Shell object script, you must:
Create an instance of the Shell object.
Create an instance of a Folder object.
Create a collection of items in the folder.
Iterate through the collection until you find the desired file.
This is considerably more complicated than using the FileSystemObject or WMI. On the other hand, the Shell object does offer a number of capabilities not found in either WMI or the FileSystemObject, including the ability to:
Retrieve extended properties for a file or folder (for example, the artist, album title, and track number for an audio file).
Display a progress dialog box while copying or moving folders.
Retrieve the locations of all the special folders on a computer.
Carry out any of the commands found on the shortcut menu when you right-click a file or folder.
In this chapter, the Shell object is used whenever it provides a unique capability not available using either WMI or the FileSystemObject.
Folders are file system objects designed to contain other file system objects. This does not mean that all folders are alike, however. Instead, folders can vary considerably. Some folders are operating system folders, which generally should not be modified by a script. Some folders are read-only, which means that users can access the contents of that folder but cannot add to, delete from, or modify those contents. Some folders are compressed for optimal storage, while others are hidden and not visible to users.
WMI uses the Win32_Directory class to manage folders. Significantly, the properties and methods available in this class are identical to the properties and methods available in the CIM_DataFile class, the class used to manage files. This means that after you have learned how to manage folders using WMI, you will, without any extra work, also know how to manage files.
Some of the more useful Win32_Directory class properties are shown in Table 11.1. These properties are identical to the properties found in the CIM_DataFile class.
Table 11.1. Win32_Directory Properties
Property | Description |
|---|---|
Archive | Boolean value indicating whether the archive bit on the folder has been set. The archive bit is used by backup programs to identify files that should be backed up. |
Compressed | Boolean value indicating whether or not the folder has been compressed. WMI recognizes folders compressed using WMI itself or using the graphical user interface; it does not, however, recognize .ZIP files as being compressed. |
CompressionMethod | Method used to compress the file system object. Often reported simply as “Compressed.” |
CreationDate | Date that the file system object was created. |
CSName | Name of the computer where the file system object is stored. |
Drive | Drive letter of the drive where the file system object is stored. |
EightDotThreeFileName | MS-DOS®–compatible name for the folder. For example, the EightDotThreeFileName for the folder C:Program Files might be C:Progra~1. |
Encrypted | Boolean value indicating whether or not the folder has been encrypted. |
EncryptionMethod | Method used to encrypt the file system object. Often reported simply as “Encryption.” |
Extension | File name extension for the file system object, not including the dot (.) that separates the extension from the file name. |
Name of the file system object, not including the extension. | |
FileSize | Size of the file system object, in bytes. Although folders possess a FileSize property, the value 0 is always returned. To determine the size of a folder, use the FileSystemObject or add up the size of all the files stored in the folder. |
FileType | Type of file system object, based on the extension and the default registration for that extension. For example, an .mdb file is likely to have the file type Microsoft Access Application. An .htm file likely has the file type HTML Document. Folders are typically reported simply as Folder. |
FSName | Type of file system (NTFS, FAT, FAT32) installed on the drive where the file or folder is located. |
Hidden | Boolean value indicating whether the file system object is hidden. |
LastAccessed | Date that the object was last accessed. |
LastModified | Date that the object was last modified. |
Name | Full path name of the file system object. For example: c:windowssystem32wbem. |
Path | Path for the folder. The path includes the leading and trailing backslashes, but not the drive letter or the folder name. For the folder c:windowssystem32wbem, the path is windowssystem32. For the folder c:scripts, the path is . |
Readable | Boolean value indicating whether you can read items in the folder. |
System | Boolean value indicating whether the object is a system folder. |
Writeable | Boolean value indicating whether you can write to the folder. |
The relationship betweenthe Win32_Directory properties and the folder properties available through Windows Explorer is shown in Figure 11.2.

In addition, the Win32_Directory and CIM_DataFile classes share the same set of methods. Some of the more commonly used methods are shown in Table 11.2.
Table 11.2. Win32_Directory and CIM_DataFile Methods
Method | Description |
|---|---|
Copy | Copies the file system object to a new location. |
Rename | Renames the file system object. |
Delete | Deletes the object from the file system. |
Compress | Compresses a file system object using Windows compression. |
Uncompress | Uncompresses a file system object that was compressed using Windows compression. |
These methods return the values shown in Table 11.3. Because files and folders share the same set of methods, you can copy, delete, or rename both files and folders using the same approach. Similarly, you can easily add error handling to file and folder scripts; the code used to interpret error codes in one script is exactly the same as the code used to interpret error codes in any other file or folder management script.
Table 11.3. WMI File and Folder Return Values
Value | Description |
|---|---|
0 | Operation completed successfully. |
2 | Access denied. |
8 | An unspecified failure occurred. |
9 | Invalid name. |
10 | Object already exists. |
11 | The file system is not NTFS. |
12 | The platform is not Windows NT®, Windows 2000, or Windows® XP. |
13 | The drive is not the same. |
14 | The folder is not empty. |
15 | A sharing violation has occurred. |
16 | Invalid file. |
17 | The user does not have the rights required to perform this operation. |
21 | Invalid parameter. |
In addition to the Win32_Directory class, the Win32_Subdirectory association class is also used to manage files and folders. The Win32_Subdirectory class relates a folder and its immediate subfolders. For example, in the folder structure C:ScriptsLogs, Logs is a subfolder of Scripts, and Scripts is a subfolder of the root folder C:. However, Logs is not considered a subfolder of C:.
The primary advantage of using scripts for file system management is the fact that scripts can carry out tasks that would be too tedious and time-consuming to perform using either the graphical user interface or a command-line tool. For example, suppose you have 500 domain controllers, and a new organizational policy requires you to verify the following:
It would take a significant amount of time to carry out this task using Windows Explorer or a command-line tool. By contrast, in about a half hour you can write a script that connects to each domain controller, performs the requisite checks, and logs the data. You can start this script before you go home, and when you return to work the next day, the verification will be complete.
Scripts can be used to carry out tasks such as these because, within the Windows shell, folders are actually COM objects. As COM objects, folders have properties that can be retrieved, properties that answer questions such as:
Is this folder hidden?
Is this folder read-only?
Is this folder compressed?
You can retrieve the properties of any folder in the file system using the Win32_Directory class. The properties available using this class are shown in Table 11.1. To retrieve the properties for a single folder, construct a Windows Query Language (WQL) query for the Win32_Directory class, making sure that you include the name of the folder. For example, this query binds to the folder D:Archive:
"SELECT * FROM Win32_Directory WHERE Name = 'D:\Archive'"
When specifying a file or folder name in a WQL query, be sure you use two backslashes (\) to separate path components.
Scripting Steps
Listing 11.1 contains a script that retrieves properties for the folder C:Scripts. To carry out this task, the script must perform the following steps:
Create a variable to specify the computer name.
Use a GetObject call to connect to the WMI namespace rootcimv2, and set the impersonation level to “impersonate.”
Use the ExecQuery method to query the Win32_Directory class.
To limit data retrieval to a specified folder, a Where clause is included restricting the returned folders to those where Name equals C:\Scripts. You must include both backslashes (\) in the specified name.
For the single folder in the collection, echo the properties shown in Listing 11.1.
Example 11.1. Retrieving Folder Properties
 1 strComputer = "."
 2 Set objWMIService = GetObject("winmgmts:" _
 3     & "{impersonationLevel=impersonate}!\" & strComputer & "
ootcimv2")
 4 Set colFolders = objWMIService.ExecQuery _
 5     ("SELECT * FROM Win32_Directory WHERE Name = 'c:\Scripts'")
 6 For Each objFolder in colFolders
 7     Wscript.Echo "Archive: " & objFolder.Archive
 8     Wscript.Echo "Caption: " & objFolder.Caption
 9     Wscript.Echo "Compressed: " & objFolder.Compressed
10     Wscript.Echo "Compression method: " & objFolder.CompressionMethod
11     Wscript.Echo "Creation date: " & objFolder.CreationDate
12     Wscript.Echo "Encrypted: " & objFolder.Encrypted
13     Wscript.Echo "Encryption method: " & objFolder.EncryptionMethod
14     Wscript.Echo "Hidden: " & objFolder.Hidden
15     Wscript.Echo "In use count: " & objFolder.InUseCount
16     Wscript.Echo "Last accessed: " & objFolder.LastAccessed
17     Wscript.Echo "Last modified: " & objFolder.LastModified
18     Wscript.Echo "Name: " & objFolder.Name
19     Wscript.Echo "Path: " & objFolder.Path
20     Wscript.Echo "Readable: " & objFolder.Readable
21     Wscript.Echo "System: " & objFolder.System
22     Wscript.Echo "Writeable: " & objFolder.Writeable
23 NextAs demonstrated in the preceding script, WMI can be used to bind to and retrieve the properties from a specific file system folder. In addition, WMI can be used to retrieve the properties for all the folders in the file system, allowing you to easily map the layout of your disk drives. Although you probably do not need to enumerate all the folders on a regular basis, carrying out this task on occasion can help you spot anomalies in the file system, including such things as folders that:
Should never have been created.
Are no longer required.
Do not adhere to your file system naming convention.
To retrieve a list of all the folders on a computer, use the following WQL query:
"SELECT * FROM Win32_Directory"
If you want to limit data retrieval to a single disk drive, include a Where clause specifying the drive letter. For example, this query returns a list of all the folders on drive C:
"SELECT * FROM Win32_Directory WHERE Drive = 'C'"
If you need to enumerate all the folders on a computer, be aware that this query can take an extended time to complete. For example, on a Windows 2000—based computer with 5,788 folders, a script that returns the name of each folder required 429 seconds to complete.
Scripting Steps
Listing 11.2 contains a script that returns a list of all of the folders on a computer. To carry out this task, the script must perform the following steps:
Create a variable to specify the computer name.
Use a GetObject call to connect to the WMI namespace rootcimv2, and set the impersonation level to “impersonate.”
Use the ExecQuery method to query the Win32_Directory class.
This returns a collection of all the folders on the computer.
For each folder in the collection, echo the folder name.
Example 11.2. Enumerating All the Folders on a Computer
 1 strComputer = "."
 2 Set objWMIService = GetObject("winmgmts:" _
 3     & "{impersonationLevel=impersonate}!\" & strComputer & "
ootcimv2")
 4 Set colFolders = objWMIService.ExecQuery("SELECT * FROM Win32_Directory")
 5 For Each objFolder in colFolders
 6     Wscript.Echo objFolder.Name
7 NextInstead of enumerating all the folders and subfolders on a computer, a more common task is examining the subfolders for a single folder. For example, you might have a folder named Users, and you might encourage your users to store their documents in this folder. Enumerating the subfolders within the Users folder can tell you which users have set up personal folders within that parent folder.
The Win32_Subdirectory class is an association class that allows you to associate a folder with its subfolders (or with its parent folder). Association classes typically have very few properties; their purpose is simply to derive the associations between objects. The Win32_Subdirectory class, for example, has only two properties:
GroupComponent. Returns the parent folder of a folder.
PartComponent. Returns the first-level subfolders of a folder.
To return a collection of subfolders for a folder, create an association query that sets the ResultRole to PartComponent. This indicates that all the items in the returned collection must play the role of a PartComponent, or subfolder, of the folder object. To return the parent folder for a folder, set the ResultRole to GroupComponent.
Figure 11.3 shows a sample folder structure. In this example, the associations for the folder Subfolder 1 are:
GroupComponent: Scripts.
PartComponent: Subfolder 1A; Subfolder 1B.

The Win32_Subfolder class works only on the file system level immediately above or immediately below the specified folder. If you retrieve the subfolders for the folder Scripts shown in Figure 11.3, the following two items are returned:
Subfolder 1
Subfolder 2
However, the subfolders of those subfolders (for example, Subfolder 1A and Subfolder 1B) are not included in the returned collection. This is because these folders are not directly contained within Scripts. To enumerate subfolders of subfolders, you need to create a recursive function that:
Returns a collection of subfolders.
Returns a collection of subfolders stored in each of those subfolders.
Returns a collection of subfolders stored in each of those sub-subfolders.
The recursion continues until every subfolder has been queried.
Scripting Steps
Listing 11.3 contains a script that returns a list of all subfolders within the folder C:Scripts. To carry out this task, the script must perform the following steps:
Create a variable to specify the computer name.
Use a GetObject call to connect to the WMI namespace rootcimv2, and set the impersonation level to “impersonate.”
Use the ExecQuery method and an Associators of query to return a collection of all the subfolders within the folder C:Scripts. The Associators of query requires the following parameters:
The source class, Win32_Directory, where Name equals C:Scripts.
The associated class, Win32_Subdirectory. This limits data retrieval to folders. Files are not included in the returned collection.
The ResultRole, PartComponent, indicating that the items in the returned collection should be subfolders. Setting the ResultRole to GroupComponent would return the parent folder for C:Scripts.
For each subfolder in the collection, echo the folder name.
Example 11.3. Enumerating the Subfolders of a Folder
 1 strComputer = "."
 2 Set objWMIService = GetObject("winmgmts:" _
 3     & "{impersonationLevel=impersonate}!\" & strComputer & "
ootcimv2")
 4 Set colSubfolders = objWMIService.ExecQuery _
 5     ("ASSOCIATORS OF {Win32_Directory.Name='c:scripts'} " _
 6         & "WHERE AssocClass = Win32_Subdirectory " _
 7             & "ResultRole = PartComponent")
 8 For Each objFolder in colSubfolders
 9     Wscript.Echo objFolder.Name
10 NextThe previous two topics — generating a list of all the folders on a computer, and generating a list of all the subfolders contained in a specified folder — illustrate basic forms of folder management. Unfortunately, real-world folder management does not always fall into such tidy categories. Instead, folder management often requires you to search through the entire file system looking for folders that meet specific criteria.
For example, you might need to return a list of all the encrypted folders or all the compressed folders on a computer, regardless of their physical location. With the FileSystemObject, this type of task can be achieved only by methodically retrieving each folder on each drive and then checking to see whether it meets the criteria.
WMI makes it much easier to return a list of folders meeting specific criteria; all you have to do is include the criteria within your WQL query. For example, this query returns a collection of all the compressed folders on a computer:
SELECT * FROM Win32_Directory WHERE Compressed = True
Listing 11.4 contains a script that returns a list of all the hidden folders on a computer. To carry out this task, the script must perform the following steps:
Create a variable to specify the computer name.
Use a GetObject call to connect to the WMI namespace rootcimv2, and set the impersonation level to “impersonate.”
Use the ExecQuery method to query the Win32_Directory class.
To limit data retrieval to hidden folders, a Where clause is included restricting the returned folders to those for which the Hidden property is True.
For each folder in the collection, echo the folder name.
Example 11.4. Enumerating a Specific Set of Folders
 1 strComputer = "."
 2 Set objWMIService = GetObject("winmgmts:" _
 3     & "{impersonationLevel=impersonate}!\" & strComputer & "
ootcimv2")
 4 Set colFiles = objWMIService.ExecQuery _
 5     ("SELECT * FROM Win32_Directory WHERE Hidden = True")
 6 For Each objFile in colFiles
 7     Wscript.Echo objFile.Name
8 NextFolder date properties — CreationDate, LastAccessed, and LastModified — are very useful in managing folders. For example, you might use the CreationDate property to return a list of all the folders created in the past week. O,r you might use the LastAccessed property to identify rarely used folders, folders that might be candidates for compression or for removal from the file system.
The primary complication in working with folder dates is the fact that WMI stores date and time information using the UTC (Universal Time Coordinate) format. In this format, dates are displayed as yyyymmddHHMMSS.xxxxxx±UUU, where:
yyyy represents the year.
mm represents the month.
dd represents the day.
HH represents the hour (in 24-hour format).
MM represents the minutes.
SS represents the seconds.
xxxxxx represents the milliseconds.
±UUU represents the difference, in minutes, between the current time zone and Greenwich mean time.
For example, in UTC format, a folder created on October 18, 2002, at 10:45:39 A.M. Pacific Standard Time returns this CreationDate value:
20021018104539.000000–480
This means that you cannot specify a standard date, such as 10/18/2002, in your search query; WMI will not be able to interpret this date. Instead, you will need to convert any dates used in your queries to UTC format. Your converted date should use the items in Table 11.4 in each character position in the 25-character UTC string.
Table 11.4. Converting a Date to UTC Format
Character Positions | Description | Sample Value |
|---|---|---|
1–4 | Four digits representing the year (such as 2001 or 2002). | 2002 |
5–6 | Two digits representing the month. For example, January is represented by the digits 01; November by the digits 11. | 10 |
7–8 | Two digits representing the day of the month. For example, the 5th day is represented by the digits 05; the 23rd day by the digits 23. | 18 |
9–14 | Six zeros representing the hours, minutes, and seconds of the day (in 24-hour format). If you prefer, you can specify values other than zero to create more finely-targeted searches. For example, to search for folders created after 1:47 P.M. on a given day, set these characters to 134700, where 13 represents the hours (1:00 P.M. in 24-hour format), 47 represents the minutes, and 00 represents the seconds. | 000000 |
15 | A period (.). | . |
16–21 | Six zeros representing the milliseconds. | 000000 |
22–25 | The number of minutes difference between your local time and Greenwich mean time. | –480 |
You can determine the offset from Greenwich mean time by using this script:
strComputer = "."
Set objWMIService = GetObject("winmgmts:" _
    & "{impersonationLevel=impersonate}!\" & strComputer & "
ootcimv2")
Set colTimeZone = objWMIService.ExecQuery _
    ("SELECT * FROM Win32_TimeZone")
For Each objTimeZone in colTimeZone
    Wscript.Echo "Offset: "& objTimeZone.Bias
 Next
To search for folders using the date October 18, 2002, you would use a value similar to this (depending on your time zone):
20021018000000.000000–480
Scripting Steps
Listing 11.5 contains a script that returns a list of all the folders on a computer that have been created since March 1, 2002. To carry out this task, the script must perform the following steps:
Create a variable named dtmTargetDate and set it to the value “20020301000000.000000–420.” This value, which represents the target date, March 1, 2002, can be parsed as follows:
2002 —Year.
03 —Month (in two-digit format).
01 —Day (in two-digit format).
000000 —Hours, minutes, and seconds of the day.
.000000 —Milliseconds.
–480 —Offset (in minutes) from Greenwich mean time.
Use a GetObject call to connect to the WMI namespace rootcimv2, and set the impersonation level to “impersonate.”
Use the ExecQuery method to query the Win32_Directory class.
To limit data retrieval to a specified set of folders, a Where clause is included restricting the returned folders to those with a CreationDate later than the target date of March 1, 2002.
For each folder in the collection, echo the folder name.
Example 11.5. Enumerating Folders Using Dates
 1 dtmTargetDate = "20020301000000.000000-420"
 2 strComputer = "."
 3 Set objWMIService = GetObject _
 4     ("winmgmts:" & "!\" & strComputer & "
ootcimv2")
 5 Set colFolders = objWMIService.ExecQuery _
 6     ("SELECT * FROM Win32_Directory WHERE CreationDate > '" & _
 7         dtmtargetDate & "'")
 8 For Each objFolder in colFolders
 9     Wscript.Echo objFolder.Name
10 NextThe Windows operating system includes a number of special folders, folders that have a well-defined purpose and are generally present on all computers. These special folders include virtual folders, such as My Documents and Recycle Bin, as well as physical file system folders such as Program Files and Fonts. Because of the importance of these folders, it is useful for a system administrator to be able to locate and, if necessary, manipulate these folders on any computer.
However, there are at least two problems with identifying special folders on a computer. First, the location of these folders can vary. Mary might have her My Documents folder on drive C, Ken might have his My Documents folder on drive D, while Mike might have his My Documents folder located on a network drive. In addition, there is no guarantee that these three folders are all named My Documents. Special folders can be renamed; Mary might retain the name My Documents for this folder, but Ken might have renamed his My Documents folder to Ken Myer’s Personal Folder.
Fortunately, the operating system does not use physical locations or names to keep track of special folders. Instead, special folders are tracked using CSIDLs, a standard method for identifying these objects regardless of their name or location. For example, the CSIDL for the Recycle Bin is this:
{645FF040-5081-101B-9F08-00AA002F954E}
Other special folders have similar CSIDLs.
Windows Script Host (WSH) can be used to retrieve the location of many of these special folders, particularly those that have a physical location. WSH can retrieve these locations by specifying a folder mnemonic (StartMenu, MyDocuments, Fonts). However, WSH cannot retrieve the location of all the special folders, particularly virtual folders (such as My Network Places) that do not have a physical location. In addition, WSH can only return the location of special folders; it cannot be used to enumerate the items within those folders or to perform any action on those folders.
If you need to locate any special folder on the computer or if you need to perform an action on a particular special folder, you can use the Shell object instead. The Shell object includes a number of predefined constants that can be passed to the Namespace method and return a folder object for a special folder. For example, the constant &H21& represents the Cookies folder; this code returns a folder object for the Cookies folder:
Set objShell = CreateObject("Shell.Application")
Set objFolder = objShell.Namespace(&H21&)
A list of Shell special folder constants and their Windows Script Host equivalents (where applicable) is shown in Table 11.5. WSH has one advantage over the Shell object: the WSH mnemonics (Programs for the Programs folder, MyDocuments for the My Documents folder) are easier to use and easier to remember than the Shell object constants. However, the Shell object can enumerate many more special folders than WSH can.
Table 11.5. Special Folder Constants and Their WSH Equivalents
Constant | Special Folder | WSH Equivalent |
|---|---|---|
&H1& | Internet Explorer | None |
&H2& | Programs | Programs |
&H3& | Control Panel | None |
&H4& | Printers and Faxes | None |
&H5& | My Documents | MyDocuments |
&H6& | Favorites | Favorites |
&H7& | Startup | Startup |
&H8& | My Recent Documents | Recent |
&H9& | SendTo | SendTo |
&Ha& | Recycle Bin | None |
&Hb& | Start Menu | StartMenu |
&Hd& | My Music | None |
&He& | My Videos | None |
&H10& | Desktop | Desktop |
&H11& | My Computer | None |
&H12& | My Network Places | None |
&H13& | NetHood | Nethood |
&H14& | Fonts | Fonts |
&H15& | Templates | Templates |
&H16& | All Users Start Menu | AllUsersStartMenu |
&H17& | All Users Programs | AllUsersPrograms |
&H18& | All Users Startup | AllUsersStartup |
&H19& | All Users Desktop | AllUsersDesktop |
&H1a& | Application Data | None |
PrintHood | PrintHood | |
&H1c& | Local SettingsApplication Data | None |
&H19& | All Users Favorites | None |
&H20& | Local Settings Temporary Internet Files | None |
&H21& | Cookies | None |
&H22& | Local SettingsHistory | None |
&H23& | All Users Application Data | None |
&H24& | Windows | None |
&H25& | System32 | None |
&H26& | Program Files | None |
&H27& | My Pictures | None |
&H28& | User Profile | None |
&H2b& | Common Files | None |
&H2e& | All Users Templates | None |
&H2f& | Administrative Tools | None |
&H31& | Network Connections | None |
Not all computers have each of the special folders shown in Table 11.5. However, even if a folder does not exist, the name and location of that folder are predefined by the operating system. As a result, a script that attempts to enumerate special folders does not fail even if some of these folders do not exist.
Scripting Steps
Listing 11.6 contains a script that returns the path to the My Pictures folder. To carry out this task, the script must perform the following steps:
Create a constant named MY_PICTURES and set the value to &H27&.
Create an instance of the Shell object.
Use the Namespace method to return a Folder object representing the My Pictures folder. This is done by passing the constant MY_PICTURES as the parameter for the Namespace method.
Use the Self method to return a FolderItems object for the My Pictures folder. This is required because only FolderItems objects possess the Path property, which allows you to resolve the actual path to the My Pictures folder. The Folder object returned in step 3 can return the name of the My Pictures folder but not the path.
Echo the name and path to the My Pictures folder.
After you have connected to a special folder, you can enumerate the items within the folder the same way you enumerate the files found in a standard file system folder. This allows you to do such things as identify the administrative tools or the control panel applications that are installed on a computer.
For example, Listing 11.7 contains a script that lists the administrative tools installed on a computer. To carry out this task, the script must perform the following steps:
Create a constant named ADMINISTRATIVE_TOOLS and set the value to &H2f&.
Create an instance of the Shell object.
Use the Namespace method to return a Folder object representing the Administrative Tools folder. This is done by passing the constant ADMINISTRATIVE_TOOLS as the parameter for the Namespace method.
Use the Items method to return the folder items (the installed administrative tools) within the folder.
Create a For Each loop to iterate all the folder items.
Echo the item name.
Folder management scripts are often designed to work against any folder on a computer. Because of this, folder names and paths are typically not hard-coded into the script; instead, these values must be typed in as command-line arguments each time the script is run. This provides your script with the flexibility to work against any folder on a computer; however, it also requires you to know the exact location of each folder you want to manage and to correctly type that location before the script can run. This can be particularly cumbersome if the folder you want to manage has a name such as C:System AdministrationAdministrator ToolsDiagnosticsScriptsNetworkIP Configuration.
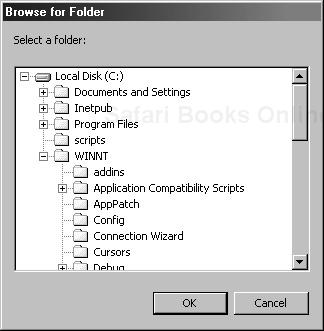
If you are working with a single folder at a time, the Shell’s Browse For Folder dialog box provides a graphical alternative to command-line arguments. Instead of requiring you to type in a folder path, the Browse For Folder dialog box (shown in Figure 11.4) allows you to select the folder from a standard Windows Explorer–like tree control.
After you select a folder and click OK, your script is bound to the Folder object for the selected folder. If you are using a Shell object script, you can proceed to carry out the desired actions on that folder. If you want to pass the selected folder to the FileSystemObject or to WMI, your script can:
Use the Self method to return a FolderItems object for the selected folder.
Use the Path method to return the path to the folder (for example, C:ScriptsLogsPerformance.vbs).
Use the Replace method to replace each backslash in the path with a pair of backslashes (for example, C:\Scripts\Logs\Performance.vbs). This must be done if you are using WMI because WQL queries require you to use double backslashes in path names.
Pass the path to WMI or the FileSystemObject.
To display the Browse for Folder dialog box, use the Shell object’s BrowseForFolder method along with the parameters shown in Table 11.6.
Table 11.6. BrowseForFolder Parameters
Parameter | Description |
|---|---|
Window handle | Numeric ID to be assigned to the displayed dialog box. For scripts, this value should be 0. |
Title | Text string to be displayed inside the dialog box. The title typically represents instructions to the user; in Figure 11.4, the title is “Select a folder to compress:” |
Options | Optional values that can be used in constructing the dialog box. Two values are particularly useful in scripts:
To display the standard dialog box, set the Options to 0. |
Root folder | Optional parameter specifying the root folder shown at the top of the dialog box. If the root folder is set to C:ScriptsADSI, the folder ADSI appears at the top of the dialog box, and neither C:Scripts nor C: is accessible. |
For example, the following code displays the Browse For Folder dialog box with these options:
A window handle of 0.
The title, “Select a folder to compress.”
No options for adding an edit box or displaying files as well as folders.
The root folder D:. Only folders on drive D are shown in the dialog box.
Set objFolder = objShell.BrowseForFolder _
    (0, "Select a folder to compress:", 0, "D:")
Scripting Steps
Listing 11.8 contains a script that uses the Browse For Folder dialog box to return the path of a selected folder. To carry out this task, the script must perform the following steps:
Create a constant named WINDOW_HANDLE and set the value to 0. This constant is used to provide the handle to the dialog box window.
Create a constant named NO_OPTIONS and set the value to 0. This constant is used to indicate that the dialog box should be displayed without any special options.
Create an instance of the Shell object.
Use the BrowseForFolder method to display the Browse For Folder dialog box. The method uses the following values for the four parameters:
WINDOW_HANDLE.
Select a folder to compress.
NO_OPTIONS.
C:Scripts.
Use the Self method to return a FolderItem object representing the folder selected in the dialog box.
Set the variable objPath to the path of the folder (for example, C:ScriptsNetwork).
Use the VBScript Replace function to replace all single backslashes () in the path with double backslashes (\). (For example, C:ScriptsNetwork becomes C:\Scripts\Network.) The double backslashes are required by WMI any time you use a single backslash in a query.
Create a variable to specify the computer name.
Use a GetObject call to connect to the WMI namespace rootcimv2, and set the impersonation level to “impersonate.”
Use the ExecQuery method to query the Win32_Directory class.
To limit data retrieval to a specified folder, a Where clause is included restricting the returned folders to the folder selected from the Browse for Folder dialog box.
For the single folder in the collection, echo the value of the Readable property.
Example 11.8. Using the Browse For Folder Dialog Box
 1 Const WINDOW_HANDLE = 0
 2 Const NO_OPTIONS = 0
 3 Set objShell = CreateObject("Shell.Application")
 4 Set objFolder = objShell.BrowseForFolder _
 5     (WINDOW_HANDLE, "Select a folder:", NO_OPTIONS, "C:Scripts")
 6 Set objFolderItem = objFolder.Self
 7 objPath = objFolderItem.Path
 8 objPath = Replace(objPath, "", "\")
 9 strComputer = "."
10 Set objWMIService = GetObject _
11     ("winmgmts:" & "!\" & strComputer & "
ootcimv2")
12 Set colFiles = objWMIService.ExecQuery _
13     ("SELECT * FROM Win32_Directory WHERE Name = '" & objPath & "'")
14 For Each objFile in colFiles
15     Wscript.Echo "Readable: " & objFile.Readable
16 NextFile systems are dynamic entities that evolve over time. For example, suppose you take a snapshot of your file system today and then compare that snapshot with your file system a year from now; the two will likely bear only a passing resemblance to each other. During the course of a year, file systems undergo many changes. New folders are created, and old folders are deleted. Some folders are copied to multiple locations, and other folders are moved to new locations. Folders are renamed, compressed, and uncompressed.
As a system administrator, it is up to you to carry out many of these activities. Fortunately, you can use scripts to help make the transition from the file system you have today to the file system you need tomorrow.
Standardization helps facilitate system administration. For example, having a standard set of folder names makes it easier to run scripts that verify that the proper set of files has been installed on a computer. With standard folder names, scripts such as these can simply connect to the desired folders without needing a list of unique folder names and locations for each individual computer.
Scripts can help you implement standardized naming schemes on computers throughout your organization. For example, the Win32_Directory class provides a Rename method that allows you to rename a folder. Thus, you can write a script that connects to all the domain controllers in your organization and renames the folder C:Stuff to C:Administrative Scripts.
To rename a folder, first bind to the folder in question and then call the Rename method. As the sole parameter to the method, pass the new name for the folder as a complete path name. For example, if the folder in the C:ScriptsLogsBackup is to be renamed C:ScriptsArchive, you must pass C:ScriptsArchive as the complete folder name. Passing only the folder name — Archive — results in an Invalid path error.
Scripting Steps
Listing 11.9 contains a script that binds to the folder C:Scripts and renames the folder C:Script Repository. To carry out this task, the script must perform the following steps:
Create a variable to specify the computer name.
Use a GetObject call to connect to the WMI namespace rootcimv2, and set the impersonation level to “impersonate.”
Use the ExecQuery method to query the Win32_Directory class.
To limit data retrieval to a specified folder, a Where clause is included restricting the returned folders to those with the name C:\Scripts. You must include both backslashes (\) in the name.
For the single folder in the returned collection, use the Rename method to rename the folder to C:Script Repository.
Echo the results of the renaming procedure. A 0 indicates that the folder was successfully renamed.
Example 11.9. Renaming Folders
 1 strComputer = "."
 2 Set objWMIService = GetObject("winmgmts:" _
 3     & "{impersonationLevel=impersonate}!\" & strComputer & "
ootcimv2")
 4 Set colFolders = objWMIService.ExecQuery _
 5     ("SELECT * FROM Win32_Directory WHERE Name = 'c:\Scripts'")
 6 For Each objFolder in colFolders
 7     errResults = objFolder.Rename("C:Script Repository")
 8     Wscript.Echo errResults
9 NextThe Win32_Directory class does not provide a one-step method for moving folders. Instead, moving a folder generally involves two steps:
The one exception to this two-step process involves moving a folder to a new location on the same drive. For example, suppose you want to move C:Temp to C:ScriptsTemporary FilesArchive. As long as the current location and the new location are on the same drive, you can move the folder by simply calling the Rename method and passing the new location as the method parameter. This approach effectively allows you to move the folder in a single step. However, the script fails if the current drive and the new drive are different. An attempt to rename C:Temp to D:Temp fails with a “Drive not the same” error.
Scripting Steps
Listing 11.10 contains a script that moves the folder C:Scripts to C:AdminsDocumentsArchiveVBScript. To carry out this task, the script must perform the following steps:
Create a variable to specify the computer name.
Use a GetObject call to connect to the WMI namespace rootcimv2, and set the impersonation level to “impersonate.”
Use the ExecQuery method to query the Win32_Directory class.
To limit data retrieval to a specified folder, a Where clause is included restricting the returned folders to those with the name C:\Scripts. You must include both backslashes (\) in the name.
For the single folder in the returned collection, use the Rename method to move the folder to C:AdminsDocumentsArchiveVBScript.
Echo the results of the procedure. A 0 indicates that the folder was successfully moved.
Example 11.10. Moving Folders Using WMI
 1 strComputer = "."
 2 Set objWMIService = GetObject("winmgmts:" _
 3     & "{impersonationLevel=impersonate}!\" & strComputer & "
ootcimv2")
 4 Set colFolders = objWMIService.ExecQuery _
 5     ("SELECT * FROM Win32_Directory WHERE Name = 'c:\Scripts'")
 6 For Each objFolder in colFolders
 7     errResults = objFolder.Rename("C:AdminsDocumentsArchiveVBScript")
 8     Wscript.Echo errResults
9 NextFolders often need to be copied from one location to another. For example, you might copy a folder from one server to another to create a backup copy of that folder. Or you might have a templates folder that needs to be copied to user workstations, or a scripts folder that should be copied to all of your DNS servers.
The Win32_Directory Copy method enables you to copy a folder from one location to another, either on the same computer (for example, copying a folder from drive C to drive D) or on a remote computer. To copy a folder, you return an instance of the folder to be copied and then call the Copy method, passing as a parameter the target location for the new copy of the folder. For example, this line of code copies a folder to the Scripts folder on drive F:
objFolder.Copy("F:Scripts")
WMI will not overwrite an existing folder when executing the Copy method. This means that the copy operation fails if the destination folder exists. For example, suppose you have a folder named Scripts and you attempt to copy that folder to a remote share named \atl-fs-01archive. If a folder named Scripts already exists on that share, the copy operation fails.
Scripting Steps
Listing 11.11 contains a script that copies the folder C:Scripts to D:Scripts. To carry out this task, the script must perform the following steps:
Create a variable to specify the computer name.
Use a GetObject call to connect to the WMI namespace rootcimv2, and set the impersonation level to “impersonate.”
Use the ExecQuery method to query the Win32_Directory class.
To limit data retrieval to a specified folder, a Where clause is included restricting the returned folders to those with the name C:\Scripts. You must include both backslashes (\) in the name.
For the single folder in the returned collection, use the Copy method to copy the folder to D:Archive. This procedure fails if the folder D:ArchiveScripts already exists.
Echo the results of the renaming procedure. A 0 indicates that the folder was successfully renamed.
Example 11.11. Copying Folders Using WMI
 1 strComputer = "."
 2 Set objWMIService = GetObject("winmgmts:" _
 3     & "{impersonationLevel=impersonate}!\" & strComputer & "
ootcimv2")
 4 Set colFolders = objWMIService.ExecQuery _
 5     "SELECT * FROM Win_32 Directory" WHERE Name = 'c:\Scripts'")
 6 For Each objFolder in colFolders
 7     errResults = objFolder.Copy("D:Archive")
 8     Wscript.Echo errResults
9 NextWMI has several limitations when copying folders. For one, WMI provides no built-in method for tracking script progress. Although many system administration scripts have no user interface and are designed to run silently, there might be times when you would like to follow the progress of a script. For example, you might want to visually track a script that copies a large number of files and folders from one computer to another. That way, you can verify that the script is proceeding as expected.
A second limitation of the WMI Copy method is that a folder-copying script fails if the destination folder already exists. For example, you might want to periodically copy a folder named DiskPerformance to an archive folder named Monitoring. The first time you run the script, the copy operation will succeed. The next time you run the script, however, the folder MonitoringDiskPerformance already exists. As a result, the copy operation fails unless you include extra code within the script to test for the existence of the DiskPerformance folder and then rename either that folder or the new folder being copied.
In addition, the WMI Copy method is an all-or-nothing method: It works only if the destination folder does not exist, and only if you copy over the entire source folder. WMI does not allow you to merge folders; that is, you cannot copy over new items without also deleting all the existing items in the destination folder.
The Shell Folder object includes a CopyHere method that allows you to overcome these limitations. First, the CopyHere method enables you to optionally display the Copying dialog box as the script runs. This dialog box is shown in Figure 11.5.

Another optional parameter allows you to copy a folder without overwriting the contents of the target folder. For example, suppose you have a target folder named E:Scripts. You can copy a second folder named Scripts to that same location without losing the data in the original target folder. Instead, the new folder is automatically named Copy (1) of Scripts. If you copy another folder, it is named Copy (2) of Scripts. This allows you to copy folders from multiple computers without having to worry about providing those folders with unique names.
Finally, the CopyHere method supports merging folders. For example, suppose you have target and source folders with the file sets shown in Table 11.7.
Table 11.7. Sample File Sets Before Copying
Source Folder | Target Folder |
|---|---|
SourceFile1 | TargetFile1 |
SourceFile2 | TargetFile2 |
SourceFile2 |
When you copy the source folder to the target folder, the file sets are merged, and the new folder contents look like those shown in Table 11.8.
Table 11.8. Sample File Sets After Copying
Source Folder | Target Folder |
|---|---|
SourceFile1 | TargetFile1 |
SourceFile2 | TargetFile2 |
SourceFile2 | SourceFile1 |
SourceFile2 | |
SourceFile2 |
Note
If the target folder already has files named SourceFile1 and SourceFile2, those files are replaced by the versions being copied from the source folder.
To copy a folder using the CopyHere method, you need to create an instance of the Shell object, and then use the Namespace method to bind to the target folder (the location where the folder will be copied). You then call the CopyHere method, passing the path of the source folder (the folder being copied) as a required parameter. In addition, you can pass one or more of the optional constants shown in Table 11.9.
Table 11.9. Shell Folder CopyHere Constants
Constant | Description |
|---|---|
&H0& | Displays a progress dialog box that shows the name of each file being copied. |
&H4& | Copies files without displaying a dialog box. |
&H8& | Automatically creates a new folder name if a folder with that same name already exists. |
&H10& | Automatically responds “Yes to All” to any dialog box that appears. For example, if you attempt to copy over existing files, a dialog box appears, asking whether you are sure you want to copy over each file. Selecting this option is identical to clicking Yes to All within that dialog box. |
&H40& | Preserves undo information. After the script has completed, you can open Windows Explorer and select Undo from the Edit menu to undo the copy procedure. |
&H100& | Displays a simple progress dialog box that does not show the name of each file being copied. Instead, it merely indicates that the copying procedure is in progress. |
For example, this line of code copies the folder C:Scripts while displaying a simple progress dialog box:
objFolder.CopyHere "C:Scripts", &H100&
Scripting Steps
Listing 11.12 contains a script that copies a folder to a new location, displaying the Copying dialog box as it carries out the procedure. To carry out this task, the script must perform the following steps:
Create a constant named FOF_CREATEPROGRESSDLG and set the value to &H0&.
Create a variable named ParentFolder and set the value to D:Archive. This variable is used to indicate where the folder should be copied to.
Create an instance of the Shell object.
Use the Namespace method to create a Folder object representing D:Archive. This is done by passing the variable ParentFolder to the Namespace method. If the folder D:Archive does not exist, the procedure fails.
Use the CopyHere method to copy C:Scripts to D:Archive. This creates a new folder, D:ArchiveScripts, that contains the same files and subfolders as C:Scripts. The CopyHere method uses two parameters:
The name of the folder being copied (C:Scripts).
The optional constant FOF_CREATEPROGRESSDLG. This causes the Copying dialog box to be displayed as the contents of C:Scripts are being copied.
The Shell method MoveHere is similar to the CopyHere method; the only difference is that MoveHere moves a folder from one location to another, whereas CopyHere copies the folder (resulting in two identical folders). Otherwise, MoveHere is called in the same manner as CopyHere and accepts the same set of optional parameters found in Table 11.9.
Scripting Steps
Listing 11.13 contains a script that moves a folder to a new location, displaying the Move Files dialog box as it carries out the procedure. To carry out this task, the script must perform the following steps:
Create a constant named FOF_CREATEPROGRESSDLG and set the value to &H0&.
Create a variable named TargetFolder and set the value to D:Archive. This variable is used to indicate where the folder should be moved.
Create an instance of the Shell object.
Use the Namespace method to create a Folder object representing D:Archive. This is done by passing the variable TargetFolder to the Namespace method. If the folder D:Archive does not exist, the procedure fails.
Use the MoveHere method to move C:Scripts to D:Archive. This creates a new folder, D:ArchiveScripts, that contains the same files and subfolders as originally found in C:Scripts. The MoveHere method uses two parameters:
The name of the folder being moved (C:Scripts).
The optional constant FOF_CREATEPROGRESSDLG. This causes the Move Files dialog box to be displayed as the contents of C:Scripts are being moved.
Folders are not necessarily permanent additions to a file system. At some point, folders might need to be deleted, perhaps because they are no longer required, because the role of the computer has changed, or because the folders were created by mistake.
The Win32_Directory class includes a Delete method that allows you to delete folders: you simply bind to the folder in question and then call the Delete method. After the Delete method is called, the folder is permanently removed from the file system; it is not sent to the Recycle Bin. In addition, no confirmation notice (“Are you sure you want to delete this folder?”) is issued. Instead, the folder is immediately removed.
You cannot delete read-only folders using the FileSystemObject; however, this can be done using WMI. If your script uses WMI and you do not want to remove a read-only folder, you must use the Readable property to check the folder status before deleting it.
Scripting Steps
Listing 11.14 contains a script that deletes the folder C:Scripts. To carry out this task, the script must perform the following steps:
Create a variable to specify the computer name.
Use a GetObject call to connect to the WMI namespace rootcimv2, and set the impersonation level to “impersonate.”
Use the ExecQuery method to query the Win32_Directory class.
To limit data retrieval to a specified folder, a Where clause is included restricting the returned folders to those with the name C:\Scripts. You must include both backslashes (\) in the name.
For the single folder in the collection, use the Delete method to delete the folder, and then echo the results of this operation. The value 0 indicates that the folder was successfully deleted.
Example 11.14. Deleting Folders
1 strComputer = "."
2 Set objWMIService = GetObject("winmgmts:" _
3     & "{impersonationLevel=impersonate}!\" & strComputer & "
ootcimv2")
4 Set colFolders = objWMIService.ExecQuery _
5     ("SELECT * FROM Win32_Directory WHERE Name = 'c:\Scripts'")
6 For Each objFolder in colFolders
7     errResults = objFolder.Delete
8     Wscript.Echo errResults
9 NextCompression provides a way to free additional storage space on a disk drive without purchasing new hardware and without removing files or folders. Depending on the size of your hard disk and the type of files stored on that disk, you might be able to recover hundreds of megabytes of disk space and thus preclude the need to purchase a new hard drive and to take the computer offline until the new drive is installed.
The Win32_Directory class includes a Compress method that compresses all the files and subfolders within a specified folder. In addition, the class also includes an Uncompress method that removes compression from all the files and subfolders in a folder. Similar methods are also provided with the CIM_Datafile class. This allows you to selectively compress or uncompress specific files within a folder.
Because compression imparts a slight performance penalty, it is not recommended for files or folders that are accessed on a routine basis; for example, you probably do not want to compress database files, log files, or user profile folders. Better candidates for compression are files and folders that are not accessed very often. For example, you might write a script to return a collection of folders on a drive that have not been accessed for a month or more and then compress each of those folders.
The amount of disk space freed by compressing folders varies depending on the type of files stored in that folder. For example, .jpg files are already compressed, and further compression has little effect on the size of the file. With other file types, however, the savings can be considerable. For example, a new folder was created on a Windows 2000-based test computer, and 33 Microsoft Word documents, taking up a total of 15 megabytes (MB) of disk space, were copied into that folder. When the documents were compressed, the folder took up only 7 MB of disk space.
Listing 11.15 contains a script that compresses the folder C:Scripts. To carry out this task, the script must perform the following steps:
Create a variable to specify the computer name.
Use a GetObject call to connect to the WMI namespace rootcimv2, and set the impersonation level to “impersonate.”
Use the ExecQuery method to query the Win32_Directory class.
To limit data retrieval to a specified folder, a Where clause is included restricting the returned folders to those with the name C:\Scripts. You must include both backslashes (\) in the name.
For the single folder in the collection, use the Compress method to compress the folder, and then echo the results of that operation. The value 0 indicates that the folder was successfully compressed.
Example 11.15. Compressing Folders
1 strComputer = "."
2 Set objWMIService = GetObject("winmgmts:" _
3     & "{impersonationLevel=impersonate}!\" & strComputer & "
ootcimv2")
4 Set colFolders = objWMIService.ExecQuery _
5     ("SELECT * FROM Win32_Directory WHERE Name = 'c:\Scripts'")
6 For Each objFolder in colFolders
7     errResults = objFolder.Compress
8     Wscript.Echo errResults
9 Next
To uncompress a folder, follow exactly the same procedure, but call the Uncompress method rather than the Compress method. For example, the script shown in Listing 11.16 uncompresses the folder C:Scripts.
Example 11.16. Uncompressing Folders
1 strComputer = "."
2 Set objWMIService = GetObject("winmgmts:" _
3     & "{impersonationLevel=impersonate}!\" & strComputer & "
ootcimv2")
4 Set colFolders = objWMIService.ExecQuery _
5     ("SELECT * FROM Win32_Directory WHERE Name = 'c:\Scripts'")
6 For Each objFolder in colFolders
7     errResults = objFolder.Uncompress
8     Wscript.Echo errResults
9 Next
Files are the ultimate building blocks of any file system; neither disk drives nor folders serve much purpose unless they are used for storing files. Despite their importance, files are often considered beyond the scope of system administration; instead, in many organizations, users manage their own files. This might be a reasonable approach except that users often:
Store files (such as files infected by viruses) that should not be on the network.
Store large media files that serve no purpose other than using up hard disk space.
Needlessly duplicate files and maintain those duplicates indefinitely.
Store files that have not been accessed in years.
Do not know how to perform file management activities such as compressing files to conserve disk space.
Because of this, it is a good idea for system administrators to keep track of the files stored within their file systems. Both WMI and the Shell object provide methods that enable you to identify a file or set of files and to return detailed information about that file (including such data as the file size and when the file was last used). In addition, both WMI and the Shell object allow you to carry out common administrative tasks such as copying, moving, renaming, and deleting files.
In the NTFS file system, files are actually made up of two distinct parts. In addition to the file itself, such as the Microsoft Word document MyDocument.doc, NTFS files also contain “metadata” regarding the file. The file MyDocument.doc contains more than just the words typed into the document; MyDocument.doc also contains information about itself, including such things as file size, the date it was created, and whether it can be modified or is a read-only file.
The WMI CIM_Datafile class allows you to retrieve this metadata for any file on a computer. Using WMI, you can retrieve any of the file properties listed in Table 11.1 (file properties are the same as folder properties). To retrieve this information, simply bind to a file and then echo the appropriate properties.
The relationship between the CIM_DataFile class and Windows Explorer is shown in Figure 11.6.

Listing 11.17 contains a script that returns the properties of the file C:ScriptsAdsi.vbs. To carry out this task, the script must perform the following steps:
Create a variable to specify the computer name.
Use a GetObject call to connect to the WMI namespace rootcimv2, and set the impersonation level to “impersonate.”
Use the ExecQuery method to query the CIM_Datafile class.
To limit data retrieval to a specific file, a Where clause is included restricting the returned files to those with the name C:\Scripts\Adsi.vbs. You must include both backslashes (\) in the name.
For the single file in the collection, echo a number of the properties shown in Table 11.1.
Example 11.17. Retrieving File Properties
 1 strComputer = "."
 2 Set objWMIService = GetObject("winmgmts:" _
 3     & "{impersonationLevel=impersonate}!\" & strComputer & "
ootcimv2")
 4 Set colFiles = objWMIService.ExecQuery _
 5     ("SELECT * FROM CIM_Datafile WHERE Name = 'c:\Scripts\Adsi.vbs'")
 6 For Each objFile in colFiles
 7     Wscript.Echo "Access mask: " & objFile.AccessMask
 8     Wscript.Echo "Archive: " & objFile.Archive
 9     Wscript.Echo "Compressed: " & objFile.Compressed
10     Wscript.Echo "Compression method: " & objFile.CompressionMethod
11     Wscript.Echo "Creation date: " & objFile.CreationDate
12     Wscript.Echo "Computer system name: " & objFile.CSName
13     Wscript.Echo "Drive: " & objFile.Drive
14     Wscript.Echo "8.3 file name: " & objFile.EightDotThreeFileName
15     Wscript.Echo "Encrypted: " & objFile.Encrypted
16     Wscript.Echo "Encryption method: " & objFile.EncryptionMethod
17     Wscript.Echo "Extension: " & objFile.Extension
18     Wscript.Echo "File name: " & objFile.FileName
19     Wscript.Echo "File size: " & objFile.FileSize
20     Wscript.Echo "File type: " & objFile.FileType
21     Wscript.Echo "File system name: " & objFile.FSName
22     Wscript.Echo "Hidden: " & objFile.Hidden
23     Wscript.Echo "Last accessed: " & objFile.LastAccessed
24     Wscript.Echo "Last modified: " & objFile.LastModified
25     Wscript.Echo "Manufacturer: " & objFile.Manufacturer
26     Wscript.Echo "Name: " & objFile.Name
27     Wscript.Echo "Path: " & objFile.Path
28     Wscript.Echo "Readable: " & objFile.Readable
29     Wscript.Echo "System: " & objFile.System
30     Wscript.Echo "Version: " & objFile.Version
31     Wscript.Echo "Writeable: " & objFile.Writeable
32 NextWhen you right-click a file in Windows Explorer and select Properties from the shortcut menu, a dialog box displays basic properties for that file, including such things as file name, file size, and the file creation, last access, and last modification dates. In addition to these basic properties, the Windows operating system also tracks a number of extended file properties. These properties are typically hidden; to display them in Windows Explorer, you must click View, click Choose Details, and then select the desired properties from the resulting dialog box (shown in Figure 11.7).

The Shell FolderItems object includes a GetDetailsOf method that allows you to access these extended properties. These properties, and their associated index numbers, are shown in Table 11.10.
Table 11.10. Retrieving Extended File Properties
Index | Property | Index | Property |
|---|---|---|---|
0 | Name | 18 | Year |
1 | Size | 19 | Track Number |
2 | Type | 20 | Genre |
3 | Date Modified | 21 | Duration |
4 | Date Created | 22 | Bit Rate |
5 | Date Accessed | 23 | Protected |
6 | Attributes | 24 | Camera Model |
7 | Status | 25 | Date Picture Taken |
8 | Owner | 26 | Dimensions |
9 | Author | 27 | Not used |
10 | Title | 28 | Not used |
11 | Subject | 29 | Not used |
12 | Category | 30 | Company |
13 | Pages | 31 | Description |
14 | Comments | 32 | File Version |
Copyright | 33 | Product Name | |
16 | Artist | 34 | Product Version |
17 | Album Title |
To access any one of these properties, call the GetDetailsOf method, passing two parameters: the name of the file and the index number of the property to be retrieved. For example, the following code snippet echoes the Duration property for a media file:
Wscript.Echo objFolder.GetDetailsOf(strFileName, 21)
Scripting Steps
Listing 11.18 contains a script that retrieves all the extended properties for each file in the folder C:Scripts. To carry out this task, the script must perform the following steps:
Create a one-dimensional array named arrHeaders, and set the size to 35. This array is used to hold the names of the extended properties.
Create an instance of the Shell object.
Use the Namespace method to return a Folder object representing the folder where the files are stored. In Listing 11.18, that folder is C:Scripts.
Create a For Next loop to return the names of the extended properties. Because the first extended property has the index number 0, the loop runs from 0 to 34.
Use the GetDetailsOf method to retrieve the names of all 35 extended properties.
For each file in the folder, set up another For-Next loop running from 0 to 34.
For each file, echo the property name, and use the GetDetailsOf method to retrieve and echo the property value.
Example 11.18. Retrieving Extended File Properties
 1 Dim arrHeaders(35)
 2 Set objShell = CreateObject("Shell.Application")
 3 Set objFolder = objShell.Namespace("C:Scripts")
 4 For i = 0 to 34
 5     arrHeaders(i) = objFolder.GetDetailsOf(objFolder.Items, i)
 6 Next
 7 For Each strFileName in objFolder.Items
 8     For i = 0 to 34
 9         Wscript.Echo i & vbtab & arrHeaders(i) _
10             & ": " & objFolder.GetDetailsOf(strFileName, i)
11     Next
12 NextThe CIM_Datafile class provides access to all the files stored on a computer, including those stored on hard disks, floppy disks, and CD-ROM drives. This means that you can use WMI and the CIM_Datafile class to retrieve a list of all the files stored on a computer.
Admittedly, retrieving a list of all the files on a computer rarely has any practical value. Queries such as this can take an extremely long time to complete; on a large file server, for example, it might take several hours to return such a list; even then, the query will complete only if there is enough memory on the computer to carry out the request. This is due to the way standard WMI queries operate. As objects (such as files) are enumerated, they are queued in memory and then reported in batches. If too many objects are found, memory can exhausted before the entire list has been generated.
In addition, a query such as this typically returns far more information than is useful. After all, even a typical user workstation might contain some 50,000 files.
Although enumerating all the files on a computer might have little practical value, it does provide an introduction to the CIM_Datafile class and emphasizes the importance of using targeted queries when working with this class. Unlike many other WMI classes, some care must be taken when using CIM_Datafile. For example, when you return a list of services on a computer using WMI, a script completes in approximately the same time regardless of whether you return the entire set of services or some subset of services (for example, all the services currently running). This is not true of CIM_Datafile. Returning a list of all the files on a computer might take hours; returning a list of all the files with the .jpg extension might take just a few seconds.
Scripting Steps
Listing 11.19 contains a script that returns a list of all the files on a computer. To carry out this task, the script must perform the following steps:
Create a variable to specify the computer name.
Use a GetObject call to connect to the WMI namespace rootcimv2, and set the impersonation level to “impersonate.”
Use the ExecQuery method to query the CIM_Datafile class.
This returns a collection of all the files on the computer.
For each file in the collection, echo the file name.
Example 11.19. Enumerating All the Files on a Computer
1 strComputer = "."
2 Set objWMIService = GetObject("winmgmts:" _
3     & "{impersonationLevel=impersonate}!\" & strComputer & "
ootcimv2")
4 Set colFiles = objWMIService.ExecQuery _
5     ("SELECT * FROM CIM_Datafile")
6 For Each objFile in colFiles
7     Wscript.Echo objFile.Name
8 NextThe script for enumerating all the files on a computer (as shown in Listing 11.19) works as long as there is sufficient memory to maintain a list of all the files on a computer. For example, on a Windows 2000–based computer with 128 MB of RAM and approximately 22,000 files, the enumeration script completed successfully. On a similar computer with approximately 82,000 files, however, the script exhausted available memory and failed.
With a standard query, data retrieval can tie up available memory and slow system performance. If you expect your file query to return a large amount of data, you might find it more expedient to use an asynchronous query, even if you are returning only a subset of files on a computer (for example, a query that returns several thousand .doc files from a file server). With an asynchronous query, objects are retrieved and reported one at a time. This allows the script to proceed with other tasks; equally important, it allows data retrieval to take place in the background, lessening the system load.
Scripting Steps
Listing 11.20 contains a script that uses an asynchronous query to return a list of all the files on a computer. To carry out this task, the script must perform the following steps:
Create a constant named POPOUP_DURATION, and set the value to 120. This ensures that the popup message box remains on screen for 120 seconds, allowing enough time for the asynchronous query to begin returning data.
Create a constant named OK_BUTTON and set the value to 0. This constant is used in constructing the popup message box.
Create an instance of the Wscript Shell object.
Create a variable to specify the computer name.
Use a GetObject call to connect to the WMI namespace rootcimv2, and set the impersonation level to “impersonate.”
Create an SWbemSink object named SINK_.
Use the ExecQueryAsync method to tie the SWbemSink object to the WQL query “SELECT * FROM CIM_Datafile”. This query returns a list of all the files on the computer and sends that list, one file at a time, to the SWbemSink object.
As each file is returned to the SWbemSinkObject, display the file name.
Example 11.20. Using an Asynchronous Query to Enumerate All the Files on a Computer
 1 Const POPUP_DURATION = 120
 2 Const OK_BUTTON = 0
 3 Set objWSHShell = Wscript.CreateObject("Wscript.Shell")
 4 strComputer = "."
 5 Set objWMIService = GetObject("winmgmts:" _
 6     & "{impersonationLevel=impersonate}!\" & strComputer & "
ootcimv2")
 7 Set objSink = WScript.CreateObject("WbemScripting.SWbemSink","SINK_")
 8 objWMIService.ExecQueryAsync objSink, "SELECT * FROM CIM_DataFile"
 9 objPopup = objWshShell.Popup("Starting event retrieval", _
10     POPUP_DURATION, "Event Retrieval", OK_BUTTON)
11 Sub SINK_OnObjectReady(objEvent, objAsyncContext)
12     Wscript.Echo objEvent.Name
13 End SubAlthough it is possible to enumerate all the files on the computer, this procedure can be extremely slow, and typically yields far more information than you can make use of. A faster, and generally more useful, approach is to enumerate all the files in a particular folder. This allows you to do such things as verify that each of your servers has a Scripts folder containing a full set of system administration scripts. Likewise, you might want to connect to an application folder and verify the version number for each .dll file stored there.
To enumerate all the files in a folder, you can use a script similar to the one shown in Listing 11.19. The only difference is that you include a Where clause in your WQL query to restrict data retrieval to those files found in the specified folder.
Scripting Steps
Listing 11.21 contains a script that returns a list of all the files in the folder C:Scripts. To carry out this task, the script must perform the following steps:
Create a variable to specify the computer name.
Use a GetObject call to connect to the WMI namespace rootcimv2, and set the impersonation level to “impersonate.”
Use the ExecQuery method to query the CIM_Datafile class.
To limit data retrieval to the files in a specific folder, a Where clause is included restricting the returned files to those with the path \Scripts\. (You must include double backslashes [\] before and after the path name.) Note that you do not have to include the drive letter provided the path is unique within the file system.
For each file in the collection, echo the file name and the file size.
Example 11.21. Enumerating All the Files in a Folder
1 strComputer = "."
2 Set objWMIService = GetObject("winmgmts:" _
3     & "{impersonationLevel=impersonate}!\" & strComputer & "
ootcimv2")
4 Set colFiles = objWMIService.ExecQuery _
5     ("SELECT * FROM CIM_DataFile WHERE Path = '\Scripts'")
6 For Each objFile in colFiles
7     Wscript.Echo objFile.Name
8 NextOne of the advantages of using WMI as a file management tool is the fact that WMI allows you to locate all the files that meet a specified set of criteria, regardless of the physical location of those files. For example, you can return a collection of all the files consisting of a particular file name extension, all the read-only files, or all the files created on a specified date. After these files are enumerated, you can carry out various operations on the entire collection, including copying, deleting, or renaming each of the files.
Tip
If you want to limit your search to a particular drive, include the appropriate Where clause in your query. For example, the clause Where Drive = ’C’ limits the search to files found on drive C.
Scripting Steps
Listing 11.22 contains a script that returns a set of all the files with a file size larger than 1,000,000 bytes. To carry out this task, the script must perform the following steps:
Create a variable to specify the computer name.
Use a GetObject call to connect to the WMI namespace rootcimv2, and set the impersonation level to “impersonate.”
Use the ExecQuery method to query the CIM_Datafile class.
To limit data retrieval to a specific set of files, a Where clause is included restricting the returned files to those with a size of 1,000,000 bytes or more.
For each file in the collection, echo the file name and the file size.
Example 11.22. Enumerating a Specific Set of Files
1 strComputer = "."
2 Set objWMIService = GetObject("winmgmts:" _
3     & "{impersonationLevel=impersonate}!\" & strComputer & "
ootcimv2")
4 Set colFiles = objWMIService.ExecQuery _
5     ("SELECT * FROM CIM_DataFile WHERE FileSize > 1000000")
6 For Each objFile in colFiles
7     Wscript.Echo objFile.Name & " — " & objFile.FileSize
8 Next
Managing files by using scripts is similar to managing folders. WMI treats files and folders as if they were essentially the same type of object; in fact, the properties and methods of the Win32_Directory and CIM_DataFile classes are identical. Files and folders are also similar in that they are not static entities; when you create a new file named C:ScriptsScriptLog.txt, there is no guarantee that it will be in the same place, under the same name, a year from now.
Instead, files might be renamed or be given a new file name extension. Files might be copied to multiple servers, moved to new locations, or deleted altogether. All of these tasks — and more — can be carried out programmatically using WMI and the Shell object.
It is not unusual for files to be given new names. Sometimes this is done to provide a file with a more descriptive name (for example, changing 03b4cast.xls to Budget Forecast for 2003.xls). At other times, this is done to ensure that data is not lost or that other operations can proceed. For example, you might have a script that backs up the Application event log to a file named ApplicationBackup.evt. If that file already exists, the backup operation fails. Consequently, you might want to rename the existing version of ApplicationBackup.evt before running the backup script. This, and any other renaming operation, can be carried out using the CIM_Datafile Rename method.
When renaming a file, you must specify the complete path name. For example, to rename a file in the C:ScriptsLogs folder, you must include the entire path name as the parameter:
errResult = objFile.Rename("C:ScriptsLogsNewName.vbs")
Passing only the file name results in an error. For example, this line of code results in an “Invalid name” error:
errResult = objFile.Rename("NewName.vbs")
Listing 11.23 contains a script that renames a file. To carry out this task, the script must perform the following steps:
Create a variable to specify the computer name.
Use a GetObject call to connect to the WMI namespace rootcimv2, and set the impersonation level to “impersonate.”
Use the ExecQuery method to query the CIM_DataFile class.
To limit data retrieval to a specific file, a Where clause is included restricting the returned files to those with the file name c:\scripts\toggle_service.vbs. You must include both backslashes in the query.
For the single file in the collection, use the Rename method to rename the file c:scripts oggle_service.old, and then echo the results of that procedure. A 0 indicates that the file was successfully renamed.
Example 11.23. Renaming Files
 1 strComputer = "."
 2 Set objWMIService = GetObject("winmgmts:" _
 3     & "{impersonationLevel=impersonate}!\" & strComputer & "
ootcimv2")
 4 Set colFiles = objWMIService.ExecQuery _
 5     ("SELECT * FROM Cim_Datafile WHERE Name = " _
 6         & "'c:\scripts\toggle_service.vbs'")
 7 For Each objFile in colFiles
 8     errResult = objFile.Rename("c:scripts	oggle_service.old")
 9     Wscript.Echo errResult
10 NextUsing a script to rename a single file is inefficient; usually, it is faster to carry out this task using Windows Explorer or a command-line tool. A more practical operation might be to use a script to change the extensions of all the files in a folder. For example, you might have a folder containing numerous log files on a computer, all with the extension .log. Using a script, you can change the extension for all of these .log files to .txt or .bkp or anything else. These repetitive tasks represent the kinds of things that scripts do best.
When changing file name extensions using WMI, it is important to keep in mind that the Rename method requires a complete path. This means that you cannot simply specify a new file name extension for the file. Instead, you must construct an entire path.
For example, suppose you have a file named Performance.log in the C:LogsMailServer folder. To rename this file to Performance.bkp, you need to pass C:LogsMailServerPerformance.bkp as the Rename parameter. This new path can be constructed by combining:
The CIM_Datafile Drive property (C:).
The Cim_Datafile Path property (LogsMailServer).
The CIM_Datafile FileName property (Performance).
A dot (.) to separate the file name and extension.
Bkp, the new extension.
Scripting Steps
Listing 11.24 contains a script that changes the file name extensions of all the .log files in a specified folder to .txt. To carry out this task, the script must perform the following steps:
Create a variable to specify the computer name.
Use a GetObject call to connect to the WMI namespace rootcimv2, and set the impersonation level to “impersonate.”
Use the ExecQuery method and an Associators of query to return a collection of all the files within the folder C:Scripts. The Associators of query requires the following parameters:
The source class, Win32_Directory, where Name equals C:Scripts.
The ResultClass, CIM_Datafile. This limits data retrieval to files, which are instances of the CIM_Datafile class. Subfolders are not included in the returned collection.
For each file in the collection, check the file name extension.
For each file in the collection with the file name extension .log, create a new file name using the following:
The folder path (C:Scripts).
The existing file name. (For example, for the file C:ScriptsDiskPerformance.log, the FileName is DiskPerformance.)
A dot (used to separate the FileName from the file name extension).
txt (the new file name extension).
Consequently, the file C:ScriptsDiskPerformance.log is given a new path: C:ScriptsDiskPerformance.txt.
Use the Rename method to rename the file, and then echo the results of that procedure. A 0 indicates that the file was successfully renamed.
Example 11.24. Changing File Name Extensions
 1 strComputer = "."
 2 Set objWMIService = GetObject("winmgmts:" _
 3     & "{impersonationLevel=impersonate}!\" & strComputer & "
ootcimv2")
 4 Set FileList = objWMIService.ExecQuery _
 5     ("ASSOCIATORS OF {Win32_Directory.Name='c:Scripts'} Where " _
 6         & "ResultClass = CIM_DataFile")
 7 For Each objFile In FileList
 8     If objFile.Extension = "log" Then
 9         strNewName = objFile.Drive & objFile.Path & _
10             objFile.FileName & "." & "txt"
11         errResult = objFile.Rename(strNewName)
12         Wscript.Echo errResult
13     End If
14 NextIn addition to copying entire folders, you often need to copy individual files or specific sets of files. For example, you might need to copy a particular template to each computer or copy all .vbs files to a new administrator workstation. The CIM_Datafile Copy method can be used to copy individual files or a set of files from one location to another.
This ability to copy individual files (as opposed to entire folders) is especially powerful when combined with WMI’s ability to locate all the files of a specified type regardless of their location in the file system. This allows you to perform such tasks as automatically searching for all .log files and copying them to a central monitoring station, or searching for all Microsoft Word files and copying them to a document repository.
You can use the CIM_DataFile class and the Copy method to copy either a single file or a set of files to a new location.
Scripting Steps
Listing 11.25 contains a script that copies all the Microsoft® Windows Media® files on a computer to a specified folder. To carry out this task, the script must perform the following steps:
Create a variable to specify the computer name.
Use a GetObject call to connect to the WMI namespace rootcimv2, and set the impersonation level to “impersonate.”
Use the ExecQuery method to query the CIM_DataFile class.
To limit data retrieval to Windows Media files, a Where clause is included restricting the returned files to those with the extension .wma.
For each file in the collection, set the value of the variable strCopy to the new path for the file. This value is a combination of the following items:
The destination folder (C:Media Archive). You must include the trailing backslash.
The file name. If the file is named Annual Meeting.wma, the file name is Annual Meeting.
A period (.), used to separate the file name and the extension.
The extension.
For example, if you have a file named D:FinanceAnnual Meeting.wma, the value of strCopy is C:Media ArchiveAnnual Meeting.wma.
Use the Copy method to copy the file to the new file path.
Example 11.25. Copying Files
 1 strComputer = "."
 2 Set objWMIService = GetObject("winmgmts:" _
 3     & "{impersonationLevel=impersonate}!\" & strComputer & "
ootcimv2")
 4 Set colFiles = objWMIService.ExecQuery _
 5     ("SELECT * FROM CIM_DataFile WHERE Extension = 'wma'")
 6 For Each objFile in colFiles
 7     strCopy = "C:Media Archive" & objFile.FileName _
 8         & "." & objFile.Extension
 9     objFile.Copy(strCopy)
10 Next
Deleting files is as an integral part of file management. Files need to be deleted for many reasons: to free up disk space; to remove outdated files; to remove inappropriate files. WMI is a powerful tool for deleting files because it allows you to select a specified set of files (regardless of their physical location in the file system) and then delete all those files in a single operation.
For example, you might have a policy that prohibits users from storing media files on a particular file server. A WMI script can be scheduled to run each night, search for a specific set of files (for example, .mp3 or .wma files), and then delete all instances of that file type.
Unlike the FileSystemObject, the WMI Delete method automatically deletes read-only files. If you do not want to delete read-only files, you have to construct your query in such a way as to exclude these files from the returned collection (for example, by including the clause Where Readable = True).
Listing 11.26 contains a script that deletes all the Windows Media files from a computer. To carry out this task, the script must perform the following steps:
Create a variable to specify the computer name.
Use a GetObject call to connect to the WMI namespace rootcimv2, and set the impersonation level to “impersonate.”
Use the ExecQuery method to query the CIM_DataFile class.
To limit data retrieval to Windows Media files, a Where clause is included restricting the returned files to those with the extension .wma.
For each file in the collection, use the Delete method to delete the file.
Example 11.26. Deleting Files
1 strComputer = "."
2 Set objWMIService = GetObject("winmgmts:" _
3     & "{impersonationLevel=impersonate}!\" & strComputer & "
ootcimv2")
4 Set colFiles = objWMIService.ExecQuery _
5     ("SELECT * FROM CIM_DataFile WHERE Extension = 'wma'")
6 For Each objFile in colFiles
7     objFile.Delete
8 NextWhen you right-click a Shell object in Windows Explorer, a shortcut menu appears showing actions that can be performed on that object. For example, when you right-click a VBScript file, you see such options as Open, Edit, Print, Create Shortcut, and Delete.
Within the Shell nomenclature, each of the commands that appear on a shortcut menu is known as a verb. A verb is a text string in the registry that specifies the command to be run when the menu item is clicked. Different objects have a different set of verbs. The Recycle Bin, for example, does not have a Print option, but it does have an Empty Recycle Bin option.
The FolderItem object features an InvokeVerbEx method that allows you to execute any of the verbs associated with an object. For example, this command opens the associated file:
objFile.InvokeVerbEx("Open")
Calling InvokeVerbEx without specifying a verb automatically invokes the default verb for the object. For example, with a Windows Media file, the default verb is Play; for a folder, the default verb is Open.
Be aware that verbs always function in exactly the same way they do when clicked in Windows Explorer. If you right-click a file and select Open, the file automatically opens. If you select Delete, however, a confirmation box is displayed before the file is deleted. This same confirmation box appears if you attempt to delete any object using InvokeVerbEx. For example, using the Delete verb on a file results in a dialog box similar to the one shown in Figure 11.8.
By comparison, right-clicking a file and selecting Print does not display a dialog box; instead, the file is automatically printed to the default printer. If you use InvokeVerbEx to print a file programmatically, that file is automatically printed to the default printer without displaying a dialog box of any kind.
Scripting Steps
Listing 11.27 contains a script that prints all the files in the folder C:Logs. To carry out this task, the script must perform the following steps:
Create a variable named TargetFolder, and set the value to C:Logs. This is the folder where the files to be printed are stored.
Create an instance of the Shell object.
Use the Namespace method to return a Folder object representing C:Logs.
Use the Items method to return a collection of all the FolderItems within C:Logs.
Create a For Each loop to iterate through all the collection of FolderItems.
For each item in the collection, use the InvokeVerbEx method to perform an action using one of the shortcut menu options for that item. In this script, that action is Print.
One potential problem with carrying out actions using Shell object verbs is knowing which verbs, and thus which actions, are available to you. Fortunately, each Shell object exposes its verbs as a collection that can be enumerated programmatically. To identify the verbs for a particular Shell object, obtain a FolderItem object and then use the Verbs method to return a collection of all the verbs for that object. You can then list each verb in the collection.
Scripting Steps
Listing 11.28 contains a script that returns a list of all the Shell Object verbs that can be used with the Recycle Bin. To carry out this task, the script must perform the following steps:
Create a constant named RECYCLE_BIN and set the value to &Ha&. This is the value used by the Namespace method to locate the Recycle Bin.
Create an instance of the Shell object.
Use the Namespace method to return a Folder object representing the Recycle Bin.
Use the Self method to return a FolderItems object for the Recycle Bin. This is required because only FolderItems objects possess the Verbs method. This method returns a list of Shell object verbs that can be used with the Recycle Bin.
Use the Verbs method to return a list of Shell object verbs that can be used with the Recycle Bin. Verbs are returned as an array, with the first verb assigned the index number 0.
Create a For Each loop to echo the name of each verb.
Example 11.28. Identifying Shell Object Verbs
1 Const RECYCLE_BIN = &Ha&
2 Set objShell = CreateObject("Shell.Application")
3 Set objFolder = objShell.NameSpace(RECYCLE_BIN)
4 Set objFolderItem = objFolder.Self
5 Set colVerbs = objFolderItem.Verbs
6 For Each objVerb in colVerbs
7     Wscript.Echo objVerb
8 NextFile systems are in a constant state of flux: New files are created, old files are deleted, and files are modified in various ways. This behavior is entirely expected, and most of it is of little interest to system administrators; system administrators do not need to be notified every time the operating system creates or deletes a temporary file, or every time a user makes a change to a Word document or a spreadsheet.
On the other hand, certain files and folders are very important to the organization. Because of that, you might want to keep a closer watch on these items. If someone adds a new file to a folder for proposed projects, you might want a notice to that effect sent to specified people. Likewise, these same people might want to be notified if a file is removed from that folder. If you have a file that prescribes the daily routine for all system administrators, you might want to be notified whenever that file is modified.
You can use the WMI event monitoring capabilities to monitor changes to the file system. If you choose to carry out such monitoring, it is highly recommended that you limit your monitoring to a specific file or folder. As noted previously, file systems are in a constant state of flux; attempting to monitor the entire file system on a computer is very slow, very processor intensive, and results in a huge quantity of data, most of which is of no interest to you. By limiting your monitoring to a specific file or folder, you can ensure that you are immediately notified of changes to the file system and that you are notified only of the changes that really matter to you.
At times, you might find it useful to know when a new file is added to the file system. For example, you might have a central repository for system administration scripts. Each time a new script is added to the repository, the script writer can be tasked with issuing an e-mail to other administrators. Alternatively, you can use a script to monitor the repository and automatically send an e-mail any time a new script is added. That way, administrators immediately know that a new script is available for use.
To keep track of newly created files, you need to write a script that includes two key elements. First, you need to monitor for new instances of the __InstanceCreationEvent class; new instances of this class are created each time a new managed object of any kind is created on the computer. Second, you need to limit data retrieval to new instances of the CIM_DirectoryContainsFile class.
CIM_DirectoryContainsFile is an association class that associates a specified folder with all the files contained within it. If you pass the name of a folder to CIM_DataContainsFile, it returns a collection of all the files in that folder. CIM_DataContainsFile has two components:
GroupComponent. The path to the folder being monitored
PartComponent. The individual files within that folder
Listing 11.29 contains a script that monitors the C:Scripts folder and issues an alert whenever a new file is added to that folder. To carry out this task, the script must perform the following steps:
Create a variable to specify the computer name.
Use a GetObject call to connect to the WMI namespace rootcimv2, and set the impersonation level to “impersonate.”
Use the ExecNotificationQuery method to monitor for new instances of the CIM_DirectoryContainsFile class, where the GroupComponent (the folder being monitored) is equal to “c:\\scripts”. All four backslashes must be included in the query.
Create a Do Loop with no exit condition. This causes the loop to continue (and the script to run) indefinitely. The only way to stop the loop is to terminate the script process.
Create an object (objLatestEvent) to represent new instances of the CIM_DirectoryContainsFile class. Each time a new file is created in C:Scripts, a new instance of objLatestEvent is created as well.
Echo the PartComponent of the objLatestEvent.TargetInstance. In the association between CIM_DirectoryContainsFile and Win32_Directory, the PartComponent represents the path name of the newly created file.
Example 11.29. Monitoring File Creation
 1 strComputer = "."
 2 Set objWMIService = GetObject("winmgmts:" _
 3     & "{impersonationLevel=impersonate}!\" & strComputer & "
ootcimv2")
 4 Set colMonitoredEvents = objWMIService.ExecNotificationQuery _
 5     ("SELECT * FROM __InstanceCreationEvent WITHIN 10 WHERE " _
 6         & "Targetinstance ISA 'CIM_DirectoryContainsFile' AND " _
 7             & "TargetInstance.GroupComponent= " _
 8                 & "'Win32_Directory.Name=""c:\\scripts""'")
 9 Do
10     Set objLatestEvent = colMonitoredEvents.NextEvent
11     Wscript.Echo objLatestEvent.TargetInstance.PartComponent
12 LoopThe CIM_DataContainsFile class can be used to keep track of the files within a specified folder. This means that CIM_DataContainsFile not only tracks which files are currently in a folder but can also keep track of changes to the contents of that folder. As shown in the preceding script, CIM_DataContainsFile can be used to identify new files added to a folder. It can also be used to identify files that are deleted from that folder.
Monitoring file deletion is similar to monitoring file creation; the only difference is that you must monitor for instances of the __InstanceDeletionEvent class. New instances of this class are created each time a managed object is deleted from the computer. By using the CIM_DataContainsFile class to limit data retrieval to deleted objects from a specific folder, you can be notified whenever a file is deleted from that folder.
Scripting Steps
Listing 11.30 contains a script that issues an alert whenever a file is deleted from the folder C:Scripts. To carry out this task, the script must perform the following steps:
Create a variable to specify the computer name.
Use a GetObject call to connect to the WMI namespace rootcimv2, and set the impersonation level to “impersonate.”
Use the ExecNotificationQuery method to monitor for deleted instances of the CIM_DirectoryContainsFile class, where the GroupComponent (the folder being monitored) is equal to “c:\\scripts”. All four backslashes must be included in the query.
Create a Do Loop with no exit condition. This causes the loop to continue (and the script to run) indefinitely. The only way to stop the loop is to terminate the script process.
Create an object (objLatestEvent) to represent deleted instances of the CIM_DirectoryContainsFile class. Each time a file is deleted from C:Scripts, a new instance of objLatestEvent is created.
Echo the PartComponent of the objLatestEvent.TargetInstance. In the association between CIM_DirectoryContainsFile and Win32_Directory, the PartComponent represents the path name of the newly deleted file.
Example 11.30. Monitoring File Deletion
 1 strComputer = "."
 2 Set objWMIService = GetObject("winmgmts:" _
 3     & "{impersonationLevel=impersonate}!\" & strComputer & "
ootcimv2")
 4 Set colMonitoredEvents = objWMIService.ExecNotificationQuery _
 5     ("SELECT * FROM __InstanceDeletionEvent WITHIN 10 WHERE " _
 6         & "Targetinstance ISA 'CIM_DirectoryContainsFile' AND " _
 7             & "TargetInstance.GroupComponent= " _
 8                 & "'Win32_Directory.Name=""c:\\scripts""'")
 9 Do
10     Set objLatestEvent = colMonitoredEvents.NextEvent
11     Wscript.Echo objLatestEvent.TargetInstance.PartComponent
12 LoopSome documents are far more important to an organization than others. Because of this, you might want to keep a closer watch on these documents and be notified whenever they change in some way. For example, you might have a manual that describes the roles and responsibilities for each of your Information Technology (IT) personnel. If this document is modified, you need to look at it immediately to see whether the changes affect your daily routine. Or, if the home page for your Web site is modified, you might want to know right away so you can quickly verify that this is a valid change, and not the result of an attack by a hacker.
You can use a WMI event notification query to issue an alert whenever a particular file is modified in any way.
Scripting Steps
Listing 11.31 contains a script that issues an alert anytime the file C:ScriptsIndex.vbs is modified. To carry out this task, the script must perform the following steps:
Create a variable to specify the computer name.
Use a GetObject call to connect to the WMI namespace rootcimv2, and set the impersonation level to “impersonate.”
Use the ExecNotificationQuery method to monitor for any changes made to the file “C:\Scripts\Index.vbs”. The two sets of double backslashes must be included in the file name.
Create a Do Loop with no exit condition. This causes the loop to continue (and the script to run) indefinitely. The only way to stop the loop is to terminate the script process.
Create an object (objLatestEvent) to represent new instances of the CIM_DirectoryContainsFile class. Each time the file C:ScriptsIndex.vbs is modified, a new instance of objLatestEvent is created as well.
Each time the file is modified, echo:
The file name.
The current size of the file (TargetInstance.FileSize).
The previous size of the file (PreviousInstance.File Size).
Example 11.31. Monitoring File Modification
 1 strComputer = "."
 2 Set objWMIService = GetObject("winmgmts:" _
 3     & "{impersonationLevel=impersonate}!\" & strComputer & "
ootcimv2")
 4 Set colMonitoredEvents = objWMIService.ExecNotificationQuery _
 5     ("SELECT * FROM __InstanceModificationEvent WITHIN 10 WHERE " _
 6         & "TargetInstance ISA 'CIM_DataFile' AND " _
 7             & "TargetInstance.Name='c:\scripts\index.vbs'")
 8
 9 Do
10     Set objLatestEvent = colMonitoredEvents.NextEvent
11     Wscript.Echo "File: " & objLatestEvent.TargetInstance.Name
12     Wscript.Echo "New size: " & objLatestEvent.TargetInstance.FileSize
13     Wscript.Echo "Old size: " & objLatestEvent.PreviousInstance.FileSize
14 LoopComputer networks evolved out of the need to share information while avoiding needless and confusing duplication. For example, suppose you have a task list that needs to be shared by a number of users. If you prefer, you can create the task list, copy it onto floppy disks, and give each user his or her own copy of the document. This works just fine, provided the task list never has to be changed.
But suppose User A completes a task, needs to add a new task, or otherwise must modify the document. User A not only has to modify his or her document but then has to copy the modified task list onto floppy disks, redistribute it, and hope that everyone else correctly updates the task list.
Needless to say, a system such as this will break down in a hurry. It is much easier, faster, safer, and more reliable to store a single copy of the task list in a central repository, and then provide users access to that document on an as-needed basis. In the Windows operating system, this central repository is typically a shared folder, a standard file system folder that is configured so that users can access it over the network.
Shared folders are an integral part of any Windows network. Therefore, it is important for system administrators to keep track of shared folders and to create new shares, modify existing shares, and delete old shares as needed. These tasks can all be carried out using WMI and the Win32_Share class. In addition, you can use Active Directory Service Interfaces (ADSI) to publish shared folders in the Active Directory® directory service, making these shares much easier for users and administrators to locate.
For the most part, you should not share out every single folder on your computer. After all, doing so exposes all your documents and all your data to anyone browsing the network. Likewise, it potentially allows anyone to make changes to critical or confidential files and folders.
To guard against the possible misuse of shared folders, it is a good idea to periodically review the shared folders on a computer and then decide whether those folders should be shared at all. You can use the Win32_Share class to return information about the shared folders on a computer. The shared folder properties available through this class are shown in Table 11.11.
Table 11.11. Win32_Share Properties
Property | Description |
|---|---|
AllowMaximum | Indicates whether or not the number of users allowed to simultaneously access this folder has been limited. If True, the value in the MaximumAllowed property is ignored. |
Caption | Description of the object. |
MaximumAllowed | Limit on the maximum number of users allowed to use this resource concurrently. The value is valid only if the AllowMaximum property is set to False. |
Name | Network name given to the shared folder. |
Path | Local path of the shared folder. |
Type | Type of resource being shared. Types include disk drives, print queues, interprocess communications (IPC), and general devices. Values are:
|
The relationship between the Win32_Share class and Windows Explorer is shown in Figure 11.9.

Scripting Steps
Listing 11.32 contains a script that enumerates the properties of all the shared folders on a computer. To carry out this task, the script must perform the following steps:
Create a variable to specify the computer name.
Use a GetObject call to connect to the WMI namespace rootcimv2, and set the impersonation level to “impersonate.”
Use the ExecQuery method to query the Win32_Share class.
This returns a collection of all the shared folders on the computer.
For each shared folder instance in the collection, echo the values for properties such as the shared folder name, the shared folder path, the maximum number of simultaneous connections allowed, and the shared folder type.
Example 11.32. Enumerating Shared Folders
 1 strComputer = "."
 2 Set objWMIService = GetObject("winmgmts:" _
 3     & "{impersonationLevel=impersonate}!\" & strComputer & "
ootcimv2")
 4 Set colShares = objWMIService.ExecQuery("SELECT * FROM Win32_Share")
 5 For Each objShare in colShares
 6     Wscript.Echo "Allow Maximum: " & vbTab & objShare.AllowMaximum
 7     Wscript.Echo "Caption: " & vbTab & objShare.Caption
 8     Wscript.Echo "Maximum Allowed: " & vbTab & objShare.MaximumAllowed
 9     Wscript.Echo "Name: " & vbTab & objShare.Name
10     Wscript.Echo "Path: " & vbTab & objShare.Path
11     Wscript.Echo "Type: " & vbTab & objShare.Type
12 Next
Creating shared folders on the local computer is easy. In Windows Explorer, simply right-click a folder, select Sharing and Security, enter the desired share name, and click OK. If you prefer to use the command line, you can use the net share command to accomplish the same task.
Sharing folders on remote computers is a different story; neither Windows Explorer nor net share allows you to share out a folder on another computer. However, you can use WMI and the Win32_Share class to create a shared folder on remote computers as well as on the local computer.
To create a shared folder using WMI, you need to connect to the Win32_Share class and then call the Create method. The Create method requires you to specify the five parameters shown in Table 11.12.
Table 11.12. Shared Folder Parameters
Parameter | Description |
|---|---|
Path | Local path to the folder being shared. This folder must already exist or the Create method fails. |
Name | Share name used to access the folder over the network. To create a hidden share, append a $ at the end of the name (for example, MyShare$). A hidden share is not visible to users browsing in Network Neighborhood but remains available to anyone who knows that the share exists. |
Type | Indicates the type of network share. This is typically one of two values:
|
MaximumAllowed | Maximum number of users permitted to connect to the share at one time. If this parameter is left blank, an unlimited number of simultaneous connections to the share are permitted. |
Description | Optional description displayed when users view the share in Network Neighborhood. |
Values returned from calling the Create method are shown in Table 11.13.
Table 11.13. Network Share Return Values
Description | |
|---|---|
0 | The operation completed successfully. |
2 | The operation could not be completed because access was denied. |
8 | The operation could not be completed because of an unknown problem. |
9 | The operation could not be completed because an invalid name was specified. |
10 | The operation could not be completed because an invalid level was specified. |
21 | The operation could not be completed because an invalid parameter was specified. |
22 | The operation could not be completed because a share by this name already exists. |
23 | The operation could not be completed because this is a redirected path. |
24 | The operation could not be completed because the specified folder could not be found. |
25 | The operation could not be completed because the specified server could not be found. |
Other | The operation could not be completed. |
Scripting Steps
Listing 11.33 contains a script that creates a shared folder on a computer. To carry out this task, the script must perform the following steps:
Create two constants, FILE_SHARE (with the value 0) and MAXIMUM_CONNECTIONS (with the value 25). FILE_SHARE is used to indicate the type of share being created, and MAXIMUM_CONNECTIONS is used to limit the number of simultaneous connections to the share to 25.
Create a variable to specify the computer name.
Use a GetObject call to connect to the WMI namespace rootcimv2, and set the impersonation level to “impersonate.”
Use the Get method to query the Win32_Share class.
Use the Create method to create a new share. The method is passed the following parameter values:
C:Finance. — Local path of the folder being shared.
FinanceShare. — Network name to be assigned to the new share.
FILE_SHARE. — Constant indicating that the new share is a standard network file share.
MAXIMUM_CONNECTIONS. — Constant setting the maximum number of simultaneous connections to the new share to 25.
Public share for members of the Finance group. — Description available to users accessing the share through Network Neighborhood.
Echo the results.
Example 11.33. Creating Shared Folders
 1 Const FILE_SHARE = 0
 2 Const MAXIMUM_CONNECTIONS = 25
 3 strComputer = "."
 4 Set objWMIService = GetObject("winmgmts:" _
 5     & "{impersonationLevel=impersonate}!\" & strComputer & "
ootcimv2")
 6 Set objNewShare = objWMIService.Get("Win32_Share")
 7 errReturn = objNewShare.Create _
 8     ("C:Finance", "FinanceShare", FILE_SHARE, _
 9         MAXIMUM_CONNECTIONS, "Public share for the Finance group.")
10 Wscript.Echo errReturnShared folders have properties — such as the maximum allowable connections — that are available through the Win32_Share class. It is easy to forget, however, that in addition to being virtual entities available over the network, shared folders are actual physical file folders on a computer hard disk. As physical file folders, shared folders have additional properties, such as the date the folder was last modified and whether or not the folder is compressed or encrypted, that are not available using the Win32_Share class.
If you need to retrieve the actual folder properties of a shared folder, you can use the Win32_ShareToDirectory class. Win32_ShareToDirectory is an association class that associates a shared folder with an actual file folder; you simply pass Win32_ShareToDirectory the name of a shared folder, and it returns a reference to the actual physical file folder. After you have that reference, you can retrieve all the properties available through the Win32_Directory class.
Listing 11.34 contains a script that maps a shared folder named Scripts to a local folder. To carry out this task, the script must perform the following steps:
Create a variable to specify the computer name.
Use a GetObject call to connect to the WMI namespace rootcimv2, and set the impersonation level to “impersonate.”
Use an Associators of query to return a collection of local folders mapped to shared folders. To ensure that only the local folder that corresponds to the shared folder Scripts is returned, a clause is included limiting data retrieval to folders that have the share name Scripts.
For the single folder in the collection, echo the folder Name. This is not the share name, but the folder name as retrieved using the Win32_Directory class.
Example 11.34. Mapping a Shared Folder to a Local Folder
1 strComputer = "."
2 Set objWMIService = GetObject("winmgmts:" _
3     & "{impersonationLevel=impersonate}!\" & strComputer & "
ootcimv2")
4 Set colShares = objWMIService.ExecQuery _
5     ("ASSOCIATORS OF {Win32_Share.Name='Scripts'} WHERE " _
6         & "AssocClass=Win32_ShareToDirectory")
7 For Each objFolder in colShares
8     Wscript.Echo objFolder.Name
9 Next
You can also create a script that maps all the shared folders on a computer to their local counterparts. This requires you to do two things:
Return a collection of all the shared folders on a computer.
For each shared folder in that collection, use an Associators of query to determine the local folder.
Listing 11.35 contains a script that maps all the shared folders on a computer to their local equivalents. To carry out this task, the script must perform the following steps:
Create a variable to specify the computer name.
Use a GetObject call to connect to the WMI namespace rootcimv2, and set the impersonation level to “impersonate.”
Use an ExecQuery call to return a collection of all the shared folders on the computer.
For each shared folder in the collection, use an Associators of query to return a collection consisting of the local folder mapped to the shared folder.
To determine the shared folder to be mapped, you use the share names returned by the Win32_Share class. For example, suppose three shared folders are returned:
Share1
Share2
Share3
The first time the For Each loop is run, the name Share1 is passed to the Associators of query. On the next iteration, the name Share2 is passed to the query. This continues until each of the shared folder names has been used in the query.
For the single local folder in the new collection, echo the share name and the folder name.
Example 11.35. Mapping All Shared Folders to Local Folders
 1 strComputer = "."
 2 Set objWMIService = GetObject("winmgmts:" _
 3     & "{impersonationLevel=impersonate}!\" & strComputer & "
ootcimv2")
 4 Set colShares = objWMIService.ExecQuery _
 5     ("SELECT * FROM Win32_Share")
 6 For Each objShare in colShares
 7     Set colAssociations = objWMIService.ExecQuery _
 8         ("ASSOCIATORS OF {Win32_Share.Name='" & objShare.Name & "'} " _
 9             & " WHERE AssocClass=Win32_ShareToDirectory")
10     For Each objFolder in colAssociations
11         Wscript.Echo objShare.Name & vbTab & objFolder.Name
12     Next
13 NextShared folders provide a convenient way for users to access and share resources. This also means that shared folders are a potential security risk; anything that gives remote users access to your computer provides a method by which that computer can be exploited.
As a system administrator, you want to keep track of the folders being shared on your network (especially those shared on servers); folders should be shared only if there is a valid reason for them to be shared and only if the proper security precautions are in place. If neither of these criteria is true, the share should be removed, at least until the reason for the share is clear and security is correctly implemented.
The Win32_Share class includes a Delete method that can be used to delete shared folders. The Delete method does not remove the local folder or erase any of the files stored in that folder. It simply stops the folder from being shared over the network. If you later change your mind, you can use the Create method to reshare the folder.
Listing 11.36 contains a script that deletes the FinanceShare shared folder on a computer. To carry out this task, the script must perform the following steps:
Create a variable to specify the computer name.
Use a GetObject call to connect to the WMI namespace rootcimv2, and set the impersonation level to “impersonate.”
Use the ExecQuery method to query the Win32_Share class.
Because only one shared folder is to be deleted, a Where clause is included to limit data retrieval to the shared folder with the name FinanceShare. This results in a collection consisting of a single folder.
To delete all the shared folders on a computer, leave out the Where clause. The resulting collection consists of all the shared folders on the computer.
For each shared folder in the collection, use the Delete method to remove the share.
Example 11.36. Deleting Network Shares
1 strComputer = "."
2 Set objWMIService = GetObject("winmgmts:" _
3     & "{impersonationLevel=impersonate}!\" & strComputer & "
ootcimv2")
4 Set colShares = objWMIService.ExecQuery _
5     ("SELECT * FROM Win32_Share WHERE Name = 'FinanceShare'")
6 For Each objShare in colShares
7     objShare.Delete
8 NextAs your network evolves, you might find it necessary to modify your shared folders. For example, you might need to limit the number of people who can connect to a shared folder at any one time. Alternatively, you might want to change the description of a shared folder, either to reflect a new use for that folder or to make it easier for users to identify the information stored in the folder.
The SetShareInfo method allows you to modify the maximum number of connections and the description of an existing shared folder. SetShareInfo accepts two parameters:
MaximumAllowed. The maximum number of users that can be connected to the share at one time. To allow unlimited simultaneous connections, leave this parameter blank.
Description. Comment describing the shared folder. This comment is visible to users who have enabled the Details view in My Network Places.
Listing 11.37 contains a script that modifies the properties of the FinanceShare shared folder on a computer. To carry out this task, the script must perform the following steps:
Create a variable to specify the computer name.
Use a GetObject call to connect to the WMI namespace rootcimv2, and set the impersonation level to “impersonate.”
Use the ExecQuery method to query the Win32_Share class.
To limit data retrieval to a specified share, a Where clause is included restricting the returned folders to those with the name FinanceShare. Without the Where clause, all the shared folders would be returned, and each shared folder would then have its properties modified.
For each shared folder in the collection, use the SetShareInfo method to set the MaximumAllowed and Description properties. The SetShareInfo method is passed two parameters:
50. — Indicating that the share supports a maximum of 50 simultaneous connections.
Public share for HR administrators and members of the Finance Group. — Description displayed to users accessing the share through My Network Places.
Example 11.37. Modifying Network Share Properties
 1 strComputer = "."
 2 Set objWMIService = GetObject("winmgmts:" _
 3     & "{impersonationLevel=impersonate}!\" & strComputer & "
ootcimv2")
 4 Set colShares = objWMIService.ExecQuery _
 5     ("SELECT * FROM Win32_Share WHERE Name = 'FinanceShare'")
 6 For Each objShare in colShares
 7     errReturn = objShare.SetShareInfo(50, _
 8         "Public share for HR administrators and the Finance Group.")
 9 Next
10 Wscript.Echo errReturnOne problem with shared folders is that each shared folder is tied to an individual computer. To access the resources on a shared folder, users must know not only the name of the shared folder itself but also the name of the computer where that shared folder is located. In a large organization, this can make it difficult to find resources.
One way to overcome this problem is to publish shared folders in Active Directory. When a shared folder is published in Active Directory, users can search for such a folder using Network Neighborhood.
You can also search for shared folders using ADSI scripts or Active Directory Users and Computers. Regardless of the tool you use, you can search for these resources based not only on name but also on description or keyword.
Shared folders are published in Active Directory by creating an instance of the Volume class that represents the shared folder. Some of the key attributes of the Volume class are listed in Table 11.14.
Table 11.14. Volume Class Attributes
Attribute | Description |
|---|---|
CN | Common name. Name of the object as displayed in Active Directory Users and Computers. (This is typically the same name as the share name.) For example: FinanceShare |
UNCName | UNC path of the shared folder. For example:\Server1FinanceShare |
Description | Description of the share and its contents. |
Keywords | Array of descriptive terms that can be used in searching for specific shared folders. |
ManagedBy | Indicates the user responsible for the share. |
Folders can be published in Active Directory either by using Active Directory Users and Computers or by using a custom ADSI script. An ADSI script can also be used to enumerate all the shared folders on a computer and then publish each one in Active Directory.
Scripting Steps
Listing 11.38 contains a script that publishes a shared folder in Active Directory. To carry out this task, the script must perform the following steps:
Use a GetObject call to bind to the organizational unit in Active Directory where the shared folder will be published.
Use the Create method to create the shared folder object. The Create method is passed two parameters:
Volume. — Indicates that the entity being created is a shared folder.
CN = FinanceShare. — Specifies the name of the published folder.
Use the Put method to specify the network path to the shared folder.
Use the Put method to specify a description of the shared folder.
This description is available to anyone who accesses the shared folder in Active Directory Users and Computers. However, this description is not available to anyone accessing the shared folder by using Network Neighborhood, nor is this the same description as the one set using the WMI Win32_Share class.
Use the Put method to specify keywords that can be used when searching for this folder.
The Keywords property is a multiple-attribute property; that is, it can accept more than one value. To assign multiple keywords to the folder, the keywords are passed as parameters using the Array method.
Use the SetInfo method to apply the changes and publish the folder in Active Directory.
Example 11.38. Publishing a Shared Folder in Active Directory
1 Set objComputer = GetObject _
2     ("LDAP://OU=Finance, DC=fabrikam, DC=com")
3 Set objShare = objComputer.Create("volume", "CN=FinanceShare")
4 objShare.Put "uNCName", "\atl-dc-02FinanceShare"
5 objShare.Put "Description", "Public share for users in the Finance group."
6 objShare.Put "Keywords", Array("finance", "fiscal", "monetary")
7 objShare.SetInfoPublished folders are like any other object stored in Active Directory: After they have been created, they need to be managed. This management includes such tasks as:
Enumerating all the published folders.
Searching for published folders that meet specific criteria.
Deleting published folders that should no longer be maintained in Active Directory.
All of these tasks can be carried out using ADSI scripts.
Folders are published in Active Directory to make it easier to identify all the shares on your network. After a folder is shared and published, you can locate it using tools such as Active Directory Users and Computers.
In addition, ADSI can be used to retrieve a list of all the folders that have been published in Active Directory. This can be done by constructing a script that returns all instances of the Volume class.
Listing 11.39 contains a script that enumerates the shared folders published in Active Directory. To carry out this task, the script must perform the following steps:
Include the On Error Resume Next statement. Without this statement, the script fails if it is unable to find any published folders in Active Directory.
Create a constant named ADS_SCOPE_SUBTREE and set the value to 2. This is used to specify a search that begins in the Active Directory root and proceeds to search all the child containers as well.
Create an instance of the Active Directory connection object (ADODB.Connection).
Create an instance of the Active Directory command object (ADODB.Command).
The command object allows you to issue queries and other database commands using the Active Directory connection.
Set the provider property of the connection object to the Active Directory provider (ADsDSOObject). This is the OLE database provider for ADSI.
Set the active connection to the Active Directory connection.
Set the command text for the Active Directory command object to the SQL query that retrieves all the published shared folders from fabrikam.com.
Specify values for time-out, search scope, and caching.
Execute the SQL query.
When the set of published shared folders is returned, use the MoveFirst method to move to the first share in the recordset.
For each share in the recordset, echo the share name, the UNC name, and the name of the user responsible for managing the share.
Example 11.39. Enumerating Published Shared Folders
 1 On Error Resume Next
 2 Const ADS_SCOPE_SUBTREE = 2
 3 Set objConnection = CreateObject("ADODB.Connection")
 4 Set objCommand =   CreateObject("ADODB.Command")
 5 objConnection.Provider = "ADsDSOObject"
 6 objConnection.Open "Active Directory Provider"
 7 Set objCOmmand.ActiveConnection = objConnection
 8 objCommand.CommandText = "SELECT Name, unCName, ManagedBy FROM " _
 9     & "'LDAP://DC=Fabrikam,DC=com' WHERE objectClass='volume'"
10 objCommand.Properties("Timeout") = 30
11 objCommand.Properties("Searchscope") = ADS_SCOPE_SUBTREE
12 objCommand.Properties("Cache Results") = False
13 Set objRecordSet = objCommand.Execute
14 objRecordSet.MoveFirst
15 Do Until objRecordSet.EOF
16     Wscript.Echo "Share Name: " & objRecordSet.Fields("Name").Value
17     Wscript.Echo "UNC Name: " & objRecordSet.Fields("uNCName").Value
18     Wscript.Echo "Managed By: " & objRecordSet.Fields("ManagedBy").Value
19     objRecordSet.MoveNext
20 LoopRetrieving a list of all the folders that are published in Active Directory is obviously useful. At the same time, in a large organization a list such as this might contain hundreds or even thousands of shares. Having to read through a list that large to find a particular folder or two would be very inefficient.
Fortunately, you can also search Active Directory for only those published folders that meet specific criteria. For example, you might search for a folder named FinanceShare, for all the folders managed by Ken Myer, or for all the folders that have “finance” as one of their keywords. By combining criteria, you can create targeted searches that help you quickly and easily locate only the published folders you are most interested in.
Scripting Steps
Listing 11.40 contains a script that searches for a published folder in Active Directory. To carry out this task, the script must perform the following steps:
Include the On Error Resume Next statement. Without this statement, the script fails if it is unable to find any published folders in Active Directory.
Create a constant named ADS_SCOPE_SUBTREE and set the value to 2. This is used to specify a search that begins in the Active Directory root and proceeds to search all the child containers as well.
Create an instance of the Active Directory connection object (ADODB.Connection).
Create an instance of the Active Directory command object (ADODB.Command).
The command object allows you to issue queries and other database commands using the Active Directory connection.
Set the provider property of the connection object to the Active Directory provider (ADsDSOObject). This is the OLE database provider for ADSI.
Set the active connection to the Active Directory connection.
Set the command text for the Active Directory command object to the SQL query that retrieves all the published folders from fabrikam.com.
To limit data retrieval to a specific set of shared folders, a Where clause is included that restricts the returned collection to those shared folders that include the keyword “finance.”
Specify values for time-out, search scope, and caching.
Execute the SQL query.
When the set of published shared folders is returned, use the MoveFirst method to move to the first share in the recordset.
For each share in the recordset, echo the share name, the UNC name, and the name of the user responsible for managing the share.
Example 11.40. Searching for a Shared Folder in Active Directory
 1 On Error Resume Next
 2 Const ADS_SCOPE_SUBTREE = 2
 3 Set objConnection = CreateObject("ADODB.Connection")
 4 Set objCommand =   CreateObject("ADODB.Command")
 5 objConnection.Provider = "ADsDSOObject"
 6 objConnection.Open "Active Directory Provider"
 7 Set objCOmmand.ActiveConnection = objConnection
 8 objCommand.CommandText = "SELECT Name, unCName, ManagedBy FROM " _
 9     & "'LDAP://DC=fabrikam,DC=com'" _
10         & " WHERE objectClass='volume' AND Keywords = 'finance*'"
11 objCommand.Properties("Timeout") = 30
12 objCommand.Properties("Searchscope") = ADS_SCOPE_SUBTREE
13 objCommand.Properties("Cache Results") = False
14 Set objRecordSet = objCommand.Execute
15 objRecordSet.MoveFirst
16 Do Until objRecordSet.EOF
17     Wscript.Echo "Share Name: " & objRecordSet.Fields("Name").Value
18     Wscript.Echo "UNC Name: " & objRecordSet.Fields("uNCName").Value
19     Wscript.Echo "Managed By: " & objRecordSet.Fields("ManagedBy").Value
20     objRecordSet.MoveNext
21 LoopBecause a published folder is simply an Active Directory object, it can be deleted using an ADSI script: You bind to the object and then use the DeleteObject method to remove it from Active Directory.
Deleting a published folder does not delete the contents of that folder, nor does it stop the sharing of that folder. Instead, it merely removes the folder from Active Directory.
Listing 11.41 contains a script that deletes a published folder from Active Directory. To carry out this task, the script must perform the following steps: