In this section:
Customizing a Template
Laying Out the Page
Changing Page Orientation
Changing Margins
Fine-Tuning Your Layout
Creating Sections
Creating Headers and Footers
Adding Columns
Creating and Customizing a Table
Creating a Table Style
Creating a Side-by-Side Layout
Not every page you create in Microsoft Word 2010 will need careful thought about the layout of the page. You might whip off a quick memo to a co-worker, for example, that doesn’t require anything special about the way the text appears on the page. But some documents—such as annual reports, newsletters, sales brochures, and training booklets—require a little more thought. And if you expect to be using the design again and again, all the better—extra thought about the layout of the document now can save you time and trouble later.
Your layout is a lot like the “bones” of your document—the beneath-the-surface underpinning that gives the finished work its sense of balance and structure. As you work through this section of the book, whether you’re actually putting your layout together now or just getting ideas for an upcoming project, you’ll see that Word 2010 gives you many different ways—and a number of powerful tools—to make creating effective layouts simple and straightforward.
Word 2010 includes a number of professionally designed templates with your version of the program, and what’s more, when you click the File tab and click New, you have the benefit of browsing dozens and dozens of additional templates available from Office.com. No matter what color, font, style, or design you want, chances are that you’ll find a template that comes close. No matter how well designed, however, no template can be everything to all people, and it’s likely that you’ll want to do some customizing to make the template fit your particular project.
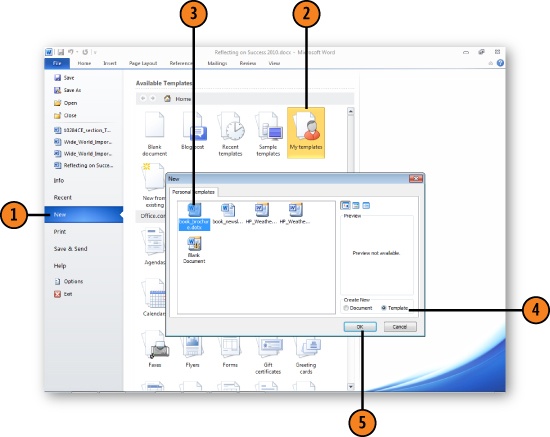
Click the File tab and click New.
Click My Templates.
Click the template you want to modify.
Click Template in the Create New section.
Click OK.
Tip
If you want to make changes to a template that’s either stored on a company Web site or available from Office.com, you won’t be able to open the template as a template. Instead, you’ll need to open it as a document, make your modifications, and then save the document as a template on your computer.
See Also
Designing a Template for information about designing your own template.
Click Save on the Quick Access Toolbar, type a unique and descriptive file name for your new template, and click Save.
On the Home tab, click the Show/Hide ¶ tool in the Paragraph group to display paragraph marks.
Replace the placeholder text with any text you want to include as part of the template.
Add any new text or other page elements.
Redefine or create your own paragraph styles and character styles.
Click File and save and close the template.

Tip
The modified template will be saved in your personal Templates folder and will appear in the New dialog box when you choose New in Backstage view and click My Templates.
Try This!
Click File, click New, click My Templates, and create a document based on the modified template to verify that the template is correct.
See Also
Create a Template from Scratch for information about starting a document based on a template.
You may find that none of the available templates is exactly what you need for your project, so you decide to create a template from scratch. The easiest way to do this is to use an existing document and set it up as a template. If you don’t have an existing document that incorporates all the special elements you need, create one and then save it. Review the entire document to determine whether the design really works and then close the document. You’ll be using a copy of the document as the basis for your template’s design, so if you don’t like the resulting template, you can simply delete it and then revise it using the same document.
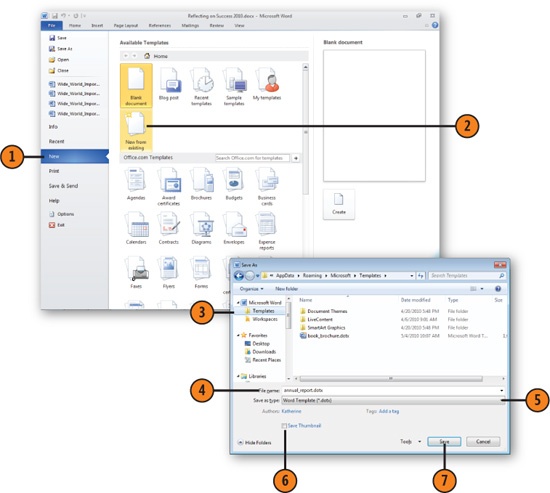
Click File and choose New.
Click New From Existing; in the New From Existing Document dialog box, navigate to the document you want to use and click Open.
Click File and click Save As, and click the Templates folder.
Type a unique and descriptive file name.
Verify that Word Template is shown in the Save As Type list.
Select this check box to save a thumbnail image of the template.
Click Save.
On the Home tab, click Show/Hide ¶ in the Paragraph group if necessary.
Add any text you want to appear in all documents based on this template.
Add your logo, header information, or tagline.
Add fields for mail merge or content collection.
Add hyperlinks you want to include.
Click Save in the Quick Access Toolbar to save the template.

Tip
To include the date and time in the template and to have Word update both each time you create a new document, click the Date & Time tool on the Insert tab in the Text group, click the format you want to use, select the Update Automatically check box, and click OK.
Tip
To locate the fields in your template while you’re designing it, or to see the fields in documents based on the template so that you don’t accidentally delete them, click File and click Options. Click Advanced, and, in the Show Document Content section, specify whether you want fields to be shaded when they’re selected or always to be shaded. Click OK to close the Word Options dialog box.
Tip
So what are fields, anyway? Word 2010 fields, also called content controls, enable you to include placeholders for information in your document that might change. For example, the Date & Time tool in the Text group of the Insert tab inserts a field that will update with the current date and time.
Just a few years ago, the printer was the likely destination for any document you created. Today you may share a document electronically, post it as a blog, send it to a Windows Live account, or e-mail it to team members. When you do plan to print a document, you have additional items to consider for your layout. Will you print the page in landscape or portrait orientation? Will the document be printed on both sides of the page? Thinking through these types of issues as you design your page helps you ensure that you get just the kind of printout you were expecting.
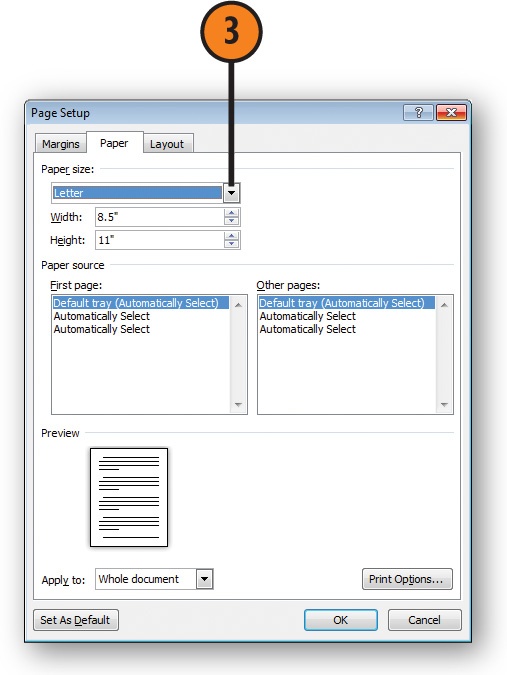
Click the Page Layout tab, click Size in the Page Setup group, and click the page size you want.
If you don’t see the page size you want, click More Paper Sizes.
Choose your paper size on the Paper tab of the Page Setup dialog box.
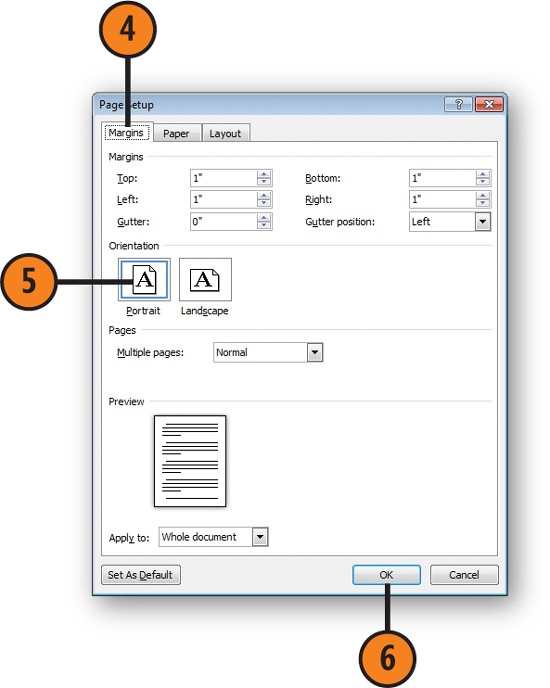
Click the Margins tab and select the margins settings you want.
Click Orientation, and select the orientation: Portrait (longer than wide) or Landscape (wider than long).
Click OK.

See Also
“Creating Variable Running Heads” on Creating Variable Headers and Footers for information about using different headers and footers in a two-sided document.
Click the Page Layout tab, click Margins in the Page Setup group, and choose Custom Margins.
Click the Margins tab, and click Mirror Margins in the Multiple Pages list.
Set the document’s side margins using the Inside and Outside boxes. The Inside margin will be on the left side of odd-numbered (right-hand, or recto) pages and on the right side of even-numbered (left-hand, or verso) pages.
Click OK.

Tip
You can apply a gutter to any document layout. For a document that’s set up for one-sided printing, you can specify the gutter location as the left side of the paper or the top of the paper. For a multiple-page layout, Word uses the default location of the gutter for the type of layout you choose. Use the preview to see the placement of the gutter.
Click Margins and choose Custom Margins.
Click the Margins tab and specify a value for the gutter.
If the Multiple Pages list is set to Normal, specify whether the gutter (and therefore the binding) should be on the left side or at the top of the page. For other Multiple Pages settings, the gutter position is set automatically.
Click OK.

Different parts of a long document sometimes require different layouts. For example, although most of your document’s text may be in portrait orientation, there might be one or two pages you want to include with tables, figures, or other special elements that need to be set up in landscape mode because of their width. By dividing the document into sections, you can set up each section with its own orientation.
Select the part of the document whose page orientation you want to change.
Click the Page Layout tab, click Margins in the Page Setup group, and choose Custom Margins.
Click the orientation you want.
In the Apply To list, choose Selected Text.
Click OK.
Use the Zoom Control on the status bar to see your pages in detail, and verify that the layout is what you want.

Tip
When you change the orientation of selected text, you’re actually creating two new sections: one for the selected text and another for the text that follows the selection.
Most of your documents may require only one set of margins, and you use paragraph indents to control the layout of individual paragraphs. Sometimes, though, a long document might have several large sections that need different margins. Setting different margins for different sections would be extremely time-consuming and tedious to do when using paragraph indents. Instead, you can set each section to start on a new page or even to start on the same page as a section that has different margins.
Select the part of the document whose margins you want to change.
On the Page Layout tab, click Margins in the Page Setup group, and click Custom Margins.
Set the new margins.
Specify Selected Text.
Click the Layout tab, and specify the point at which the section with the changed margins will start. Specify Continuous if you want the changed section to begin on the same page as the previous section.
Click OK.
Click in the next section of your document, and redisplay the Layout tab. Specify where you want this section to start. Click OK.

See Also
Adding Columns for information about using a multiple-column layout.
One of the great things about creating documents in Word 2010 is that you never need to be completely done with a document—unless you choose to, that is. You can turn a report into a letter, a letter into a brochure, a brochure into postcards, and so on. Electronic documents means never having to say you’re finished! After you’ve chosen the new layout for the text, you may need to adjust the flow by changing the way the lines break or adjusting the paragraphs. Here’s how to do that.
Select the paragraph or paragraphs in which you want to make changes.
On the Home tab, click the dialog launcher in the Paragraph group.
Click the Line And Page Breaks tab.
Select or clear this check box to control the way paragraphs break across consecutive pages.
Select this check box if the paragraph is a heading that must always be on the same page as the beginning of the following paragraph.
Select this check box if you never want to allow a paragraph to break across pages.
Click OK.

Tip
There are many definitions of the terms widow and orphan in the publishing world. In Word’s world, widows and orphans are single lines that get separated from the paragraph to which they belong and become marooned alone at the top (orphan) or bottom (widow) of a page. Widows and orphans are considered aesthetically undesirable in both worlds.
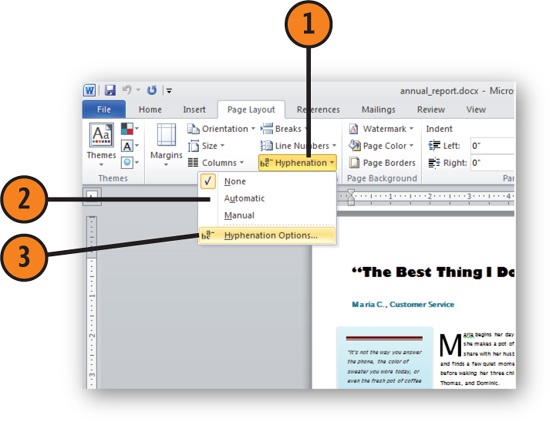
Click Hyphenation in the Page Setup group of the Page Layout tab.
Click the hyphenation setting you want to apply to the document.
To fine-tune hyphenation settings, click Hyphenation Options.
Click to have Word automatically hyphenate your document.
Set the amount of space from the right text margin where you want words to be hyphenated.
Choose whether you want to limit the number of hyphenations that appear in a row.
Click OK.

Caution
Always apply manual page breaks as the very last adjustment you make to a document before you print it. Editing a document after you’ve applied page breaks can result in an unacceptably short page or an extra blank page. However, if you do need to edit the document after page breaking, click File and click Print to preview your document and examine the page breaks.
When you are working with really long documents, you’ll find it easier to control headers and footers, page numbers, and more if you divide the document into sections. Word will start your chapters or sections on odd-numbered pages and will create running heads to your specifications.
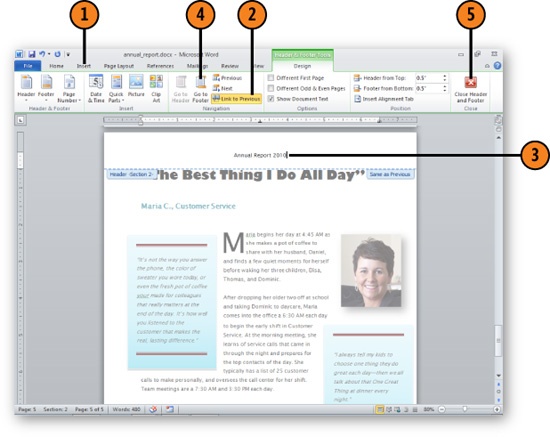
Click the Insert tab, click the Header tool in the Header & Footer group, and click Edit Header. Any text in the header comes from the previous header.
On the Header & Footer Tools Design tab, click the Link To Previous tool to turn it off and to disconnect the header from the previous header.
Replace the old header text, if any, with the text for your new running head.
Click the Go To Footer tool to move to the footer, and repeat steps 2 and 3 for the footer. If the document is set for a different running head on the first page, or for different running heads on odd- and even-numbered pages, repeat steps 2 and 3 for those running heads.
Click Close Header And Footer when you’ve finished.
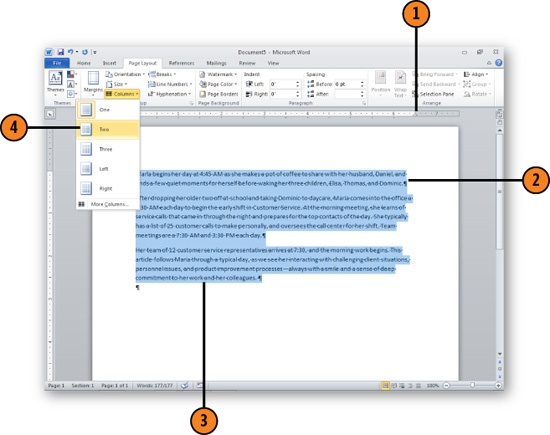
Columns add special layout style to documents that contain a lot of text. You might add columns in a newsletter, a brochure, or sales literature. Word 2010 makes it easy for you to flow text into columns on your page. You can set up multiple columns, change the width of columns, and even add divider lines to help add more visual interest to the page.
Without worrying about the layout just yet, complete the content of your document. Make sure the page orientation and the margins are set correctly for the document.
On the Home tab, click the Show/Hide ¶ tool in the Paragraph group if it isn’t already turned on.
Select the text that you want to flow into columns.
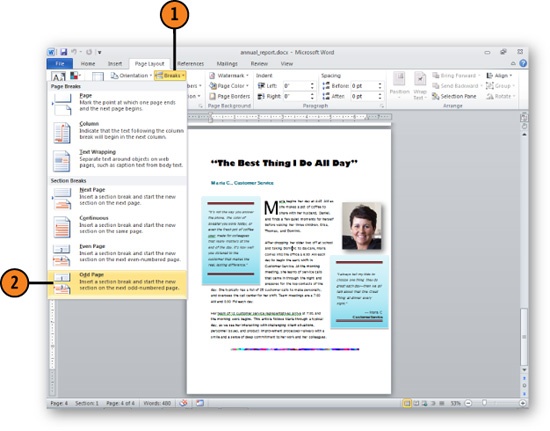
On the Page Layout tab, click Columns in the Page Setup group, and select the layout you want. Word makes the selected text into a separate section by inserting Continuous section breaks before and after the selected text.
If you want to adjust the columns, click anywhere in the section that has the columns.
Click the Columns tool again, and click More Columns in the Columns gallery to display the Columns dialog box.
If you don’t want even-width columns, clear this check box, and then specify the width you want for each column.
Select this check box if you want a vertical line centered between adjacent columns.
Make sure the settings are applied only to the selected text, and then click OK.

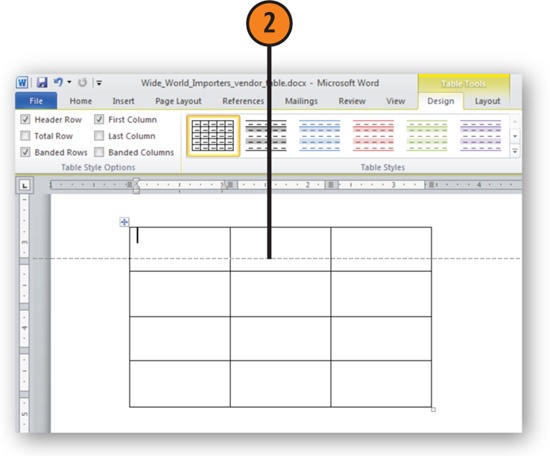
Tables are your friends. They give you a simple, logical way to align numbers, text, and pictures on your page. Word 2010 offers a number of ways you can create a table, but the simplest and most versatile method is to create an empty, unformatted table with a prescribed number of rows and columns. You can easily add content, and you can format and modify it later.
Click the Insert tab and click the Table tool. Move the mouse pointer to select the number of rows and columns you want in your table, and then click to insert the table.
Click in the first cell and insert your content.
Press Tab to move to the next cell, and add your content. (Press Enter only to start a new paragraph inside a table cell.) Continue pressing Tab and entering content to complete your table. If you’ve reached the end of your table but you still need to enter more items, press Tab, and Word creates a new row.

See Also
Creating a Table from Text for information about converting existing text in paragraphs into text in a table.

In the same way that you use templates for creating specialized types of documents, you can use a table template to create a specialized type of table, complete with formatting and related material—a title or caption, for example. The table designs you select are coordinated with the document theme you are using, so the colors, fonts, and effects will match the other items on your page.
Click in your document where you want the table to appear.
On the Insert tab, click Table, point to Quick Tables, and click the type of table you want.
Drag the mouse over the content of the table, and press the Delete key to remove the sample text.
Click in the top-left cell, and type your information. Use the Tab key to move through the cells, and enter the rest of your content.

Tip
Once you’ve created the table, you can modify its appearance by applying table styles and other formatting.
See Also
Formatting a Table for information about formatting a table.
It’s possible to use tabs to align content in columns, but aligning your content means that the content can get seriously messed up if you decide to reformat the document with different fonts, margins, and layouts. One way to avoid this is to convert your text into a table. That way, not only is the formatting much simpler, but you can use the table tools to organize your information more easily.
Make sure the content is correctly separated by tabs, commas, paragraphs, or other marks. Delete any extra tabs (more than one tab between columns, for example) even if this affects the current alignment.
Select all the text.
Click the Insert tab, click Table, and click Convert Text To Table.
Choose the number of columns you want to create.
Select the type of mark you used to separate the columns of text.
Click OK.

Of course, part of creating and working with a table means adding to it or removing bits you don’t need. Word 2010 makes it easy for you to modify the layout of an existing table by adding or deleting rows and columns anywhere in the table.
Click in the table next to where you want to add a row or column.
On the Table Tools Layout tab, choose what you want to add.

Tip
To delete the content of a row or column without deleting the row or column itself, select the row or column, and press the Delete key.
Caution
If you want to delete content from a row or column without deleting the row or column itself, make sure your selection doesn’t extend outside the table. If it does, you’ll delete whatever part of the table is selected as well as its content.
Try This!
Create a table with three columns and three rows. Click in the top-left cell. Drag the mouse to the right to select the first two cells. Click the Table Tools Layout tab and then click Insert Left. With the new columns selected, click Insert Above. Note that the number of rows and columns that are inserted is based on the number of rows and columns in which cells were selected. Now try deleting rows and columns to revert to the size of the original table.

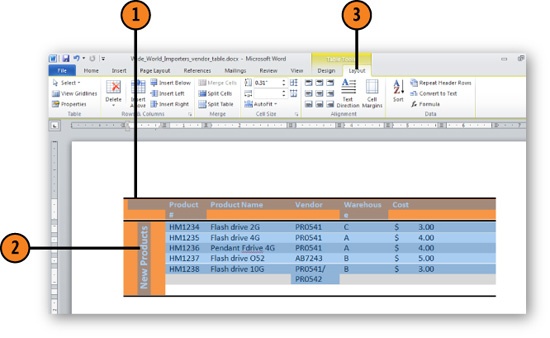
Getting things to line up is what a table is all about. You can use several special tools to align the text in your table. Not only can you center, left-align, or right-align the text in the table, but you also can actually change the text direction to create special effects for table row or column information.
Create and format your table.
Click in a cell or select all the cells to which you want to apply a specific alignment.
On the Table Tools Layout tab, click an Alignment tool to apply the alignment you want.
Try This!
Select an entire column in a table that will contain decimal numbers. Select the Decimal tab stop on the ruler, and click in the horizontal ruler to place the tab stop in the column. Your numbers will be aligned by their decimal points in that column.
See Also
Customizing a Table Layout for information about changing the size of cells to accommodate sideways text.
See Also
Formatting a Table for information about formatting a table.
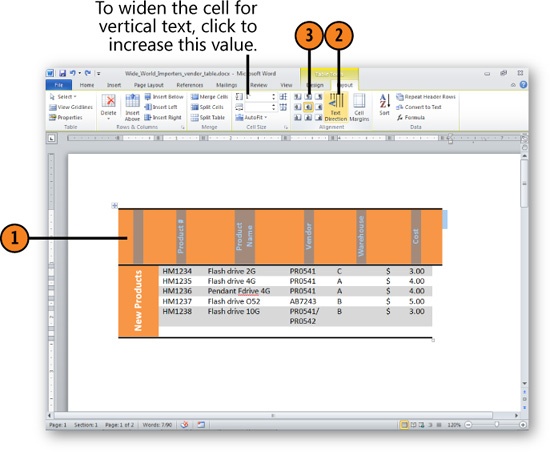
Tailoring the table to fit and showcase your content in the best possible way is simple in Word 2010. You can change the width of columns or the height of rows, for example, or draw new cell boundaries and erase old ones. Word gives you a great deal of flexibility in the layout of your table.
In Print Layout view, move the mouse pointer over the table to make the Size box appear.
Drag the Size box to change the size of the table.

On the Table Tools Design tab, select the type of border, the border thickness, and the border color you want for the new boundary.
Click the Draw Table tool if it isn’t already turned on. (You’ll see a little pencil pointer on your screen when the tool is turned on.)
Drag the pencil pointer from a cell boundary to the opposite boundary. Add as many cell boundaries as you need. Click the Draw Table tool to turn it off when you’ve finished.

Caution
When you’re working on a table using the Draw Table and Eraser tools, it’s difficult to achieve a high degree of precision. It’s easy, for example, to accidentally add boundaries you don’t want or delete those you do want. Carefully inspect your table after you add or delete a boundary. You can remedy an error by clicking the Undo tool on the Quick Access toolbar.
Ordinarily you’ll want to position your table using the same alignment you choose for the surrounding text. However, you might want to set a table off a bit by changing its horizontal position—indenting or centering it, for example. By using Word’s alignment settings instead of moving the table manually, you can ensure that the settings will remain in effect even if you change the margins or any other page settings.
Click the table, and then, on the Table Tools Layout tab, click the Properties tool in the Table group to display the Table Properties dialog box.
On the Table tab, click an alignment.
If you chose Left Alignment, specify the distance you want the table to be indented from the left margin.
If you want to the change the default alignment settings, click Around in the Text Wrapping section, click the Positioning button, make your changes in the Table Positioning dialog box that appears, and then click OK.
Click OK.

Try This!
Create two tables, one smaller than the other. Drag the smaller table and place it on top of the larger table. Note that the smaller table has become “nested” inside the larger table. Right-click in the nested table, choose Table Properties from the shortcut menu, and, on the Table tab of the Table Properties dialog box, click an alignment for the table. Click OK. Note that the alignment of the nested table is relative to the cell in which it’s nested. Now click the Undo tool to return the tables to their original state.
See Also
Moving a Table on the facing page for information about setting text to wrap around a table.
You can move a table just as you would move any object on your page—by clicking and dragging. You can also position a table precisely by using the tools available on the Table Tools Layout tab. When you drag a table, you can position it both horizontally and vertically on the page, just as you can position a picture on the page. When you move the table horizontally, you’re also setting it to have text wrapping, so, if there’s room, any text can wrap around all four sides of the table.
Switch to Print Layout view or Web Layout view if necessary by clicking the view tool in the lower-right corner of the screen.
Point to the table until the Move box appears.
Drag the Move box and the table to the location you want.
If you can’t place the table in the exact location you want, or if the text isn’t wrapping in the way you want, click Properties on the Table Tools Layout tab.
Specify the alignment relative to the text, and specify that you want the text to wrap around the table.
Click Positioning to display the Table Positioning dialog box.
Make any changes to the position of the table and specify how far the table should be from any surrounding text.
Click OK.
Click OK to close the Table Properties dialog box.


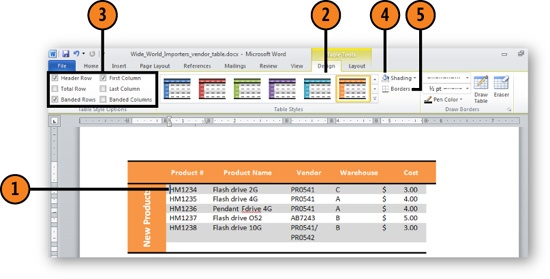
So you know how to use a table to organize your data—text, pictures, numbers, and more. Did you know you can also apply styles and formats to the table content you create? For example, you can use shading to delineate certain cell groupings, add borders to draw attention to particular cells, or use the formatting tools to vary the dimensions and alignment of the text.
Click inside the table.
On the Table Tools Design tab that appears, select a style for the table.
Select or clear the check boxes to turn the display of various table elements on or off, as desired.
Select the cell or cells to which you want to add or from which you want to remove shading, click the Shading tool and select a color to add shading, or select No Color to remove shading.
Select the cell or cells to which you want to add or from which you want to remove borders, click the Borders tool and select the borders you want, or select No Borders to remove the borders.
Click the Table Tools Layout tab, and use the tools to add or delete rows or columns, to set the dimensions of the rows and columns, and to set the text alignment, direction—that is, horizontal or vertical—and margins.

See Also
Using a Predesigned Table for information about using a template to create a preformatted table.
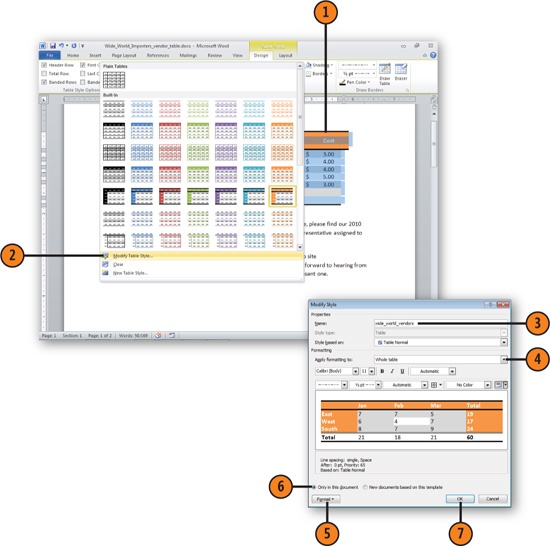
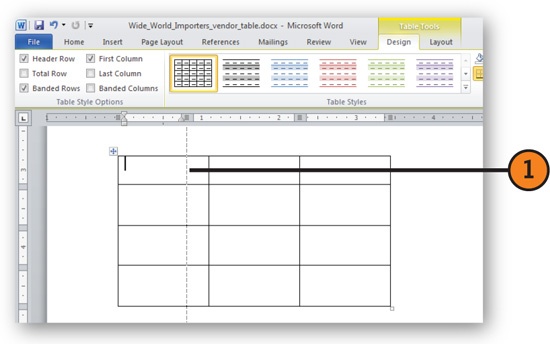
The styles you can apply to your tables in Word connect directly to the theme style you have selected or your document. Table styles in Word include special design elements including colors, shading, and more. You can use one of the table styles or modify one to best reflect what you’d like to see in your document. The easiest way to customize a table style is to create a table, apply an existing table style to it, and then modify the formatting to create your own style.
Create a table, and, on the Table Tools Design tab, apply the table style that’s closest to what you have in mind.
Click the More button in the lower-right corner of the Table Styles group and click Modify Table Style.
Enter a new name for your style.
In Apply Formatting, click Whole Table in the drop-down list.
Use the formatting tools or click the Format button to specify any formatting that will be common to all the elements of the table—the font, for example. Click another element in the list, and use the formatting tools or click the Format button to redefine the formatting for that element. Continue clicking elements and changing their formatting as necessary.
Specify whether you want to have this style available in only this document or in all documents based on the current style.
Click OK.