
Chapter at a Glance

Many CRM system implementations are initiated by sales and marketing teams to build a shared, central repository of customer sales and order data. In the previous chapters of this book, you’ve learned how Microsoft Dynamics CRM can be used to manage marketing activities, prospective customers (leads), sales opportunities, and orders. Of course, after a sale is completed, your company’s relationship with the customer does not end! To ensure that the customer is satisfied with the sale, customer service teams can use the information gathered during the marketing and sales processes to manage the post-sale relationship with the customer.
Consider the following scenario: You’ve just purchased a flight to your favorite vacation locale from a travel website. The day before you’re scheduled to leave, you receive an email message indicating that your flight has been canceled and that you’ll need to contact the travel website’s customer service team for more information. You call the customer service number listed in the message, only to be routed through three customer service representatives, explaining your situation to each before someone finally books you on another flight.
Regardless of the purchase, this scenario is not uncommon when customer support issues are involved, which is why a system that allows customer service teams to share sales and support information is such a powerful concept. All communications regarding the support request can be captured in one location and viewed by everyone on the team to ensure a speedy resolution. As the archive of service requests accumulates, customer service managers can identify common issues and trends that can then be used to drive enhancements to the sales process, service, or product development.
In Microsoft Dynamics CRM, service requests are called cases. A case represents any request or support incident for a customer. Typically, a case includes a description of the service issue or problem reported by the customer and the related notes and follow-up activities that service representatives use to resolve the issue.
Providing an avenue for customers to submit requests or issues during and after the sales process is critical to ensuring that customers are satisfied and willing to do business with your company in the future.
In this chapter, you’ll learn how customer service teams can create, update, and resolve cases in Microsoft Dynamics CRM.
Important
The images used in this book reflect the default form and field names in Microsoft Dynamics CRM. Because the software offers extensive customization capabilities, it’s possible that some of the record types or fields have been relabeled in your Microsoft Dynamics CRM environment. If you cannot find the forms, fields, or security roles referred to in this book, contact your system administrator for assistance.
Important
You must know the location of your Microsoft Dynamics CRM website to work the exercises in this book. Check with your system administrator to verify the web address if you don’t know it.
Each case in Microsoft Dynamics CRM contains the details of a customer request or issue, as well as follow-up dates, resolution steps, and other details. Multiple cases can be tracked for each customer, and each case has its own follow-up dates and status value. Because of the flexibility of the case record and the ability to customize forms and fields in Microsoft Dynamics CRM, cases are often used to track more than just support requests. Examples of how we’ve seen cases used include the following:
Resolving call center support requests from customers of a financial services firm
Managing concierge requests for top-tier clients of a hospitality provider
Tracking safety requests to fix potholes and replace broken streetlights for a municipal government
Capturing end-user requests for the CRM system itself
Tracking warranty requests for residential home sales
In this exercise, you’ll create a new case for a customer who is requesting a product catalog. After creating the case with the appropriate details from the customer, you’ll assign it to a customer service representative.
Note
SET UP Use your own Microsoft Dynamics CRM installation in place of the CRM sample data shown in the exercise. Use the Windows Internet Explorer web browser to navigate to your Microsoft Dynamics CRM website before beginning this exercise.
In the Service area, click Cases to view the case list.
 On the ribbon, on the Cases tab, click the New button to launch the New Case form.
In the Title field, enter the following text description: Product Catalog Request.
 Click the Lookup button next to the Customer field, and select an
account.
Click the Lookup button next to the Customer field, and select an
account.Select a Subject category for the case.
Set the Case Origin field to Phone to indicate that the customer called with this request.
Set the Case Type field to Request.
 On the Case
tab of the ribbon, click Save to create the case.
On the Case
tab of the ribbon, click Save to create the case.Tip
Microsoft Dynamics CRM automatically assigns a number to each case when it is first saved. Case auto-numbering can be configured by system administrators in the Administration section of the Settings pane. By default, each case will be created with a three-character prefix (CAS), a four-digit code, and a six-character identifier—for example, CAS-01028-H6R6J6.
 On the Case
tab of the ribbon, in the Collaborate group, click the Assign button to assign the case to a customer service representative.
On the Case
tab of the ribbon, in the Collaborate group, click the Assign button to assign the case to a customer service representative.In the Assign to Team or User dialog box, select Assign to another user or team and use the Lookup button to select another user record.
Click OK to assign the record to the selected user.


Configuring the Subject Tree
Subjects are categories that are used to organize products, sales literature, cases, and knowledge base articles in Microsoft Dynamics CRM. Consider the subject tree as an index of topics related to your business. A hierarchical subject tree can be used in Microsoft Dynamics CRM to categorize your business information. Because subject categories are applied across sales and service records, it’s important to consider the best categories for your business when configuring your Microsoft Dynamics CRM system.

Your subject tree might be aligned to your products or business divisions, or perhaps you want to track customer invoicing questions without relating them to a specific product or service. The following table includes sample subject trees for different industries.
Business Type | Sample Subject Tree |
|---|---|
Financial services firm |
|
Software consulting company |
|
Residential real estate developer |
|
The subject tree is accessed and updated from the Business Management section of the Settings area in Microsoft Dynamics CRM. Because the right to create, edit, and remove subjects for your organization is considered an administrator function, changing the structure of the subject tree is outside the scope of this book. For assistance with creating the subject tree in your Microsoft Dynamics CRM environment, contact your system administrator.
Depending on the complexity of the customer request or issue, it might take a customer service representative just a few minutes to resolve a case, whereas more complicated cases might take days or even months before they are resolved. Because the workload of a customer service team is subject to the requests and support issues created each day, it’s important for teams to continuously resolve issues and track progress on new issues as they’re logged.
For example, the catalog request example in the previous section has a straightforward resolution: The customer service representative will create a task for the fulfillment clerk to send a catalog to the customer, and after this has been completed, no additional follow-up is required with the customer.
Many requests require more research, either internally or with the customer. After submitting an initial warranty claim for a malfunctioning stereo system, a customer might be asked to speak to a service representative on the phone several times and schedule an appointment at a service center before the stereo is fixed. And if it can’t be fixed, the customer might be asked to ship the broken stereo to the manufacturer for replacement.
For customer service managers, tracking the steps taken during a case provides a way of identifying the best solution to frequently logged issues and managing the amount of time each representative spends on a case.
In this exercise, you’ll log a follow-up activity for the case created in the previous section, creating a task activity to track time spent on the service request.
Note
See Also For more information about activities, see Chapter 4.
Note
SET UP Use the Internet Explorer web browser to navigate to your Microsoft Dynamics CRM website, if necessary, before beginning this exercise. You need the Product Catalog Request case you created in the previous exercise. Open the Product Catalog Request case.
On the ribbon, click the Add tab to display additional options for the case.
 In the Activity group, click Task to create a new task related to the case.
Note
Activities can also be created from the Activities view accessed in the entity navigation pane of the Case form. See Chapter 4 for more information.
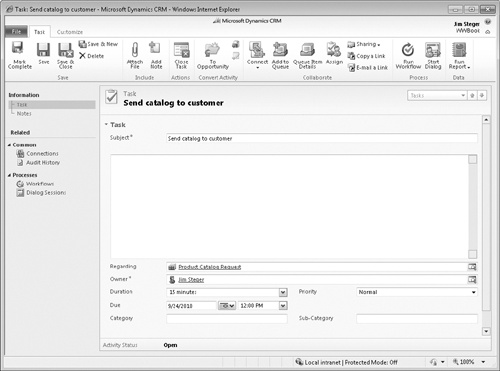
Enter the following in the Subject field: Send catalog to customer.
In the Due field, select a date three business days from today’s date.
Set the Duration field on the Task form to 15 minutes. The duration is the anticipated time the task will take to complete.
 Click the Mark
Complete button to mark the task as completed.
Click the Mark
Complete button to mark the task as completed.After the status of the task is updated to Completed, the Task form automatically closes.

As customer service teams work toward resolving service request questions and incidents, it’s important to maintain an accurate status value for each case to ensure that new cases are addressed in a timely manner and worked on until a resolution is identified. When a case is resolved to the customer’s satisfaction, customer service representatives can update the status of the case to Resolved, which will maintain the case record in the Microsoft Dynamics CRM database but remove it from the active case view.
Before a case can be marked as resolved, all open, related activities must be completed or canceled. The duration value of each completed activity regarding the case will be totaled when the case is resolved, so customer service managers can track the amount of time spent working on the case.
In this exercise, you’ll mark the case created in a previous exercise as resolved.
Note
SET UP Use the Internet Explorer web browser to navigate to your Microsoft Dynamics CRM website, if necessary, before beginning this exercise. You need the Product Catalog Request case you created earlier in this chapter. Open the Product Catalog Request case.
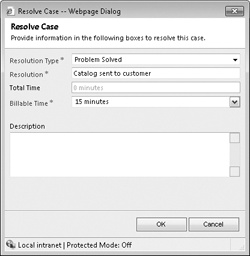
 On the Case
tab of the ribbon, in the Actions
group, click the Resolve
Case button to resolve the case.
On the Case
tab of the ribbon, in the Actions
group, click the Resolve
Case button to resolve the case.In the Resolve Case dialog box, enter Catalog sent to customer in the Resolution field and leave 15 minutes selected in the Billable Time field.
Note
By default, Microsoft Dynamics CRM includes only one status option for the Resolved case status: Problem Solved. This value will automatically appear in the Resolution Type field in the Resolve Case dialog box. The customization tools in Microsoft Dynamics CRM can be used to modify status reason values for cases to match your business needs. Contact your system administrator for assistance.
Click OK to update the case status to Resolved.
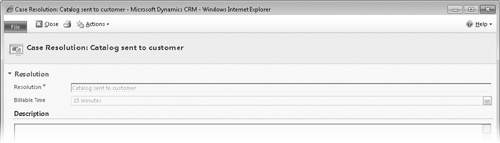
All fields will be saved and made read-only on the form. Microsoft Dynamics CRM automatically creates a Case Resolution activity that stores the details of the resolution in the case’s closed activities.
In the entity navigation pane for the case, click Closed Activities to view the completed activities for the case.
Open the Case Resolution activity. Note that the resolution and total time for the case are stored in the history for reporting and analysis.

There will be times when a case drops off the customer’s priority list or the customer resolves an issue internally. Imagine a situation in which a customer submits a warranty claim for a refrigerator he recently purchased. The day after the case was logged with the appliance company’s customer service team, the company issues a recall of the customer’s refrigerator model, having seen several similar cases logged against it in previous months. The customer service team sets up a new case tracking category to manage recall requests and logs a new case under it for the customer. To prevent the initial case from remaining in the customer service team’s active case list, the case is canceled. Canceled cases are deactivated so that all fields on the form are read-only, but these cases can still be searched and referenced as necessary. Sometimes the reverse happens—a case that was previously resolved or canceled is reopened if the issue reoccurs for the customer. Resolved and canceled cases can be reactivated in Microsoft Dynamics CRM so that customer service teams can continue working with them. Software development companies often have cases that require ongoing customer input; these cases might be canceled if no response is received from the customer for a long period of time. In this example, the case could be reopened in Microsoft Dynamics CRM if the customer contacts the support team at a later date.
In this exercise, you’ll mark a case as Canceled and then reopen it.
Note
SET UP Use the Internet Explorer web browser to navigate to your Microsoft Dynamics CRM website, if necessary, before beginning this exercise.
In the Service area, click Cases, and then in the on the Cases tab of the ribbon, click New to create a new case.
In the New Case form, type or select values in the required fields, as follows:
Field
Value
Title
Unable to register new software licenses
Customer
Sonoma Partners, or any account in your system
Subject
Default Subject, or any subject in your system
Click Save to create the case.
 In the Actions group on the ribbon’s Case tab, click the Cancel
Case button.
In the Actions group on the ribbon’s Case tab, click the Cancel
Case button.In the Case Cancel Confirmation dialog box, select the appropriate status reason for the cancellation, and then click OK to confirm that you want to cancel the case.
After you click OK, the case will update to Canceled status and all fields on the case form will be read-only.
 In the Actions group on the ribbon’s Case tab, click the Reactivate button.
In the Reactivate the Selected Case dialog box, click OK to reactivate the case.
This will update the case to Active status, and all the fields in the form will again be editable.


A case represents any service request or support incident for a customer in Microsoft Dynamics CRM. Customer service teams can use cases to manage customer requests and problems.
Customer service managers can analyze case data to identify frequently occurring customer issues, improve product or service offerings, and streamline the time it takes service representatives to resolve issues.
By default, Microsoft Dynamics CRM requires that a case be assigned a Subject value. The subject tree allows you to categorize sales and support records in Microsoft Dynamics CRM and should be configured by a system administrator.
Follow-up activities ensure that steps are taken to resolve a case. A follow-up activity might be a simple task to send a catalog or update a customer’s address, or it could be more involved, such as a series of phone calls with the customer, service appointments, or research tasks.
By tracking activities to a case, customer service managers can add the duration of each completed activity to the total time spent on the case. This total is automatically calculated in the Resolve Case dialog box.
Maintaining the status value of each case accurately is important to ensure that new issues are addressed in a timely manner and resolved as quickly as possible.
Cases can be marked as Resolved or Canceled to remove them from the active case list. Updating a case to Resolved or Canceled status makes the case read-only in Microsoft Dynamics CRM; however, cases with these statuses can be reactivated as needed—for example, if the customer reports the problem again or if additional edits to the case are necessary.