
Chapter at a Glance

Sales and marketing professionals often need to load bulk data into their Microsoft Dynamics CRM systems. Manually entering these records would be a time-consuming and expensive task. Examples of bulk data that might need to be imported include:
A list of leads, contacts, or accounts purchased from a third party.
A list of contacts obtained from a conference recently attended by the sales staff.
A file full of business contacts brought by an employee who has just joined the company.
Microsoft Dynamics CRM allows users to import data with an easy-to-use Import Data Wizard. With this wizard, you can import hundreds or thousands of records in just a few clicks. In addition to importing core record types such as leads, contacts, and accounts, you can also use the Import Data Wizard to import other record types, including any custom record types created by your system administrator.
In this chapter, you will learn how to import data by using the Import Data Wizard. Additionally, you will learn how to view the results of a data import and how to troubleshoot import errors. Finally, you will learn how to update existing data quickly by taking advantage of the data enrichment feature.
Note
Practice Files Before you can complete the exercises in this chapter, you need to copy the book’s practice files to your computer. The practice file you’ll use to complete the exercises in this chapter is in the Chapter18 practice file folder. A complete list of practice files is provided in Using the Practice Files at the beginning of this book.
Important
The images used in this book reflect the default form and field names in Microsoft Dynamics CRM. Because the software offers extensive customization capabilities, it’s possible that some of the record types or fields have been relabeled in your Microsoft Dynamics CRM environment. If you cannot find the forms, fields, or security roles referred to in this book, contact your system administrator for assistance.
Important
You must know the location of your Microsoft Dynamics CRM website to work the exercises in this book. Check with your system administrator to verify the web address if you don’t know it.
Most data import tools allow users to import simple values into text fields. For more complex data importing—importing into drop-down lists and lookup fields, for example—you usually need to enlist IT resources to write code to map the data. These tasks usually have to go through a prioritization and scheduling process. By the time the data is finally imported, either the need has been met manually or the data is out of date.
The Microsoft Dynamics CRM Import Data Wizard solves most of these challenges. Although the wizard requires the import file to be mapped to the related Microsoft Dynamics CRM attributes, you can accomplish this without enlisting a software development resource. The process of mapping data might sound intimidating; fortunately, the Import Data Wizard does most of the work for you!
Microsoft Dynamics CRM uses data maps as the basis for translating how a source field converts into a related destination field. Consider the following example: suppose you have a file of contacts you would like to import into Microsoft Dynamics CRM. Within your source file, there is a field called First, which contains the first name of a contact. In Microsoft Dynamics CRM, the related field is named First Name. In order to import the data in the source file, you need to map the First field in the source file to the First Name field in the destination (Microsoft Dynamics CRM).
The Import Data Wizard is a simple and intuitive interface that navigates you through the import process. In just a few steps, you can import your records into Microsoft Dynamics CRM. Most entities are available for data import. By default, the following record types are available for import.
Account |
Address |
Announcement |
Appointment |
Article |
Article Template |
Business Unit |
Campaign |
Campaign Activity |
Campaign Response |
Case |
Case Resolution |
Competitor |
Connection |
Contact |
Contract |
Contract Line |
Contract Template |
Currency |
Customer Relationship |
Discount |
Discount List |
Document Location |
Facility/Equipment |
Fax |
Goal |
Goal Metric |
Invoice |
Invoice Product |
Lead |
Letter |
Marketing List |
Note |
Opportunity |
Opportunity Close |
Opportunity Product |
Opportunity Relationship |
Order |
Order Close |
Order Product |
Phone Call |
Price List |
Product |
Queue |
Queue Item |
Price List Item |
Quote |
Quote Close |
Quote Product |
Recurring Appointment |
Rollup Query |
Sales Attachment |
Sales Literature |
Security Role |
Service |
Service Activity |
Sharepoint Site |
Site |
Subject |
Task |
Team |
Territory |
Unit |
User |
Tip
Custom entities are also available for data import. It is unlikely that the user will know which entities are custom and which are native, so be sure to check the list of record types available in the Import Data Wizard. Contact your system administrator if you would like a list of custom entities.
The Import Data Wizard requires you to input the following information:
The name and path of the data file to be imported
Delimiter settings
Data mappings
The target record type
The duplicate detection setting
The name of the record owner
In this exercise, you will use the Import Data Wizard to import data.
Note
SET UP Use the Windows Internet Explorer web browser to navigate to your Microsoft Dynamics CRM website before beginning this exercise. You need the ContactImport1.csv file located in your Chapter18 practice file folder to complete this exercise.
 In the Workplace area, click Imports, and then click the Import Data button on the Imports tab of the ribbon.
Click Browse, and then locate the ContactImport1.csv file.
Click Next to select the file as the data source for your import.
Important
A delimiter is a character or series of characters that indicates a boundary in certain files. In comma-separated files, each value is separated by a comma, which is specified in the Field Delimiter field in the Import Data Wizard. The following line shows a record that has a Data Delimiter value of Quotation Mark (“) and a Field Delimiter value of Comma ( , ).
“Jesper”,“Aaberg”,“[email protected]”,555-0173 Depending on the input file, you might need to change the delimiter options.
On the Review File Upload Summary page, click Next to select the data map for your import.
In the System Data Maps list, select Default (Automatic Mapping).
Click Next to proceed to the next step of the Import Data Wizard.
On the Map Record Types page, in the Microsoft Dynamics CRM Record Types field, select Contact, and then click Next.
On the Map Fields page, in the Source Fields column, select Last in the Required Fields list.
This will map the Last column of the source file to the required Last Name field in Microsoft Dynamics CRM.
Map the additional fields to match those in the following table:
Source Fields
CRM Fields
City
Address 1: City
E-mail
E-mail
First
First Name
State
Address 1: State/Province
Street
Address 1: Street 1
Type of Address
Address 1: Address Type (Option Set)
Work Num
Business Phone
Zip
Address 1: ZIP/Postal Code
Click Next to move to the next page. Then, on the Review Mapping Summary page, click Next.
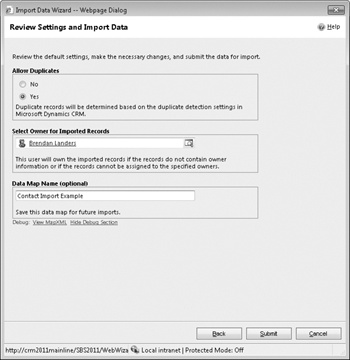
On the Review Settings and Import Data page, select Yes in the Allow Duplicates area.
In the Select Owner for Imported Records area, leave the default selection. In the Data Map Name area, enter Contact Import Example.
Click Submit.
The data will now be imported, and the Contact Import Example data map will be created for future use.
Click Finish to exit the Import Data Wizard.
The Imports grid appears with a new record called ContactImport1.csv {Contact}, indicating that the import has been submitted to the system for processing. The status of the import will update automatically as the import is processed behind the scenes.


As the previous exercise demonstrated, stepping through the Import Data Wizard is a straightforward process. The most time-consuming part of the process is mapping the fields, which is a simple task that nevertheless takes patience and an understanding of basic data concepts. To streamline the data import process, Microsoft Dynamics CRM allows you to create files that map automatically. This takes some setup with the Advanced Find tool, but you will find that it saves you valuable time in the long run.
Note
See Also For more information about Advanced Find, see Chapter 16.
Tip
The key to automatic mapping is the column headers in your import file. If the column headers in your import file match the field display names in Microsoft Dynamics CRM, your file will automatically map. You can use Advanced Find or an existing view to create a template for your import file in which the column headers mirror the field values in Microsoft Dynamics CRM, and then perform a copy-and-paste operation to paste the rows of data you would like to import into the template file.
In this exercise, you will create an Advanced Find query that you will export to create an import file that uses automatic mapping.
Note
SET UP Use your own Microsoft Dynamics CRM installation in place of the site shown in this exercise. Use the Internet Explorer web browser to navigate to your Microsoft Dynamics CRM website, if necessary, before beginning this exercise.
 On the ribbon, click the Advanced Find button.
The Advanced Find window appears.
In the Look For field, select Accounts.
In the Use Saved View field, select My Active Accounts.
 On the ribbon, in the Show group, click the Results button.
The Results window is displayed with the matching account records.
Select Static worksheet with records from this page, and click Export.
The File Download dialog box appears.
Click Save, save the file as MyAccounts.xls to a familiar location on your computer, and then close the Advanced Find window.
Open the MyAccounts.xls file in Microsoft Excel, save it as a CSV (comma-separated value) file named MyAccounts.csv, and then close Excel.
Back in Microsoft Dynamics CRM, on the File menu, click Tools, and then click Import Data to launch the Import Data Wizard.
Click Browse and locate the MyAccounts.csv file, then click Next.
On the Review File Upload Summary page, click Next.
On the Select Data Map page, in the System Data Maps list, select Default (Automatic Mapping), and then click Next.
On the next page, in the Microsoft Dynamics CRM Record Types list, select Account, and then click Next.
Microsoft Dynamics CRM automatically populates most of the fields. The E-Mail (Primary Contact) field is not mapped because it is from the contact entity, not the account entity.
Leave the E-mail (Primary Contact) field as Not Mapped, and click Next. Click OK in the warning box regarding the unmapped field.
Click Next on the Review Mapping Summary page.
On the Review Settings and Import Data page, select Yes in the Allow Duplicates area and leave the default selection in the Select Owner for Imported Records area. Leave the Data Map Name blank, and click Submit.


Tip
Although you might not want to export a file from your Microsoft Dynamics CRM application and import it back into the system, you can easily use the output of the file as a template and paste import data into the file. Your file will automatically map as long as the column headings are not manipulated.
The import will run in the background after it has been initiated. You can continue to use Microsoft Dynamics CRM during this time. The process can take a minute to several minutes, depending on the size of the import file.
You will want to review the results of the import to ensure that all records have been imported as expected and, if necessary, troubleshoot import-related errors. Microsoft Dynamics CRM provides a tool that lets you easily obtain this information without leaving the familiar application interface.
After your import is completed, you can view its status in the Imports view, which is available in the Workplace area. Each import is displayed as a separate record in the Imports grid, and if you double-click a record, you can view the details of that import job. Each import record shows important information, such as the name of the user who submitted the import, the date and time the import was submitted, and the import file name and file size. Additionally, you can view the records that were created during the import process and examine the errors for records that failed to import.
The ability to view failures for each import allows you to easily identify issues with your import file so that you can update it and re-import the records that did not get created during the import process. Each error row displays the following information.
Column | Description |
|---|---|
Sequence Number | An identifier for the error row |
Description | A description of the error for that row |
Column Heading | The name of the column in the import file that is causing the error |
Column Value | The value that is causing the error |
Original Row Number | The number of the row in the import file that is producing the error |
Source Row | The full row of text that is failing |
Tip
Any row that succeeds in the import process (and consequently does not show up in the Failures list) will be imported into Microsoft Dynamics CRM. Do not assume that no records were imported because a single row failed.
Note
Troubleshooting An import file can fail for several reasons. Each specific row in the Failures list can have a different error; therefore, you might need to diagnose more than one issue before attempting to re-import.
In this exercise, you will view the status and troubleshoot related errors for the import you submitted earlier in this chapter. Then you will research the failure so that you can understand the root cause of the issue. Finally, you will correct the error and re-import the error row.
Note
SET UP Use the Internet Explorer web browser to navigate to your Microsoft Dynamics CRM website, if necessary, before beginning this exercise. You need the ContactImport1.csv import you submitted earlier in this chapter.
In the Workplace area, click Imports.
Look for the row that contains the ContactImport1.csv contact import you submitted in the Using the Import Data Wizard section earlier in this chapter.
Look at the Status Reason value for the import.
The Status Reason will be set to either Parsing, Transforming, Importing, or Completed. If the Status Reason is not Completed, return at a later time.
Review the Successes, Partial Failures, Errors, and Total Processed values.
You should see that 39 rows have completed successfully and one row has errors.
Double-click the record to display additional information.
In the entity navigation pane, click Failures.
The record that failed in the import process is displayed.
You can attempt to diagnose the error based on the message and data provided in the error row. You know that the issue is related to the 36th row in the import file, and the error description states that the text entered exceeds the maximum length. You can also see that the contact being imported was George Sullivan.
Locate and open the import file.
Find the text row with George Sullivan. Notice that the value in the Zip column is erroneous. Update the ZIP Code to 60463.
Delete the other (non-error) rows in the file.
Click Save As, save the file as ContactImport1_Update.csv to a familiar location on your computer, and then close the Excel file.
In Microsoft Dynamics CRM, on the File menu, click Tools, and then click Import Data to launch the Import Data Wizard.
Click Browse, locate the ContactImport1_Update.csv file, and then click Next.
On the Review File Upload Summary page, click Next.
On the Select Data Map page, in the Customized Data Maps list, select Contact Import Example, and then click Next.
Important
The Contact Import Example data map was created earlier in this chapter, in the exercise in the Using the Import Data Wizard section.
On the next page, in the Microsoft Dynamics CRM Record Types list, select Contact, and then click Next.
On the Map Fields page, click Next.
Click Next on the Review Mapping Summary page.
Leave the default options on the Review Settings and Import Data page, and click Submit.
Your error row should now be imported successfully.


As you can see, Microsoft Dynamics CRM allows users to easily create records in bulk by using a simple, intuitive wizard. In addition to creating data by using this wizard, you might want to update data in bulk through a similar interface. In Chapter 16, you learned how to use the Edit Multiple Records feature to update multiple records in a single action, but this tool only works when you want to make the same updates to all records. Sometimes you might need to update multiple records but make different updates to different records. Consider the following scenarios:
Your staff has a weekly sales meeting in which salespeople share opportunity status and progress. After this meeting, a designated individual updates Opportunity data to reflect the updates covered at the meeting.
You add a new field to Microsoft Dynamics CRM to capture an additional pertinent piece of information. You want to update the field for existing records.
Microsoft Dynamics CRM includes a Data Enrichment feature that allows you to export data to Excel, make updates, and then re-import the data. This allows you to make updates in bulk to existing records without having to go record by record.
In this exercise, you will export the list of active opportunities, update the data in Excel, and re-import the data by using the Import Data Wizard.
Note
SET UP Use your own Microsoft Dynamics CRM installation in place of the site shown in this exercise. Use the Internet Explorer web browser to navigate to your Microsoft Dynamics CRM website, if necessary, before beginning this exercise.
In the Sales area, click Opportunities.
 On the Opportunities tab of the ribbon, in the
Data group, click the Export to Excel button.
On the Opportunities tab of the ribbon, in the
Data group, click the Export to Excel button.Select Static worksheet with records from this page as the type of worksheet to export.
At the bottom of the dialog box, select the Make this data available for re-importing by including required column headings check box.
Click Export. On the File Download page, click Save, and save the file as For Re-import - Open Opportunities.xml to a familiar location on your computer.
Open the For Re-import - OpenOpportunities.xml file in Excel.
Update the Topic field and the Est. Close Date field for one record, and the Probability and Rating fields for a different record.
Notice that the Rating field, which is a picklist in Microsoft Dynamics CRM, offers you a picklist to choose from in Excel.
Click Save, and close the OpenOpportunities.xml file.
Back in Microsoft Dynamics CRM, on the File menu, click Tools, and then click Import Data to launch the Import Data Wizard.
The Import Data Wizard appears.
On the first page, click Browse and locate the OpenOpportunities.xml file. Click Next.
On the next page, in the Microsoft Dynamics CRM Record Type list, select Opportunity, and then click Next.
Click Next on the Map Fields page and again on the Review Mapping Summary page.
Leave the default options on the next page, and click Submit.
On the Review Settings and Import Data page, select Yes in the Allow Duplicates area and leave the default selection in the Select Owner for Imported Records area. Click Submit.


The Import Data Wizard allows Microsoft Dynamics CRM users to import records in bulk by using a straightforward wizard that is available within the familiar application interface.
Data maps allow users to map data from a field in a source file to its Microsoft Dynamics CRM target field. Data maps are reusable for future data import needs.
You need to provide a data map only if your column headings do not match the Microsoft Dynamics CRM column headings or if your list values do not match the values in the target mapping column.
You can view the status of a data import in the Imports view, which is available from the Workplace area. You can do so both while the import is running and after the import process has completed. You can then view successes and failures by opening the related import record.
You can update existing records by exporting them to Excel and re-importing them by using data enrichment.