
Chapter at a Glance

Microsoft Dynamics CRM offers a Microsoft Dynamics CRM for Outlook interface in addition to the web client interface. Without a doubt, the integration with Microsoft Outlook generates the most excitement and interest among Microsoft Dynamics CRM users. Information workers love the fact that they can work directly with their Microsoft Dynamics CRM data in Outlook without needing to open a second software application. More importantly, users do not need to learn a new software application to perform their day-to-day functions. The Microsoft Dynamics CRM for Outlook user experience closely matches the rest of the functions that users already know how to perform in Outlook. This chapter will highlight many of the key steps and processes you’ll use when working with Microsoft Dynamics CRM for Outlook.
Important
Before you can use Microsoft Dynamics CRM for Outlook, you or your system administrator must install the software on your computer. In this chapter, we assume that the Microsoft Dynamics CRM for Outlook software is already installed and connecting properly to your Microsoft Dynamics CRM server.
Your company can deploy one of two versions of the Microsoft Dynamics CRM for Outlook software:
Microsoft Dynamics CRM for Outlook
Microsoft Dynamics CRM for Outlook with Offline Access
Both versions offer almost identical functionality, but the Offline Access version allows you to work offline, disconnected from the Microsoft Dynamics CRM server. In this chapter, we will assume that you are using the Offline Access client.
In this chapter, you will learn how to use the integration between Microsoft Dynamics CRM and Outlook to create contacts, tasks, appointments, and email messages in Outlook and track them in Microsoft Dynamics CRM. You’ll also learn how to work with Microsoft Dynamics CRM records while disconnected from the server.
Note
Practice Files The exercises in this chapter require only records created in earlier chapters; none are supplied with the book’s practice files. For more information about practice files, see Using the Practice Files at the beginning of this book.
Important
The examples and exercises in this chapter use Microsoft Dynamics CRM for Outlook and Outlook 2010, but Microsoft Dynamics CRM also supports Outlook 2007 and Outlook 2003. If you are using Outlook 2007 or Outlook 2003, the exercises and steps might vary, because the user interface is different in Outlook 2010. In addition, some features and functionality are not available in Outlook 2007 or Outlook 2003.
Important
The images used in this book reflect the default form and field names in Microsoft Dynamics CRM. Because the software offers extensive customization capabilities, it’s possible that some of the record types or fields have been relabeled in your Microsoft Dynamics CRM environment. If you cannot find the forms, fields, or security roles referred to in this book, contact your system administrator for assistance.
Important
You must know the location of your Microsoft Dynamics CRM website to work the exercises in this book. Check with your system administrator to verify the web address if you don’t know it.
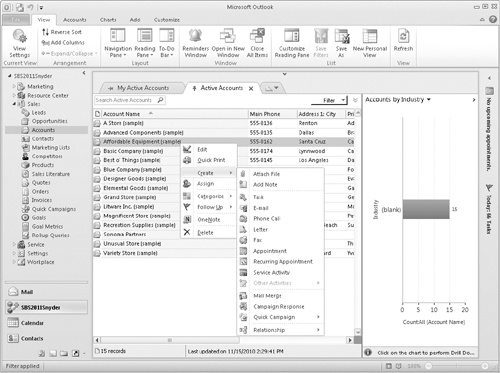
With Microsoft Dynamics CRM for Outlook, you can access CRM records and perform key actions directly within Outlook. Many users prefer to access their CRM data by using this technique instead of using the web client because they are already working in Outlook to manage email and perform other tasks. The Outlook client user interface is a little different from the web client, so here is a brief overview of the various components.

Solution folder You will see this button in Outlook after you install the Outlook client. You click it to access additional Microsoft Dynamics CRM functionality. The name that appears in this button will match the name of the organization with which your Microsoft Dynamics CRM system is associated.
Ribbon Just as in the web client, the ribbon displays different buttons and features depending on the context. For example, if you’re viewing a list of accounts, the ribbon displays actions that you can take with account records. If you’re viewing a list of contacts, the ribbon will display a different set of actions, those that are available for contact records.
View tabs Use this area to select the data view you want to work with. In addition, you can use the view tabs to pin views that you want to quickly access in the future.
Lists Similar to the grid in the web client, this area displays a list of records. Microsoft Dynamics CRM for Outlook filters the records displayed in the list depending on the view selected on the view tab.
Quick Find Just as in the web client, you can enter a search term in the Quick Find field to search for specific records. However, unlike the web client version of Quick Find, the Outlook client Quick Find only searches for records in the currently displayed view. The web client Quick Find searches for records across the entire database.
Filter You can use this to filter the records in the displayed view.
Reading pane The reading pane in the Outlook client behaves like the reading pane you use when working with Outlook contacts, email, and so on. Selecting a record in the list updates the reading pane to show additional information about that record. Note that the reading pane is for display only; you cannot edit records within the reading pane.
In this exercise, you will familiarize yourself with Microsoft Dynamics CRM for Outlook by displaying a new view and navigating through records.
Note
SET UP Open Outlook with Microsoft Dynamics CRM for Outlook installed before beginning this exercise. You need the Sonoma Partners account record you created in Chapter 3. If you cannot locate the Sonoma Partners record in your system, select a different account record for this exercise.
In the Outlook navigation pane, click the solution folder button that displays the name of your Microsoft Dynamics CRM organization.
In the navigation pane, click Sales and then click Accounts. A list of Microsoft Dynamics CRM accounts is displayed.
Click the top record in the list. The reading pane displays information about that account.
On the keyboard, press the Down arrow. Microsoft Dynamics CRM highlights the next account record in the list, and the record displayed in the reading pane updates accordingly.
In the Quick Find area, type Sonoma Partners, and then press Enter. This should display the Sonoma Partners sample record you created in Chapter 3. If you didn’t create that record, you can perform this exercise with any account in this list.
Double-click the Sonoma Partners record in the list. Microsoft Dynamics CRM launches the account record in the web client. Within this window, you can make any record edits necessary.
 On the ribbon, click the Save and Close button.
Next you will display a new account view within Microsoft Dynamics CRM for Outlook.
 In the view tabs area, click the new tab icon located to the
right of the open tab. A list of available system and personal
views appears.
In the view tabs area, click the new tab icon located to the
right of the open tab. A list of available system and personal
views appears.Click Active Accounts. Microsoft Dynamics CRM adds a second tab and displays a list of active accounts within Microsoft Dynamics CRM for Outlook.
 Now click the pin icon located on the left
side of the Active Accounts tab.
When you do so, Microsoft Dynamics CRM for Outlook keeps this tab
open so that you can quickly access it in the future.
Now click the pin icon located on the left
side of the Active Accounts tab.
When you do so, Microsoft Dynamics CRM for Outlook keeps this tab
open so that you can quickly access it in the future. Microsoft Dynamics CRM for Outlook also
lets you personalize the appearance of the user interface. Let’s assume that you want to turn
off the reading pane and replace it with a chart. Click the
Reading Pane button, and select Off on the submenu that appears. Microsoft
Dynamics CRM for Outlook removes the reading pane for the current
entity you’re working with (accounts).
Microsoft Dynamics CRM for Outlook also
lets you personalize the appearance of the user interface. Let’s assume that you want to turn
off the reading pane and replace it with a chart. Click the
Reading Pane button, and select Off on the submenu that appears. Microsoft
Dynamics CRM for Outlook removes the reading pane for the current
entity you’re working with (accounts). On the ribbon, click the Charts tab, click the Chart
Pane button, and select Right from the submenu that appears.
On the ribbon, click the Charts tab, click the Chart
Pane button, and select Right from the submenu that appears.Microsoft Dynamics CRM displays a chart to the right of the list. Within this chart area, you can choose to display different charts. You can select the chart you want to display by clicking the chart name at the top of the chart pane.
Finally, let’s assume that you want to log an activity for one of the accounts in the list. As in the web client, you could use the Add tab on the ribbon to access the buttons you need. However, Microsoft Dynamics CRM for Outlook also provides a menu that allows you to log activities directly from the list. To access this menu, right-click any account in the list and click Create. Microsoft Dynamics CRM for Outlook opens a list of actions you can take against the record, allowing you to create activities, run a mail merge, add a note, and more.


Now that you have worked with the basic user interface of Microsoft Dynamics CRM for Outlook, let’s take a quick look at how to access the settings area. You should not need to access this area very often, but it is important to know where the settings information is located. Some of the key actions you might take in this area include:
Setting personal options.
Modifying your synchronization and offline data filters.
Importing contacts.
In this exercise, you will access the CRM settings within Microsoft Dynamics CRM for Outlook.
Note
SET UP Start Outlook with Microsoft Dynamics CRM for Outlook installed, if necessary, before beginning this exercise.
On the Outlook ribbon, click the File tab.
In the left pane, click CRM.

One of the main benefits of Microsoft Dynamics CRM for Outlook is that the software will automatically synchronize your contacts, tasks, and appointments between Outlook and Microsoft Dynamics CRM. Therefore, if you create a new contact in the Microsoft Dynamics CRM web client, the software can automatically download a copy of that contact into Outlook. Likewise, if you update a contact’s information (with a new address or phone number, for example) in Outlook, the software will automatically update the Microsoft Dynamics CRM database. If other users of your system synchronize the updated contact to their Outlook file, they will receive your updates in the next sync process. This bi-directional update of contact information between Outlook and Microsoft Dynamics CRM means that you and other users can always access the latest information. In addition to synchronizing contacts, Microsoft Dynamics CRM for Outlook can perform similar updates for Outlook appointments and tasks. If you use a mobile device and synchronize it with Outlook, you will be able to access Microsoft Dynamics CRM contacts, appointments, and tasks on your mobile device.
Important
Microsoft Dynamics CRM can also synchronize other activities—such as phone calls, letters, and faxes—to Outlook. Regardless of the activity type (phone call, letter, fax, or task) in Microsoft Dynamics CRM, the synchronization software will copy all of the activities into Outlook as tasks.
Microsoft Dynamics CRM for Outlook does not synchronize all of the contacts, appointments, and tasks from your Outlook file; rather, it synchronizes only the records that you track in Microsoft Dynamics CRM. If you have personal records in Outlook that you do not want to copy into the Microsoft Dynamics CRM database, you do not need to track those records in Microsoft Dynamics CRM. You can determine whether a particular record is tracked in Microsoft Dynamics CRM by opening the record and looking for the CRM tracking pane located at the bottom on the record. If there is a tracking pane, the record is part of the Microsoft Dynamics CRM for Outlook synchronization process.

Tip
A tracked record can also be identified by the presence of the Untrack button in the CRM group on the record’s ribbon.
In addition, records tracked in Microsoft Dynamics CRM will display a special icon when you view a list of records in Outlook.

When you first install Microsoft Dynamics CRM for Outlook, the software uses its default settings for the synchronization process. One of these settings sets the software to perform the synchronization process in the background every 15 minutes. This automatic background sync provides you with the convenience of not having to remember to explicitly sync your records. If you want, you can change your options to increase the amount of time between automatic synchronizations, but you cannot make it less than 15 minutes.
Tip
When you are connected to the server, changes made to contacts, tasks, and appointments in Outlook synchronize to the Microsoft Dynamics CRM server when the record is saved. However, changes made to the Microsoft Dynamics CRM server in the web client will not appear in Outlook until the completion of the next synchronization process.
If don’t want to wait for the next scheduled synchronization interval, you can manually launch the synchronization process. In this exercise, you will manually synchronize Outlook records with the Microsoft Dynamics CRM server.
Note
SET UP Start Outlook with Microsoft Dynamics CRM for Outlook installed, if necessary, before beginning this exercise.

Note
See Also As a reminder, you can create contacts in Microsoft Dynamics CRM by using either Microsoft Dynamics CRM for Outlook or the web client. This chapter shows you how to use Microsoft Dynamics CRM for Outlook, but you can also refer to Chapter 3 for an explanation on how to create contacts by using the web client.
Microsoft Dynamics CRM can synchronize your existing contacts from the Microsoft Dynamics CRM server so that they display in your Outlook contacts file. However, as you continue to work with the system, you will want to create and track new contact records. To create contacts in Outlook and track them in Microsoft Dynamics CRM, create the record in Outlook as you normally would, click the Track button, and then save the contact. Doing so will create the contact record in Microsoft Dynamics CRM and include the record as part of future data synchronizations. When creating contacts in Outlook, you also can link the contact record to a parent account in Microsoft Dynamics CRM by clicking the Set Parent button on the Contact tab of the ribbon in Outlook.
Tip
Microsoft Dynamics CRM does allow you to specify a contact record as a parent record for another contact, but most organizations use account records as parents for contact records. For the purposes of this book, we’ll assume that you’ll use accounts as parent records for contacts.
As is the case when you create a contact in the web client, when you create a new contact in Outlook, track it in Microsoft Dynamics CRM, and link it to an existing parent account, the mapped fields (such as address and phone) in the contact record will not automatically update with information from the parent account. However, if you link a contact to a parent account from Microsoft Dynamics CRM, Microsoft Dynamics CRM for Outlook can save the parent account name in the Company field on the Outlook contact.
Note
Troubleshooting Filling out the Company field in the Outlook contact record will not automatically link the contact to that company’s account record in Microsoft Dynamics CRM. For new contacts that you create in Outlook and track in Microsoft Dynamics CRM, you must explicitly link the record to a parent account.
When you track a contact in Microsoft Dynamics CRM, you can access additional information about the record from Outlook by clicking one of the following links in the contact record’s ribbon:
View In CRM This link will open the contact record in the Microsoft Dynamics CRM web client. This allows you to view all of the details and related records that you’re tracking in Microsoft Dynamics CRM.
View Parent This link will open the account record of the parent account. Typically the parent is the company for which the contact works.
In this exercise, you will create two new contacts (one from Outlook and one from the web client) to see how the different options impact the contact data. You will also update the contact records and manually kick off the synchronization process.
Note
SET UP Start Outlook with Microsoft Dynamics CRM for Outlook installed, if necessary, before beginning this exercise. You need the Sonoma Partners account record you created in Chapter 3. If you cannot locate the Sonoma Partners record in your system, select a different account record for this exercise.
 In the Outlook navigation pane, click
Contacts. On the ribbon, click
New Contact to open the new contact
form.
In the Outlook navigation pane, click
Contacts. On the ribbon, click
New Contact to open the new contact
form.Enter Chris Perry as the contact name.
 Click the Set
Parent button and, on the menu that appears, click Account.
Click the Set
Parent button and, on the menu that appears, click Account.A Microsoft Dynamics CRM lookup window opens.
In the text field, enter Sonoma Partners, and then press the Enter key to search for the account in Microsoft Dynamics CRM. Select the appropriate account in the results, and then click OK.
Important
If you cannot locate the Sonoma Partners account in your system, you can use any account for this exercise.
The Sonoma Partners account name appears in the Company field of the Chris Perry Outlook contact.
Note
Troubleshooting If the parent account name does not appear in the Company field, check your preference setting in the Microsoft Dynamics CRM for Outlook options. To update this preference, access the CRM settings as you did in the exercise earlier in this chapter, and click Set Personal Options. On the Synchronization tab of the Options window, locate the Update The Company Field For Outlook Contacts section and make sure that the check box is selected. This will allow you to automatically update the Company field with the parent account name.
On the ribbon, click the Save and Close button.
This record is now tracked in Microsoft Dynamics CRM, as indicated by the CRM tracking pane.
Open Windows Internet Explorer and browse to the address of your Microsoft Dynamics CRM system.
Navigate to the account records and open the Sonoma Partners account or other parent account selected in step 5.
In the navigation pane, click Contacts.
The Chris Perry record appears and is linked to this account.
Double-click the Chris Perry record to open it. In the Business Phone field, enter (312) 555-1212.
On the ribbon, click the Save and Close button. Microsoft Dynamics CRM closes the window and returns you to the list of contacts associated with the account.
 In the entity navigation pane of the
account record, click Contacts.
Then on the ribbon of the account record, click the Add New Contact button to launch the New
Contact form.
In the entity navigation pane of the
account record, click Contacts.
Then on the ribbon of the account record, click the Add New Contact button to launch the New
Contact form.In the First Name field, enter Jose. In the Last Name field, enter Curry.
Note that, because you created this contact from the account, the contact record includes the mapped fields such as address and phone number from the parent account record.
Click the Save and Close button.
Close Internet Explorer.
 In Outlook, click the File tab, and then click CRM. Click the Synchronize button, and then click the Synchronize option that appears on the
submenu.
In Outlook, click the File tab, and then click CRM. Click the Synchronize button, and then click the Synchronize option that appears on the
submenu.A window opens, indicating that Microsoft Dynamics CRM for Outlook is updating data.
In the Outlook navigation pane, click Contacts. In the search box, enter Jose Curry.
The contact you created in the web client now appears in your Outlook file (with the mapped fields from the account).
In the search box, enter Chris Perry.
Outlook shows the Chris Perry record, which now includes the phone number that you entered in the web client.

You just learned how to add and track contacts in Microsoft Dynamics CRM one record at a time. However, you might already have a lot of contacts in your Outlook file that you would like to track, and you probably don’t want to link them one record at a time, especially if you have hundreds of contacts. Fortunately, Microsoft Dynamics CRM for Outlook includes an Add Contacts wizard that helps you quickly and easily add your existing Outlook contacts to Microsoft Dynamics CRM.
Before you use the Add Contacts wizard, you might want to create different folders for your contacts to separate them into different groups, such as business contacts and personal contacts. When you work through the wizard, you can select the contact folders to use. If you don’t have any contact folders, the Add Contacts wizard will include all of your contacts in the process.
Alternatively, instead of creating new folders, you can assign your existing Outlook contacts to different categories by using Outlook’s category functionality. During the Add Contacts wizard import process, you can choose the categories of contacts to add to Microsoft Dynamics CRM.
In this exercise, you will use the Add Contacts wizard to load existing Outlook contacts into Microsoft Dynamics CRM.
Note
SET UP Start Outlook with Microsoft Dynamics CRM for Outlook installed, if necessary, before beginning this exercise.
On the ribbon, click the File tab and in the left pane, click CRM.
 Click the Import
Contacts button, and click Add
Contacts on the submenu.
Click the Import
Contacts button, and click Add
Contacts on the submenu.Microsoft Dynamics CRM for Outlook launches the Add Contacts wizard.
Click Next.
If you have created multiple contact folders, the Choose Contact Folders step appears. (If you don’t have multiple folders, the wizard skips this step.)
Select the folder you want to use for this process and click Next.
The wizard analyzes the contacts and displays the Choose Contact Groups dialog box.
On this screen, you can choose which contacts to add to Microsoft Dynamics CRM. You can group the contacts by company name, email domain, or category. If you want to see the contacts in any of the groups, click the group name hyperlinked in blue to display a new window that lists the contacts.
You can choose the groups of records to import by selecting the check boxes of the records that you want to add to Microsoft Dynamics CRM.
For this exercise, select a group of records to import.
Tip
It is recommended that you only select one or two groups to test that the import works as you expect.
You might notice that the Number Of Contacts column includes color coding in the form of red, yellow, or green bars. These colors indicate the following:
In addition to adding contacts to Microsoft Dynamics CRM, the Add Contacts wizard can also import email messages and appointments associated with the imported contacts. To enable this option, select the Track all communications for added contacts check box.
By default, the wizard will automatically create new accounts in Microsoft Dynamics CRM linked to the imported contacts. To disable this option, clear the Use Company Name to be the Account check box.
Note
Troubleshooting If your system administrator has enabled the duplicate checking settings for Microsoft Dynamics CRM, the Add Contacts wizard might not create account and contact records during the import process. Check with your system administrator to see if this applies to your system.
Alternatively, Microsoft Dynamics CRM might already include account records that match the contacts you’re importing. If you run the Add Contacts wizard with the default settings, it will import and create the contacts, but it won’t link your imported contacts to the existing accounts automatically. Instead, you can choose to manually match the contacts you’re importing to existing Microsoft Dynamics CRM accounts.
To do this, click the Advanced link. Two new columns appear. In the Set Account column, click in the box to display a new menu.
From this menu, click Pick Existing Account.
The account lookup record dialog box appears. Select the account you want to manually link the contact to.
For this exercise, select any account, and then click OK to return to the wizard.
Click Add Contacts.
The Add Contacts wizard runs through the process and displays a final confirmation screen, which includes a listing of any errors that might have occurred during the import process.


In addition to synchronizing contacts, Microsoft Dynamics CRM for Outlook can synchronize tasks and appointments between Microsoft Dynamics CRM and Outlook. The process of creating and tracking tasks and appointments follows the same rules as previously outlined for contacts. You can create the task and appointment records in Outlook by using the standard Outlook tools, and then click the Track button to save a copy to Microsoft Dynamics CRM. As you learned in previous chapters, you can also specify a Regarding value for activities such as tasks and appointments.
If you create tasks or appointments in the web client, Microsoft Dynamics CRM for Outlook can also synchronize those records from the server into your Outlook file.
Even though you can create and send Microsoft Dynamics CRM email messages with the web client, most users prefer to create and reply to their email messages with Outlook. Copies of these Outlook email messages can be saved to Microsoft Dynamics CRM so that you can go back later and see a complete history of the communications. Much like creating contacts, tasks, and appointments in Outlook, you can create email messages as you normally would in Outlook and save a copy of each message to Microsoft Dynamics CRM by clicking the Track button. When processing an email message, Microsoft Dynamics CRM for Outlook reviews the list of message participants and automatically looks for matching email records in the Microsoft Dynamics CRM database. If it finds matching email addresses, the software appends the email message to the matching records as a completed email activity. This email matching process searches for matching email addresses across those record types that contain email addresses in Microsoft Dynamics CRM, such as contacts, accounts, leads, queues, users, and facilities/equipment.
In addition to linking an email message to the participants, Microsoft Dynamics CRM can be used to specify the record the email message is regarding. For example, you might send multiple email messages to a single customer, but one message might be about an existing order, whereas a different message might be about a customer service issue. By specifying the Regarding field of each message (one is regarding an order, and the other is regarding a service issue), you can split up the communication history to the appropriate records. This will save you time when you are viewing the activity history related to each record. Microsoft Dynamics CRM for Outlook saves a list of your recently used Regarding values so that you can quickly track email messages regarding recent topics.
In addition to tracking email messages sent from Outlook, Microsoft Dynamics CRM for Outlook allows you to track email messages that you receive. To track these types of messages, you can open the message and click the Track button, or you can select the email message in your Inbox and then click the Track button in the CRM group on the ribbon. You can set the Regarding value of the message by using the Set Regarding button on the ribbon.
Tip
You don’t have to track email messages one at a time; you can select multiple email messages and click the Track button. Depending on your email system and your Microsoft Dynamics CRM tracking configuration, Microsoft Dynamics CRM can automatically track all of the email messages in a subject thread so that you don’t have to manually track every message. Contact your system administrator to determine your exact system configuration.
Note
See Also For more information about tracking email messages and other activities in Microsoft Dynamics CRM, see Chapter 4.
When composing email messages with the Microsoft Dynamics CRM for Outlook client installed, you can also do the following:
Insert a CRM email template.
Insert a CRM knowledge base article.
Attach sales literature stored in CRM.
These features allow you to save time and clicks because you can quickly access templates, articles, and attachments stored within Microsoft Dynamics CRM.
Microsoft Dynamics CRM for Outlook also allows you to access an Outlook address book that contains your Microsoft Dynamics CRM records. The Microsoft Dynamics CRM address book allows you to easily access the email addresses of your Microsoft Dynamics CRM records directly in Outlook, without requiring you to look up their email addresses from the web client. In addition, the Microsoft Dynamics CRM address book can include email information about non-contact records, which you cannot synchronize to Outlook.

Tip
You can configure additional settings for the Microsoft Dynamics CRM address book in the Microsoft Dynamics CRM for Outlook options.
In this exercise, you will create an email message in Outlook, insert an email template, and track the message in Microsoft Dynamics CRM.
Note
SET UP Start Outlook with Microsoft Dynamics CRM for Outlook installed, if necessary, before beginning this exercise. You need the Sonoma Partners account record you created in Chapter 3. If you cannot locate the Sonoma Partners record in your system, select a different account record for this exercise.
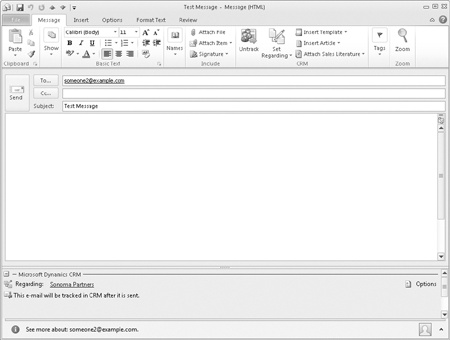
 On the ribbon, click the Home tab, and then click the New E-Mail button. A blank email message appears.
In the To field, enter any email address that does not already exist in your Microsoft Dynamics CRM database. (You need to use a new email address to complete steps 13 and 14 of this exercise.)
In the Subject field, enter Test Message.
On the ribbon, click the Track button. The CRM tracking pane will appear.
 Click the Set
Regarding button, and then select More.
Click the Set
Regarding button, and then select More.A Microsoft Dynamics CRM lookup window opens.
In the lookup window, click the Look for list to see the entities to which you can link the email message. Select Account.
In the search box, enter Sonoma Partners, and press the Enter key to search for the account in Microsoft Dynamics CRM. Select the appropriate account in the results, and then click OK.
In the CRM tracking pane, you can see that Microsoft Dynamics CRM has updated the Regarding value to Sonoma Partners.
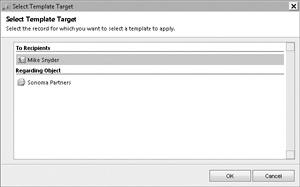
 On the ribbon of the email message, click the Insert Template button, and then click More
Email Templates.
On the ribbon of the email message, click the Insert Template button, and then click More
Email Templates.Important
If your tracked email message has different types of records such as accounts, contacts, and leads, you will need to specify a template target when you insert a template, because the different record types can have different email templates available. If your email message is only regarding one type of record (like the one in this exercise), it will skip the Select Template Target dialog box.
Microsoft Dynamics CRM launches the Insert Template dialog box. This dialog box displays the global email templates plus the email templates related to the record you’re sending a message to. For example, if you’re sending an email message to a contact, you will see contact templates. If you’re sending to a lead, you’ll see lead templates. Because this email is regarding the Sonoma Partners account record, you’ll see the Account templates in addition to the global templates.
For this exercise, click Marketing communication unsubscribe acknowledgement.
Click OK. Microsoft Dynamics CRM asks whether you want to override your existing email subject with the template subject. If you click OK, Microsoft Dynamics CRM will update your email subject to the subject associated with the email template. Instead, click Cancel, and Microsoft Dynamics CRM only inserts the selected email template into the body of your email.
Click the Sent Items link in the folder list to display a list of your sent email messages. Double-click the test email message you just sent.
Assuming that you entered an email address not already in your database, you will see in the CRM tracking pane that the sample email address is colored red. This record color indicates that Microsoft Dynamics CRM could not find a matching email address in your system.
To manually resolve this email message to a particular contact record, click the red email address. A menu will appear, from which you can choose to create the record as a contact or as a lead. For this exercise, click the Create as contact option.
A blank contact form appears. Enter Mike as the First Name and Snyder as the Last Name. On the ribbon, click the Save and Close button. Now if you view the history of the Mike Snyder contact or the Sonoma Partners account, you can view a copy of this email message.


Tip
This exercise showed how to create a contact from an email message that you sent. For email messages and appointments that you receive from others, you can configure Microsoft Dynamics CRM for Outlook to automatically create records (either contacts or leads) when you click the Track button. You can access this setting by clicking the Options link in the CRM tracking pane.
After Microsoft Dynamics CRM for Outlook completes its initial synchronization process with your Outlook file, special rules apply to how the synchronization process handles deleted records. For example, deleting a contact record in Outlook will not delete that contact record in Microsoft Dynamics CRM. Conversely, deleting a contact in Microsoft Dynamics CRM removes the synchronized contact from Outlook for all users except for the Outlook user who owns the record in Microsoft Dynamics CRM.
With respect to deleted records, Microsoft Dynamics CRM for Outlook follows a set of rules and conditions to determine how the synchronization process should update Outlook and Microsoft Dynamics CRM. Microsoft Dynamics CRM for Outlook processes deleted records as outlined in the following table.
Record Type | Action | Record State | Result |
|---|---|---|---|
Contact | Delete in Microsoft Dynamics CRM | Any | Deleted from Outlook for all users except contact owner. Remains in contact owner’s Outlook file. |
Contact | Delete in Outlook | Any | No change in Microsoft Dynamics CRM. |
Task | Delete in Microsoft Dynamics CRM | Pending (not completed in Outlook) | Deleted from Outlook. |
Task | Delete in Microsoft Dynamics CRM | Past (completed in Outlook) | Remains in Outlook. |
Task | Delete in Outlook | Pending (open in Microsoft Dynamics CRM) | Deleted from Microsoft Dynamics CRM. |
Task | Delete in Outlook | Past (completed or canceled in Microsoft Dynamics CRM) | No change in Microsoft Dynamics CRM. |
Appointment | Delete in Microsoft Dynamics CRM | Pending (open in Microsoft Dynamics CRM) | Deleted from Outlook if appointment start time is in the future. |
Appointment | Delete in Microsoft Dynamics CRM | Past (completed or canceled in Microsoft Dynamics CRM) | Remains in Outlook. |
Appointment | Delete in Outlook | Pending (open in Microsoft Dynamics CRM) | Deleted from Microsoft Dynamics CRM if deleted by appointment owner or organizer. Not deleted from Microsoft Dynamics CRM if deleted in Outlook by a non-owner or non-organizer. |
Appointment | Delete in Outlook | Past (completed or canceled in Microsoft Dynamics CRM) | No change in Microsoft Dynamics CRM. |
If you delete a contact in Outlook (which does not delete the contact from Microsoft Dynamics CRM) and then someone subsequently modifies that contact record in Microsoft Dynamics CRM, Microsoft Dynamics CRM for Outlook will recreate that contact in the your Outlook file, even though you previously deleted it.
On a related note, deactivating contact records in Microsoft Dynamics CRM does not remove the contacts from Outlook. You must manually delete the deactivated contacts from Microsoft Dynamics CRM if you don’t want them to appear in your Outlook file any longer.
In this exercise, you will delete two records to see how the synchronization process treats each scenario.
Note
SET UP Start Outlook with Microsoft Dynamics CRM for Outlook installed, if necessary, before beginning this exercise. Confirm that you have permission to delete contact records in Microsoft Dynamics CRM. If you are not sure, contact your system administrator. You need the Sonoma Partners account record you created in Chapter 3 and the Chris Perry and Jose Curry contact records you created earlier in this chapter. If you cannot locate these records in your system, select different records for this exercise.
In the Outlook navigation pane, click Contacts.
In the search box, type Chris Perry to locate the contact record.
 Select the Chris
Perry record and, on the ribbon, click the Delete button.
Select the Chris
Perry record and, on the ribbon, click the Delete button.Open Microsoft Dynamics CRM in Internet Explorer and navigate to the account list. Locate the Sonoma Partners account and double-click it to open it.
Click Contacts in the entity navigation pane.
A list of contacts associated with the account appears. Note that even though you deleted the Chris Perry contact from Outlook, Microsoft Dynamics CRM for Outlook did not delete the record on the server.
Click the Jose Curry record and click the Delete button on the ribbon. In the Contact Delete Confirmation dialog box, click the Delete button, and then click OK in the secondary confirmation dialog box.
Close Internet Explorer.
Open Outlook. On the ribbon, click the File tab and then click CRM. Click the Synchronize button, and select Synchronize from the submenu. Microsoft Dynamics CRM runs the synchronization process.
In the Contact search box, type Jose Curry. Outlook displays the matching contact record. Double-click the record to open the contact.
Note that Microsoft Dynamics CRM for Outlook did not delete the contact from your Outlook file because you are listed as the owner of this record. However, this contact record is no longer tracked in Microsoft Dynamics CRM. If you delete a contact record owned by a different user, Microsoft Dynamics CRM for Outlook will remove that record from your Outlook file.
If you install Microsoft Dynamics CRM for Outlook with Offline Access, you have the option to work with your Microsoft Dynamics CRM data when you are disconnected from the server. This feature is useful if you need to travel onsite to customer meetings, because you can look up your existing notes, add new notes, run reports, and much more without needing an Internet connection. The concept of disconnecting from the Microsoft Dynamics CRM server is known as going offline. When you go offline, Microsoft Dynamics CRM for Outlook copies a subset of the Microsoft Dynamics CRM database to your computer. While offline, you can perform almost all of the Microsoft Dynamics CRM functionality just the same as when you’re online. When you are able to connect to the Microsoft Dynamics CRM server again, you go online to synchronize your offline database with the main Microsoft Dynamics CRM database. When you go online, Microsoft Dynamics CRM for Outlook will automatically determine which records it should upload to the Microsoft Dynamics CRM database and which records it needs to synchronize with your local database.
Because some Microsoft Dynamics CRM databases can get quite large, going offline does not copy all of the data to your computer. Instead, Microsoft Dynamics CRM for Outlook uses offline synchronization filters to determine which subsets of the database it should copy to the offline database. The use of offline synchronization filters provides better performance and faster synchronization times than if you were using the entire Microsoft Dynamics CRM database. Offline synchronization filters are discussed more thoroughly in the next section.
Tip
You can configure Microsoft Dynamics CRM for Outlook with Offline Access to perform a background update of your local data as often as every 15 minutes. Setting up this option in the Microsoft Dynamics CRM for Outlook options will allow you to go offline more quickly in the future, in addition to allowing you to access relatively updated offline data in case you forget to explicitly go offline.
In this exercise, you will go offline, open a record while disconnected from the Microsoft Dynamics CRM server, and then go back online.
Note
SET UP Start Outlook with Microsoft Dynamics CRM for Outlook with Offline Access installed, if necessary, before beginning this exercise. In order to complete this exercise, you need the version of Microsoft Dynamics CRM for Outlook that allows you to go offline. Contact your system administrator if you need to have a different version of Microsoft Dynamics CRM for Outlook installed.
 On the Outlook ribbon, click the CRM tab, and then click the Go Offline button.
A progress window opens, showing you the status of the synchronization process.
When the process is complete, the Go Offline button will change to Go Online. This indicates that you are now working with data from the local database instead of data from the Microsoft Dynamics CRM server.
In the Outlook navigation pane, click the button with the name of your CRM organization, expand the Sales folder, and then click Accounts.
You will see a list of accounts, just as if you were viewing them while connected to the Microsoft Dynamics CRM server. Depending on your offline synchronization filters, you might see only a subset of all of the Microsoft Dynamics CRM accounts.
To confirm that you are working offline, double-click an account record to open it. When the account record is open in Internet Explorer, press F11 on the keyboard.
The Internet Explorer address bar appears. If you examine the web address of the account record, you will notice that it starts with http://localhost:2525 instead of the typical web address that you use to access Microsoft Dynamics CRM. This localhost address references the offline version of Microsoft Dynamics CRM, so you know that you’re working offline.
 Click the Go
Online button to reconnect to the Microsoft Dynamics CRM
server.
Click the Go
Online button to reconnect to the Microsoft Dynamics CRM
server.

As you learned in the previous section, offline synchronization filters define which data Microsoft Dynamics CRM for Outlook with Offline Access will copy from the server to your offline database. During the installation process, Microsoft Dynamics CRM creates more than 35 different offline synchronization filters for the records in your system. If you plan to work offline frequently, you should examine these default offline synchronization filters to make sure you’ll have access to the information you need when offline.

Two common modifications to the default local data groups are:
Including all reports to run offline, because the default local data group downloads only the reports you own to the offline database.
Including custom entities, because the default local data group does not include any custom entities.
If your computer uses the online-only version of Microsoft Dynamics CRM for Outlook, your system still contains synchronization filters, but the software uses them for a different purpose. Online-only users of Microsoft Dynamics CRM for Outlook configure their Outlook synchronization filters to specify which types of records the software should copy from the server to your Outlook file. By default, Microsoft Dynamics CRM for Outlook includes Outlook synchronization filters that will copy contacts, phone calls, tasks, and other records that you own from the CRM server into your Outlook file.

You can delete, deactivate, or modify synchronization filters, or add entirely new data groups if you want. Some users like to create synchronization filters so that Microsoft Dynamics CRM copies all of the contacts for the accounts and opportunities that they own.
In this exercise, you will modify the offline synchronization filters for Microsoft Dynamics CRM for Outlook with Offline Access to include contacts you modified in the past 30 days in your offline database.
Important
When you run reports offline, the reports will include only data from the offline database, which is typically a subset of the entire database. If you need to report on the entire database, make sure you go online first.
Note
SET UP Start Outlook with Microsoft Dynamics CRM for Outlook with Offline Access installed, if necessary, before beginning this exercise.
On the Outlook ribbon, click the File tab, and then click CRM.
Click the Synchronize button, and then click the Outlook Filters option that appears on the submenu. The Outlook Filter dialog box appears.
 In the grid toolbar, click the New button. The New Filter dialog box appears.
In the Look For picklist, select Contact.
Click the Select link, and choose Modified By.
Click the Select link again, click Modified On, and then click On. In the new picklist that appears, choose the Last X Days option.
In the text field that appears, enter 30.
 In the toolbar, click the Save button. A dialog box will appear, prompting you to
name this filter. Type Contacts modified
by current user in the last 30 days. Then click the
OK button.
In the toolbar, click the Save button. A dialog box will appear, prompting you to
name this filter. Type Contacts modified
by current user in the last 30 days. Then click the
OK button.Click the Close button in the upper-right corner to close the window.
On the ribbon, click the Go Offline button. Microsoft Dynamics CRM will run with offline synchronization with this new filter in place. If you have modified contacts you don’t own in the last 30 days, you will see those contacts downloading in the progress window.

Microsoft Dynamics CRM for Outlook provides integration between Outlook and Microsoft Dynamics CRM.
Microsoft Dynamics CRM for Outlook is available in two versions: one for online use only, and one with offline access so that you can work while disconnected from the server.
Microsoft Dynamics CRM for Outlook performs a bi-directional synchronization of tracked contacts, tasks, and appointments between Outlook and the Microsoft Dynamics CRM server.
You can use the Add Contacts wizard to import contacts that already exist in Outlook into Microsoft Dynamics CRM. The wizard also gives you the option to automatically create new accounts and activities during the process. You can also link imported contacts to existing Microsoft Dynamics CRM accounts by using the Advanced option.
To create contacts, tasks, and appointments in Outlook that will appear in the Microsoft Dynamics CRM database, simply click the Track button on the ribbon.
You can create and reply to email messages in Outlook and track those communications to the appropriate Microsoft Dynamics CRM records by clicking the Track button.
Synchronized records follow a unique set of processing rules regarding deletion, depending on their ownership, status, and other variables.
Microsoft Dynamics CRM for Outlook with Offline Access allows users to copy data to a local database and work offline.
Synchronization filters define which records are synchronized to your Outlook file. In offline mode, you can configure any record type that you want to access while offline. For online-only use, Outlook synchronization filters define the records that are synchronized to your Outlook file.
You can create new synchronization filters or modify synchronization filters according to your needs.