
Chapter at a Glance
In previous chapters, you learned about cases and knowledge base articles, which capture the customer requests and product information used by customer service teams to address support issues. Most of the service requests your company receives are not likely to be resolved by referencing a single knowledge base article. Instead, each request is probably routed through an involved process that includes verifying a customer’s information and service agreement terms, obtaining details about the problem, and escalating to the correct customer service representative to resolve the case. Large customer service teams typically have several tiers of support resources so that senior-level representatives can focus on complex or advanced issues while level-one representatives take calls from customers and verify basic information.
To facilitate the routing process of service requests, Microsoft Dynamics CRM allows customer service teams to manage multiple service agreement types and submit cases to service queues. Service contracts are agreements that define the support terms offered to a customer, either during a specified time period or for a specified number of cases or hours. Each contract contains one or more contract lines, which are the line-item details such as service term, pricing, and other conditions for the services specified in the contract. Contracts are valuable if your organization offers support services to its customers, because they allow customer service representatives to quickly identify each customer’s eligibility for support.
After verifying that a customer is eligible for customer service, the level-one representative creates a case detailing the issue and submits it to the team’s work queue so that another representative can research the solution. A queue is a holding bin of open cases and activities that need to be completed. Queues can be accessed by multiple members of a team so that individuals can accept new work items as they complete old ones.
Contracts and queues are used to manage customer service processes to ensure that customer requests are handled efficiently.
In this chapter, you’ll learn how to create, activate, and renew service contracts for your customers and use queues to distribute cases to your customer service team.
Note
Practice Files The exercises in this chapter require only records created in earlier chapters; none are supplied with the book’s practice files. For more information about practice files, see Using the Practice Files at the beginning of this book.
Important
The images used in this book reflect the default form and field names in Microsoft Dynamics CRM. Because the software offers extensive customization capabilities, it’s possible that some of the record types or fields have been relabeled in your Microsoft Dynamics CRM environment. If you cannot find the forms, fields, or security roles referred to in this book, contact your system administrator for assistance.
Important
You must know the location of your Microsoft Dynamics CRM website to work the exercises in this book. Check with your system administrator to verify the web address if you don’t know it.
Even if you don’t work at a call center, your company probably provides some type of post-sale support to customers. To offset support costs within an organization, many companies sell service agreements to customers to ensure that the customer’s questions or problems are addressed within predefined terms, such as response time, guarantee of resolution, availability, and so on. The terms of a service agreement vary for different organizations and industries. For example, a large manufacturing company might offer warranties on parts and repair calls, and a professional services firm might offer support for a predefined number of incidents or a specified period of time.
Microsoft Dynamics CRM provides you with the flexibility to set up several different types of contract templates, which provide the framework for service contracts. Each contract template has an allotment type that indicates the units of service, such as number of cases, time, or coverage dates. You can create as many templates as needed in your organization. The following table details the components of a contract template.
Field | Description |
|---|---|
Name | The name of the contract template. |
Abbreviation | An abbreviation of the template name. This is displayed with the name when you create a new contract. |
Billing Frequency | The invoice frequency for the contract, such as monthly, bimonthly, quarterly, semiannually, or annually. |
Allotment Type | The service units of the contract, which could be in number of cases, time, or coverage dates. |
Contract Service Level | The rating of the customer service level. The default values are Gold, Silver, and Bronze. |
Use Discount As Percentage | A configuration field in which you can set any applicable discount amount as a percentage or as a fixed dollar value. |
Description | Additional comments or a description of the contract template. |
Calendar | The hours of availability by day for the contract. This is typically set to include regular business hours but can be configured for 24-hour, 7-days-a-week support. |
Tip
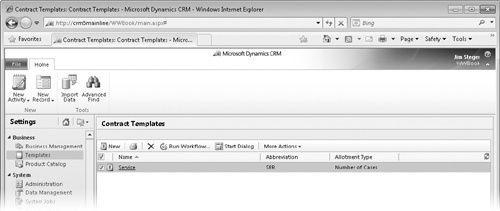
Because you can’t create a contract without a contract template, Microsoft Dynamics CRM includes a default contract template named Service. You can access this template in the Templates section of the Settings area.
In Microsoft Dynamics CRM, each contract must be created from a contract template. The values from the contract template act as defaults for the content of each contract record, although some values—such as the service level and the discount type—can be overridden at the contract level. After creating a contract, customer service managers add line items (contract lines) to specify the details of the agreement. The following list describes some typical examples of contracts and contract lines:
A local park district provides contracts to refreshment vendors to manage cleanup and facility maintenance requests. In this example, contract lines are allotted a number of minutes to be used toward maintenance.
A plumber offers two types of service contracts, one to provide a one-year warranty on services and another to track incident-based requests. In this example, contract lines are allotted coverage dates for the first type of contract and a number of cases for the second type.
A financial services firm offers incident-based support to large brokerage clients to ensure that preferred customers receive high-priority, 24/7 support. In this example, contract lines are allotted a number of cases.
A medical supply provider manages setup and maintenance of home health care supplies for patients on behalf of hospitals and insurance companies. In this example, contract lines are allotted a fixed number of service calls for particular products.
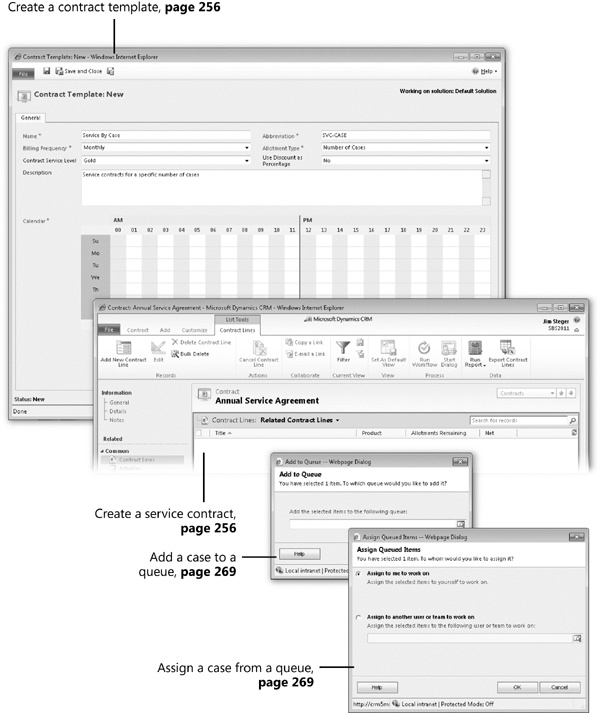
In this exercise, you’ll create a contract template for a case-based service agreement and then use it to create a contract that provides 20 service cases.
Note
SET UP Use your own Microsoft Dynamics CRM installation in place of the CRM sample data shown in this exercise. Use the Windows Internet Explorer web browser to navigate to your Microsoft Dynamics CRM website before beginning this exercise. You need the Sonoma Partners customer account you created in Chapter 3. If you cannot locate the Sonoma Partners account in your system, select a different customer account for this exercise. Also, use a user account that has the CSR Manager security role or another role with privileges to create contract templates, contracts, and contract lines.
In the Settings area, click Templates, and then click Contract Templates to view the available templates.
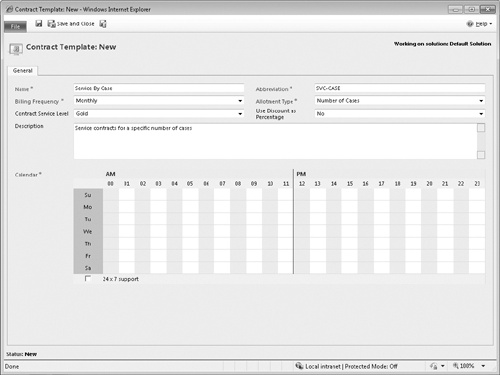
 Click the New button to launch the New Contract Template form.
Complete the New Contract Template form with the following values.
Name
Service By Case
Abbreviation
SVC-CASE
Billing Frequency
Monthly
Allotment Type
Number of Cases
Contract Service Level
Gold
Use Discount as Percentage
No
Description
Service contracts for a specific number of cases
In the Calendar area, click the days and hours to designate the availability of service resources for the agreement from 9:00 A.M. until 5:00 P.M., Monday through Friday.
Tip
Note that the Calendar hours are based on a 24-hour day, so 5:00 P.M. displays as 17:00. When configuring the availability for your contract templates, you can click the day (row) or hour (column) headings in the Calendar area to toggle the settings for all cells of that value. For example, if you click the 08 column heading, all of the days will be set to available for 8:00 A.M. If you click the column heading again, you will toggle all of the days to unavailable at 8:00 A.M.
Important
At least one time slot must be marked for availability in the Calendar area before you can save a contract template. Green dots indicate the times that support is offered. If your organization does not limit when customer service is offered, select the 24 x 7 Support check box below the Calendar to mark all days as available. Calendar settings are not enforced when service requests are created.
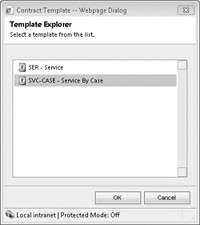
 In the form toolbar, click the Save and Close button to finish creating the contract template.
In the Template Explorer dialog box, select the SVC-CASE - Service By Case template.
Click OK to close the dialog box and open the New Contract form. In the General section of the form, enter or select the following values.
Contract Name
Annual Service Agreement
Customer
Sonoma Partners
Contract Start Date
9/1/2010
Contract End Date
8/31/2011
Bill To Customer
Sonoma Partners
Billing Start Date
9/1/2010
Billing End Date
8/31/2011
Billing Frequency
Monthly
Discount
Amount
Service Level
Gold
 Click the Save button to create the contract.
Tip
Microsoft Dynamics CRM automatically assigns a unique identifying number to each contract when it is first saved. Similar to the auto-numbering for cases and knowledge base articles, contract numbering can be configured by system administrators in the Administration section of the Settings pane. By default, each case will be created with a three-character prefix (CNR), a five-digit code, and a six-character identifier—for example, CNR-01006-V7PQMB.
In the entity navigation pane of the new contract, click Contract Lines.
 On the ribbon, on the List Tools Contract Lines tab, click the
Add New Contract Line button to launch the New
Contract Line form.
On the ribbon, on the List Tools Contract Lines tab, click the
Add New Contract Line button to launch the New
Contract Line form.In the General section of the New Contract Line form, in the Title field, enter FY2010-FY2011.
Verify that the Start Date and End Date fields default to 9/1/2010 and 8/31/2011, respectively.
Important
Microsoft Dynamics CRM validates the start and end dates entered in the contract line to ensure that the end date does not occur in the past and that both the start and end dates are within the Contract Start Date and Contract End Date fields specified on the Contract form. If the end date of 8/31/2011 occurs in the past, you will need to change it to a future date to complete this exercise.
In the Total Cases/Minutes field, enter 20.
Tip
For this example, the Total Cases/Minutes field will be required on the form, because the associated contract template allots a number of cases to the contract. When a contract template with an allotment type of Coverage Dates is used, the Total Cases/Minutes field will be read-only on the form, because the contract covers a time period rather than a specified number of cases or minutes.
In the Total Price field, enter 10,000. In the Discount field, enter 2,500.
Click Save to create the contract line.
Important
Each time the Contract Line form is saved, several fields are updated automatically based on system calculations. In the Allotment Details section, the total cases or minutes logged against the contract line is subtracted from the Total Cases/Minutes value to display the allotments remaining. In the Pricing section, the net charge is recalculated based on the Total Price and Discount values, and a rate is calculated based on the Total Price and Total Cases/Minutes values.


When a contract is created in Microsoft Dynamics CRM, the system assigns a default status of Draft to the contract. Only contracts in Draft status can be edited; after a contract has progressed to Invoiced or Active status, the fields in the contract are locked. When the contract is Active, service cases can be logged against the contract and a running tally of used cases or time is tracked against the total allotment specified in the contract line.
Given the need for a business to lock down the terms of a contract while still allowing for flexibility as the company’s needs change, the life cycle of a contract can become complicated. Consider the following scenarios for why a service contract might change:
A company’s internal team takes over support for a software application, so it cancels its support agreement with a consulting firm.
A customer service manager receives notification from her company’s accounting department that a customer has several past due invoices for support services, so the manager places the customer’s service contract on hold to prevent any new cases from being created until the balance is paid.
Upon the expiration of a year-long service agreement, a customer decides to renew the contract for another year of service.
Not every contract will follow a fixed life cycle from start to finish, so it’s important to understand how contract statuses are managed in Microsoft Dynamics CRM and what actions are allowed for each status. The following table provides an overview of contract statuses and available actions.
In this exercise, you’ll move the contract created in the previous section to Active status, log a case against it, and then renew it.
Note
SET UP Use your own Microsoft Dynamics CRM installation in place of the CRM sample data shown in this exercise. Use the Internet Explorer web browser to navigate to your Microsoft Dynamics CRM website, if necessary, before beginning this exercise. You need the contract you created in the previous exercise. Also, use a user account that has the CSR Manager security role or another role with privileges to create and edit contracts, contract lines, and cases.
In the Service area, click Contracts, and then double-click the contract created in the previous exercise.
 On the Contract tab of the ribbon, in the Actions group, click the Invoice Contract button.
Because the start date is in the past, the contract automatically moves to the Active status and allows you to enter cases against it.
In the entity navigation pane of the contract, click Cases to view the case manager for the contract.
 On the ribbon, click the New button to open a new case against the
contract.
On the ribbon, click the New button to open a new case against the
contract.In the New Case form, enter the following values.
Title
Replace water line for company coffee machine
Customer
Sonoma Partners
Subject
Default Subject
Case Type
Problem
Case Origin
Phone
Contract
Annual Service Agreement (created in the previous exercise)
Contract Line
FY2010-FY2011 (created in the previous exercise)
Click Save to create the case.
In the Actions group on the ribbon, click Resolve Case to mark the case as resolved.
Tip
Only resolved cases are counted against the total allotment specified on the contract line. For each resolved case, the remaining allotment is recalculated. For example, if a contract line has five cases specified in the Total Cases/Minutes field, it’s possible to log six or more cases against it, as long as no more than five of those cases are in Resolved status.
In the Resolve Case dialog box, in the Resolution field, enter Water line replaced.
Click OK to mark the case as Resolved.
 Click the browser window’s Close button to close the case window.
 In the Contract form, in the entity navigation
pane, click Contract Lines. Then
click the Refresh button, if needed, to verify that the Allotments Remaining value is updated to
19.
In the Contract form, in the entity navigation
pane, click Contract Lines. Then
click the Refresh button, if needed, to verify that the Allotments Remaining value is updated to
19. On the ribbon, click the Contract tab, and then in the Actions group, click Renew Contract to renew the contract for another term.
In the dialog box, leave Include canceled contract lines selected, and then click OK.
Close the draft contract.
In the Service area, in the Contracts view, note that a new contract in Draft status has been created with the same number as the active contract.
Double-click the renewed contract in Draft status, and verify that the start and end dates are automatically calculated as an extension of the original contract.


In addition to using contracts to manage the number of cases or service hours billed to customers, customer service teams can use service queues to improve the routing of cases and ensure that each request is handled efficiently. In Microsoft Dynamics CRM 2011, a queue is a public listing of records, such as cases and activities. Queues are typically set up based on team assignments or subject matter expertise on a product or service.
When a case is added to a service queue, it is shared by the group of users that have access to the queue until it is accepted by or assigned to a customer service representative. When a record is added to a queue, Microsoft Dynamics CRM creates a queue item, associates the record to that queue item, and then displays queue items in the Workplace area. Customer service managers can create queues in the Business Management section in the Settings area.
Users can work on items from queues they have access to by assigning themselves to the queue items. After a record (such as a case) is assigned to a user, it is moved to the user’s Items I Am Working On view and cannot be worked on by other team members until it is released.
Users can perform the following actions on items in a queue.
Action | Description |
|---|---|
Moves a queue item from one queue to another. Each item can only be associated to one queue at a time. This action also allows a user to reassign the target records from the queue item during this process. | |
Work On | Assigns a queue item to a particular user or team. When a user works on an item, the queue item will be displayed in a special view for the user. Only one user or team can be assigned to work on a queue item at a time. |
Release | Removes the user associated with the queue item. |
Remove | Removes the queue item from the queue. |
Displays additional information associated with the queue item. |
In Microsoft Dynamics CRM 2011, most records—such as accounts and contacts—can be owned by users or teams. Although queues cannot own a record, Microsoft Dynamics CRM allows you to add a record to a queue. When you add a record to a queue, the owner of the record stays the same and will display in the queue, but other users can now choose to work on the record. When a user selects the record to work on it, Microsoft Dynamics CRM associates the queue item to that user, and the queue item then appears in the user’s unique Items I Am Working On queue.
Important
Adding a record to a queue does not change the ownership of the record. A queue item can only belong to one queue at a time. Furthermore, a queue item can only be assigned to one user or team at a time.
If you enter an email address when you create a queue, you can have service requests received by that email address delivered directly to the queue. All inbound email messages to that address will then be created as email activity records in Microsoft Dynamics CRM and will be displayed in the queue so customer service representatives can accept each email message and follow up accordingly. When configuring email messages to automatically display in a queue, you can select options that determine which messages will be displayed. For example, you can display the following:
All email messages sent to the specified address.
Only those email messages that are sent to the specified address in response to messages sent from Microsoft Dynamics CRM.
Only those email messages that are sent to the specified address from a lead, contact, or account in your Microsoft Dynamics CRM database.
Only those email messages that match an address from a Microsoft Dynamics CRM record that is email enabled.
You do not need to supply an email address when setting up a queue, but this feature is helpful for customer service teams that receive a lot of service requests via email.
Note
See Also With Microsoft Dynamics CRM workflow, you can set up routing rules to automatically assign cases to the appropriate queue. Furthermore, you can configure workflow rules for the queue items, allowing for escalation within the queue itself. Although the workflow feature is beyond the scope of this book, you can learn more about it in Working with Microsoft Dynamics CRM 2011, by Mike Snyder and Jim Steger (Microsoft Press, 2011).
In this exercise, you’ll create a service queue and route a case to it, then accept the case into your Items I Am Working On queue.
Note
SET UP Use the Internet Explorer web browser to navigate to your Microsoft Dynamics CRM website, if necessary, before beginning this exercise. You need the Product Catalog Request case you created in Chapter 10. If you cannot locate the Product Catalog Request case, select a different active case for this exercise. Also, ensure that your user account has the CSR Manager security role or another role with privileges to create queues and cases.
In the Settings area, click Business Management, and then click Queues to view the available queues.
In the New Queue form, enter the following information:
Queue Name
Catalog Request
E-mail
Owner
This will vary among individual systems, so select your user account.
Description
Catalog fulfillment requests
Convert to e-mail activities
All e-mail messages
E-mail access type - Incoming
None
E-mail access type - Outgoing
None
Click Save and Close to create the queue.
In the Service area, click Cases to view the case manager.
Locate the Product Catalog Request case, and then select the record in the grid (without opening it).
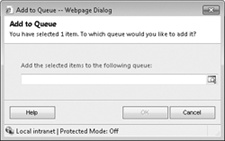
 On the ribbon, in the Collaborate group on the Cases tab, click the Add to
Queue button to associate the case to a queue.
On the ribbon, in the Collaborate group on the Cases tab, click the Add to
Queue button to associate the case to a queue.In the View selector, change the view to Queues: Primary E-mail (Pending Approval), select the Catalog Requests queue, and then click OK.
In the Workplace area, click Queues, and then select Items available to work on from the view selector. Then select the Catalog Requests queue to verify that the case you assigned appears.
 Make sure that the case is selected. Then,
on the Queue Items tab of the ribbon, click the Work On button to assign the case into your
personal queue.
Make sure that the case is selected. Then,
on the Queue Items tab of the ribbon, click the Work On button to assign the case into your
personal queue.Click OK to verify that you are accepting the case.
In the view selector, click the Items I am working on queue, and verify that the case now appears.


Service contracts can be used to manage support requests from customers. Each contract includes the duration of the agreement, the number of incidents or hours of service, pricing, and customer billing information. Multiple contract lines can be assigned to a contract to store the particular terms of each agreement.
Customer service managers can create contract templates to establish the framework for service contracts. Each contract must be created from a contract template.
Contracts can be edited only while in Draft status, so it’s important that customer service representatives complete the contract terms as thoroughly and accurately as possible before moving the contract to Invoiced status.
Each contract in Invoiced status is automatically moved to Active status on the specified start date and moved from Active to Expired status on the end date if the contract has not been renewed.
Cases can be logged against only those contracts that are in Active status.
A contract can be renewed while in Active, Canceled, or Expired status. When renewing a contract, Microsoft Dynamics CRM creates a copy of the original contract and stores a link to the originating contract on the new record.
Contracts can be placed on hold or canceled to prevent new cases from being logged against them.
Customer service teams can share records, such as cases, in queues to ensure that all service requests are routed to the correct people and resolved quickly.
When a record is added to a queue, Microsoft Dynamics CRM creates a separate queue item and associates it to the queue and to the record.
Records remain in a queue until they are accepted by a user, who assumes responsibility for handling the queue item or escalating it to another representative.
Service requests submitted via email can be assigned to a queue automatically, if an email address was assigned to the queue during setup.