Chapter 15. Securing a SharePoint Environment
IN THIS CHAPTER
- Identifying Isolation Approaches to SharePoint Security
- Physically Securing SharePoint Servers
- Securing SharePoint’s SQL Server 2005 Installation
- Hardening SharePoint Server Security
- File-Level Security for SharePoint Servers
- Securing a SharePoint Farm Using Windows Server Update Services
- Verifying Security Using the Microsoft Baseline Security Analyzer (MBSA)
- Deploying Transport-Level Security for SharePoint
- Using Virtual Private Networks to Secure Access to SharePoint
- Examining Integration Points Between SharePoint and Public Key Infrastructure
- Examining IPsec for Internal SharePoint Encryption
- Configuring Simple IPsec Between SharePoint Servers
- Best Practices
Microsoft Office SharePoint Server 2007 was built to be a robust, capable, and scalable environment. Along with SharePoint’s capabilities comes the responsibility to secure its vital components, protecting them from attacks and data loss. Fortunately, SharePoint allows for a wide range of security functionality, features, and tools to properly secure a SharePoint farm. Knowledge of these capabilities is a must for a SharePoint administrator.
This chapter focuses on the aspects of information security that an organization can implement to protect information stored in a SharePoint environment. This includes server-level security from a network operating system and Web Services perspective, Active Directory integration, firewall and access to intranet and extranet information, file-level security for information stored and indexed on non-SharePoint-managed data stores, file-level security for information stored within a SharePoint-managed data store, user-level security for access to SharePoint data, and administrative controls to monitor and manage user and access security. In addition, tools and services useful for securing SharePoint such as Windows Server Update Services, Microsoft Baseline Security Analyzer, IPsec, Public Key Infrastructure (PKI), and others are covered to provide for enhanced security.
Identifying Isolation Approaches to SharePoint Security
Various organizations have varying security needs. Some organizations, for example, require strong security and cannot tolerate even the slightest risk to their business. Other organizations have a much higher tolerance for security risks and often choose to make a system more functional at the expense of security. SharePoint scales its security well to the needs of these different organizations and provides a wide spectrum of security options that can be suited to the needs of many different organizations.
Arising from these ideas is the concept of security through isolation. SharePoint servers running on an isolated network segment, for example, are highly secure compared to those directly located on the Internet. The following section deals with approaches to isolate users via security boundaries in SharePoint. Each option further isolates users and increases the security offered. With the increased security comes decreased functionality, however. The functional needs of an organization must be weighed against the security needs.
Isolating SharePoint Data with Separate SharePoint Lists
The simplest, most straightforward approach to security through user isolation comes through the application of security on the list level in SharePoint. This model involves the entire pool of users having access to the site but then being disallowed or allowed access to SharePoint content through security set at the list level.
This model, although the most functional, is weakest in security. Administrators of the parent site can seize access of the lists, and users are subject to potential cross-site script attacks in this design, which limits its security.
Isolating SharePoint Through Deployment of Separate Sites or Site Collections
Granting various groups of users access to SharePoint content by organizing them into sites is a more secure approach to SharePoint design. Users are limited in the types of access they receive to other sites, and searching can be limited to specific information. Administrative overhead is increased in this example, however, because separate groups of users and permissions need to be maintained. It is also more difficult to manage because all sites in the same Site Collection must use the same content database, reducing the scalability of the system.
Deploying users into separate Site Collections goes even further down the path of security and scalability. Separate Site Collections can be more easily scaled out than separate sites, because each host can theoretically host up to two million sites in a domain, if required. Both of these models are still vulnerable to cross-site scripting attacks, however. If a site is vulnerable to this type of activity, a more secure model might be needed.
Isolating SharePoint with Separate Host Headers and Virtual Servers
The problem of cross-site scripting attacks can be addressed through the creation of multiple host headers or virtual servers in SharePoint. Host headers allow for multiple domain names to correspond to different Site Collections in SharePoint. As a result, you can have a single SharePoint farm correspond to http://sharepoint.companyabc.com and http://sharepoint.cco.com and have them point to separate sets of data. This allows for an increased level of security between the sites, because users cannot see the data from the other Site Collections. This, of course, reduces the amount of collaboration that can take place between the sites and is limited in scope. Going one step further, each host header can be associated with an individual virtual server in SharePoint. By doing this, each Site Collection can be associated with a separate application pool. Each application pool is logically separate from the others and is theoretically not subject to failure if another one goes down or becomes corrupt. This also helps to further secure the SharePoint data, because users are on separate physical processes from each other.
Isolating SharePoint with Separate Physical Servers or Networks
The last, most secure, and also most expensive option for SharePoint security through isolation is by deploying each Site Collection on separate servers or in separate networks. If you deploy on separate servers, a great deal of independence is achieved because attacks and snoops from one site are physically removed from the resources of another. This can prove to be expensive, however, because individual servers need to be purchased, configured, and maintained.
The ultimate security boundary for interconnected networks is just to disconnect them from each other. It goes without saying that the most secure SharePoint farm is the one connected to an isolated network. There are some major disadvantages to this, however, because access from any other location becomes impossible.
Physically Securing SharePoint Servers
One of the most overlooked but perhaps most critical components of server security is the actual physical security of the server itself. The most secure, unbreakable web server is powerless if a malicious user can simply unplug it. Worse yet, someone logging in to a critical file server could potentially copy critical data or sabotage the machine directly.
Physical security is a must for any organization because it is the most common cause of security breaches. Despite this fact, many organizations have loose levels, or no levels, of physical security for their mission-critical servers. An understanding of what is required to secure the physical and login access to a server is a must.
Restricting Physical Access to Servers
Servers should be physically secured behind locked doors, in a controlled-access environment. Soft-felt cubicles do not provide much in the realm of physical security, so it is unwise to place mission-critical servers at the feet of administrators or in similar, unsecure locations. Rather, a dedicated server room or server closet that is locked at all times is the most ideal environment for the purposes of server security.
Most hardware manufacturers also include mechanisms for locking out some or all of the components of a server. Depending on the other layers of security deployed, it might be wise to use these mechanisms to secure a server environment.
Restricting Login Access
All servers should be configured to allow only administrators to physically log in to the console. By default, such use is restricted on domain controllers, but other servers such as file servers, utility servers, and the like must specifically forbid these types of logins. To restrict login access, follow these steps:
- Choose Start, All Programs, Administrative Tools, Local Security Policy.
- In the left pane, navigate to Security SettingsLocal PoliciesUser Rights Assignment.
- Double-click Allow Log On Locally.
- Remove any users or groups that do not need access to the server, as shown in Figure 15.1. (Keep in mind that on SharePoint web front-end servers, the IUSR_SERVERNAME account needs to have Log on Locally access to properly display web pages.) Click OK when finished.
Figure 15.1. Restricting login access.

A group policy set on an organizational unit (OU) level can be applied to all SharePoint servers, simplifying the application of policies and negating the need to perform it manually on every server.
Using the Run As Command for Administrative Access
Logging off administrators after using any and all workstations and servers on a network is often the most difficult security precaution to enforce. If an administrator forgets, or simply steps away from a workstation temporarily without logging out, any persons passing by can disrupt the network infrastructure as they please.
For this reason, it is wise to consider a login strategy that incorporates the Run As command embedded in Windows Server 2003. Essentially, this means that all users, including IT staff, log in with restricted, standard User accounts. When administrative functionality is required from a workstation, IT support personnel can invoke the tool or executable by using the Run As command, which effectively gives that tool the administrative capabilities of the account designated by Run As. If an administrator leaves a workstation console without logging off, the situation is not critical because the console will not grant a passerby full administrator access to the network. For SharePoint servers, only administrators should be able to log in to the console, however.
Use the following example to invoke the Computer Management MMC snap-in using the Run As command from the GUI:
- Navigate to (but do not select) Start, All Programs, Administrative Tools, Computer Management.
- Right-click Computer Management in the program list, and then choose Run As.
- In the Run As dialog box, shown in Figure 15.2, choose the credentials that the program will run under and click OK.
Figure 15.2. Using the Run As command.

A command-line version of the Run As tool allows for the same type of functionality. For example, you can enter the following syntax from the Start, Run window to open a command prompt with administrator access:
runas /user:DOMAINNAMEadministrator cmd
In addition to the manual method of using Run As, an administrator’s desktop can be configured to have each shortcut automatically prompt for the proper credentials upon entering an administrative tool. For example, you can permanently set the Active Directory Users and Computers MMC snap-in to prompt for alternative credentials by following these steps:
- Choose Start, All Programs, Administrative Tools.
- Right-click Computer Management and choose Properties.
- On the Shortcut tab, click the Advanced button.
- Check the Run with Different Credentials box, as shown in Figure 15.3, and click OK twice to save the settings.
Figure 15.3. Running a shortcut with alternative credentials.

Administrative access is sometimes required to change some of the shortcut properties. You might need to log in as a user with higher privileges to set up the shortcuts on other users’ profiles.
Securing SharePoint Access by Using Smartcards
The ultimate in secured infrastructures uses so-called smartcards for login access; these smartcards are fully supported in Windows Server 2003. A smartcard is a credit card–sized piece of plastic with an encrypted microchip embedded within. Each user is assigned a unique smartcard and an associated PIN. Logging in to a workstation is as straightforward as inserting the smartcard into a smartcard reader and entering the PIN, which can be a combination of numbers and letters, similar to a password.
Security can be raised even higher by stipulating that each smartcard be removed after logging in to a console. In this scenario, users insert into the smartcard reader a smartcard physically attached to their person via a string. After entering their PIN, they log in and perform all necessary functions. Upon leaving, they just remove the smartcard from the reader, which automatically logs them off the workstation. In this scenario, it is nearly impossible for users to forget to log off because they must physically detach themselves from the computer to leave.
Securing SharePoint’s SQL Server 2005 Installation
SQL Server has a strong relationship with SharePoint Server 2007 because it is the back-end database repository for SharePoint data. All of SharePoint configuration and content databases are stored within SQL Server, which makes it highly important and recommended to follow security best practices on SQL Server just as one would when securing SharePoint to minimize vulnerabilities.
The enforcement of SQL Server security should be one of the most important tasks SQL Server database administrators commit them to, especially in today’s digital economy. Further, to properly ensure vulnerabilities are minimized, SQL Server security should be a part of both the test and production SQL Server systems.
Equally important, as a result of continuous advancements made my Microsoft, SQL Server 2005 has significant enhancements to the security model of the database platform, which now provides more precise and flexible control resulting in tighter security. Some of the features that have been enhanced include the advanced security of surface area reduction, data encryption, native encryption, authentication, granular permissions, and user and schema separations. These advancements contribute to the Microsoft Trustworthy Computing initiative that defines the steps necessary to help support secure computing.
At present, numerous SQL Server security best practices are applicable when deploying SharePoint. The following sections discuss some of these best practices.
Windows Versus SQL Server Authentication
Authentication is a security measure designed to establish the validity of a user or application based on criteria such as an account, password, security token, or certificate. Typically, after the validity has been verified, the user or application is granted authorization to the desired object.
SQL Server 2005 continues to support two modes for validating connections and authenticating access to database resources: Windows authentication and SQL Server authentication. Both authentication methods provide the SharePoint application access to SQL Server and its resources such as the SharePoint Config, Site, and Content Databases.
Windows Authentication Mode
Windows Authentication mode leverages Active Directory user accounts or groups when granting access to SQL Server. This is the default and recommended authentication mode, and it allows IT professionals to grant domain users access to the database server without creating and managing a separate SQL Server account. In addition, when using Windows Authentication mode, user accounts are subject to enterprisewide policies enforced in the Active Directory domain such as complex passwords, password history, account lockouts, minimum password length, and maximum password length.
SQL Server Authentication Mode
SQL Server Authentication, also referred to as Mixed Mode Authentication, uses either Active Directory user accounts or SQL Server accounts when validating access to SQL Server. SQL Server 2005 now introduces the ability to enforce policies for SQL Server login passwords when using SQL Server Authentication. This functionality was not available in SQL Server 2000; therefore, Windows Authentication was most definitely the recommended practice for managing authentication in the past.
Which Authentication Mode Should Be Used?
Windows Authentication works best if the SQL Server will be accessed from within the organization and all user accounts needing access reside in Active Directory. For example, Windows Authentication can be used when deploying SharePoint if both the SharePoint and SQL server reside in the same domain or in separate domains that are trusted. On the other hand, SQL Server Mixed Mode Authentication works best if users or applications require access to SQL Server and are not associated with the domain that SQL Server resides in. For example, SQL Server Authentication should be leveraged if the SharePoint server is not in the same domain as the SQL server and a trust does not exist between the two environments.
Even though SQL Server 2005 now can enforce policies such as SQL Server account password complexity, password expiration, and account lockouts, Windows Authentication mode is still the recommended alternative for controlling access to SQL Server. The added advantage of Windows Authentication is that Active Directory provides an additional level of protection with the Kerberos protocol, and administration is reduced by leveraging Active Directory groups when providing access to SQL Server.
The ability for SQL Server Authentication in SQL Server 2005 to manage both password and lockout properties is only available if SQL Server is installed on Windows Server 2003.
Configuring SQL Server 2005 Authentication Modes
Follow these steps to select the server authentication mode:
1. Choose Start, All Programs, Microsoft SQL Server 2005, SQL Server 2005 Management Studio.
2. In SQL Server 2005 Management, right-click a desired SQL server, and then click Properties.
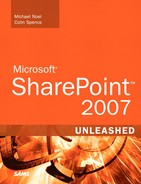
3. On the Security page, under Server authentication, select the desired server authentication mode, and then click OK, as shown in Figure 15.4.
Figure 15.4. Configuring SQL Server 2005 authentication modes.

4. In the SQL Server Management Studio dialog box, click OK to acknowledge the need to restart SQL Server.
5. In Object Explorer, right-click a desired server, and then click Restart. If the SQL Server Agent is running, it will require a restart, too.
If Windows Authentication mode is selected during installation, the SA login is disabled by default. If the Authentication mode is switched to SQL Server Mixed mode, after the installation, the SA account is still disabled and must be manually enabled.
Understanding the SA Account and Setting a Strong Password
If SQL Server Authentication mode is used, a strong SA password should also be used. By default, the SA account has full administrative privileges over a SQL Server installation; therefore, if this account is compromised, the intruder will have full access to the SQL server, including all databases. In the past, it was common to find production SQL Server installations with a weak or blank SA password that increased the risk of security vulnerabilities and compromises. Microsoft introduced the concept of checking for blank SA passwords during the installation of Service Pack 4 on SQL Server 2000. The IT professional was informed of the security vulnerabilities associated with maintaining a blank password; however, they were not forced to enter a password, leaving the account and server still vulnerable.
This is no longer the case with SQL Server 2005. If SQL Server authentication is used, a strong SA password must be entered; otherwise, it is not possible to continue with the installation of SQL Server 2005. A SQL Server strong password must be at least six characters in length and satisfy at least three of the following four criteria:
- Must contain uppercase letters
- Must contain lowercase letters
- Must contain numbers
- Must contain nonalphanumeric characters (for example, #, %, or ^)
In addition, the strong password cannot be Password, Admin, Administrator, SA, or Sysadmin; and cannot use either the name of the user logged on to the computer or the computer name. These are all considered weak passwords.
Not allowing a weak or blank password reinforces the fact that Microsoft is serious about their ongoing Trustworthy Computing initiative. In the past two years, Microsoft has invested significant time and resources to enhance the security in each of its products, including both SQL Server 2005 and SharePoint 2007.
To change or assign a strong SA password, follow these steps:
1. Choose Start, All Programs, Microsoft SQL Server 2005, SQL Server 2005 Management Studio.
2. In Object Explorer, first expand the Security folder, and then the Logon folder. Right-click the SA account, and then click Properties.
3. On the General page in the Login Properties dialog box, enter a new complex SA password, confirm it, and then click OK, as shown in Figure 15.5.
Figure 15.5. SQL Server Login Properties dialog box for the SA account.

4. Restart Microsoft SQL Server Services, including SQL Server Agent.
When using the SQL Server Authentication mode, it is recommended to use a Secure Sockets Layer (SSL) certificate on the SharePoint web server to encrypt the HTTP traffic.
Minimize SQL Server 2005 Attack Surface
After SQL Server 2005 for SharePoint has been installed, the SQL Server Surface Area Configuration tool should be run to reduce the system’s attackable surface area by disabling unused services, components, features, and remote connections.
To reduce surface attack and secure the SQL Server 2005 installation for SharePoint, it is recommended that an IT professional launch the SQL Server Surface Area Configuration tool and disable all unnecessary services, components, and connections that will not be used.
Typically, only the Database Engine, SQL Server Agent, and SQL Server Browser services are required for a base SharePoint installation. For more advanced installations, Full-Text Search, Analysis Services, and Reporting Services might be needed.
Managing Services and Connections to Reduce Surface Attack
To reduce surface attack on the SQL Server installation, follow these steps:
- Choose Start, All Programs, Microsoft SQL Server 2005, Configuration Tools, SQL Server Surface Area Configuration.
- On the SQL Server Surface Area Configuration start page, click the Surface Area Configuration for Services and Connections hyperlink.
- For the basic SharePoint SQL Server 2005 installation, on the View by Instance tab, change the startup type from Automatic to Disabled on all unnecessary services except for the Database Engine, SQL Server Agent, and SQL Server Browser, stop the service, and then click Apply and OK when complete, as shown in Figure 15.6.
Figure 15.6. Managing services and connections and disabling unnecessary SQL Services.

If Windows Authentication mode is selected during installation, the SA login is disabled by default. If the authentication mode is switched to SQL Server Mixed mode, the SA account is still disabled and must be manually enabled.
After the unnecessary services have been disabled, it is possible to take security a step further by leveraging the Surface Area Configuration for Features hyperlink in the SQL Server 2005 Surface Area Configuration dialog box. The SQL Server 2005 Surface Area configuration for Features allows an IT professional to further tune security by turning individual features of SQL Server 2005 on or off. The following features can be turned on or off:
Analysis Services Features
- Ad-hoc Data Mining Queries allow Analysis Services to use external data sources via OPENROWSET.
- Anonymous Connections allow unauthenticated users to connect to Analysis Services.
- Linked Objects enables linking dimensions and measures between instances of Analysis Services.
- User-Defined Functions allows loading user-defined functions from COM objects.
Database Engine Features
- Ad-hoc Remote Queries allows using OPENROWSET and OPENDATASOURCE.
- CLR Integration allows using stored procedures and other code written using the .NET Common Language Runtime.
- Database Mail lets you use the new Database Mail system to send email from SQL Server.
- HTTP Access enables HTTP endpoints to allow SQL Server to accept HTTP connections.
- OLE Automation enables the OLE automation extended stored procedures.
- Service Broker enables Service Broker endpoints.
- SMO and DMO turn on Server Management Objects and Distributed Management Objects.
- SQL Mail lets you use the older SQL Mail syntax for sending email from SQL Server.
- Web Assistant enables the Web Assistant for automatic output to web pages.
- xp_cmdshell turns on the xp_cmdshell extended stored procedure.
Reporting Services Features
- HTTP and Web Service Requests allows Reporting Services to deliver reports via HTTP.
- Scheduled Events and Report Delivery enables “push” delivery of reports.
It is a best practice to fully understand which components of SQL Server are needed by the SharePoint installation when using the SQL Server 2005 Surface Area Configuration tool for configuring services, connections, or features. Failure to understand will ultimately mean that these SharePoint components will fail. For example, if SharePoint is leveraging Full-Text Search, this service must be enabled.
Using SQL Server Security Logs
The previous sections discuss ways to minimize security vulnerabilities on SQL Server. Now that SQL Server has been hardened, it is beneficial to enable auditing. Security auditing on SQL Server will monitor and track activity to log files that can be viewed through Windows application logs or SQL Server Management Studio. SQL Server offers four security levels that relate to security auditing, as follows:
- None—Disables auditing so that no events are logged
- Successful Logins Only—Audits all successful login attempts
- Failed Logins Only—Audits all failed login attempts
- Both Failed and Successful Logins—Audits all login attempts
By default, security auditing is set to Failed Logins Only. It is a best practice to configure security auditing to capture both failed and successful logins. At the least, security auditing should be set to Failure. By doing so, you can save, view, and act upon failed logins.
To configure security auditing for both failed and successful logins, follow these steps:
1. Choose Start, All Programs, Microsoft SQL Server 2005, SQL Server 2005 Management Studio.
2. In SQL Server 2005 Management, right-click a desired SQL server, and then click Properties.
3. On the Security page, under Login auditing, select the desired auditing criteria option button, and then click OK, as shown in Figure 15.7.
Figure 15.7. Configure security auditing to both failed and successful logins.
4. Restart the SQL Server Database Engine and SQL Server Agent to make auditing changes effective.
Hardening SharePoint Server Security
Earlier versions of Windows Server, such as Windows NT 4.0 and Windows 2000, often required a great deal of configuration after installation to “harden” the security of the server and ensure that viruses such as Code Red and Nimbda would not overwhelm or disable the server. Fortunately in SharePoint’s operating system, Windows Server 2003, by default, many less commonly used services are turned off. In fact, the entire Internet Information Services (IIS) 6.0 implementation on every server is turned off, making the actual server itself much less vulnerable to attack.
In Windows Server 2003, it is important to first define which roles a server will use and then to turn on only those services as necessary, and preferably with the use of the Configure Your Server Wizard.
Hardening a Server with the Security Configuration Wizard in Windows Server 2003 Service Pack 1
The most impressive and useful addition to Windows Server 2003 Service Pack 1 has to be the Security Configuration Wizard (SCW). SCW allows for a server to be completely locked down, except for the specific services that it requires to perform specific duties. This way, a WINS server only responds to WINS requests, and a DNS server only has DNS enabled, and a SharePoint Server only responds to SharePoint requests. This type of functionality was long sought after and is now available.
SCW enables administrators to build custom templates that can be exported to additional servers, thus streamlining the securing process when setting up multiple systems. In addition, current security templates can be imported into SCW to allow for existing intelligence to be maintained.
The advantages to using the SCW service on a SharePoint server are immediately identifiable. The SharePoint server, because it is often directly exposed to the Internet for web services, is vulnerable to attack and should have all unnecessary services and ports shut down. A properly configured firewall normally drops this type of activity, but it is always a good idea to put in an additional layer of security for good measure.
Installing Service Pack 1 for Windows Server 2003 only allows the SCW service to be installed. It is not, however, installed by default, and must be set up from the Add or Remove Programs applet in Windows via the following procedure:
- Logged in as a local administrator, click Start, Control Panel, Add or Remove Programs.
- Click Add/Remove Windows Components.
- Scroll down and check Security Configuration Wizard from the alphabetic list of components. Click Next to continue.
- Click Finish when the installation is complete.
Once installed, the wizard can be run to lock down the SharePoint server to run only the bare necessities required. This includes SQL access, web- and ASP-related web access, and any other access methods that are required for the server. Each SharePoint implementation differs, so it is important to prototype running the wizard to determine the right settings for each individual SharePoint server.
Using Security Templates to Secure a SharePoint Server
Windows Server 2003 contains built-in support for security templates, which can help to standardize security settings across servers and aid in their deployment. A security template is a text file formatted in such a way that specific security settings are applied uniformly. For example, the security template could force a server to only use Kerberos authentication, and not attempt to use down-level (and less secure) methods of authentication. Figure 15.8 shows one of the default templates included in Windows Server 2003, the securedc.inf template file, located in the \%systemroot%security emplates directory.
Figure 15.8. A sample security template file.

Application of a security template is straightforward and can be accomplished by applying a template directly to an Active Directory OU, site, or domain via a Group Policy Object (GPO). Security templates can be enormously useful in making sure that all servers have the proper security applied, but they come with a large caveat. Often, the settings defined in a template can be made too strict, and application or network functionality can be broken by security templates that are too strong for a server. It is therefore critical to test all security template settings before deploying them to production.
Shutting Off Unnecessary Services
Each service that runs, especially those that use elevated system privileges, poses a particular security risk to a server. Although the security emphasis in Windows Server 2003 reduces the overall threat, a chance still exists that one of these services will provide entry for a specialized virus or determined hacker. A great deal of effort has been put into the science of determining which services are necessary and which can be disabled. Windows Server 2003 simplifies this guessing game with an enhanced Services MMC snap-in. To access the Services console, choose Start, All Programs, Administrative Tools, Services.
As shown in Figure 15.9, the Services console not only shows which services are installed and running, it also gives a reasonably thorough description of what each service does and the effect of turning it off. It is wise to audit the Services console on each deployed server and determine which services are necessary and which can be disabled. Many services such as the Print Spooler, Telephony, and others are unnecessary on a SharePoint server and simply create more potential security holes. Finding the happy medium is the goal because too many running services could potentially provide security holes, whereas shutting off too many services could cripple the functionality of a server.
Figure 15.9. Using the Services console to administer the server.

The Security Configuration Wizard (SCW), previously discussed in this chapter and available with Windows Server 2003 SP1, provides for automatic shutdown of unnecessary services. Therefore, it is ideal from a security perspective to become familiar with it.
File-Level Security for SharePoint Servers
SharePoint controls access to files stored within its database through user authentication, site groups, and similar SharePoint-specific security mechanisms. In addition to these considerations, care must be taken to secure actual file-level access to SharePoint itself. A secured database is useless if an unauthorized user can simply delete it or copy it off. A full understanding of the file-level security inherent in Windows Server 2003 is a must for a complete understanding of SharePoint security itself.
Exploring NT File System Security
The latest revision of the NT File System (NTFS) is used in Windows Server 2003 to provide for file-level security in the operating system. Each object referenced in NTFS, which includes files and folders, is marked by an access control entry (ACE) that physically limits who can and cannot access a resource. NTFS permissions use this concept to strictly control read, write, and other types of access on files.
Although SharePoint servers are not often file servers, they can still grant or deny file access in the same way and should have the file-level permissions audited to determine whether there are any holes in the NTFS permission set. Changing NTFS permissions in Windows Server 2003 is a straightforward process; simply follow these steps:
1. Right-click the folder or file onto which the security will be applied and choose Sharing and Security.
2. Select the Security tab.
3. Click the Advanced button.
4. Uncheck the Allow Inheritable Permissions from the Parent to Propagate box.
5. Click Remove when prompted about the application of parent permissions.
6. While you’re in the Advanced dialog box, use the Add buttons to give access to the groups/users who need access to the files or folders.
7. Check the Replace Permission Entries on All Child Objects box, as shown in Figure 15.10, and click OK.
Figure 15.10. Setting NTFS permissions.

Take care when applying security settings; propagating incorrect security settings can lock out all subfolders on a server. When modifying security, a full understanding of the directory structure is required.
8. When prompted about replacing security on child objects, click Yes to replace child object security and continue.
9. Click OK to close the property page.
Auditing File Access to SharePoint Servers
A good practice for file-level security is to set up auditing on a particular server, directory, or file. Auditing on NTFS volumes allows administrators to be notified of who is accessing, or attempting to access, a particular directory. For example, it might be wise to audit access to SharePoint servers, to determine whether anyone is attempting to access restricted information, such as the location of database files. After auditing has been turned on via a local or group policy, you can follow these steps to set up simple auditing on a folder on a SharePoint server:
1. Right-click the folder or file onto which the auditing will be applied and choose Properties.
2. Select the Security tab.
3. Click the Advanced button.
4. Select the Auditing tab.
5. Uncheck the Allow Inheritable Auditing Entries from the Parent to Propagate box and click Apply.
6. Using the Add button, enter all users and groups that will be audited. If you’re auditing all users, enter the Everyone group.
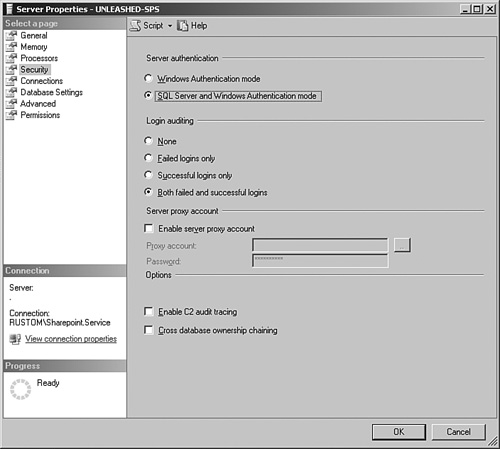
7. In the Auditing property page, select all types of access that will be audited. If you’re auditing for all success and failure attempts, select all the options, as indicated in Figure 15.11.
Figure 15.11. Selecting what to audit.
8. Click OK to apply the settings.
9. Check the Replace Auditing Entries on All Child Objects box, and click OK twice to save the settings.
Securing a SharePoint Farm Using Windows Server Update Services
One of the main drawbacks to Windows and SharePoint server security has been the difficulty in keeping servers current with the latest security fixes. For example, the security fix for the Index Server component of IIS was available for more than a month before the Code Red and Nimbda viruses erupted onto the scene. If the deployed servers had downloaded the patch, they would not have been affected. The main reason that the vast majority of the deployed servers were not updated was that keeping servers and workstations current with the latest security patches was a manual and time-consuming process. For this reason, a streamlined approach to security patch application was required and realized with the release of Software Update Services (SUS) and the newer Windows Server Update Services (WSUS).
Using a dedicated WSUS server for SharePoint and other servers is fast becoming a best-practice approach to intelligent patch management. Smaller environments can simply use the integrated Windows Update client to achieve similar functionality, however. It is best to outline whether WSUS is practical in a SharePoint environment.
Understanding the Background of WSUS: Windows Update
In response to the original concerns regarding the difficulty in keeping computers properly patched, Microsoft made available a centralized website called Windows Update to which clients could connect, download security patches, and install them. Invoking the Windows Update web page remotely installed an executable, which ran a test to see which hotfixes had been applied. Those that were not applied were offered up for download, and users could easily install these patches.
Windows Update streamlined the security patch verification and installation process, but the major drawback was that it required a manual effort to go up to the server every few days or weeks and check for updates. A more efficient, automated process was required.
Deploying the Automatic Updates Client
The Automatic Updates Client was developed to automate the installation of security fixes and patches and to give users the option to automatically “drizzle” patches across the Internet to the local computer for installation. Drizzling, also known as Background Intelligent Transfer Service (BITS), is a process in which a computer intelligently uses unused network bandwidth to download files to the machine. Because only unused bandwidth is used, there is no perceived effect on the network client itself.
The Automatic Updates Client was included as a standard feature that is installed with Windows 2000 Service Pack 3 and Windows XP Service Pack 1. It is also available for download as a separate component.
Understanding the Development of Windows Server Update Services
The Windows Update website and the associated client provided for the needs of most home users and some small offices. However, large organizations, concerned about the bandwidth effects of downloading large numbers of updates over the Internet, often disabled this service or discouraged its use. These organizations often had a serious need for Windows Update’s capabilities. This fact led to the development of Software Update Services, which was later improved into the new product, Windows Server Update Services.
WSUS is a free download from Microsoft that effectively gives organizations their own, independent version of the Windows Update server. WSUS runs on a Windows Server 2003 machine that is running IIS. Clients connect to a central intranet WSUS server for all their security patches and updates.
WSUS is not considered to be a replacement technology for existing software deployment solutions such as System Center Configuration Manager 2007, the new version of Systems Management Server (SMS). Instead, it is envisioned as a solution for mid- to large-size businesses to take control over the fast deployment of security patches as they become available.
Examining WSUS Prerequisites
Deploying WSUS on a dedicated server is preferable, but it can also be deployed on a Windows Server 2003 server running other services, as long as that server is running IIS. The following list details the minimum levels of hardware on which WSUS will operate:
- 700MHz x86-compatible processor
- 512MB RAM
- 6GB available disk space
Although WSUS can prove very useful for securing a SharePoint environment, it is not recommended to install the WSUS server component on a SharePoint farm member, because it can interfere with IIS functionality on that box.
In essence, a WSUS server can easily be set up on a workstation-class machine, although more enterprise-level organizations might desire to build more redundancy in to a WSUS environment.
In addition to these hardware requirements, WSUS also requires the installation of IIS 5.0 or greater and BITS (Background Internet Transfer Service) 2.0 or greater.
Installing a Windows Server Update Services System
The installation of WSUS is straightforward, assuming that IIS has been installed and configured ahead of time. The executable for WSUS can be downloaded from the WSUS website at Microsoft (http://www.microsoft.com/wsus).
To complete the initial installation of WSUS, follow these steps:
1. Run the WSUS Setup from the CD or the download executable.
2. Click Next at the Welcome screen.
3. Review and accept the license agreement to continue. Click Next to continue.
4. Select to Store Updates Locally and accept the default location. Click Next to continue.
5. Select to install the SQL Desktop Engine on the computer and click Next.
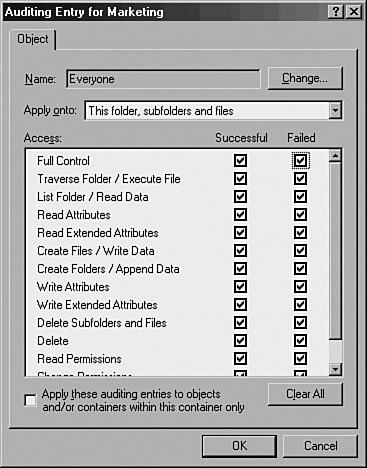
6. Select to Use the Existing IIS Default Web Site, as shown in Figure 15.12. Click Next to continue.
Figure 15.12. Installing WSUS.
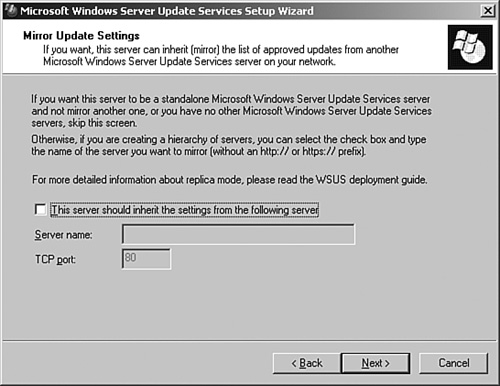
7. Do not check to inherit settings from a different server, as shown in Figure 15.13. This is only checked if an existing WSUS server exists that settings should be copied from. Click Next to continue.
Figure 15.13. Reviewing WSUS installation settings.
8. Click Next after reviewing the settings on the Ready to Install dialog box.
9. The installation will complete and, when the Finish button is clicked, the admin website URL will display.
The administration web page (http://servername/WSUSAdmin) automatically displays after installation. This page is the main location for all configuration settings for WSUS and is the sole administrative console. By default, it can be accessed from any web browser on the local network. All further configuration takes place from the Admin console, as illustrated in Figure 15.14.
Figure 15.14. Viewing the WSUS Admin console.

Setting WSUS Options
After installation, WSUS will not physically contain any security patches. The first task after installation should be configuring all the options available to the server. You can invoke the Options page by clicking Options in the upper pane of the WSUS Admin page.
The Options page in WSUS allows for specific settings such as Synchronization Options, Automatic Approval Options, and Computer Options to be set. These options provide for critical information such as how often the server will synchronize itself, whether a proxy server will be used, and how to manage computer groups.
Synchronizing a WSUS Server
After configuring all the options in WSUS, particularly the options regarding which security patch languages will be supported, the initial synchronization of the WSUS server can take place. To perform the synchronization, follow these steps:
1. Open the WSUS Admin web page by launching Internet Explorer on the WSUS server and going to http://localhost/WSUSAdmin.
2. Click the Synchronize Now link in the main pane.
3. The next screen to be displayed, shown in Figure 15.15, gives you the option of synchronizing with the WSUS site now or setting up a synchronization schedule. It is advised to do a full WSUS synchronization first and to schedule subsequent downloads on a daily basis thereafter. So, in this example, click the Synchronize Now button.
Figure 15.15. Setting WSUS synchronize server options.

4. An updated WSUS catalog will then be downloaded in addition to all the security patches that exist on the corporate WSUS server. Downloading might take a significant amount of time, depending on the Internet connection in use.
Plan to run the initial synchronization of WSUS over a weekend, beginning the download on Friday evening. Given the number of security patches that you will need to download and the overall Internet connection bandwidth consumption, it is wise to limit the impact that this procedure will have on the user population.
Approving WSUS Software Patches
After the initial synchronization has taken place, all the relevant security patches will be downloaded and ready for approval. Even though the files are now physically downloaded and in the IIS metadirectory, they cannot be downloaded by the client until the approval process has been run on each update. This allows administrators to thoroughly test each update before it is approved for distribution to corporate servers and workstations. To run the approval process, follow these steps:
1. Open the WSUS Admin web page by launching Internet Explorer on the WSUS server and going to http://localhost/WSUSAdmin.
2. Click the Updates link in the top pane.
3. Select all updates that will be approved (you can select multiple ones), and click the link for Change Approval, as shown in Figure 15.16.
Figure 15.16. Approving updates.

4. From the drop-down box, select Install, and then click OK.
5. Select to Replace Any Existing Approvals and click OK.
6. The updates will then be approved.
Depending on the number of updates downloaded, the preceding steps might need to be repeated several times before all updates are approved.
A good approach to testing updates is to download them first on a client with direct access to Windows Update on the Internet. After the test server or workstation has successfully downloaded and all functionality has been verified, that particular security patch can be approved in WSUS for the rest of the corporate clients.
Automatically Configuring WSUS Clients via Group Policy
As previously mentioned, the Automatic Updates client can be downloaded from Microsoft and deployed on managed nodes, such as SharePoint farm members, either manually or through automated measures. Service Pack 3 for Windows 2000 includes the client by default, as does Service Pack 1 for Windows XP. After the client is installed, it can be configured to point to a WSUS server, rather than the default Internet Windows Update location.
The configuration of each client can be streamlined by using a Group Policy Object in an Active Directory environment. Windows Server 2003 domain controllers automatically contain the proper Windows Update Group Policy extension, and a Group Policy Object can be defined by following these steps:
1. Open Active Directory Users and Computers (Start, All Programs, Administrative Tools, Active Directory Users and Computers).
2. Right-click the OU that will have the group policy applied and click Properties.
3. Select the Group Policy tab.
4. Click the New button and name the group policy.
5. Click the Edit button to invoke the Group Policy Object Editor.
6. Expand the Group Policy Object Editor to Computer ConfigurationAdministrative TemplatesWindows ComponentsWindows Update, as illustrated in Figure 15.17.
Figure 15.17. Configuring Windows Update Group Policy settings.

7. Double-click the Configure Automatic Updates setting.
8. Set the group policy to be enabled, and configure the automatic updating sequence as desired. The three options given—2, 3, and 4—allow for specific degrees of client intervention. For seamless, client-independent installation, choose option 4.
9. Schedule the interval that updates will be installed, bearing in mind that some updates require reboots.
10. Click Next Setting to configure more options.
11. Click Enabled to specify the web location of the WSUS server. Entering the fully qualified domain name is recommended, as indicated in Figure 15.18. Enter both settings (usually the same server) and click OK to save the group policy settings.
Figure 15.18. Setting the WSUS server location via a group policy.

12. Repeat the procedure for any additional OUs. (The same group policy can be used more than once.)
Organizations that do not use Active Directory or group policies have to manually configure each client’s settings to include the location of the WSUS server. This can be done through a local policy or manually through Registry settings, as defined in the WSUS Help.
A useful trick for automating the testing of new WSUS patches is to deploy two WSUS servers and two sets of group policies. The first WSUS server serves as a pilot WSUS server, and all updates are approved as soon as they become available. A subset of the client population then points to this server through a GPO and installs the patches immediately. After the patch has been validated on this pilot group, the real WSUS server can then be set to approve the patch, deploying the update to the rest of the user population. This model requires more hardware resources but streamlines the WSUS update process.
Deploying Security Patches with WSUS
Depending on the settings chosen by the group policy or the Registry, the clients that are managed by WSUS will automatically download updates and install them on clients at a specified time. Some computers may be configured to allow for local interaction, scheduling proper times for the installation to take place and prompting for “drizzle” downloading.
Clients that are configured to use WSUS will not be prompted to configure their Automatic Update settings, and they will be grayed out to prevent any changes from occurring. Users without local administrative access cannot make any changes to the installation schedule, although local admin users can postpone forced installs.
Generally, it is good practice to allow servers to control the download and installation schedule, but to force clients to do both automatically. This is typically performed during off hours as reboots are required in some cases. Depending on the political climate of an organization, this may or may not be a possibility.
Deploying WSUS in an environment helps to realize control over an enterprise deployment such as a SharePoint 2007 farm. Therefore, in-depth knowledge of the software and how it can be configured is ideal for a SharePoint administrator.
Verifying Security Using the Microsoft Baseline Security Analyzer (MBSA)
Like Microsoft Office SharePoint Server 2007, Windows Server 2003 and Microsoft SQL Server 2005 also require the latest service packs and updates to reduce known security vulnerabilities. Microsoft offers an intuitive free downloadable tool, Microsoft Baseline Security Analyzer (MBSA), to streamline this procedure. This tool identifies common security vulnerabilities on SharePoint servers by identifying incorrect configurations and missing security patches for Windows Server 2003, IIS, and Microsoft SQL Server.
MBSA not only has the potential to scan a single SharePoint server, but it can also scan multiple instances of SQL Server if multiple instances are installed. The MBSA SQL Server scan detects and displays SQL Server vulnerabilities such as the following: members of the sysadmin role, weak or blank SQL Server local accounts and SA passwords, SQL Server Authentication mode, SQL Server on a domain controller, and missing service packs and updates.
The Microsoft system requirements for installing MSBA are as follows:
- Operating system must be Windows Server 2003, Windows XP, or Windows 2000.
- Internet Explorer must be version 5.01 or later.
- An XML parser such as the one available with IE 5.01 or MSXML version 3.0 SP2 must be available.
Installing MBSA
Installation of MBSA is straightforward, and it can be installed on any workstation in the network. To install, complete the following steps:
1. Download the latest version of the Microsoft Baseline Security Analyzer from the Microsoft website. The current link is http://www.microsoft.com/mbsa.
2. Double-click the MBSA installation file mbsasetup-en.msi to launch the installation.
3. At the Welcome screen shown in Figure 15.19, click Next to begin installation.
Figure 15.19. Microsoft Baseline Security Analyzer Setup Welcome screen.

4. Read and accept the license agreement; click Next.
5. Select the destination folder where the application will be installed. The default destination path is C:Program FilesMicrosoft Security Baseline Analyzer.
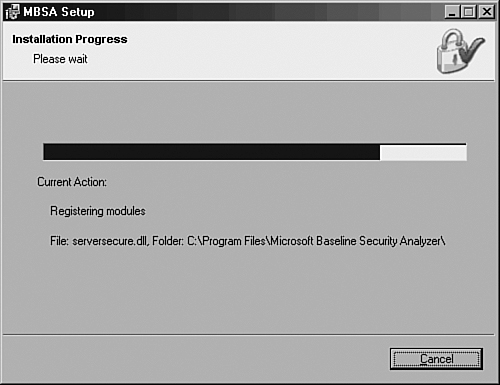
6. Click Install when ready. The application is installed automatically, as shown in Figure 15.20.
Figure 15.20. Installing MBSA.
7. Click OK when informed that MBSA is installed correctly.
Scanning for Security Vulnerabilities with MBSA
MBSA can scan a single computer or a range of computers based on an IP address, range of IP addresses, computer name, or all computers in a domain. The security scanner can identify known security vulnerabilities on several Microsoft technologies such as Windows, IIS, or SQL Server. In addition, MBSA can also identify weak passwords and missing service packs and updates.
To scan a SharePoint server for known SQL or Windows vulnerabilities, weak passwords, and security updates, follow these steps:
- Choose Start, All Programs, Microsoft Baseline Security Analyzer 1.2.
- Click Scan a Computer to pick the system to scan. An administrator also has the opportunity to scan more than one computer by either entering a valid IP address range or a domain name.
- On the next screen, enter the computer name or IP address of the desired SharePoint server. Select all options desired and click Start Scan, as shown in Figure 15.21.
Figure 15.21. MBSA computer scan and options screen.

Viewing MBSA Security Reports
A separate security report is generated for the desired server when the computer scan is completed. A report is generated regardless of a local or remote scan. Scan reports also are stored for future viewing on the same computer the MBSA tool was installed.
The MBSA security reports are intuitive and address each vulnerability detected. If MBSA detects a missing SQL Server service pack, Windows patch, or hotfix, it displays the vulnerability in the Security Update Scan section and provides the location that will focus on the fix.
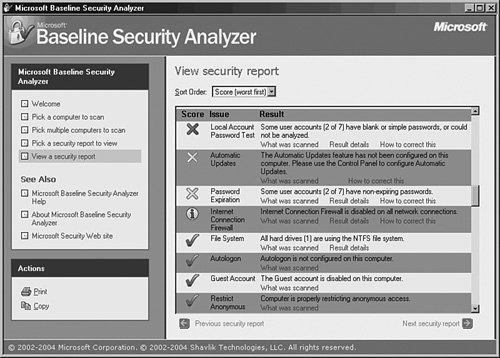
Review the security report generated from the scan conducted in the example, as shown in Figure 15.22. Each section scanned has a score associated with it. An end user or an administrator can easily browse each section identifying known security vulnerabilities, verifying what was scanned, checking the results, and analyzing how to correct any anomalies that MBSA detected.
Figure 15.22. MBSA security report.
Deploying Transport-Level Security for SharePoint
The very nature of interconnected networks requires that all information be sent in a format that can easily be intercepted by any client on a physical network segment. The data must be organized in a structured, common way so that the destination server can translate it into the proper information. This is especially the case for SharePoint environments. This simplicity also gives rise to security problems, however, because intercepted data can easily be misused if it falls into the wrong hands.
The need to make information unusable if intercepted is the basis for all transport-level encryption. Considerable effort goes into both sides of this equation: Security specialists develop schemes to encrypt and disguise data, and hackers and other security specialists develop ways to forcefully decrypt and intercept data. The good news is that encryption technology has developed to the point that properly configured environments can secure their data with a great deal of success, as long as the proper tools are used. SharePoint’s operating system, Windows Server 2003, offers much in the realm of transport-level security, and deploying some or many of the technologies available is highly recommended to properly secure important data.
Realizing Security by Deploying Multiple Layers of Defense
Because even the most secure infrastructures are subject to vulnerabilities, deploying multiple layers of security on critical network data is recommended. If a single layer of security is compromised, the intruder has to bypass the second or even third level of security to gain access to the vital data. For example, relying on a complex 128-bit “unbreakable” encryption scheme is worthless if an intruder simply uses social engineering to acquire the password or PIN from a validated user. Putting in a second or third layer of security, in addition to the first one, makes it that much more difficult for intruders to break through all layers.
Transport-level security in Windows Server 2003 uses multiple levels of authentication, encryption, and authorization to provide an enhanced degree of security on a network. The configuration capabilities supplied with Windows Server 2003 allow for the establishment of several layers of transport-level security.
Understanding Encryption Basics
Encryption, simply defined, is the process of taking intelligible information and scrambling it so as to make it unintelligible for anyone except the user or computer that is the destination of this information. Without going into too much detail on the exact methods of encrypting data, the important point to understand is that proper encryption allows this data to travel across unsecured networks, such as the Internet, and be translated only by the designated destination. If packets of properly encrypted information are intercepted, they are worthless because the information is garbled. All mechanisms described in this chapter use some form of encryption to secure the contents of the data sent.
Using Virtual Private Networks to Secure Access to SharePoint
A common method of securing access to SharePoint farms from across unsecured networks is to create a virtual private network (VPN), which is effectively a connection between two private nodes or networks that is secured and encrypted to prevent unauthorized snooping of the traffic between the two connections. From the client perspective, a VPN looks and feels just like a normal network connection to SharePoint—hence the term virtual private network.
Data sent across a VPN is encapsulated, or wrapped, in a header that indicates its destination. The information in the packet is then encrypted to secure its contents. The encrypted packets are then sent across the network to the destination server, using a VPN tunnel.
Examining VPN Tunnels
The connection made by VPN clients across an unsecured network is known as a VPN tunnel. It is named as such because of the way it “tunnels” underneath the regular traffic of the unsecured network.
VPN tunnels are logically established on a point-to-point basis but can be used to connect two private networks into a common network infrastructure. In many cases, for example, a VPN tunnel serves as a virtual WAN link between two physical locations in an organization, all while sending the private information across the Internet. VPN tunnels are also widely used by remote users who log in to the Internet from multiple locations and establish VPN tunnels to a centralized VPN server in the organization’s home office. These reasons make VPN solutions a valuable asset for organizations, and one that can be easily established with the technologies available in Windows Server 2003.
VPN tunnels can either be voluntary or compulsory. In short, voluntary VPN tunnels are created when a client, usually out somewhere on the Internet, asks for a VPN tunnel to be established. Compulsory VPN tunnels are automatically created for clients from specific locations on the unsecured network and are less common in real-life situations than are voluntary tunnels.
Reviewing Tunneling Protocols
The tunneling protocol is the specific technology that defines how data is encapsulated, transmitted, and unencapsulated across a VPN connection. Varying implementations of tunneling protocols exist and correspond with different layers of the Open System Interconnection (OSI) standards-based reference model. The OSI model is composed of seven layers, and VPN tunneling protocols use either Layer 2 or Layer 3 as their unit of exchange. Layer 2, a more fundamental network layer, uses a frame as the unit of exchange, and Layer 3 protocols use a packet as a unit of exchange.
The most common Layer 2 VPN protocols are the Point-to-Point Tunneling Protocol (PPTP) and the Layer 2 Tunneling Protocol (L2TP), both of which are fully supported protocols in Windows Server 2003 and are also natively available in Microsoft Internet Security and Acceleration (ISA) Server 2000 and 2004.
Outlining the PPTP and L2TP Protocols
Both PPTP and L2TP are based on the well-defined Point-to-Point Protocol (PPP) and are accepted and widely used in various VPN implementations. L2TP is the preferred protocol for use with VPNs in Windows Server 2003 because it incorporates the best of PPTP, with a technology known as Layer 2 Forwarding. L2TP allows for the encapsulation of data over multiple network protocols, including IP, and can be used to tunnel over the Internet. The payload, or data to be transmitted, of each L2TP frame can be compressed, and encrypted, to save network bandwidth.
Both PPTP and L2TP build on a suite of useful functionality introduced in PPP, such as user authentication, data compression and encryption, and token card support. These features, which have all been ported over to the newer implementations, provide for a rich set of VPN functionality.
Detailing the L2TP/IPsec Secure Protocol
Windows Server 2003 offers an additional layer of encryption and security by utilizing IP Security (IPsec), a Layer 3 encryption protocol, in concert with L2TP in what is known, not surprisingly, as L2TP/IPsec. IPsec allows for the encryption of the L2TP header and trailer information, which is normally sent in clear text. This also has the added advantage of dual-encrypting the payload, adding an additional level of security into the mix. IPsec is particularly useful in communications between SharePoint servers because information sent between members of a farm is unencrypted by default, making it more vulnerable to snooping.
L2TP/IPsec has some distinct advantages over standard L2TP, namely the following:
- L2TP/IPsec allows for data authentication on a packet level, allowing for verification that the payload was not modified in transit, and the data confidentiality provided by L2TP.
- Dual-authentication mechanisms stipulate that both computer-level and user-level authentication must take place with L2TP/IPsec.
- L2TP packets intercepted during the initial user-level authentication cannot be copied for use in offline dictionary attacks to determine the L2TP key because IPsec encrypts this procedure.
An L2TP/IPsec packet contains multiple, encrypted header information, and the payload itself is deeply nested within the structure. This allows for a great deal of transport-level security on the packet itself.
Examining Integration Points Between SharePoint and Public Key Infrastructure
The term Public Key Infrastructure (PKI) is often loosely thrown around but is not often thoroughly explained. PKI, in a nutshell, is the collection of digital certificates, registration authorities, and certificate authorities that verify the validity of each participant in an encrypted network. Effectively, a PKI itself is simply a concept that defines the mechanisms that ensure that the user who is communicating with another user or computer on a network is who he says he is. PKI implementations are widespread and are becoming a critical component of modern network implementations.
PKI is a useful and often critical component of a SharePoint design. The PKI concepts can be used to create certificates to encrypt traffic to and from SharePoint virtual servers to the Internet. Using SSL encryption is a vital method of securing access to a SharePoint site and should be considered as part of any SharePoint farm that enables access from the Internet.
Understanding Private Key Versus Public Key Encryption
Encryption techniques can primarily be classified as either symmetrical or asymmetrical. Symmetrical encryption requires that each party in an encryption scheme hold a copy of a private key, which is used to encrypt and decrypt information sent between the two parties. The problem with private key encryption is that the private key must somehow be transmitted to the other party without it being intercepted and used to decrypt the information.
Public key, or asymmetrical, encryption uses a combination of two keys mathematically related to each other. The first key, the private key, is kept closely guarded and is used to encrypt the information. The second key, the public key, can be used to decrypt the information. The integrity of the public key is ensured through certificates. The asymmetric approach to encryption ensures that the private key does not fall into the wrong hands and only the intended recipient will be able to decrypt the data.
Using SSL Certificates for SharePoint 2007
A certificate is essentially a digital document issued by a trusted central authority and used by the authority to validate user identity. Central, trusted authorities such as VeriSign are widely used on the Internet to ensure that software from Microsoft, for example, is really from Microsoft, and not a virus in disguise.
Certificates are used for multiple functions, such as the following:
- Secured SharePoint site access
- Secured email
- Web-based authentication
- IPsec
- Code signing
- Certification hierarchies
Certificates are signed using information from the subject’s public key, along with identifier information such as name, email address, and so on, and a digital signature of the certificate issuer, known as the certificate authority (CA).
Using Windows Server 2003 Certificate Services for SharePoint Servers
Windows Server 2003 includes a built-in CA known as Certificate Services. Certificate Services can be used to create and manage certificates; it is responsible for ensuring their validity. Certificate Services is often used to generate SSL certificates for SharePoint virtual servers if there is no particular need to have a third-party verify an organization’s certificates. It is common practice to set up a standalone CA for network encryption that requires certificates only for internal parties. Third-party CAs such as VeriSign are also extensively used but require an investment in individual certificates.
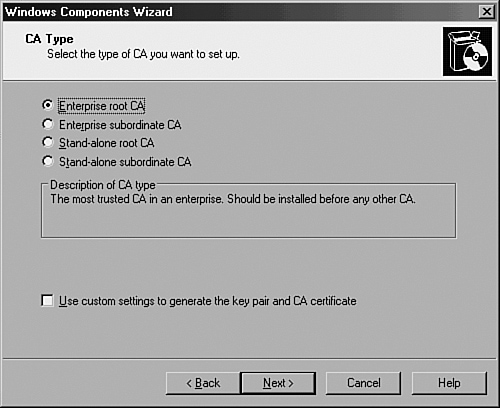
Certificate Services for Windows Server 2003 can be installed as one of the following CA types:
- Enterprise root CA—The most trusted CA in an organization and should be installed before any other CA. All other CAs are subordinate to an enterprise root CA.
- Enterprise subordinate CA—Must get a CA certificate from an enterprise root CA, but can then issue certificates to all users and computers in the enterprise. These types of CAs are often used for load balancing of an enterprise root CA.
- Standalone root CA—The root of a hierarchy that is not related to the enterprise domain information. Multiple standalone CAs can be established for particular purposes.
- Standalone subordinate CA—A standalone subordinate CA receives its certificate from a standalone root CA and can then be used to distribute certificates to users and computers associated with that standalone CA.
To install Certificate Services on a Windows Server 2003 Server, follow these steps:
1. Choose Start, Control Panel, Add or Remove Programs.
2. Click Add/Remove Windows Components.
3. Check the Certificate Services box.
4. A warning dialog box appears, as shown in Figure 15.23, indicating that the computer name or domain name cannot be changed after you install Certificate Services. Click Yes to proceed with the installation.
Figure 15.23. Certificate Services warning.

5. Click Next to continue.
6. The following screen, shown in Figure 15.24, allows you to create the type of CA required. Refer to the preceding list for more information about the different types of CAs that you can install. In this example, choose Enterprise Root CA, and click Next to continue.
Figure 15.24. Selecting the type of CA server to install.
7. Enter a common name for the CA—for example, CompanyABC Enterprise Root CA.
8. Enter the validity period for the CA, and click Next to continue. The cryptographic key is then created.
9. Enter a location for the certificate database and the database logs. The location you choose should be secure, to prevent unauthorized tampering with the CA. Click Next to continue. Setup then installs the CA components.
10. If IIS is not installed, a prompt appears, as shown in Figure 15.25, indicating that Web Enrollment will be disabled until you install IIS. If this box appears, click OK to continue. If IIS is installed, a message is displayed that indicates that IIS will be stopped to complete the installation. Click Yes to continue.
Figure 15.25. IIS warning in the CA installation procedure.
11. Click Finish after installation to complete the process.
Examining Smartcards PKI Authentication for SharePoint
A robust solution for a PKI network can be found in the introduction of smartcard authentication for users. Smartcards are plastic cards that have a microchip embedded in them; this chip allows them to store unique information in each card. User login information, and certificates installed from a CA server, can be placed on a smartcard. When a user needs to log in to a system, she places the smartcard in a smartcard reader or simply swipes it across the reader itself. The certificate is read, and the user is prompted only for a PIN, which is uniquely assigned to each user. After the PIN and the certificate are verified, the user can log in to the domain and access resources such as SharePoint.
Smartcards have obvious advantages over standard forms of authentication. It is no longer possible just to steal or guess someone’s username and password in this scenario because the username that allows access to SharePoint can be entered only via the unique smartcard. If stolen or lost, the smartcard can be immediately deactivated and the certificate revoked. Even if a functioning smartcard were to fall into the wrong hands, the PIN would still need to be used to properly access the system. Layering security in this fashion is one reason why smartcards are fast becoming a more accepted way to integrate the security of certificates and PKI into organizations.
Examining the Encrypting File System (EFS)
Just as transport information can be encrypted via certificates and PKI, so too can the NT File System (NTFS) on Windows Server 2003 be encrypted to prevent unauthorized access. The Encrypting File System (EFS) option in Windows Server 2003 allows for this type of functionality and improves on the Windows 2000 EFS model by allowing offline folders to maintain encryption sets on the server. EFS is advantageous, particularly for laptop users who tote around sensitive information, such as documents checked out of SharePoint document libraries. If the laptop or hard drive is stolen, these documents are worthless and inaccessible to the thief because they are scrambled and can be unscrambled only with the proper key. EFS is proving to be an important part in PKI implementations.
Integrating PKI with Non-Microsoft Kerberos Realms
The Windows Server 2003 Active Directory component can use the PKI infrastructure, which uses trusts between foreign non-Microsoft Kerberos realms and Active Directory. The PKI infrastructure serves as the authentication mechanism for security requests across the cross-realm trusts that can be created in Active Directory. After these trusts are in place, user accounts from these non-Microsoft Kerberos realms can be used to allow access to SharePoint sites.
Examining IPsec for Internal SharePoint Encryption
IPsec, mentioned briefly in previous sections, is essentially a mechanism for establishing end-to-end encryption of all data packets sent between computers. IPsec operates at Layer 3 of the OSI model and uses encrypted packets for all traffic between members.
IPsec is often considered to be one of the best ways to secure the traffic generated in an environment and is useful for securing both SharePoint servers and client workstations in high-risk Internet access scenarios and in private network configurations for an enhanced layer of security.
Reviewing the IPsec Principle
The basic principle of IPsec is this: All traffic between clients—whether initiated by applications, the operating system, services, and so on—is entirely encrypted by IPsec, which then puts its own header on each packet and sends the packets to the destination server to be decrypted. Because every piece of data is encrypted, this prevents electronic eavesdropping, or listening in on a network in an attempt to gain unauthorized access to data.
Several functional IPsec deployments are available, and some of the more promising ones are actually built in to the network interface cards (NIC) of each computer, performing encryption and decryption without the operating system knowing what is going on. Aside from these alternatives, Windows Server 2003 includes a robust IPsec implementation by default, which can be configured to use a PKI certificate network or the built-in Kerberos authentication provided by Active Directory on Windows Server 2003.
Detailing Key IPsec Functionality
IPsec in Windows Server 2003 provides for the following key functionality that, when combined, provides for one of the most secure solutions available for client/server encryption:
- Data privacy—All information sent from one SharePoint machine to another is thoroughly encrypted by such algorithms as 3DES, which effectively prevent the unauthorized viewing of sensitive data.
- Data integrity—The integrity of IPsec packets is enforced through ESP headers, which verify that the information contained within an IPsec packet has not been tampered with.
- Antireplay capability—IPsec prevents streams of captured packets from being resent, known as a “replay” attack, blocking such methods of obtaining unauthorized access to a system by mimicking a valid user’s response to server requests.
- Per-packet authenticity—IPsec uses certificates or Kerberos authentication to ensure that the sender of an IPsec packet is actually an authorized user.
- NAT Traversal—The Windows Server 2003 implementation of IPsec now allows for IPsec to be routed through current Network Address Translation (NAT) implementations, a concept defined more thoroughly in the following sections.
- Diffie-Hellman 2048-bit key support—Virtually unbreakable Diffie-Hellman 2048-bit key lengths are supported in the Windows Server 2003 IPsec implementation, essentially ensuring that the IPsec key cannot be broken.
Understanding IPsec NAT Traversal
As previously mentioned, IPsec in Windows Server 2003 now supports the concept of Network Address Translation Traversal (NAT-T). This support may prove to be vital for allowing IPsec traffic to run from SharePoint servers on an internal network to clients on the Internet. Understanding how NAT-T works first requires a full understanding of the need for NAT itself.
NAT was developed simply because not enough IP addresses were available for all the clients on the Internet. Because of this, private IP ranges were established (15.x.x.x, 192.168.x.x, and so on) to allow all clients in an organization to have a unique IP address in their own private space. These IP addresses were designed to not route through the public IP address space, and a mechanism was needed to translate them into a valid, unique public IP address.
NAT was developed to fill this role. It normally resides on firewall servers or routers to provide for NAT capabilities between private and public networks. Routing and Remote Access Service (RRAS) for Windows Server 2003 provides NAT capabilities, too.
Because the construction of the IPsec packet does not allow for NAT addresses, IPsec traffic has, in the past, just been dropped at NAT servers because there was no way to physically route the information to the proper destination. This posed major barriers to the widespread implementation of IPsec because many clients on the Internet today are addressed via NAT.
NAT-T, which is a new feature in the Windows Server 2003 IPsec implementation, was jointly developed as an Internet standard by Microsoft and Cisco Systems. NAT-T works by sensing that a NAT network needs to be traversed, encapsulating the entire IPsec packet into a UDP packet with a normal UDP header. NAT handles UDP packets flawlessly, and they are finally routed to the proper address on the other side of the NAT.
NAT-T works well but requires that both ends of the IPsec transaction understand the protocol so as to properly pull the IPsec packet out of the UDP encapsulation. With the latest IPsec client and server, NAT-T becomes a reality and is positioned to make IPsec into a much bigger success than it is today.
NAT-T was developed to keep current NAT technologies in place without changes. However, some implementations of NAT have attempted to make IPsec work natively across the translation without NAT-T. Disabling this functionality with NAT-T might be wise, however, because it might interfere with IPsec because both NAT-T and the NAT firewall will be attempting to overcome the NAT barrier.
Configuring Simple IPsec Between SharePoint Servers
IPsec is built in to Windows Server 2003 machines and is also available for clients. In fact, basic IPsec functionality can easily be set up in an environment running the Windows Server 2003 Active Directory because IPsec can use the Kerberos authentication functionality in lieu of certificates. It is a straightforward process to install and configure IPsec between SharePoint servers or clients and should be considered as a way to further implement additional security in a SharePoint environment.
The procedure outlined in the following sections illustrates the setup of a simple IPsec policy between a SharePoint server and a client on a network. In this example, the SharePoint server is SERVER7, and the client is CLIENT2.
Viewing the IPsec Security Monitor
To view the current status of any IPsec policies, including the ones that will be created in this procedure, the IPsec Security Monitor MMC snap-in on SERVER7 needs to be opened. The MMC snap-in can be installed and configured by following these steps:
1. Choose Start, Run, and type mmc into the Run dialog box. Click OK when complete.
2. In MMC, choose File, Add/Remove Snap-in.
3. Click the Add button to install the snap-in.
4. Scroll down and select IP Security Monitor; then click the Add button followed by the Close button.
5. The IP Security Monitor MMC snap-in should now be visible, as shown in Figure 15.26. Click OK.
Figure 15.26. Adding the IP Security Monitor MMC snap-in.
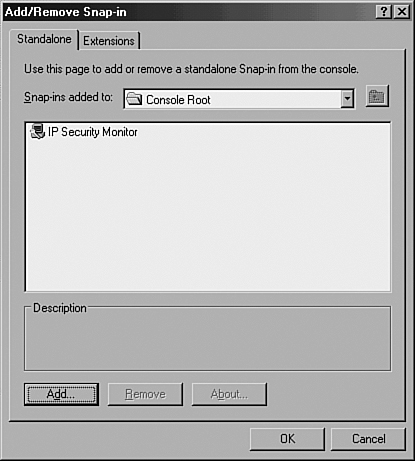
6. In MMC, expand to Console RootIP Security MonitorSERVER7.
7. Right-click SERVER7 and choose Properties.
8. Change the auto refresh setting from 45 seconds to 5 seconds or less. Click OK when finished. You can then use the MMC IP Security Monitor console to view IPsec data.
Establishing an IPsec Policy on the SharePoint Server
Default IPsec policies are enabled on Windows Server 2003 and newer clients. To access these settings, follow this procedure on SERVER7:
- Choose Start, All Programs, Administrative Tools, Local Security Policy (use Default Domain Controller Security Settings when the server is a domain controller).
- Navigate to Security SettingsIP Security Policies on Local Computer.
- In the details pane, right-click Server (Request Security) and select Assign.
The following three default IPsec policies available allow for different degrees of IPsec enforcement:
- Server (Request Security)—In this option, the server requests but does not require IPsec communications. Choosing this option allows the server to communicate with other non-IPsec clients. It is recommended for organizations with lesser security needs or those in the midst of, but not finished with, an implementation of IPsec, because it can serve as a stop-gap solution until all workstations are IPsec configured. This option does allow for some of the enhanced security of IPsec but without the commitment to all communications in IPsec.
- Client (Respond Only)—This option allows the configured machine to respond to requests for IPsec communications.
- Secure Server (Require Security)—This is the most secure option, and stipulates that all network traffic be encrypted with IPsec. This policy effectively locks out other types of services not running IPsec and should be set only if a full IPsec plan has been put into place.
Establishing an IPsec Policy on the Client
The SharePoint client, CLIENT2, likewise needs to be configured with a default IPsec policy, in a similar fashion to the server policy defined in the preceding section. To configure the client on Windows XP, follow these steps:
- Choose Start, All Programs, Administrative Tools, Local Security Policy. (Administrative Tools must be enabled in the Task Manager view settings.)
- Navigate to Security SettingsIP Security Policies on Local Computer.
- Right-click Client (Respond Only) and select Assign, as shown in Figure 15.27.
Figure 15.27. Creating a Client IPsec policy.
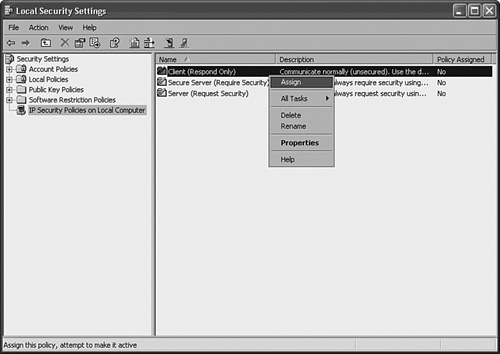
Verifying IPsec Functionality in Event Viewer
After the local IPsec policies are enabled on both CLIENT2 and SERVER7, IPsec communications can take place. To test this, either ping the server from the client desktop or perform other network tests, such as accessing SERVER7’s SharePoint site.
A quick look at the IP Security Monitor that was established in MMC on SERVER7 shows that IPsec traffic has been initialized and is logging itself, as shown in Figure 15.28.
Figure 15.28. Viewing IP Security Monitor logging.
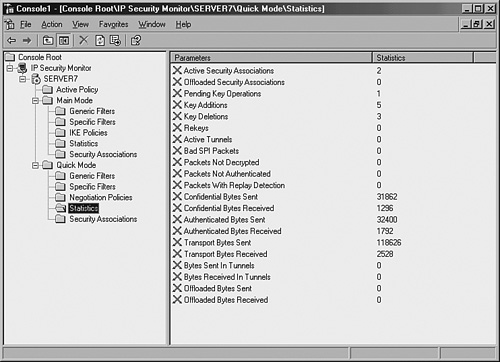
In addition to using the IP Security Monitor to log IPsec traffic, the Security log in the Event Viewer on SERVER7 can be used to check for IPsec events. Filter specifically for Event ID 541, which indicates successful IPsec communications, as shown in Figure 15.29.
Figure 15.29. Viewing an IPsec Event log success entry.
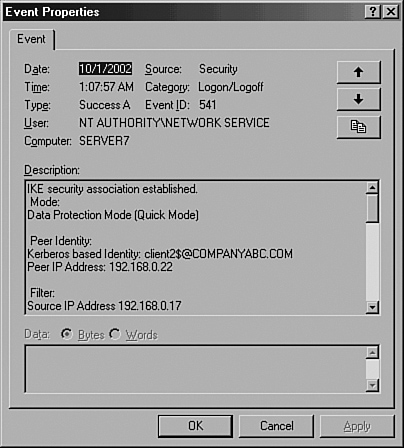
These default IPsec policies are useful in establishing ad hoc IPsec between SharePoint clients on a network but are limited in their scope. Enterprisewide IPsec policies can be accomplished through the use of group policies, however. Proper planning of an enterprise IPsec implementation is necessary to effectively secure an entire environment using custom IPsec policies.
Summary
SharePoint in combination with Windows Server 2003 comes fully loaded with a wide variety of security mechanisms, tools, and techniques to help protect and secure data within the environment. Without a full understanding of these tools, however, it can be difficult if not impossible to properly secure a SharePoint 2007 environment.
Using a layered approach to security with SharePoint, it becomes possible to deploy multiple lines of defense against hackers, scripts, or snoops. SharePoint combines its integrated security with the security capabilities of the Windows Server 2003 operating system and the lockdown capabilities of the Security Configuration Wizard, allowing for robust file security, transport security, and physical security. All these options make SharePoint a formidable product, ready for enterprise deployment.
Best Practices
- Use a layered approach to security, with more than one mechanism in place to deter attackers.
- After validating in a prototype environment, apply the latest patches and updates on SharePoint servers to further protect the server against attack.
- Use the Security Configuration Wizard (SCW) to harden a SharePoint server and reduce the surface attack area.
- Use the Microsoft Baseline Security Analyzer (MBSA) tool to verify the security of SharePoint servers.
- Use Secure Sockets Layer (SSL) certificates on any SharePoint traffic that traverses a public network such as the Internet.
- Use an internal Public Key Infrastructure (PKI) deployment with Windows Server 2003 Certificate Services to generate SSL certificates for SharePoint if third-party certificates are not being used.
- Physically secure SharePoint servers behind locked doors and in secure locations.
- Consider the use of IPsec to encrypt traffic between SharePoint servers.
- Turn on SQL auditing so that failure attempts or potentially all access is audited.
- Design SharePoint with isolation approaches to security in mind.
- Use Server Security templates to secure the Windows Server 2003 operating system that SharePoint runs on, but ensure that the security settings are tested in advance.
- Restrict login access to SharePoint servers.
- Consider the use of PKI smartcards for user authentication to SharePoint.
- Reset the SQL SA password to a cryptic setting to prevent attacks against that account.
- Consider the use of VPNs to secure remote access to internal SharePoint sites from the Internet.
- Limit anonymous access to SharePoint farms that do not contain any proprietary information.
- Enable password and account lockout policies on SharePoint servers.
- Consider the use of Windows Server Update Services (WSUS) to provide patch management to a SharePoint farm.