Chapter 7. Using Libraries and Lists in SharePoint 2007
IN THIS CHAPTER
Lists and libraries are two key components of the SharePoint 2007 environment. They allow users to manage documents by uploading them to libraries or to manage rows and columns of information in a list, which is similar to a spreadsheet in many ways. This chapter presents a high-level overview of each standard library and list provided by SharePoint Server 2007 and points out which are offered in Windows SharePoint Services 3.0. Relatively simple samples are provided to illustrate the new and improved features in each list or library.
For those readers not experienced with SharePoint 2003, information is provided in each section to help explain the main features of each list and library and help explain their benefits. Additional attention is paid to the new and exciting features provided in SharePoint 2007 and how weaknesses and holes in SharePoint 2003 functionality have been addressed. This allows both new and experienced SharePoint users to get a sense of how their organization might benefit from the default lists and libraries in SharePoint 2007.
The standard tasks that a site administrator would typically perform are covered in Chapter 8, “Managing Libraries and Lists in SharePoint 2007,” which builds on the content provided in this chapter, to provide additional information on the standard management tasks required to customize and maintain sites and workspaces. Also, for some additional design and planning information, see Chapter 2, “Planning and Architecting a SharePoint 2007 Deployment,” and Chapter 4, “Planning the SharePoint 2007 User Environment.”
SharePoint 2007 Libraries
Many users wonder what the difference is between just continuing to store their files in a file share on a network share, keeping them on their local hard drives to make sure they are close at hand, or emailing them to people when needed. SharePoint document libraries offer a variety of features that have proven to be useful to a wide range of users and projects and that empower the site administrators to customize the storage and collaborative features of the library and enhance user productivity. Some of the advantages provided by a SharePoint document library include the following:
- The administrator of a document library has a great deal of control over who can add, modify, and delete documents, or just read them.
- Versioning can be turned on for a document library that keeps a complete copy of previous versions of the document for reference or recovery purposes.
- Alerts can be set on a document within the library or for the entire library so that the user receives an email notification if a document is modified, added, or deleted.
- Documents can be checked out, with the name of the person who has the document checked out listed in the library, so that other users can’t modify the document.
- A template can be stored in the document library that can be used to create a new document that is stored in the library by default.
- Metadata can be added to a document library that enables users to better describe what the document contains, which client it belongs to, how many pages it is, or pretty much any other kind of textual or numeric information.
- Views can be created that group documents by certain criteria, sort them by any of the columns in the library, or only display documents that meet certain criteria.
- The ability to search within the library for text contained within the document is a feature often not available on a corporate network. In addition, the ability to search the metadata associated with a document.
- If the organization decides on certain standards for the customization of a document library, it can create a template that can be used in other sites.
Although most users of SharePoint 2003 document libraries are a little suspicious at first, and might even complain about learning yet another software application, they tend to quickly appreciate the features that make their working day easier. For example, the fact that only the latest version shows up in the document library means that they don’t have to worry that they are in fact editing the latest and greatest version. Also, notes can be used when viewing the different versions, so a user can quickly see notes on changes other people have made. Site administrators quickly come to appreciate the ability to add new columns of information to a document library that help them manage their documents and help their users quickly find the exact document they are looking for. For example, by simply adding a column called Client, a Sales Manager can make it clear which client a document was created for. In addition, if you provide a column titled Value of Opportunity, the total dollar amount of the proposal can easily be seen without opening the document.
Still, there were areas that many users found lacking, and client after client searched for third-party products, hired developers to create solutions, or simply educated their users about the following:
- It wasn’t clear to users that just clicking the document name would open the document in Read-Only mode and that the proper procedure for editing was to access the drop-down Edit menu, check out the document, and then select Edit in Microsoft Office Word.
- There was no way to enforce a check out of a document, which led many users to question the usefulness of this feature, when it could easily be avoided.
- Document libraries lacked an undelete feature. If a user accidentally deleted a document, there was no way to easily recover it. There is no “undo” button in a document library, nor does the document get moved to a “Recycle Bin.” Often, a whole site would need to be restored just to recover one document.
- Users could only set an alert that would send an email alert to their personal address, and couldn’t set it for a group or another person, a feature that many managers and administrators ask for.
- No workflow functionality was built in. Workflow enables documents to be routed from one person to another, typically in order, to facilitate the approval or completion of the document. An effective workflow has additional features to escalate if documents aren’t reviewed within a certain time window.
- If documents were uploaded in groups, metadata was not applied to each document.
As the remainder of this section demonstrates, SharePoint Server 2007 provides most of these improvements, along with a number of additional enhancements.
Using SharePoint 2007 Libraries
A SharePoint 2007 document library maintains the look and feel of the SharePoint 2007 site that houses it, as shown in Figure 7.1. There are several changes from the format of a document library in SharePoint 2003. One immediately apparent difference is that the Quick Launch menu doesn’t change when the document library is opened; it looks the same as on the Home page of the site (in this case the Unleashed1 site). However, the functionality previously offered in the Quick Launch area is still available but has been relocated to the toolbar. The Views list that was previously available in the Quick Launch menu area is now available in the toolbar in the main area, above and to the right of the list of documents. The actions (Alert Me, Export to Spreadsheet, and Modify Settings and Columns) have also moved from the Quick Launch bar in SharePoint 2003 to the menu bar in SharePoint 2007. This toolbar now offers drop-down functionality, which is a much more efficient use of space.
Figure 7.1. Shared Documents view with Edit drop-down menu.

The column headings that display in this default view (Type, Name, Modified, Modified By) provide a good starting point for simple document libraries and can be modified by a site administrator or other user with sufficient rights (as discussed in Chapter 8).
Another improvement in the general capabilities of a document library in SharePoint Server 2007 is in the area of search: The drop-down menu for search scopes (that shows All Sites in Figure 7.1) offers the default options of This List, This Site, All Sites, and People. In SharePoint 2003, the user only had the option of searching the items in the list or library, and couldn’t search the site that contained the list or library, nor could users search all sites. Searching is covered in greater detail in Chapter 13, “Benefiting from the Enhanced Search Capabilities in SharePoint 2007.”
As shown in Figure 7.1 and indicated by the arrow, a document that has been checked out is marked by a different icon than one that hasn’t been checked out. This icon for a checked-out document has a small green arrow in the lower-right corner. This is an improvement over SharePoint 2003, where the Checked Out To column had to be included in the view to see that a document was checked out. However, for a user to see who has the document checked out in SharePoint 2007, the Checked Out To column needs to be displayed in the All Documents view or another standard view.
Exploring the Toolbar in a SharePoint 2007 Document Library
Following is a summary of the features offered in the different toolbar menus in a SharePoint 2007 document library (as shown in Figure 7.1). These tools allow the user to perform a great number of tasks quickly and easily within the library, from adding new documents from a template, to uploading one or multiple documents, to connecting to Outlook, adding columns, and exporting to Microsoft Access.
Because the options provided can change based on the privileges of the user, the groups that can perform the different tasks are listed in the following sections. This removes one of the issues from SharePoint 2003 where users could click some management links and even complete information on a screen before they were prompted to authenticate.
The New Menu
The New menu is fairly self-explanatory and enables a user with the Add Items permission for lists and libraries to launch a template document that can be modified and saved by default back to the library. By default, members of the Approvers, Designers, Hierarchy Managers, Members, and Owners groups, or users with those specific rights, can create a new document. Other users won’t see this option on the toolbar.
When selected, this menu by default offers two options: New Document or New Folder. If Allow Management of Content Types is selected for the document library advanced settings, additional content types can be selected. Content types are discussed later in Chapter 8. In short, templates and content types give the site administrators a great deal of flexibility in creating a template document, or set of template documents that a user can choose from when creating a new document in a SharePoint 2007 document library. In SharePoint 2003, you could only create one template for a document library or list.
The Upload Menu
The Upload menu offers two choices: Upload Document or Upload Multiple Documents. By default, members of the Approvers, Designers, Hierarchy Managers, Members, and Owners groups, or individuals with these specific rights, can upload one or more documents to a document library. Other users will not see this menu on the toolbar.
When uploading one or more files, the user can opt to Overwrite Existing Files by checking this box in the Upload Document page. If versioning is enabled in the library, the user will get a different option: Add as a New Version to Existing Files.
Figure 7.2 shows the upload multiple documents interface. The left side offers a navigation pane so that the user can find the desired documents, and then the boxes next to the document names need to be checked and the OK button clicked for the upload to commence. Although multiple boxes can be checked, whole folders cannot be checked, nor can files from multiple folders be uploaded simultaneously.
Figure 7.2. Upload Multiple Documents window.

The Actions Menu
The Actions menu offers a number of different and powerful options and is context sensitive based on the privileges of the user logged in. This menu is visible to all users who can access the document library, but Home Visitors, Quick Deploy Users, and Restricted Readers will have somewhat limited abilities, as described in more detail in the following list:
- Edit in Datasheet—This option is available to members of the Approvers, Designers, Hierarchy Managers, Members, and Owners groups, and to users with these specific rights applied. Other users get the option to View in Datasheet. When a user selects this option, the contents of the document library display in a spreadsheet fashion, as shown in Figure 7.3, and additional tools become available. Generally, the Datasheet view is used to rapidly enter recurring text for columns of metadata that are editable. Note also that in this view the widths of columns can be adjusted, and a drop-down menu for sorting becomes available, as indicated by the arrow in Figure 7.3.
Figure 7.3. Datasheet view of Shared Documents library with filter menu shown and task pane open.

To access these additional tools, the arrow on the right side of the document library (circled in Figure 7.3) should be clicked, and the task pane will expand. This task pane includes the following tools as indicated by icons in the upper portion of the task pane: Cut, Copy, Paste, Undo, Sort, Remove Filter/Sort, and Help. Note that using the Copy command to copy an entire row in the library in the default view that includes the Name, Modified, and Modified By columns and then selecting an entire separate row will result in an error message: “The selected cells are read only.” Note that the Actions drop-down menu offers additional options when in Datasheet view: Show in Standard View, New Row, Task Pane, Totals, and Refresh Data.
As shown in Figure 7.3 there is a column titled Document Status with the entry Draft in the top row, but nothing in the cells below it. The Copy and Paste tools could be used to copy the text “Draft” in the Document Status column and paste it in the cells below it. If a whole row is selected, the Cut tool sends the item to the Recycle Bin. A pleasant surprise is that the Help button brings up context-sensitive help that provides additional information on the topic.
Below these tools in the Office Links section of the task pane the user can access additional tools—Track This List in Access, Export to Access, Report with Access, Query List with Excel, Print with Excel, Chart with Excel, Create Excel PivotTable Report.
These tools are generally more applicable to lists than document libraries but a document might contain information that would be useful to export to Access, or might be extensive enough that an Excel query would be required. Using the Print with Excel option is also handy because printing directly from Internet Explorer doesn’t provide much flexibility.
If the user accesses the Actions menu while in Datasheet view, she will see different options, which are context sensitive and include the following: Show in Standard View, New Row, Task Pane, Totals, Refresh Data.
Make sure that the standard desktop is compatible with Datasheet views; otherwise, users will be filing help desk tickets when they try to access this feature. The following are requirements for the Datasheet view:
- Per Microsoft, Office 2007 must be installed on your computer. However testing with Office 2003 showed normal functionality, but with the “old” task pane from SharePoint 2003.
- Install the Microsoft Office Access Web Datasheet Component that is included with 2007 Office release on your computer. This is also a requirement for Office 2003 and is found on the Office 2003 Professional CD.
- Internet Explorer 5.01 with Service Pack 2 (SP2) or later is required to open the list in Datasheet view.
- Make sure security settings in the browser support Microsoft ActiveX controls.
It is probably worth creating a FAQ posting on this issue because it is a common question among end users.
- View in Datasheet—If the user doesn’t have edit rights in the document library, he will only see the option of View in Datasheet. These includes members of the Quick Deploy Users group and Restricted Readers group and users with these specific rights. This view is still useful for sorting or seeing the Totals row.
- Open with Windows Explorer—A nice new option in SharePoint 2007, when this is selected a separate Explorer window opens and provides standard Explorer functionality, with the complete toolbar along the top with File, Edit, View, Tools, Help options (in Windows XP Pro). SharePoint 2003 offers the Explorer view, which changed the view within the library view area but didn’t provide the full range of Explorer menu options, making some tasks difficult. The user’s rights in the document library are still respected, so right-clicking an item and deleting it won’t delete it from the library, nor can an item be added via the Explorer window if the user doesn’t have appropriate rights.
In SharePoint 2003, users would sometimes get an error when trying to use the Explorer view because the URL length exceeded the allowed number of characters. SharePoint 2007 gives you an error if your URL path exceeds 260 total characters in length. The actual error reads, “The specified file or folder name is too long. The URL path for all files and folders must be 260 characters or less (and no more than 128 characters for any single file or folder name in the URL). Please type a shorter file or folder name.”
- Connect to Outlook—This topic is covered in Chapter 10, “Using Word, Excel, and Excel Services with SharePoint 2007.” It allows the user to connect a SharePoint library to Outlook 2007.
- Export to Spreadsheet—Similar to the commands available from the task pane that is available in the Datasheet view, the Export to Spreadsheet action opens Excel 2007 (or Excel 2003). This feature is covered in Chapter 10.
- View RSS Feed—When selected, this option opens the listfeed.aspx page, as shown in Figure 7.4, which gives the user a chance to see what the content of the document library will look like when accessed through the RSS feeder functionality in SharePoint 2007. Note that this functionality is not supported in Internet Explorer 6. When the user clicks the arrow next to the document statistics (circled in Figure 7.4), he will be taken to the View Properties page for that item.
Figure 7.4. View RSS Feed page.
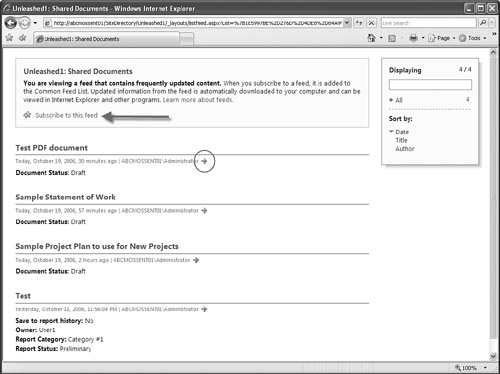
If the user clicks the Subscribe to This Feed link in Internet Explorer 7 (indicated by the arrow in Figure 7.4), he will be prompted for the following information in an Internet Explorer window—Name for the feed, folder to create the feed in, and an option to create a new folder.
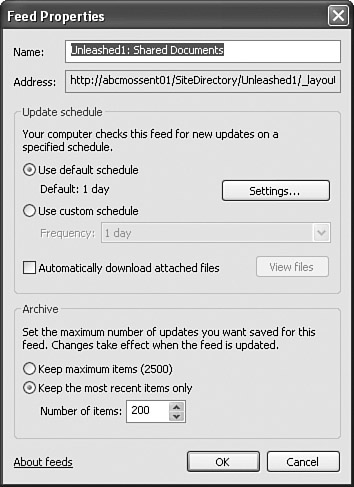
When the user has subscribed, he is given the option to View My Feeds, and Internet Explorer 7 will show the Favorites menu with the Feeds option selected. This enables a user to keep in touch with the contents of a document library. Internet Explorer 7 allows users to customize the feed properties after a feed has been selected. Figure 7.5 shows the options available in this interface. Feeds can be checked for updates every 15 minutes, 30 minutes, 1 hour, 4 hours, 1 day, 1 week. Other options include automatically marking feed as read when reading a feed, playing a sound when a feed is found for a web page, automatically downloading attached files, and setting the maximum number of updates you want saved for the feed.
Figure 7.5. Feed Properties window.
- Alert Me—As shown in Figure 7.6, the alerting feature has a number of improvements over alerts in SharePoint 2003. A great improvement is the ability to enter multiple email addresses that alerts will be sent to. Distribution lists can also be added, which will delight many managers and project managers. The types of changes, as shown in Figure 7.6, are the same as in SharePoint 2003, but there is an added level of granularity, as shown in Figure 7.7, that can specify that an alert only gets sent when someone else changes a document (as opposed to the user getting an alert that he changes a document, which is generally not that useful), or if a document I created or last modified is changed. This is also useful because document library users are typically more concerned about documents they created or recently modified.
Figure 7.6. New Alert page (1 of 2).

Figure 7.7. New Alert page (2 of 2).

The final option in the Send Alerts for These Changes section is interesting. The drop-down menu after the Someone Changes an Item That Appears in the Following View option shows any views that have filters associated with them. This opens up a whole new level of granularity for alerts. An example of how this is useful is a case where a view has been created that only lists documents where the Status value equals Final. Therefore, the user setting the alert would only be alerted if a document that meets this filter criteria changes. Some end-user training might be required to give examples of how powerful filters now are. Also, note that in the When to Send Alerts section, alerts can be sent immediately, via a daily summary, or via a weekly summary that sends on a specific day, at a specific time.
The Settings Menu
The Settings menu is available only to members of the Designers, Hierarchy Managers, and Owners groups, or with these specific rights. These features technically fall under the management topic, and so are covered in detail in the next section “Managing SharePoint 2007 Libraries.”
The View Menu
The View menu on the right edge of the toolbar is available to members of all groups, but only members of the Designers, Hierarchy Managers, and Owners groups can modify or create views. The processes involved in modifying and creating views are covered in the section “Creating Views in Document Libraries.”
- All Documents—The All Documents view is a standard view that provides the user with basic information about the documents stored in the library: Type, Name, Modified, and Modified By.
- Explorer View—Similar to the view offered in SharePoint 2003, the Explorer view (which is different from the action Open with Windows Explorer) displays the contents of the document library in an Explorer type environment, where certain standard commands are available and right-clicking an item brings up standard Explorer commands. Figure 7.8 shows a document library in Explorer view. Note that a graphics file has been right-clicked, and the menu includes the Scan tool (which launches McAfee) and Resize Picture tool (a Windows XP Power Toy). Many users rely on this view to cut and paste multiple documents into SharePoint.
Figure 7.8. Explorer view in a document library.

- Modify this View—This option is only available to members of the Designers, Hierarchy Managers, and Owners groups, and is covered in the section “Creating and Using Views in Document Libraries.”
- Create View—As with the preceding option, this is only available to members of the Designers, Hierarchy Managers, and Owners groups, and is covered in the section “Creating and Using Views in Document Libraries.”
Edit Menu Options for Documents
The Edit menu that displays when users hover their mouse over the document name, as shown in Figure 7.9, offers a number of options, each of which is covered in the next sections.

View Properties
As shown in Figure 7.10, a variety of tools are made available after View Properties has been selected from the drop-down menu: Edit Item, Delete Item, Manage Permissions, Manage Copies, Check In, Workflows, Alert Me. Once again, these are shown based on the permissions of the user accessing the document library. Each of these commands is addressed in the following sections.
Figure 7.10. View Properties page.

Edit Properties
This option displays the metadata associated with the item and allows the user, if he has the appropriate permissions, to modify this data. For the document in Figure 7.10, the metadata includes Name, Title, and Document Status, as shown in Figure 7.11. Document Status is a column added to the document library that allows the user to set the status of the document to Draft, Final, In Review, or Published. Note that there is a Delete Item button in the toolbar, and a Spelling button (which opens a Spell Checker window). Content types can also be changed from this view. The version of the document is shown, too, based on the settings for versioning in the document library; also shown are the created date and user information for the creator, and the last modified date and user information on the person who last modified the document.
Figure 7.11. Edit Properties page.

Manage Permissions
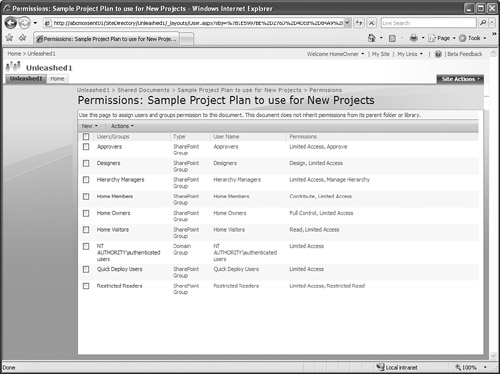
Some sites inherit their permission settings from the parent folder or library, in which case permissions cannot be customized in this screen. A user with the Manage Lists permissions (Designers, Hierarchy Managers, and Owners) can select Edit Permissions from the Actions menu, which will copy the permissions from the parent folder or library and then allow them to be edited, as shown in Figure 7.12.
Figure 7.12. Edit Document permissions.
Note that folders now can have permissions assigned to them! They will by default inherit the permissions of the library (the “parent") that contains them. If Edit Permissions is selected for the folder, however, a message will be shown that reads as follows: “You are about to create unique permissions for this folder. Changes made to the parent folder or document library permissions will no longer affect this folder.”
SharePoint 2007 adds this additional step of permission granularity to folders and to documents contained in document libraries. This can present quite a challenge for IT staff who need to educate site administrators and end users about this level of complexity. A good rule of thumb is to “keep it simple” to begin with, when users and SharePoint administrators are learning, and to consider using different document libraries rather than different permissions on folders within a document library. This was a required practice in SharePoint 2003 because folders and items within a document library had to share the permissions of the document library. By creating separate libraries (one for documents that are generally available, and one for “top secret” documents, for example), there is also less chance for human errors that might accidentally change the settings for a document and suddenly make it visible to everyone.
Edit in Microsoft Office Application
This option allows users with Edit Items privileges (Approvers, Designers, Hierarchy Managers, Members, and Owners) to open the document in the associated Microsoft Office application. This process and limitations are covered in Chapter 10 and Chapter 11, “Leveraging Additional Office 2007 Products in a SharePoint 2007 Environment.”
Delete
Users with Delete Items permissions (Approvers, Designers, Hierarchy Managers, Members, and Owners) can send the item to the Recycle Bin, where it can be restored or permanently deleted by users who have rights to access the Recycle Bin.
Send To
This capability was often requested by users of SharePoint 2003 document libraries who wanted an easy way to email a document to a co-worker (or even themselves!) or “publish” the document to another location. Although the Explorer view in SharePoint 2003 allowed some of this functionality, it involved some additional steps, so it is handy to have this functionality accessible through the Edit menu. The options available when Send To is highlighted include the following:
- Other Location—As shown in Figure 7.13, the destination must be a URL to a SharePoint document library, and a copy of the document is being made. A different filename can be given to the document, such as adding “Published” or “Copy” to the title, and the user can request that any copies be updated whenever the original is checked in. This makes it easy for the user who follows the process of checking out the original document, editing it, and checking it in to update any copies that are still linked to the original (see the Caution that follows).

An alert can also be generated when the document is updated, as shown in Figure 7.13. A Copy Progress window appears when OK is clicked to verify all the information is accurate, and an Internet Explorer window might appear warning of the security risk of copying the file to another SharePoint location.
Fortunately, there is a relatively easy way to know how many copies are floating around by accessing the View Properties link on the Edit menu, and then clicking Manage Copies. Figure 7.14 shows a sample screen where there are two copies of the document on another SharePoint server (abcwssv301), one of which will prompt for updates, the other of which will not.
Figure 7.14. Manage Copies page.

Note that the heading in Figure 7.14, “Copies that do not prompt for updates,” really means “these copies won’t get updated.” This is true even if the Update Copies action is clicked in this same window (as indicated by the arrow in Figure 7.14). So, if a user of one of the copies of the original document decides to edit it, it might be overwritten. Therefore, it is recommended that documents be copied to libraries that are read-only. If one of these copies is edited in the additional locations, the user is prompted with a message that the document is a copy and given a choice to Go to Source Item or Unlink the Item. However, users might not understand the ramifications of this message and not realize that their changes might be overwritten.
- E-mail a Link—When this is clicked, Outlook opens, and an email opens that includes a link to the document.
- Create Document Workspace—This topic is covered in Chapter 9, “Designing and Managing Pages, Workspaces, and Sites in SharePoint 2007.”
- Download a Copy—This gives the user the options Open or Save, with the intention that the user is going to save a copy outside of SharePoint 2007. When this document is saved elsewhere, it no longer has a connection to the SharePoint 2007 environment.
The Check-Out and Check-In Process
This is widely considered one of the more important features of a document management system, and it is vastly improved in SharePoint 2007. Administrators can now force a check out before editing can take place, as discussed in the “Managing SharePoint Libraries” section. In addition, a user can now check out a document and save it to a SharePoint Drafts folder in the My Documents folder. If the user chooses this option, she can edit the document even if she is offline and can’t connect to the SharePoint 2007 server.
The “Basic” Check-Out Process
To check out a document (and not use local drafts), edit it, and then check it back in, follow these steps:
1. Access the Edit menu for a document.
2. Click Check Out. A window will appear that gives the option to Use My Local Drafts Folder. If this box is checked, the document will then be available for offline editing. Uncheck the box, click OK, and when the process completes, the document will be marked as checked out with a green arrow in the icon for the document.
3. Access the Edit menu, and select Edit in Microsoft Office Word (or applicable Office product). The document will then open for editing.
4. When the changes are complete, you can save the changes by clicking the save icon or accessing the File menu and choosing Save. You can then check in the document by accessing the Microsoft Office button, choosing the Server menu, and then selecting Check In, as shown in Figure 7.15.
Figure 7.15. Check In option from Word 2007.

5. You are then asked to determine the Version Type, as shown in Figure 7.16, which can be a Minor Version (draft), Major Version (publish), or Overwrite the Current Minor Version. Comments can be added at this point, too. Comments are helpful to let others know what specific changes have been made. One helpful bit of information to provide is the areas of the document that have been changed (pages, sections, tabs, line items, and so on). The final option is that you can Keep the Document Checked Out After Checking In This Version. This allows you to reserve the document so that others can’t edit it.
Figure 7.16. Check In options window in Word 2007.

Additional information on the options available from other Office 2007 applications is provided in Chapter 9.
The Local Drafts Check-Out Process
This process is slightly different but is the default behavior when a user checks out a document (because the check box next to Use My Local Drafts Folder is checked by default). To edit the document and then save back to the SharePoint 2007 document library, follow these steps:
1. Access the Edit menu for a document and click Check Out. Then, leaving the Use My Local Drafts Folder box checked, click OK.
2. If you then click the document name in an attempt to edit the document, you will see a File in Use window, as shown in Figure 7.17.
Figure 7.17. File in Use message.

3. Or, if you access the Edit menu and then click the Edit in Microsoft Office Word option, which logic would dictate is the appropriate step, you also get the File in Use window. This is because a copy of the file has been saved to your my Documents folder in the SharePoint Drafts folder.
4. So instead, the you must navigate to this folder on your local system, and then open it by double-clicking the file, or by opening it from the appropriate Office application. After it has been opened, you can make changes, save it, and then close it.
5. To upload the document to the SharePoint 2007 document library, you use a standard uploading method, such as accessing the document library and clicking the Upload button. You then browse to your SharePoint Drafts folder and upload the document.
6. As shown in Figure 7.18, you then enter the standard information for a document upload, and ideally keep the Add as a New Version to Existing Files box checked, and then click OK.
Figure 7.18. Upload Document window.

7. You then verify or modify the information in the Properties window, as shown in Figure 7.19, and click Check In. Note in Figure 7.19 that the user has decided to label this as a Final document in the Document Status metadata drop-down menu.
Figure 7.19. Document Properties window.

8. The document will then be fully checked in, and you will be in the document library. Note that a copy of the document still exists in your SharePoint Drafts folder, so this should be cleaned up periodically.
Overriding Check Outs
Checking in a document can be performed by the user who checked out the document or an administrative resource, and by users with the Override Check Out list permission (Approvers, Designers, Hierarchy Managers, and Home Owners). When users with these permissions check in a document, they receive this message: “The document documentname has been checked out by Username since date and time. Do you want to override this check out now?”
Discard Check Out
A user can decide to discard the check out altogether. If she chooses this option, she is prompted to confirm. If she clicks OK, the check out is undone. Note that if the document was checked out without saving a copy to the SharePoint Drafts folder, and changes were then made and saved to the checked-out document, but the document was not checked in, when the Discard Check Out option is chosen, these changes are lost. However, if the Use My Local Drafts Folder option was chosen when the document was checked out, changes were made and saved, and then the Discard Check Out option is used, the changes still exist in the local copy of the file.
As the previous section describes, the Check Out, Check In, Discard Check Out, and Use My Local Drafts Folder options are somewhat complex. The best way to familiarize users with the different options is to have them attend classroom training where they can work through different scenarios with others with a trainer’s assistance.
Versioning in SharePoint 2007
SharePoint 2003 products only supported major versions, so it was hard for someone viewing the version history of a document to tell whether one version was more significant than another. Although companies can use major and minor versions in different ways, typically a major version contains more important changes and should be preserved, whereas minor versions can be deleted. This helps to reduce the number of versions taking up database space in SharePoint.
A SharePoint user with appropriate privileges can decide whether to save only major versions, or whether to also save minor versions. Limits to the number of major and minor versions that a document library will retain can also be set. A number up to 99,999 can be entered. So, for example, a site administrator might decide to allow both major and minor versions, and to save 10 major versions and 2 minor versions (drafts) for each major version, allowing for some rollback and history of each major version, but controlling the total number retained.
When users choose Publish a Major Version, they can then add comments, and when they click OK, the version is published. Figure 7.20 shows the versions saved for a document, which includes the 1.0 version that was just published.
Figure 7.20. Versions window showing major and minor versions.

If another user with appropriate permissions decides that this does not qualify as a major version, that user can “demote” it by selecting Unpublish This Version. Then when that user clicks OK in the confirmation window, it will be unpublished. As shown in Figure 7.21, which shows the versions information for the same document after it has been unpublished, what had been version 1.0 is now demoted to version 0.6, with User1 listed as the individual who modified it.
Figure 7.21. Versions window after the Unpublish command was used.

Figures 7.20 and 7.21 give views of the Version History information for the document Company XYZ SharePoint findings and recommendations.doc. If the information in the Modified column is selected with the mouse, a drop-down menu is provided, with the options View, Restore, and Delete. Figure 7.22 shows the results of using the Restore command on an older version (version 0.4).
Figure 7.22. Versions after a minor version restore.

Workflows
Workflows are a much-requested feature in SharePoint; they further enhance the features of a document library. Although alerts are nice, and even more useful in SharePoint 2007, someone still needs to set them when certain criteria are met. Built-in workflows, on the other hand, operate in more of a push fashion. Also with alerts, users can decide they want to turn off their alerts, defeating the usefulness of alerts as a form of workflow. Figure 7.23 shows the basic options for workflows that can be accessed by Approvers, Designers, Hierarchy Managers, Home Members, and Home Owners. The two default workflows are Approval and Collect Feedback.
Figure 7.23. Workflows window.

Workflows are discussed in Chapter 21, “Using Designer 2007 to Extend SharePoint 2007 Workflows and Customize the User Experience.”
Alert Me
Alerts were covered in the “Exploring the Toolbar in a SharePoint 2007 Document Library” section earlier in this chapter. By selecting Alert Me in the Edit menu for a document, the user has access to a subset of the options for an alert provided in the toolbar. The Change Type options—All Changes, New Items Are Added, Existing Items Are Modified, Items Are Deleted, and Web Discussion Updates—aren’t offered because they don’t apply when the alert is on a specific document. Note also that the Someone Change an Item That Appears in the Following View option is not available either when setting an alert on a single item. Figure 7.24 shows the My Alerts on This Site page, which shows the alerts that will be sent out immediately, which include two documents, and alerts that will be sent out daily, and that apply to a document library. So this page makes it clear which alerts are on libraries and lists, and which are on individual items.
Figure 7.24. My Alerts on this Site page.

Other Types of Libraries in SharePoint 2007
The previous section provided a walkthrough of the different tools available from within a document library. This section covers the different standard libraries available to a site administrator. A user must have the Manage Lists permission to create new lists or libraries. To create a new library, the user needs to click the Site Actions drop-down menu from a site home page and then select Create. The user is then presented with a variety of options. In SharePoint Server 2007, these options are as follows:
- Document Library
- Form Library
- Wiki Page Library
- Picture Library
- Translation Management Library
- Report Library
- Data Connection Library
- Slide Library
In Windows SharePoint Services version 3, these options are as follows:
- Document Library
- Form Library
- Wiki Page Library
- Picture Library
Because the document library has already been covered in the previous section, the focus of this section is the remaining libraries, with an emphasis on the new features and advantages of each.
Form Library
These libraries are designed to house and manage XML-based forms, such as those created by InfoPath. This topic is covered in depth in Chapter 23, “Exploring Business Process and Business Intelligence Features in SharePoint 2007.”
Wiki Page Library
Wiki libraries have become increasingly popular over the past several years and are considered essential collaboration environments for many companies. The environments allow a number of users to collaborate on one “document” that is fluid in nature, and it can contain a wide variety of content types and offer tracking tools to keep track of most recent changes, including who made them. In SharePoint 2007, wiki page libraries support pictures, tables, hyperlinks, and wiki linking.
Creating a Wiki Page Library
When a wiki page library is created, the creator needs to provide a name, description, and decide whether it will be displayed on the Quick Launch menu. After the library has been created, some helpful information is displayed, which includes a link to How to Use This Wiki Library. If clicked, the resulting page provides information on editing wiki pages, creating links to pages, creating pages, managing your wiki library, restoring a page, and viewing incoming links. This information is helpful to new users and helps them understand the SharePoint 2007 wiki library capabilities.
Figure 7.25 shows a sample wiki library page that is being used by the Company ABC team to create a proposal for Company XYZ. Note that this page includes a company logo at the top of the page, formatted text, and a link to a separate wiki page (circled in Figure 7.25); and note the link to View All Pages (indicated by the arrow in Figure 7.25) in the lower-left corner.
Figure 7.25. Home page of a wiki library.

Tools Available in the Wiki Library
If the Edit link in the toolbar is clicked, the user is provided with a familiar set of editing tools, as shown in Figure 7.26. Text can be edited, cut, and pasted; tables can be created; hyperlinks can be added; pictures can be pasted (provided they are available via a URL); and as indicated by the arrow in Figure 7.26, the HTML source can be edited, so simple formatting items such as the horizontal line below the Company ABC logo can be added. A spell checker is also made available.
Figure 7.26. Edit page for a wiki page.

The History link in the toolbar allows the user to browse through different iterations of the page, as shown in Figure 7.27, and see what changes were made in that version, and choose to delete or restore a previous version. This view does not show changes in web parts, images, or HTML formatting, but does show items that were deleted or added, as visible in the text, where some items are crossed out and others highlighted. The Version History link in the toolbar provides a view of the different versions without the highlighting of changes, and this can also be used to view, delete, and restore other versions.
Figure 7.27. History page for a wiki page.

View All Pages provides the user a view of the different wiki pages in the library, as shown in Figure 7.28. Note that in the resulting AllPages.aspx view, the standard document library menus are provided: New, Actions, Settings, View, and Site Actions. The Recycle Bin is also available. As shown in Figure 7.28, the Edit menu provides the same basic options: View Properties, Edit Properties, Manage Permissions, Edit In, Delete, Send To, Check Out, Version History, and Alert Me. This adds another dimension of power to the wiki pages in the library.
Figure 7.28. View All Pages in a wiki library.

Picture Library
Picture libraries share many similarities with document libraries but have some additional tools that facilitate working with image files. Of immediate interest are the different views. The All Pictures Thumbnails view is shown in Figure 7.29, and the other standard views are Details and Filmstrip. The Actions menu provides the tools shown in Figure 7.29: Edit (opens the Office Picture Manager), Delete, Download, Send To, View Slide Show, Open with Windows Explorer, Connect to Outlook, View RSS Feed, and Alert Me.
Figure 7.29. Sample picture library.

As with SharePoint 2003, the picture library has limitations in terms of which file types it can display; so if the organization has specific needs for support of certain file types, some research might be needed to ensure that the standard picture library will suffice.
When you are uploading multiple pictures, the Office Picture Manager opens, which allows the selection of multiple graphics files and provides tools for editing the pictures, viewing their properties, changing the filename, and choosing a different file type or resolution. There are limitations to the file types that the Office Picture Manager will support, and allow you to upload, so you might have to use the regular Add Picture command to upload nonsupported files.
The file types that the Office Picture Manager can edit and will preview are as follows:
- .gif (Graphic Interchange Format)—These can be viewed, edited, and compressed. Animated .gif files cannot be viewed, and if they are edited will save over the original file.
- .jpeg, .jpg, .jpe, .jfif (jpeg/jiff extensions)—These can be viewed, edited, and compressed.
- .bmp (Windows OS/2 Bitmapped Graphics)—These can be viewed, edited, and compressed.
- .png (Portable [Public] Network Graphics)—These can be viewed, edited, and compressed.
- .wmf, .emf (Windows metafile and Extended or Enhanced Windows metafile)—These can be viewed and compressed, or saved to a different file format that can be edited.
- .tif, .tiff (Tagged Image File Format)—The first page can be viewed and edited, and the file compressed. This can cause issues for multipage scanned documents.
Many companies make extensive use of .pdf file formats, as a safe way to deliver documents electronically, and many copiers produce .pdf output that is perfect for processing items such as copies of original documents or copies of receipts for expense reports. Although the picture library doesn’t display a Thumbnails view of a .pdf file, if the Adobe Reader is installed (7.0.8 was tested), a user can click the blank thumbnail in the Thumbnails view, and the Adobe Reader will open displaying the image. In the Filmstrip view, if the blank thumbnail is selected, the user has the option of clicking Open Item, and the Adobe Reader will display it.
If you use the Explorer view from the Actions menu, additional file editing tools might be available. For example, Microsoft offers several Power Toys for XP (www.microsoft.com/windowsxp/downloads/powertoys/xppowertoys.mspx), including the RAW Image Thumbnailer and Viewer and Image Resizer. RAW images are created by many digital cameras, and the Image Resizer offers a quick and easy way to change the resolution of graphic images.
Translation Management Library
This library is designed to manage documents that need to be translated, and so has a fairly specialized audience in mind. A Translation Management workflow can be included in the library that brings additional functionality to the library.
Report Library
Another specialized library, a report library, is designed to track and manage reports and can create dashboard pages. Because this is a complex topic that leads into additional business intelligence features in SharePoint 2007, Chapter 22 covers the capabilities of this library and of dashboard pages.
Data Connection Library
These libraries store Office Data Connection (ODC) files (.odc), which describe connections to external data and metadata about these files. ODCs can describe the connection between an Excel spreadsheet and external data sources or for an InfoPath form.
A data connection library allows these connections to be defined and managed locally; so if the logical location of the data changes, it can be centrally changed and managed, without needing to update each spreadsheet.
Slide Library
A slide library is intended to receive slides from Microsoft PowerPoint, and so the Upload menu only provides one option: Publish Slides: Publish New Slides to This Slide Library from Microsoft Office PowerPoint. If this option is chosen, PowerPoint opens, and the user can then choose a PowerPoint document and choose any of the slides (or all of them) to upload.
This is an excellent way to facilitate management and reuse of individual PowerPoint slides. To create a presentation from slides in a slide library, follow these steps:
- Select the appropriate slides from the list by checking the box on the left side. The selection needs to be within one folder, however; so the process will need to be repeated if items from different folders need to be copied to a presentation.
- Click the Copy Slide to Presentation tool on the toolbar, as shown in Figure 7.30, and then choose from the options to Copy to a New Presentation; or if a PowerPoint presentation is open, choose Copy to an Open Presentation. And the option Keep the Source Presentation Format and the option Tell Me When This Slide Changes can also be selected. Click OK.
Figure 7.30. Sample slide library.

Each slide in the library is actually a PowerPoint file, as can be demonstrated by right-clicking the document name in the All Slides view and selecting Save Target As and saving to a local folder. This might increase the total size of the PowerPoint presentation, so some experimentation is recommended before a large number of slides are uploaded to the slide library.
SharePoint 2007 Lists
Arguably, just as important as document libraries, lists provide a huge range of tools to end users and administrators, project managers, customers, and partners. A list presents information in columns and rows, much as a spreadsheet does, and then provides special features suited to the purpose of the list. A number of people can work on a SharePoint 2003 list at the same time, facilitating collaboration much more easily than trying to share an Excel spreadsheet.
SharePoint 2003 provided a number of standard lists that offered special features for specific users. In SharePoint 2003, an Announcements list included an expiration date for announcements, after which they would no longer appear. The Events list offered several different calendar-type views and could generate meeting workspaces. The Issues list could send an email to an individual when an item was assigned to that person and keep a running log of notes added to the list. A Survey list allowed site administrators to create surveys and then see a graphical summary of the responses. The Discussions list offered a bare-bones but functional way for threaded discussions to take place.
Along with the specialized features and functions, lists offered many of the features of document libraries. Attachments could even be added to a list item, but versions of that attachment wouldn’t be tracked. Approvals could be required for a list item before it became visible to the general public. A form of item-level security is available in SharePoint 2003 lists, because list users can be limited to only seeing their own items (useful in a survey) or editing nothing, only their own items or all items. New columns could be added and views created, and a list could be created from scratch or based on an existing Excel spreadsheet.
As with document libraries, there were a number of areas where end users wanted additional functionality:
- Formatting content in lists could be time-consuming and the results less than perfect.
- There was no undelete or Recycle Bin available in a list. If you deleted a line item, or a whole list, it was gone for good.
- Printing from a list rarely yielded the results users were looking for, so the contents would need to be exported to Excel and then formatted for printing.
- The Tasks list did not interact with Outlook tasks, which was counterintuitive to many users.
- The Events list exported read-only items to Outlook but couldn’t import peoples’ calendars or roll up a group of calendars.
- Surveys had limitations on how many of each type of column could be added, limiting the complexity of the survey.
- Discussion lists had a number of limitations, one of which was not being able to view the item that was being responded to.
- No workflow functionality was built in.
The following sections cover the new standard offerings in SharePoint 2007 and highlight the enhanced features.
Using SharePoint 2007 Lists
SharePoint 2007 lists offer a similar set of tools to users as document libraries. As shown in Figure 7.31, the New, Actions, and Settings menus are visible, as is the drop-down View menu. If the user hovers over the Item Name field, the drop-down Edit menu becomes available. The features offered by the different standard lists are detailed in the following sections.
Figure 7.31. Sample Announcements List view.

The standard lists available in SharePoint 2007 and Windows SharePoint Services version 3 are as follows:
- Announcements list
- Contacts list
- Discussion Board list
- Links list
- Calendar list
- Tasks list
- Project Tasks list
- Issue Tracking list
- Survey list
- Custom list
- Custom list in Datasheet view
- KPI list (SharePoint Server 2007 only)
- Languages and translators (SharePoint Server 2007 only)
- Import spreadsheet
Announcement Lists
Announcement lists are a great way to share time-sensitive information with site users. Figure 7.32 shows a sample announcement on the home page of a top-level site. Note that a graphic image is included, the text is nicely formatted, and the bulleted items are actually hyperlinks to additional content on the company’s intranet.
Figure 7.32. Announcement list on a home page.

Some improvements in the Announcement lists include the following:
- Versioning is now available in lists, which was not possible in SharePoint 2003 products. SharePoint 2007 lists do not allow for major and minor versions; but if the option to Require Content Approval for Submitted Items is activated, drafts of submitted items can be retained.
- The number of versions can be limited as with document libraries, and if the option to Require Content Approval for the list is selected, the number of drafts that are kept for approved versions can be selected. This feature helps to limit the number of versions that are retained.
- Users who can see draft items are now configurable to include any user who can read items, only users who can edit items, or only users who can approve items (and the author of the item).
- An option to Open with Access is now available in the Actions menu.
- Formatting tools are improved, with the option of now working with HTML code to facilitate precise formatting of announcements. Figure 7.33 shows the edit page for an announcement. The arrow indicates the Edit HTML Source button, and the Text Entry – Webpage Dialog window at the bottom of the figure shows a portion of the HTML code used to display the content. Note also that a Spelling tool is available in the toolbar.
Figure 7.33. Edit an announcement page with HTML code.

Contacts List
The Contacts list in SharePoint 2003 was an excellent place to store information about members of a team, department, or group that created a site or workspace, and for tracking external contacts of interest. One limitation was that although contacts could be imported from Outlook 2003, or exported to Outlook 2003, the links weren’t dynamic, so changes wouldn’t replicate. When users were adding contacts to a SharePoint 2003 Contacts list, they could be imported from Outlook, but there was an awkward step involved of giving SharePoint 2003 permission to access the Outlook folder. SharePoint 2007 Contacts lists offer a more customizable connection between the Contacts list and Outlook 2007.
A user can just click the New menu and enter information from scratch, or she can use the Connect to Outlook option from the Actions menu. When this is clicked, the user is asked whether she wants to Connect This SharePoint Contacts List to Outlook, and can then choose to modify additional options by clicking the Advanced button, as shown in Figure 7.34. If she clicks Yes, a new folder is created in Outlook 2007 based on the name provided in the SharePoint List Options window (shown in Figure 7.34). Changes made to this contact in Outlook 2007 are then synchronized to the SharePoint 2007 list and vice versa.
Figure 7.34. Connecting a SharePoint 2007 Contacts list to Outlook 2007.

Contacts that exist within a SharePoint 2007 Contacts list can also be exported from the Edit menu by clicking Export Contact or by clicking View Item in the Edit menu and then choosing Export Contact. The user exporting the contact is then asked whether he wants to open or save the file, and the file type is .vcf or vCard File format. If a picture has been added to the contact, however, it won’t be exported.
As with other SharePoint 2007 lists, versioning can be turned on, which is a good way to keep track of changes made to contacts in the list. Alerts are also available on the list as a whole or individual items. With these features, users can actually use a Contacts list to keep track of more than just basic contact information; they can also keep track of activities that take place with different contacts.
Additional connectivity features between Outlook 2007 and SharePoint 2007 are discussed in Chapter 10.
Discussion Board List
SharePoint 2007 provides a greatly improved Discussions list. As shown in Figure 7.35, the Subject view shows only the top-level discussion topics. If a user clicks the subject, the threaded discussion is then shown. Although this differs significantly from the performance of many public discussion groups, it is functional and should meet the needs of most organizations. Figure 7.36 shows the Threaded view. Note that the replies are slightly indented to show which topic they apply to. A Flat view is also available that does not indent items.
Figure 7.35. Subject view in Team Discussion list.

Figure 7.36. Threaded view in Team Discussion list.

One of the biggest problems with the SharePoint 2003 Discussions lists was the inability to see the topic that a reply was being posted for. This caused many people to cut and paste the original item into their reply, causing quite a bit of clutter. In addition, when replying to a post, the replier can edit the post (referred to as a “quoted message") to pare it down, or highlight the sentence he is focusing on, and ideally, enhance the communication. Figure 7.37 shows an example of the rich text editing field in a reply.
Figure 7.37. Reply window in Team Discussion list.

Links List
A fairly straightforward list, the Links list allows the user to enter URLs, provide a title, and include some description of the content of the URL. The URLs can refer to internal sites, SharePoint sites, workspaces, or even documents or list items. Additional columns and metadata can be added if needed. An important element of Links lists is the ability to change the order in which they appear in the Summary view on the home page of the site. This feature is included, as it was in SharePoint 2003, and in SharePoint 2007 it is located in the Actions menu.
Figure 7.38 shows the Change Item Order page for a list library. Note that unlike SharePoint 2003, the change order screen doesn’t include the URL for the link, so you’ll want to make sure the name of the link accurately reflects the important elements of the link. The arrows indicate three links: one to Colligo, one to Convergent, and one to Microsoft. Note that the Colligo link name makes it clear that the URL points to a product they have that relates to SharePoint, whereas the Convergent Computing link is vague, and the Microsoft one is specific, but would normally be filed under O because it starts with Office. This is not a problem if there are only a few links; if there are dozens or hundreds, however, a user might not think to look under Office when looking for a Microsoft link. A better solution is to name the Microsoft link Microsoft: Office.Microsoft.com/SharePoint Server.
Figure 7.38. Change Item Order window in a Links list.

Calendar List
The Calendar list offers quite a number of enhancements and turns a regular SharePoint list into a powerful scheduling and collaboration tool. The improvements from SharePoint 2003 are significant and welcome and are evident from the moment the Calendar list is opened. The presentation of the calendar is much more polished, and it looks similar to the new Outlook 2007 calendars. There is a mini calendar in the Quick Launch area that allows the user to jump quickly from one year to another or from one month to another.
Figure 7.39 shows a sample Calendar list with several items added: two vacations, a recurring weekly meeting on Mondays, another on Wednesdays, and several other events. On the 15th of the month, as indicated by the arrow in Figure 7.39, the text “1 more item” makes it clear that there is another item taking place that day. Clicking the Expand All link above the Calendar view will also show the additional items. The calendar item on the 18th of the month, circled in Figure 7.39, is titled “Test Migration Process (See Workspace)” to make it clear that there is a meeting workspace that has been created for this meeting. Otherwise, someone viewing the calendar items wouldn’t know there was a meeting workspace for this item unless he clicks the item, which brings up the DispForm.aspx page, or the View Item page.
Figure 7.39. Month view in a Calendar list.

Figure 7.40 shows the NewForm.aspx page, which is opened when the user clicks New Item in the New menu. This page requires the entry of a title for the event, the start time, and the stop time, and allows other information to be entered, such as description and location. A new option is available for a meeting, the option to Make This an All-Day Activity That Doesn’t Start or End at a Specific Hour. The option to Use a Meeting Workspace to Organize Attendees, Agendas, Documents, Minutes, and Other Details for This Event is also provided. Workspaces are covered in Chapter 9.
Figure 7.40. Creating a repeating meeting in the Calendar list.

One item to note, and be wary of, is that if a start time is entered, the end time doesn’t change to a default 30 minutes later, as Outlook 2003 or 2007 does, so the end time needs to be entered, too. If the meeting is not recurring, this means that the user needs to spend extra time selecting the start time, the start date, and then the end time and end date.
Interestingly, if the meeting is saved with the end time before the start time (which might happen if the user forgets to change the end time and date because the default date is the current date), SharePoint 2007 will incorrectly start the meeting at the earlier time! So, SharePoint 2007 looks at the spanned time, but isn’t checking that the start time and date are actually before the end time and date.
If a user clicks View Item from the Edit menu, she has the option to Export Event, which will save the item to an .ics iCalendar file in the location of her choosing. This can then be dragged into an Outlook 2007 calendar. Or, the user can connect the whole calendar to Outlook by clicking Connect to Outlook in the Actions menu. A new calendar will be created containing the events in the SharePoint 2007 Calendar list. Clients have been excited to hear that users can now add appointments in Outlook to this calendar, and these events will be synchronized to the SharePoint 2007 Calendar list, assuming they have appropriate rights. Some Outlook features such as reminders are not supported in the SharePoint 2007 Calendar list, but the basic event will be synchronized. An Outlook 2007 user can also drag and drop an appointment from his personal calendar to the SharePoint 2007 exported calendar and will be warned that “Any incompatible content will be removed during the next synchronization.” The original version of each affected item will be preserved in the Local Failures folder. Also, although the start and stop time are retained, the actual day is not, so a user could drag an appointment from one day to a different day and not realize it. So, some training for end users is important.
If a user tries to create a meeting request (as opposed to a appointment) in the Outlook 2007 calendar that was exported from SharePoint 2007, and invites other people, this will not successfully synchronize to the SharePoint 2007 Calendar list. The user will also get an error message when the request is sent: “Responses to this meeting request will not be tallied because this meeting is not in your main Calendar folder. Is this OK?” If the person clicks OK and then synchronizes Outlook 2007, an error message will be received that starts off, “Failed to copy one or more items because some are not compatible with SharePoint....”
Tasks List
Task lists are an essential management tool that facilitate day-to-day operations of a department, activities that need to be performed by a group, or specific, well-defined steps that need to take place in a complex project, such as a marketing, engineering, or IT project. SharePoint 2007 provides both a Tasks list and Project Tasks list, the first of which is discussed in this section and the second in the next section.
Figure 7.41 shows a New Item page for a Tasks list. The fields are fairly self-explanatory, and of course new fields can be added if the existing fields don’t provide enough granularity. The choices in drop-down menus, Priority and Status, can also be modified, as discussed in Chapter 8. Note that the Assigned To field now allows the entry of a name or partial name, and a click of the Check Names button (indicated with an arrow in Figure 7.41) will check Active Directory or the profiles database for a match. In SharePoint 2003, only the names of users who were assigned by name to the site or the list, or had actually visited the site if they were part of a group given permission to the site or list, were made visible. This could limit the usefulness of the Assigned To field, because if a new site was created, and Active Directory or SharePoint cross-site groups were used to provide access to the site or list, only users who had actually visited the site or list would show up! Often, a manager would need to track people down and request that they visit the site so that they could have tasks assigned to them! Or, individuals would have to be assigned by name, reducing the usefulness of Active Directory and SharePoint groups.
Figure 7.41. New Item page in a Tasks list.

A number of other improvements and new features are worth highlighting. The views offered include All Tasks, My Tasks, Due Today, Active Tasks, By Assigned To, By My Groups. The new By My Groups option will show any tasks assigned to a group that the currently logged-on user is a member of. Because tasks can only be assigned to one individual or to one group, this is a helpful way of assigning a task to a group rather than one person. A natural thought is that this could lead to confusion, because it might not be clear which member of a group, if anyone, is actually working on the task. If a task that has been assigned to a group is edited by a member of that group, however, he has the opportunity to choose Claim Task from the toolbar. This will then assign the task to that individual and alert the other members of the group that the task has been reassigned. Now if another member of the group checks to see whether the task is being worked on, it will be clear that someone has claimed it.
A list administrator has the option to Send E-mail When Ownership Is Assigned, which is a feature that in SharePoint 2003 was not available in Tasks lists, only in Issues lists, a fact that confused many users and caused people to actually modify the Issues list so that it could be instead used as a Tasks list.
The Actions menu provides the tool Connect to Outlook. If selected, this will ask the users if they want to Connect This SharePoint Task List to Outlook, and will provide access to the Advanced options. The tasks will then display in an Outlook 2007 Tasks list, as shown in Figure 7.42. Tasks that have been completed are shown crossed out, and tasks that are overdue are in red (indicated by arrows in Figure 7.42). These tasks can be dragged and dropped to the user’s own task list in Outlook 2007.
Figure 7.42. Tasks list items after being connected to Outlook 2007.

Some caution is needed because a user with sufficient rights who moves a task out of the task list after it has been connected to Outlook 2007, will actually remove the item from the SharePoint 2007 Tasks list after the two are synchronized, making it appear as if the item has been deleted from the SharePoint 2007 Tasks list. And, this “deleted” item will not show up in the Recycle Bin in the SharePoint 2007 Tasks list. So, users should be informed of this behavior.
If the Create Visio Diagram link is selected from the Actions menu, and Visio 2007 is installed, a useful management tool is automatically created in Visio. This is discussed in more detail in Chapter 11.
Project Tasks List
The Project Tasks list looks very much like a Microsoft Project Gantt chart, when using the default Project Tasks view, as can be seen in Figure 7.43, because it provides a Gantt chart in the upper half of the Web Part view and a list of tasks below it. The items listed in the Title column in the Gantt-style chart are hyperlinks to the view of the task, and the actual bars are for viewing purposes only and can’t be stretched or shortened as in Microsoft Project. The completion percentage for a task is reflected in the bar, with the darker portion of the bar representing the percentage of the task that is completed. Columns cannot be added or removed from the top chart, but it still offers a nice visual summary of task status.
Figure 7.43. Project Tasks view in a Project Tasks list.

It is nice to see that printing produces quite acceptable results, with both Internet Explorer 6 and Internet Explorer 7 only printing the contents of the Gantt-style chart and the listed items below, instead of the print jobs from SharePoint 2003, which printed everything on the screen, resulting in unacceptable results in most cases.
Issue Tracking List
The Issue Tracking list is designed for tracking issues of interest to the group using the site. Typically, these have to do with delivery of the services that the group provides. In SharePoint 2003, an Issues list allowed an email to be sent to the person to which an issue was assigned, making it well suited for use as a lightweight help desk application. The list also tracked comments, but each time the item was edited, the Comments field would be blank, and the previous comments would display as belonging to the last version. SharePoint actually created a different entry for each edit, which led to some interesting item ID numbers, sometimes confusing users. Also, there wasn’t by default an enduring “description” field, so a basic requirement for most users was to add a description field that stayed static, while the comments field rolled over each time the item was edited.
SharePoint 2007 has fixed these basic issues and added more functionality in the Related Issue field, as shown in Figure 7.44. There is now a Description field that is persistent, so a thorough description of the issue can be entered that is immediately evident when a user views the item. Only one person can be assigned to the issue. The Related Issues area now shows a list of all other items in the Issue Tracking list, and one or more can be added to the issue, as circled in Figure 7.44. The comments entered in the Comments field show up tagged with the information of the user who entered them when the issue is later viewed, as shown in Figure 7.45. This view is informative because it includes a full description of the issue and an efficient summary of the comments that have been added. As indicated by arrows, the Related Issues are hyperlinks, so a user can just click a related issue to review the details. Also, because a person who viewed a previous version of the issue might have changed more than just the comments, the dates listed in the Comments section (one of which is circled in Figure 7.45) open up the full version of the issue. So, if the Description or Assigned To fields were changed, there is a record.
Figure 7.44. Adding a new issue in an Issue Tracking list.

Figure 7.45. Viewing an issue in an Issue Tracking list.

Survey List
Surveys are quite useful to solicit input from SharePoint users. They can be used for basically any purpose (for instance, requesting input on the design of a site, or the components of the site, or on more specific topics such as company initiatives or marketing campaigns). In SharePoint 2003, many users requested more control over the formatting of the surveys, because in many cases they were hard to read, and users didn’t like scrolling down one page and wanted page breaks.
Before creating a survey list, the administrator should think about the purpose of the survey, who will be able to respond to it, whether names will be displayed, whether the survey will be anonymous, and whether multiple responses from an individual will be allowed. It is also a good idea to have a few users test the survey and give their input on whether it is clear and easy to answer.
An introduction to the survey should be drafted prior to creating the survey, and then included in the description section to let people know what the purpose of the survey is, whether their responses will be anonymous, and whether they can change their submissions or complete more than one survey. Figure 7.46 shows a sample description that provides this level of information to a visitor in the New page for a survey list. This screen also allows the administrator to choose whether survey names will be shown in the survey results; if not, then the Created By column will only show the three asterisks (***), not the actual user’s name. The New page also allows the administrator to decide whether users can provide multiple responses or just one.
Figure 7.46. Creating a Survey list.
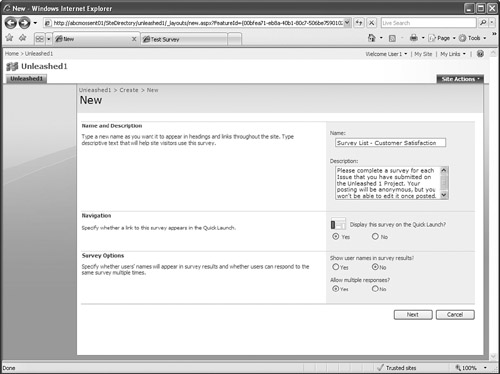
Figure 7.47 shows a New Question screen, which appears after the information is provided in the New page. This sample survey starts by using the Lookup (information already on this site) type of answer. This type of question can be connected to other lists and libraries on the site, and in this example provides a drop-down menu showing the items in the Title column from the Issue Tracking list. Note that a wide range of question types can be created in the Question and Type section of the New Question page. A new entry here is the Page Separator (inserts a page break into your survey), which isn’t really a question, but is helpful for breaking up long surveys. Business Data is also a new choice and enables you to connect to business data types that are loaded in the catalog.
Figure 7.47. New Question page in a Survey list.

Figure 7.48 shows the second question on this survey, which uses the Rating Scale (a matrix of choices or a Likert scale), where subquestions are asked, and the user can rate each one on a scale of 1 to 5 (or other scale set by the administrator) and set the definitions for the low, middle, and high numbers. In this case, 1 is defined to mean Disagree, 3 to mean Neutral, and 5 to mean Agree. Figure 7.49 shows the survey as a user would see it.
Figure 7.48. New Rating Scale Question page in a Survey list.

Figure 7.49. Respond to This Survey page in a Survey list.
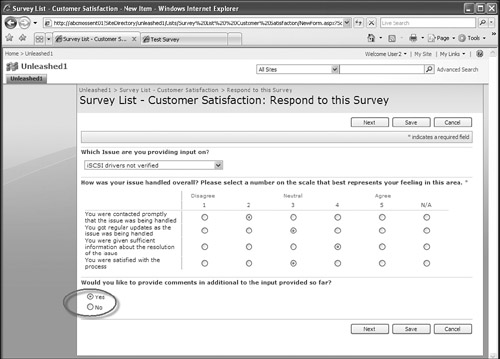
The Branching Logic question type, as circled in Figure 7.49, has been added to the survey. If the user selects Yes, she is provided with an additional question, which in this case is a Multiple Lines of Text question, so she can provide more input on the issue. If the user selects No, she will skip to the end of the survey, never seeing that additional question. This feature allows for a new degree of sophistication on a survey; specifically, later questions asked can be determined by earlier responses. Note also that in Figure 7.49 there are three buttons—Next, Save and Cancel—that allow users to save their responses to that point of the survey or proceed without saving or cancel out of the survey. This is valuable because in SharePoint 2003 surveys, especially long ones, users might start a survey, run off to a meeting or get otherwise distracted, and when they came back their session would have timed out, and they’d have to start over. A savvy user would use screen captures to save time, but many users would have to start from scratch.
Although much more could be discussed in terms of best practices for creating a survey, general trial and error is the best way to get the most appropriate combination of questions and format. A final feature that offers value to administrators is the ability to Show a Graphical Summary of Responses, as shown in Figure 7.50. This enables an administrator to quickly see the range of responses to the questions and summarize all the textual responses in one place.
Figure 7.50. Graphical summary of responses in a Survey list.
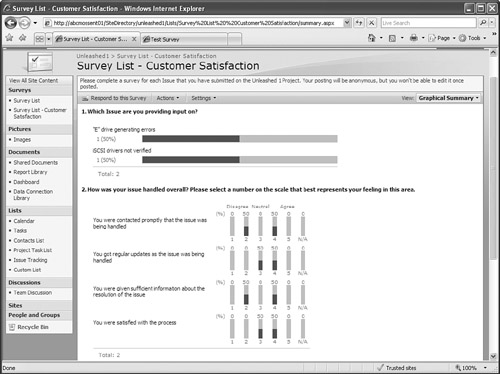
SharePoint 2007 survey lists are more polished than SharePoint 2003 surveys, a fact that will positively influence end users and, ideally, improve the organization’s ability to collect valid data.
Custom List and Custom List in Datasheet View
These lists enable the user to create a list from scratch, by choosing and defining the different columns that make up the list. Chapter 8 uses these lists as an introduction to the basic tools and options involved in administrating lists and libraries.
KPI List
Key Performance Indicators (KPI) lists allow the creation of KPIs based on data in a SharePoint list, data in an Excel workbook, data in SQL Server 2005 Analysis Services, or based on manually entered information.
Languages and Translators
This list allows the entry of new items that specify the language of an attachment, and the language that it needs to be translated to, and a person or group can be assigned to the project, as shown in Figure 7.51. This is ideally suited for multinational organizations and for businesses that deal with international clientele.
Figure 7.51. New item in a Languages and Translations list.

Import Spreadsheet
This list allows the user to import an existing Excel spreadsheet into a SharePoint 2007 list. This list is covered in more depth in Chapter 10 to show both the power and limitations of this type of list.
Summary
This chapter provided an overview of the different standard SharePoint 2007 document libraries and lists. The basic features included in the standard SharePoint 2007 document libraries and lists were reviewed, with extra attention paid to the new features added since SharePoint 2003.
Much more time could be spent on tips and tricks and drilling into more advanced customizations of document libraries through metadata and complex views, but experimenting with the different features is one of the best ways of learning how they can best meet specific needs.
After reading this chapter, you should find the process of experimenting with the new libraries and lists easier and the key features of each standard list clearer, facilitating their effective use.
Best Practices
- If possible, use Microsoft Office 2007 products with SharePoint 2007 to ensure the best level of compatibility with the new document libraries and lists found in SharePoint 2007.
- The ability to publish the contents of a document library as an RSS feed allows users to subscribe to content and decide how often they want the content updated. This is a nice option to supplement alerts, which can be overwhelming to the inboxes of users who use them extensively.
- Consider giving some training to end users on the new capabilities of the Alerts action in document libraries. Alerts can now be so granular that a user gets a weekly summary on a certain day, at a certain time, that also goes to a distribution list and only alerts the user of changes to a specific view!
- Although the new feature of SharePoint 2007 document libraries that allows folder-level permissions and document-level permissions is powerful, it should be used with caution. Managing a document library and troubleshooting end-user issues when folder-level and document-level security are used can be quite a challenge for new Owners or site administrators.
- The new tool Send To in the Edit menu in a document library can be useful but also quite complex, so it is recommended that when items are copied to another SharePoint site, the document library they are copied to be read-only. This will stop possible confusion where a user edits the copy, only to have it be overwritten when someone updates copies from the Manage Copies page for the original document.
- The check-out and check-in process has been greatly improved since SharePoint 2003. Users now have the option of saving a copy locally during check out, which allows them to work on the document when offline. They also have new options when checking in a document, which include saving the new document as a minor version (draft), major version (publish), or overwriting the current minor version. This gives great flexibility by allowing the use of major and minor versions and by reducing clutter by allowing the user to just save over the last minor version.
- Wiki libraries provide a functional set of tools that corporate users have been clamoring for over the past several years. Wiki libraries have similar tools to document libraries and can have multiple pages, each of which can be edited with an extensive toolset. Adds and deletions can be viewed for each version of the page, and older pages can be restored to be the latest page or deleted to save space.
- Picture libraries are quite limited in terms of which file types can be displayed in thumbnail format, so make sure to determine the primary file types that will be stored and check to make sure they are supported by SharePoint 2007 picture libraries. The Explorer view can be used in some cases to preview other file types, such as .pdfs, if third-party applications such as Adobe Reader have been installed.
- Discussion boards are greatly improved and allow repliers to view the text they are replying to, which is a welcome update.
- The look and feel of Calendar lists (called Events lists in SharePoint 2003) has been improved, and calendars can be connected to Outlook 2007. Appointments can be created from Outlook that will the synchronize with and update the SharePoint 2007 Calendar list. Some limitations apply, as outlined in this chapter, so some caution when using this ability is advised.
- The Tasks lists can be configured to Send E-mail When Ownership Is Assigned, which is a feature that in SharePoint 2003 was not available in Tasks lists, only in Issues lists. And if a SharePoint 2007 group is assigned to an item, all members receive an email.
- The Project Task list provides a Gantt-style view of tasks, start and due dates, and level of completion, and can be printed nicely from either Internet Explorer 6 or Internet Explorer 7, making this list well suited for lightweight project management.
- Issue Tracking lists have been improved in several ways to enhance their usability, including the ability to see a previous version of an issue in its entirety so that all changes to it can be reviewed.
- Survey lists have a number of improvements, including better formatting and the ability to add page breaks, look up a person or a group, and provide business data. Branching logic is also allowed, so the type of answer to a question can move the user down a particular branch of other questions.