Chapter 8. Managing Libraries and Lists in SharePoint 2007
IN THIS CHAPTER
- Planning Lists and Libraries
- Creating Libraries in SharePoint 2007
- Configuring Document Library Settings
- Customizing SharePoint 2007 Libraries
- Creating Lists in SharePoint 2007
- Customizing SharePoint 2007 Lists
- Managing Lists and Libraries
- Best Practices
It is important for the resources that will be designing and implementing SharePoint 2007 lists and libraries to understand the range of tools available to manage the design of the libraries and lists, as well as to configure the columns and views available within them. Otherwise the end users might feel that the tools they use aren’t tuned to their specific needs, and standards for metadata and list types won’t be set, resulting in more chaotic environments that become hard to manage as they grow. Particularly important are the concepts of site columns and content types, which are covered in this chapter.
This chapter covers the main topics that a site administrator needs to know when creating, modifying, and managing lists and libraries in SharePoint 2007. This chapter builds on the content provided in Chapter 7, “Using Libraries and Lists in SharePoint 2007,” and assumes that the reader is already familiar with the features offered by SharePoint 2007 lists and libraries. Because some of the tasks a library or list administrator would need to perform overlap with those that a site administrator or site collection administrator, this chapter includes some site-level and portal-level configuration steps. Windows SharePoint Services 3.0 and SharePoint Server 2007 offer different tools for library and list administration purposes, and each section points out the differences. Chapter 9, “Designing and Managing Pages, Workspaces and Sites in SharePoint 2007,” continues the dual themes of design and management by providing information on the next tier of management tasks required to manage sites and workspaces.
Planning Lists and Libraries
The process of planning lists and libraries was already fairly complex in SharePoint 2003 is now even more involved because SharePoint 2007 offers additional features and options when creating lists and libraries. In fact, many companies avoided doing any planning whatsoever with SharePoint 2003, and just installed the default portal and created some standard team sites. They then used the “learn by doing” method to see which features end users adopted and how the site administrators and designers were able to leverage the built-in features. The problem with this methodology, or lack of one, was that each site collection evolved in a different direction, and powerful features such as metadata, views, and alerts were often not used effectively.
A good example of this is the use of folders within document libraries. It is comfortable and familiar for a site administrator simply to duplicate a folder structure that already exists on a file share on the network. For example, a Corporate Reports library would be created and a folder would be created for each quarter. Although this might be more familiar to end users as well, they’ll continue to spend time browsing each folder to try and find what they need, just as they already do on the network. A better practice is to simply add a column using the Choice (menu to choose from) information type, which would include the appropriate list of years and quarters. This introduces users to the concept of metadata and encourages a new user to sort by this metadata or use the datasheet view and then filter by quarter. Another downside of rolling out SharePoint without any standards is that content could lose metadata if a document is copied and pasted (using the Explorer view) from one document library to another.
This section also introduces and discusses two very important components of the SharePoint 2007 infrastructure: site columns and site content types. A default set of both site columns and site content types is provided, and the SharePoint 2007 design team can choose to keep the default settings, pare them down to the base essentials, or start from scratch. Most organizations typically choose to keep the default settings and options, and perform some testing to determine whether they meet the basic requirements of the stake holders. Decisions in this area affect the standards created for lists and libraries to roll out and the level of training that the site administrators and users need. So, it is even more important to spend adequate time planning and testing the design of libraries and lists with SharePoint 2007 than with SharePoint 2003.
A question that is commonly asked in the design phase is, “When should I use a library and when should I use a list?” Lists and libraries in SharePoint 2007 share even more features in common than in SharePoint 2003, so this decision can be somewhat tricky. Libraries are designed to hold and manage documents, whereas lists are designed to hold rows of information. So, a new entry to a library is based on a document, whereas a new entry in a list is based on a form that has to be completed. Yet lists can also store attachments, allowing them to function as a type of document repository. But libraries can also store complex metadata information and have a datasheet view, just like lists.
In terms of the differences, document libraries allow users to check out documents, and can be configured to require users to check out documents before editing them, whereas lists do not have this feature. Libraries can also be email-enabled, and they can have custom Send To destinations defined. Although lists can use content types, they are limited to a subset of content types, and so they can’t provide the wide range of templates that libraries can.
A list can actually be better suited than a library for storing documents in one case. In a case where extensive notes have to be included in multiple lines of a text column, a list does not have potential problems storing more than 255 characters of text. So, for a situation in which the document repository holds documents with fairly static content but a large amount of descriptive information, a list can have advantages. But the general rule of thumb is that libraries are for storing and managing documents, and lists are for storing and managing rows of data.
Planning Library Configurations
For an organization to make the best use of SharePoint 2007 libraries, the individuals doing the planning need to have an understanding of the different types of libraries as covered in Chapter 7. Ideally some testing should be performed to determine which features are the most useful for the organization. The “Other Types of Libraries in SharePoint 2007” section in Chapter 7 lists the standard libraries available in Windows SharePoint Services 3.0.
Company policies should be followed (or created, if they’re not already in place) when new libraries are created. For example, there might be a template that has been created that should be used to track all marketing documents, that has already agreed-on columns that will be included (which could include site columns, as well as one or more content types), specific versioning settings, and one or more workflows, customized views, and perhaps a custom Send To destination. If templates aren’t being used, guidelines or checklists should be given to new site administrators with suggestions on the settings to use.
This of course requires that some standards be set by the SharePoint administrative team, and ideally some templates be created that are made available for the site collection administrators. Because SharePoint 2007 libraries have even more features and options than SharePoint 2003, site administrators should be encouraged to discuss which of the following features are required.
The following high-level decisions should be made before rolling out document libraries to users in the production environment:
- Naming conventions for libraries—Setting these standards will help avoid confusion later.
- Outlining the different standard library types that should be used—The organization might decide to limit the use of libraries to document libraries and picture libraries if the user base is new to SharePoint. If users are more advanced, additional libraries such as the wiki page library or the form library can be used.
- Use of standard library templates—Standard templates can greatly enhance the functionality to the user community by ensuring that the company standards for privileges, general and advanced settings, and metadata are in place when the library is made available.
- Use of content types—Will the default content types be used as is, modified, or not used at all? Are new content types needed? If so, how will they be configured?
- Use of site columns—As with content types, will they be used in the standard libraries? If so, which ones?
- Use of versioning—If so, will major and minor versions be tracked, or just major? New users will need to be trained on using versions, and the use of versioning can dramatically increase the total amount of data stored in the SQL database(s).
- Requiring approval before posting a new document or list item—This configuration choice requires that approvers are identified and understand the approval process.
- Requiring documents to be checked out before they can be edited—For some types of document libraries this might be a requirement, but for less restricted content, it might not be needed.
- Allowing items contained in the library to appear in search results—The content of some top secret libraries should most likely not appear in search results, but for other libraries, it might be essential that the items appear.
- Use of audience targeting in the library—A powerful feature, but one that requires the definition of audiences and training of library administrators to understand how this feature is used.
- Use of workflows in the library—Workflow might be critical for certain types of documents in the organization, but overkill for others. Multiple workflows can also be defined for a library adding functionality, but doing so complicates administration.
- Use of information management policies—Will they be applied to the library? If so, which ones?
Additional decisions that can be made at a later time or changed based on the needs of the users include the following:
- If versioning is to be used, how many copies of minor and major versions will be kept? Or will all versions be kept?
- Who can see drafts (minor versions that haven’t been approved)? Users with read privileges or only users with edit privileges?
- Is there a special document template that will be used for the library?
- Will browser-enabled documents be used?
- Will a custom Send To destination be used?
- Will the New Folder command be offered as an option in the library?
- Will unique permissions be used for the library or will it inherit permissions from the site?
- Will the document library be configured to receive emails? If so, what are the address and other settings?
Additional information about these options follows in the next sections. Figures 8.1 and 8.2 show sample worksheets that can be used to help make and record these decisions.
Figure 8.1. Library design worksheet page 1.
Figure 8.2. Library design worksheet page 2.

Refer to Chapter 7 for more specifics on the options available for different types of libraries, such as the wiki page, picture, data connection, and slide libraries.
As these decisions are made, it is a good idea to jot them down and make sure that they are tested in a lab or prototype environment to ensure that the libraries are relatively easy to use and maintain. Creating an Excel spreadsheet for a library, such as the one shown in this section, and a separate tab for each type of library is an excellent way of tracking this information. Because there are multiple library management pages in the SharePoint 2007 user interface, each of which has different tidbits of information, having all the settings listed in one place can be extremely helpful.
Planning List Configurations
This process is quite similar to that of planning libraries, with the main difference being that there are more different standard types of lists than of libraries. Chapter 7 provides information about the standard lists available in Windows SharePoint Services 3.0 and SharePoint Server 2007. Many of these lists are designed for specific purposes, such as an announcements list, contacts list, or discussion board list, and the default columns, settings, and views might be adequate or need minor adjustments, so the design and standardization process might be easier for lists than for libraries.
Some of the more flexible lists, such as the custom list, KPI list, and import spreadsheet list, will require additional planning. To give an idea of the steps involved, an example of creating a custom list is provided later in this chapter.
The following high level decisions should be made before rolling out lists to users in the production environment:
- Naming conventions for lists—Setting these standards will help avoid confusion later. It is generally a good idea to leave a word in the name of the list that refers to the base list used.
- Different standard lists that should be used on a site—Standards for top-level sites and subsites can vary, but the organization might decide that every site should have an announcements list, a contacts list, a tasks list, and a custom list based on the purpose of the site.
- Whether standard templates should be used—Standard templates for custom lists will be especially useful and help ensure that even sites with different administrators have similar lists in them.
- Whether content types should be used—If so, which ones per standard list?
- Whether versioning should be used—If so, will both drafts and published versions be kept or just published versions?
- Whether users can read other items in the list, or only their own—This is especially important in survey lists, and possibly in tasks lists as well.
- Whether users can edit other items in the list or only their own, or none.
- Whether approval is required before posting a new list item.
- Whether to allow items contained in the list to appear in search results.
- Use of audience targeting in the list.
- Use of workflows in the list.
- Information management policies applied to the list.
The following are additional decisions that can be made at a later time or changed based on the needs of the users:
- Are attachments enabled in the list?
- Will the New Folder command be offered as an option in the list?
- Will unique permissions be used for the library or will it inherit permissions from the site?
Additional information about these options follows in the next sections. Figures 8.3 and 8.4 provide some sample worksheets for designing custom lists.
Figure 8.3. List design worksheet page 1.

Figure 8.4. List design worksheet page 2.

Using Site Columns
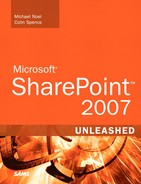
An option provided by SharePoint 2007 is for the administrator to add one or more columns from a set of site columns to a list or library. The Customize Library Name page (_layouts/listedit.aspx) offers the Add from Existing Site Columns option. If clicked, the administrator will see the Add Columns from Site Columns page (_layouts/AddFieldFromTemplate.aspx) as shown in Figure 8.5. This list can be quite intimidating if the administrator isn’t familiar with the purpose and function of these columns, so some explanation is in order even if the administrator resource doesn’t have any influence over top-level portal settings.
Figure 8.5. Add Columns from Site Columns page.
The following is only a summary of the groups of site columns and a selection of the options available (because there are too many options to list here):
- Base columns—These include columns such as Append-Only Comments, Categories, Language, URL, and Workflow Name.
- Core contact and calendar columns—These include columns such as Address, Anniversary, Assistant’s Name, Assistant’s Phone, Birthday, and Business Phone.
- Core document columns—These include columns such as Author, Category, Comments, Contributor, Coverage, and Date Created.
- Core task and issue columns—These include columns such as % Complete, Actual Work, Assigned To, Billing Information, Date Completed, and Due Date.
- Extended columns—These include columns such as Company Phonetic, First Name Phonetic, Issue Status, Last Name Phonetic, Related Issues, and Task Group.
- Key performance indicators—These include columns such as Auto Update, Data Source, Detail Link, Display Folder, Formatted Indicator Goal, and Formatted Indicator Value.
- Page layout columns—These include columns such as Byline, Image Caption, Page Content, Page Icon, Page Image, and Redirect URL.
- Publishing columns—These include columns such as Article Date, Contact, Contact E-Mail Address, Contact Name, Contact Picture, and Scheduling End Date.
- Reports—These include columns such as Owner, Report Category, Report Description, Report Status, and Save to Report history.
This partial list should help make it clear that a wide range of predefined columns exist to facilitate the job of the site-level resource that needs to come up with standard lists and libraries. Some of these columns simply provide settings designed to manage the type of information that they will be storing, whereas other actually contain information.
An example of how a site column can be used is the site Language column, which includes a long list of different languages. The site administrator might decide that this list should include only languages officially supported by the company and reflect the countries where the company does business, and that this long list is too hard to dig through and wastes time. She could then either create a site-level column that will show up in the Custom Columns grouping, or could seek out the portal administrator and make her case for a change.
In this example, the portal administrator decides to do the site administrator a favor and change the list, as shown in Figure 8.6. The list of languages is pared down to a handful (as shown circled in Figure 8.6). Note that the other standard settings for this column type (which is a choice column in this case) such as Description, Require That the Column Contains Information, and others are available, as shown in Figure 8.6. The portal administrator in this example also chose to not have a default value, preferring to allow the user to specifically chose a language, and to allow fill-in choices. Finally, because the Update All List Columns Based on This Site Column option is set to Yes, after OK is clicked, these changes will affect all lists and libraries in all subsites using this column.
Figure 8.6. Change site column.

If the site administrator gets the cold shoulder from the portal administrator or simply decides to create a column of her own, this can be done from the site’s Site Settings page (_layouts/settings.aspx) by clicking on Site Columns in the Galleries section, which reveals the Site Column Gallery page (_layouts/mngfield.aspx). The Create button can then be clicked, and information entered to create a new site column. Figure 8.7 shows the results after a site column titled Unleashed1, indicated by the arrow, has been created. Note that although all the other entries list Home as their source, Unleashed1 has a source of Unleashed1, the site where it was created. This site column will not show up at the portal level in its column gallery because it is specific to the top-level site.
Figure 8.7. Site column gallery showing new custom column.

Using Content Types
Another powerful tool provided by SharePoint 2007 is the ability to define content types at the site or portal level and then use them in libraries. A content type “describes the attributes of a document, folder, or list item” according to the SharePoint 2007 help files. Additionally, a site content type can define properties, forms used to edit and display the properties, and specify one or more workflows that will be made available for the document or list item.
Content types can be very powerful after the organization decides to what extent they will be used. Before they can be used, however, a library must be configured to enable the support of content types. Follow these steps to enable contact type support:
- Access the document library settings page from the Settings menu in the document library.
- Click Advanced Settings on the _layouts/listedit.aspx page.
- Click Allow Management of Content Types Selected on the _layouts/advsetng.aspx page and click OK.
The Settings page (_layouts/listedit.aspx) page will now show a section titled Content Types that lists the existing content types, as well as two links: Add from Existing Site Content Types, through which new content types can be added from a list, and Change New Button Order and Default Content Type, which controls the content types and order shown under the New button in the Library.
Using Site Content Types
Content types can be a little bit confusing, so a good way to become familiar with how they function is to review the different default content types provided with Windows SharePoint Services 3.0 and SharePoint Server 2007.
Windows SharePoint Services 3.0 content types:
- Document content types—Basic Page, Document, Dublin Core Columns, Form, Link to a Document, Master Page, Picture, Web Part Page
- Folder content types—Discussion, Folder
- List content types—Announcement, Contact, Event, Far East Contact, Issue, Item, Link, Message, Task
- Special content types—Unknown Document Type
SharePoint Server 2007 content types:
- Business Intelligence Content Types—Dashboard Page, Indicator using data in Excel workbook, Indicator using data in SharePoint list, Indicator using in SQL Server Analysis Services, Indicator using manually entered information, Report
- Document content types—Same as with Windows SharePoint Services 3.0
- Folder content types—Same as with Windows SharePoint Services 3.0
- List content types—Same as with Windows SharePoint Services 3.0
- Page layout content types—Article Page, Redirect Page, Welcome Page
- Publishing content types—Page, Page Layout, Publishing Master Page
- Special content types—Same as Windows SharePoint Services 3.0
From this list it is clear that Windows SharePoint Services 3.0 provides content types for documents, folders, list contents, and a “special content type.” SharePoint Server 2007 adds Business Intelligence, Page Layout, and Publishing content types, which reflect the additional features that SharePoint Server 2007 adds to Windows SharePoint Services 3.0.
Creating a Site Content Type
The exercise of creating a new content type reveals more about the functionality that a content type can provide. The administrator needs Manage Web Site privileges (by default offered to the Hierarchy Managers and Owners groups). Using the Site Actions menu, the administrator can access the Site Settings submenu and then choose Site Content Types from the Galleries section. If Create is chosen from the toolbar, the New Site Content Type page (_layouts/ctypenew.aspx) will be displayed, as shown in Figure 8.8. In this screen, the name of the content type is entered along with a description, and a parent content type category must be chosen along with the parent content type. An existing group can then be chosen or a new group defined. In this example, the Dublin Core parent content type was used.
Figure 8.8. New Site Content Type.

The Dublin Core metadata element set contains 15 descriptors designed to make it easy for “digital tourists” to easily understand that content that is described by the metadata elements regardless of the type of content managed. This element set has been widely accepted as documented by the National Information Standards Organization (NISO) in its document titled “The Dublin Core Metadata Element Set” (ISSN: 1041-5653). As of June 2000, the Dublin Core exists in more than 20 translations, has been adopted by CEN/ISSS (European Committee for Standardization/Information Society Standardization System), and is documented in two internet RFCs (Requests for Comments). It also has official standing within the WWW Consortium and the Z39.50 standard.
The elements are as follows:
Title
Creator
Subject
Description
Publisher
Contributor
Date
Type
Format
Identifier
Source
Language
Relation
Coverage
Rights
After these choices are accepted by clicking OK, the _layouts/ManageContentType.apsx page is displayed, as shown in Figure 8.9. A detailed discussion of all these features is outside of the scope of this chapter, but a quick summary of the available options follows.
Figure 8.9. Manage Site Content Type page.

As indicated by the circled hyperlink and arrow in Figure 8.9, the Source column contains links to the parent content type, which is at the top level of the portal, as shown at the bottom of the Internet Explorer window.
Modifying a Site Content Type
Now that the Project Plan site content type has been created, it can be customized and tested. If the Advanced Settings link is clicked from the _layouts/ManageContentType.apsx page for the new Project Plan content type, the following options are available as shown in Figure 8.10:
- Document Template—The Enter the URL of an Existing Document Template and Upload a New Document Template options are provided. So, if this content type is chosen from the New menu in the library, the template referenced here will be used. In this example, a new document template is provided.
- Read Only—The option of setting the content type to be read only is offered. This adds to the other methods of controlling which users have the ability to modify documents contained within the library, and so should be kept in mind when designing and managing a library.
- Update Sites and Lists—All content types inheriting from this type can be updated. This feature should be used with caution, as mentioned earlier, because any customizations made to the child site and list content types will be lost. In this case, the content type is new and there are no other content types inheriting from it.
Figure 8.10. Site content type advanced settings for a content type.

The Workflow Settings link allows an administrator to add a workflow. For this example, a standard workflow will be assigned to this content type, as shown in Figure 8.11. From this window (_layouts/AddWrkfl.aspx) a workflow template is chosen, a unique name given to the workflow, a tasks list assigned to use with the workflow, a history list named, and different start options can be chosen. In this example, Require Manage Lists Permissions to Start the Workflow is chosen and Start This Workflow When a New Item Is Created is selected.
Figure 8.11. Add a Workflow page for a content type.

The next settings that can be modified include the Document Information Panel Settings link that allows the administrator to specify whether to use a default template for Microsoft Office applications, to use a an existing custom template (and edit it if required), to upload an existing custom template, or to create a new custom template in InfoPath 2007. Document Information Panels will be discussed in Chapter 10, “Using Word, Excel and Excel Services with SharePoint 2007.”
The Information Management Policy Settings link allows an administrator to choose from having no policy, defining a policy, or using a site collection policy.
The Manage Document Conversion for This Content Type link allows the administrator to determine which of the following conversions are allowed:
- From InfoPath form to EMF image
- From InfoPath form to PNG image
- From InfoPath form to TIFF image
- From InfoPath form to web page
- From Word document to web page
- From Word document with macros to web page
- From XML to web page
For the conversions to a web page, additional configuration options are available. These will be covered in Chapter 12, “Implementing Records Management and Enabling Web Content Management in SharePoint 2007.”
Creating Libraries in SharePoint 2007
As discussed in the previous section, quite a bit of work should be done before libraries are rolled out to the general population or even the testing community. After some initial decisions have been made about which libraries are needed in the site, the designer or administrator has to decide whether to use an existing library provided in the template or to create one from scratch.
Assuming that a new library is required, this section walks through the basic steps involved in creating a library, and some of the differences between different standard library types. As discussed in Chapter 7, several different types of libraries are offered by Windows SharePoint Services 3.0 and SharePoint Server 2007. Windows SharePoint Services 3.0 offers these options:
SharePoint Server 2007 offers a more extensive list:
- Document Library
- Form Library
- Wiki Page Library
- Picture Library
- Translation Management Library
- Report Library
- Data Connection Library
- Slide Library
Note also that libraries can be created from templates. The process of creating a template is covered later in this chapter in the section titled “Using Library Templates.”
Creating a Document Library
To create a document library, an administrator needs Manage Lists privileges. From the home page of the site, the View All Site Content link can be clicked in the Quick Launch area, and then the Create button can be clicked on the menu bar in the viewlists.aspx page to open the Create page (_layouts/create.aspx). In addition, if using the Collaboration Portal Site Template, the Site Actions menu offers the Manage Content and Structure link, which takes the user to the Site Content and Structure page (_layouts/sitemanager.aspx) when clicked. With the proper site selected in the navigation pane, an administrator can then select the New drop-down menu, and then choose List, which then opens the create.aspx page. If using the standard Site template, simply clicking the Create link will open the create.aspx page.
If Document Library is chosen, the administrator will see a page similar to the one shown in Figure 8.12. The administrator should enter a descriptive but short name, a description that will be useful to visitors, whether the library will receive email (and, if so, the address), whether versioning will be used, and finally what type of document template to use. These options will be explored more in the “Configuring Document Library Settings” section of this chapter. An important decision to make is in the Document Template drop-down menu. The standard options are as follows:
- Microsoft Office Word 97–2003 Document
- Microsoft Office Excel 97–2003 Spreadsheet
- Microsoft Office PowerPoint 97–2003 Presentation
- Microsoft Office Word Document
- Microsoft Office Excel Spreadsheet
- Microsoft Office PowerPoint Presentation
- Microsoft Office OneNote Section
- Microsoft Office SharePoint Designer Web Page
- Basic Page
- Web Part Page
Figure 8.12. New page when creating a document library.

Creating Other Libraries
Other types of libraries give slightly different options during the creation process, which give some insight into their limitations and intended functions. The differences are discussed in the following list:
- Form libraries offer only the option of a Microsoft Office InfoPath form in the Document Template drop-down menu. This ensures that new items created in this library use an InfoPath form.
- Wiki libraries only require name and description information, and a decision about displaying in the Quick Launch area.
- Picture libraries don’t offer any options in the Document Template drop-down menu. Therefore, items have to be uploaded to a picture library rather than created from a template.
- A data connection library doesn’t offer the option of receiving email, and doesn’t offer any options for document templates.
- A translation management library doesn’t offer the option of receiving email, and adds the option to Add a Translation Management Workflow to This Document Library.
- A report library doesn’t offer the option of receiving email, and doesn’t offer any options for document templates.
- A slide library doesn’t offer the option of receiving email, and doesn’t offer any options for document templates.
Configuring Document Library Settings
This section delves into the range of tools available to the individual or individuals tasked with configuring and managing document library settings. A good place to start is to clarify the basic differences in the administrative tools available in Windows SharePoint Services 3.0 and SharePoint Server 2007. Figure 8.13 shows the grid of the settings available in a document library from SharePoint Server 2007 as compared to Windows SharePoint Services 3.0. Windows SharePoint Services 3.0 document libraries do not offer item scheduling, audience targeting settings, workflow settings, information management policy settings, or incoming email.
Figure 8.13. Table comparing document library settings in SharePoint Server 2007 and Windows SharePoint Services v3.

Readers familiar with SharePoint Portal Server 2003 are familiar with the audience feature, which was not previously available except in portal areas, so it is nice to see it now available across all sites when SharePoint Server 2007 is used.
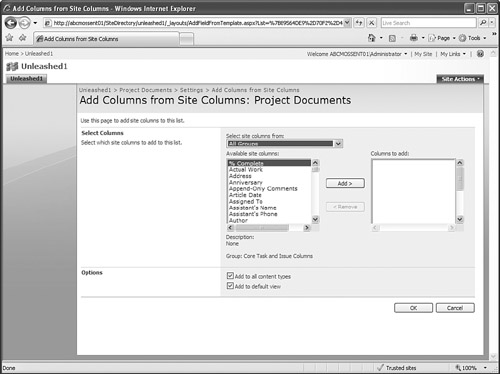
Document Library Settings
The document library settings can be accessed by accessing the Document Library Settings link in the Settings menu of a document library. The listedit.aspx page will be shown (assuming that the user has Manage Lists privileges in the library) as shown in Figure 8.14. Site administrators will quickly become familiar with this page, and SharePoint 2003 site administrators will see a better organized Modify Settings and Columns page (also named listedit.aspx in SharePoint 2003). The main difference in SharePoint 2007 is that the items formerly contained in the General Settings section of the listedit.aspx page are now broken in three groupings: General Settings, Permissions and Management, and Communications. The Columns and the Views sections remain quite similar.
Figure 8.14. Customize Shared Documents page.
Title, Description, and Navigation Settings
As mentioned previously in this chapter, the settings for a document library should be determined as much as possible by company policy to facilitate the effective use of document libraries throughout the company. For example, something as seemingly trivial as the level of information provided in the description section of a document library, or whether the document library appears on the Quick Launch bar, can have an impact on the user community.
Some general best practices include the following:
- The title of the document library should be short and descriptive—Shared Documents isn’t very descriptive, whereas something like Team Proposals or Technical Template Documents is more useful. Remember that document libraries tend to become more numerous on popular sites, and if a user is saving to a document library from an Office application, he or she will need to know from the library’s title and description which one to use.
- Try to include useful information in the description field for the user community—This is a great place to mention which content types are used, as well as whether versioning is on, whether content approval is required, whether an email address is available for the library, and so on. This will help new users understand how to use the library effectively.
- A document library should be included in the Quick Launch bar if it will be used by all or most site users—If the document library is to be used by only a small subset of users that are more advanced and will be able to find it easily by clicking View All Site Content on the home page, it can be left off the Quick Launch bar. Chapter 9 provides some additional guidance in configuring the Quick Launch bar and other navigation aids.
Although many site administrators pay little attention to the titles given to libraries and often ignore the description field, more seasoned administrators realize the importance and benefits of putting some thought into how these features are used.
Versioning Settings Explored
Versioning settings can become quite complex, as can be inferred from Figure 8.15. The first option to be decided is whether content approval is required for submitted items. If this is set to Yes, an item uploaded to or created in the library is considered a draft item, and by default will be visible only to the person who posted it and to people with Manage Lists privileges.
Figure 8.15. Versioning settings for a document library.

The next decision to be made is whether versioning will be used. No is the default setting, but a different choice can be made when creating a document library. The other choices are for only major versions to be created, or for both major and minor versions to be created.
When deciding what level of versioning to use, a couple of things need to be kept in mind. First, SharePoint 2007 stores documents in the SQL database, so each time a new version is created, the database stores a complete copy of the document, not just the changes. So, if the file size limit in SharePoint 2007 is quite large—for example, several hundred megabytes (which is not unusual in larger organizations)—a gigabyte of storage space can be used up by a handful of versions. Therefore, a general best practice is to restrict the use of versioning as the permissible upload file size increases. The number of major and minor versions should likewise be restricted.
In the Draft Item Security section, the library administrator can decide which users are allowed to see draft items. The options are as follows:
- Any User Who Can Read Items.
- Only Users Who Can Edit Items.
- Only Users Who Can Approve Items (and the Author of the Item). This option is selectable only if Yes is selected in the Content Approval section.
A general best practice is that if Content Approval is required, the third option should be chosen unless there is a good reason to open up viewing of draft items. Now the problem arises of making sure that approvers actually know that items are awaiting their attention. When the document library is set up, the individuals tasked with approving documents should have two alerts set up for them, as follows:
- The first alert should be for New Items Are Added and Someone Else Changes a Document.
- The second alert should be for Existing Items Are Modified and Someone Else Changes a Document.
The frequency can be immediately or daily, depending on the company standards and purpose and contents of the library.
Alternately, a workflow can be used for similar functionality. See Chapter 21, “Using Designer 2007 to Extend SharePoint 2007 Workflows and Customize the User Experience.”
Advanced Settings in Document Libraries
Advanced settings for both Windows SharePoint Services 3.0 document libraries and SharePoint Server 2007 document libraries look the same but have some differences under the surface. Figure 8.16 shows the Advanced Settings page for a document library, titled Project Documents, which has been designed to house all documents pertaining to the projects managed by the Unleashed 1 site team. Content types have been enabled for this library because the administrator wants to allow the use of predefined content types, which will be discussed in Chapter 9. Because this option is selected, the Template URL field is grayed out, as circled in Figure 8.16. The Open in the Client Application option is selected rather than the Display as a Web Page option.
Figure 8.16. Advanced settings for a document library.

A Custom Send To Destination has been entered. This allows a user to send a document to a predefined destination (in this case, to http://abcmossent01/Docs/Documents/) and to define the destination name, which is Shared Company Documents in this case. This bears some additional discussion, so see the following section for more information.
Note that the Display “New Folder” Command on the New Menu? choice is set to No because the manager of this library wants his users to use metadata instead of folders for organizing their files. Finally, the option to Allow Items from this Document Library to Appear in Search Results? is set to Yes.
Custom Send To Destination
As mentioned in the previous section, a Custom Send To Destination can be defined. The name and location of the library must be entered. Make sure not to include the .aspx page information. For example, “http://abcmossent01/Docs/Documents/” is a valid address, but “http://abcmossent01/Docs/Documents/forms/allitems.aspx” is not. The Advanced Settings page will not identify an error with this entry, so it should be tested right away to make sure that it works. The user has to have appropriate privileges in this library or the process will not complete successfully.
When a user chooses this custom Send To destination from the Edit menu in the document library, she will see a page (copy.aspx) that confirms the location and two additional settings, as shown in Figure 8.17. This page gives the user a chance to test the link that has been provided by using the Click Here to Test link (circled in Figure 8.17). However, even if the location opens properly in a browser, the process might not complete successfully. For example, if a document with the same name already exists in the destination folder, the process will fail. Or if the destination is not a SharePoint Server 2007 folder, the process will fail. The user can also decide whether to enable the Prompt the Author to Send Out Updates When the Document Is Checked In? option and to select whether to use the Create an Alert for Me on the Source Document option. After these settings are ready, the user clicks OK, is presented with a Copy Progress window, and has to click OK once more. Then the user will be alerted whether the process succeeds. If it fails, she will be asked whether she would like to try the process again. If the user requested that an alert be created, the confirmation of the alert should arrive in her inbox shortly.
Figure 8.17. Copy page when using send to custom destination.

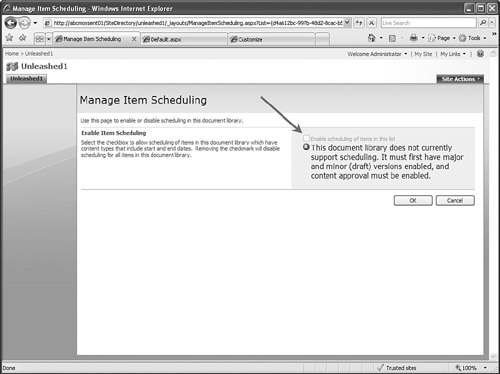
Manage Item Scheduling
The next option on the settings page (listedit.aspx) in the General Settings section, if content types are used, is Manage Item Scheduling. The Manage Item Scheduling page is shown in Figure 8.18, but in this case the document library does not meet the criteria required to enable item scheduling. As shown in the error message in Figure 8.18, the document library does not have major and minor versions enabled, and content approval is not enabled. Furthermore, the content type needs to have a start date and end date assigned to it for the scheduling component to work.
Figure 8.18. Manage item scheduling for a document library.
Audience Targeting
Audiences were previously offered in SharePoint Portal Server 2003 areas, but audience targeting is quite different, so users of SharePoint Portal Server 2003 should be aware of the differences. If audience targeting is turned on in a SharePoint 2007 library, each item in the library can have audiences assigned to it. This doesn’t hide the item from other users in the library, but can be used (as its name implies) to target the item to an audience though the use of web parts, such as the Content Query web part. An example of this follows.
To turn on audience targeting, a user with manage lists privileges simply accesses the Settings menu and then clicks Document Library Settings. In the General Settings menu, he chooses Audience Targeting Settings and then checks Enable Audience Targeting. Then one or more audiences can be assigned to items in the library. The user then hovers over a document name and, from the Edit menu, selects Edit Properties, which gives him the opportunity to select one or more target audiences for that item. Figure 8.19 shows the Select Audiences window in the EditForm.aspx page for a status report. The browse icon is indicated by an arrow in Figure 8.19. Clicking the icon brings up the Select Audiences window (also shown in Figure 8.19), which provides three options from the drop-down menu: Global Audiences, Distribution Lists and Security Lists, and SharePoint Groups.
Figure 8.19. Selecting an audience for a document.
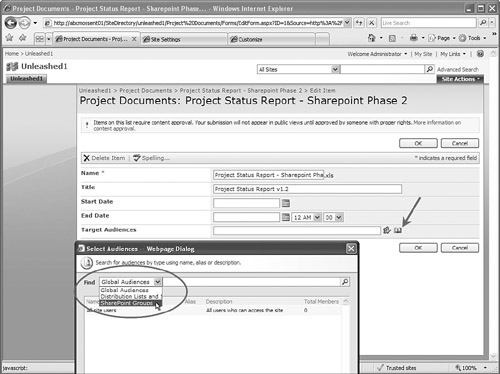
Global audiences need to be created by an administrator with access to Shared Services Administration from the SharePoint Central Administration site. Distribution/Security Groups are created by a domain administrator and so are normally outside of the influence of a SharePoint site administrator. Figure 8.20 shows the options available when the SharePoint Groups option (shown highlighted in Figure 8.19) is chosen. In this example, Home Owners and Home Members are being given rights to see this item.
Figure 8.20. Adding SharePoint groups to an audience for a document.

When audience targeting is enabled in a SharePoint Server 2007 library and one or more audiences are assigned to the item, all other users of that library with read permissions will still see that item, so it is not a replacement for item-level security. Audience targeting allows a library or site administrator to use a web part, such as the Content Query web part, to display targeted items to members of the groups specified to personalize the experience of those users.
Using Audience Filtering
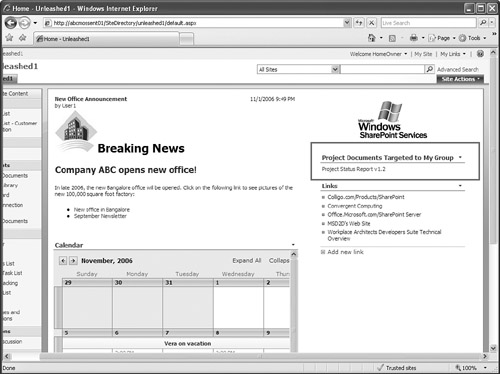
Figure 8.21 shows the results of adding a Content Query web part to the home page of the Unleashed1 top-level site. In this case, the web part was configured to look at the content of the Project Documents document library and to apply audience filtering. The title of the web part was also modified. The following is a list of the specific configurations applied to the web part:
- Show items from the list /Site Directory/Unleashed1/Project Documents
- Show items from the Document Library list type
- Show items from all content types
- Apply audience filtering
- Change the title to Project Documents Targeted to My Group.
Figure 8.21. Content Query web part displaying audience-targeted information.
Document Library Permissions and Management
This section of the listedit.aspx page offers additional tools that affect who can access the library, what privileges individuals and groups will have, whether workflows can be used in the library, and information management policy settings. Brief descriptions of these items are as follows:
- Delete This Document Library—This is self-explanatory. After a document library is deleted, it and all the files contained within it will be sent to the site’s Recycle Bin.
- Save Document Library as Template—This is an important task for a site or library administrator, and will be discussed in the following section.
- Permissions for This Document Library—A very critical component of a library, this is discussed below in the section titled “Assigning Permissions to Libraries.”
- Manage Checked Out Files—Any files that are checked out but do not have any checked-in versions will be listed here.
- Workflow Settings—Workflows are discussed in detail in Chapter 21.
- Information management policy settings—These policies are discussed in Chapter 15, “Securing a SharePoint Environment.”
Using Library Templates
A library template can be a great way to allow other users to quickly create on their site a new library that has all the customizations to meet company policies for the particular library.
Figure 8.22 shows the Save as Template page, which provides a field for entering the filename (the extension will be .stp), a name for the template, and a description for the template. The user can decide to include content as well. This page clarifies that “item security is not maintained in a template.” After the user clicks the OK button, the template is saved and the user has the option to view the List Template Gallery page.
Figure 8.22. Save as Template page.

If the option to include content is selected, only a small amount of content can be saved. If more content is present in the library when the user tries to save the template, he will get an error message saying that no more than 10,485,760 bytes (10MB) can be saved. Also, because item security is not maintained in a template, be careful not to include sensitive information in a template.
The List Template Gallery page is shown in Figure 8.23, and it displays the ProjectDocumentDocLibv1.stp file uploaded in the previous example. Note that the List Template Gallery is stored at the top level of the hierarchy, at the top site level, rather than for the specific site. After a template has been uploaded, it will be available to administrators that access the sitename/_layouts/create.aspx page.
Figure 8.23. List Template Gallery.

If the Edit icon is clicked (circled in Figure 8.23), the user can modify the name of the file, title of the document, description, and delete or check out the template. If one user checks out the template, other users won’t be able to modify document metadata before first forcing a check in (if they have sufficient rights). The template can still be used for creating new libraries while checked out, however. So, the check out process for a template has a limited impact.
Like other libraries, the List Template Gallery offers Upload, Actions, and Settings menus. Other standard columns in the All Templates view include Language, Product Version, and Feature ID. Templates from SharePoint 2003 products can be uploaded without error, but won’t be available to a SharePoint 2007 user when she accesses the create page (sitename/_layouts/create.aspx).
Because List Templates can be checked out, it is a good idea to add the Checked Out To column or the Type column. The Type column includes the icon for the file type, which changes when the item is checked out. Neither of these columns is included by default.
Assigning Permissions to Libraries
A site administrator might choose to modify the permissions assigned to a library. There are many situations in which certain users should have only read permission to the content included in a library, whereas others should be able to edit items. As previously mentioned, SharePoint 2007 offers document-level and folder-level permissions, so there should now be enough granularity available for even the most complex libraries.
If a library is inheriting permissions from its parent, the permissions specific to a document library cannot be changed without severing this connection. An easy way to tell the status of this relationship is to go to the Permissions for this Document Library Page from the Settings page and click on the Actions drop down menu. If the options Manage Permissions of Parent and Edit Permissions are offered, the library is inheriting permissions. In addition, the screen will be read only in its formatted form, whereas a library that isn’t inheriting permissions will contain check boxes and links, as shown in Figure 8.24.
Figure 8.24. Permissions page for a document library.

An example of a common modification to a library that is not inheriting its permissions is the removal of the NT AUTHORITYAuthenticated Users domain group and the Restricted Readers SharePoint group. If the Authenticated Users group was left with permissions to this library, any authenticated domain user would have limited access to the contents of the library. By checking the box next to both listings (indicated by the numbers 1 and 2 in Figure 8.24) and then clicking Remove User Permissions in the Actions menu, an administrator removes these two groups from the library.
Clicking the New menu allows an administrator to add a new group or individual(s) to the library. Figure 8.25 shows the Add Users page (_layouts/aclinv.aspx page) where the group abcunleashed1 was entered and the Check Names button was then clicked. This group was assigned contribute rights, and a welcome email will be sent to this group with a personal message, as shown in Figure 8.25.
Figure 8.25. Add Users page for a document library.

Document Library Communications
The final section on the listedit.aspx page accessed by clicking Document Library Settings from the Actions menu in the document library is the Communications section. This section offers two following options: Incoming E-Mail Settings and RSS Settings. Many SharePoint 2003 users requested better connectivity with Exchange because SharePoint 2003 could connect to public folders to only a limited extent, and only attachments could be uploaded to the SharePoint 2003 document library. Fortunately, SharePoint 2007 offers enhanced Exchange connectivity. RSS capability is another key communication feature because most power users have numerous RSS subscriptions. Now SharePoint 2007 libraries can provide updates via RSS feeds, which should make many end users happy because this provides an alternative to alerts.
Incoming Email Settings
Figure 8.26 shows a sample document library email settings page. The Yes option is selected under Allow This Document Library to Receive E-Mail, and an email address is listed in the field below it. Several additional decisions have to be made on this page. including how the attachments will be saved and grouped, whether files with the same name will be overwritten, whether the original email will be saved, and whether meeting invitations will be saved. The final option is to determine whether email messages will be accepted based on library permissions only or if they will be accepted from any sender.
Figure 8.26. Incoming E-Mail Settings page for a document library.

The incoming email settings will also have to be configured in the Operations tab of the Central Administration interface; this will be covered in Chapter 18, “Configuring Email-Enabled Content and Exchange Server Integration.” Additional functionality can be enabled, such as the creation of distribution groups from SharePoint sites, and specification of the Active Directory container where new distribution groups and contacts will be created.
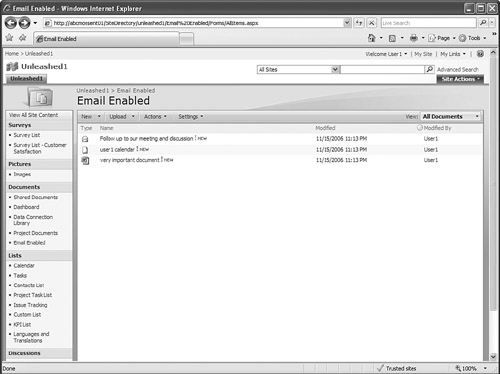
Figure 8.27 shows a document library that has the Save All Attachments in Root Folder option configured. Note that even though only one email was received, there are three items in the library: the email itself, the calendar information that was included in the email in Outlook 2007, and the document that was attached. So, it might be easier to manage if the Save All Attachments in Folders Grouped by E-Mail Subject or Save All Attachments in Folders Grouped by E-Mail Sender option is chosen.
Figure 8.27. E-mail–enabled document library with email, calendar, and attachment.
RSS Settings
RSS stands for Really Simple Syndication, Rich Site Summary, and/or RDF Site Summary depending on who you ask, but RSS feeds are an XML-based system that allows users to subscribe to web content when they use RSS-aware software. RSS feeds have flourished over the last several years, and many SharePoint implementations used feed reader add-ins that enable site administrators to include these feeds on their sites. A benefit of these feeds is that the information updates regularly. SharePoint 2007 now has the capability to publish information in libraries and lists as RSS feeds.
Figure 8.28 shows the listsyndication.aspx page that allows an administrative resource to configure a library’s RSS settings. The first choice to make is whether RSS feeds will be enabled for this library. Although RSS feeds can be helpful in broadcasting information to interested users, they might not be appropriate for every library. The managers of the library have to consider whether end users will benefit from regular updates on the content of the library enough to warrant the use of the RSS feed service.
Figure 8.28. Modify List RSS Settings page for a document library.
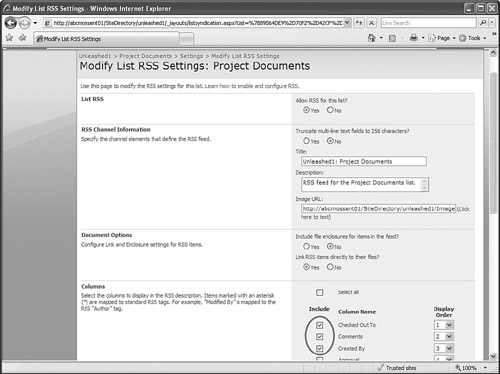
As shown in Figure 8.28, the administrator should then decide whether to truncate multiline text fields to 256 characters. This can be implemented if large amounts of text are being included in text fields. A title, a description, and a URL for the image to be associated with the feed need to be identified. File enclosures for items in the feed can be included, and RSS items can be linked to their files. Next, as shown near the bottom of Figure 8.28, any combination of the standard columns (or other columns added to the library) can be displayed in the RSS description. Some experimentation is generally required to determine which columns to include. In this example, only the Checked Out To, Comments (a column created in addition to the standard columns for this library), and Created By columns were selected (shown circled in Figure 8.28). Finally, the number of maximum items to include and maximum number of days to include have to be entered. A Defaults button is provided (not shown) to give a sample default configuration.
Figure 8.29 shows the results of the following settings, which provide a basic guideline for a standard configuration that will suit most document libraries, if View RSS Feed is clicked on the Actions menu:
- File Enclosures Not Included
- RSS Items Linked to Their Files
- Checked Out To, Comments, Created By Columns Displayed
- 25 Max Items Displayed
- 7 Days Included
Figure 8.29. Internet Explorer 7 RSS Feed view.

By displaying fewer columns of information, more items can be displayed. Adding the Comments column gives some added description about what content the file contains, and the Checked Out To information lets the RSS subscriber know whether the document is checked out and therefore “reserved,” or at least not editable by anyone except the person who has it checked out. Note, as circled in Figure 8.29, that Internet Explorer 7 allows the results to be sorted by date, title, or author. Figure 8.30 shows the results if Internet Explorer 6.0 is used, which displays the information slightly differently, provides a table of contents, and does not provide the Search bar or Sort By options.
Figure 8.30. Internet Explorer 6 RSS Feed view.

For some additional information on RSS feed options, refer to the section titled “Exploring the Toolbar in a SharePoint 2007 Document Library” in Chapter 7. Also see Chapter 10 for additional information about accessing RSS feeds from Outlook 2007.
Customizing SharePoint 2007 Libraries
Two of the menu items available in a document library were not covered in the previous chapter because they should be made available only to library and site administrators due to their influence on the structure of the library and affect on how users access the information contained in the library:
- Create Column
- Create View
In addition, two other slightly more advanced features are essential tools for the site administrator:
- Using Content Types
- Using Site Columns
Each of these topics is quite complex, but the following two sections will provide an overview of each, and provide guidance on best practices and examples that will help an administrator learn more about how to best use them.
Creating Columns in Document Libraries
When a user with Manage Lists permissions accesses the Settings menu, she will see the Create Column option. If this option is chosen, the screen shown in Figure 8.31 will be presented, which provides the user with a number of different column types to choose from. Each column requires a column name, which should generally be kept short because the longer the name is, the wider that column will be in the standard view. Yet the name should be specific so that if referenced in a calculated column, or from another list or library, what the column contains will be fairly clear. So, naming a column 2 or Choice is probably not that helpful to users or other administrators or designers. Each column offers a Description field where descriptive text can be entered about the column.
Figure 8.31. Create Column page.

Each type of column then requires certain decisions to be made as to the nature of the data the will be tracked, as shown in the list following the next paragraph. Each column type gives the option Require That This Column Contains Information with the exception of the Yes/No and Calculated (calculation based on other columns) columns. The Yes/No column will by its nature contain a value (yes or no), as will a Calculated column (the formula).
Two other options shared by each type of column are the Add to All Content Types (if content types are enabled in the library) and the Add to Default View options, with a check box next to it. If the column is added to all content types, each content type available on that site will have the column added. This is a great way to ensure that every place that content type is in use that the column and that its settings will be included. This would allow a site administrator who uses content types to add a column such as Client Name, Project Phase, or Document Status to all content types. If Add to Default View is selected, the column will be added to whichever view is currently selected as the default view. It will by default be the furthest column to the right, but that can be modified in the view.
The following list shows the standard columns made available in a document library and lists the options (other than Column Name, Add to All Content Types and Add to Default View) that are given to that column type:
- Single Line of Text—Maximum number of characters (1–255); default value (text or calculated value).
- Multiple Lines of Text—A yes/no option is given to the Allow Unlimited Length in Document Libraries option. And the Number of Lines for Editing option can also be used to specify a particular number of lines. It is a best practice NOT to allow unlimited length in document libraries, as discussed in the Caution.
The ability to allow unlimited length in multiple lines of text columns in document libraries is dangerous, so administrators are strongly encouraged to NOT use it.
SharePoint 2003 limited the number of characters that could be added in a multiple lines of text column to 255 characters. Many users (the authors included) found this to be an annoying limitation because 255 characters is typically only a couple of short sentences, and this made it difficult to adequately describe a complex document. In addition, there was no character counter, so several attempts at saving were typically required to come in under the character limit. Additional multiple lines of text columns would often be added for this “spill over.”
A registry change could remove this limit, but if the document with more than 255 characters of metadata in a multiline text column was opened, and that column was accessed through the shared workspace task pane, the additional text would be stripped off and lost.
If Allow Unlimited Length in Document Libraries is selected in a multiline text column, be aware of this limitation. A warning window appears if this option is selected, but doesn’t spell out sufficient detail, and end users could easily lose data. A best practice is to NOT use this option unless end users are trained on the risks.
- Choice (Menu to Choose From)—The choices are entered line by line, with no special punctuation needed. These choices can then be displayed in a drop-down menu, with radio buttons or check boxes next to them. Check boxes allow the user to make multiple selections. Fill-in choices can be allowed, and a default value can be set. This is a very powerful column option because it allows the administrator to determine which options the user can select from, and whether new options can be entered by the user as needed. A general best practice is to NOT set a default choice because doing so can encourage the end user to be “lazy” and simply accept the default choice.
- Number (1, 1.0, 100)—Minimum and maximum numbers can be set, and the number of decimal places can be set to Automatic, 0, 1, 2, 3, 4, or 5. The number can also be set to a percentage.
- Currency—Minimum and maximum numbers can be set, and the number of decimal places can be set to Automatic, 0, 1, 2, 3, 4, or 5. A default value can be set or a calculated value can be entered. The currency format can be selected.
- Date and Time—The format of Date Only or Date and Time can be chosen, a default value can be entered, with the choices of (None), Today, or a fixed date and fixed time. A calculated value can also be entered.
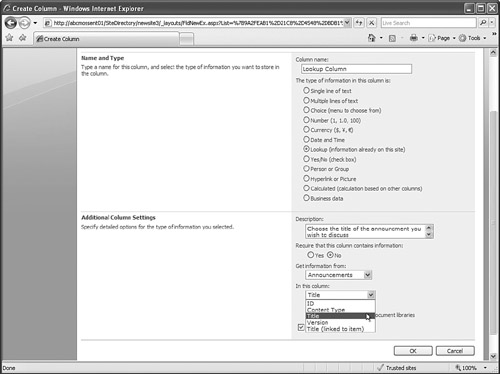
- Lookup (Information Already on This Site)—This column is specifically designed to pull information from other lists and libraries on the same site. When Lookup (Information Already on This Site) is selected, all the lists and libraries will be listed in the drop-down menu beneath Get Information From. After the list or library is selected, the different columns that are valid will be shown in the In This Column drop-down menu, as shown in Figure 8.32. This column type also allows the Allow Multiple Values option, which is an improvement over the single choice allowed in SharePoint 2003. However, if that option is selected, an error message states Earlier versions of client programs might not support a lookup column that allows multiple selections. Adding this column might block those programs from saving documents to this library.
Figure 8.32. Get information from options for a lookup column.
The Allow Unlimited Length in Document Libraries option is provided, but if clicked, a warning message states Columns with long text are not supported by most applications for editing documents and could result in a loss of data. Only remove this limit if users will be uploading documents through the website, and not saving directly from the application. As discussed earlier in this chapter, it is recommended NOT to allow unlimited length in document libraries. Refer to the Caution earlier in this chapter.
Figure 8.33 shows what not to do in the lookup column.
Figure 8.33. Incorrect configuration for a lookup column.

The option to allow multiple values in a lookup column should NOT be used if there are users with older versions of the Office products (Office 2003 or earlier). If the Require That This Column Contains Information option is selected for this column, the document will not be properly uploaded unless a choice is made in the lookup column. However, Office 2003 doesn’t support the interface that allows for multiple selections, so it will look to the user of an Office 2003 product as if the document uploaded successfully but it will be only “partially” uploaded, and the user will get errors when he tries to check it in. Users of the library will see the document as existing but checked out. And it cannot be checked in because a requirement for check in is to choose a lookup value, so the document exists in an incomplete state. If an administrator tries to force a check in, the message You must fill in all required properties before checking in this document will be provided.
- Yes/No (Check Box)—This gives you only the option of the default value being Yes or No.
- Person or Group—This type of column allows a user to choose a person or group. Figure 8.34 shows the options available. As noted previously, the Allow Multiple Selections option should not be used unless all clients are using Office 2007 products. The next option allows the selection of people only or people and groups. The administrator should decide whether the All Users or SharePoint Group option should be the set of users to choose from. If All Users is chosen, when a user is entering a value, he clicks the Browse button to access the Select People window, types in a partial name, and clicks the Search icon; matching names from the directory will appear. If SharePoint Group is selected, after the Browse button is clicked, the Select People window will show all the members of that group, which allows the user to make a choice from available names, rather than having to know the person to assign. Figure 8.35 shows an example of this.
Figure 8.34. Additional column settings for a Person or Group column.

Figure 8.35. Select People window for Person or Group column entry.

- Hyperlink or Picture—For this column, the administrator needs to decide whether to format the URL as a picture or as a hyperlink. This is a great way to display a graphic image within a library. It is generally a good idea to use a picture library instead of a document library if extensive graphics are to be displayed. Some project managers find this a relatively easy way to display red, yellow, green images, which immediately tell the user the status of the associated item. Of course, URLs can be displayed as clickable URLs as well to provide links to other sites or documents.
- Calculated (Calculation Based on Other Columns)—Calculations can be very useful but somewhat complex to set up. Fortunately the information available from the SharePoint help file is quite useful in this area. Clicking the question mark Help button in the upper-right corner brings up the Windows SharePoint Services Technology Version 3 Help and How-To window, and one of the options is Formulas and Functions. If selected, this item provides a good overview of how to use calculations effectively. For example, the formula =IF([Column1]=15, “OK", “Not OK") will display the value “OK” if the contents of Column1 equal 15, otherwise “Not OK” will display. Another sample formula, =TEXT(WEEKDAY([Column1]), “dddd"), will determine the actual day based on a date, so input of “11/19/2006” would display as “Sunday.” Many more examples are available in the help files.
- Business Data—This column requires the administrator to select a business data type from the Business Data Type Picker window, and then display a specific field. This process will be covered in Chapter 22, “Exploring Business Process and Business Intelligence Features in SharePoint 2007,” which discusses the Business Data Catalog.
Column Ordering
The Column Ordering link on the _layouts/listedit.aspx page allows the administrator to change the order in which the columns appear on the page when a new document is uploaded to the library or when document properties are edited. This is essentially a fine-tuning process, but can have an impact on the user experience if there are a number of different required fields or choices to be made. For example, leaving a required field at the very bottom of the list might cause it to be overlooked and generate an error when the user tries to save the input.
If content types are enabled in the library, the column ordering won’t be visible on the _layouts/listedit.aspx page, but must be accessed in the List Content Type page (_layouts/ManageContentType.aspx) accessible by clicking on the content type on the _layouts/listedit.aspx page.
Column Indexing
A new feature in SharePoint 2007, column indexing allows the administrator to determine which columns will be indexed by SharePoint, as shown in Figure 8.36. In this example, the administrator would like the Title column to be indexed so that content in the Title field can be included in searches. Chapter 13, “Benefiting from the Enhanced Search Capabilities in SharePoint 2007,” discusses other search improvements in more detail.
Figure 8.36. Indexed Columns page for a document library.

Creating Views in Document Libraries
Although it is all well and good that a document library contains dozens or hundreds of documents, and has been customized with a handful of additional columns, the end users will grumble if they aren’t given standard views to chose from that make it easy for them to find the information easily.
Organizations typically have other standard columns that they include, such as document status and customer or project name, and these are helpful columns to display in the default view. In some cases, sorting the documents by the newest is critical to the user base, and in others sorting by the document title works best.
When Create View is selected from the Settings menu in a document library, the administrator is presented with five options: Standard View, Datasheet View, Calendar View, Gantt View, and Access View.
Creating a Standard View
This is the most used view, and offers the following options:
- View Name—As usual, it is helpful to make the view name descriptive of what the view shows. “New View” doesn’t give useful information, but “View Sorted by Document Modification Date” tells the users what it shows. In addition, if a view is being created specifically for use on the home page or a web part page and to take up a minimum of real estate, a title such as “Home Page View” is helpful.
- Audience—The choices are Create a Personal View and Create a Public View. Personal views can be used only by the creator, whereas public views are available to all users.
- Columns—This section allows the administrator to decide which columns are displayed in this view. Most views should include the Type column, as well as the Name column, and often the ID column is helpful to display because it shows the unique number assigned to that document. Other columns can be used as needed. Note that this list represents the default columns for that type of library as well as any custom columns added, either created from scratch or added from the Site Columns list.
Remember that if the Name (Linked to Document with Edit Menu) option isn’t included in the view, users won’t have access to the drop-down edit menu, which means they can’t check out a document or perform other standard actions. The Edit (Link to Edit Item) can be included instead, but this might confuse some users because it takes them to the editform.aspx page, and they won’t see the drop-down menu.
- Sort—Two levels of sorting are allowed in document libraries. A best practice is to sort only by columns visible in that view unless the view name makes it clear what the sort criteria are. Sorts can be either ascending or descending. More popular sorts include by document name, created date, modified date, or on metadata added that are specific to the library.
- Filter—One or more filters can be applied to a view. The Show Items Only When the Following Is True option has to be selected, and then the criteria can be set. A column is chosen, and then the operand—is equal to, is not equal to, is greater than, is less than, is greater than or equal to, is less than or equal to, begins with, or contains—is chosen. The And or Or function is then chosen, and additional criteria can be set.
- Group By—Grouping creates headings that can be rolled up or expanded to show the contents grouped by a specific column’s contents. Two levels of grouping can be used, and the default state of Collapsed or Expanded can be chosen. A new feature of Number of Groups to Display Per Page has been added for libraries with large amounts of files.
- Totals—This section displays the columns that can have totals shown. For certain columns, the options might be None or Count; whereas for others, more options will be made available based on the type of content. If a currency column is present, for example, the options offered are None, Count, Average, Maximum, Minimum, Sum, Std Deviation, and Variance.
- Style—Several different styles are made available to change the formatting of the content: Basic Table, Document Details, Newsletter, Newsletter, No Lines, Shaded, Preview Pane, and Default. Preview Pane is new to SharePoint 2007 and offers a view of the document metadata when the document title is hovered over. Figure 8.37 shows a sample Preview Pane view.
Figure 8.37. Sample preview pane view.

- Folders—This section gives the options of using folders in this view. So, even if folders have been created in the library and are in use, this view can show content in a flat hierarchy. Furthermore, the view can be available from all folders, in the top-level folder only, or in folders of a certain content type.
- Item Limit—The total number of items to display per page in the view can be set. This can apply to the total number of items returned or to batches.
- Mobile—The view can be set as a mobile view, or the default mobile view, but it must be a public view. Mobile views are for mobile Internet devices such as phones; they display a more compact and vertical layout of the page.
Datasheet View
As covered in Chapter 7, a Datasheet view allows users with a compatible version of Office to view the contents of the document library in a spreadsheet format, and access a number of editing tools, including tools that can link or export data to other applications.
Gantt View
Also covered in Chapter 7, this view shows a graphical representation of the contents of the list, but requires that date information be available for the items.
Access View
If this option is selected, Microsoft Access 2007 will open and allow the user to create forms and reports that are based on the contents of the list. The use of Access with SharePoint 2007 libraries will be covered in Chapter 11, “Leveraging Additional Office 2007 Products in a SharePoint 2007 Environment.”
Creating Lists in SharePoint 2007
As with libraries, creating lists can be a complex process because the number of options is large and might be overwhelming to a new administrator. Many administrators choose to include a subset of the standard lists provided in Windows SharePoint Services 3.0 or SharePoint Server 2007. The following lists are available in Windows SharePoint Services 3.0:
- Announcements
- Contacts
- Discussion Board
- Links
- Calendar
- Tasks
- Project Tasks
- Issue Tracking
- Survey
- Custom List
- Custom List in Datasheet View
- Import Spreadsheet
SharePoint Server 2007 offers all of these as well as the following:
- KPI List
- Languages and Translators
Chapter 7 gives additional information about the basic features of each list, so additional time won’t be spent on each list in this section.
As with libraries, an administrator needs Manage Lists privileges to create a list. From the home page of the site, the View All Site Content link in the Quick Launch area can be clicked, and the Create button on the menu bar in the viewlists.aspx page can then be clicked to open the Create page (_layouts/create.aspx). In addition, if you are using the Collaboration Portal Site Template, the Site Actions menu offers the Manage Content and Structure link, which when clicked takes the user to the Site Content and Structure page (_layouts/sitemanager.aspx). With the proper site selected in the Navigation pane, the administrator can then select the New drop-down menu, and then choose List, which then opens the _layouts/create.aspx page. Other Site templates will simply use the Create button.
The choices for lists are split between three headings: Communications, Tracking, and Custom Lists. For this example, a custom list will be created, so Custom List should be selected on the _layouts/create.aspx page. The administrator will then be prompted for a name and a description for the list, and asked whether the list should be displayed on the Quick Launch bar. After this information is provided and the Create button is clicked, the administrator will see an empty list with the Attachments and Title columns. At this point, the administrator will have to perform additional customizations to the list in the same way that libraries can be configured, and as summarized in the section titled “Configuring Document Library Settings” earlier in this chapter.
Customizing SharePoint 2007 Lists
Many of the tasks that an administrator needs to perform are similar in both libraries and lists, so this section will concentrate on the differences between lists and libraries. Figure 8.38 shows the differences in list settings available in Windows SharePoint Services 3.0 and SharePoint Server 2007 lists, as available on the _layouts/listedit.aspx page. Windows SharePoint Services 3.0 lists do not allow for audience targeting settings, workflow settings, or information management policy settings. Microsoft obviously put some more thought into the reasons that companies would choose the more complex and expensive SharePoint Server 2007 product over the “free” Windows SharePoint Services 3.0 product.
Figure 8.38. Table comparing list settings in SharePoint Server 2007 and Windows SharePoint Services 3.0.

Some of these tasks will be performed when the list or library is being configured for the first time, whereas others will be performed on an ongoing basis, as users make requests, or the administrator realizes that tweaks to the configuration could provide better value to the users.
Versioning Settings for a List
Versioning settings for a list are simpler than for a library. Figure 8.39 shows the versioning settings page for a custom list. The options visible on this page depend on the choices made in the Content Approval and Version History sections. The Draft Item security options are grayed out unless Yes is selected in Content Approval. The Keep Draft for the Following Number of Approved Versions option is grayed out unless Yes is selected in the Content Approval section and Yes is selected in the for Create a Version Each Time You Edit an Item in This List option. In this example, Content Approval is turned on, and Version History is turned on, so the number of versions to be kept can be configured, and the number of versions that drafts will be kept for can be selected.
Figure 8.39. List Versioning Settings page for a custom list.
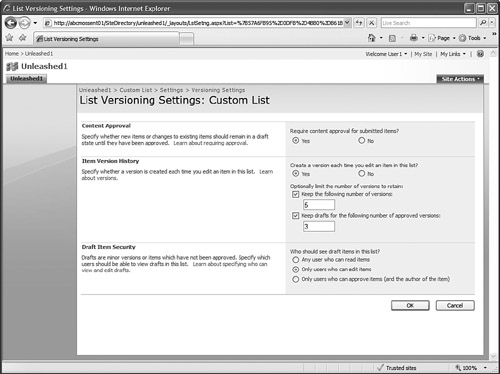
Advanced Settings for a List
Figure 8.40 shows the List Advanced Settings page (_layouts/advsetng.aspx) for a custom list. Note that this is slightly different for the options made available in a library. Lists provide the ability to limit read and edit access to items that are in the list. For some lists, it is advantageous to allow users to read only their own items (items that they have created), or to limit which items they can edit, or not let them edit any items at all. For example, in a survey list, users probably should be able to read only their own response to the survey, but probably shouldn’t be able to go back and edit their response. In a custom list used to display reference information, users might be allowed to read all items, but edit only the ones that they created.
Figure 8.40. List Advanced Settings page for a custom list.
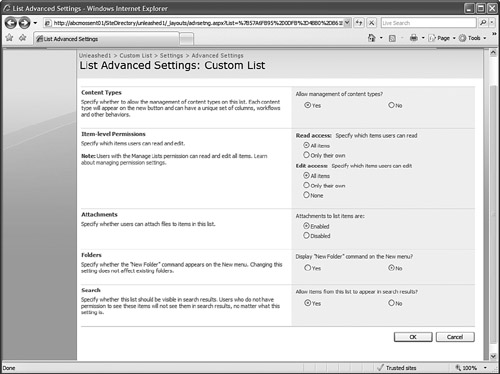
Attachments can be enabled or disabled for lists, and new folders can be enabled in lists. This feature enables the list to be more “library-like,” but there are still a number of reasons that libraries are better for storing documents and lists are better for storing rows of information, including
- Library templates can offer a variety of choices based on content types, whereas lists are more limited.
- Libraries can be email-enabled.
- Libraries can have custom Send To destinations.
Managing Lists and Libraries
Several tools exist to help the administrator keep on top of the different lists and libraries that exist in the site. By accessing the View All Site Content link in the Quick Launch bar on the home page, the administrator can quickly see all the different lists and libraries, even those that are not visible in the Quick Launch area. Figure 8.41 shows a sample view of the All Site Content page (_layouts/viewlists.aspx) with the default All Site Content view selected. Note in Figure 8.41 that the drop-down menu also provides views of document libraries, lists, picture libraries, discussion boards, surveys, and sites and workspaces for more specific views. This page doesn’t give access to additional tools, but does display the count of items in the list or library and the last modified date. This is a nice way for an administrator to see where the activity is taking place, and whether some lists or libraries simply aren’t being used. If a list or library hasn’t been updated in a number of weeks or months, it might be a good idea to check what content is available within it, and look for redundancy with another list or look for other reasons that it isn’t being used by checking in with some of the regular site users or power users. Use of audience targeting, RSS feeds, or adding some alerts for groups or users might enhance the use of this list. But pushing information to end users might not help if the list or library does not have useful content.
Figure 8.41. All Site Content page.

An administrator using the Collaboration Portal Site Template could also access the Manage Content and Structure link from the Site Actions menu, and gain access to additional management tools. Figure 8.42 shows a sample Site Content and Structure page (_layouts/sitemanager.aspx) with the Unleashed1 site highlighted in the Navigation pane on the left. A detailed review of these tools is left until the next chapter, which focuses on site-level management, but several of the tools available on this page are very helpful in the management of lists and libraries. In Figure 8.42, the drop-down menu for Project Documents was accessed, revealing the Open Link in New Window, New, Delete, Copy, and Edit Properties options. As shown by the arrow in Figure 8.42, a new item can be added from this interface, which would be an actual contact item. Note that content types can’t be added in this manner. If Edit Properties is selected, the Setting page (_layouts/ListEdit.aspx) page will be shown, so the full range of tools will be made available.
Figure 8.42. Site Content and Structure page.

Figure 8.43 shows the details of the Project Documents library after the link in the left navigation pane has been clicked. Note that each item in the library is displayed along with additional metadata. In Figure 8.43, a document is selected, as indicated by the arrow, and the Show Related Resources link was clicked, resulting in the display of the Resources Related To pane, as shown by the curved arrow. In this example, the links included in the document are shown. The document link in the Name column provides access to the Edit menu, as it would in the document library itself. The Edit column offers a 1 or 0 entry, which indicates whether or not the document is checked out, but note that the icon for the document does not change to show the checked out status. The Content Type ID is also visible in this view, at the right side of the Project Documents pane. It is a unique number such as 0x0101002ED2E3A979FE204785D073E629408491 that SharePoint uses to identify the content type and update it if needed.
Figure 8.43. Site Content and Structure page with library detail.

The New menu provides the options of creating a new folder (if folders are enabled in the list or library) or a new item (but not new content types). The Actions menu allows appropriate actions to be taken for selected items, among the following list:
- Copy (not allowed if document is checked out)
- Move (not allowed if document is checked out)
- Delete
- Check Out (not allowed if document is already checked out)
- Discard Check Out (only if document is checked out)
- Check In (only if document is checked out)
- Reject (only if item is approved)
- Approve (only if item is not yet approved)
- Publish (to create a major version, if enabled in the library)
- Unpublish This Version (to demote a major version to a minor version, if enabled in the library)
The Settings menu in the Site Content and Structure window provides the following options:
- List Settings—This link opens the _layouts/listedit.aspx page.
- Add to Favorites—This adds the Site Content and Structure page to Internet Explorer favorites.
- Show Link to This Location
The View menu shows the different views available for the list or library being displayed as well as a number of reports that are available to the administrator. In this example, the following views and reports are shown:
- All Documents—This is a standard view for a document library that shows all entries in the library.
- My Submissions—This is a standard view for a document library that shows all submissions from the current user.
- Approve/Reject Items—This is a standard view for a document library with content approval enabled.
- Checked Out to Me—All documents and pages checked out to “me” in the library, or in the site and subsites, if the site leaf is selected in the Navigation pane.
- Last Modified by Me—All documents and pages last modified by “me” in the library, list, site, and subsites, depending on which item is selected from the Navigation pane.
- Pending Approval—Any documents, list items, or pages pending approval by “me.”
- My Tasks—All tasks assigned to “me” on the site and subsites.
- All Draft Documents—All documents and pages not yet published on the site or subsites.
- Going Live Within Next Seven Days—All documents and pages that will be published and visible to readers within the next seven days in this site and subsites.
- Expiring Within Next Seven Days—All documents and pages that will be visible only to authorized users within the next seven days in this site and subsites.
These tools allow the list and library administrator to perform a wide variety of tasks, and he or she will quickly find this to be an indispensable tool for a Collaboration Portal Site. Note that there is still a need for tools that will provide additional basic information to the administrator. For example, a summary of who can do what in a list or library is still lacking.
Summary
This chapter covered the wide range of subject that the individuals tasked with designing and managing lists and libraries will need to be familiar with. The process of list and library design is quite complex, and some sample worksheets were provided that can assist in the design process. After the basic lists and libraries that the organization will be using have been designed, the details of each configuration need to be ironed out through trial-and-error testing, as well as based on the requirements for each list or library. Content types and site columns were introduced, and their importance in the design of lists and libraries discussed from a high level. The process of creating lists and libraries was reviewed, as well as the process involved in creating new columns and views. Any one of these topics requires extensive use and experimentation for an administrator resource to truly master the different possibilities, and gathering input from the end users and test users will be extremely important in the adoption cycle.
A sampling of the administrative tools available to the individuals tasked with managing and maintaining lists and libraries was also given. Additional attention will be given to management tools in the next chapter because there is some overlap between what the site administrator will be responsible for and what the list or library administrator will be responsible for.
Best Practices
- The process of planning lists and libraries was already fairly complex in SharePoint 2003 is now even more involved because SharePoint 2007 offers additional features and options when creating lists and libraries. If the bread-and-butter libraries and lists are well planned and tested before production rollout, the user community will get more value out of them, and reap more benefits in the collaboration arena as well.
- Site columns allow a site administrator to create standard columns for use in that site and subsites to ease the task of customizing lists and libraries. Note that columns from the portal can also be used, but in many cases it is better to use site columns that were created specifically for that site because changes to the site columns can be pushed out to all lists and libraries that use that column, and this might be too risky to do for every top-level site and subsite in the environment. Generally, a site administrator will understand the ramifications of such a push, but a portal administrator probably wouldn’t know how many dozens or hundreds of sites would be affected by such a change.
- Content types are an extremely powerful tool that allow an administrator to define the “wrapper” around a document in a library that controls the template used for the item, whether or not it is read only, workflow settings, document information panel settings, information management policy settings, and document conversion settings. Multiple content types can be defined for each library and thus libraries are no longer limited to using just one template.
- When creating a library, it is worth reviewing the differences in the basic capabilities between different libraries because some have limitations, such as not allowing a user to create an entry based on a template (picture library) or not being able to receive emails (wiki, data connection, translation management, report, and slide libraries).
- Training is an important part of the adoption cycle of libraries and lists, so customized trainings should be made available to the early adopters of SharePoint 2007. Ideally, these individuals will then provide a support structure for additional users to help them come up to speed quickly. The training should be tailored to users based on which features are being made available in the standard libraries and those features that will most enhance user collaboration and productivity.
- If versioning is to be used, the organization needs to realize that each time a new version is captured by SharePoint, a full copy of the file is being stored in SQL Server, thus the use of versioning, and number of major and minor versions kept, will affect the size of the content database(s).
- List or library templates can be created, and should be created during the testing phase to help new site administrators have easy access to approved lists and libraries. Content of up to 10MB can be included to provide standard documents relevant on the type of library.
- If the organization plans on email enabling libraries in SharePoint 2007, and attachments will frequently be attached to emails, a general recommendation is to use the option Save All Attachments in Folders Grouped by E-Mail Subject or Save All Attachments in Folders Grouped by E-Mail Sender to make it clear which email message attachments are affiliated with.
- A good basic set of options for configuring RSS feeds from a document library includes the following settings: File Enclosures Not Included, RSS Items Linked to Their Files, Checked Out To and Created By Columns Displayed, 25 Max Items Displayed, 7 days Included. Modifications can, of course, be made if needed, and typically include displaying other key metadata in the RSS feed.
- The Site Content and Structure page in the SharePoint Server 2007 Collaboration Portal provides a wealth of tools for administrators in charge of maintaining lists and libraries and provides access to the contents of each list and library as well as extensive management tools.