Chapter 12. Implementing Records Management and Enabling Web Content Management in SharePoint 2007
IN THIS CHAPTER
- Implementing Records Management in SharePoint 2007
- Enabling Web Content Management in SharePoint 2007
- Best Practices
Previous chapters in this section have covered many of the document management capabilities of document libraries and connectivity to Office 2007 and some Office 2003 applications. However, the more complex topics of records management and web content management have been saved for this chapter.
Records management is vitally important to publicly traded companies (and companies regulated by governmental organizations such as the FDA), and a successful records management program can mean the difference between passing or failing audits. In a similar way, effective management of content display (to users) and the overall look and feel of the SharePoint environment can tremendously impact how SharePoint is adopted within the organization and whether it is used to present an image and data to the external world, partners, and clients.
This chapter starts with the topic of records management. The discussion then turns to web content management, highlighting SharePoint Server 2007 tools that can meet a wide range of organizational needs. Notice that SharePoint Server 2007 is specifically mentioned here; Windows SharePoint Services 3.0 does not offer most of the tools that are discussed.
Implementing Records Management in SharePoint 2007
SharePoint Server 2007 offers a specialized records center site template, which is designed to be a records “vault” with features built in that help ensure the integrity of the files stored in it. The use of information management policies can help enforce labeling standards, auditing, and expiration of records. These policies can be configured within SharePoint Server 2007 and do not require additional Microsoft or third-party products. Within a records center, a feature allows items to be put on hold status, suspending the records management policies on items to help ensure that they remain unchanged during litigation, audits, or other processes. Record routing that enables automated routing of content to its proper location within the records management system, based on its content type, and metadata are packaged separately to provide additional information about the document. In addition, the records center was designed to be extensible if third-party applications are being used outside of SharePoint 2007.
Implementing records management in SharePoint 2007 requires some preparation to ensure that the process meets the needs of the organization. In addition, a number of steps are involved to properly configuring the SharePoint 2007 server in the Central Administration interface, design and use the proper content types, and then to configure the records center template and information management policies. These steps are covered later in this section.
From an organizational standpoint, a Records Management Plan should be created, as should a Retention Policy. Essentially, the Records Management Plan defines which records the organization will be storing in the records center site, which content types will be used, and how the documents will get to the records center, either via workflow, manual processes (such as using the Send To feature from a document library), or through automated batch processes. The Records Management Plan should also identify the roles and responsibilities of the individuals who will manage the records site; and ensure that the proper content types are being used, that workflows are kept up-to-date, and that batch processes are functioning. The Retention Policy should determine whether documents will expire after a certain period of time and what happens after that time (for example, delete or archive).
Consider creating a unique web application for the records center site. The data stored by the records center will then be stored in a separate content database, which can be backed up separately and restored separately. There might also be different guidelines for the storage of this information and retention of “official” company documents compared to “standard” documents stored in departmental site collections or personal sites.
Creating the Records Center
In SharePoint Server 2007, you can find a template called Records Center in the Enterprise tab. This template is specially designed to offer features that are well suited for use as a records management site. When a records management site is created, a number of standard lists and libraries are included.
Document libraries included in the records center by default are as follows:
- Hold Reports—Each report lists all the records included in a hold, if any.
- Missing Properties—A library that stores files that are missing metadata.
- Records Pending Submission—A temporary storage location for records submitted to the records center that are missing required metadata.
- Unclassified Records—A sample library that can be used to store records submitted to the records center that do not match any other Record Routing entry. When the site is first created, this is the default location for any submitted files.
The default document libraries in a records center site do not include the document libraries that will actually be used to store the records themselves. It is up to the records site administrator to determine the number and type of document libraries, what their titles should be, whether they use content types, what columns are required to have data, and other standard library settings.
Lists that are included in the records center by default are as follows:
- Holds—This list tracks external actions that my cause a record disposition to be suspended, for example audits or litigations. There are no holds by default, so the administrator will need to add these for different standard holds, or create new ones as needed. For example a hold might be created and titled “Audit Hold (Ernst and Young)” and this hold would then be applied to documents that the auditor had flagged as needing further review or update.
- Links—This is a standard links list.
- Record Routing—Use this list to route incoming records to the appropriate document library. For each type of record in the list, specify the title and description of the record type, the location where you want to store records of that type, and the name of other record types (aliases) that you want to store in the same location. You can specify any record type to be the default. If an incoming record doesn’t match any of the record types in the list, it is stored in the location you specified for the default record type. An example is given later in this section that shows how to create a routing list item and test its functionality.
- Records Center—An Announcements list.
- Submitted E-mail Records—This list is used by the records center to temporarily store received email records. When a document is submitted via email to the address for the site (listed by default in the Announcements list when the site is first created [for example, [email protected]]), it appears in this list. This list has the following settings: Email Enabled, Save Email Attachments, Don’t Save Original Email, Don’t Save Meeting Invitations, and Accept Email Messages Based on List Permissions. Content Approval is off, and Versioning is off by default. Allow Items from This List to Appear in Search Results is set to Yes (on the List Advanced Settings page), and this might actually not be an ideal setting because items in this list are only submissions and may not be approved for posting; so, consider changing this setting to No.
- Tasks—A task list for workflows.
It is strongly recommended that the standard lists and libraries not be deleted because doing so might affect the performance of the records center. A new records center administrator should review the configuration settings for each list and library to get a sense of their features, standard views, and functionality.
Configuring a Records Center as an External Service Connection
The Central Administration interface allows the configuration of a records center, so it is available from document libraries. This function is essential for some organizations and might actually not be desirable for others. For example, one organization might want document library users to be able to send documents directly to the records center, whereas others might want a more manual process in which only certain managers who know the email address of the records center can forward documents to it.
Only one records center can be configured per server farm in the Central Administration user interface. After a records center has been configured, a document library in that server farm will offer the records center as a Send To option, as shown in Figure 12.1.
Figure 12.1. Records Center option on the Send To submenu.
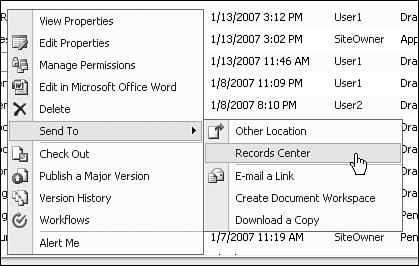
To enable this option, follow these steps:
- Start the Central Administration application. On the top link bar, click the Application Management tab.
- On the Application Management page, in the External Service Connections section, click Records Center.
- On the Configure Connection to Records Center page, in the Records Center Connection section, select Connect to a Records Center. In the URL box, type the URL where the Records Center web service is located (note that the URL should end with /_vti_bin/officialfile.asmx; for example, http://abcmoss01/sitedirectory/recordscenter/_vti_bin/officialfile.asmx). In the Display Name box, type a display name (that will show up in the Send To submenu in a document library) for the records center site. Click OK.
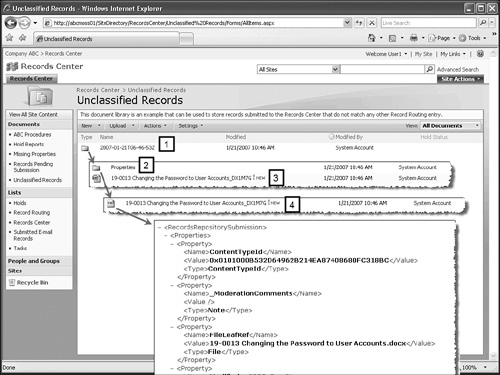
After configuring this, verify that it is functioning properly by accessing a document library within the farm. Access the Edit menu for a document, then Send To, and select the name of the records center. The message “Operation completed successfully” should then appear. Then visit the records center site and make sure the item has been placed in the proper location. If no additional configuration has been done on the records center site, the document is delivered to the Unclassified Records library, as shown in Figure 12.2. As shown in this figure, the file does not just appear in the library, but is packaged in a folder, indicated by the number 1, and this folder is labeled with the date and time it was created. Within this folder, as indicated by number 2, there is a Properties folder and the file itself, indicated by number 3. The actual file that was uploaded is stamped with a random alphanumeric extension to ensure that even if another version of the document is forwarded, this item will be a unique entry. Within the Properties folder is an XML file (number 4) containing additional information about the document, a subset of which is included in Figure 12.2. If auditing was configured for the farm, an Auditing Information folder is also included.
Figure 12.2. Breakdown of the results of sending a document to a records center.
Enabling Auditing for the Site Collection
As mentioned in the preceding section, auditing information can also be captured for a document. First, however, it must be configured for the site collection or for the document libraries from which documents will be routed. To enable auditing, follow these steps:
1. Access the top level sites with an account that has site collection administration rights, access the Site Actions menu, select Site Settings, Modify All Site Settings to open the Site Settings page, and then click Site collection audit settings.
2. The Configure Audit Settings page (_layouts/AuditSettings.aspx page) will open, as shown in Figure 12.3. The types of events to audit for the site collection can be chosen for document and items include: opening or downloading documents, viewing items in lists, or viewing item properties; editing items; checking out or checking in items; moving or copying items to another location in the site; deleting or restoring items. Events applying to lists, libraries, and sites can also be audited, with the choices being editing content types and columns, searching site content, and editing users and permissions. Click OK to return to the Site Settings page.
Figure 12.3. Configure Audit Settings page.

3. From the Site Settings page, click Audit Log Reports to see the different standard reports that are offered. These are quite numerous and include Content Activity Reports, Custom Reports, Information Management Policy Reports, and Security and Site Settings Reports.
The following section includes information about how to create an auditing policy that can be applied to specific libraries to monitor a subset of the activities that a site collection auditing policy audits.
Creating Site Collection Policies
Site collection policies can be created to further manage content in records center sites. As with audit settings, the Site Collection Policies tool is accessed from the Site Settings page (_layouts/SiteSettings.aspx) and then opens the Site Collection Policies page, which provides the tools to create and import policies. If the Create link is clicked, the administrator is presented with the Edit Policy page, as shown in Figure 12.4. The main options along with Name and Administrative Description are the Policy Statement, Enabling Labels, Enabling Auditing, Enabling Expiration, and Enabling Barcodes.
Figure 12.4. Edit Policy page.

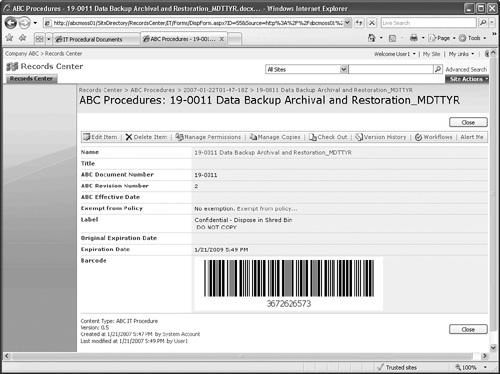
These policies are shown when a user views the document properties, and some options apply when a user prints a document that has a policy applied. (For instance, the user is prompted to input a barcode number or to insert a label.) Figure 12.5 shows a document properties page (DispForm.aspx page). The label information is listed, the expiration date assigned to the document is listed, and the barcode automatically generated is listed.
Figure 12.5. Document properties page showing policy options.
Using Content Types to Ensure Proper Categorization in the Records Center
A key component in configuration of the records center is to have proper content types in use in the document libraries that will be used to store the documents that will ultimately end up in the reports center. Ideally, these would be determined during the design phase of the SharePoint 2007 project, to ensure that they are included in the site templates that will then be used for the different departmental site collections.
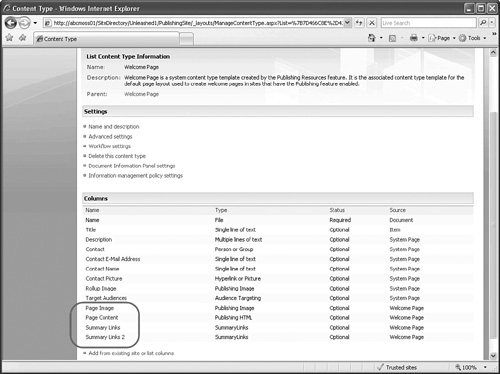
For example, Company ABC might want content types named ABC IT Procedure, ABC Manufacturing Procedure and ABC HR Policy that will be made available in document libraries that will be routing documents to the records center. There might then be a document library in each top-level departmental site that is titled ABC DepartmentName Procedural Documents that includes this content type. The top-level site administrator for that department (the IT department, for example) would then be in charge of reviewing any documents posted to this library and then using the Send To feature to manually send an approved document to the records center. Figure 12.6 shows the Site Content Type page (_layouts/ManageContentType.aspx) for the ABC IT Procedure content type. This simple content type just adds three columns to the parent document content type and points to a customized template that includes standard section headings and header and footer configurations. The added columns, circled in Figure 12.6, are ABC Document Number, ABC Revision Number, ABC Effective Date, the first two of which are required, the third is optional.
Figure 12.6. Site Content Type page.

Assuming this content type is applied to a document in the ABC IT Procedural Documents document library, the site administrator will then just have to access the Send To feature to send the document to the records center, where it will be routed into a specific library according to the Record Routing list, as discussed below. This assumes that the records center is configured as an external service connection.
Creating Additional Document Libraries in the Records Center
As mentioned earlier in this chapter, the records center template does not by default include the destination document libraries, only specialized libraries to hold content that does not include a complete set of metadata. So, the records center administrator must create one or more libraries to store the documents that will be maintained.
Note that in the records center template, document libraries cannot be deleted through the user interface, so some thought and planning should go into how many document libraries need to be created.
It is not required to use the same content types in the document library that were used in the initial document libraries, and applied to the documents for routing purposes, because the metadata will be packaged in the XML files bearing the documents’ names. However, easier access to the metadata from the content type can be found through the View Properties link in the Edit menu.
Because the default view in a document library organizes routed documents and their associated property and auditing XML files (as applicable) in folders, the site administrator might want to create views that do not use folders. To do this, create a new view for the document library, give it a title (for example, No Folders), and in the Folders section of the page select Show All Items Without Folders. Click OK and review the results. Note that now there are two or three files (depending on whether auditing is enabled) for each uploaded document.
Try modifying the view (No Folders, in this example) to group by type. To do this, select the Modify This View option from the View menu, and then in the Group By section select Type (icon linked to document) from the drop-down menu in the First Group by the Column area. And, select Expanded in the By Default, Show Groupings section. Click OK. A sample view is shown in Figure 12.7. This provides quicker access to the data in the document library without having to navigate up and down through the folder structure.
Figure 12.7. Modified view in a document library.

Modifying the Record Routing List to Route Content Types
The next step in the process of configuring the records center is to add an item to the Record Routing list that will route a document to the appropriate document library in the records center site when it is received. The content type ABC IT Procedure was created in the previous section, and an item can be added to the Record Routing list that will route documents of this content type to a specific document library in the records center site.
To add an item to the Record Routing list, follow these steps:
1. Access the Record Routing list on a records center site. Click the New menu and select New Item.
2. Provide a title for the item. This is important because it represents the name of the content type to be routed. For this example, enter ABC IT Procedure in the title. Then a description can be entered, as shown in Figure 12.8. The location, which is the document library name, needs to be entered. Aliases can be entered to represent this record routing entry. Finally, if the default box is checked, this library will receive any items routed to the records center site that don’t contain a content type that can be routed.
Figure 12.8. Record routing for a content type.

3. A file that is sent to the records center using the Send To feature in a site library will be routed into the appropriate record center library based on the content type of the document and the matching entry in the Record Routing list in the records center. Words in the Title or Alias in the routing list should match the name of the Content Type of the document.
Email Content as Records
Exchange Server 2007 includes policy features similar to those provided by SharePoint Server 2007. In Exchange Server 2007, an administrator can configure an Exchange folder so that when a user moves an email message into the folder, the e-mail message is copied to the records center site via Simple Mail Transfer Protocol (SMTP).
Enabling Web Content Management in SharePoint 2007
SharePoint Server 2007 incorporates many of the features and capabilities previously offered in Content Management Server 2002 (CMS). Many people are curious about the additional tools offered by CMS 2002, so a quick summary of some of the key features is provided here:
- Template-Based Publishing—Centrally manage branding, navigation, layout, and corporate publishing standards through authoring and presentation templates.
- Publishing Tasks—Streamline the publishing process by creating publishing tasks that automate repetitive steps.
- Publishing Workflow—Ensure content is properly reviewed and approved prior to publication by developing multistep role-based workflow customized to meet your business needs.
- Content Scheduling—Ensure content is always published on time and is never out of date by automating your publishing and archiving schedule.
- Real-Time Site Updates—Streamline the content deployment process by enabling business users to safely publish content in the development environment, the staging environment, or the web production servers.
- Page Revision History—Enable users to perform ad hoc audits by automatically storing content revisions and page versions.
- Dynamic Page Assembly—Dynamically assemble pages to personalize content based on user profile, click-through analysis, Internet browser, device, and language preference.
- Dynamic Template Switching—Switch templates quickly to present content in different styles and layouts to support diverse sets of browsing devices.
- Connected Content Pages—Easily share content across multiple pages within the website.
- Dynamic Content Caching—Achieve maximum page serving performance by caching of both static and dynamic content.
- Site Deployment Manager—Import and export content and templates for deployment and replication between servers.
Some of the features also existed in some form in SharePoint 2003, such as the ability to require approval before a document appears to the general public in a document library, which can be considered a level of publishing. This can come in handy in an Announcements list, for example, to ensure that announcements do not appear before they have been reviewed. Version tracking of documents in document libraries was also included, but only major (1, 2, 3) versions were supported, so there wasn’t a distinction between a draft and a major version.
List templates, library templates, and site templates enabled administrators to capture a level of customization and make it available to other sites in the collection, but to make a site template available to use for new top-level sites required a “force-feeding” process and command-line activity to make the portal aware of the new site and to make it available in the list of site templates.
Site themes and Cascading Style Sheets (CSS) allowed a certain amount of control over the look and feel of the site and pages contained in it, but extensive configuration changes required significantly more work on the part of the designer and involved creating new site definitions, or editing multiple XML files, which was by no means an intuitive process. FrontPage 2003 gave “complete power” to designers, but caused the pages to become unghosted in the process, which affected performance and changed the behavior of the pages in several key ways. In fact, FrontPage 2003 was scary enough to prompt many organizations to forbid its use. Changing simple user interface components, such as the navigation bar, or even changing the order of items in the Quick Launch area, generally required the use of FrontPage or the purchase of third-party web parts. So, a common complaint was that the navigation tools were subpar (or perhaps even less complimentary).
Workflow also was not natively provided in SharePoint 2003 products, although third-party products from companies such as Nintex and K2.Net or CorasWorks provided different levels of workflow.
At the portal level in SharePoint Portal Server 2003, the use of audiences could also affect the views of content that end users had.
SharePoint 2007 incorporates and improves on many of the features of CMS 2002 to make the process of content management much smoother. A number of features have already been presented in previous chapters, including the following:
- Enabling features such as Require Content Approval for submitted items and Create Major versions and Create Major and Minor (draft versions)
- Determining who can see draft items in a document library.
- Creating a list template or a site template
- Modifying the basic navigation options for a site and modifying the Quick Launch area
Publishing Templates
A good place to start and learn about publishing in the SharePoint environment is with the publishing templates offered with a site collection in SharePoint Server 2007 (but not in Windows SharePoint Services 3.0). The options are as follows:
- Publishing Site—Creates a site for publishing web pages. This is well suited for more complex and professional layouts, where the standard web parts will be ungainly and visual content is to be integrated with text.
- Publishing Site with Workflow—Creates a site for publishing web pages on a schedule by using approved workflows.
- News Site—A site for publishing news articles and links to news articles. It includes a sample news page and an archive for storing older news items. A news site is included in the standard enterprise Collaboration Portal template.
Publishing Sites
Fundamentally, a publishing site is designed to be composed of a variety of pages that are stored in the pages document library. These pages contain content that can be customized, and the pages themselves use system content types and page layouts stored in the Master Page Gallery. This allows the organization to control the look and feel and layout of the standard pages (such as Page, Article Page, and Welcome Page), while the individual publishing site designers and administrators can concentrate on the content and functionality offered by the pages.
Publishing sites offer a WYSIWYG editing environment different from the tools offered in the default.aspx of most standard SharePoint 2007 sites. A variety of tools are provided to web designers to facilitate the creation, modification, and storage of pages, and these are discussed later in this section.
When a new publishing site is created from the template, a blank site including document libraries titled Documents, Images, and Pages for storing web publishing assets and a Workflow Tasks list are provided.
A required feature for a publishing site is Office SharePoint Server Publishing, which must be configured as Active in the Site Features page (_layouts/ManageFeatures.aspx). This feature is not active by default for nonpublishing sites. If it is turned on (for example, for a team site), the site will add the publishing-specific libraries and allow the use of page layouts and will take advantage of other publishing features such as site variations.
Figure 12.9 shows a new publishing site after Edit Page was clicked on the toolbar. As shown in the address bar, this page actually resides in the Pages library in the site. A standard SharePoint 2007 site, such as one created from the Team Site template, offers a default.aspx page in the top-level folder. By publishing pages from the pages library, the publishing site offers more flexibility to designers, including the ability to save a variety of different versions of a page (helpful in case rollbacks are needed or to copy base pages from one publishing site to another).
Figure 12.9. New publishing site default.aspx page.

The page editing toolbar is visible on this page (it appears if Edit Page is selected from the Site Actions menu). This toolbar provides information on the status of the page (Checked Out, in this case) and the status of the page (Only You Can See and Modify This Page in Figure 12.9). Several menus are available—Page, Workflow, Tools—as are the Check In to Share Draft and Publish buttons. Summaries of these menus are as follows:
- The Page menu offers Save, Save and Stop Editing, Check In, Discard Check Out, Page Settings, Delete Page, and Add Web Parts.
- The Workflow menu provides tools specific to workflows. If one or more workflows have been created for the pages library that stores this page, the Workflow menu allows the use of Publish, Cancel Approval, Cancel Scheduling, Unpublish, Approve/Reject, View Page Tasks, Start a Workflow.
- The Tools menu provides tools including Spelling, Preview in New Window, Check for Unpublished Items, Submit a Variation, Update Variations, Quick Deploy, Version History, Compare Text Changes, View Page Status, and View Recycle Bin.
Although a full review of all these tools is beyond the scope of this chapter, they offer the page designer a full palette of tools to facilitate the design process. The designer doesn’t have to leave the SharePoint 2007 browser interface for most standard changes. SharePoint Designer 2007 can be used for additional editing, and this is covered later in this chapter.
Because the pages are stored in a document library, the standard SharePoint 2007 tools are available and can prove helpful in the design process. For example, version control is on by default for both major and minor revisions, draft items can only be seen by users who can edit items, and documents are required to be checked out before they can be edited.
Three content types are included in the pages library by default: Page, Article Page, and Welcome Page. Figure 12.10 shows the Welcome Page list content type management page (_layouts/ManageContentType.aspx), which clarifies that “it is the associated content type template for the default page layout used to create welcome pages in sites that have the Publishing feature enabled.” A link to the parent content type is provided, as are access to additional settings and a list of the columns included in this content type. Notice that the field controls (visible in Figure 12.9) Page Image, Page Content, Summary Links, and Summary Links 2 are listed in the Columns section of Figure 12.10. This shows that the content type actually controls the components that are included in the welcome page, and these can be affected by creating a new content type or modifying the existing ones.
Figure 12.10. Welcome Page content type information page.
Another key component that affects the overall look and feel of the page is the page layout associated with the page; for example, the welcome page is associated with the WelcomeLinks.aspx page layout. The page layout editing process is reviewed later in this chapter along with a review of SharePoint Designer 2007 functionality.
Edit Content in the Field Controls
Editing content on a page in a publishing site, as shown in Figure 12.11, is fairly straightforward:
- The Page Image field type offers the Click to Add a New Picture link. After a new picture has been selected, the Edit Picture tool provides access to a number of settings in the Edit Image Properties window that make the life of the designer much easier. The image can function as a hyperlink if desired, and can open a new window when clicked. Other tools include layout alignment options (bottom, middle, top, left, right, top of text, middle of text, bottom of text), the border thickness (0 indicates no border), horizontal and vertical spacing (pixels), the ability to use the default image size, or to specify a size in pixels and to maintain the aspect ratio (you only need to enter the width or the height to maintain aspect ratio). With these tools, the designer can quickly modify how the picture impacts the content in the Page Content field control.
- The Page Content field type editing tools are shown in Figure 12.11 and allow the designer to compose fairly advanced text, image, and table combinations. As indicated in Figure 12.11, one of the tools is the Insert Reusable Content button. In this example, two items of reusable content (discussed in more detail in the next section) have been added. These can be moved around in the field control if needed. Another tool is the Edit HTML Source button, also labeled in Figure 12.11. This is a quick way to add HTML code to the content, such as something simple like the horizontal line (<HR align=center width=250>) that was added to this content. A quick look at the HTML source for this content shows the location and ID of the reusable content: <SPAN class=“” id=__publishingReusableFragment contentEditable=false fragmentid="/ReusableContent/2_.000“>
Figure 12.11. Editing tools on a publishing page.

- The Summary Links field control allows the designer to quickly add a new link or a new group. The link can be to an item or a person (as indicated with an arrow in Figure 12.12). A New Group can be added to organize a larger number of links (circled in Figure 12.12). The Configure Styles and Layout button provides access to a number of different styles that can be applied to new links and to existing links. Some of these styles are Image on Left (used in Figure 12.12), Title and Description, Title Only, Bulleted Title, Image Only, and Clickable.
Figure 12.12. Summary links editing tools on a publishing page.

Figure 12.13 shows the published results of this page. The pages available on the standard Publishing Site template make it ideally suited for communicating to a wide audience and can use formatting, graphics, and layout to grab the attention of both internal viewers and external partners.
Figure 12.13. Published version of a welcome page.

Because version tracking in on by default in the Pages library, it is a good idea to use the Preview in New Window tool in the Tools menu when in Edit mode for a page. This will generate fewer versions than using the Check In to Share Draft feature or the Publish button. And after a page has been published, it is helpful and will free up space in the database if the Delete Minor Versions tool is used in the Version History page (_layouts/Versions.aspx). The minor versions will be in the Recycle Bin for the defined number of days (in case they are needed for restoration).
Leveraging Reusable Content
Reusable content is created and managed in a list contained in the top-level site in SharePoint Server 2007 called Reusable Content. This list does not have content by default, but that is easily remedied by clicking the New menu and selecting either Reusable HTML or Reusable Text. If reusable content will be used extensively, populate the Content Category column, because it does not have any choices in it other than “none” by default. For example, reusable content might be categorized by internal versus external content, company information, employee bios, product descriptions, and other standard groupings.
The new item page for reusable content (NewForm.aspx) allows for the entry of a title, comments, the selection of a content category (if any have been defined), and a check box for Automatic Update. If the Automatic Update box is checked, the content of the item is inserted into web pages in read-only format; and if the source changes, it changes on the pages where it is referenced. If it is not selected, a copy of the content is inserted into web pages in editable form and won’t be updated if the source changes.
Choosing a Different Master Page for a Publishing Site
As shown in Figure 12.13, this site has a professional appearance, but the designer might want to make additional changes. Because this page is designed to act as a type of newsletter, the designer feels that there is too much “clutter” on the site and would like to change the overall look and feel. An easy way to do this is by accessing the Site Settings page (_layouts/settings.aspx) and selecting Master Page in the Look and Feel section. The Site Master Page Settings page (_layouts/ChangeSiteMasterPage.aspx) will then open.
This allows the designer to change the site master page or the system master page. The site master page is used by all publishing pages, but not the other forms and views on the site. The system master page will change other forms and pages. So for publishing sites, the two can be the same or completely different. Often, having a different site master page is helpful so that users can tell when they are on published pages.
To make this change, the designer changes the default setting (Inherit Site Master Page from Parent of this Site) to Specify a Master Page to Be Used by This Site and All Sites That Inherit from It. A drop-down menu lists all the *.master pages that are stored in the Master Page Gallery on the top-level site. A preview is shown of the master page, including color scheme and a brief description is given. There is an option to Reset All Subsites to Inherit This Site Master Page Setting, which can be selected if this change is to be populated to sites that are currently inheriting from the site. The same options are available for the changing the system master page.
The third section on the Site Master Page Settings page allows the designer to specify a different CSS URL if needed, or to use the Windows SharePoint Services default styles, or to specify a CSS file to be used by the current site and sites inheriting from it.
The designer in this example decides to choose the BlueBand.master site master page. Figure 12.14 shows the results when this option is chosen, and the welcome page for the publishing site is displayed. When compared to the page displayed in Figure 12.13, the new BlueBand.master version has a less-cluttered appearance because the Site Actions menu has been moved to the top navigation bar, the search field no longer provides the drop-down menu, no tabs are visible, and the Recycle Bin link and icon no longer appears in the Quick Launch. The breadcrumb trail has shifted up and to the left, so it is a little less intrusive to the content of the page.
Figure 12.14. Welcome page with BlueBand.master site master page applied.

Modifying the Master Page
If the designer wants to make additional changes that aren’t allowed in the browser editing interface, the master page and style sheets can be modified. This process is a bit more involved, but SharePoint 2003 users will agree that it is a more supportable process, because designers don’t need to manually edit any files on the server itself in most cases. Following is an example of modifying the BlueBand.master page and the logo style.
The logical place to start would is just to modify the Pages/default.aspx page on the publishing site. If the user attempts to do that, she will see the following message: “This page cannot be edited in SharePoint Designer. You can edit the content in the browser, or edit the corresponding page layout in SharePoint Designer.” The options Edit in Browser, Edit Page Layout, and Cancel are provided. If the designer chooses Edit Page Layout, which is what she wants to do, the WelcomeLinks.aspx page opens. This is not the page she wants, so she closes SharePoint Designer and decides to go directly to the Master Page and Page Layouts Gallery and follows these steps:
1. Access the Master Pages and Page Layouts Gallery from the Site Settings page (_layouts/settings.aspx) for the top-level site, and click Master Pages and Page Layouts link. The Master Page Gallery opens. Check out the BlueBand.master document, and then select Edit in Microsoft Office SharePoint Designer from the Edit menu.
Make sure that the account being used to edit the master page has appropriate privileges in the Master Page Gallery. By default, the designers group is included with design privileges. This allows a member of the designers to view, add, update, delete, approve, and customize content. Other groups have limited privileges: Approvers have read privileges, hierarchy managers have read privileges, restricted readers have restricted read privileges, style resource readers have read privileges, and the system account has full control. Also, verify the privileges of the designer in the Styles library (accessible through the All Site Content page). Once again, the designer group has design privileges, but other accounts are locked down.
2. SharePoint Design 2007 will open and display the BlueBand.master document. By default, the Folder List, Tag Properties, Page Design, Toolbox, and Manage Styles tool panes will be open. Figure 12.15 shows an example where the Split mode of editing has been selected.
Figure 12.15. BlueBand.master page open in SharePoint Designer 2007.

3. Select the logo (circled in Figure 12.15). This will reveal the code that corresponds to this item, and the Tag Properties pane will show property information about that item. Both of these items are indicated by straight arrows in Figure 12.15.
4. A number of options are now available for the designer, depending on what she wants to accomplish. In this case, she just wants the sample logo to go away because it has nothing to do with the organization. Options include the following:
• Simply delete the logoLinkId. When saved, the published page will not display anything in the region, solving the problem.
• Change the CSSClass to something like headertitle-large. This will get rid of the logo.
• Edit the CSS style that includes the logo. It turns out not to be the .logo style, but the “.logo a” that references the logo. A curved arrow connects the “.logo a” style with its preview, showing the logo. If the user right-clicks “.logo a,” several options are available, including Go to Code, New Style, Modify Style, Attach Style Sheet, and others. She could select Go to Code and change the reference to a different logo file. (Clicking the Modify Style option would allow editing of the logo file as well using a more user friendly user interface.) Figure 12.16 shows an example of this level of editing where the default reference to a logo .jpg file (originally bl_logo.jpg) was changed to the appropriate logo file (logo75_2c.jpg). The padding was also changed from the default 75 pixels to 90 pixels because the new logo is wider than the old one. This change also requires that the new logo is uploaded to the Style Library Images folder.
Figure 12.16. Changing the Band.css file in SharePoint Designer 2007.

- When the designer saves these changes, the Band.css style sheet is modified, which will affect every site that references this style sheet; so a change like this should only be made if the designer is sure the results will not be negative. In addition, the Band.css file will need to be checked out by the designer in the Style Library, en-us, Core Styles folder. Because versioning is on, and check out is required before modifying any of these files, any “goofs” can be undone by unpublishing the latest version and restoring the original version. But care is required if this level of design work is to be performed. This being said, the results of changing the reference to the logo had the affect the designer wanted, as shown in Figure 12.17. The irrelevant logo is gone, replaced with a company-approved logo, and for additional pages created on this site, the same look and feel will apply, as shown in Figure 12.18.
Figure 12.17. Results of changing the BlueBand.master page and Band.css file.
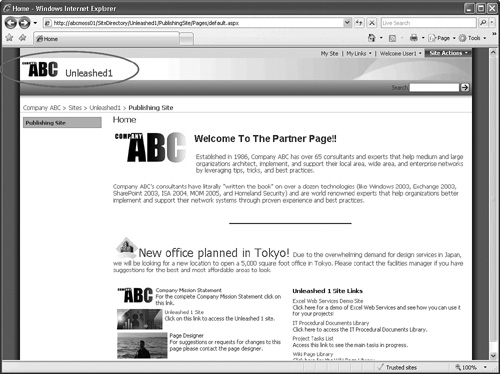
Figure 12.18. New page on the publishing site showing the updated logo.

Creating Master Pages and Page Layouts
The process recommended by Microsoft to create a new master page uses SharePoint Designer 2007 to create a new page, and then the minimal code needed for proper functionality is entered. You can find the full set of steps and the code needed in the SharePoint 2007 SDK documentation. Search for “How to: Create a Minimal Master Page” on the Microsoft website for the steps and the code.
In addition, existing master pages can be copied, and then the copies can be modified to the heart’s content of the designer.
Page layouts are fairly easy to create, as follows:
1. To create a new page layout, access the Master Page Gallery, click the New button, and select Page Layout. The description of a Page Layout clarifies that it is “a system content type template created by the Publishing Resources feature. All page layouts will have the column templates from Page Layout added.”
2. Then the options available from valid existing content types (Page Layout Content Types or Publishing Content Types) are provided on the New Page Layout screen (shown in Figure 12.19). For this example, choose Article Page in the Page Layout Content Types.
Figure 12.19. New Page Layout page.

3. Enter the URL name, title information, and optionally a description.
4. If different variation labels are available, they can be selected, too. Variations are discussed later in this chapter.
5. Click OK. The Master Page Gallery will return. Select the new page, and select Edit in Microsoft Office SharePoint Designer. If asked to check out the document, click OK.
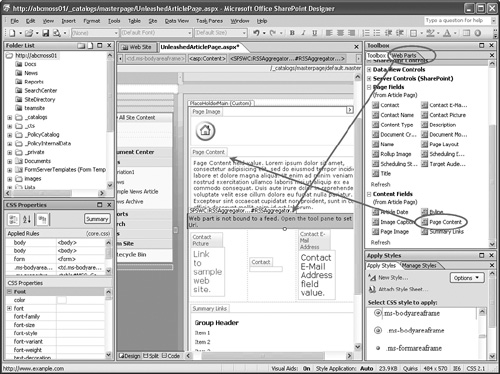
6. When the page is opened in Designer 2007, access Content Fields in the Toolbox pane, and drag and drop several to the body of the page within the PlaceHolderMain (Custom) field, as shown in Figure 12.20. Web parts can also be added by selecting Web Parts from the Task Panes menu. The Web Parts tab is visible behind the Toolbox tab in Figure 12.20. After the basic Page Fields and Content Fields and web parts have been placed on the page, click the Save button, and then close the file.
Figure 12.20. Adding page fields, content fields, and web parts in Designer 2007.
7. Return to the Master Page Gallery and check in the file as a major version.
Once created, saved, and published as a major version, this new page layout will appear as an option when a user in a publishing site is in the process of creating a new page.
After a new page layout has been created, it is worth a visit to the Master Page Gallery to make sure it is really checked in and ready for use. For the new file created, access the Edit Properties tool in the Edit menu and verify that the proper content type is applied (for example, Page Layout), that the item has both a name and a title, that the associated content type group (for example, Page Layout Content Types) and content type name are correct (for example, Article Page). Also, verify that Hidden Page is not selected. Note also that Authenticated Cache Profile and Anonymous Cache Profile settings can be configured here. Make sure to save changes, check the document in as a major version (or minor as appropriate), and approve it so that it can be seen by other administrators and designers.
Cache Profiles
Cache profiles can enhance the performance of .aspx pages when used properly. When configured, each front-end server uses the page output cache to store rendered output of a given page, and different variations of this page for different user classes (such as Member, Owner, Visitor). Note that extra RAM might be required if cache profiles are enabled because RAM is used to cache the rendered pages.
Output cache needs to first be enabled and can be configured from the Site Settings page (_layouts/settings.aspx) for the top-level site by clicking Site collection output cache in the Site Collection Administration section.
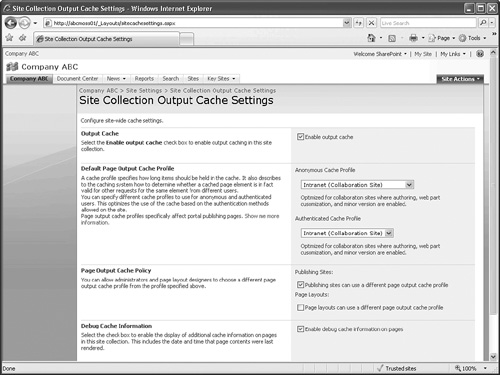
Enable Output Cache needs to be selected, and then anonymous cache profile. Authenticate cache profile options can be selected. Other options are available as shown in Figure 12.21. In this example, the anonymous cache profile and the authenticated cache profiles are set to Intranet (Collaboration Site). Publishing sites can use a different page output cache profile, and debug cache information on pages is selected.
Figure 12.21. Site collection output cache settings.
Additional settings are available via the Site Collection Cache Profiles link in the Site Collection Administrator area of the Site Settings page, including the following:
- Perform ACL Check
- Duration in Seconds to Keep the Cached Version Available
- Check for Changes
- Vary by Custom Parameter
- Vary by HTTP Header
- Vary by Query String Parameters
- Vary by User Rights
- Cacheability
- Safe for Authenticated User
- Allow Writers to View Cached Content
The Site Collection Object Cache link in the Site Collection Administrator area of the Site Settings page gives access to additional settings and tools that can be used to reset the cache and manage cross-list queries:
- Object Cache Size
- Object Cache Reset
- Disk Based Cache Reset
- Cross List Query Cache Changes
- Cross List Query Results Multiplier
It is difficult to provide best practice recommendations for setting because of the number of variables. In general, the organization should run performance tests on the environment without cache profiles, and then enable the cache profiles in different configurations and rerun the tests to optimize the results. The impact on front-end server RAM should be reviewed at different load levels to ensure that it is sufficient. However, it is clearly advantageous to the farm administrator to have a toolset of this nature available.
Working with Site Variations
Site variations are designed for organizations that are working with multiple languages. A site or site collection is marked as the source version, and changes made to the source can be automatically or manually propagated to the target variations. As is demonstrated in this section, a language needs to be identified for each variation, and SharePoint 2007 will automatically detect the language in use on the visitor’s computer and route the user to the appropriate page, if there is one that corresponds to the user’s language.
At the top-level site, access the Site Settings page (_layouts/settings.aspx) and select the Variations link in the Site Collection Administration section. The following settings can be configured on the Variations Settings page (_layouts/VariationSettings.aspx):
- Variation Home—Browse to the site where the source and target variations will be created.
- Automatic Creation—Site and page variations can be automatically created, or not.
- Recreate Deleted Target Page—If someone deletes a target page, when the source is republished a new target page can be created or not.
- Update Target Page Web Parts—Web part changes can be propagated when the source page is updated and then published. If changes are published, any personalization on target pages will be lost.
- Notification—An email notification can be sent to owners when a new site or page is created or when a page is updated by the variation system.
- Resources—Choose to either reference existing resources or copy resources.
After these variations settings have been chosen and saved, the variation home cannot be changed because variation hierarchies will have been created. Other settings, such as Automatic Creation, can be changed at a later date. There can also only be one variation within a site collection.
After the variation has been created, a page titled VariationRoot(default) is created in the variation home site (as shown in Figure 12.22), and the default welcome page of the variation home is replaced with the VariationRoot page. So for example, if a user now clicks News, that user will actually be sent to the News/Variation1/Pages/default.aspx page. This behavior is controlled by the VariationsRootLanding.ascx file located on the front-end server and can be edited if needed. The SharePoint 2007 SDK offers details about the editing process. Search Microsoft.com for “How to: Customize the Variation Root Landing Logic.”
Figure 12.22. Site content and structure for variations-enabled site.

Next, the variation labels need to be created. Access the Variation Labels link on the Site Settings page (_layouts/settings.aspx). The Variation Labels page will open (_layouts/VariationLabel.aspx). Enter the following information:
- Label and Description
- Display Name
- Locale—The language set that will be looked for to route users to this variation.
- Hierarchy Creation—Choose between Publishing Sites and All Pages, Publishing Sites Only, or Root Site Only.
- Source Variation—One of the variations can be set to be the source variation, and a Publishing Site template needs to be selected. This setting cannot be modified after variation hierarchies have been created.
Variation logs are also available from the Site Settings page (_layouts/settings.aspx). Figure 12.23 shows a sample Variation Logs page with records of several activities.
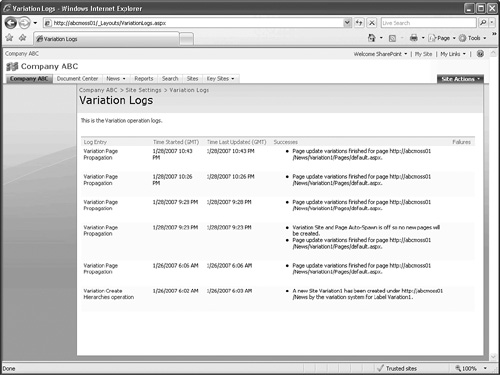
With the addition of workflows to the pages library, an organization can have resources involved in the process to translate the variation sites as appropriate, because translations aren’t automatically completed.
Document Conversion
Another powerful tool provided by SharePoint Server 2007 is the ability to perform document conversions. Document conversions can occur between the following formats:
- From InfoPath form to web page (.xml into .html)
- From Word document to web page (.docx into .html)
- From Word document with macros to web page (.docm into .html)
- From XML to web page (.xml into .html)
A converted document still has some connection to the original document, but not vice versa. The ParentID string is saved with the converted document that represents the name of the original file and ParentVersionID that represents the version number of the original file. Other than that, there is no enduring connection between the two documents, and they should be treated as separate entities. For example, if the original document is updated, it will not automatically update the converted document.
Figure 12.24 shows the configuration options for document conversions for a web application (_admin/DocTransAdmin.aspx). Additional configuration options are available in the Converter Settings area on this page, including time-out length in seconds, maximum number of retries, and maximum file size that the converter will handle.
Figure 12.24. Document conversions settings.
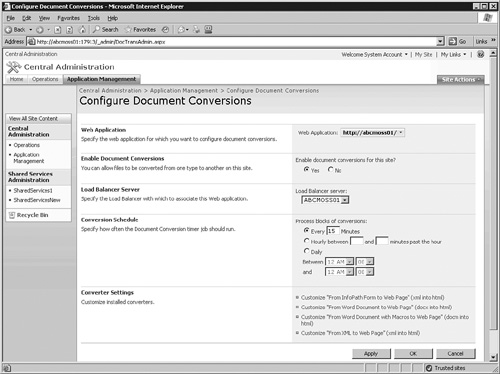
Figure 12.25 shows a sample Create Page from Document screen when the Convert Document link is selected from the Edit menu in a document library in a publishing site. A different site URL can be chosen; the URL can be modified, too. A nice feature is also the ability to send an email to one or more users when the process is complete. This process can be quite processor intensive, so testing is recommended, and setting a reasonable size limit for the document is suggested.
Figure 12.25. Create Page from Document page.

Web Publishing and Deployment
SharePoint Server 2007 comes with the built-in capability of publishing content from one site collection to another, and these site collections can be in different farms. The following steps walk through a sample configuration in which content from one SharePoint Server 2007 enterprise server (abcmoss01) is published to a SharePoint Server 2007 standard server (abcmossstd01). Note that a Windows SharePoint Services 3.0 server cannot accept incoming content deployment jobs.
Configuring Content Deployment Settings on the Target Server
The target server in this case is abcmossstd01. To configure it to accept content from abcmoss01, follow these steps:
1. From the Central Administration interface on the target server (abcmossstd01, in this case), select the Operations tab, and then in the Content Deployment section, select Content Deployment Settings. Configure the server to Accept Incoming Content Deployment Jobs, and verify that the correct server is selected as the import server (abcmossstd01, in this case). As mentioned on the Content Deployment Settings page (_admin/DeploymentSettings.aspx), the server that will be managing the import of content deployment jobs will need sufficient available disk space to store the data that it is sent and must be running an administration web application for the farm. The export server is not important in this case because this server will only be receiving content, but a choice needs to be made (abcmossstd01, in this case). Encryption between farms is recommended, and the standard is HTTPS, but not required. (Do Not Require Encryption is selected in this case.) A path needs to be specified for the temporary files, and these files will be deleted after the deployment job is finished. (The default of C:WindowsTempContentDeployment is kept in this case.) Finally. specify the number of reports to retain for each job. Trial and error will be needed based on the complexity of the job to determine the appropriate number. Keep the default number of 20 to start with. Click OK.
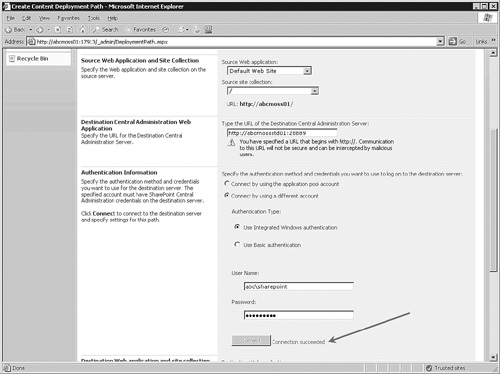
2. Return to the source server (abcmoss01, in this case), access the Central Administrator console, access the Operations tab, and in the Content Deployment section select Content Deployment Paths and Jobs. Click New Path to create a new path. When the Create Content Deployment Path page (_admin/DeploymentPath.aspx) opens, enter a name for the path and a description (it’s helpful to define the destination and purpose of the path), choose the source web application (in this case, Default Web Site, with the source site collection of “/"). Enter the URL of the destination central administrator server (in this case, abcmossstd01). Next, decide whether to use the application pool account or a specific account and then either Integrate Windows Authentication or Basic Authentication (use Integrated Windows Authentication in this example), and then enter the username and password (in this example, abcsharepoint is used). Click the Connect button. As shown in Figure 12.26, the connection will either succeed and the “Connection Succeeded” message (indicated with an arrow in Figure 12.26) will appear or error information will be provided.
Figure 12.26. Creating a content deployment path
3. Next, still on the DeploymentPath.aspx page, select the destination web application (SharePoint – 80 in this example), and the destination site collection ("/” in this example). Decide whether to Deploy User Names or not (in this example, select it). Finally, select whether to deploy security information with the content; and if so to deploy All, Role Definitions Only, or None (for this example, select All). Click OK to save this page. Note that a Quick Deploy job has automatically been created for this path. This can be used to update the path if needed in the future.
4. Now a Content Deployment Job can be created using this path. To do so, click New Job on the Manage Content Deployment Paths and Jobs page (_admin/Deployment.aspx). Provide a name and description for the job, and then select a content deployment path from the drop-down menu (titled ABCMOSSSTD01 Path1 in this example). Click the scope; in this example, Specific Sites Within the Site Collection is selected. Click the Select Sites button and select a site. The Select Sites window opens and provides the option of selecting a specific site or a branch (sites and subsites). Select a branch of limited total size. (The Unleashed1 branch is selected in this example as shown in Figure 12.27.) Then click OK.
Figure 12.27. Creating a Content Deployment job.

When selecting which sites to deploy in a Content Deployment job, if a subsite is chosen, all the parent sites must already be deployed or be part of the deployment job. For example, a site http://servername/sites/abc/def can’t be deployed if the parent site (abc) doesn’t already exist.
5. Next, select the schedule for the job, either as a one-time-only job or recurring at intervals defined through the interface. In this example One Time Only is selected, and a time is defined in the near future to validate the settings. Then select to Deploy Only New, Changed, or Deleted Content or select to Deploy All Content, Including Content That Has Been Deployed Before. And select whether emails should be sent if the job succeeds or if it fails, and to what address. Click OK.
Summary
This chapter covered the complex topics of using the Records Center enterprise template and then tuning the SharePoint 2007 environment to be able to leverage it. This involves a number of steps, as outlined in the chapter, and a key component is the use of content types and policies. Some preparation is also needed to ensure that regulatory guidelines are met and that individuals are identified and trained to understand how to route documents to the records center.
In addition, web content management and publishing features provided in SharePoint 2007 were discussed. The use of publishing templates and the design tools offered in the SharePoint user interface and some of the capabilities of SharePoint Designer 2007 were covered. The discussion then turned to the different types of portal-level templates to provide some insight into more complex web content management scenarios. Finally, the web publishing and deployment capabilities of SharePoint Server 2007 were discussed; these might prove valuable in more complex SharePoint environments in which large amounts of content must be published from one farm to another or to an Internet-facing web server.
Best Practices
- Implementing a records center in SharePoint 2007 requires a number of steps. After the records center site has been created, customized, and the site collection configured with the appropriate policies and content types, and workflows have been created, training should be provided to the individuals who will be involved with the maintenance of the records center site, and the individuals who will be managing the documents that will be routed to the records center.
- Consider using a separate web application to house the records center. This facilitates management of the site (and backup and restore processes). Administration can also be customized to comply with any regulations that might apply to the data being stored and managed.
- A Records Management Plan should be created, as should a Retention Policy, as part of the implementation of the records center. These are essential to ensure that the organization has a well thought-out plan for roles and responsibilities, naming strategies for documents, metadata definitions for each type of document, and an understanding of any external mandates and regulations.
- Then the Records Center enterprise template should be used to create the records center. Typically, only one should be configured per server farm; if more than one is created, only one can be identified as an external service connection. Use the Central Administration to configure the records center as an external service connection that will allow users to use the Send To option from a document library Edit menu.
- Content types need to be created or identified that will be used in the document libraries that will be routing documents to the records center. These should ideally conform to the different types of documents defined in the Records Management Plan and be named logically to minimize confusion and facilitate the use and management of the record routing list.
- Additional configuration of the records center will involve creating the appropriate document libraries for different content types, and entries in the Record Routing list that will ensure that documents end up in the right places. Custom views can facilitate working with the data in the libraries that will end up containing the routed documents.
- Site collection policies can be created to enable labels, enable auditing, enable expirations, and enable barcodes if needed.
- Publishing Site templates provide an extremely powerful toolset for News items and content that will be relatively static and needs to be appealing visually, and that might be provided to external partners, potential clients, or corporate Internet sites.
- Reusable content on the top-level site can greatly facilitate the creation of pages in publishing sites. Changes made to the reusable content can then be propagated to the sites using this content for immediate updates.
- Master pages and layout pages greatly enhance an organization’s ability to modify the look and feel of published pages.
- When cache profiles are configured, each front-end server uses the page output cache to store rendered output of a given page. Note that extra RAM might be required if cache profiles are enabled because RAM is used to cache the rendered pages. When configured and managed properly, this can improve the speed of the page rendering seen by end users. Web part developers should be aware of possible caching that might influence how their web parts behave.
- Site variations allow organizations to automatically route end users to a version of a site that has been customized to the language requirements of the user based on the language installed on the user’s computer. The translation process is not automated, however, and must be performed manually, but can be assisted by workflows.
- Document conversions allow users to create web pages from InfoPath forms, Word documents (.docx or .docm), and XML files.
- Content deployment paths can be created from one site collection to another. Each site collection needs to be on SharePoint Server 2007, either Standard or Enterprise edition. Windows SharePoint Services version 3 cannot either publish or receive content.