Chapter 9. Designing and Managing Pages, Workspaces, and Sites in SharePoint 2007
IN THIS CHAPTER
- Planning Pages, Workspaces, and Sites
- Creating Pages and Workspaces in SharePoint 2007
- Creating Sites from the Collaboration Tab
- Creating Sites from the Enterprise Tab
- Creating Sites from the Publishing Tab
- Configuring the Look and Feel of Sites
- Using the Galleries
- Best Practices
The previous two chapters covered the basics of using libraries and lists in SharePoint 2007, as well as the tools needed to manage lists and libraries in SharePoint 2007. The next logical step is to review the units that contain lists and libraries which include pages, workspaces, and sites. The steps involved in creating these items are covered as well as a range of design decisions that need to be made to ensure that they meet the needs of the organization. To be more specific, the Users and Permissions, Look and Feel, and Galleries columns on the Site Settings page (_layouts/settings.aspx) will be covered. This will give the individual tasked with configuring and managing these components a good overview of the different options available, and techniques for managing them.
This chapter stops short of covering the larger topic of site collection management and the tools provided in the Site Administration and Site Collection Administration columns on the Site Settings page. These tools and supporting processes are covered in Chapters 14, “Managing and Administering SharePoint Infrastructure,” and 16, “Maintaining and Monitoring SharePoint 2007 Environments and Databases.”
Planning Pages, Workspaces, and Sites
The SharePoint 2007 products provide a great variety of templates for pages, workspaces, and sites. These templates make it very easy for an organization to experiment with different configurations and features and then decide when and how to use each template. It also makes a difference where the creation process is executed for both the URL of the resulting page or site, and in some cases the functionality will actually be different based on where the site is created.
When a SharePoint 2007 environment is first being set up, the administrator will typically set up a top-level site structure from the Central Administration interface (specifically the Create Site Collection tool in the Application Management tab, which brings up the _admin/createsite.aspx page). The choices are different if Windows SharePoint Services 3.0 is used or if SharePoint Server 2007 is used. Windows SharePoint Services 3.0 contains a Collaboration tab and Meetings tab that offers the following options:
- Team Site
- Blank Site
- Document Workspace
- Wiki Site
- Blog
- Basic Meeting Workspace
- Blank Meeting Workspace
- Decision Meeting Workspace
- Social Meeting Workspace
- Multipage Meeting Workspace
To create a site collection at the top level, a web application (IIS website) has to be available. If SharePoint Server 2007 is being used, some additional templates are made available. In the Enterprise tab and Publishing tabs, the following options are accessible:
- Document Center
- Records Center
- Site Directory
- Report Center
- Search Center with tabs
- My Site Host
- Search Center
- Collaboration Portal
- Publishing Portal
A general best practice when running SharePoint Server 2007 is to use the Collaboration Portal template for the site collection. Microsoft labels this a “starter site hierarchy for an intranet divisional portal...includes a home page, News site, a Site Directory, a Document Center, and a Search Center with Tabs.” Users of SharePoint 2003 technologies will see similarities with the default SharePoint Portal Server 2003 configuration.
So, for most SharePoint administrators, there will be a site collection already in place that includes a number of top-level sites. There are now a variety of different ways of creating new subsites, workspaces, and pages, including the following:
- Using the Site Actions menu from a top-level site, and then the Create Page link (which opens the _layouts/CreatePage.aspx page) or the Create Site link (which opens the _layouts/newsbweb.aspx page).
- Accessing the All Site Content page from a top-level site. Then use the Create tool, which opens the Create page (the _layouts/create.aspx page). Choose Basic Page (which opens the _layouts/bpcf.aspx page), Web Part Page (which opens the _layouts/spcf.aspx page), or Sites and Workspaces (which opens the _layouts/newsbweb.aspx page).
- Using the Create Site tool from a Site Directory site at the top level (which opens the _layouts/newsbweb.aspx page).
- Using the Site Actions menu from a subsite (such as Unleashed1) and then the Create tool (which opens the _layouts/create.aspx page) and then selecting Basic Page (which opens the _layouts/bpcf.aspx page), Web Part Page (which opens the _layouts/spcf.aspx page), or Sites and Workspaces (which opens the _layouts/newsbweb.aspx page).
Note that in each of these cases the URL of the page or site will be based on the starting location. Figure 9.1 shows an example of how the structure can become complicated by using the Site Content and Structure page (the _layouts/sitemanager.aspx page) at the top level of the site collection. The sites indicated by the number 1 are top-level sites, whereas the site indicated by the number 2 is a subsite, and the site indicated by number 3 is a “sub-subsite.” In this example, a site directory was created under the Team Site (circled in Figure 9.1) and a subsite was then created from that Site Directory, called Blank Site (indicated by number 3). If the Site Directory that lives under Team Site is deleted, all of its subsites (including Blank Site) will be deleted.
Figure 9.1. Site content and structure sample.

Site collection administrators should establish guidelines and standards for how new sites are created, and share these with other site administrators. This will help ensure that the URLs of new sites are standardized. For example, how many top-level sites are needed (http://servername/sitename) as opposed to subsites (http://servername/sitedirectoryname/subsitename) created under the top-level site directory (if there is one).
When creating pages and workspaces from the _layouts/create.aspx page from a top level or subsite, both Windows SharePoint Services V3 and SharePoint Server 2007 offer the same options for web pages and workspaces:
- Basic Page
- Web Part Page
- Document Workspace
- Basic Meeting Workspace
- Blank Meeting Workspace
- Decision Meeting Workspace
- Social Meeting Workspace
- Multipage Meeting Workspace
The options for site templates depend upon what version of SharePoint 2007 is being used. If Windows SharePoint Services 3.0 is being used, the options are as follows:
If SharePoint Server 2007 Standard or Enterprise Edition is being used, the options include those offered in Windows SharePoint Services 3.0 in addition to the following:
- Document Center
- Records Center
- Personalization Site
- Site Directory
- Report Center
- Search Center with Tabs
- Search Center
It can be helpful to create a top-level site and then create one of each page, workspace, and site below it based on the standard templates. This gives administrators and users a central place to visit where they can see the different standard templates. Each one should be customized to meet company standards for look, feel, and content. Most users should have read-only access or these demo sites can quickly become cluttered with entries or changed so that they become very different from the original templates. Site administrators can then be encouraged to create their own sites and experiment further.
Pages and workspaces generally do not require as much planning as sites do because they are generally created for specific, ad hoc, needs. Pages are housed in libraries and so can be copied and moved. Workspaces are technically subsites and require some additional configuration when created, but are already quite well designed for their intended purposes, whether for collaboration on a document or to contain additional information about a meeting or group of meetings. The main area that needs planning for workspaces is privileges, so worksheets are provided (Figures 9.2 and 9.3) to assist with this planning.
Figure 9.2. Permissions planning worksheet.

The worksheets cover the following topics:
- Are user permissions the same as the parent, or are they unique to the subsite?
- If permissions are unique, are there any changes that need to be made to the existing permissions? If so, what are they? In many cases, it is a great time saver if Active Directory groups already exist and can be added to SharePoint site groups, but in some cases this is not practical, and individuals need to be added to different site groups.
- Are new SharePoint site groups needed? In some cases, a group needs to be created for use on a specific site and might be needed on subsites as well. For example, a group for a specific project might be created to ensure that only those individuals have access to the site. If one or more new SharePoint groups are needed, see Figure 9.3 for a worksheet to define the details of the group(s).
Figure 9.3. New SharePoint group worksheet.

Sites, however, typically require a larger amount of planning, and to help with this process, site design worksheets 1 and 2 are provided in Figures 9.4 and 9.5. These worksheets require that a number of decisions be made before the site is created, including in the following areas:
- Site title, site description, site URL: In general, it is a good idea to keep these short and descriptive.(initially in the _layouts/newsbweb.aspx page, but later accessible from the _layouts/prjsetng.aspx page).
- Template to use: This can be a default template or modified template that is made available through the template gallery (select this on the _layouts/newsbweb.aspx page).
- Logo to use for site: This logo might be available to all sites (typically stored in the C:Program FilesCommon FilesMicrosoft Sharedweb server extensions12TEMPLATEIMAGES folder) or might be stored in a picture library on the specific site. If the logo will be used by multiple sites, it is generally a good idea to store it in the IMAGES folder (_layouts/prjsetng.aspx page).
- Master page to use: This will be discussed later in the chapter, but there a site has both site master pages and a system master page that need to be specified as being inherited from the parent site, or referenced specifically. Additionally, a CSS file can be inherited, chosen from Windows SharePoint Services default styles, or specified separately (_Layouts/ChangeSiteMasterPage.aspx page).
- Additional lists or libraries needed beyond those provided by the template: Based on the template selected for the site, additional lists or libraries might need to be added. These would be created normally from the _layouts/create.aspx page.
- Site theme: A number of themes are available out-of-the-box that affect the fonts and color schemes used in the site. These will not change pages that have had themes applied directly (_layouts/themeweb.aspx page).
- Use top link bar from parent: Depending on the purpose of the site, it can be helpful or confusing to have the tabs available on the parent site available in a subsite (choose Initial on the _layouts/newsbweb.aspx page).
- List site in site directory: Other options include selecting the division and region that should be listed. Or a new entry might be needed that reflects the content of the site and intended audience. (Select this on the _layouts/newsbweb.aspx page.)
- Enable RSS: RSS feeds can be allowed or not. If they are to be allowed, other settings can be specified, including Copyright Text, Managing Editor Text, and Webmaster Text. In addition, the Time to Live (Minutes) setting can be changed from the default 60 minutes(_layouts/siterss.aspx page).
- Enable Quick Launch, enable Tree view: These can be turned off or on, as needed (/_layouts/navoptions.aspx page).
- Show subsites and show pages: Subsites and pages can be listed or not, as needed (_layouts/AreaNavigationSettings.aspx page).
- Sort subsites, pages, headings, and navigation links when shown in navigation: This can be sorted automatically or manually, and pages can be sorted automatically (_layouts/AreaNavigationSettings.aspx page).
- Global navigation: The same navigation items as the parent site can be displayed or only items below the current site (_layouts/AreaNavigationSettings.aspx page).
- Current navigation: The same navigation items as the parent site can be displayed, or the current site and items below and sibling sites can be displayed, or only the items below (_layouts/AreaNavigationSettings.aspx page).
- Allow this site to appear in search results: In most cases, the site should be searchable from higher-level sites (for users who have access to the site only), but there might be cases in which the contents need to be hidden from top-level searches. (_layouts/srchvis.aspx page)
- Index .aspx pages: The three options offered here are Do Not Index ASPX pages if This Site Contains Fine-Grained Permissions (where individual items on the pages on the site have more restrictive permissions than the page itself), Always Index All ASPX Pages on the Site, and Never Index any ASPX Pages on the Site (_layouts/srchvis.aspx page).
- Any columns to be set to nocrawl .
- Any URLs to add to members of “This and related sites” search scope: This options give the administrator a chance to add URLs for sites that she considers related to further customize the search scope for the site.
Figure 9.4. Site design worksheet 1 of 2.
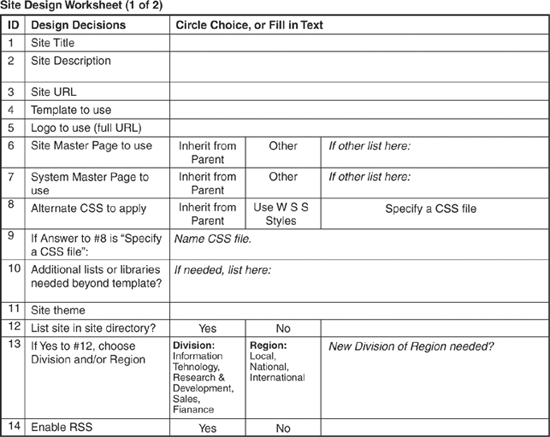
Figure 9.5. Site design worksheet 2 of 2.

Figures 9.4 and 9.5 provide sample worksheets that can be used when designing a site. The previous bullets list the page names where the different settings can be found because the user interface scatters these around, making them somewhat hard to find. Some of the items on the checklist are entered during the creation of the site (items 1–4), whereas others have default settings when the site is created that can be changed at a later date.
One topic that has been left out of these worksheets is that of site features on the _layouts/settings.aspx page. The only option available in Windows SharePoint Services 3.0 is Team Collaboration Lists, whereas SharePoint Server 2007 standard offers:
- Office SharePoint Server Publishing
- Office SharePoint Server Standard Site Features
- Team Collaboration Lists
- Translation Management Library
The SharePoint Server 2007 Enterprise edition adds Office SharePoint Server Enterprise Site features.
These items are normally left as configured by the SharePoint administrator team, but can be customized if needed.
Creating Pages and Workspaces in SharePoint 2007
SharePoint 2007 pages can be used for a variety of purposes, but some consideration should be given as to whether it is best to use a SharePoint page or an actual site. Web part pages can have multiple web parts placed on them, so in some cases they might be a good alternative to creating a new site. The following sections review the basic page and web part page creation process as well as document and meeting workspaces.
Many other types of pages can be created, including article pages, redirect pages, and welcome pages and these more complex pages will be covered in Chapter 12, “Implementing Records Management and Enabling Web Content Management in SharePoint 2007.”
Creating Basic Pages
Basic pages are useful for creating static pages that contain rich text, graphic images, hyperlinks, tables, bullets, and numbered items. They need to be stored in a document library, but can be referenced from other libraries, lists, or sites, so they function well for reference information, marketing information, and instructional material.
A slight risk of using basic pages is that because they reside in a document library, someone could accidentally delete the page. Fortunately SharePoint 2007 provides the Recycle Bin so that these deletions can easily be undone. There are also advantages to basic pages as they can easily be copied and placed in additional libraries.
A new basic page can be created by a user with Add Items privileges from the Create page (_layouts/create.aspx) by clicking on the Basic Page link in the Web Pages column. The page simply requires a name be assigned to it; then the option of Overwrite If File Already Exists? can be selected, and a document library on that site must be selected to house the basic page. After OK is clicked, the new page opens with the Rich Text Editor displayed.
Figure 9.6 shows a sample basic page with a graphic image, title, and a table included. Note from the URL of the page that it is housed in the document library named Shared Documents. The Rich Text Editor window is accessed by clicking the Edit Content link, and a number of tools are available in this window, as circled in Figure 9.6.
Figure 9.6. Basic Page with Sample Content.

This basic page will now be accessible from the document library, and has the standard Edit menu tools associated with it, so it can be managed just as another document in the library would be. If SharePoint Designer 2007 is installed on the PC, the Edit menu will provide the Edit in Microsoft Office SharePoint Designer option. The basic page can also be saved as an HTML file by right-clicking it in the document library and choosing to save it to another location. The document can then be edited in a text editor or product, such as SharePoint Designer, to customize it in other ways.
Creating Web Part Pages
Whereas basic pages are limited to rich text, hyperlinks and images (assuming only the Rich Text Editor is used) web part pages can take advantage of the full selection of web parts available to the user. Thus they can serve a multitude of purposes, from providing an alternative to the home page that provides access to other lists and libraries on the site, to displaying business data, key performance indicators, and RSS viewers, to filtering web parts, and personalizing content based on the user’s identity.
Creating a web part page requires a few more decisions upfront, and the resulting web part is then quite easily modified from within the SharePoint 2007 user interface. As with a basic page, a web part page is created from the Create page (_layouts/create.aspx) by clicking on Web Part Page. A name needs to be assigned to this page, and the Overwrite if file already exists? option can be selected if appropriate. With a web part page, however, a layout needs to be selected. The options are as follows:
- Full Page, Vertical
- Header, Left Columns, Body
- Header, Right Column, Body
- Header, Footer, 3 Columns
- Header, Footer, 2 Columns, 4 Rows
- Header, Footer, 4 Columns, Top Row
- Left Column, Header, Footer, Top Row, 3 Columns
- Right Column, Header, Footer, Top Row, 3 Columns
A sample preview of the formatting is provided when one of these options is selected to give a sense of what the page will look like. As a general rule, it is helpful to have several zones to choose from, so one of the more complex pages is often a better choice. For example, the Header, Footer, 3 Columns option provides five different zones to place web parts in, and zones without web parts in them won’t take up space on the screen. For web part pages that need a zone similar to the Quick Launch area, either of the choices that include Left Column provide a similar zone.
Figure 9.7 shows a Header, Footer, 3 Columns web part page immediately after it was created. The main options available are Edit Title Bar Properties (circled in Figure 9.7) which allows the user to customize the title, caption, and description, and provides an image link. In the image link, a URL or path should be entered for the image. Typically, the URL refers to a SharePoint 2007 picture library, but there might be cases in which images in another location should be referenced; for example, a remote web server.
Figure 9.7. Web part page in Design mode.
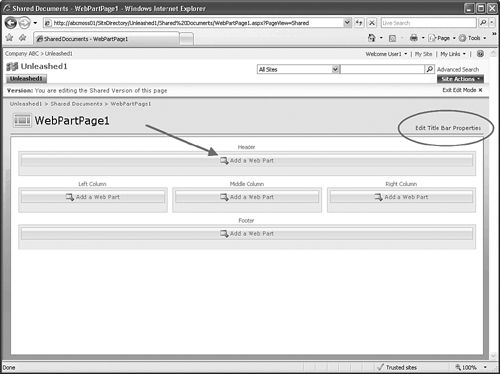
If one of the Add a Web Part links available in a zone is clicked (as indicated by the arrow in Figure 9.7), the administrator will have access to the Add Web Parts window, which shows all the web parts available in the web part gallery for that site collection. The selection will vary depending on whether Windows SharePoint Server v3 or SharePoint Server 2007 is being used. Management of web parts is an important site management process, and so it will be covered in more depth later in the chapter.
Figure 9.8 shows the Add Web Parts window, which allows the user to add web parts from the site gallery. In this figure, the Contact Details and the Content Editor Web Part options are selected for addition to the web part page. To edit this page in the future, the Site Actions menu can be accessed and Edit Page selected. Or, because this web part page is stored in a document library, tools made available via the Edit menu can be used. For example, the Edit in Microsoft Office SharePoint Designer option can be used (assuming that Designer 2007 is installed on the machine) or the Edit Properties link can be clicked. This brings up the EditForm.aspx, which provides the Open Web Part Page in Maintenance View option, an example of which is given in Figure 9.9. This is an important page to know about, especially if the web part page stops rendering properly, as can happen if the page is moved to another site or SharePoint environment. Note that the link Switch to Personal View is offered in the toolbar, and this will add a column titled Personalized?, which shows whether any of the web parts have been personalized. The user can also close or delete a web part, for troubleshooting or aesthetic purposes, after selecting it and checking the box next to it. Sometimes it is obvious that a web part is causing an issue because it doesn’t render properly, or might not even show up on the page. So, closing the web part in the web part page maintenance window can solve the problem, or it might need to be deleted completely. The Reset option will reset personalized settings in the selected web part or web parts to their shared values.
Figure 9.8. Add Web Parts window.

Figure 9.9. Web Part Page Maintenance page.

Creating Workspaces in SharePoint 2007
Workspaces can be created on the Create Site page (_layouts/newsbweb.aspx) via the Sites and Workspaces link. The Collaboration tab offers the Document Workspace option, whereas the Meetings tab offers several different options: Basic Meeting Workspace, Blank Meeting Workspace, Social Meeting Workspace, Team Site, Blank Site, Wiki Site, Blog, and Multipage Meeting Workspace.
Examples of the document workspace and several different meeting workspaces will be provided in this section to give an idea of the basic features of each, and items that the administrator should be aware of when supporting these items.
An Overview of a Document Workspace
When create a workspace, a title and description are needed, and a URL name is required as well. In general, it is a best practice to keep the URL name short, descriptive, and free of spaces. A decision needs to be made whether the same permissions as the parent site should be used or unique permissions, and whether the link bar form the parent site will be used or not. Finally, a decision needs to be made whether to list the site in the site directory, and then which division and region. After the Create button is clicked, the user will see something similar to the document workspace shown in Figure 9.10.
Figure 9.10. New document workspace.

A document workspace includes a shared documents library, an announcements list, a calendar list, a links list, a tasks list, and a team discussion board. The home page includes the Members web part as well to show who has access to the workspace. In this example, the link bar from the parent site was not chosen, so only one tab is visible. Note from the bread crumb trail (indicated by the arrow in Figure 9.10) that the workspace is located below the Unleashed1 site, and is not contained in a document library. As its own site, the document library comes equipped with the full complement of site management tools, accessible through the Site Actions menu.
Note also that a document workspace can be created from inside of a document library. The Edit menu of a document contains the Send To entry, which provides the option of Create Document Workspace. If chosen, the user will be prompted with a message that A new Document Workspace will be created. A copy of this document will be stored in the new workspace. From the new workspace, you can publish the document back to its original location. So, this is another way to create a workspace. This method uses the name of the document as the URL, and includes only the creator in the members list, so other users have to be added manually. As with other sites, this document workspace can be set to inherit permissions from the parent site on the Permissions page (_layouts/user.aspx).
This will most likely be the most common way that a document workspace is created and used because often an ad hoc decision is made that several people need to collaborate intensively on a particular document, for which a different workspace is needed. Discussions can be logged, emails can be logged in the document library, and supporting materials can be uploaded as well. For example, a document workspace is well suited to creating a proposal, a marketing presentation, or a complex report. This workspace should generally be temporary because the main document is published “back” to the source library.
You can create more than one document workspace from a document library via the Edit menu. Even if there is already a document workspace in existence for a document, the Send To menu option offers the option of Create Document Workspace. The only hint that a document workspace already exists is that the name of an additional document workspace will have a number in parentheses at the end (such as Very Important Document(1)). Users should be informed of the importance of checking to make sure that a document workspace doesn’t already exist by accessing the Sites link in the Quick Launch area from the top-level site.
This is another reason that versioning can be important: An alternative instance of a document that has been overwritten by accident can be recovered.
Document workspaces can also be created from Office 2007 applications such as Word 2007, and this process will be reviewed in Chapter 10, “Using Word, Excel and Excel Services with SharePoint 2007.”
An Overview of a Meeting Workspace
The processof creating a meeting workspace from the on the Create Site page (_layouts/newsbweb.aspx) is identical to that outlined in the previous section for a document workspace, with the exception that a template from the Meetings tab should be chosen. For this example the Basic Meeting template will be used. Figure 9.11 shows a basic meeting workspace with some content added. The standard components included are an objectives list, an agenda list, an attendees list, and a document library. The Site Actions menu is shown expanded in Figure 9.11, and it provides the options for creating a new library, list, or web page, editing the page, accessing site settings, adding a new page, or managing existing pages. If Add Pages is selected, the user will need to enter a name for the new page and click Add. Then web parts can be added to the page by accessing the Site Actions menu and selecting Edit Page. If the Add Web Part link is selected in one of the zones, the Add Web Parts window will be displayed (as shown in Figure 9.12). Web parts can now be added to the new page.
Figure 9.11. New basic meeting workspace.
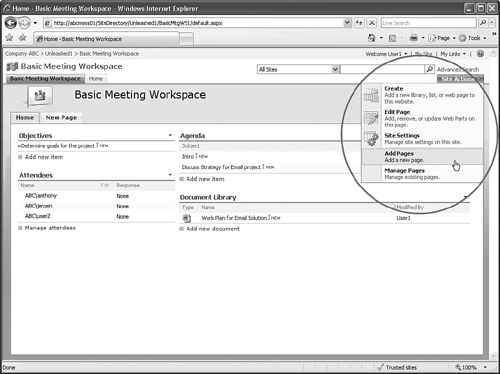
Figure 9.12. Add web parts to a new page meeting workspace.

Just as a document workspace can be created from a document library, a meeting workspace can be created based on a calendar item. Instead of accessing the Edit menu, however, the Edit Item link from the Edit menu is clicked, and then the option to Use a Meeting Workspace to Organize Attendees, Agendas, Documents, Minutes, and Other Details for This Event should be chosen. When OK is clicked after this choice is made, the user needs to enter the following additional information about the workspace:
- Create a New Meeting Workspace or Link to an Existing Meeting Workspace
- Title
- Description
- URL Name
- Use Same Permissions as Parent Site or use Unique Permissions
- Template to Use (if not linking to an existing meeting workspace)
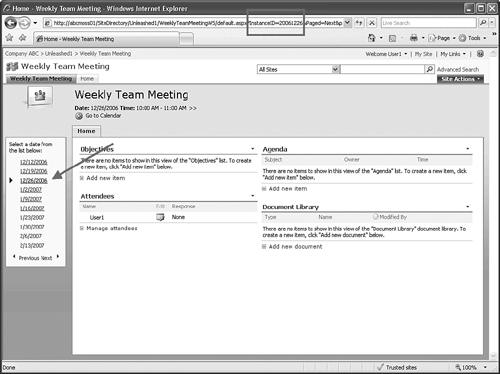
Figure 9.13 shows a sample meeting workspace created in this fashion for a company holiday party that used the social meeting workspace template. Note that a link is provided to Go to Calendar (as indicated by the arrow in Figure 9.13), which will open the calendar list item.
Figure 9.13. Sample social meeting workspace.

Meeting workspaces can also be created for recurring events, with the full range of templates available. Figure 9.14 shows a sample recurring event. Note the hyperlinks that connect to the different instances of the meeting, and each link is actually a separate page that is given an InstanceID (as indicated in the address bar in Figure 9.14) that reflects the date of the event. Notice in Figure 9.14 that only the first several links on the left side are underlined. This means that only those links have been accessed, causing SharePoint to create an instance for each one. Note also that individual instances of the meeting can be modified in the calendar list, and they will still be referenced in the list. If the date of a meeting instance is changed, however, the InstanceID will not change but will still reflect the original date of the meeting.
Figure 9.14. Sample recurring meeting workspace.
Meeting workspaces can also be created from Outlook 2007, and this will be covered in Chapter 11, “Leveraging Additional Office 2007 Products in a SharePoint 2007 Environment.”
Managing Workspaces
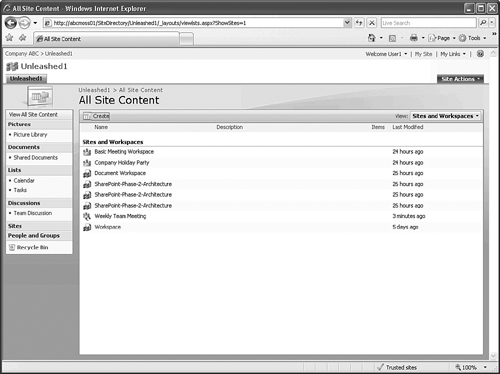
A good way to close this section is to spend a minute on some basic management tools to assist with managing workspaces. The All Site Content page (_layouts/viewlsts.aspx) with the Sites and Workspaces view selected, as shown in Figure 9.15, is a very useful view to access because it lists all the sites, document workspaces, and meetings workspaces. The icon illustrates whether it is a document workspace, meeting workspace, recurring meeting workspace, or site, and whether, if the name is clicked, the site or workspace will open. The Last Modified column clearly shows how recently the workspace has been accessed. It should be immediately clear in Figure 9.15 that the document titled SharePoint-Phase-2-Architecture has three workspaces in use, and that should probably be rectified by deleting the extra workspaces.
Figure 9.15. All Site Content page showing sites and workspaces.
Creating Sites from the Collaboration Tab
The section covers the process of creating sites from the Collaboration tab on the Create page (_layouts/newsbweb.aspx), and delves into the features included in each default site to give a sense of what makes the site tick to facilitate the design and management of these sites. Workspaces were addressed in the previous section.
As mentioned previously in this chapter, the number of features that can be tuned for a site is significant, so using the worksheets provided earlier in the chapter is recommended. Another recommendation is to create sample sites from each template, customized based on the design decisions made on the worksheets, and then let users test them and provide feedback.
Team Site
A team site can be created from the New SharePoint Site page (_layouts/newsbweb.aspx) by selecting the Team Site option from the Collaboration tab in the Template Selection section. The site also requires a title, URL name, and decisions have to be made whether to use unique permissions or to use the same permissions as the parent site, and whether to use the top link bar from the parent site. Finally, the decisions of whether to list the site in the site directory, and if so which division and region to use, have to be made. After the Create button is clicked, the site will be created.
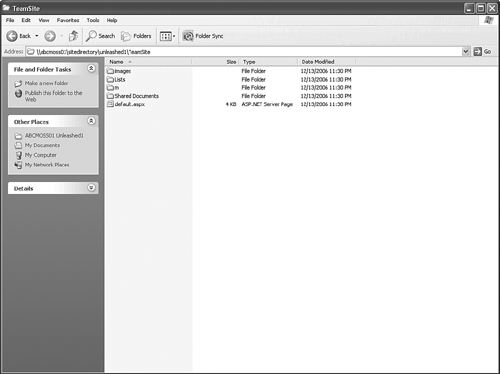
My Network Places can be used to get a sense of what a team site is. If a new entry is created for the site that contains the new subsite in My Network Places, and the top-level site is opened, the subsite (for example TeamSite) will be listed as a folder. If this folder is opened, several folders are present, by default: images, lists, m, Shared Documents, and default.aspx, as shown in Figure 9.16. The Shared Documents folder contains any documents uploaded already, a Forms folder, which contains a number of .aspx pages, as well as a template.doc Word document and an empty Document folder. The Lists folder contains folders for Announcements, Calendar, Links, Tasks, and Team Discussions because these are the standard lists included in a team site. The m folder contains a default.apsx folder that is used for mobile clients. Note that the actual contents of the lists (if any) is stored in a SQL database, out of the reach of Windows Explorer and My Network Places, and so it will not be visible. The default.aspx page is the home page for the site and can be opened in Notepad or Designer 2007 for additional review.
Figure 9.16. Using My Network Places to view the contents of a team site web folder.
Blank Site
A blank site is created with only the Microsoft Windows SharePoint Services logo visible in an Image web part. This site requires customization before it will be useful. This is a good template to use when training designers or administrators because it gives them a chance to browse the web parts available through the web part gallery, and practice creating lists and libraries from the create.aspx page.
Wiki Site
Chapter 7, “Using Libraries and Lists in SharePoint 2007,” gives an overview of the functionality of a wiki page library, so this section will concentrate on the wiki site template, which contains a wiki site library.
When a new wiki site is created, it contains a single wiki library and is customized to redirect from a standard default.aspx page to a Home.aspx page in the wiki pages library. Figure 9.17 shows the standard view of a new wiki site. From here the administrator can easily customize this page by clicking the Edit button. If the Site Actions menu is accessed and Edit Page is clicked, a zone is available underneath the wiki section where web parts can be added.

Because this library is housed in a site, additional libraries and lists can be created by clicking the View All Site Content link in the Quick Launch area, and then selecting Create. If the wiki site is for use by a limited group of users or one department, a single wiki library might be sufficient. But for larger groups of users, cross-departmental or cross-disciplinary use, additional wiki libraries can be useful. It might also be helpful to create a standard document library to house reference documents, or create a calendar list to track events.
After a new wiki site has been created, it actually opens by redirecting from the normal default.aspx page to a Home.aspx page in the Wiki Pages library, as apparent in the address bar in Figure 9.17. Although this is fine if the administrator wants to bypass a standard landing page, this can be a limiting feature for more complex uses when the site house more than one wiki library, and might actually contain other lists and libraries.
An administrator or savvy user will notice the redirect, and perhaps be confused by the inability to see the landing page. Even if the link to the landing page on the far left of the breadcrumb trail (outlined in Figure 9.17) is clicked, the user is still redirected to the Home.aspx page. A natural inclination at this point would be to disable this custom behavior, and a method is listed next that does not involve the use of SharePoint Designer 2007.
Simply deleting the Home.aspx wiki page in the Wiki Page library will stop the redirect. To do so, click the View All Pages link in the Quick Launch area, and the Wiki Pages library will open. By default this contains the Home.aspx page and a How to Use This Wiki Site.aspx page. Choose Delete from the Edit menu for the Home.aspx page. Now click on the leftmost entry in the breadcrumb trail and the actual default.aspx page will be loaded. This page can be edited normally, and if additional lists or libraries are added to this site, web part views can be added to the page to provide easy access. Should the administrator want the redirect to be put in place at a later date, a page titled Home.aspx simply needs to be created in the Wiki Pages library.
Figure 9.18 shows a modified landing page (default.aspx) that might be better suited for an enterprise wiki site, and contains multiple wiki libraries, designed for different topics. The standard Wiki Pages library was also altered so that it does appear in the Quick Launch. In addition, a picture library was created on this site, and a custom view made visible on the default.aspx page so that the images being discussed in the wiki libraries are readily available to users of the site.
Figure 9.18. Modified wiki site with multiple wiki libraries.

Blog Site
A dedicated blog library is not provided in SharePoint 2007; instead, a blog site template needs to be used to provide the blogging functionality. Most users have experience using blogs or have even created and maintained their own, and so should feel right at home in a SharePoint 2007 blog site. As defined in the “Welcome to your Blog!” text, “A Blog is a site designed to help you share information. Blogs can be used as news sites, journals, diaries, team sites and more...Blogs are typically displayed in reverse chronological order (newest entries first), and consist of frequent short postings...it is also possible for your site visitors to comment on your postings.”
As with other site templates, it is helpful to be familiar with the lists and libraries included in a default SharePoint 2007 blog site, and these are as follows:
- A picture library titled Photos
- A list titled Categories to define the categories available for posts
- A list titled Comments that stores comments made on posts
- A links list titled Links for general links
- A links list titled Other Blogs
- A list titled Posts for storing posts in the blog
Figure 9.19 shows a blog site with one new entry added to give an example of the environment. Working from left to right on this page, it should be immediately obvious that the Quick Launch area has been modified: the normal View All Site Content link is offered, but below that are found a Categories menu with default categories, an Other Blogs menu (empty), and a Links menu with three links to different views in the Posts list. At the bottom on the Quick Launch area an RSS Feed link is offered. Clicking the Categories link allows an administrator to configure appropriate links for the content of the site. These will then be available to users posting content to the site.
Figure 9.19. Blog site with a new entry.

In Figure 9.19, a Welcome Note has been added by User1 and, as indicated by the arrow, a comment has been left. Information is provided below the entry on the time and date that the item was posted (customizable by the author), the user that posted it, as well as Permalink, Email This Post, and Comments links.
On the right side of the screen, an Admin Links web part view has been added with several links:
- Create a Post: Opens the _layouts/NewPost.aspx page where a new blog entry can be created by adding a title, body content, category choice, and a published time and date. The published entry will show up next to the entry, even if it is different from the actual publishing date and time. This gives the author flexibility, but readers should realize the date and time aren’t necessarily accurate. If the owner of the blog chooses to allow other users to add posts, but require his approval, this allows him to use the date and time the other user posted an item, rather than when it was approved.
- Manage Posts: This link opens the Lists/Posts/AllPosts.aspx page, which allows the management of posts in standard list format. By default content approval is required for submitted items, versioning is off, and only users who can approve items can see draft items. RSS settings are allowed by default as well. Note that there are several views available in this list: All Posts, By Author, Calendar, and My Posts.
- Manage Comments: If comments are left on posts, they are stored in the Lists/Comments list, accessible by this link.
- All Content: This link displays the All Site Content page (_layouts/viewlists.aspx).
- Set Blog Permissions: This link submits a query to the help engine that provides additional information on setting permissions for a blog.
- Launch Blog Program to Post: When this link is clicked for the first time, Word 2007 launches and the New SharePoint Blog Account window opens, requiring that the user confirm the blog URL and then optionally configure Picture Options (as shown in Figure 9.20). If Picture Options is clicked, the user can choose a picture provider (SharePoint Blog, My Own Server, or None – Don’t Upload Pictures), or click one of the help links provided. SharePoint blog is the default picture provider. After OK is clicked, a warning message will be shown saying that the username and password will be sent from Word to the blog service provider. After Yes is clicked, an Account registration successful message should appear, and then Word 2007 can be used to compose new posts. The advantage of using Word 2007 to post to the blog, instead of using the SharePoint Create a Post option, is that Word provides functionality to easily insert tables, graphics, shapes, and charts into the posts.
Figure 9.20. New SharePoint Blog Account window.

Figure 9.21 shows Word 2007 being used to create a blog posting, and the Blog Post tab active. Note that there are several blog-related buttons available in the tab, circled in Figure 9.21. The Publish button allows the user to publish to a SharePoint 2007 blog site (which can be selected from the drop-down menu, as indicated by the arrow in Figure 9.21) as a draft or a completed entry. The Home Page button will open the default blog site in a new window. The Insert Category button (which has been selected in Figure 9.21) allows the user to choose from an existing category or enter a new one in the field provided. Categories are useful to structure the information in the Blog under different subjects. The Open Existing button shows other posts on the active blog, allowing the user to open and edit if they have appropriate permissions. Finally, the Manage Accounts button opens the Blog Accounts window (visible in Figure 9.21) where new blog information can be entered, existing information can be edited, the default can be changed, or an item can be removed. The options for new blog accounts include Windows Live Spaces, Blogger, SharePoint Blog, Community Server, TypePad, WordPress, and Other. If Other is chosen, the API types offered are Atom or MetaWebLog, so if your blog provider uses either of these APIs, you can connect to your blog from Word.
Figure 9.21. Using Word 2007 to create a blog post.

Creating Sites from the Enterprise Tab
Several site templates are available in the Enterprise tab (available only if Enterprise Client Access Licenses are used with SharePoint) on the _layouts/newsbweb.aspx page: Document Center, Records Center, Personalization Site, Site Directory, Search Center with Tabs, and Search Center. Although they are labeled as enterprise site templates, they don’t need to be created as top-level sites, but can be created further down in the hierarchy. For example, a document center can be created as a top-level site (http://sitecollectionname/document_center), but could also be created lower down in the structure (for example, http://sitecollectionname/unleashed1/document_center) The following sections cover the basic features and uses of the enterprise sites, as well as providing some guidance on their use.
Document Center
The first option under the Enterprise tab in the _layouts/newsbweb.aspx page, a document center site includes a document library, announcements list, and tasks list. The home page contains a view of the announcements list, an Upcoming Tasks web part, and Relevant Documents web part. Figure 9.22 shows a sample document center home page after the addition of a new document library (titled New Document Library) and after several documents have been uploaded.
Figure 9.22. Document center home page showing checked out status of documents.

User1 is logged in, and the relevant documents web part displays the documents that User1 has uploaded to the default document library as well as to the new document library, their location, last modified date, and other information. If the administrator selects Modify Shared Web Part from the drop-down menu in the title bar of the Relevant Documents web part, several options are available in the Data section of the Editing pane, which easily modify what is displayed:
- Include Documents Last Modified by Me (selected by default)
- Include Documents Created by Me (not selected by default)
- Include Documents Checked Out to Me (not selected by default)
- Display a Link to the Containing Folder or List (selected by default)
- Maximum Number of Items Shown (Between 1 and 10,000) (the default number is 15)
Selecting Include Documents Checked Out to Me is a best practice in many cases because users are more likely to regularly check a home page rather than dig through several document libraries, so seeing all the documents checked out to them in one place is advantageous. In Figure 9.22, the checked-out documents are displayed because they were recently modified by User1, not because they have been checked out.
The default document library present in a document center site template is configured to require review of each document uploaded. When a user uploads a document, he will have to confirm the content of the name field and then click Check In to save the document. Figure 9.23 shows the Forms/EditForm.aspx page with the mode set to Upload&CheckInComment (partially visible in the Address bar). If multiple documents are uploaded, they will appear with checked out status and will have to be individually checked in or other users won’t be able to access them.
Figure 9.23. Confirmation page for document upload.

The default behavior of the document library on a document center site is to require a review of the document properties before it will be accessible by other users. This can cause problems if multiple documents are uploaded at once because their default status will be checked out and they won’t be accessible by other users. An easy way to avoid this behavior is to delete the standard document library and create a new one.
Records Center
The records center site template will be covered in detail in Chapter 12, “Implementing Records Management and Enabling Web Content Management in SharePoint 2007,” because they offer a number of powerful tools designed to meet the specific challenges of records management.
Personalization Site
When a personalization site is created, it should be immediately obvious that it is customized to appeal to the user logged on, as the Quick Launch pane contains their picture (assuming that a picture has been added on their My Site) as shown in Figure 9.24. The tabs include My Home, the personalization site, and My Profile, showing the user that he is tightly connected to his personal site. Note from the URL that the site actually “lives” in a separate location; for example, http://abcmoss01/SiteDirectory/Unleashed1/PersonalizationSite/Default.aspx.
Figure 9.24. Default personalization site.
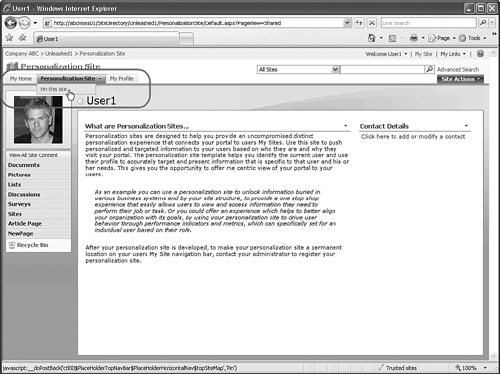
The active tab for the personalization tab has a drop-down arrow on it, and it gives the user the Pin This Site option (as shown in Figure 9.24) that will, if selected, pin the site to the individual’s My Site as a tab, making it immediately accessible from their My Site. If it isn’t pinned, it won’t appear when the user accesses his My Site. So, it should be clear that this type of site is designed to provide information customized to a particular user’s needs for information.
When a personalization site is created, several paragraphs of information are provided to give a description of its purpose. An excerpt is as follows:
“Personalization sites are designed to help you provide an uncompromised distinct personalization experience that connects your portal to users My Sites. Use this site to push personalized and targeted information to your users based on who they are and why they visit your portal. The personalization site template helps you identify the current user and use their profile to accurately target and present information that is specific to that user and his or her needs.”
A personalization site contains three document libraries—titled Documents, Images, and Pages—and a Workflow Tasks list by default. The home page also contains some filter web parts, and an example will be given of how these can be used to meet the stated goals of this type of enterprise site.
If the Site Actions drop-down menu is accessed (notice that it shows the top-level site selection of tools, even if it was created as a subsite) and Edit Page is selected, the Current User Filter and Profile Property Filter web parts are revealed to be part of the top zone (as shown in Figure 9.25). A Content Editor web part containing the What are Personalization Sites... text is in the middle-left zone, and the Contact Details tool pane is in the middle-right zone. The bottom zone is empty.
Figure 9.25. Edit Mode on a personalization site.

To illustrate how to use the current user filter, follow these steps:
1. Access the Workflow Tasks list on the personalization site, and add several tasks that are assigned to different users. In this example, User1 and User2 are each assigned one task.
2. From the home page for a personalization site, click on Edit Page in the Site Actions menu.
3. In the menu bar of the Profile Property Filter, select Modify Shared Web Part and the Editing pane will open. Note that the value Name should be selected in the drop-down menu under SharePoint Profile Value for Current User. This shows that the Filter web part will provide this value of the current user to a web part that it is connected to (at this point it is not yet connected to any web part). Browse the other entries in the drop-down menu. Note that there are many SharePoint profile values that can be selected from. SharePoint updates the profile database with content from Active Directory as well as from content added in the shared services database. The link to Learn About Filter Web Parts also provides additional information on the use of filter web parts. Click OK to close the editing pane.
4. Click Add a Web Part in the middle-left zone, and check the box next to Workflow Tasks in the Lists and Libraries section. Click Add. There is now a web part on this page, with some content, that can be filtered.
5. Now open the Edit menu in the Profile Property Filter, mouse over the Connections link, mouse over Send Filter Values To, and then click on Workflow Tasks. The Configure Connection window will open. Select Assigned To in the Consumer Field Name drop-down menu. Click Finish. Now the page should look like Figure 9.26. Notice that only tasks assigned to the currently logged-in user will display (User1 in this case) as indicated by the arrow. Also notice that the Profile Property Filter now shows the connection to the Workflow Tasks web part, as circled in Figure 9.26.
Figure 9.26. Profile Property Filter connected to a Workflow Tasks web part.

6. If the Edit menu is accessed from the Current User Profile web part and the Connections link is accessed, note that no web parts are shown as available for a connection because the only web part added to the page (Workflow Tasks) is already connected to by the Profile Property Filter.
This quick example shows how the filter web parts can be used to customize the experience of the end user accessing this page. If the personalization page is pinned to the user’s My Site, it will be very easy for the user to find this page because the link to My Site is visible in most cases. Other filter web parts that can be used include the following:
- Business Data Catalog Filter: Filters the contents of web parts using a list of variables from the Business Data Catalog.
- Choice Filter: Filters the contents of web parts using a list of values entered by the page author.
- Date Filter: Filters the contents of web parts by allowing users to enter or pick a date.
- Page Field Filter: Filters the contents of web parts using information about the current page.
- Query String (URL) Filter: Filters the contents of web parts using values passed via the query string.
- SharePoint List Filter: Filters the contents of web parts by using a list of values from a SharePoint list.
- SQL Server 2005 Analysis Services Filter: Filters the contents of web parts using a list of values from SQL Server 2005 Analysis Services cubes.
- Text Filter: Filters the contents of web parts by allowing users to enter a text value.
Site Directory
A site directory is included in the Collaboration Portal template, which is often used for a primary site collection (or portal). So, in many cases, the SharePoint portal will already include a site directory at the top level. However, if it is not available, one can be created at a later date or an additional site directory might be needed to facilitate navigation from a subsite. For example, a subsite might be for the Engineering department, and there could be dozens or even hundreds of sites below it, which would make unwieldy the basic navigations tools, such as the Tree view in the Quick Launch area or a links list with the subsites included.
Figure 9.27 shows a new site directory site created under a subsite. Note that a Create Site tab and a Add Link to Site tab are included on the right side. The Create Site option will appear only if the current user has permissions to create subsites (Hierarchy Managers and Owners by default), and the Add Link to Site option is available only to users with Contribute privileges in the Sites list.
Figure 9.27. New site directory.

Use additional site directories with caution because their behavior is slightly different from the site directory that is created at the top level of a site collection when the Collaboration Portal template is used, or the Site Directory template from the SharePoint Central Administration Create Site Collection page (_admin/createsite.aspx). It is a safe assumption that additional site directories will need more care and feeding than the default top-level site directory.
For example, if you create a site directory underneath a subsite called Unleashed1, and then choose to use the Create Site option from the site directory’s home page, the new site will be created underneath the site directory site. So, for example, the URL would be ...Unleashed1/sitedirectoryname/newsitename. This is typically not a desirable behavior because if the site directory is deleted, the subsites are deleted as well. There is no way to change the URL during the creation process, so it is a better idea to create the site from the site above the site directory; for example, Unleashed1.
In addition, when a new site is created, the user will be presented with the Site Category options from the top-level site directory, which might be different from those offered in the lower-level site directory.
In the Site Actions menu there is a link to Scan for Broken Links that facilitates the ongoing management of the contents of the site directory, and this should be run periodically to make sure that all the listed sites are valid.
A site directory site includes three document libraries—Documents, Images, Pages—as well as three lists: Sites, Tabs, and Workflow Tasks. Clicking on Edit Page from the Site Actions menu reveals the structure of the site directory home page in more detail, as shown in Figure 9.28. The Description field can be customized from this view, or web parts can be added to the header zone, left column, right column, or footer zones. The Contact Details web part can easily be modified by clicking the link provided, and a contact name can be added, the person’s picture can be included, and other formatting choices made.
Figure 9.28. New site directory in Edit mode.

The tabs Categories, Top Sites, and Site Map are shown in the center of the page, not included in any zones, which means that they can’t be changed from this interface. Two links are provided—Add New Tab and Edit Tabs—and these can be used to add new tabs to the page. Before a new tab can be used, however, a new page must be created in the Pages library, or created elsewhere and copied to this library. After the new page has been added to the Pages library, the Add New Tab link can be clicked, and the administrator can then enter a tab name, the page name, and a Tooltip that is displayed when the tab is moused over. If Edit Tabs is selected, the Tabs list is opened, and the administrator can create a new tab from there, edit tab properties (such as the name of the tab or Tooltip), or delete an existing tab.
If the Edit menu in the menu bar for the Categories web part is accessed, and Modify Shared Web Part is selected, the administrator can add header text, change header style, or change the number of columns that the category information is presented in. The default is three columns, but this can be changed to ensure that the information presents properly. Source data and source view can be changed along with other standard options.
If the Site Map tab (indicated with an arrow in Figure 9.28) is selected, the Pages/sitemap.aspx page will load, and the administrator will need to again select Edit Page from the Site Actions menu for the Site Map web part. Accessing the Modify Shared Web Part link in the Edit menu provides a number of other settings that can be configured to modify the Site Map page. As shown in Figure 9.29, the Start From field was changed from / (the top level site) to /SiteDirectory/Unleashed1 and the Levels to Show option is set to 1. This means that any site created under the Unleashed1 site will be shown, but nothing under those sites. Up to three levels can be shown if needed. The number of display columns can be changed, as with the Categories web part. The sort order can also be change from the default setting of Sort Contents as They Are Sorted in Navigation to be sorted by title, creation date, or last modified date. Figure 9.30 shows the results of these changes (only one level of sites shown, and the sites are alphabetized).
Figure 9.29. Sample site map modifications.
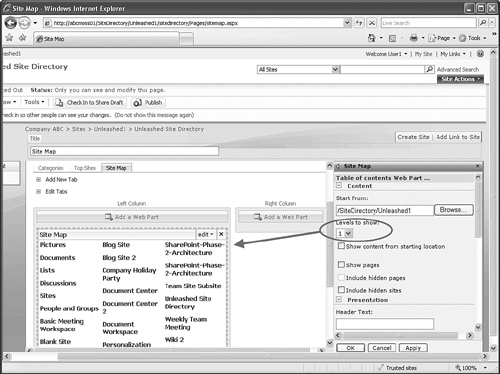
Figure 9.30. Modified site map.

Changing the Options for Division and Region
A common requirement is to change the options available for Division and Region because the default options are simply provided as examples. As mentioned in the Caution earlier in this section, if a site directory template is used to create a subsite, and then a site is created underneath it, the division and region settings from the top-level site directory will be used, which can be confusing to subsite administrators. Therefore, the steps to follow would be better used on a top-level site directory, so the screen captures and URLs in those captures reflect a top-level site directory not a subsite site directory.
To change the Division and Region options, follow these steps:
- From the Site Directory home page, click View All Site Content. When the All Site Content page opens, select the Sites list.
- From the Settings menu, select List Settings. In the Columns area, click on Division (or Region).
- From the Edit Column page (_layouts/FldEdit.aspx) the name of the column can be changed (from the default Division to Department, for example) and the available options can be modified. To change these, in the Additional Column Settings section, enter new choices in the Type Each Choice on a Separate Line text box, as shown in Figure 9.31 where the item Engineering was added, and delete or modify the existing choices. Note that enabling the Allow ‘Fill-In’ Choices option doesn’t allow the user to add text during the site creation process. When the changes are satisfactory, click OK.
Figure 9.31. Modifying the division column settings.
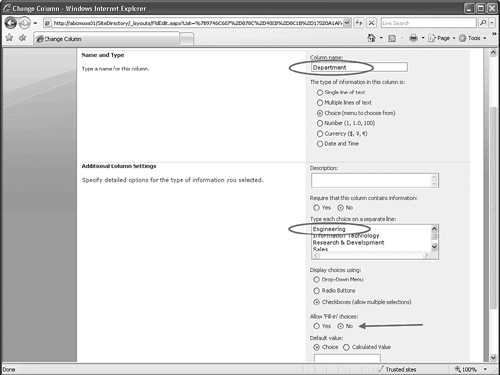
Figure 9.32 shows the results of changing the column name Division to Department, and of adding an Engineering department, and of modifying the Region choices. Notice that there is one entry under the Tasks and Tools heading labeled Top Tasks, and if this is clicked, the items tagged as top tasks in the sites list will appear. By default, only the Setup MySite item is included. This can easily be deleted and other tasks can be included if desired.
Figure 9.32. Categories division column settings.

Report Center
The Report Center template will be covered in Chapter 22, “Exploring Business Process and Business Intelligence Features in SharePoint 2007.” A report center site includes a number of libraries and lists that are ideally suited for allowing an organization to present business intelligence dashboards and reports to the user base. These include the following:
- Data Connections Library: Office data connection files and universal data connection files can be created in this library.
- Reports Library: Reports and dashboard pages can be created from this library.
- Report Calendar: This can be used to track when reports need to be delivered, and for generating workspaces to review and discuss these reports prior to delivery.
- Sample Dashboard KPI Definitions: This list provides several key performance indicators based on standard content types: Indicator Using Data in SharePoint List, Indicator Using Data in Excel Workbook, Indicator Using data in SQL Server 2005 Analysis Services, and Indicator Using Manually Entered Information.
Search Center
A search center is configured by default to have a search field with a link to the Advanced Search page. More information is provided on searching functionality in SharePoint 2007 in Chapter 13, “Benefiting from the Enhanced Search Capabilities in SharePoint 2007.”
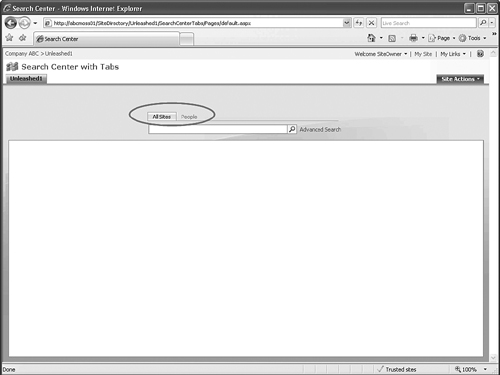
The search center provides tabs to further customize the page, as shown in Figure 9.33. Clicking Edit Page from the Site Actions menu will allow the administrator to add new tabs or modify existing tabs.
Figure 9.33. Search center with tabs.
Additional web parts can be added to the default.aspx page in a search center by accessing the Site Actions menu, and selecting Edit Page. If Add a Web Part is clicked, the Add Web Parts window opens, and the suggested web parts include the following:
- Advanced Search Box
- People Search Box
- People Search Core Results
- Search Action Links
- Search Best Bets
- Search Box
- Search Core Results
- Search High Confidence Results
- Search Paging
- Search Statistics
- Search Summary
By using a combination of these web parts, the functionality of a search center can be customized based on the needs of the administrator and user community.
Creating Sites from the Publishing Tab
The three site templates offered in the Publishing tab on the _layouts/newsbweb.aspx page will be covered in Chapter 12, “Implementing Records Management and Enabling Web Content Management in SharePoint 2007.” These templates are Publishing Site, Publishing Site with Workflow and News Site.
Configuring the Look and Feel of Sites
A set of tools are available for the site administrator that control the look and feel of top-level and subsites. These are greatly enhanced from SharePoint 2003, and with some experimentation will allow the SharePoint and site administrators to create an optimized set of tools for the user community.
From a top-level site, the Site Settings page (_layouts/settings.aspx) offers a Look and Feel column that includes the following tools:
- Master Page
- Title, Description, and Icon
- Navigation
- Page Layouts and Site Templates (top-level sites only)
- Welcome Page (top-level sites only)
- Tree View
- Site Theme
- Reset to Site Definition
- Searchable Columns
For a subsite, the tools are slightly different:
- Title, Description, and Icon
- Master Page
- Navigation
- Tree View
- Site Theme
- Save Site as Template (subsites only)
- Reset to Site Definition
- Searchable Columns
Basic Customizations Using Icons and Master Pages
The Title, Description, and Icon link on the settings.aspx page allows the administrator to quickly change the title of the home page, add descriptive text, and include an image as the page icon. The default image is titlegraphic.gif and the location is listed as /layouts/images/, which corresponds to the C:Program FilesCommon FilesMicrosoft SharedWeb Server Extensions12TemplateIMAGES directory. Commonly used images or icons should be placed in this directory. The titlegraphic.gif image is 24 × 20 pixels, at 96 dots per inch, so replacement icon(s) should be roughly the same size and resolution for consistency’s sake.
Site administrators should be discouraged from pointing to a picture library on their site because this can lead to additional prompts for logins if the library has different security settings. It is a good idea to ask new site administrators to provide any extra images to the SharePoint administrator team to load locally on the web server(s).
The URL can also be changed from this page, but this should be done with caution because SharePoint won’t automatically redirect users that try to use the old link. If a site is changed from ...TeamSiteABC to ...TeamSiteXYZ, a user that enters ...TeamSiteABC will receive an HTTP 404 Not Found error. It is handy to be able to change the URL as site administrators do sometimes.
Master pages affect the look and feel of the site, and can be inherited from the parent of the site, or a specific master page can be specified for use on the site and on sites that inherit from it. If needed, the default.master page can be edited in Designer 2007 or a page can be created from scratch for specific purposes. Chapter 13 will provide some additional review of master pages and some examples of the customization process.
Navigation Settings
Having useful, configurable, and flexible navigation tools is very important to allow SharePoint administrators and site administrators to ensure that their sites meet their needs and the needs of their users. With SharePoint 2003, a common complaint was that the Quick Launch area wasn’t configurable enough, and the top navigation bar was also not flexible enough. Fortunately, SharePoint 2007 offers highly configurable navigation tools.
The tabbed interface on a site and the Quick Launch area are easily configured for a site. To modify these settings, from a top-level site, access the Site Actions menu, mouse over Site Settings entry, and click Modify Navigation. The _layouts/AreaNavigationSettings.aspx page will then open, as shown in Figure 9.34. The first options allow the administrator to decide whether to show subsites and/or whether to show pages in the tabbed navigation area. The site itself will always be shown, and if Show Subsites is checked, the subsites will be listed to the right of the containing site (by default). If Show Pages is checked, pages created in the Pages library will be shown. Figure 9.35 shows a top-level site’s tabs with show subsites unchecked, and show pages checked. If Sort Automatically is checked, several sorting options are provided: Title, Created Date, Last Modified Date, in ascending order, or in descending order. If Sort Manually is checked, the administrator can use the Move Up and Move Down tools in the Navigation Editing and Sorting section (circled in Figure 9.34). The other tools include Hide, which will stop the item from appearing in a tab, Add Heading, and Add Link.
Figure 9.34. Site Navigation Settings page.

Figure 9.35. Sample tab configuration.
Add Heading allows the administrator to create a new tab item, which can contain a URL or simply be a placeholder. Then a link can be created that will be accessible from that tab. For example, a heading can be created called Key Sites with no URL associated with it, and then a link called Unleashed 1 with the URL of http://abcmoss01/sitedirectory/unleashed1 included (as indicated with the arrow in Figure 9.34). Figure 9.36 shows the portion of the navigation tabs with the new heading and link. Note that a URL is required for links for optional for headings.
Figure 9.36. Sample tab configuration with heading and link.

Modifications to the Current Navigation section on the _layouts/AreaNavigationSettings.aspx page will affect the appearance of items in the Quick Launch area.
On a subsite, the site navigation settings (the AreaNavigationSettings.aspx page) available from the Site Settings page (_layouts/settings.aspx page) provide some additional options:
- For Global Navigation (Tabs): Display the same navigation items as the parent site or display the navigation items below the current site.
- For Local Navigation (Quick Launch): Display the same navigation items as the parent site, display the current site, the navigation items below the current site and the current site’s siblings, or display only the navigation items below the current site.
In addition, the Quick Launch area can easily be turned off by accessing the _layouts/navoptions.aspx page (click on Tree View in the Site Settings page). In addition if Enable Tree View is checked, the Quick Launch area will include a tree-style navigation tool, as shown in Figure 9.37.
Figure 9.37. Tree navigation added to the Quick Launch area.
In a matter of a few minutes, the site administrator can fine-tune how these two key navigation elements appear and add new items to meet the needs of the users.
Site Themes
Site themes are accessible from the _layouts/themeweb.aspx, and previews are given for the different standard themes. Changing a theme does not affect a site’s layout or pages that have been individually themed, but do change the color scheme of the site. A little experimentation will quickly allow the site administrator to pick a theme that meets her expectations. If none of the themes is suitable, a tool such as Designer 2007 can be used. Alternatively, a new site theme can be created based on one of the existing ones, but this is a more complex process that would normally be performed by a web designer.
Save Site as a Template
Using this tool from the _layouts/settings.aspx page allows the administrator to create an .stp file that will be available in the future when additional subsites are created. The site templates are stored in the Site Template Gallery at the top-level site. Figure 9.38 shows a sample site template gallery with two entries in it. Site templates cannot exceed 10485760 bytes (roughly 10.5 MB), which limits the amount of content that can be included. SharePoint 2003 users will be pleased to see that this process is much easier than the convoluted method of “force feeding” a site template to the portal in SharePoint Portal Server 2003!
Figure 9.38. Site definitions gallery at a top-level site.

Figure 9.39 shows the _layouts/newsbweb.aspx page. Notice that a new tab titled Custom is now available (circled in the figure), and it includes the two entries in the site template gallery: Unleashed1 and blanksite.
Figure 9.39. Custom site template options.

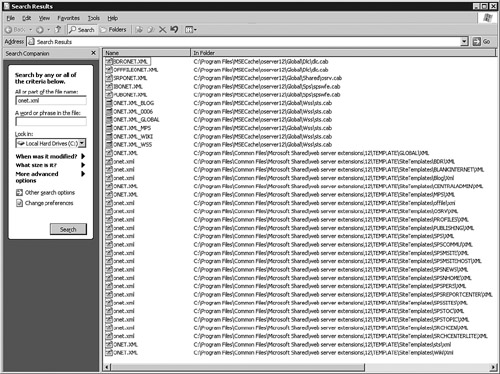
Reset to Site Definitions
This is a new tool in SharePoint 2007 that gives the site administrator a fall-back plan in case the site stops rendering or needs to be reset for other reasons. The page (_layouts/reghost.aspx) allows the administrator to reset a specific page to the site definition, or to reset all pages in the site. Site definitions are stored on each front-end web ser server and include the onet.xml file. Figure 9.40 shows the different standard onet.xml files included in SharePoint Server 2007. Note that individual files exist for different types of sites, such as a blog site, publishing site, news site, and wiki site. Changing an onet.xml file will affect sites that have been created from this file originally, so this is a powerful way of pushing changes through the organization. However, it is not without risk and could break a number of sites, so SharePoint 2007 offers other alternatives, such as master pages.
Figure 9.40. onet.xml files included in SharePoint Server 2007.
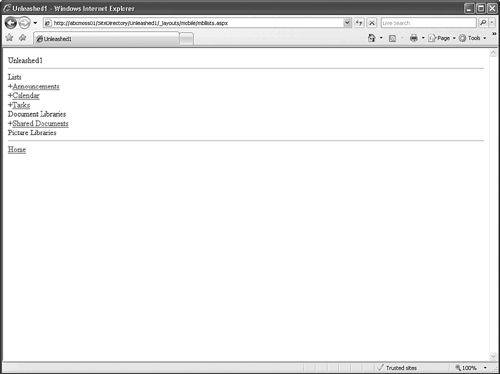
Mobile Pages
An item that is also visible on the _layouts/settings.aspx page is the URL for the mobile site. If this URL (by default, the site name with m/ appended to it) is accessed, it can be seen to be very sparse, and ideally suited for access from a Windows Mobile OS device, such as the Motorola Q or similar device. Figure 9.41 shows a sample mobile page. These pages can, like any other page, be modified in SharePoint Designer if needed, but it is a general best practice to keep the modifications to a minimum.
Figure 9.41. Sample mobile page.
Using the Galleries
Galleries contain a number of different items that are available to site administrators such as master pages, site content types, and site columns. The type and number of galleries vary depending on whether the site is a top level or subsite. A top-level site provides the following galleries:
- Site Content Types
- Site Columns
- Site Templates
- List Templates
- Web Parts
- Workflows
- Master Pages and Page Layouts
A subsite provides the following galleries:
- Master Pages
- Site Content Types
- Site Columns
The Web Part gallery will be reviewed in this section to illustrate the capabilities of the gallery and standard tools provided.
Web Part Gallery
SharePoint 2007 offers a vastly enhanced range of web parts. A site administrator should put some time and effort into determining which of these web parts to make available to the user community, and to get to know the range of web parts. Although this can be a daunting task, it will greatly improve the usefulness of the SharePoint sites and provide value to the user community. Windows SharePoint Service v3 offers the following web parts in the Web Part gallery:
- MSContentEditor.dwp: Content Editor web part to display formatted text, tables and images.
- MSImage.dwp: Image web part to display pictures and photos.
- MSMembers.dwp: Site Users web part to see a list of the site users and their online status, if presence is enabled.
- MSPageViewer.dqp: Page Viewer web part to display linked content, such as files folders or web pages.
- MSSimpleForm.dwp: Form web part is used to connect simple form controls to other web parts.
- MSUserDocs.dwp: Relevant Documents web part displays documents that are relevant to the current user.
- MSUserTasks.dwp: Displays the tasks assigned to the current user.
- MSXml.dwp: Use for XML and XSL transformation of the XML.
SharePoint Server 2007 offers a much more extensive list of web parts, which will depend whether the Standard or Enterprise version is installed. This list is too extensive to cover here, but a SharePoint administrator should make some decisions about limiting which web parts are available for general use. If the site administrators are experienced with SharePoint 2003 and have worked with web parts previously, it might be acceptable from a support standpoint to allow them to use all the standard web parts. However, if many of the site administrators or site designers aren’t familiar with SharePoint web parts, the full list might be quite daunting. Fortunately, the web part gallery allows the SharePoint administrator to limit which web parts are made available to subsite administrators.
Figure 9.42 shows the EditForm.aspx view of a web part (BusinessDataActionsWebPart.dwp) in the web part gallery. This gives the SharePoint administrator a chance to provide additional information about a web part if needed in the Description box, as well as specify a group to which the web part belongs. In SharePoint 2003, it could be very difficult to find a specific web part for administrators and designers because grouping was not provided. Quick Add Groups are now provided to further define the list of suggested web parts that appear when an administrator clicks the Add Web Part link in Edit mode of a page. As shown in Figure 9.42, a custom value can be configured. In this example, this web part will appear as a suggestion for the middle right, middle left, or bottom zones for a My Site. Note that Manage Permissions is available and this allows the SharePoint administrator to determine what users have which permissions to this web part.
Figure 9.42. Edit Properties page for a web part in the Web Part gallery.

For example, as shown in Figure 9.43, a web part’s permissions can be modified so that a more restricted group of users have access to it. In this example, all users and groups will be removed with the exception of the SharePoint system account, so this web part will be visible only to the system account when browsing the gallery to add web parts.
Figure 9.43. Change permissions for a web part in the Web Part gallery.

Summary
This chapter provided an overview of the process of designing and managing pages, workspaces and sites in SharePoint 2007. In a number of cases, future chapters will further expand on the features of certain site templates, and web parts that can be used on pages, sites, and workspaces. A good take-away for this topic is that quite a bit of planning and testing is required to ensure that the resulting environment truly meets the needs of the user community. The four worksheets provided near the beginning of the chapter provide a sample tool that can be used when engaging in this design process. Tips and Cautions were provided in several areas because certain site templates might perform differently depending where in the site hierarchy they are created.
Best Practices
- Different levels of planning are required for pages, workspaces, and sites. Typically, pages and workspaces are used on an ad hoc basis, so planning is minimal and modifications are easily made after the page or workspace is created. For sites, however, there are many more choices and configuration options, so planning should take place before the site is created. Worksheets are provided in this chapter to assist in the process of making these decisions for site permissions, new SharePoint groups, and site design.
- Basic pages and web parts pages can be very useful to create pages that are housed in document libraries that meet the needs of specific users. These pages can easily be copied and used on other sites, but can also be deleted like a regular document.
- Workspaces can be created from scratch or based on a document or calendar list item. Each workspace is a site, and can be managed as a site, so users should be shown how to create and manage these workspaces, and what to do with the content when the workspace is no longer required.
- If a workspace is created from a document using the Edit menu and the Send To option, when the document has been completed and the workspace is no longer needed, the document should be published back to the document library so that the latest version is available in the document library.
- A helpful way to understand a site or workspace is to use My Network Places, add an entry for a SharePoint 2007 site that contains a workspace or a subsite, and then browse the workspace and/or subsite. Note the different folders present, and which ones contain .aspx files and actual documents.
- A blog site needs to be created to provide blogging functionality in SharePoint 2007. As with other sites, it is important to plan how this site will be used, which users and groups will have which privileges on the site, and whether additional lists or libraries are required.
- It is recommended to set up a default site directory path and enforce that sites are automatically listed in this directory. This option is available in the Central Admin Operations page (/_admin/SiteDirectorySettings.aspx).
- Store custom systemwide images, stylesheets, or other pages in custom folders and not in the default Microsoft folders. In the case of system images, it is recommended to create a subfolder in c:Program FilesCommon FilesMicrosoft Sharedweb server extensions12TEMPLATEIMAGES called CUSTOM and store images in there. The relative HTTP path to these images will then be /layouts/images/custom/.
- The default site directory path can be specified in a central administration page (/_admin/SiteDirectorySettings.aspx) and it can enforce that sites are automatically listed in this Site Directory when they are created. This greatly simplifies the management of the site directory.
- Use caution when creating a site directory site as a subsite (for example, http://servername/subsite/sitedirectory) because it will not offer the same functionality as the standard top-level site (for example, http://servername/SiteDirectory).
- Changing the global navigation options (the tabs on a site’s home page) and the current navigation options (the Quick Launch area) allow an administrator to quickly customize the tools the users have to quickly and easily access different subsites, pages, or even links to sites and pages located elsewhere in the organization.
- After customizing a site or site collection to suit the organization’s needs, consider saving it as a site template so that it will appear as an option when a new subsite is being created.