Chapter 13. Benefiting from the Enhanced Search Capabilities in SharePoint 2007
IN THIS CHAPTER
- Comparing Search Functionality in Different Versions of SharePoint 2007
- Windows SharePoint Services Search Service
- SharePoint Server 2007 Search Capabilities
- Best Practices
The capability to search within the SharePoint environment is vitally important to the user community. One of SharePoint 2003’s much vaunted capabilities was to do just that, and a reason to upgrade to SharePoint Portal Server 2003 from Windows SharePoint Services 2.0 was the capability to search and index content stored outside of the SharePoint environment, such as file shares. SharePoint 2007 builds on and enhances this functionality with better designed and more intuitive tools. Where the SharePoint 2003 products relied on SQL Server full-text searching, Windows SharePoint Services 3.0 and SharePoint Server 2007 share new and improved search technology which greatly enhances the power and flexibility of the tools.
This chapter covers the features provided in the Windows SharePoint Services 3.0 search service and SharePoint Server 2007 search. It also gives some insight into what is possible in tuning, optimizing, and configuring these products to meet the organization’s needs.
Comparing Search Functionality in Different Versions of SharePoint 2007
Figure 13.1 shows a grid comparing the different features available from Windows SharePoint Services 3.0, SharePoint Server 2007 for Search, and SharePoint Server 2007 as provided in the SharePoint Server 2007 Software Development Kit (SDK). As shown in this chart some key differences between the products are
- Windows SharePoint Services 3.0 can only search local SharePoint content. However, SharePoint Server 2007 has the greatest flexibility in searching SharePoint content, as well as other external content sources, such as Exchange Server content, file shares, Lotus Notes, and line-of-business content.
- Windows SharePoint Services 3.0 Search does not offer best bets, results removal, people search, or knowledge network, all of which can enhance search functionality.
- Windows SharePoint Services 3.0 doesn’t offer Business Data Search.
- All versions support security trimming, but only SharePoint Server 2007 Enterprise Search supports custom security trimming. Security trimming ensures that users don’t even see links to data to which they do not have access.
Figure 13.1. Search features grid.

There might be situations where testing of the security trimming features in SharePoint Server 2007 need modification. This is made possible through the ISecurityTrimmer interface, which contains two methods that must be implemented. The first method is the Initialize Method, which is executed when the security trimmer is loaded into the worker process, and second is the CheckAccess Method, which is executed at least once each time a search query returns results. The SharePoint Server 2007 SDK contains additional information about using these tools and creating a custom security trimmer.
The following sections delve more deeply into the Windows SharePoint Services 3.0 search functionality and SharePoint Server 2007 search features. Office SharePoint Server 2007 for Search is not covered in depth, but it might be an attractive product for an organization to prototype if other SharePoint features are not currently required.
Windows SharePoint Services 3.0 Search Service
If Windows SharePoint Services 3.0 is installed by itself, only the Windows SharePoint Services Search service will be used. To access the settings for this service, open the Central Administrator Console, click on the Operations tab and select Services on Server. Windows SharePoint Services Search should be listed. Click on the Windows SharePoint Services Search link. The following settings are available and can be changed if needed:
- Service Account—By default this uses the predefined Local Service account, but another account can be used if needed.
- Content Access Account—By default this is set to the Local Service account, but can be changed to another account if needed.
- Search Database—The database server is specified, as well as the database name. Windows authentication is the default method. SQL authentication can be selected, but this is generally not recommended.
- Indexing Schedule—The default is every five minutes, but hourly or daily indexing may be configured instead. No new files are available for searching until they are indexed, so a smaller time period is usually preferable.
Testing Windows SharePoint Services Search Functionality
Following are the basic syntax rules that apply to Windows SharePoint Services search:
- The Search service automatically includes variations of words that are based on the base stem of the word, such as plurals. For example, a search for the word page also returns results for pages.
- You cannot use wildcard characters, such as the asterisk (*).
- The Search service does not support Boolean functions such as AND and OR. You can include or exclude keywords, however, by using the + (plus) or – (minus) sign in front of the keyword. The plus (+) tells SharePoint that the word must be included in the results, and the minus indicates that the term cannot be included in the results. For example, the query fox –quick returns a list of items containing the word fox and not containing the word quick. Multiple conditions can be placed on a search in this way.
- The Search service automatically ignores common words such as the, it, and by, as well as single-digit numbers.
- The Search service is not case sensitive.
- Attachments to list items do not appear in search results.
A quick test of this functionality can be accomplished by creating a Word document and uploading it to a document library housed in a Windows SharePoint Services 3.0 site. Type the sentence The quick brown fox jumped over the lazy dog and use this same sentence as the title. Immediately after the document has been uploaded, access the This List option in the Search drop-down menu, type quick in the search field, and press Enter. Note that the results do not include the document that has just been uploaded, as it still needs to be indexed by SQL Server. Two .aspx pages are returned instead, as they contain the word quick in the text Quick Launch (see Figure 13.2).
Figure 13.2. Search results before indexing has occurred.

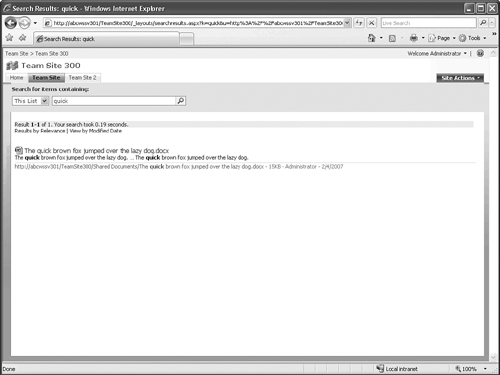
Wait five minutes and repeat the search. The results should match what is shown in Figure 13.3. Note the View by Modified Date option on this page to below the search field. If the search still doesn’t show results, the problem could be that the indexing schedule on the Configure Windows SharePoint Services Search Service Settings page (/_admin/SPSearchServiceInstanceSettings.aspx) is set to a value other than five minutes, search is not functioning properly, or the library is excluded from searching.
Figure 13.3. Search results after indexing has occurred.

Next, create another Word document and include the text The slow brown fox jumped over the energetic dog and save it to the document library with this text as its title. Wait five minutes and try the following searches:
- Search for fox –quick. The new document discussing the slow brown fox should appear, but the original document about the quick brown fox does not appear.
- Search for quick brown fox. Then search for quick brown fox. The results should be the same.
- Search for jump. No results appear.
- Search for .docx. Both documents should appear, assuming they were saved in the .docx format.
Excluding .aspx Pages from Indexing
A natural request at this point is to not index the .aspx pages, as these results clutter up the search for the average user on a team site. If the site is a publishing site, however, and content contained in .aspx pages can be exactly what the searcher is looking for, no changes might be needed. To turn off indexing of .aspx pages, follow these steps:
- Access the Site Actions menu, and select Site Settings. In the Site Administration column, click on Search Visibility.
- The first option, Allow this Web to Appear in Search Results?, should be set to Yes, and in the Indexing ASPX Page Content section, Do Not Index ASPX Page if this Site Contains Fine-grained Permissions is checked by default. See the note on fine-grained permissions for an additional discussion on this topic. Select Never Index any ASPX Pages on this Site. Click OK.
- After the index refreshes, the .aspx pages are no longer indexed, and the results look like those shown in Figure 13.4.
Figure 13.4. Search results after .aspx pages are removed from indexing.
Fine-grained permissions result when permissions that are different from the default site permissions are applied at a list, library, or document level. It is important for the administrators to understand that if fine-grained permissions are in use on a site, a web part that shares data with another web part could expose information to indexing to which a user should not have access. For example, if the Top Secret list is locked down to only members of the Owners group, but a web part open to the Visitors group displays information from this list, a member of the Visitors group might do a search that would reveal a link to an item in the Top Secret list. The user wouldn’t be able to actually open the link because she does not have permissions to open items from that list, but she might see results that shouldn’t be available, and she might think the software is not working properly and complain.
Another way to ensure that a page is not indexed is to edit the page in a program such as SharePoint Designer 2007 and add the No HTML Index meta tag to all pages that the index server shouldn’t crawl.
Rebuilding the Index
If Search services is turned off from the Central Administrator Console Services on Server page (_admin/Server.aspx), a message that states “The Windows SharePoint Services Search service that was enabled on this server will be uninstalled and all index files will be deleted permanently” is shown.
If a search is attempted from a document library when the Search service is turned off, a message says “Your search cannot be completed because this site is not assigned to an indexer. Contact your administrator for more information.” This is an improvement from Windows SharePoint Services 2.0, in which no message was provided if Search services were not functional.
At the time of this writing, however, the index database and log database need to be deleted by hand or the service cannot be started again. If the Start action is selected from the Services on Server page without deleting the database, an error message appears. It says, “databasename on np:\.pipeMSSQL$Microsoft##SSEEsqlquery contains user-defined schema. Databases must be empty before they can be used. Delete all of the tables, stored procedures, and other objects, or use a different database.”
To delete the database in SQL Server 2005 Express, follow these steps:
- On the server running the Search service, click Start, All Programs, Administrative Tools, Services. Scroll down to the SQL Server 2005 Embedded Edition Service (MICROSOFT##SSEE), right-click on it, and select Delete.
- Now that SQL has been stopped, the databases can be deleted. Be careful, as deleting the wrong database might have unpleasant results. For Windows SharePoint Services 3.0 installations using SQL Server 2005 Express, these files are located in the C:WindowsSYSMSISSEEMSSQL.2005MSSQLDATA folder. The name of the search database is WSS_Search_servername.mdf by default. Delete the search database and related log file (same filename but with the extension _log.ldf) by right-clicking on each file and selecting Delete.
- Restart the SQL Server 2005 Embedded Edition Service (MICROSOFT##SSEE) by right-click on it and selecting Start.
- From the Operations tab in the Central Administrator console, click Services on Server. Click Start next to the Windows SharePoint Services Search entry. The Configure Windows SharePoint Services Search Service Settings page on Server Servername (/_admin/SPSearchServiceInstanceSettings.aspx) opens. In the Search Database section, type a new database name in the Database Name field. Click Start.
- Now a new database is created (verify this by checking in the C:WindowsSYSMSISSEEMSSQL.2005MSSQLDATA folder). It won’t have content until it indexes the existing content. This can be tracked by accessing the Operations tab and clicking Timer Job Definitions in the Global Configuration column. Look for the SharePoint Services Search Refresh item. When it says it has succeeded, the content is ready to search once more.
SharePoint Server 2007 Search Capabilities
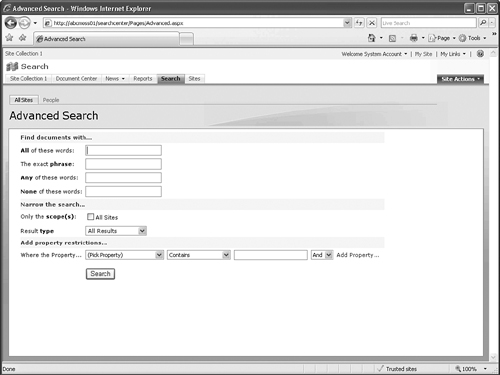
SharePoint Server 2007 search uses the same base engine as Windows SharePoint Services 3.0, but then adds additional capabilities and functionality to meet the needs of larger organizations and more complex SharePoint implementations. The end user immediately sees a difference from Windows SharePoint Services Search because SharePoint Server 2007 offers an advanced search page, as shown in Figure 13.5. The advanced search capabilities of SharePoint Server 2007 enable the user to use the interface shown in Figure 13.5 to perform complex searches, or the syntax can be entered directly into the search box.
Figure 13.5. Advanced search page in SharePoint Server 2007.

Property filters such as the following can be entered directly into the search bar for very granular searches:
- author:—For example, typing author:Spence returns any documents with the word Spence in the author field.
- title:—For example, typing title:Quick returns any documents with the word Quick in the title.
- site:—For example, typing site:http://abcwssstd01 (include quotes around the URL if it contains spaces)
- filetype:—For example, typing filetype:docx returns all files with the .docx extension.
- ContentType:—For example, typing ContentType:Announcement returns all items in an announcement list.
What makes the search tool even more powerful is the capability to combine different search filters. A sample search string could therefore be similar to the following: fox filetype:pdf author:user1.
Managing Search Configuration Settings in SharePoint Server 2007
To manage the search configuration settings in SharePoint Server 2007, the Shared Services Administrator web application needs to be accessed. This web application has the Search Settings tool for configuring search functionality as well as the Search Usage Reports, an extremely powerful tool for administrators who want to better understand the types of searches being performed.
Figure 13.6 is an overview of the internal architecture of Enterprise Search in SharePoint Server 2007. The index engine connects to content and accesses the textual information using the protocol handlers and IFilters. The locations of specific words are then stored in the content index where word breakers and stemmers facilitate more pertinent searches.
Figure 13.6. SharePoint Portal 2007 internal architecture.

Search Services in SharePoint Server 2007
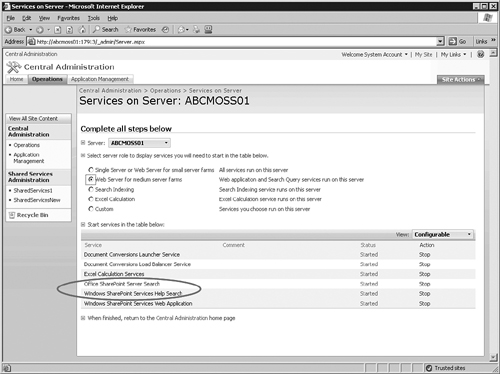
Two services are listed on the Services on Server page (/_admin/Server.aspx) in the Central Administrator console: Office SharePoint Server Search and Windows SharePoint Services Help Search (see Figure 13.7). The Office SharePoint Server Search is an enhanced version of the Windows SharePoint Services Search included in Windows SharePoint Services 3.0. The Windows SharePoint Services Servers Help Search is dedicated to indexing the help files and enabling users to search this content. If the Search Indexing option is selected (as it might be in a more complex server farm where the server is dedicated to the indexing function), only the Office SharePoint Search service is available. Clicking the Windows SharePoint Services Servers Help Search link shows the same options as would be available in Windows SharePoint Services 3.0 for the Windows SharePoint Services Search service.
Figure 13.7. The Services on Server page for SharePoint Server 2007.
Interestingly, the default indexing schedule is every five minutes on the /_admin/SPSearchServiceInstanceSettings.aspx page for Windows SharePoint Services Help Search. This is not necessary as the Help Service content will most likely not be changing. Even if custom content is added to the help database (by default named Windows SharePoint Services_Search_servername), five minutes is most likely overkill. A general best practice is to change this to a more logical setting, based on the needs of the organization and how often, if ever, the help database changes. This way the processing cycles of the server won’t be unnecessarily impacted.
Configuring Search Settings
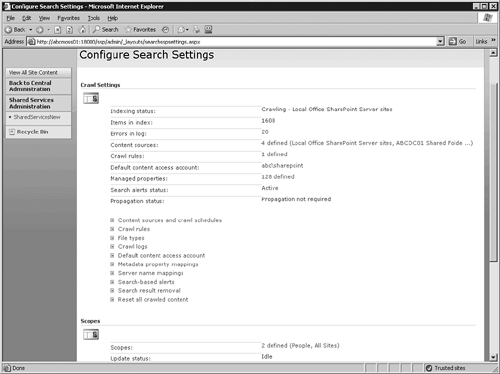
The Configure Search Settings page (ssp/admin/_layouts/searchsspsettings.aspx) contains a variety of tools, as shown in Figure 13.8. This page becomes very familiar to SharePoint server or farm administrators who want to optimize the search and indexing performance of the SharePoint environment. The main components accessible on this page are covered in the following sections.
Figure 13.8. The Configure Search Settings page.
Content Sources
Clicking the Content Sources and Crawl Schedules link reveals the Manage Content Sources page (ssp/admin/_layouts/ListContentSources.aspx). This page instantly gives an overview of the content sources, current status, and scheduled time for the next full and incremental crawls. By default, only the Local Office SharePoint Server Sites content source is present. Figure 13.9 shows the Edit Content Source page (/ssp/admin/_layouts/editcontentsource.aspx) for the Local Office SharePoint Server Sites content source after it has been modified to remove several of the default web applications that were included, and now only includes a top-level site, a subsite, and a sub-subsite. Note that this content source is set to Crawl Only the SharePoint Site of Each Start Address, because the administrator, in this example, chose to restrict the crawl to three specific sites.
Figure 13.9. The Edit Content Source page.

Additional content sources can be added by clicking New Content Source on the Manage Content Sources page. The options for content sources are SharePoint sites, websites, file shares, Exchange Public Folders, and business data. Figure 13.10 shows the settings for a file share crawl, with the The Folder and All Subfolders of Each Start Address option enabled. Although the file share was entered as \abcdc01C$shared folder, SharePoint converts this to the format shown of file://abcdc01/c$/shared folder. After these settings are saved, and if a full crawl is stated, the administrator is returned to the Manage Content Sources page (as shown in Figure 13.11).
Figure 13.10. The Add Content Source page.

Figure 13.11. The Manage Content Sources page.

The administrator can choose the following options from the Content Source drop-down menu: Edit, View Crawl Log, Start Full Crawl, Start Incremental Crawl, Resume Crawl, Pause Crawl, Stop Crawl, or Delete. As circled in Figure 13.11, several content sources are shown in this example, including a local SharePoint content source, a shared folder on a file server, an Exchange public folder, and an intranet website. The full crawl schedules are set to happen weekly on Sundays, and incremental crawl schedules vary depending upon the type of data to be crawled. The scheduling interface is quite flexible, with the exception that events need to be scheduled to start on the hour. Crawls can then be scheduled for every X amount of minutes for a total of Y minutes, which enables crawls to recur at regular intervals during the day. Some fine tuning is needed to ensure that incremental crawls do not overlap themselves. For example, if an incremental crawl is set to happen every 10 minutes, but regularly takes more than 10 minutes to complete, data might get missed. To tell if this is happening, simply wait until the crawl starts, and then monitor its status on the Manage Content Sources page to see if it completes and resets to idle status before the crawl starts again.
Crawl Rules
New crawl rules need to be created when a content source does not accept the default content access account. For example, if a file share on the network, public folder, or intranet is not accessible to the default content access account (abcsharepoint in the previous example), a different account needs to be specified. Figure 13.12 shows the Add Crawl Rule page, where the path, choices about the scope of items to crawl (including Exclude All Items in this Path and Include All Items in this Path), and which account to use can be entered. In Figure 13.12 an intranet site is being crawled. The Do Not Allow Basic Authentication box is cleared because the intranet site is internal, so passing the password without encryption is not a major concern.
Figure 13.12. The Add Crawl Rule page.

Here are definitions for the different search wildcards, such as the * character, that can be used:
- * as the site name—Apply the rule to all sites.
- *.* as the site name—Apply the rule to sites with dots in the name.
- *.site_name.com as the site name—Apply the rule to all sites in the site_name.com domain (for example, *.abc.com).
- *.top-level_domain_name (such as *.com or *.net) as the site name—Apply the rule to all sites that end with a specific top-level domain name (for example, .com or .net).
- ?—Replace a single character in a rule. For example, *.unleashed?.com applies to all sites in the domains unleashed1.com, unleashed2.com, and so on.
Use the testing feature on the Manage Crawl Rules page to test different subsites and make sure they match the rule created. Bear in mind when creating a crawl rule that there is a difference between the three following URLs:
For example, if http://intranet.abc.com/*.* is entered, the root site of intranet.abc.com is not searched, only the subsites. To search the root site, use the http://intranet.abc.com/* option.
A crawl rule with multiple wildcards can be created to search only certain file types, such as *://*.doc.
This rule includes every document with the .doc file extension, which could be useful if the administrator is only interested in a specific subset of files in a specific location.
By experimenting with the crawl rules, the administrator can fine-tune the content available to end users with a great degree of precision.
File Types
The following lists the file types that are indexed by default in SharePoint Server 2007 and included in the default file type inclusion list (found in the Manage File Types page, /ssp/admin/_layouts/managefiletypes.aspx). A number of documents discussing SharePoint Server 2007 say 200 file types are indexed, but according to the Shared Services tool, and specifically the Manage File Types page, a much smaller number of file types are indexed by default. The IFilters enable SharePoint to determine what textual information is contained within the document. If a new file type is added without a corresponding IFilter being installed, only the file information metadata is indexed.
- ascx
- asp
- aspx
- doc
- docm
- docx
- dot
- eml
- exch
- htm
- html
- jhtml
- jsp
- mht
- mhtml
- msg
- mspx
- nsf
- odc
- php
- ppt
- pptm
- pptx
- pub
- tif
- tiff
- txt
- url
- vdx
- vsd
- vss
- vst
- vsx
- vtx
- xls
- xlsm
- xlsx
- xml
This second list shows the extensions of the additional file types supported by SharePoint Server 2007, but that are not included in the default list.
- asm
- bat
- c
- cmd
- cpp
- css
- cxx
- def
- dic
- h
- hhc
- hht
- hpp
- hta
- htw
- htx
- lnk
- mpx
- one
- pot
- pps
- stm
- trf
- xlb
- xlt
These lists should be reviewed to validate that the file types included by default do need to be indexed, and if any of the nondefault file types should be added.
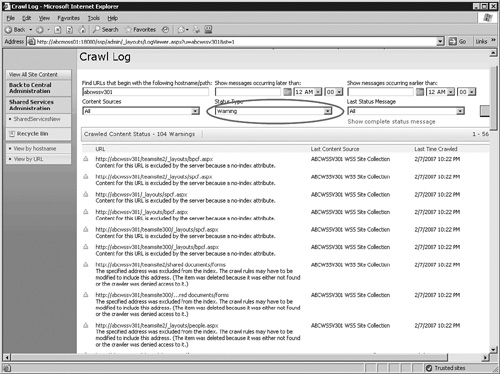
Crawl Logs
Crawl logs provide valuable information to the search administrator, and are available from several places in the Shared Services Administration site. The crawl logs can be accessed directly by doing to the Crawl Log page (/ssp/admin/_layouts/logsummary.aspx), an example of which is shown in Figure 13.13. Every entry in the Crawled Content Status frame on this page is an active link (with the exception of the Total column) and provides detailed information on the hostname, successful crawls, warnings, and errors. Figure 13.14 shows a sample of the warnings for the abcwssv301 site, which has a large number of warnings. As circled in Figure 13.14, the Status Type box is set to Warning, and other conditions can be set for the data the log displays. Messages occurring later or earlier than a certain time and date can be requested, a different content source can be selected, the status type can be changed, and a specific status message can be chosen. This enables the search administrator to quickly review the results and ensure that the crawls are functioning properly. Figure 13.14 reveals a number of warnings about .aspx files, but the message clarifies that this is due to the content being excluded by the server because of a no-index attribute.
Figure 13.13. The Crawl Log page viewed by hostname.

Figure 13.14. The Crawl Log page viewed by URL.
Metadata Property Mappings
The next link available on the Configure Search Settings page is the Metadata Property Mappings link, which opens the Metadata Property Mappings page (/ssp/admin/_layouts/schema.aspx). The Crawled Properties page is accessible from here as well, as shown circled in Figure 13.15.
Figure 13.15. The Managed Properties view.

The Managed Properties view shows the property names that are mapped to crawled properties. The type of data, whether the property can be deleted, and whether it can be used in scopes is listed. Additionally, the crawled property mappings are shown, if there are any. Clicking the Crawled Properties link shows logically grouped properties (see Figure 13.16). A search field is available to find properties, which can be a great time saver instead of manually sorting through each folder.
Figure 13.16. The Crawled Properties view.

Metadata property mappings map properties extracted from documents during crawls to managed properties, which users can use in search queries. A good example is when a user accesses the Advanced Search page and selects the Author property. SharePoint uses the property mappings to include specific crawled metadata. As shown in Figure 13.15, Author is mapped to Mail:6(Text) and Office:4(Text). Additional metadata values could be added to this managed property, if desired, to expand the scope of the results returned.
A good example of the importance of reviewing and testing what properties are included in the index is revealed in the Microsoft Knowledge Base article 928302, titled “Anonymous users can search the version comments in a document or in a picture in SharePoint Server 2007” (http://support.microsoft.com/kb/928302/en-us). This article describes how, by default, anonymous users who visit a site can search for a document or a picture by using words that were included in the check-in or version comments. A good test to validate this is to check out a document, modify it, and check it in with comments. Run an incremental crawl on the data, and run a search containing words in the comments. Now, based on one or more words contained in the comments field, the document is returned in a search. This can be quite confusing because the individual searching for a specific term, such as logo, would expect the document or obvious metadata about the document to contain this term. To stop the check-in comments from being included in the search, follow these steps:
- On the Shared Services Administration page, click Search Settings under Search.
- On the Configure Search Settings page, click Metadata Property Mappings.
- On the Metadata Property Mappings page, click Crawled Properties.
- Under Crawled Properties View, click the SharePoint folder.
- Under Crawled Properties View—SharePoint, click ows__CheckinComment(Text).
- On the Edit Crawled Property page, click to clear the Include Values for this Property in the Search Index box, and click OK.
Perform an incremental crawl and then try searching on the term again. This time it should not show up.
Browsing through the other folders in the Crawled Properties view (refer to Figure 13.16) is therefore quite revealing, and shows the search administrator more specifically what content is being made available to the user community. For example, a browse through the People folder shows that a great number of properties are made available based on the information entered in users’ profiles.
Server Name Mappings
The Server Name Mappings page (/ssp/admin/_layouts/listservernamemappings.aspx) enables the search administrator to override how SharePoint Server 2007 displays the search results or how users access content after documents are crawled. These need to be used carefully, as the URLs associated with the search results will change to the new value, so it must be a valid address or the content will not be accessible.
Search-Based Alerts
The Configure Search-Based Alerts page (/ssp/admin/_layouts/enablealerts.aspx) enables the search administrator to turn on or disable search-based alerts. A search-based alert enables a user to receive an alert when the results to a previously executed search change. Figure 13.17 shows a sample screen with different options for a search-based alert. In this example, the next time the crawling process finds one or more new documents with the word architecture in the document or in its metadata, the user (User1) will receive an email alert at the end of the day listing the new findings. Note that immediate alerts are not an option, as these could easily flood the user’s inbox, potentially causing email traffic issues.
Figure 13.17. A sample search-based alert.

This setting needs to be turned back on after the Reset All Crawled Content link is used from the Configure Search Settings page.
Search-based alerts can be an easy and powerful way for a manager to keep an eye on changes to key terms or on user activities he is interested in monitoring. Search for all items created by a specific user, and then create an alert from this search. When that user adds a new item, it is added to the search results.
Make sure to check the search alerts status on the Configure Search Settings page after resetting crawled content. It is off by default, and needs to be re-enabled for end users’ search-based alerts to work.
Search Result Removal
The Remove URLs from Search Results page (/ssp/admin/_layouts/searchresultremoval.aspx) enables the search administrator to modify the search results to exclude certain URLs. This is one way to help ensure that confidential data isn’t revealed in SharePoint 2007 searches. Site administrators can also be instructed to not include their sites in searches, but because they might forget, this is a more sure-fire way of enforcing exclusions.
When a URL and wildcards are entered on the Remove URLs from Search Results page, it is added as a crawl rule, which can then be modified or deleted.
Reset All Crawled Content
When the Reset All Crawled Content link is selected, the Deactivate Search Alerts During Reset check box should be kept selected as a general best practice. This helps ensure that users with search alerts won’t get invalid results when the index is repopulated. Of course, performing a full crawl after the index is reset can take a considerable amount of time, so it is generally recommended that this step only be taken after business hours, and that the user community be made aware that searching will not be fully functional while the content index is being repopulated. If the Reset Now button is clicked, a window appears asking for confirmation, and if the OK button is then clicked, the index is emptied, and the Configure Search Settings page now shows zero items in the index.
Scopes
By default there are two scopes—People and All Sites—and these are reflected in the two tabs that appear by default in the Advanced Search page (Advanced.aspx). Clicking View Scopes on the Configure Search Settings page shows an overview of the scopes defined for the environment, segmented into shared and web application specific scopes, as shown in Figure 13.18. The update status of each scope is listed, along with the number of items in each scope. Scopes created for specific web applications can later be copied to the shared grouping if the scope is to be opened up for general use.
Figure 13.18. The View Scopes page (default settings).

The following steps show an example of creating a new scope:
1. From the View Scopes page (/ssp/admin/_layouts/viewscopes.aspx?mode=ssp), click New Scope.
2. Type a title (such as Intranet Documents) and an optional description. This description won’t be displayed to end users and can be used to understand the purpose of the scope. Then choose either Use the Default Search Results Page or Specify a Different Page for Searching this Scope. To keep things simple, keep Use the Default Search Results Page selected. Click OK.
3. The new scope appears on the View Scopes page with the note “Empty—Add Rules.” Click Add Rules to open the Add Scope Rule page (/ssp/admin/_layouts/matchingrule.aspx).
4. On the Add Scope Rule page, the four options for the rule type are Web Address, Property Query, Content Source, and All Content. Based on which of these options is selected, different options are available to fine-tune the rule. In this example, the Content Source type is selected, and Company ABC Intranet is selected from the drop-down menu. To be available in the drop-down menu, the content sources need to have been configured previously.
5. Next, choose between Include, Require, and Exclude as a behavior. For this example, select Include. Then click OK. The View Scopes page reloads, and the message in the Update Status column indicates that this is a new scope and it will be ready after the next update. After the update has completed, the number of items included displays, as shown in Figure 13.19.
Figure 13.19. The View Scopes page with a new scope.

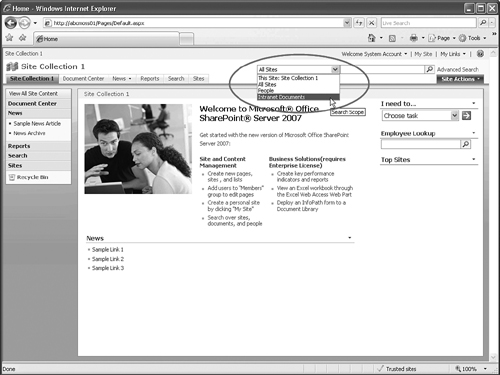
6. Now the scope needs to be made available in the site collection to enable end users to access it. To do this, access the Site Settings page for the site collection (/_layouts/settings.aspx) and select Search Scopes from the Site Collection Administration column. The View Scopes page opens, as shown in Figure 13.20. The new scope should be shown (indicated by the arrow in Figure 13.20). The new scope now needs to be added to the Search Dropdown group (circled in Figure 13.20). For this example, click Search Dropdown.
Figure 13.20. The View Scopes page for site collection with a new scope.

7. The Edit Scope Display Group page opens (/_layouts/scopedisplaygroup.aspx). In the Scopes section, the new scope (Intranet Documents in this example) and its position from the top of the drop-down menu can be selected. The default scope in this drop-down menu can be changed if needed. Leave the defaults and click OK.
8. Return to the site collection home page and access the Search drop-down menu. The new option should appear (as shown in Figure 13.21).
Figure 13.21. The new search scope is available in the drop-down menu.
Although it takes some planning and modifying several steps in the shared services administrator console as well as the site collection site settings, configuring SharePoint Server 2007 to function as a search hub for the organization can be extremely beneficial to the end-user community.
Authoritative Page
SharePoint Server 2007 gives the shared services administrator the opportunity to directly affect the search results ranking by using authoritative and non-authoritative sites. The Specify Authoritative Pages page (/ssp/admin/_layouts/editrelevancesettings.aspx) enables the entry of most authoritative pages, second-level authoritative pages, third-level authoritative pages, as well as the demoting of sites that should be ranked lower than the other sites. Once again, this provides another level of fine-tuning that can be performed to ensure that the search results meet the needs of specific end users.
Search Usage Reports
The Search Usage Reports link on the Shared Services Administration home page (/ssp/admin/default.aspx) enables the shared services administrator to review what type of searches users are attempting and to see the types of results users are getting. Periodic reviews of these reports are helpful to get a sense of which areas of the search environment could be improved. Figure 13.22 shows a portion of the Search Queries Report page, titled “Top Queries over Previous 30 Days.” It is immediately obvious that the user base was especially interested in the top terms on the list, and the shared services administrator might be able to deduce something about usage patterns, or at least the areas that are of most interest to end users, from this report. A useful feature is the capability to export this information to Excel or PDF format for additional analysis or archiving.
Figure 13.22. The Top Queries over Previous 30 Days report.

The Search Results page, the second of the standard options, offers a Queries with Zero Results report, which shows areas that end users are interested in but for which no content is available. This data can be parsed and provided to managers and site administrators or reviewed as a group to see in which areas users are interested. If users are entering acronyms or abbreviations for complex industry specific terms, keywords can be created or best bet links to key sites can be provided.
Search Settings for a Site Collection
The top-level site administration tools provide for some customization of the end-user search experience that doesn’t require the use of the shared services. The Search Settings link on the Site Settings page (/_layouts/settings.aspx) opens the Search Settings page (/_layouts/enhancedSearch.aspx), which enables the site administrator to decide whether to use custom scopes. The previous section gave an example of the power of custom scopes, so a general best practice is to permit their use, but there might be situations where the site administrator would rather not use custom scopes.
If custom scopes are not allowed, the user only has the This Site: SiteName option to choose from by default in the drop-down search menu. The Advanced Search link is also removed. To re-enable custom scopes, the default /searchcenter/pages link needs to be entered.
Create Keywords and Best Bets
Keywords can be created by accessing the Site Settings page (/_layouts/settings.aspx) for the top-level site, and then selecting the Search Keywords link. Clicking Add Keyword then opens up the Add Keyword page (/_layouts/Keyword.aspx), as shown in Figure 13.23. The keyword phrase is what search queries will match to return a keyword result, and the synonyms represent the most likely entries that users will be using. A best bet is simply a link to a URL that will be recommended for the keyword. A contact can be added for the keyword, who will be contacted if a review date is set for the keyword. An expiration date can also be set for the keyword. Figure 13.23 shows the results when a keyword synonym (in this case the word SF) is entered. Notice that the keyword is shown off to the right side, along with the best bet site listed with a star next to it and the URL below it.
Figure 13.23. The Add Keyword page.

In an acronym-reliant industry such as Information Technology, this functionality can assist end users in retrying their searches with the keyword that appears.
Modifying the Default Search Pages
A common request from clients is to modify the default advanced.aspx search page. It includes several languages that the average company does not have in its environment. To modify this page, follow these steps:
- Click the Advanced Search link from the top-level site, and then click Site Actions and Edit Page. Click the Edit menu for the Advanced Search box, and then the Modify Shared Web Part link. The editing pane opens.
- Uncheck the Show the Languages Picker box in the Scopes section of the editing pane. This hides the language picker.
- Also, for this example, check the Show the Scope Picker box. This enables the user to choose a predefined scope for the search from within the advanced search page.
- Click OK and then the Publish button, and the results should look like Figure 13.25.
Figure 13.24. Results of entering a keyword synonym.

Figure 13.25. The Advanced Search page after editing.
Note that in Figure 13.25 only one scope is displaying. That is because the settings in the View Scopes page (/_layouts/viewscopes.aspx) specify which scopes appear on the Advanced Search display group. These can be modified, and the additional scopes will then appear on the Advanced Search page, as shown in Figure 13.26.
Figure 13.26. The Advanced Search page after advanced search display group modification.

Adding IFilters
As mentioned previously, IFilters are needed to enable SharePoint to access and index the textual content of files. The Adobe PDF IFilter is one of the first IFilters most organizations install, but they might require other IFilters, such as the OneNote IFilter, or IFilters for third-party files, such as CADD files or word processing file types other than those from Microsoft.
The following steps summarize how to install the Adobe IFilter for use with an all-in-one configuration of SharePoint Server 2007 using SQL Server 2005 Express:
- Download the Adobe IFilter from Adobe.com (search for IFilter60.exe) to the SharePoint Server 2007 indexing server.
- After it has completed downloading, double-click the ifilter60.exe icon to install it.
- Access the Shared Services Provider administrator console, click Search Settings, and then click File Types.
- Click New File Type. Type pdf and click OK.
- Locate an acceptable PDF icon to use (such as pdf16.gif) and copy it to the Program FilesCommon FilesMicrosoft SharedWeb Server Extensions12TemplateImages folder.
- Now locate the docicon.xml file in the C:Program FilesCommon FilesMicrosoft SharedWeb Server Extensions12TEMPLATEXML folder. Edit it to include a reference to the PDF file type and icon. Right-click the docicon.xml file and select Edit. After the line that starts “<Mapping Key="onetoc2” value="icont.gif"...", add this new line: <Mapping Key="pdf" Value=";nameofpdficon.gif"/> (replace nameofpdficon with the appropriate filename). Access the File menu and click Save. Then exit Notepad.
- Open a command prompt and navigate to the folder that contains the Adobe PDF Filter 6.0 files on the indexing server. For example, the folder might be C:Program FilesAdobePDF IFilter 6.0. Type regsvr32.exe pdffilt.dll and press Enter. A RegSvr32 success notice should appear.
- Also from the command prompt, type iisreset to reset IIS.
- Re-index the content to make sure that the IFilter is functioning properly.
Note that the textual content in PDF documents might not appear in search results for a number of reasons. Sometimes a PDF document doesn’t actually contain text, but is just a scanned image, so there is nothing to index. In other cases, there might be errors with the IFilter or searching service, so review the server logs on both the front-end and back-end servers for any search-related errors. Also note that the Adobe IFilter 6.0 is a 32-bit filter and is not supported in Windows Server 2003 64 Bit running the 64-bit version of SQL Server 2005.
Summary
This chapter provides an overview of the search functionality provided in Windows SharePoint Services 3.0 as well as SharePoint Server 2007 to help readers understand the capabilities of each and to better understand the added benefits (which are considerable) of implementing SharePoint Server 2007. SharePoint Server 2007 search settings, exposed through the Shared Services administrator console, are complex and powerful, and enable the search administrator to define content sources outside of SharePoint 2007, as well as drill down and define managed properties, metadata property mappings, scopes, and schedules. Other tools, such as crawl logs and search usage reports, enable the administrator to get a detailed understanding of the search engine performance and queries that users are entering.
Best Practices
- Check the settings for sites with linked web parts and fine-grained permissions, as discussed in this chapter. This could expose data to a search if the linked web part is more open than the data to which it is connecting. Consider selecting Never Index and ASPX Pages on this Site if the site contains confidential information. This excludes .aspx pages from indexing, which can also clean up search results in general.
- Review the process outlined in this chapter for rebuilding the index database, as this can be a useful step in troubleshooting Windows SharePoint Services 3.0 searching issues.
- SharePoint Server 2007 Search builds on the Windows SharePoint Services 3.0 search engine and adds a great deal more flexibility, as discussed in this chapter. Time should be spent testing the different content sources and schedules for full and incremental crawls to meet organizational requirements.
- Additional content sources can be added when using SharePoint Server 2007 Search, including SharePoint sites, websites, file shares, Exchange Public Folders, and business data. Flexible full crawls and incremental crawls can be configured. When there are multiple content sources, be sure that the schedules don’t overlap for efficiency with processing resources on the server.
- Content sources can be used in display groups for the Search drop-down menu, as well as the advanced search display group (which can be shown on the Advanced Search page). This can be very useful for end users to narrow down their search as shown in this chapter.
- The Metadata Property Mappings page for both managed properties and crawled properties (both available on the /ssp/administrator/_layouts/schema.aspx page) should be reviewed so the search administrator is aware of which properties are used in scopes by default and contained in each category.
- The built-in search usage reports in Shared Services provide valuable information for the search administrator, so she can understand the most common search terms and why queries might have zero results.
- The standard search pages in SharePoint Server 2007 generally need some modification to best suit the needs of the organization. For example, the different language choices might need to be modified or removed, and custom scopes can be included.
- Additional IFilters, such as the Adobe IFilter 6.0, need to be added to ensure that the textual content of file types that are not automatically indexed is made available to the user community.