Chapter 14. Managing and Administering SharePoint Infrastructure
IN THIS CHAPTER
- Administering Windows SharePoint Services Site Settings
- Operations Management with the SharePoint Central Admin Tool
- Application Management with the SharePoint Central Admin Tool
- Managing Shared Services in SharePoint 2007
- Using Additional Administration Tools for SharePoint
- Best Practices
Administration of a SharePoint 2007 Products and Technologies infrastructure can be complex and intimidating. Fortunately, a series of tools was created to simplify the administration of SharePoint farms. Tools such as the SharePoint Central Administration tool were redesigned with this new version of SharePoint to centralize the vast majority of tasks. Other administrative tasks are also simplified with other easy-to-use admin interfaces. It is subsequently important for a SharePoint administrator to become familiar with the tools and tasks available within the platform.
This chapter gives an overview of the SharePoint administrative tools, including a step-by-step look at all of the major links and tasks included in the tools. Considerable emphasis is placed on exploring the SharePoint Central Admin tool and the Site Settings Administration tool. In addition, a look at the other admin interfaces, including the STSADM command-line tool, SQL 2005 Management Studio, IIS Manager, and the Shared Services Admin tool is covered.
Administering Windows SharePoint Services Site Settings
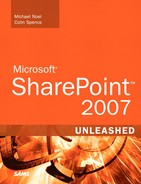
The first tool that a site administrator should become familiar with is the Site Settings Administration tool, shown in Figure 14.1. The Site Settings Administration tool lists links to administrative tasks that affect the individual site itself, and is available with Windows SharePoint Services (WSS) 3.0 sites, as well as with Microsoft Office SharePoint Server (MOSS) 2007 sites.
Figure 14.1. Viewing the Site Settings Administration options.

These sets of administration options are not visible to standard site members that do not have admin access to the site, but are available to each site administrator. Simply click on the Site Options button and select Site Settings, as shown in Figure 14.2.
Figure 14.2. Entering site settings administration.
Each administrative task is organized within the Site Settings tool by category, such as Users and Permissions and Look and Feel. Each of these categories is explained in more detail in this section of the chapter.
Users and Permissions
This category contains permissions-related tasks and is where site admins need to be to add members to a site or to change permissions. It includes the following links:
- People and Groups—New users can be added to the site via this interface. For example, if a site admin wants to grant members of an Active Directory (AD) group site member status, the admin can use this interface to do so.
- Site Collection Administrators—Site collection administrators, who have full control to the entire site collection and who receive notices about the site, can be configured here.
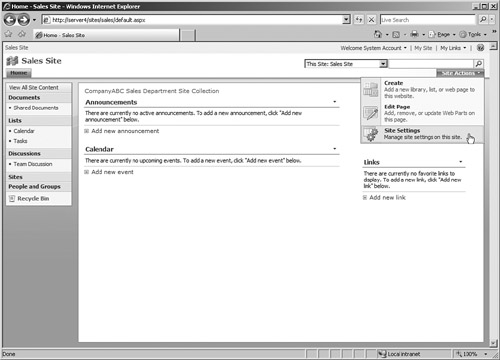
- Advanced Permissions—Advanced site permissions, shown in Figure 14.3, allow a site admin to specify unique permissions for members of the site.
Figure 14.3. Viewing advanced site permissions.
Look and Feel
The Look and Feel category encompasses all those tasks which affect the appearance of the site collection itself, including what navigation options are displayed, what theme is applied, and other visual options. The following admin links are available in this category:
- Title, Description, and Icon—Allows for the title of the site, the description that appears in site searches, and a site logo to be chosen. The logo can be a picture file that is stored in an image library within the site (the preferred option), or it can be physically stored on each front-end web server.
- Tree View—The Quick Launch toolbar, which displays links to content on the left side of the site, can be enabled (the default setting) or disabled from this link. Tree view (disabled by default) allows a hierarchical navigation aid to site content and can be enabled here.
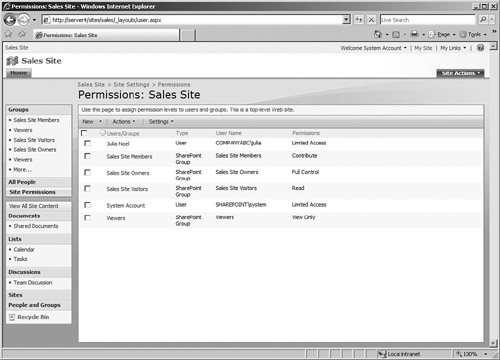
- Site Theme—The theme of a site, its look and feel that is consistent across all site content, can be configured using this link. A range of options, shown in Figure 14.4, is available.
Figure 14.4. Setting a site theme.
- Top Link Bar—Links can be added to the top link bar by using this option. The default is to only display the Home tab, but other tabs, which are highly useful navigation aids, can be added to the top link bar as required.
- Quick Launch—The exact links displayed in the Quick Launch toolbar can be modified using this option.
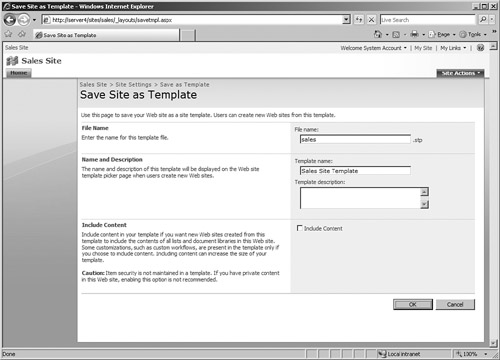
- Save Site As Template—The look and feel, arrangement, and set of web parts of a particular site can be saved as a flat-file template by using this link. Saving a site as a template is extremely useful if you need to create multiple sites using a customized look and feel that needs to be consistent across the sites. In addition, the Save Content check box can be checked, allowing site content such as documents and list contents to be saved as part of the flat file (see Figure 14.5).
Figure 14.5. Saving a site as a template.
- Reset to Site Definition—This option is a very powerful tool that allows an admin to reset all pages within a site to the default site definition for SharePoint 2007. This option is useful if a site administrator has been overly aggressive with site modification using SharePoint Designer 2007 (the new version of FrontPage) or other design tools, and has broken site functionality or navigation. It can also be used to reset sites that have been migrated from SharePoint 2003 but did not inherit the new SharePoint 2007 look and feel in the migration process.
Galleries
The Galleries category contains options for modifying site galleries, which are the libraries that contain content types, web parts, master pages, and other content types that are used throughout the site. The Galleries category contains the following links:
- Master Pages—Master pages define how the SharePoint site is laid out, such as where the web part zones are located and how many columns exist on each page. Master pages can be modified, and new ones can be added to be made available to site editors.
- Site Content Types—This link allows different types of site content to be declared, such as what an announcement list looks like, what a dashboard page looks like, and so forth. It defines information about the content, such as what columns are contained within the default content types. For example, Figure 14.6 displays some of the options that can be configured for the Contact site content type, including what columns are available when adding contacts to the site. Modification of existing content types and addition of custom content types can be performed using this link.
Figure 14.6. Modifying site content types.

- Site Columns—The Site Column gallery contains the full selection of all default columns that are available within the site. It includes columns for calendars, contacts, documents, issues, web parts, and all default content types. Adding a column type to this gallery allows it to be used across all content within the site itself.
- Site Templates—The Site Collection gallery can be loaded with unique site templates, saved from the Look and Feel category options and imported within this link. The templates added to this gallery can be used within the site to stamp out identical sites.
- List Templates—This gallery contains list templates, which can be modified and used to generate custom lists that have identical criteria, such as the number and type of columns. It is a useful gallery for minimizing the work involved in creating new list types from scratch.
- Web Parts—The Web Part gallery, shown in Figure 14.7, is one of the more important galleries as it contains the full disposition of web parts available for use within the site. Custom third-party web parts can be added to the site gallery through this interface.
Figure 14.7. Examining the Web Part gallery.

- Workflows—The Workflows gallery contains a list of the available MOSS 2007 workflow options that can be used through the site, such as document approval, feedback collection, translation management, and others. Unlike the other galleries, this one is not immediately editable and is only available with MOSS 2007.
Site Administration
The Site Administration category contains a vast range of functions which affect the individual site itself and that don’t fall into the other categories. It is distinguished from the Site Collection Administration category, which has tasks that affect the entire site collection itself. The links available in this category include the following:
- Regional Settings—Regional settings define a whole range of options that are specific to the population using the system. These settings include local languages, time zone, type of calendar, work week, and time format.
- Site Libraries and Lists—This link allows individual content within the site to be modified directly, including changing versioning settings, defining audience targeting settings, and modifying columns.
- Site Usage Reports—Site usage reports are extremely useful for understanding how a site is used, such as what are the top pages in use, who are the top users, and other important data that can be used to gain a better understanding of site usage. Note that site usage reporting must be turned on under the Operations tab in the SharePoint Central Admin tool and in the Shared Services Administration tool.
- User Alerts—User alerts administration allows a site administrator to view the user alerts created in the entire site and delete them if necessary.
- RSS—Settings for Really Simple Syndication (RSS) feeds, shown in Figure 14.8, can be modified through this link. This includes enabling and disabling them in the site.
Figure 14.8. Modifying settings for RSS feeds.

- Search Visibility—This link allows a site administrator to define whether the site will be visible in search results.
- Sites and Workspaces—The capability to view all subsites and workspaces within the site, or create sites directly, can be performed with this link. In addition, site creation permissions can be granted or revoked from this option.
- Site Features—Specific features of the site, such as user profiles, search, business data catalog, and other features available to organizations with the proper SharePoint licenses, are listed in this area (see Figure 14.9). They can be deactivated and activated at the site level from here.
Figure 14.9. Changing site features.

- Delete this Site—This option allows the entire site and all subsites to be deleted.
- Related Links Scope Settings—Allows for search scopes to be modified, removing or adding specific areas of the site from being searched.
Site Collection Administration
Settings that affect the entire site collection are grouped under this category. This includes the following options:
- Search Settings—A custom search center can be specified here, such as one managed by a shared service provider. This sets the site collection to use the custom scopes, instead of the ones included with the site collection when it is created by default.
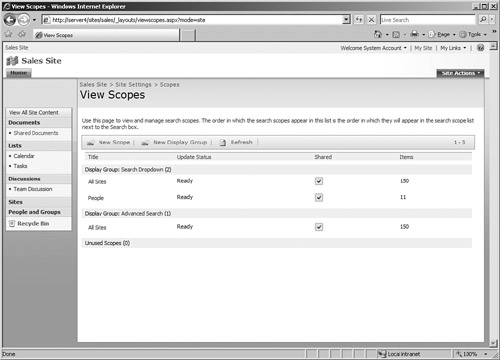
- Search Scopes—The default search scopes include the All Sites and People settings. Additional custom scopes created in SharePoint Designer 2007 or other custom tools can be specified for the site collection in this area, as shown in Figure 14.10.
Figure 14.10. Modifying search scopes.
- Search Keywords—Specific search keywords can be defined for an organization, so specific search results are returned when the keyword is entered. For example, the administrator can define the company name as a keyword and include a keyword definition that will be returned when the company name is searched.
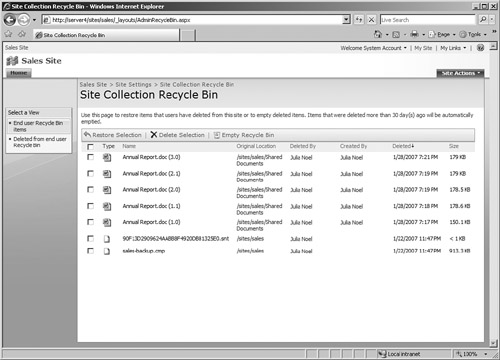
- Site Collection Recycle Bin—The site collection Recycle Bin, shown in Figure 14.11, allows site administrators to recover items that users have deleted. This Recycle Bin is the second-stage Recycle Bin, which contains items that have already been removed from the Recycle Bin visible to the end user.
Figure 14.11. Viewing the site collection Recycle Bin.
- Site Directory Settings—Site directory settings, such as the relative path where new sites will be created and whether new sites must contain metadata, can be changed from this area.
- Site Collection Usage Reports—This option also allows usage reports to be viewed, but expands the scope to include usage reports for the entire site collection, not just the individual site.
- Site Collection Features—Site collection features are more expansive than the feature sets that can be activated or deactivated at the site level. Features such as routing workflows, reporting, and translation management are listed here.
- Site Hierarchy—This area allows a quick view of all sites in the site collection.
- Portal Site Connection—A direct link to a portal site, such as a root site, can be created in the site collection pages in this area.
- Site Collection Audit Settings—A new feature in SharePoint 2007 is the capability to audit actions such as the checkout and check-in of documents, document editing, item deletion, searches performed, and other criteria. Auditing is not enabled by default and must be turned on using this area of the Site Settings Administration tool.
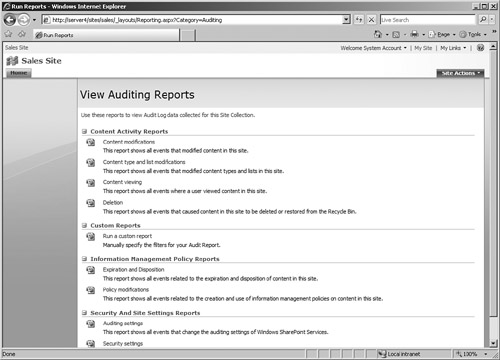
- Audit Log Reports—This area, shown in Figure 14.12, allows a list of auditing reports to be generated. Auditing must be turned on at the site collection level first, using the Site Collections Audit Settings link.
Figure 14.12. Viewing auditing reports.
- Site Collection Policies—A site collection policy is one that drives information management settings for specific documents or document libraries. Policies can be created that work together with the Windows Server 2003 Information Rights Management (IRM) service to define when a document expires, if it can be printed or forwarded, and other features. These policies are generally regulation driven, and third-party add-ons used for industry regulation compliance can be imported into this area of the site collection.
Operations Management with the SharePoint Central Admin Tool
The single most important tool to a SharePoint administrator is the SharePoint Central Admin tool, shown in Figure 14.13. This tool, run on a dedicated IIS Virtual Server using a unique port (such as 14199), is installed on the first server in a farm. It consists of three tabs: Home, Operations, and Application Management. The tool can be invoked from the server console by clicking Start, All Programs, Microsoft Office Server, SharePoint 3.0 Central Administration.
Figure 14.13. Using the SharePoint Central Admin tool.

The Home tab gives a list of tasks that should be performed when first installing SharePoint and also gives a concise view of the servers in the farm topology. Administration is performed either under the Operations tab (the focus of this section) or the Application Management tab.
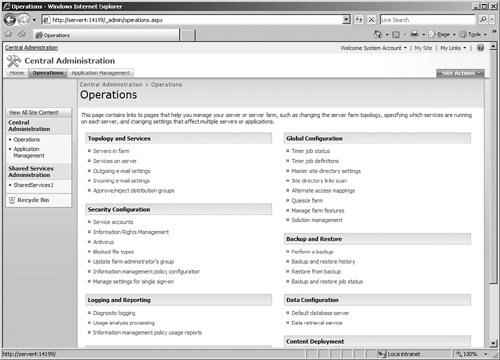
The Operations tab, shown in Figure 14.14, controls items such as server roles, global settings, backups and restores, logging, and content deployment. The specific categories and their links are discussed in detail in the following sections.
Figure 14.14. Viewing the Operations tab.
Topology and Services
The Topology and Services category defines server roles and settings, such as which server is used for outgoing emails and what application services run on specific servers. The following links are available in this category:
- Servers in Farm—Simply lists the servers in the farm and which services they are running. The administrator can also remove a specific server from the farm.
- Services on Server—Allows specific services to be started or stopped on an individual server.
- Outgoing Email Settings—This area, shown in Figure 14.15, allows a SMTP server to be defined that will be used to forward alerts and other emails to end users. The SMTP server must be configured to accept connections and allow relaying from the SharePoint Server.
Figure 14.15. Configuring outgoing email settings.

- Incoming Email Settings—Incoming email settings, shown in Figure 14.16, are new in SharePoint 2007. Mail can be set to be received directly by the SharePoint Server and delivered into email-enabled distribution lists and discussion groups. This is a powerful piece of functionality that is described in more detail in Chapter 18, “Configuring Email-Enabled Content and Exchange Server Integration.”
Figure 14.16. Configuring incoming email settings.

- Approve/Reject Distribution Groups—Distribution groups, automatically created for email-enabled content, can be rejected or approved using this interface. This is a process also described in more detail in Chapter 18.
Security Configuration
The Security Configuration category covers administrative functions that have direct security implications, such as service account settings, single sign-on, antivirus, and other options. The links provided for this category are as follows:
- Service Accounts—Allows the service accounts used by SharePoint to be modified. It is also useful for resetting the passwords listed when they are changed at the directory level.
- Information Rights Management—This area allows Information Rights Management (IRM) to be enabled. IRM can restrict document rights, such as preventing a user from printing a document, emailing it, modifying it, or viewing it past an expiration date. A Rights Management Services (RMS) server must be set up for this functionality.
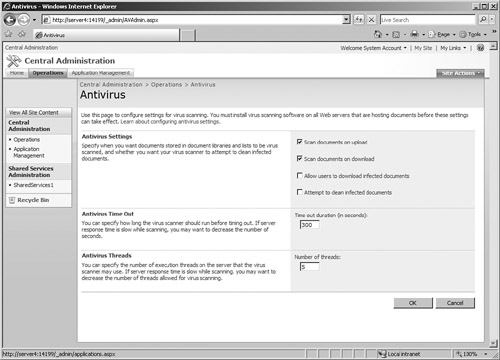
- Antivirus—Specific antivirus settings, shown in Figure 14.17, are configurable here. Note that antivirus scanners such as the Microsoft Forefront Security for SharePoint 2007 product must be installed on all front-end servers for these settings to be in effect.
Figure 14.17. Configuring antivirus settings.
- Blocked File Types—This area allows an administrator to block specific file extensions from being uploaded into the SharePoint site collection. A default blocked set of extensions, such as .bat, .com, and .exe, are listed. If a specific extension needs to be allowed, it can be specified here.
- Update Farm Administrator’s Group—This area allows farm administrations to be added. Farm administrators can take ownership of any content site, so care should be taken when granting this type of admin access.
- Information Management Policy Configuration—This area, shown in Figure 14.18, allows an administrator to view what types of information management policy features are enabled within the content in the farm. These features allow IRM on content to be enabled, permitting expiration of content, auditing, labels, and barcodes to be added to documents.
Figure 14.18. Viewing Information Management Policy settings.

- Manage Settings for Single Sign-on—This page permits single sign-on settings to be customized, such as encryption key settings, server settings, and enterprise application definitions. Single sign-on, the ability to log in once and then have access to multiple farms without logging in again, needs to be enabled and the Microsoft Single Sign-on service must be turned on for this area to become active.
Logging and Reporting
The Logging and Reporting category contains those tasks related to diagnostic logging, usage, and information management reports. It includes the following links:
- Diagnostic Logging—Diagnostic logging settings, shown in Figure 14.19, allow an administrator to turn on advanced logging within the SharePoint site. These logs can be used to diagnose problems within the farm. Settings for the trace log, which shows all requests made to SharePoint, can be configured here.
Figure 14.19. Configuring diagnostic logging.

- Usage Analysis Processing—Usage analysis reporting can be enabled within the farm here. It must also be enabled within the shared services provider. Usage analysis reporting allows site administrators to view how their sites are being used, who are the top users, what are the top search queries, which pages get the most hits, and the like.
- Information Management Policy Usage Reports—Recurring policy usage reports can be configured in this area. This allows an administrator to create reports that indicate how content is being used. This type of reporting is generally driven by industry regulation, such as Sarbanes-Oxley, HIPAA, the FDA’s 21 CFR Part 11, and other governmental regulations.
Upgrade and Migration
This category covers useful tasks for a migration from SharePoint 2003 content. Specifics about the process can be found in Chapter 6, “Migrating from SharePoint 2003 to SharePoint 2007.” This category includes the following links:
- Content Management Server Migration—Migration from Microsoft Content Management Server (MCMS) 2002—its functionality is integrated into SharePoint 2007—can be controlled from this area (see Figure 14.20). A migration profile, which allows an administrator to point the server to a MCMS database, specifies the destination for the data. More information on this topic can be found in Chapter 6.
Figure 14.20. Enabling enterprise features in the farm.
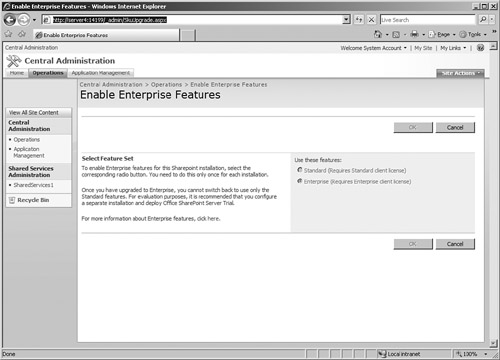
- Enable Enterprise Features—This area, shown in Figure 14.20, permits SharePoint enterprise features to be enabled. SharePoint Enterprise Client Access Licenses must be obtained for all users within the farm before these features can be enabled. Check with a Microsoft licensing specialist for more information on obtaining enterprise licenses.
- Enable Features on Existing Sites—This area allows the enterprise license features to be propagated to all site collections in the farm. This has to be done to existing site collections if enterprise functionality has only recently been enabled.
- Convert License Type—Because an enterprise license key is required for the enterprise features to be enabled, the correct enterprise product key must be used in the farm. If a farm was originally installed with the standard edition licensing, the product key can be upgraded to an enterprise one in this area.
Global Configuration
Settings that affect all aspects are the farm and that don’t fit into other categories are grouped into this section. These include important administrative tools such as timer jobs, alternate access mappings, and farm feature activation. The following links are included in this category:
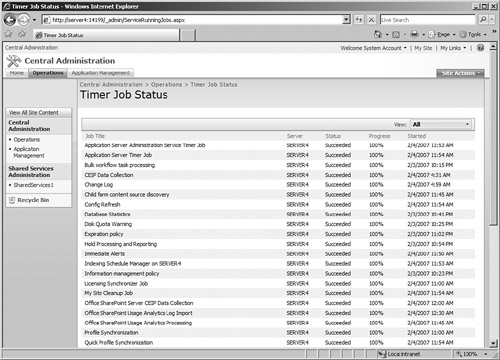
- Timer Job Status—Timer jobs are regularly scheduled tasks that perform specific maintenance tasks. Status for these timer jobs, shown in Figure 14.21, can be viewed from this area. The WSS Timer Job Service (OWSTIMER) performs these tasks on a scheduled basis.
Figure 14.21. Viewing timer job status.
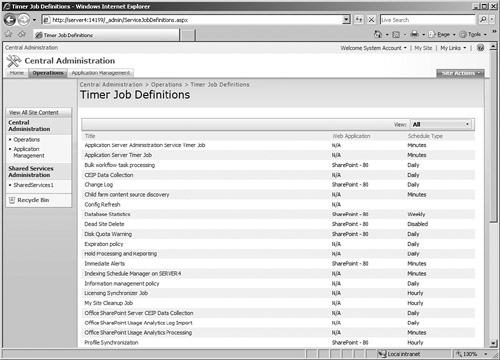
- Timer Job Definitions—Definitions of the individual timer jobs that have been set up can be viewed from this console, shown in Figure 14.22. Individual timer jobs can be renamed or disabled in this area. More detailed administration of timer job settings can be performed using the STSADM command-line tool, which is described in more detail in the section of this chapter titled “Command-Line Administration of SharePoint Using the STSADM Tool.”
Figure 14.22. Configuring timer job definitions.
- Master Site Directory Settings—The site directory is the listing of all site collections in a farm. A custom path to the site directory can be enabled here.
- Site Directory Links Scan—This area is where scanning for broken links within the site directory is enables. It then updates those links with the proper site information. By default, the scan runs daily.
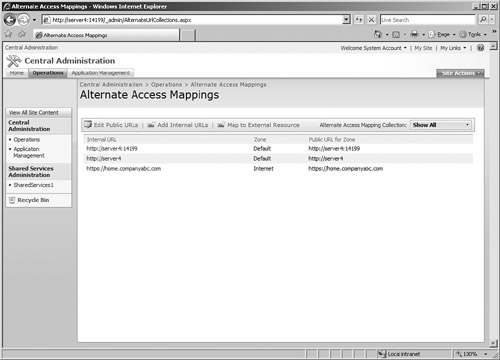
- Alternate Access Mappings—This highly important area controls alternate access mappings (AAM), shown in Figure 14.23. AAMs are needed to indicate different server host header values for the machine. For example, in the diagram, http://server4 is the URL used to access the server internally, whereas https://home.companyabc.com is the URL used for external access. If an AAM is configured, SharePoint automatically translates all links to the host header value used by the client to access site content. This reduces the chance of links not working externally. For more information on configuring AAMs for remote access, reference Chapter 20, “Providing Secured Remote Access to SharePoint Using ISA Server 2006.”
Figure 14.23. Configuring alternate access mappings.
- Quiesce Farm—The capability to quiesce a farm is highly useful for farm maintenance. Rather than shutting down a farm suddenly, quiescing the farm allows an administrator to slowly take it offline, not allowing new connections but permitting existing connections to finish their work before offline maintenance is performed.
- Manage Farm Features—Features that are turned on at the farm level, such as Excel Services, spell checking, data connection libraries, and global web parts, can be activated or deactivated from this area.
- Solution Management—This area allows third-party, add-on, or custom solution management packages to be viewed and administered. By default, no solution packages are installed in a farm. The STSADM –o addsolution command is used to add these packages.
Customized timer jobs can be written using the SPJobDefinition programming class along with the SPService class. More information can be found at http://msdn2.microsoft.com/en-us/library/microsoft.sharepoint.administration.spjobdefinition.aspx
Backup and Restore
This category contains the tasks related to data backup and restore of site content and site settings in the farm. More specific information on backing up and restoring SharePoint can be found in Chapter 17, “Backing Up and Restoring a SharePoint Environment.” The following links are included in this category:
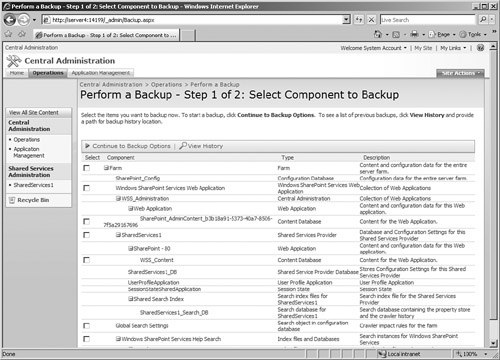
- Perform a Backup—A backup of farm components, shown in Figure 14.24, can be performed using this link. Granular backup of specific components can be performed by selecting only specific content.
Figure 14.24. Backing up SharePoint farm components.
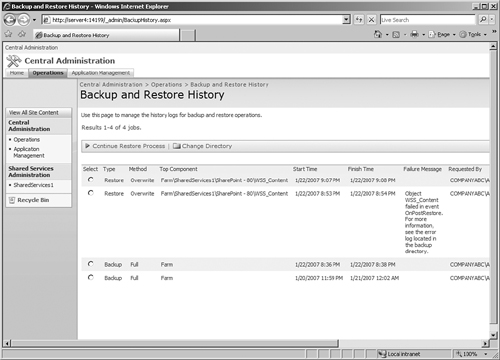
- Backup and Restore History—History of the backups and restores performed on the farm can be viewed in this area, shown in Figure 14.25.
Figure 14.25. Viewing the backup and restore history.
- Restore from Backup—As this link suggests, this area allows an administrator to restore content from one of the backup file locations.
- Backup and Restore Job Status—This area displays the current status of a backup or a restore job.
Data Configuration
The Data Configuration category has tasks related to data locations and specifics on the data retrieval service. It includes the following links:
- Default Database Server—This area allows an administrator to define which server is the default server used when creating new content databases.
- Data Retrieval Service—The data retrieval service provides links between data sources and data viewers, such as web parts. It allows web parts such as the spreadsheet web part to access data in a foreign database, using XML web services. Data retrieval services can be configured in this area (see Figure 14.26).
Figure 14.26. Configuring data retrieval services.

Content Deployment
Content deployment allows the sharing of data from other farms. This category controls administration of those tasks related to content deployment, such as the following:
- Content Deployment Paths and Jobs—Individual content deployment jobs can be set up using this area, allowing farm content to be replicated to other farms.
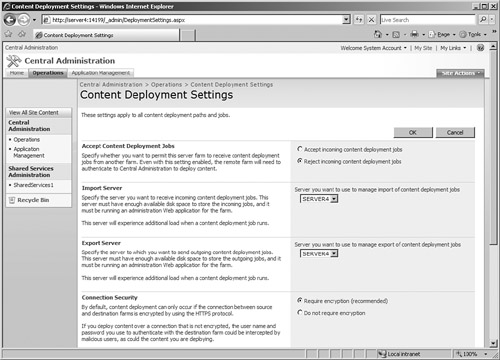
- Content Deployment Settings—This area, shown in Figure 14.27, enables configuration of which server accepts content deployment jobs, which manages exports, and whether content deployment jobs are rejected (the default) or accepted.
Figure 14.27. Configuring content deployment settings.
- Check Deployment of Specific Content—To check on the status of a content deployment job, use this area. By entering the URL here, the completion status of the replication job can be verified.
Application Management with the SharePoint Central Admin Tool
The third tab in the SharePoint Central Admin tool interface, shown in Figure 14.28, is the Application Management tab, which contains all of the SharePoint settings relating to individual web applications within the farm.
Figure 14.28. Viewing the Application Management tab in the SharePoint Central Admin tool.

Just as with the Operations tab, administrative tasks are organized by category, with all of the categories containing tasks that are specific to application management, such as workflow settings, search, security, and site management. Specific tasks within each category are described in more detail in the following sections.
SharePoint Web Application Management
SharePoint web applications are the logical construct that defines how the content is delivered to an end user. For example, a web application can be created for the sp.companyabc.com SharePoint presence, and another can be created for home.companyabc.com, and so on. All of the web application management admin tasks are contained under this category as follows:
SharePoint 2007 web applications are the rough equivalent of SharePoint 2003 portals from an administrative perspective.
- Create or Extend Web Application—This area permits an IIS Virtual Server (website) to be extended with SharePoint, effectively creating the web application where SharePoint will be housed and where a new content database will be linked. An IIS website can be linked to an existing web application from this area, which allows different IIS authentication settings to be placed on a set of content. For example, one IIS virtual server could be used for internal access to a single content database, with Integrated Windows Authentication used to provide for single sign-on users, whereas another IIS virtual server could be configured to use Secure Sockets Layer (SSL) encryption with basic authentication, but still point to the same content database. This web application would then be used for external Internet-based access to the same content data.
- Remove SharePoint from IIS Website—This link enables an administrator to remove a web application from an IIS virtual server and to delete the IIS virtual server as well.
- Delete Web Application—This area expands the deletion capabilities of the previous area, allowing content databases to be removed in addition to the IIS websites.
- Define Managed Paths—A managed path in a SharePoint web application is a subdirectory such as /sites that is specifically defined as an area where site collections can be housed. Managed paths can be created or deleted in this area (see Figure 14.29).
Figure 14.29. Defining managed paths.

- Web Application Outgoing Email Settings—Outgoing email settings specific to individual web applications can be configured here. The outgoing email server is an SMTP server, such as an Exchange server, that can be used for forwarding alerts and generated reports from the specific web application. In this area, an administrator can override the default outgoing email server settings for the farm that are configured in the Operations tab.
- Web Application General Settings—Web application general settings include a whole range of options for the web application, such as those shown in Figure 14.30. This includes default time zone, maximum upload size, RSS feed enabling, Recycle Bin status, and other important settings for each web application.
Figure 14.30. Configuring web application general settings.

- Content Databases—All content databases for a specific web application can be viewed, along with the number of sites within those content databases. Adding additional content databases can be performed from this area.
- Manage Web Application Features—Specific features on the web application, such as search, enterprise Client Access License (CAL) features, and other settings are enabled or disabled from this area.
- Web Application List—This area gives a rundown of all of the web applications in the farm.
SharePoint Site Management
Site collection tasks, such as creating or deleting a site collection, quota settings, and other site-specific administration, are grouped in this category, including the following links:
- Create Site Collection—Individual site collections can be created from this link.
- Delete Site Collection—As might be surmised, this link allows entire site collections to be deleted.
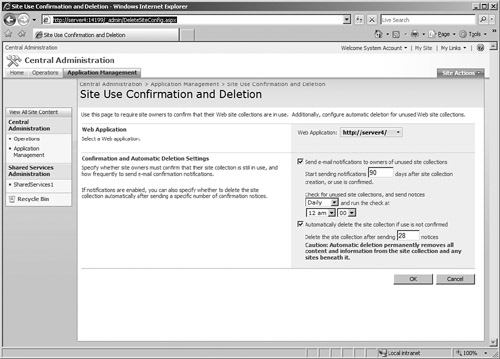
- Site Use Confirmation and Deletion—SharePoint allows site administrators to set up automatic site deletion for unused sites, as shown in Figure 14.31. If a site collection has not been used for a specified period of time, it can be marked for deletion. Emails are sent to the site administrator of the specific site to warn them of the impending deletion before the deletion actually takes place. This can help to ensure that data is kept fresh and that stale sites are removed.
Figure 14.31. Setting up automatic site deletion.
- Quota Templates—Site quotas put restrictions on the amount of data that can be stored in a site. This area allows templates to be created for site quotas so they can be applied to multiple web applications.
- Site Collection Quotas and Locks—The capability to lock a site from being modified or accessed can be controlled from this area (see Figure 14.32). In addition, quota templates created from the previous link can be applied to individual site collections.
Figure 14.32. Configuring site locks.

- Site Collection Administrators—Individual primary and secondary site administrators can be added to each site collection using this area.
- Site Collection List—This area displays a full list of the site collections in the web application.
Search
Search settings are defined in this category, which consists of the Manage Search Service link. Search settings can be configured here, including information about proxy servers in use, farm-level search settings, and other search-specific administration, as shown in Figure 14.33.
Figure 14.33. Configuring search settings.

InfoPath Forms Services
InfoPath Forms Services is administered under this category. XML-based forms that can be filled out by users are set up for a SharePoint 2007 environment here. The following links are included:
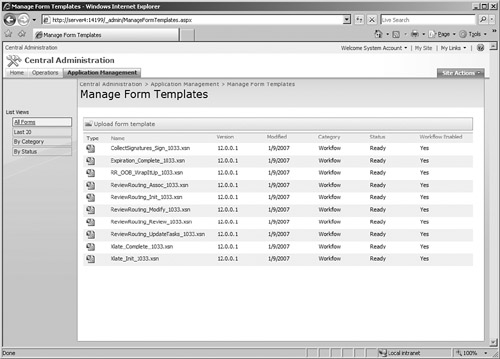
- Manage Form Templates—Form templates, shown in Figure 14.34, can be managed from this area. These templates can be used to create specific InfoPath templates, such as workflow templates.
Figure 14.34. Examining InfoPath Forms templates.
- Configure InfoPath Forms Services—InfoPath Forms Services settings can be configured in this area. Timeout settings, SSL authentication settings, and other administrative settings relating to InfoPath Forms Services can be configured.
- Upload Form Template—New InfoPath Forms templates can be added into the template gallery using this area.
- Manage Data Connection Files—Data connection files for use with InfoPath can be uploaded in this area.
- Manage the Web Service Proxy—If a proxy will be used between InfoPath Forms and web services, it can be enabled in this area on a per–web application basis.
Office SharePoint Server Shared Services
Creating and configuring the farm’s shared services can be performed using the tasks in this category. More in-depth configuration of a specific shared services provider (SSP) can be performed using the Shared Services Administration page. It is accessed from the left navigation page and is described in more detail in this chapter. The following tasks are available in this category:
- Create or Configure this Farm’s Shared Services—Setting up the initial SSP can be done within this area, shown in Figure 14.35. In addition, SSP restores can be performed.
Figure 14.35. Editing a shared services provider.
- Grant or Configure Shared Services Between Farms—Shared services can be configured to share information between farms. This was the original intent in creating the concept of shared services, as they are meant to be a gateway into a farm’s functionality and a hook for sharing specific content with other farms. This area allows sharing with other farms to be enabled or disabled.
- Check Services Enabled in this Farm—This area shows any issues that have been uncovered within the farm.
- Configure Session State—Session state, configured by default, allows the farm to keep track of which user is making which request, and is enabled to provide functionality within specific applications that require this service. It can be enabled or disabled from this interface.
Application Security
This category contains application-specific security settings, allowing administrators to enable self-service site management, different authentication providers, and other settings. It contains the following links:
- Security for Web Part Pages—This allows an administrator to specify whether users can create connections between web parts, passing data from web part to web part. It is enabled by default. It also controls whether users can access the Web Part gallery.
- Self-Service Site Management—Self-service site management allows users to create their own site collections. It is turned off by default.
- User Rights for Web Application—The User Permissions area, shown in Figure 14.36, shows the full range of list permissions that can be selected by a site administrator within the web application. Deselecting a permission makes it unavailable as an option when security is applied to lists.
Figure 14.36. Selecting the type of user permissions available within the web application.

- Policy for Web Application—This area defines the type of rights that specific accounts, such as the Search Crawling account, have within the web application. Global rights to a user or group can be granted within this area, such as granting an auditing group read access to the entire web application.
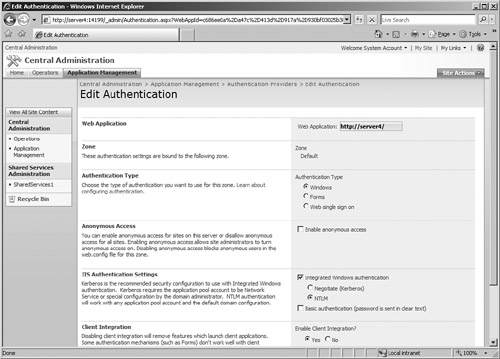
- Authentication Providers—The list of authentication providers, which can include Windows/AD Authentication but can also contain non-forms authentication or web single sign-on authentication, is displayed in this area. By clicking on the default provider, the authentication provider can be changed in the page shown in Figure 14.37 to forms-based authentication or another type of authentication. Anonymous authentication to the web application can also be enabled here.
Figure 14.37. Configuring authentication providers.
External Service Connections
This category groups together those administration options related to the connections SharePoint makes to external providers, such as HTML viewers or document conversion servers. The following links are available in this section:
- Records Center—A connection to a Records Center can be made here. A Records Center is a special site that is created using a specific template for records retention policies.
- HTML Viewer—An HTML viewer allows web users without a full Microsoft Office installation to view Office documents within their browser. A link to an HTML viewer server can be made from within this area.
- Document Conversions—Document conversions can be enabled within a web application from this area, shown in Figure 14.38. A document conversions server allows office document to be converted to HTML files directly. It differs from the HTML viewer in that the viewer simply displays them in HTML, whereas the document conversions server actually allows users to convert their documents dynamically from one format to another.
Figure 14.38. Linking to a document conversions server.

Workflow Management
Workflow settings, available in MOSS 2007, permit preconfigured procedures to be followed for document approval, routing, and other tasks. There is only one link available in this category and it is the Workflow Settings link. An administrator can enable workflow on an individual SharePoint web application and can specify task notification settings using this link (see Figure 14.39).
Figure 14.39. Configuring workflow settings.

Managing Shared Services in SharePoint 2007
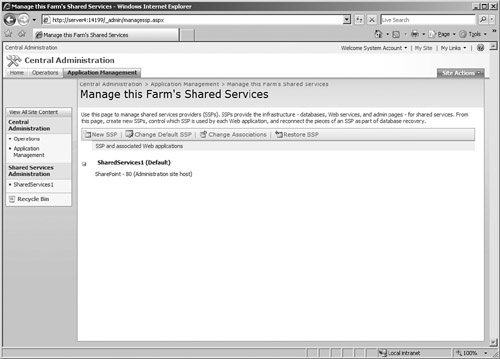
Managing a specific SSP can be accomplished from the Shared Services Administration page, shown in Figure 14.40 and available via a link on the left navigation pane.
Figure 14.40. Performing shared services administration.
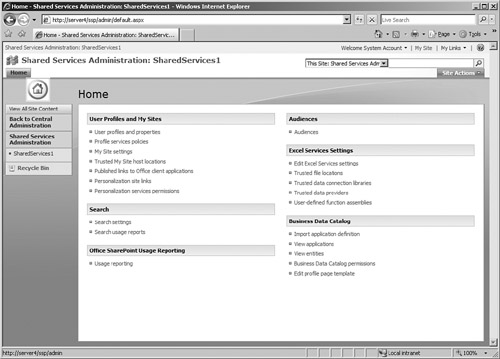
Each SSP has its own page, which controls important administrative functionality for the web applications that fall under the jurisdiction of the individual SSP. Just as with the rest of the SharePoint Central Admin tool, SSP administration is divided into specific categories, such as Search, User Profiles, Business Data Catalog, and the like. Each of the administrative options in each category is defined in the following sections.
User Profiles and My Sites
User profiles are a vitally important tool for SharePoint that allows unique and searchable information about site users to be stored. SharePoint provides the capability to pull user profiles from Active Directory, allowing information stored in AD to become part of the profile. This category covers user profile configuration and also contains information on configuring My Sites settings. The following links are available in this category:
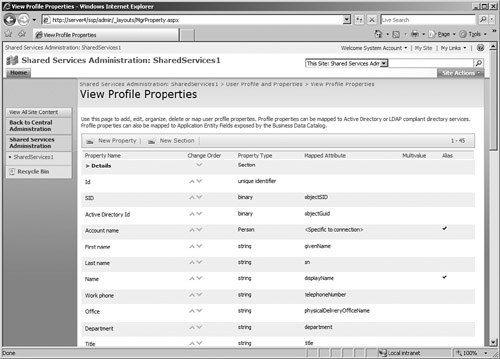
- User Profiles and Properties—The User Profiles and Properties area, shown in Figure 14.41, is the first stop for setting up user profiles. Full import and incremental import schedules from Active Directory can be set up from this interface. Clicking on Configure Profile Import allows the domain information to be configured, including which account is used to access domain information about users. In addition, specific attributes from Active Directory can be imported, allowing for custom attributes to populate SharePoint profiles. Clicking on the View Profile properties list invokes the page shown in Figure 14.42, where specific AD attributes can be added to the import.
Figure 14.41. Configuring profile import settings.
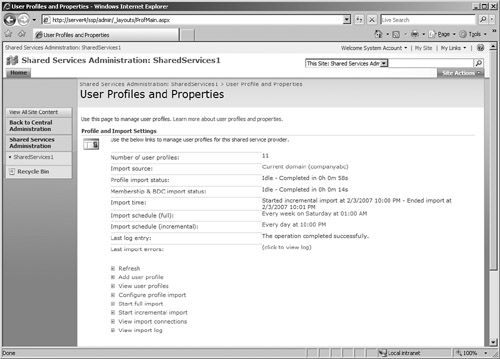
Figure 14.42. Adding AD attributes to profile import settings.
- Profile Services Policies—Profile Services policies define which profile fields are visible to other users using search, and which fields can be modified directly by users.
- My Site Settings—My Site settings control the administration of the personal sites known as My Sites. By default, each user within a SharePoint web application has the ability to create a personal site that can be used to store personal information or to advertise information about the user. General administration settings for My Sites are controlled from this area, including the location of the personal sites, how they are named, whether the user can change language settings, and the default reader for the site group.
- Trusted My Site Host Locations—In large, distributed My Site implementations, My Site databases may be stored across multiple SSPs. This area enables administration of those locations.
- Published Links to Office Client Applications—This list can be used to add a published link to SharePoint sites and list when documents are opened and saved. The links show up under the My SharePoint Sites tab on the office applications when opening and saving the documents.
- Personalization Site Links—This area allows global customized links to be added to the My Site horizontal navigation bar at the top of each personal site. Audiences can be used to specify which links appear for which users.
- Personalization Services Permissions—This page controls the rights that site administrators have to different shared services controls. Granular administration of specific settings, such as the capability to manage user profiles, set permissions, or customize personal site permissions, can be set from this area.
Search
Search and index settings for the SSP are controlled from this category. It is critical to note that search will not be set up properly in a SharePoint farm until it is configured properly in this category. The following links are defined here:
- Search Settings—The search settings page, shown in Figure 14.43, allows administrators to define what content sources will be crawled and to set up a schedule to crawl them. Clicking on the Content Sources and Crawl Schedules link and then editing the individual content source object configures exact crawl schedules, as shown in Figure 14.44. Search results will not be displayed in sites until this is configured.
Figure 14.43. Configuring SSP search settings.

Figure 14.44. Setting crawl schedules.

- Search Usage Reports—These reports, an example of which is shown in Figure 14.45, give administrators an idea of what types of things for which users are searching. By viewing this data, insight can be gained into what interests users.
Figure 14.45. Viewing search usage reports.

Office SharePoint Usage Reporting
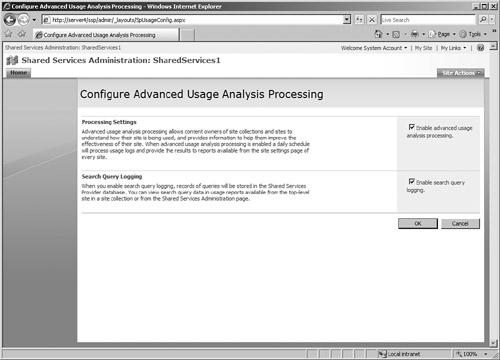
Usage reporting, which displays information about which users access sites, which pages they request the most, and other important information, is covered here (see Figure 14.46). The Usage Reporting link allows usage reporting and/or search query logging to be enabled for the SSP. It must be enabled here and in the Operations tab for it to go into effect.
Figure 14.46. Enabling usage reporting.
Audiences
Audiences are a construct in SharePoint 2007 that allows administrators to target content towards specific groups of users, making it appear for some audiences and not appear for other audiences. The Audience link is used to create audiences, compile audiences, and schedule compilation schedules (see Figure 14.47). Audiences can be created by clicking on the Create Audience link. After they are created, rules can be defined for audience membership, such as what is shown in Figure 14.48. Membership in an Active Directory group, for example, can dictate an audience membership, or membership can be based on property names.
Figure 14.47. Configuring audiences.
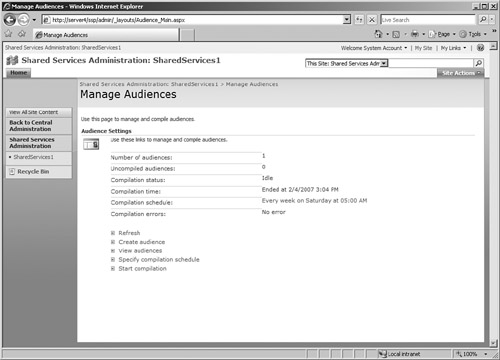
Figure 14.48. Creating an audience.

Excel Services Settings
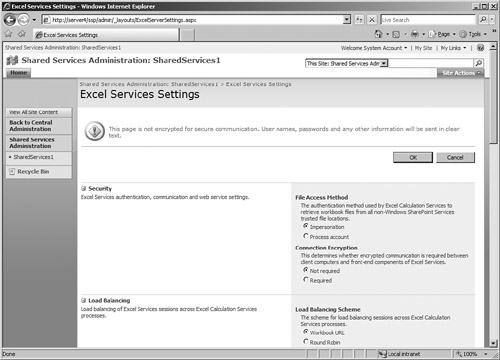
Excel Services in SharePoint 2007 allows end users to perform Microsoft Excel-based functionality without actually having Excel locally installed on their system. Users can calculate, manipulate, and modify Excel spreadsheets directly from a web browser. Excel Services is managed by shared services, and subsequently the admin options for it are listed in this category. Links for Excel Services include the following:
- Edit Excel Services Settings—All general settings for Excel Services are stored in this area, shown in Figure 14.49. Settings such as the type of load balancing used, maximum sessions per user, the memory cache, and other important configuration settings are stored and configured from this location.
Figure 14.49. Configuring Excel Services.
- Trusted File Locations—An administrator can define which Excel workbook file locations are allowed from this area. If the specific site collections are not defined here, Excel Services requests are denied. Entire web applications and their children, such as sp.companyabc.com, can be allowed from this area.
- Trusted Data Connection Libraries—Any individual document libraries which need to have Excel Services enabled can be specified in this area.
- Trusted Data Providers—The Trusted Data Providers section, shown in Figure 14.50, defines the sum of all external data courses that can be linked to from Excel workbooks on the server. It contains a default list of standard data providers, such as SQL, Oracle, and IBM DB2.
Figure 14.50. Viewing trusted data providers.

- User-Defined Function Assemblies—Function assemblies for Excel Services, which are called by Excel Services in certain circumstances, can be defined in this area.
Business Data Catalog
The Business Data Catalog in SharePoint 2007 allows a MOSS 2007 site to pull information from line-of-business applications, such as Siebel or SAP, without writing custom code. It is controlled by Shared Services and includes the following links:
- Import Application Definition—The first step to setting up an external data source for the Business Data Catalog is to define the application with an application definition file. This definition can be performed from within this area, as shown in Figure 14.51.
Figure 14.51. Importing application definitions for the Business Data Catalog.

- View Applications—This area displays the full sum of any installed Business Data Catalog applications.
- View Entities—This area displays Business Data Catalog entities.
- Business Data Catalog Permissions—Granular permissions for the Business Data Catalog can be specified in this area.
- Edit Profile Page Template—The template used for business data items can be directly edited using this area.
Using Additional Administration Tools for SharePoint
Although the vast number of administrative tools are stored within either the SharePoint Central Admin tool or the Site Settings Administration tool, some additional tools can be used by SharePoint administrators to fully administer a SharePoint environment. These include the powerful command-line STSADM tool, as well as specialty admin tools such as the IIS Manager and the SQL 2005 Management Studio.
Command-Line Administration of SharePoint Using the STSADM Tool
The STSADM tool has a long history with SharePoint products and technologies. Indeed, the acronym itself refers to SharePoint Team Services (STS) Administration, which was the 1.0 version name of the Windows SharePoint Services product, originally released with an older version of the FrontPage web authoring tool.
It’s not intuitive to find the STSADM tool, unfortunately, as it is buried in the C:Program FilesCommon FilesMicrosoft Sharedweb server extensions12BIN folder on a SharePoint front-end server. C: is the drive where SharePoint was installed.
It’s convenient to add the C:Program FilesCommon FilesMicrosoft Sharedweb server extensions12BIN folder to the PATH statement on a SharePoint Server, so STSADM can be run from any location in the command prompt window.
A huge sum of administrative tasks can be performed with the admin tool. Typing stsadm -? using the command prompt while in the BIN folder displays a full list of the flags that can be used with the tool.
Figure 14.52. Examining STSADM options.
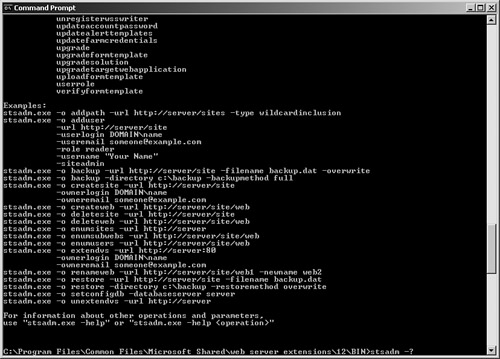
STSADM can create, delete, back up, and restore sites; add and remove users; change timer job intervals; change roles; and perform many other tasks. Reviewing the entire list of options available is highly recommended.
For example, with STSADM, you can change the timer job controlling alerts and make it run every minute instead of the default five minutes by typing the following, as shown in Figure 14.53 (replace server4 with the name of your web application):
![]()
Figure 14.53. Performing STSADM administration.

Or you can back up a site collection using the following syntax, as shown in Figure 14.53:
![]()
Simply replace the server4/sites/sales path with the specific site collection you want to back up and change the C:SiteBackup.dat location to one of your choosing.
STSADM is an extremely powerful tool, and it does not typically warn an administrator when changes are about to be made. It is therefore highly important to double-check the syntax of the command-line string entered, and to understand the full implication of the settings that will be changed.
Working with the Internet Information Services Manager Tool
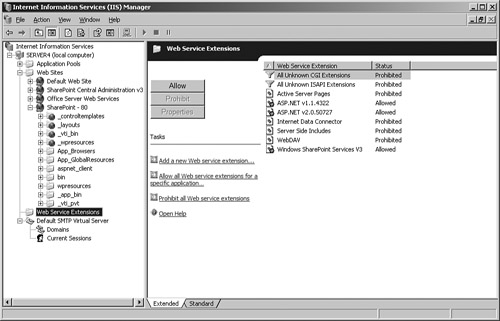
Occasionally, some administration of the Internet Information Services (IIS) application is required that cannot be performed using the SharePoint Central Admin tool. This includes installing the Secure Sockets Layer (SSL) certificates and changing authentication settings. The IIS Manager tool, shown in Figure 14.54, can be used for this functionality and can be invoked by clicking on Start, All Programs, Administrative Tools, Internet Information Services (IIS) Manager.
Figure 14.54. Using the IIS Manager tool for administration.
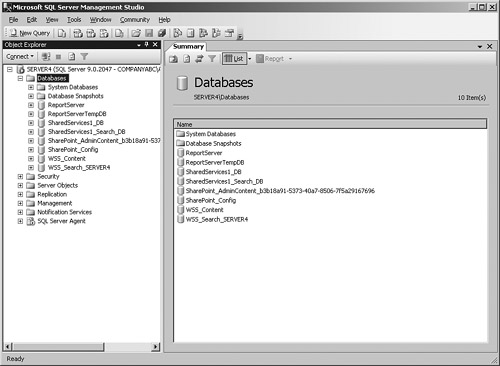
SQL Administration for SharePoint
Administration of the SharePoint databases needs to be performed using the SQL Server Management Studio with SQL 2005 and with the SQL Server Enterprise Manager in SQL 2000. The SQL Server Management Studio, shown in Figure 14.55, is discussed in more detail in Chapter 16, “Maintaining and Monitoring SharePoint 2007 Environments and Databases.”
Figure 14.55. Using the SQL Server Management Studio tool for administration.
Summary
Administration of SharePoint products and technologies can be complex, but fortunately Microsoft has centralized the vast number of administrative functions into a small number of highly powerful tools. Familiarity with these tools, and in particular with the SharePoint Central Administration tool, is subsequently a must for a SharePoint 2007 administrator.
In addition to the SharePoint Central Admin tool, powerful command-line administration using STSADM is available, and database and IIS–specific admin tools provide additional administrative functionality. Through the use of these tools, administration of a SharePoint environment is more streamlined and facilitated.
Best Practices
- Become very familiar with all the tasks in the SharePoint Central Administration tool.
- Let individual site administrators become more aware of the site settings administration options that are available in each site.
- Enable usage analysis processing to get a better idea of how sites are being used and which ones are more popular.
- Consider using automatic site deletion for stale sites to reduce the overhead on the environment that is generated by unused sites.
- Enable search crawling within the shared services administration pages when a new SSP is created. Without enabling crawling within the admin pages, search queries will not return results.
- Use the IIS Manager tool for SSL certificate generation and to change authentication settings on individual IIS websites that are used by web applications in SharePoint.
- Review the powerful options in the STSADM command-line tool, but be cautious about using it because it does not give warnings before making changes.