Chapter 20. Providing Secured Remote Access to SharePoint Using ISA Server 2006
IN THIS CHAPTER
- Understanding the Internet Security and Acceleration Server 2006
- Outlining the Need for ISA Server 2006 in SharePoint Environments
- Outlining the Inherent Threat in SharePoint HTTP Traffic
- Securing Access to SharePoint with Secure Sockets Layer Encryption
- Securing SharePoint Sites with ISA Server 2006
- Logging ISA Traffic
- Monitoring ISA from the ISA Console
- Best Practices
In today’s risk-fraught computing environment, any exposed service is subject to frequent attack from the Internet. This is particularly true for web services, including those offered by Microsoft Office SharePoint Server (MOSS) 2007 and Windows SharePoint Services (WSS) 3.0. Exploits using the Hypertext Transport Protocol (HTTP) that these services use are becoming very commonplace, and it is not considered best practice to make a SharePoint Server directly accessible via the Internet.
Fortunately, the productivity gains in SharePoint 2007 can still be utilized and made more accessible by securing them behind a reverse-proxy server such as Microsoft’s Internet Security and Acceleration (ISA) Server 2006. ISA Server allows for advanced application layer filtering of network traffic, greatly securing the overall SharePoint environment. In addition, ISA Server supports deployment models in the Perimeter zone (DMZ) of existing firewalls, giving organizations the capability to deploy advanced application layer filtering for SharePoint without reconfiguring existing security infrastructure.
This chapter details the ways that SharePoint 2007 sites can be secured using the Internet Security and Acceleration Server 2006 product. Deployment scenarios for securing SharePoint related services with ISA are outlined and specific step-by-step guides are illustrated.
Understanding the Internet Security and Acceleration Server 2006
The rise in the prevalence of computer viruses, threats, and exploits on the Internet has made it necessary for organizations of all shapes and sizes to reevaluate their protection strategies for edge-services such as SharePoint Server. No longer is it possible to ignore or minimize these threats as the damage they cause can cripple a company’s business functions. A solution to the increased sophistication and pervasiveness of these viruses and exploits is becoming increasingly necessary.
Corresponding with the growth of these threats has been the development of the ISA Server product from Microsoft. The latest release of the product, ISA Server 2006, is fast becoming a critical business component of many organizations, who are finding that many of the traditional packet filtering firewalls and technologies don’t necessarily stand up to the modern threats of today. The ISA Server 2006 product provides that higher level of application security required, particularly for tools such as SharePoint sites and other web services.
Although it is possible to secure a SharePoint site with the older ISA Server 2004 version of ISA Server, it is highly recommended to use the 2006 version as it includes built-in securing templates for SharePoint sites. Subsequently, this chapter only demonstrates the use of ISA 2006 for securing SharePoint 2007.
Outlining the Need for ISA Server 2006 in SharePoint Environments
A great deal of confusion exists about the role that ISA Server can play in a SharePoint environment. Much of that confusion stems from the misconception that ISA Server is only a proxy server. ISA Server 2006 is, on the contrary, a fully functional firewall, VPN, web caching proxy, and application reverse-proxy solution. In addition, ISA Server 2006 addresses specific business needs to provide a secured infrastructure and improve productivity through the proper application of its built-in functionality. Determining how these features can help to improve the security and productivity of a SharePoint environment is subsequently very important.
In addition to the built-in functionality available within ISA Server 2006, a whole host of third-party integration solutions provide additional levels of security and functionality. Enhanced intrusion detection support, content filtering, web surfing restriction tools, and customized application filters all extend the capabilities of ISA Server and position it as a solution to a wide variety of security needs within organizations of many sizes.
Outlining the High Cost of Security Breaches
It is rare when a week goes by without a high-profile security breach, denial of service (DoS) attack, exploit, virus, or worm appearing in the news. The risks inherent in modern computing have been increasing exponentially, and effective counter-measures are required in any organization that expects to do business across the Internet.
It has become impossible to turn a blind eye toward these security threats. On the contrary, even organizations that would normally not be obvious candidates for Internet attack must secure their services as the vast majority of modern attacks do not focus on any one particular target, but sweep the Internet for any destination host, looking for vulnerabilities to exploit. Infection or exploitation of critical business infrastructure can be extremely costly for an organization. Many of the productivity gains in business recently have been attributed to advances in information technology functionality, including SharePoint-related gains, and the loss of this functionality can severely impact the bottom line.
In addition to productivity losses, the legal environment for businesses has changed significantly in recent years. Regulations such as Sarbanes-Oxley (SOX), HIPAA, and Gramm-Leach-Bliley have changed the playing field by requiring a certain level of security and validation of private customer data. Organizations can now be sued or fined for substantial sums if proper security precautions are not taken to protect client data. The atmosphere surrounding these concerns provides the backdrop for the evolution and acceptance of the ISA Server 2006 product.
Outlining the Critical Role of Firewall Technology in a Modern Connected Infrastructure
It is widely understood today that valuable corporate assets such as SharePoint sites cannot be exposed to direct access to the world’s Internet users. In the beginning, however, the Internet was built on the concept that all connected networks could be trusted. It was not originally designed to provide robust security between networks, so security concepts needed to be developed to secure access between entities on the Internet. Special devices known as firewalls were created to block access to internal network resources for specific companies.
Originally, many organizations were not directly connected to the Internet. Often, even when a connection was created, no type of firewall was put into place as the perception was that only government or high-security organizations required protection.
With the explosion of viruses, hacking attempts, and worms that began to proliferate, organizations soon began to understand that some type of firewall solution was required to block access to specific “dangerous” TCP or UDP ports that were used by the Internet’s TCP/IP Protocol. This type of firewall technology would inspect each arriving packet and accept or reject it based on the TCP or UDP port specified in the packet of information received.
Some of these firewalls were ASIC-based firewalls, which employed the use of solid-state microchips, with built-in packet filtering technology. These firewalls, many of which are still used and deployed today, provided organizations with a quick and dirty way to filter Internet traffic, but did not allow a high degree of customization because of their static nature.
The development of software-based firewalls coincided with the need for simpler management interfaces and the capability to make software changes to firewalls quickly and easily. The most popular firewall in organizations today, Check Point, falls into this category, as do other popular firewalls such as SonicWALL and Cisco PIX. ISA Server 2006 was built and developed as a software-based firewall, and provides the same degree of packet-filtering technology which has become a virtual necessity on the Internet today.
More recently, holes in the capabilities of simple packet-based filtering technology has made a more sophisticated approach to filtering traffic for malicious or spurious content a necessity. ISA Server 2006 responds to these needs with the capability to perform application-layer filtering on Internet traffic.
Understanding the Growing Need for Application-Layer Filtering
Although nearly all organizations with a presence on the Internet have put some type of packet-filtering firewall technology into place to protect the internal network resources from attack. These types of packet-filter firewall technologies were useful in blocking specific types of network traffic, such as vulnerabilities that utilize the RPC protocol, by simply blocking TCP and UDP ports that the RPC protocol would use. Other ports, on the other hand, were often left wide open to support certain functionality, such as the TCP 80 port, utilized for HTTP web browsing and for access to SharePoint. As previously mentioned, a packet-filter firewall is only able to inspect the header of a packet and understand which port the data is meant to utilize, but unable to actually read the content. A good analogy to this would be if a border guard was instructed to only allow citizens with specific passports to enter the country, but had no way of inspecting their luggage for contraband or illegal substances.
The problems that are becoming more evident, however, is that the viruses, exploits, and attacks have adjusted to conform to this new landscape, and their creators have started to realize that they can conceal the true malicious nature of the payload within the identity of an allowed port. For example, they can piggy-back their destructive payload over a known “good” port that is open on a packet-filter firewall. Many modern exploits, viruses, and scumware, such as illegal file-sharing applications, piggy-back off of the TCP 80 HTTP port, for example. Using the border guard analogy to illustrate, the smugglers realized that if they put their contraband in the luggage of a citizen from a country on the border guards’ allowed list, they could smuggle it into the country without worrying that the guard will inspect the package. These types of exploits and attacks are not uncommon, and the list of known application-level attacks continues to grow.
In the past, when an organization realized that they had been compromised through their traditional packet-filter firewall, the common knee-jerk reaction was to lock down access from the Internet in response to threats. For example, an exploit that would arrive over HTTP port 80 might prompt an organization to completely close access to that port on a temporary or semi-permanent basis. This approach can greatly impact productivity because SharePoint access would be affected. This is especially true in a modern connected infrastructure that relies heavily on communications and collaboration with outside vendors and customers. Traditional security techniques would involve a trade-off between security and productivity. The tighter a firewall was locked down, for example, the less functional and productive an end user could be.
In direct response to the need to maintain and increase levels of productivity without compromising security, application-layer stateful inspection capabilities were built into ISA Server that can intelligently determine if particular web traffic is legitimate. To illustrate, ISA Server inspects a packet using TCP Port 80 to determine if it is a properly formatted HTTP request. Looking back to the analogy we have been using, ISA Server is like a border guard who not only checks the passports, but is also given an X-ray machine to check the luggage of each person crossing the border.
The more sophisticated application-layer attacks become, the greater the need for a security solution which can allow a greater degree of productivity while reducing the type of risks which can exist in an environment that relies on simple packet-based filtering techniques.
Outlining the Inherent Threat in SharePoint HTTP Traffic
The Internet provides somewhat of a catch 22 when it comes to its goal and purpose. On one hand, the Internet is designed to allow anywhere, anytime access to information, linking systems around the world together and allowing that information to be freely exchanged. On the other hand, this type of transparency comes with a great deal of risk, as it effectively means that any one system can be exposed to every connected computer, either friendly or malicious, in the world.
Often, this inherent risk of compromising systems or information through their exposure to the Internet has led to locking down access to that information with firewalls. Of course, this limits the capabilities and usefulness of a free-information exchange system, such as what web traffic provides. Many of the web servers need to be made available to anonymous access by the general public, which causes the dilemma, as organizations need to place that information online without putting the servers it is placed on at undue risk.
Fortunately, ISA Server 2006 provides robust and capable tools to secure web traffic, making it available for remote access but also securing it against attack and exploit. To understand how it does this, it is first necessary to examine how web traffic can be exploited.
Understanding Web (HTTP) Exploits
It is an understatement to say that the computing world was not adequately prepared for the release of the Code Red virus. The Microsoft Internet Information Services (IIS) exploit that Code Red took advantage of was already known, and a patch was made available from Microsoft for several weeks before the release of the virus. In those days, however, less emphasis was placed on patching and updating systems on a regular basis, as it was generally believed that it was best to wait for the bugs to get worked out of the patches first.
So, what happened is that a large number of websites were completely unprepared for the huge onslaught of exploits that occurred with the Code Red virus, which sent specially formatted HTTP requests to a web server to attempt to take control of a system. For example, the following URL lists a sample URL that illustrates an HTTP sequence that would attempt a Code Red exploit:
http://sharepoint.companyabc.com/scripts/..%5c../winnt/system32/ cmd.exe?/c+dir+c:
This one in particular attempts to launch the command prompt on a web server. Through the proper manipulation, viruses such as Code Red found the method for taking over web servers and using them as drones to attack other web servers.
These types of HTTP attacks were a wakeup call to the broader security community as it became apparent that packet-layer filter firewalls that could simply open or close a port were worthless against the threat of an exploit that packages its traffic over a legitimately allowed port such as HTTP.
HTTP filtering and securing, fortunately, is something that ISA Server does extremely well, and offers a large number of customization options that allow administrators to have control over the traffic and security of the web server.
Securing Encrypted (Secure Sockets Layer) Web Traffic
As the World Wide Web was maturing, organizations realized that if they encrypted the HTTP packets that were transmitted between a website and a client, it would make it virtually unreadable to anyone who would potentially intercept those packets. This led to the adoption of Secure Sockets Layer (SSL) encryption for HTTP traffic.
Of course, encrypted packets also create somewhat of a dilemma from an intrusion-detection-and-analysis perspective, as it is impossible to read the content of the packet to determine what it is trying to do. Indeed, many HTTP exploits today can be transmitted over secure SSL-encrypted channels. This poses a dangerous situation for organizations that must secure the traffic against interception, but must also proactively monitor and secure their web servers against attack.
ISA Server 2006 is uniquely positioned to solve this problem, as it includes the capability to perform end-to-end SSL bridging. By installing the SSL certificate from the SharePoint web front-end server on the ISA Server itself, along with a copy of the private key, ISA is able to decrypt the traffic, scan it for exploits, and then reencrypt it before sending it to the SharePoint server. Very few products on the marketplace do this type of end-to-end packet encryption, and fortunately ISA allows for this level of security. Before ISA can secure SharePoint SSL traffic, however, an SSL certificate must be placed on the SharePoint Server, a process which is described in the next section of this chapter.
Securing Access to SharePoint with Secure Sockets Layer Encryption
By default, SharePoint is configured to use Integrated Windows authentication. This form of authentication works fine if access to the server is over a trusted internal network, but is not feasible for access over the Internet.
Because of this limitation, a form of authentication that can be sent across the Internet must be used. This effectively limits the SharePoint Server to using Basic Authentication, which is supported by most web browsers and devices. The problem with Basic Authentication, however, is that the username and password that the user sends is effectively sent in clear text, and can be intercepted and stolen in transit. In addition, documents and other confidential information are transmitted in clear text, a huge security issue.
The solution to this problem is to use what is known as Secure Sockets Layer (SSL) encryption on the traffic. SSL encryption is performed using Public Key Infrastructure (PKI) certificates, which work through the principle of shared-key encryption. PKI SSL certificates are widely used on the Internet today. Any website starting with an https:// uses them, and the entire online merchant community is dependent upon the security of the system.
For SharePoint, the key is to install a certificate on the server so the traffic between the device and the server is protected from prying eyes. There are effectively two options to this approach, as follows:
- Use a third-party certificate authority—A common option for many organizations is to purchase a certificate for SharePoint from a third-party trusted certificate authority (CA) such as VeriSign, thawte, or others. These CAs are already trusted by a vast number of devices, so no additional configuration is required. The downside to this option is that the certificates must be purchased and the organization doesn’t have as much flexibility to change certificate options.
- Install and use your own certificate authority—Another common approach is to install and configure Windows Server 2003 Certificate Services to create your own CA within an organization. This gives you the flexibility to create new certificates, revoke existing ones, and not have to pay immediate costs. The downside to this approach is that no browser trusts the certificate by default, and error messages to that effect are encountered on the devices unless the certificates are manually trusted or forced out to client domain members via Active Directory Group Policy Objects.
Installing a Third-Party Certificate Authority on a SharePoint Server
If a third-party certificate authority will be used to enable SSL on a SharePoint Server, a certificate request must first be generated directly from the SharePoint Server. After this request has been generated, it can be sent off to the third-party CA, who will then verify the identity of the organization and send it back, where it can be installed on the server.
If an internal CA will be utilized, this section and its procedures can be skipped, and readers can proceed directly to the “Using an Internal Certificate Authority for SharePoint Certificates” section.
To generate an SSL certificate request for use with a third-party CA, perform the following steps:
1. From the SharePoint Server open IIS Manager (Start, All Programs, Administrative Tools, Internet Information Services [IIS] Manager).
2. Under the console tree, expand SERVERNAME (local computer), Websites. Right-click the SharePoint Virtual Server where SSL will be used and click Properties.
3. Select the Directory Security tab.
4. Under Secure Communications, click the Server Certificate button.
5. At the welcome page, click Next to continue.
6. From the list of options displayed, select Create a New Certificate, and click Next to continue.
7. From the Delayed or Immediate Request dialog box, select Prepare the Request Now, but Send It Later and click Next.
8. Type a descriptive name for the certificate, such as what is shown in Figure 20.1. Leave the bit length at 1024 and click Next to continue.
Figure 20.1. Generating a SSL certificate request for a SharePoint Virtual Server.

9. Enter the name of the organization and what organizational unit will be associated with the certificate. These fields are viewable by external users, and should accurately reflect the organizational structure of the requestor.
10. Enter a common name for the SharePoint website in the form of the Fully Qualified Domain Name (FQDN). An example of this would be home.companyabc.com. Click Next to continue.
If the SharePoint site will be made accessible from the Internet, the common name of the site will need to be made accessible from the Internet via a DNS ‘A’ record.
11. Enter the appropriate information into the Geographical Information dialog box, such as state, city, and country. Abbreviations are not allowed. Click Next to continue.
12. Enter a filename for the certificate request, such as C:spcert.txt, and click Next to continue.
13. On the Request File Summary dialog box, review the summary page for accuracy, and click Next to continue
14. Click Finish to end the Web Server Certificate Wizard.
After the certificate request has been generated, the text file, which looks similar to the one shown in Figure 20.2, can then be emailed or otherwise transmitted to the certificate authority via its individual process. Each CA has a different procedure, and the exact steps need to follow the individual CA’s process. After an organization’s identify has been proven by the CA, it sends back the server certificate, typically in the form of a file, or as part of the body of an email message.
Figure 20.2. Viewing a certificate request file.

The certificate then needs to be installed on the server itself. If it was sent in the form of a .cer file, it can simply be imported via the following process. If it was included in the body of an email, the certificate itself needs to be cut and pasted into a text editor such as Notepad and saved as a .cer file. After the .cer file has been obtained, it can be installed on the SharePoint Server using the following process:
- From the SharePoint Server, open IIS Manager (Start, All Programs, Administrative Tools, Internet Information Services [IIS] Manager).
- Under the console tree, expand SERVERNAME (local computer), Websites. Right-click the SharePoint Virtual Server and click Properties.
- Select the Directory Security tab.
- Under Secure Communications, click the Server Certificate button.
- At the welcome page, click Next to continue.
- From the Pending Certificate Request dialog box, select Process the Pending Request and Install the Certificate, and click Next to continue.
- Enter the path and filename where the .cer file was saved (the Browse button can be used to locate the file) and click Next to continue.
- Click Finish to finalize the certificate installation.
At this point in the process, SSL communication to the SharePoint Server can be allowed, but forcing SSL encryption for the SharePoint traffic requires more configuration, which is outlined in the “Forcing SSL Encryption for SharePoint Traffic” section.
Using an Internal Certificate Authority for SharePoint Certificates
If a third-party certificate authority is not utilized, an internal CA can be set up instead. There are several CA options, including several third-party products, and it may be advantageous to take advantage of an existing internal CA. Windows Server 2003 also has a very functional CA solution built into the product, and one can be installed into an organization.
Proper design of a secure Public Key Infrastructure is a complex subject, and organizations might want to spend a good amount of time examining the many factors that can influence CA design. This step-by-step scenario assumes a very basic design, with an Enterprise CA installed directly into a domain controller.
To set up an internal certificate authority on a domain member server or, more commonly, on a domain controller, the certificate authority component of Windows Server 2003 can be installed using the following procedure:
1. Click on Start, Control Panel, Add or Remove Programs.
2. Click on Add/Remove Windows Components.
3. Check the box labeled Certificate Services.
4. At the warning box, shown in Figure 20.3, click Yes to acknowledge that the server name cannot be changed.
Figure 20.3. Installing a local certificate authority.

5. Click Next to continue.
From the subsequent dialog box, shown in Figure 20.4, select what type of certificate authority will be set up. Each type of CA has different ramifications and is useful in different situations. The following is a list of the types of CAs available for installation:
- Enterprise root CA—An enterprise root CA is the highest level certificate authority for an organization. By default, all members of the forest where it is installed trust it, which can make it a convenient mechanism for securing SharePoint or other services within a domain environment. Unless an existing enterprise root CA is in place, this is the typical choice for a home-grown CA solution in an organization.
- Enterprise subordinate CA—An enterprise subordinate CA is subordinate to an existing enterprise root CA, and must receive a certificate from that root CA to work properly. In certain large organizations, it might be useful to have a hierarchy of CAs or to isolate the CA structure for SharePoint to a subordinate enterprise CA structure.
- Stand-alone root CA—A stand-alone root CA is similar to an enterprise CA, in that it provides its own unique identity, and can be uniquely configured. It differs from an enterprise CA in that it is not automatically trusted by any forest clients in an organization.
- Stand-alone subordinate CA—A stand-alone subordinate CA is similar to an enterprise subordinate CA, except that it is not directly tied or trusted by the forest structure, and must take its own certificate from a stand-alone root CA.
Figure 20.4. Selecting a CA type to install.

After choosing the type of CA required, continue the CA installation process by performing the following steps:
1. In this example, the enterprise certificate authority is chosen. Click Next to continue.
2. Enter a common name for the certificate authority, such as what is shown in Figure 20.5. Click Next to continue.
Figure 20.5. Entering a common name for the certificate authority.

3. Enter locations for the certificate database and the database log (the defaults can normally be chosen) and click Next to continue.
4. Click Yes when warned that the IIS Services will be restarted.
5. Click Finish after the installation is complete.
After the internal CA is in place, the SharePoint Server can automatically use it for generation of certificates. To generate and install a certificate on a SharePoint Server using an internal CA, use the following technique:
1. From the SharePoint Server, open IIS Manager (Start, All Programs, Administrative Tools, Internet Information Services [IIS] Manager).
2. Under the console tree, expand SERVERNAME (local computer), Websites. Right-click the SharePoint Virtual Server and click Properties.
3. Select the Directory Security tab.
4. Under Secure Communications, click the Server Certificate button.
5. At the welcome page, click Next to continue.
6. Select Create a New Certificate and click Next to continue.
7. From the Delayed or Immediate Request dialog box, select Send the Request Immediately to an Online Certification Authority and click Next to continue.
8. Enter a name for the certificate, such as CompanyABC SP Certificate, leave the bit length at 1024, and click Next to continue.
9. Enter the Organization and Organizational unit name, keeping in mind that they should accurately reflect the real name of the requestor. Click Next to continue.
10. Enter the Fully Qualified Domain Name (FQDN) of the SharePoint Server, such as home.companyabc.com.
11. In the Geographical Information dialog box, enter an un-abbreviated state, city, and country, and click Next to continue.
12. Specific the SSL port (443 is the default) that the server will use and click Next to continue.
13. Under the Choose a Certification Authority dialog box, shown in Figure 20.6, select the CA that was set up in the previous steps and click Next to continue.
Figure 20.6. Installing a local CA certificate on a SharePoint Server.

14. Review the request in the Certificate Request Submission dialog box and click Next to continue.
15. Click Finish when complete.
After installation, the certificate can be viewed by clicking on the View Certificate button of the Directory Services tab under the Virtual Server properties.
After placed on a server, SSL encryption is made available on the SharePoint Server. If the enterprise certificate authority is installed in an Active Directory domain, all the domain members include the internal CA as a trusted root authority and connect to SharePoint via SSL with no errors. External or non-domain members, however, need to install the enterprise CA into their local trusted root authorities.
Forcing SSL Encryption for SharePoint Traffic
After either a third-party or a local internal certificate has been installed on a SharePoint web server, the web server is typically set up to force SharePoint traffic to use SSL encryption, rather than allow that traffic to use the unencrypted HTTP protocol. To solve this problem, SSL encryption must be forced from the SharePoint Server via the following procedure:
1. On the SharePoint Server, open IIS Manager (Start, All Programs, Administrative Tools, Internet Information Services [IIS] Manager).
2. Navigate to Internet Information Services, Websites, SharePoint Website (or whatever the SharePoint virtual server is named).
3. Right-click on the Virtual Server and choose Properties.
4. Choose the Directory Services tab.
5. Under Secure communications, click the Edit button.
6. From the Secure Communications dialog box, shown in Figure 20.7, check the boxes for Require Secure Channel (SSL) and Require 128-bit encryption. Click OK.
Figure 20.7. Forcing SSL encryption on the SharePoint virtual server.

7. Click Edit under the Authentication and Access Control section.
8. Make sure that Basic Authentication is checked (it’s needed for SSL) and click OK.
9. Click OK again to save the changes.
Securing SharePoint Sites with ISA Server 2006
SharePoint sites comprise one of the more common types of content that are secured by ISA Servers. This stems from the critical need to provide remote document management while at the same time securing that access. The success of ISA deployments in this fashion give tribute to the tight integration Microsoft built between its ISA product and the SharePoint 2007 product.
An ISA Server used to secure a SharePoint implementation can be deployed in multiple scenarios, such as an edge firewall, an inline firewall, or a dedicated reverse-proxy server. In all these scenarios, ISA secures SharePoint traffic by pretending to be the SharePoint Server itself, scanning the traffic that is destined for the SharePoint Server for exploits, and then repackaging that traffic and sending it on, as is illustrated in Figure 20.8.
Figure 20.8. Explaining SharePoint site publishing with ISA Server 2006.

ISA performs this type of securing through a SharePoint Site Publishing rule, which automatically sets up and configures a listener on the ISA Server. A listener is an ISA component that listens to specifically defined IP traffic, and processes that traffic for the requesting client as if it were the actual server itself. For example, a SharePoint listener on an ISA Server responds to SharePoint HTTP requests made to it by scanning them for exploits and then repackaging them and forwarding them to the SharePoint Server itself. Using listeners, the client cannot tell the difference between the ISA Server and the SharePoint Server itself.
ISA Server is also one of the few products that has the capability to secure web traffic with SSL encryption from end to end. It does this by using the SharePoint Server’s own certificate to re-encrypt the traffic before sending it on its way. This also allows for the “black box” of SSL traffic to be examined for exploits and viruses at the Application layer, and then reencrypted to reduce the chance of unauthorized viewing of the traffic. Without the capability to scan this SSL traffic, exploits bound for a SharePoint Server could simply hide themselves in the encrypted traffic and pass right through traditional firewalls.
This chapter covers one common scenario that ISA Server is used for, securing a SharePoint site collection. In this example, home.companyabc.com is using ISA. The steps outlined here describe this particular scenario, though ISA can also be used for multiple other securing scenarios.
Configuring the Alternate Access Mapping Setting for the External URL
Before external access can be granted to a site, an Alternate Access Mapping (AAM) must be established for the particular web application. An AAM is a host header value (such as https://portal.companyabc.com, http://server4, https://home.companyabc.com, and so forth) that must be consistently applied to the site across all links. If it is not put into place, external clients will not be able to access internal links.
To configure the AAM on a web application in this scenario, home.companyabc.com, perform the following tasks:
1. Open the SharePoint Central Admin Tool from the SharePoint Server (Start, All Programs, Microsoft Office Server, SharePoint 3.0 Central Administration).
2. Click on the Operations tab.
3. Under the Global Configuration options, click the Alternate Access Mappings link.
4. Click Edit Public URLs.
5. Enter the https:// AAM needed under the Internet text box, as shown in Figure 20.9. In this example, https://home.companyabc.com is entered. Click Save.
Figure 20.9. Configuring Alternate Access Mappings.

6. Review the AAMs listed on the page for accuracy, and then close the SharePoint Central Admin tool.
Installing an SSL Certificate on a SharePoint Server
It is generally well accepted that SharePoint content that travels across an insecure network such as the Internet should be encrypted to prevent it from being examined by prying eyes. The most common form of encryption for web traffic is Secure Sockets Layer (SSL) encryption using Public Key Infrastructure (PKI) X.509 certificates. The certificates themselves reside on the IIS virtual servers that have been extended as SharePoint web applications.
If SSL is not already enabled on a SharePoint web application, it must be set up and configured in advance of the following procedures, which describe how to use ISA to filter the SSL traffic destined for the SharePoint Server. Use the procedures outlined in the earlier section of this chapter titled “Securing Encrypted (Secure Sockets Layer) Web Traffic” to install and configure an SSL certificate on the SharePoint server.
ISA Server 2006 also supports SSL encryption that terminates on the ISA Server. ISA can then make a connection to a web application secured with Integrated Windows Authentication. This can be convenient for those organizations that desire to offload SSL from the SharePoint environment.
Exporting and Importing the SharePoint SSL Certificate to the ISA Server
For ISA to decrypt the SSL traffic bound for the SharePoint Server, ISA needs to have a copy of this SSL certificate. The certificate is used by ISA to decode the SSL packets, inspect them, reencrypt them, and send them on to the SharePoint Server itself. For this certificate to be installed on the ISA Server, it must first be exported from the SharePoint Server as follows:
This procedure assumes that the SSL certificate has already been added to the IIS Virtual Server, per the process outlined earlier in this chapter, in the section titled “Securing Encrypted (Secure Sockets Layer) Web Traffic.”
- From the SharePoint Server (not the ISA Server), open IIS Manager (Start, All Programs, Administrative Tools, Internet Information Services [IIS] Manager).
- Navigate to Internet Information Services, SERVERNAME (local computer), Websites.
- Right-click on the Virtual Server housing the SharePoint Web Application and choose Properties.
- Choose the Directory Security tab.
- Click View Certificate.
- Click the Details tab.
- Click Copy to File.
- At the wizard, click Next to begin the export process.
- Select Yes, Export the Private Key and click Next to continue.
- Select to include all certificates in the certification path and also select to enable strong protection. Click Next to continue.
- Type and confirm a password and click Next to continue.
- Enter a file location and name for the file and click Next.
- Click Finish.
After the .pfx file has been exported from the SharePoint Server, it can then be imported to the ISA Server via the following procedure:
It is important to securely transmit this .pfx file to the ISA Server and to maintain high security over its location. The certificate’s security could be compromised if it were to fall into the wrong hands.
1. From the ISA Server, open the MMC console (Start, Run, mmc.exe, OK).
2. Click File, Add/Remove Snap-in.
3. Click the Add button.
4. From the list shown in Figure 20.10, choose the Certificates snap-in and click Add.
Figure 20.10. Customizing an MMC Certificates snap-in console for import of the SharePoint certificate.

5. Choose Computer Account from the list when asked what certificates the snap-in will manage and click Next to continue.
6. From the subsequent list in the Select Computer dialog box, choose Local Computer: (the computer this console is running on) and click Finish.
7. Click Close and OK.
After the custom MMC console has been created, the certificate that was exported from the SharePoint Server can be imported directly from the console via the following procedure:
1. From the MMC Console root, navigate to Certificates (Local Computer), Personal.
2. Right-click the Personal folder and choose All Tasks, Import.
3. At the wizard welcome screen, click Next to continue.
4. Browse for and located the .pfx file that was exported from the SharePoint Server. The location can also be typed into the filename field. Click Next when located.
5. Enter the password that was created when the certificate was exported, as illustrated in Figure 20.11. Do not check to mark the key as exportable. Click Next to continue.
Figure 20.11. Installing the SharePoint certificate on the ISA Server.

6. Choose Automatically Select the Certificate Store Based on the Type of Certificate, and click Next to continue.
7. Click Finish to complete the import.
After it is in the certificates store of the SharePoint Server, the SharePoint SSL certificate can be used as part of the publishing rules.
If a rule that makes use of a specific SSL certificate is exported from an ISA Server, either for backup purposes or to transfer it to another ISA Server, the certificate must also be saved and imported to the destination server, or that particular rule will be broken.
Creating a SharePoint Publishing Rule
After the SharePoint SSL has been installed onto the ISA Server, the actual ISA SharePoint publishing rule can be generated to secure SharePoint via the following procedure:
The procedure outlined here illustrates an ISA SharePoint publishing rule that uses forms-based authentication (FBA) for the site, which allows for a landing page to be generated on the ISA Server to pre-authenticate user connections to SharePoint.
1. From the ISA Management Console, click once on the Firewall Policy node from the console tree.
2. In the Tasks tab of the Tasks pane, click the Publish SharePoint Sites link.
3. Enter a descriptive name for the publishing rule, such as SharePoint Publishing Rule.
4. Select whether to publish a single website, multiple websites, or a farm of load-balanced servers, as illustrated in Figure 20.12. In this example, we choose to publish a simple single website. Click Next to continue.
Figure 20.12. Creating a SharePoint Publishing Rule.

5. Choose whether to require SSL from the ISA Server to the SharePoint Server, as shown in Figure 20.13. Providing end-to-end SSL support for ISA is recommended. Click Next to continue.
Figure 20.13. Choosing SSL publishing options.

6. On the Internal Publishing Details dialog box, enter the site name that internal users use to access the SharePoint Server. Examine the options to connect to an IP address or computer name. This gives additional flexibility to the rule. Click Next to continue.
7. Under the subsequent dialog box, enter the domain name for which you want to accept requests in the This Domain Name (Type Below): text box and enter the FQDN of the server, such as home.companyabc.com. This restricts the rule to requests that are destined for the proper FQDN. Click Next to continue.
8. Under Web Listener, click New.
9. At the start of the Web Listener Wizard, enter a descriptive name for the listener, such as SharePoint HTTP/HTTPS Listener, and click Next to continue.
10. Again a prompt is given to choose between SSL and non-SSL. This prompt refers to the traffic between the client and SharePoint, which should always be SSL whenever possible. Click Next to continue.
11. Under Web Listener IP Addresses, select External Network and leave it at All IP Addresses. Click Next to continue.
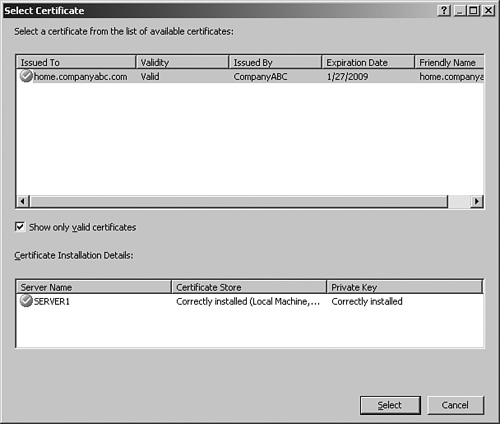
12. Under Listener SSL Certificates, click on Select Certificate.
13. Select the previously installed certificate, as shown in Figure 20.14, and click the Select button.
Figure 20.14. Choosing a certificate for the listener.
14. Click Next to continue.
15. For the type of authentication, choose HTML Form Authentication, as shown in Figure 20.15. Leave Windows (Active Directory) selected and click Next.
Figure 20.15. Choosing a form of authentication for the listener.

16. The Single Sign on Settings dialog box is powerful, because it allows all authentication traffic through a single listener to be processed only once. After the user has authenticated, she can access any other service, be it an Exchange OWA server, web server, or other web-based service that uses the same domain name for credentials. In this example, we enter .companyabc.com into the SSO domain name. Click Next to continue.
17. Click Finish to end the Web Listener Wizard.
18. Click Next after the new listener is displayed in the Web Listener dialog box.
19. Under Authentication Delegation, choose Basic from the drop-down box. Basic is used because SSL is the transport mechanism chosen. Click Next to continue.
20. At the Alternate Access Mapping Configuration dialog box, shown in Figure 20.16, select SharePoint AAM Is Already Configured on the SharePoint Server because we have configured it in previous steps.
Figure 20.16. Configuring Alternate Access Mapping settings for the SharePoint rule.

21. Under User Sets, leave All Authenticated Users selected. In stricter scenarios, only specific AD groups can be granted rights to SharePoint using this dialog box. In this example, the default setting is sufficient. Click Next to continue.
22. Click Finish to end the wizard.
23. In the details pane, click Apply and then click OK when finished to commit the changes.
The rule now appears in the details pane of the ISA Server. One additional step is critical in this process. By default, the HTTP filter on an ISA rule will block certain HTTP strings required by SharePoint traffic. This can cause certain SharePoint pages to not load properly when accessing them through ISA. The HTTP Filter will block some high bit characters and some HTTP commands that do not comply with HTTP normalization if this change is not made. To change the HTTP filter settings so they do not interfere with SharePoint, do the following:
- Double-click the rule in the Console pane.
- Select the Traffic tab.
- Click the Filtering button, and then select Configure HTTP.
- Under the General tab, unclick the boxes labeled Verify Normalization and Block High Bit Characters.
- Click OK, OK, Apply, and OK to save the settings.
After configuring the HTTP filter, additional rule settings can be viewed or modified by double-clicking on the rule brings up the settings. This brings up the settings shown in Figure 20.17. Tabs can be used to navigate around the different rule settings. The rule itself can be configured with additional settings based on the configuration desired. To serve as a baseline, the following rule settings would be configured with a standard, SSL-secured SharePoint Site rule on an ISA server. These settings can be used as a baseline for further customization if required:
• Name: SharePoint
• Enable=checked
• Action tab—Action to Take=Allow; Log Requests Matching this Rule=checked
• From tab—This Rule Applies to Traffic from These Sources=Anywhere
• To tab—This Rule Applies to this Published Site=home.companyabc.com; Forward the Original Host Header Instead of the Actual One (Specified in the Internal Site Name Field)=checked; Specify How the Firewall Proxies Requests to the Published Server=Requests Appear to Come from the ISA Server
• Traffic tab—This Rule Applies to Traffic of the Following Protocols=HTTP, HTTPS; Require 128-bit Encryption for HTTPS Traffic=checked; HTTP Filter=Uncheck Verify Normalization and Uncheck Block High Bit Characters; leave the rest at the defaults.
• Listener tab—Listener Properties - Networks=External; Port(HTTP)=80; Port(HTTPS)=443; Certificate=home.companyabc.com; Authentication methods=FBA with AD; Always Authenticate=No; Domain for Authentication=COMPANYABC
• Listener tab, Properties Button—Networks tab=External, All IP Addresses; Connections tab=Enable HTTP Connections on Port 80, Enable SSL Connections on Port 443; HTTP to HTTPS Redirection=Redirect Authenticated Traffic from HTTP to HTTPS; Forms tab=Allow Users to Change Their Passwords, Remind Users that Their Password Will Expire in this Number of Days=15; SSO tab=Enable Single Sign On, SSO Domains=.companyabc.com
• Public Name tab—This Rule Applies to Requests for the Following Websites=home.companyabc.com
• Paths tab—External Paths=All Are Set to <same as internal>; Internal Paths= /*, /_vti_inf.html*, /_vti_bin/*, /_upresources/*, /_layouts/*
• Authentication Delegation tab—Method Used by ISA Server to Authenticate to the Published Web Server=Basic Authentication
• Application Settings tab—Use Customized HTML Forms Instead of the Default=Unchecked
• Bridging tab—Redirect Requests to SSL Port=443
• Users tab—This Rule Applies to Requests from the Following User Sets=All Authenticated Users
• Schedule tab—Schedule=Always
• Link Translation tab—Apply Link Translation to this Rule=Checked
Figure 20.17. Viewing the SharePoint rule.

Different rules require different settings, but the settings outlined in this example are some of the more common and secure ones used to set up this scenario.
Logging ISA Traffic
One of the most powerful troubleshooting tools at the disposal of SharePoint and ISA administrators is the logging mechanism. The logging mechanism gives live or archived views of the logs on an ISA Server, and allows for quick and easy searching and indexing of ISA Server log information, including every packet of data that hits the ISA Server.
Many of the advanced features of ISA logging are only available when using MSDE or SQL databases for the storage of the logs.
Examining ISA Logs
The ISA logs are accessible via the Logging tab in the details pane of the Monitoring node, as shown in Figure 20.18. They offer administrators the ability to watch, in real time, what is happening to the ISA Server, whether it is denying connections, and what rule is being applied for each allow or deny statement.
Figure 20.18. Examining ISA logging.

The logs include pertinent information on each packet of data, including the following key characteristics:
- Log Time—The exact time the packet was processed.
- Destination IP—The destination IP address of the packet.
- Destination Port—The destination TCP/IP port, such as port 80 for HTTP traffic.
- Protocol—The specific protocol that the packet utilized, such as HTTP, LDAP, RPC, or others.
- Action—What type of action the ISA Server took on the traffic, such as initiating the connection or denying it.
- Rule—Which particular firewall policy rule applied to the traffic.
- Client IP—The IP address of the client that sent the packet.
- Client Username—The username of the requesting client. Note that this is only populated if using the firewall client.
- Source Network—The source network from which the packet came.
- Destination Network—The network where the destination of the packet is located.
- HTTP Method—If HTTP traffic, this column displays the type of HTTP method utilized, such as GET or POST.
- URL—If HTTP is used, this column displays the exact URL that was requested.
By searching through the logs for specific criteria in these columns, such as all packets sent by a specific IP address or all URLs that match http://home.companyabc.com, advanced troubleshooting and monitoring is simplified.
Customizing Logging Filters
What is displayed in the details pane of the Logging tab is a reflection of only those logs that match certain criteria in the log filter. It is highly useful to use the filter to weed out the extraneous log entries which just distract from the specific monitoring task. For example, on many networks, an abundance of NetBIOS broadcast traffic makes it difficult to read the logs. For this reason, a specific filter can be created to only show traffic that is not NetBIOS traffic. To set up this particular type of rule, do the following:
1. From the ISA Admin Console, click on the Monitoring node from the Console tree and select the Logging tab in the details pane.
2. From the Tasks tab in the Tasks pane, click the Edit Filter link.
3. Under the Edit Filter dialog box, change the Filter By, Condition, and Value fields to display Protocol; Not Equal; and NetBIOS Datagram. Click Add to List.
4. Repeat for the NetBIOS Name Service and the NetBIOS Session values, so that the dialog box looks like the one displayed in Figure 20.19.
Figure 20.19. Creating a custom logging filter.

5. Click Start Query.
It cannot be stressed enough that this logging mechanism is quite literally the best tool for troubleshooting ISA access. For example, it can be used to tell if traffic from clients is even hitting the ISA Server, and if it is, what is happening to it (denied, accepted, and so forth).
Monitoring ISA from the ISA Console
In addition to the robust logging mechanism, the ISA Monitoring node also contains various tabs that link to other extended troubleshooting and monitoring tools. Each of these tools performs unique functions, such as generating reports, alerting administrators, or verifying connectivity to critical services. It is subsequently important to understand how each of these tools works.
Customizing the ISA Dashboard
The ISA Dashboard, shown in Figure 20.20, provides quick and comprehensive monitoring of a multitude of ISA components from a single screen. The view is customizable, and individual components can be collapsed and/or expanded by clicking on the Arrow buttons in the upper-right corner of each of the components. All of the individual ISA monitoring elements are summarized here.
Figure 20.20. Viewing the ISA Dashboard.

The ISA Dashboard is the logical parking page for ISA administrators, who can leave the screen set at the Dashboard to allow for quick glances at ISA health.
Monitoring and Customizing Alerts
The Alerts tab, shown in Figure 20.21, lists all of the status alerts that ISA has generated while it is in operation. It is beneficial to look through these alerts on a regular basis and acknowledge them when they no longer need to be displayed on the Dashboard. If alerts need to be permanently removed, they can be reset instead. Resetting or acknowledging alerts is as simple as right-clicking on an alert and choosing Reset or Acknowledge.
Figure 20.21. Viewing the ISA Alerts tab.

Alerts that show up in this list are listed because their default alert definition specified displaying them in the console. This type of alert behavior is completely customizable, and alerts can be made to do the following actions:
- Send email
- Run a program
- Report to Windows Event log
- Stop selected services
- Start selected services
For example, it might be necessary to force a stop of the firewall service if a specific type of attack is detected. Configuring alert definitions is relatively straightforward. The following process illustrates how to create an alert that sends an email to an administrator when a SYN attack is detected:
1. From the Alerts tab of the ISA Monitoring node, select the Tasks tab in the tasks pane.
2. Click the Configure Alert Definitions link.
3. Under the Alert Definitions dialog box, shown in Figure 20.22, choose SYN Attack and click Edit.
Figure 20.22. Creating a custom alert definition.

4. Choose the Actions tab from the SYN Attack Properties dialog box.
5. Check the Send Email checkbox.
6. Enter the organization’s information in the SMTP Server, From, To, and Cc fields, similar to what is shown in Figure 20.23.
Figure 20.23. Entering SMTP server information.
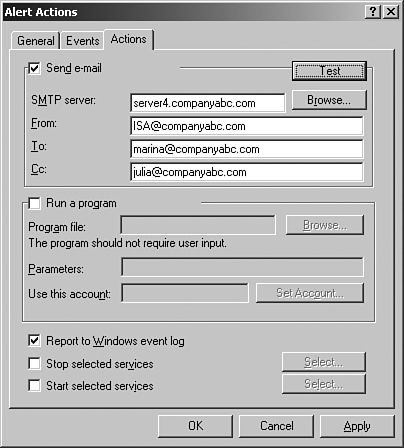
7. Click the Test button to try the settings, and then click OK to acknowledge a successful test.
8. Click OK, OK, Apply, and OK to save the settings.
As is evident from the list, a vast number of existing alert definitions can be configured, and a large number of thresholds can be set. In addition, you can configure more customized alerts by clicking the Add button on the Alerts Properties dialog box and following the wizard. This allows for an even greater degree of customization.
Monitoring Session and Services Activity
The Services tab, shown in Figure 20.24, allows for a quick view of the ISA services, if they are running, and how long they have been up since previously being restarted. The services can also be stopped and started from this tab.
Figure 20.24. Monitoring ISA services.

The Sessions tab allows for more interaction, as individual unique sessions to the ISA Server can be viewed and disconnected as necessary. For example, it might be necessary to disconnect any users who are on a VPN connection if a change to the VPN policy has just been issued. This is because VPN clients that have already established a session with the ISA Server are only subject to the laws of the VPN policy that was in effect when they originally logged in. To disconnect a session, right-click on it and choose Disconnect Session, as shown in Figure 20.25
Figure 20.25. Disconnecting a session.

Creating Connectivity Verifiers
Connectivity verifiers can be a useful way of extending ISA’s capabilities to include monitoring critical services within an environment, such as DNS, DHCP, HTTP, or other custom services. Connectivity verifiers are essentially a quick and dirty approach to monitoring an environment with very little cost, as they take advantage of ISA’s alerting capabilities and the Dashboard to display the verifiers.
For example, the following step-by-step process illustrates setting up a connectivity verifier that checks the status of an internal SharePoint server:
1. In the Monitoring tab of the ISA Console, click on the Connectivity tab of the details pane.
2. In the Tasks tab of the tasks pane, click the Create New Connectivity Verifier link.
3. Enter a name for the Connectivity Verifier, such as Web Server Verifier, and click Next.
4. Under the Connectivity Verification Details dialog box shown in Figure 20.26, enter the server FQDN, the Group type (which simply determines how it is grouped on the Dashboard), and what type of verification method to use (in this case an HTTP GET request).
Figure 20.26. Configuring a SharePoint HTTP connectivity verifier.

5. Click Finish.
6. Click Yes when prompted to turn on the rule that allows ISA Server to connect via HTTP to selected servers.
7. Click Apply and OK.
After they are created, connectivity verifiers that fit into the major group types are reflected on the Dashboard. Creating multiple connectivity verifiers in each of the common group types can make the Dashboard a more effective monitoring tool.
Summary
The capability of ISA Server 2006 to secure and protect SharePoint products and technologies gives it powers not present in other firewall solutions. In addition, because ISA is easily deployed in the DMZ of existing firewalls as a dedicated security appliance, its capabilities are further extended and it can be deployed in environments of all shapes and sizes.
Best Practices
- Use SSL encryption to secure the traffic to and from a SharePoint Server, particularly if that traffic will cross an unsecured network, such as the Internet.
- Monitor ISA Server using the MSDE or SQL logging approaches for the greatest level of monitoring functionality.
- Remember to turn off the Verify Normalization and Block High Bit Characters HTTP filter settings for a SharePoint publishing rule in ISA.
- Secure any edge-facing service such as SharePoint with a reverse-proxy system such as ISA Server 2006.
- Deploy ISA reverse-proxy capability in the existing DMZ of a firewall if it is not feasible to replace existing firewall technologies.