
Chapter 22. Exploring Business Process and Business Intelligence Features in SharePoint 2007
IN THIS CHAPTER
- Using InfoPath 2007 with SharePoint 2007 and Forms Server 2007
- Business Intelligence in SharePoint 2007
- Best Practices
This chapter covers both business process and business intelligence–related features in SharePoint 2007. InfoPath 2007 is tackled first, with several examples given of how forms can be made to be virtually error-proof and intelligent so they adapt based on the entries made in certain fields. To use InfoPath 2007 forms, however, users need to have InfoPath 2007 installed on desktops. Fortunately, SharePoint Server 2007 and Forms Server 2007 include additional functionality that allows form designers to publish browser-enabled form templates. This eliminates the requirement for users of the forms to have InfoPath 2007 installed on their computers, which was a major complaint and hindrance to the adoption of InfoPath forms previously.
The chapter then tackles the hot but often confusing topic of Business Intelligence (BI) by reviewing the different components of SharePoint Server 2007 that allow an organization to define and present critical business data to managers, executives, and decision makers. Excel Services and the Excel Web Access web part are reviewed from this point of view. Key Performance Indicators and Filter Web Parts are also briefly reviewed. This process creates a sample dashboard, and the sample dashboard provided in the Reports site is also covered. Coverage of data connections to external databases and application is outside the scope of this chapter due to the complexity of the topic. Hopefully, this chapter will give a much clearer picture of how SharePoint 2007 can enhance business processes and business intelligence gathering and sharing for the organization.
Using InfoPath 2007 with SharePoint 2007 and Forms Server 2007
Every company uses forms of different shapes, sizes, and complexities. They can be found in piles in the HR office, on the Intranet in Adobe .pdf format, on the file server in Word template or Excel spreadsheet formats, or in many other varieties. InfoPath 2003 and forms libraries in SharePoint 2003 offered a powerful set of tools for organizations to use to create powerful, intelligent forms that could be centrally managed and take advantage of SharePoint 2003’s document management features. InfoPath 2007 builds on these basic features, as the following sections cover, and Forms Server 2007 extends the usefulness of these forms by reducing the costs to the organization of making these forms available to the user community. Forms Services, available in Forms Server 2007 or included with SharePoint Server 2007 Enterprise edition, provide additional features to facilitate management of InfoPath 2007 forms and allow users to browser-enable form templates.
Preparing to Create InfoPath 2007 Forms
Forms can be created in InfoPath 2007 from scratch, or existing templates can be used and modified quite easily. Room is not available in this chapter to cover the actual design steps of laying out a form from scratch, so the Asset Tracking form template is used as a basis for the examples and discussions of features in this chapter. Other sample templates that are available are Expense Report, Meeting Agenda, Status Report, and Travel Request. Additional forms can be found on Microsoft’s website on the Templates Categories page (http://office.microsoft.com/en-us/templates/CT101527321033.aspx?av=ZIP). Categories include agendas, expense reports, invoices, plans, purchase orders, reports, time sheets, evaluations, and itineraries. By downloading and reviewing the elements of these templates, the designer will most likely save time over creating a form from scratch.
Template parts can also be designed that can be used in other forms. Creating a form from scratch can be a complex process, so it is recommended that form designers work with one or more of the default templates before creating one from scratch. Some basic decisions that need to be made about a form include
- What fields are needed on the form? Time should be dedicated to some group planning to reach a consensus on the fields that are needed.
- What intelligence is needed in the form to limit the data that is entered, or to provide options based on an external data source?
- Does the form need to be created from scratch, or can a sample template be used?
- Will the form be created for InfoPath Forms Services, for a SharePoint 2007 Form Library, to email recipients, to a network location, or as an installable form template (requires Microsoft Visual Studio)? Different restrictions might apply based on the publishing destination.
- If the form will be published to a SharePoint 2007 form library or to an InfoPath Forms Services server, which fields will be promoted or available in the SharePoint site and Outlook folder?
- What functionality will be available to users of the form (such as printing, saving as PDF file, using the form offline, and so forth)? The following section on form design basics provides information on a number of the options available.
- Will digital signatures be used? If so, on the whole form or on specific fields, and which type of digital signatures will be allowed? The options are to allow only one signature, all the signatures are independent (co-sign), or each signature signs the preceding signatures (counter-sign).
These decisions should be jotted down, and if the design of the form is complex in terms of logic, a flow chart can be created to clarify the functionality of the form. For example, if a specific entry in one field of the form changes the availability of other fields or opens new sections of the form, and rules or custom programming causes other actions to occur, visual representation of these processes can be helpful. InfoPath does provide a Logic Inspector that can assist in this process after the form is designed.
It is important for the form to be thoroughly tested prior to distribution to the organization as dramatic changes to the design or functionality of the form might affect the display of data entered in previous versions of the form.
File Components of a Form Template
A form template is actually composed of a number of files, and it is helpful to understand the different components of a form template when designing and managing InfoPath 2007 forms. To see the different components of a form, open a form template, access the File menu, click Save As Source Files, and save to an easily accessible location that won’t get confused with working templates. Figure 22.1 shows a sample collection of files that make up an Asset Tracking form which consists of a combination of file types: .GIF Image, .XSF InfoPath Form Definition File, .XSD File, .XML Document, and .XSL Stylesheet.
Figure 22.1. The InfoPath Source Files window.

Following are some explanations of the functions of the different file types:
- Form definition file (manifest.xsf)—This file contains the XML schemas that the file uses and the resource files that it contains.
- XML Schema (myschema.xsd)—This file contains elements and attributes represented in groups and fields. Each data source that is associated with a form template, including the main data source, has a corresponding .xsd file.
- View (view1.xsl)—XSL Transformation (XSLT) files are used to present the data that is contained in the form for users to fill out.
- XML template (template.xml)—This data is displayed to users when they first open a form, until they select or enter different values.
Form Design Basics
A new form can be created that is either a form template or template part. The form template can be based on a blank form, web service, database, XML, or Schema or Connection Library. And the option exists to enable browser-compatible features only, if the form is intended for use exclusively on SharePoint Forms Server 2007 servers. Basic design tasks include
- Layout—Use tables and regions to arrange items on the form template.
- Controls—Add controls to enable users to enter data into the form.
- Data Source—Display and modify the data source for the form template.
- Views—Create different views for the form template.
Form options, available from the Tools menu, allow additional options that affect the functionality of the form. The categories offered on this page vary based on choices made within the different categories. For example, the Browser category does not show up if the form is not set to be browser based. The settings available in this window (as shown in Figure 22.2) are very important in determining the functionality of the form, and should be reviewed in detail during the form design process. For example, an organization might not want forms being printed out at all by end users, so the designer chooses to disable printing for the form. Another organization might be very concerned with being able to validate that the content of fields in the form have not changed, and decide to use digital signatures for specific fields.
Figure 22.2. InfoPath Form Options window: Browser category.

A summary of the categories available in the Form Options window include
- Browser—This option only appears if the form has been configured to be opened in a browser in the Compatibility tab. As shown in Figure 22.2, these options determine which, if any, toolbars will be available on the browser-based form and which commands will be included. The language that will be used in toolbars and dialog boxes can be selected, and rendering on a mobile device can be enabled.
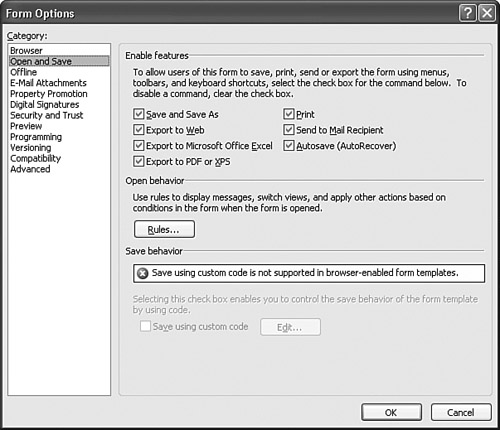
- Open and Save—Features can be enabled or disabled in this category, as shown in Figure 22.3. Functions as basic as Save and Save As, exporting the form, printing the form, or sending to a mail recipient can be disabled. Rules can be created to display messages, switch views, and apply other actions.
Figure 22.3. InfoPath Form Options window: Open and Save category.
- Offline—Affects the behavior of the form when offline, and lets the designer choose whether to allow users to fill out this form if data from data sources is unavailable. The option is provided to store data returned from queries so the form can be used in Offline mode.
- Email Attachments—This allows the designer to determine whether specific form files are sent along with the email, or whether the user can decide when he sends the email. InfoPath email forms, which allow users to open, fill out, and submit the form in email, can be enabled or disabled.
- Property Promotion—Determines which columns will be available in SharePoint sites and Outlook folders. These values can also be set or changed when publishing the form to a form library.
- Digital Signatures—Digital signatures can be enabled or disabled. If enabled, they can be enabled for the entire form, or for specific data in the form. For browser-enabled form templates, signing the entire form is not supported. Digital signatures must be enabled for specific fields. Signable data can be assigned to a set (do not include spaces in the name of the set), and the options for signing are to allow only one signature, all the signatures are independent (co-sign), and each signature signs the preceding signatures (counter-sign).
Enabling digital signatures for specific fields in a form allows different users of the form to sign different sections, helping ensure that business processes are being followed and providing an auditable trail for future reference. For example, a form might need multiple electronic signatures, which is easily accomplished by this built-in feature to InfoPath 2007.
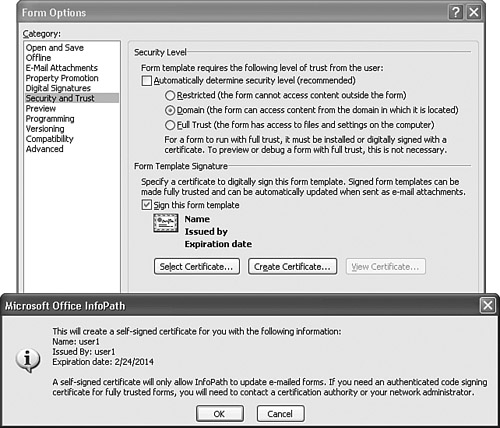
- Security and Trust—Security levels can be determined automatically, or they can be set to Restricted, Domain, or Full Trust (as shown in Figure 22.4). A certificate can be selected to digitally sign the form template, or a certificate can be created as shown in Figure 22.4. A self-signed certificate will only allow InfoPath to update emailed forms.
Figure 22.4. InfoPath Form Options window: Security and Trust category.
- Preview—Allows the designer to specify the user role with which to preview the form, and to specify a sample set of data to use during preview.
- Programming—A custom task pane can be selected to be displayed to users accessing the form. If code is added to the form using Visual Basic or C#, the .NET Framework 2.0 will be required on the client’s system to fill out the form. Form template code language possibilities are Jscript, VBScript, C#, C# (InfoPath 2003 Compatible), Visual Basic, and Visual Basic (InfoPath 2003 Compatible). Custom task panes are not supported in InfoPath Forms Services, nor are scripts and deprecated object models.
- Versioning—The current version number of the form is revealed, and options are given for behavior on version upgrades: Do Nothing (existing forms might not work properly), Automatically Upgrade Existing Forms, or Use Custom Event.
The version number of the form is always tracked in InfoPath 2007. Form template changes can have unanticipated results, depending on the extent of the changes. The new version of the form should be tested with existing content, especially if existing forms aren’t upgraded automatically. For example, the form template might be updated, but when older forms are opened, errors might occur, or data might not display properly. Custom events can be created (and a JavaScript template is provided where the code can be entered) for data validation and form-level events.
- Compatibility—An option is provided to design a form template that can be opened in a browser or InfoPath, and errors for code that uses InfoPath-only features can be hidden. The URL of a server running InfoPath Forms Services can be entered to verify compatibility. Finally, a report on InfoPath 2003 compatibility can be provided. Figure 22.5 shows the Design Checker.
Figure 22.5. Design Checker task pane.

- Advanced—This option allows the designer to disable the form customization commands on the Tools menu to discourage users who are filling out the form from changing the form template. Form merging can be enabled in this category (not supported with browser-enabled form templates), and default values can be set for one or more fields in the form. Finally, blank values in mathematical operations can be treated as zero.
The Advanced category in the Form Options window lets the designer enable protection for the form, which disables the form customization commands, which is generally considered to be a best practice to dissuade users from trying to change the template.
InfoPath Forms Basics in SharePoint 2007
In SharePoint Server 2007 or Windows SharePoint Services 3.0, a form library can be created that is designed specifically to store and manage InfoPath 2007 forms by following these steps:
- Create the form library from the Create page (/_layouts/create.aspx) by choosing the Form Library option in the Libraries column.
- After the library is created, access the New menu and select New Document. A window opens, as shown in Figure 22.6, that requests a form template, and a message indicates that the user should “close this dialog box, and then use InfoPath to publish a form template to the library.”
Figure 22.6. Open with Form Template window.

To create a form in InfoPath 2007 and publish to SharePoint 2007 follow these steps:
1. Open InfoPath 2007, click File, New and select the Asset Tracking form.
2. After the Asset Tracking form is open, access the File menu and choose Save, and save the form locally (with a title such as “AssetTrackingForm1"). Then access the File menu again, and choose Publish.
3. The Publishing Wizard opens. Select the option To a SharePoint Server With or Without InfoPath Forms Services. Click Next.
4. Enter the location of the SharePoint site, including the name of the form library (such as http://abcmoss01/sitedirectory/unleashed1/forms library), and click Next.
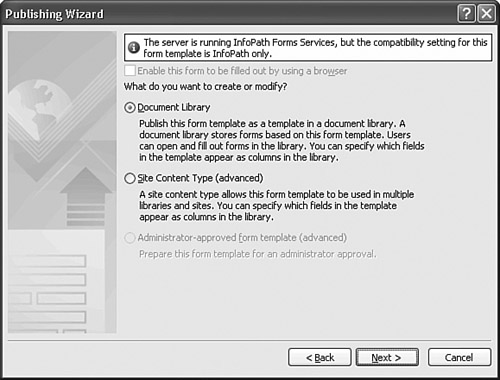
5. In the next screen, as shown in Figure 22.7, the Document Library option is selected. Note that there is also an option to select Site Content Type, if this form template is meant to be used in multiple libraries and sites. Check the box next to Site Content Type (advanced) for this example. Note also that the option to Enable This Form to Be Filled out by Using a Browser is grayed out, because the form is being saved to a SharePoint 2007 form library, not a Forms Server 2007 server. Click Next.
Figure 22.7. The Forms Publishing Wizard in InfoPath 2007.
6. On the next screen, make sure that Create a New Content Type is selected. Verify that the Form content type is selected, and click Next.
7. Provide a name (such as “Asset Tracking Form") and a description for the form, and click Next.
8. On the next screen, specify a location and filename for the form template (such as http://abcmoss01/sitedirectory/unleashed1) and click Next.
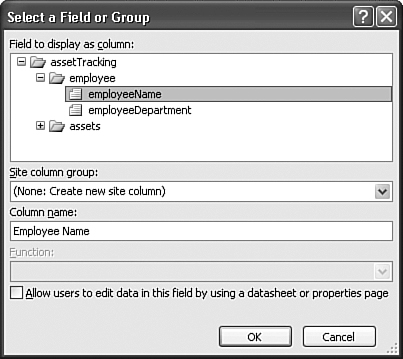
9. On the next screen, click the Add button to select the columns that will be available in SharePoint sites and Outlook folders. Figure 22.8 shows the Select a Field or Group window, where the employee folder is expanded, and employeeName is selected. The Allow Users to Edit Data in This Field by Using a Datasheet or Properties Page option is left blank. Click OK, and then re-enter this screen and select employeeDepartment with the checkbox left blank and click OK. Because this information reflects the name of the individual that entered the data, it should not be editable.
Figure 22.8. The Forms Publishing Wizard in InfoPath 2007: Select a Field or Group window.
10. For this example, return to this Select a Field or Group window, expand the Asset folder, and select the following fields one at a time: assetID, assetMake, assetModel, and assetAssignedTo.
11. The Publishing Wizard should now look like Figure 22.9. Click Next.
Figure 22.9. The Forms Publishing Wizard in InfoPath 2007: Columns to be available in SharePoint 2007.

12. Review the settings and click Publish. After the publishing process has occurred, the wizard should give the option to Manage This Content Type.... Click this link and the Asset Tracking Form content type should appear, as shown in Figure 22.10. Return to InfoPath 2007 and close the wizard.
Figure 22.10. A content type created from an InfoPath form.

13. Now associate the Site content type with the Forms Library through the Form Library Settings page (/_layouts/listedit.aspx) by clicking on Advanced Settings, and verifying that Allow Management of Content Types is set to Yes. Then return to the settings page, click the Add from Existing Content Types option in the Content Types section, and select the Asset Tracking Form content type that was created.
14. Return to the Forms Library and now when the New menu is clicked, Asset Tracking Form appears. Assuming the user accessing this library has InfoPath 2007 installed on his desktop, he is able to fill in this form and save data to the library. Figure 22.11 shows the Forms Library after two forms have been filled out and saved to the library. Data contained in the forms is used to populate the columns in the library, which allows users of the library to quickly filter based on these columns without having to open the actual document. Version tracking can also be used to track changes in the forms, and other document library features such as alerts and workflow can be used as needed.
Figure 22.11. The Forms Library with two entries.

If you leave the allow users to edit data in this field by using a datasheet or properties page, a message is shown that states: “This could put the form’s data at risk because when the field is edited on SharePoint, its business logic such as Data Validation, Rules, Formulas, Code, and Script will not run.”
The Edit menu for InfoPath 2007 forms saved to a form library offers the option Edit in Browser, but unless Forms Server 2007 is available, the user will receive an error message. Also, users with InfoPath 2003 installed see the option Edit in Microsoft Office InfoPath, but will receive an error message if they attempt to open the form.
Making the Forms Smarter
Although the process reviewed in the previous section is interesting, in that the content of the form is actually made available through the columns that are visible in the library, the overall functionality of the form is basic, as there is no intelligence, and no rules applied to the data entered. InfoPath 2007 offers a number of features that can be used to make the forms more advanced in their levels of functionality. These features can verify that the data being entered meets criteria that are built into the form, can change the appearance of the data based on its value, or activate different components of the form based on responses to certain fields. These features help ensure that the data entered is correct and enhance the functionality of the form. The following sections will cover these features:
- Conditional Formatting
- Data Validation
- Rules
- Programming
- Logic Inspector
- External Data Sources
Conditional Formatting
Conditional formatting can be applied to a cell in InfoPath 2007, and allows the form designer to create definitions for conditions that result in certain formatting. To access conditional formatting, right-click a field in an InfoPath 2007 form, and select Conditional Formatting (or choose Conditional Formatting from the Format menu). Then conditional formatting can be assigned by clicking the Add button.
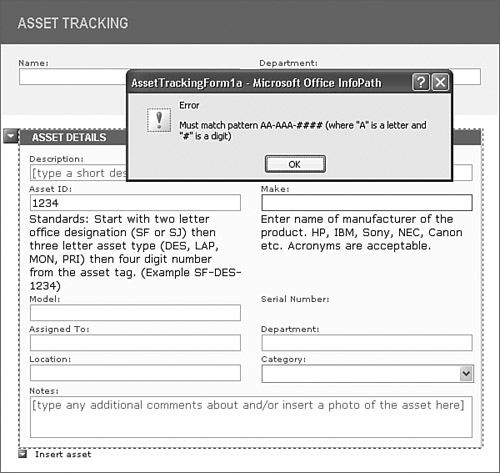
A basic example for the form shown in Figure 22.12 is where conditional formatting could be applied to the Asset ID field, based on the office where the asset is located. For example, if the field contained the letters SF, the text could be green, whereas if it contained the letters SJ, the text could be red.
Figure 22.12. A sample Asset Tracking form in InfoPath 2007.

A more powerful feature of conditional formatting is that other fields on the form can be referenced to affect a separate field. For example, on the form shown in Figure 22.12 the user is requested to enter a specific format for the Asset ID (two letters for the location, three letters for the type of item, and then four digits from the asset tag). Conditional formatting can then hide the Serial Number field based on the type of asset, because the organization is not concerned with tracking the serial numbers of anything other than desktop and laptop computers.
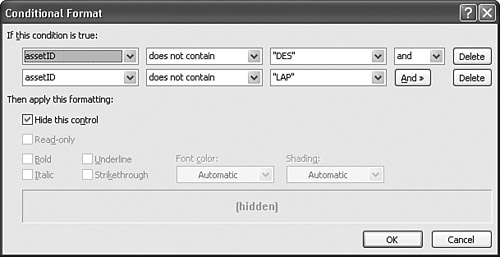
Following are the steps needed to hide a field based on the contents of a separate field:
1. Right-click the field to be hidden (Serial Number field in this example), and click Conditional Formatting. The click Add, and the Conditional Format window opens.
2. Select the reference field from the first drop-down menu, select the condition Does Not Contain, and then type in the appropriate text (DES on the first line). Click the Add button to add a second line.
3. The settings for the second line are similar but enter the text for the second option (LAP in this example). In the Then Apply This Formatting section, select Hide This Control. Figure 22.13 shows an example of the results. With these settings, if the Asset ID field doesn’t contain the letters DES and it doesn’t contain the letters LAP, the Serial Number field is hidden. Click OK and then click OK again.
Figure 22.13. Conditional formatting in InfoPath 2007.
4. After you are back in design mode, click the Preview button to test the data entry. Note that there is no field visible under the text Serial Number until DES or LAP is entered in the Asset ID field.
This is just one example of how conditional formatting can be used for more than simply changing the font or color of text entered in a form.
Data Validation
Data validation helps ensure that the entries in form fields meet criteria set by the form’s designer. If a form contains data validation errors and it is connected to a database or Web service, users won’t be able to submit the form until they fix these errors. A copy of the form can be saved locally, and then submitted later after the errors are fixed.
To access data validation, right-click the field, and select Data Validation. The process of creating a data validation rule is similar to conditional formatting, with a main difference that a dialog box is displayed if the data does not meet the condition(s) defined. For example, if the condition Asset Make Is Blank is met, a dialog box can be opened that says “Please enter an asset make.”
Figure 22.14 shows conditional formatting that will apply when the value entered into the assetID field does not match a custom pattern (AA-AAA-#### where A indicates a letter and # indicates a number). Figure 22.15 shows an example of an invalid entry in the preview mode for this form.
Figure 22.14. Data validation in InfoPath 2007.
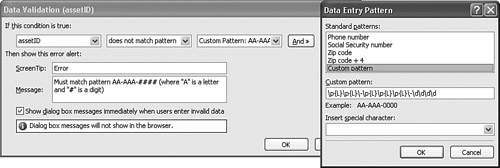
Figure 22.15. Sample error message from data validation in InfoPath 2007.
Rules, Programming, and Logic Inspector
The Rules, Programming, and Logic Inspectors are each advanced tools that can enhance the intelligence of the form. A full examination of these features is outside of the scope of this chapter. Rules can be added to a field to perform one of several tasks:
- Show a dialog box message
- Show a dialog box expression
- Set a field’s value
- Query using a data connection
- Submit using a data connection
- Open a new form to fill out
To add one of the three programming options (Changing Event, Validating Event, or Changed Event), Microsoft Visual Studio Tools for Applications (VSTA) is required. This requires that the Microsoft .NET Framework 2.0 and Microsoft Core XML Service 6.0 are installed as well. When a script is added to a form template, InfoPath starts the Microsoft Script Editor (MSE), which allows the designer to add, edit, and debug script in a form template.
The Logic Inspector is a powerful tool that aggregates a number of different functions in the form: data validation, calculated default values, rules, and programming. This is very helpful as the logic involved in a form can rapidly become confusing and in some cases contradictory.
External Data Sources
A form does not have to be an “island” that simply accepts information a user plugs into it. Fields in the form can interact with data from a variety of external data sources:
- Microsoft Office Access database
- Microsoft SQL Server database
- Web service
- Document library or list on a server running Microsoft Windows SharePoint Services
- XML file
Three types of data connections are possible when connecting to an external data source:
- Query data only—A query data connection receives data from a data source and stores that data in the form.
- Submit data only—A submit data connection sends data from the form to a data source, to an application on a Web server, to a document library on a server running Microsoft Windows SharePoint Services, or in an email message.
- Both query and submit data—Query and submit data connections both receive data from and send data to a data source.
To connect a data source to a SharePoint 2007 list, follow these steps:
- Access the Tools menu, click Data Connections. Click Add.
- Click Create a New Connection To, and then select Receive Data. Click Next.
- Select SharePoint Library or List. Click Next.
- Enter the URL of the SharePoint 2007 site that contains the list or library (http://abcmoss01/sitedirectory/unleashed1/ is entered in this example). Click Next.
- Choose the list or library from the Select a List or Library list (HP Model Numbers is selected in this example). Click Next.
- Check the box next to the field or fields that can be selected from (Title is selected in this example). Click Next.
- Check the box next to Store a Copy of the Data in the Form Template if desired. Click Next.
- Enter a name for the data connection (HP Model Numbers is entered in this example). Click Finish.
To enable a field to access this data, follow these steps:
1. Select a field in the form. For this example, the Model field from the Asset Tracking form that has been used in previous examples is selected. Right-click the field and choose Change To, and then choose List Box.
2. Right-click the list box, and select List Box Properties. The List Box Properties window opens. Select Look Up Values from an External Data Source, as shown in Figure 22.16.
Figure 22.16. The List Box Properties window in InfoPath 2007.

3. From the Data Source drop-down menu, select the custom data source.
4. Click the icon to the right of the Entries box and select the field in the SharePoint 2007 list that will provide the values. Click OK.
5. Access the Preview mode for the form, and click Yes if presented with the security notice.
6. As shown in Figure 22.17, the values in the SharePoint 2007 list are now available from the list box.
Figure 22.17. Example of an external data source in InfoPath 2007.

Extending the Reach of Forms with Forms Server 2007
Forms Server 2007 is a stand-alone Office server product, which means that it cannot be installed on a server that contains another server product such as SharePoint Server 2007. Forms Server 2007 uses InfoPath Forms Services to deliver server-based electronic forms to users, and can host forms that can be filled out through a browser, which means that users do not have to have InfoPath 2007 installed on their desktops to fill out forms.
The installation requirements for Forms Server 2007 are the same as Windows SharePoint Services 3.0, as in fact Forms Server is essentially Windows SharePoint Services 3.0 with additional forms functionality enabled. Figure 22.18 shows the Add/Remove Programs view of a server with Forms Server 2007 installed.
Figure 22.18. Add or Remove programs window for a Forms Server 2007 server.

Configuring Forms Server Functionality
Configuration options for Forms Services are available on the Application Management tab in the Central Administration Console. The different tools are
- Manage Form Templates and Upload Form Templates—Templates can be uploaded to the Central Administrator web application. A verification tool is available to check the form template for detailed errors, warnings, and other information. Existing forms can be upgraded using the new version if desired, and existing browser-based form-filling sessions can be terminated or allowed to complete.
- Configure InfoPath Forms Services—A number of configuration options are available on this page (/_admin/ipfsConfig.aspx), including allowing users to browser-enable form templates, and rendering form templates that are browser-enabled by users. Default data connection timeouts, maximum data connection timeouts, and data connection response size in kilobytes can be set. SSL can be required for HTTP authentication to data sources. Additional settings such as allowing embedded SQL authentication can also be set.
- Manage Data Connection Files—Data connection files can be uploaded to the Central Administration web application.
- Manage the Web Service Proxy—The web service proxy for data connections between InfoPath forms and web services can be enabled, and the web service proxy can be enabled for user forms.
Publishing to a Forms Server
For this example, open the Expense Report template. Verify in the Form Options window that the Design a Form Template That Can Be Opened in a Browser or InfoPath box is checked in the Compatibility category. Also select some fields in the Property Promotion category that will be available in the SharePoint site. Click OK to close the Form Options window.
Follow these steps to publish to a Forms Services server:
1. Access the File menu, and click Publish.
2. The Publishing Wizard opens. Select the option To a SharePoint Server With or Without InfoPath Forms Services. Click Next.
3. Enter the location of the SharePoint site on a server that has Forms Services enabled (such as http://abcforms01/) and click Next.
4. In the next screen, the Enable This Form to Be Filled Out by Using a Browser should be checked, and Document Library option should be selected. Leave these default options and click Next.
5. On the next screen, verify that Create a New Document Library is selected. Click Next.
6. Provide a name (such as Asset Tracking Form) and a description for the form, and click Next.
7. Type a name for the document library, such as Expense Report Forms. Click Next.
8. Verify that the columns listed are the ones you want to be available in the SharePoint site. If more columns are needed, click Add, and add additional ones. Click Next when the settings are satisfactory.
9. Review the settings and click Publish.
10. After the publishing process has occurred, click Open This Form in the Browser. Figure 22.19 shows an example of the browser-based view of the Expense Report form after it has been published to a Forms Server 2007 server. As circled in Figure 22.19, several buttons are available in the toolbar—Submit, Save, Save As, Close, and Print View.
Figure 22.19. Browser view of an InfoPath 2007 form published to a forms server.

11. Enter sample text in the expense report, making sure to fill in fields marked with the red asterisk, and then click Submit. When asked to save the form, enter a title that is reflective of the content of the form (such as User1 Expense today’s date). Click Save.
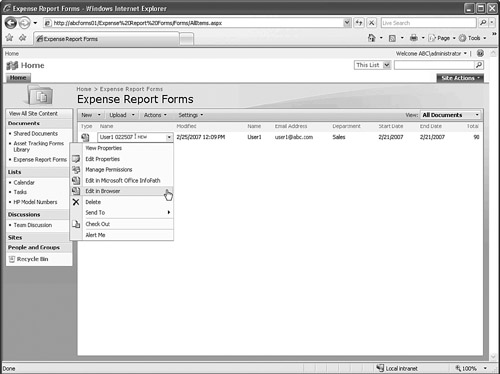
12. Access the forms library that was created to house the form, and it should now have one form saved in it, as shown in Figure 22.20. The form can now be edited either in InfoPath 2007 or in a browser.
Figure 22.20. InfoPath 2007 form published to a forms server form library.
Business Intelligence in SharePoint 2007
Organizations store data pertaining to their line of business in many formats. These can include databases (such as SQL, Oracle, Access, and proprietary third-party databases) as well as documents that are stored on file servers, filers, or desktops. Email is another business tool that often contains business critical information. An important step to take, and one that SharePoint 2007 helps facilitate, is to provide a structure where this information can be stored and accessed. Most organizations have dozens or hundreds of reports that are run regularly or on an as-needed basis that enable managers, executives, and decision makers to understand whether the organization is meeting its goals in many different areas. SharePoint 2007 offers a variety of tools that make it relatively simple to pull specific data from a variety of different sources, and then present it in a way that facilitates analysis and decision making.
Excel Services
Excel Services is discussed in detail in Chapter 10, “Using Word, Excel, and Excel Services with SharePoint 2007,” and it allows enhanced management and dissemination of Excel-based data. The spreadsheets can be stored on the SharePoint 2007 server, and then some or all of the data can be viewed through the Excel Web Access web part in a read-only mode, or with some degree of interactivity that doesn’t affect the source data. Chapter 10 gives some examples of this process and functionality.
Figure 22.21 gives an example of an Excel worksheet that was published to a SharePoint Server 2007 site (the Unleashed2 site) that is designed for managerial use only. The Excel data that is displayed is not modifiable, but Excel Web Access allows the user to open a copy of the data in Excel including all formulae, or open a snapshot in Excel, which only contains the format and values. After it is opened in Excel, in either format, the data can be manipulated, printed, graphed, or otherwise modified, all without changing the original data (that is, stored in a document library on the same site with versioning on). Notice in Figure 22.21 that the data has conditional formatting applied to it, so higher values are marked with an x while the lower values are marked with a check mark. This helps anyone viewing the data instantly see which values are problematic and which don’t merit concern. The data can also be filtered, as any of the down arrows in the first row of the Excel Web Access web part (in this example, next to Site, Bandwidth and Disk Space) can be clicked and a variety of filters applied. For example, a user could use a filter in the Disk Space column to only display values greater than 2,000,000,000.
Figure 22.21. Excel Web Access web part displaying formatted content.

Although the data in an Excel Web Access web part can’t have an alert assigned to it, the spreadsheet it is based on can, so if the base spreadsheet changes the user will be alerted via email.
Key Performance Indicators
The example shown in the previous section of data displayed in an Excel Web Access web part is useful to viewers of the information, but it still displays a lot of information, requiring the user to use filters to limit the values, and it might not communicate the overall state of the data. For example, the Web Services manager might simply want to know how the organization is doing in terms of overall disk space used up compared to how much disk space is available on the server storing the data.
To do this, a Key Performance Indicator (KPI) can be created based on the information contained in the spreadsheet used in the previous example. A more complex example could involve pulling the information about disk space utilized directly from the SQL database.
The following steps are required to create a KPI that tells the Web Services manager the overall status of disk space:
1. Create a KPI list on the site by accessing the Create page for the site. Choose KPI List from Custom Lists. Provide a name (such as KPI List) and click Create.
2. Click the New menu in the KPI list, and select Indicator Using Data in Excel Workbook.
Other new KPIs that can be created include Indicator Using Data in a SharePoint List, Indicator Using Data in SQL Server 2007 Analysis Services, and Indicator Using Manually Entered Information. There isn’t room in this chapter to cover all of these different processes, but it is helpful to understand the different options provided in the KPI list.
3. Fill in the Name field (for this example Total Storage for Sites Status), and the Description and Comments fields.
4. In the Workbook URL field, click the icon to the right to select the workbook. In this example, the workbook is located on the site and is SiteUsage.xlsx.
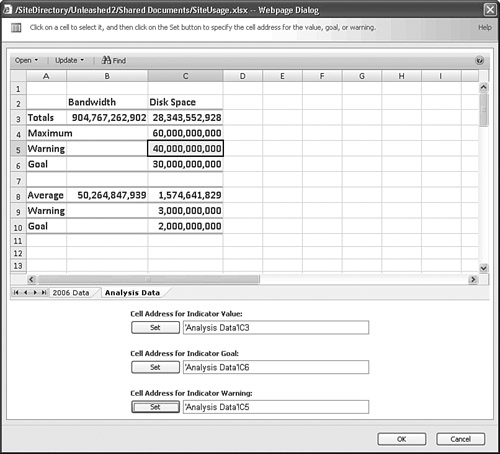
5. Then for the Cell Address for Indicator Value, click the icon to the right, which opens the selected workbook in a Webpage Dialog box, as shown in Figure 22.22. Three values need to be selected from the worksheet: the indicator value (which is the current value that will be evaluated), the indicator goal (the number that defines green status), and the indicator warning (the number that defines red status). In this example, the indicator value is the total current disk space used up by the websites on the first tab of the spreadsheet. The warning number of 40,000,000,000 was manually entered into the spreadsheet, as was the goal number of 30,000,000,000. These goal and warning numbers could be changed manually if more hard drive space is allocated in the future, for example, and the KPI that is being defined would automatically update, because it is simply reading the value from specific cells. Click OK when done.
Figure 22.22. Setting indicator values for a KPI from an Excel spreadsheet.
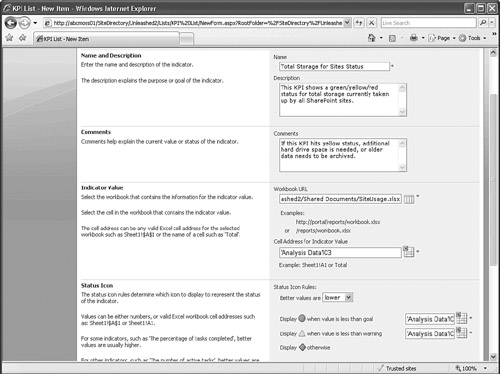
6. In the Status Icon Rules drop-down menu, for this example, choose Lower to complete the definition Better Values Are Lower. Note that the goal and warning fields are already completed because they were defined in step 5. Figure 22.23 shows the KPI list settings.
Figure 22.23. KPI list item settings.
7. In the Details Page field a custom page can be referenced, if one exists, that contains detailed information about this indicator. For this example, none will be selected.
8. Set the update rules to Recalculate the Indicator Value for Every Viewer. The other option is to manually update the value of this indicator with the Update Values link.
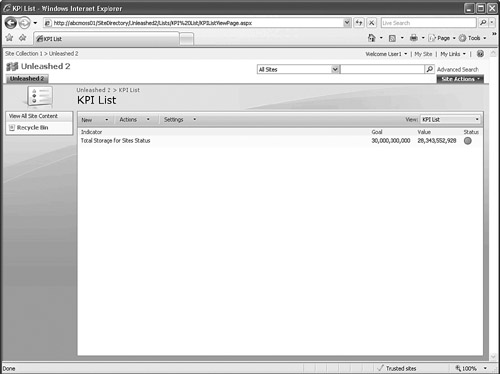
9. Click OK to save these settings. Figure 22.24 shows the results in the KPI list.
Figure 22.24. KPI list with new entry.
Now that the KPI has been defined it is easily displayed on the default.aspx page for this site by following these steps:
- From the default.aspx page for the site, click Edit Page from the Site Actions menu. Click Add a Web Part in the Left zone.
- Select the web part KPI Details and click Add.
- Click the Edit menu in the KPI Details web part, and click Modify Shared Web Part. In the Tool pane, select the KPI list by clicking the icon to the right of the field, and selecting the KPI list that was created in the previous section (titled “KPI List” in this example). Then select the specific KPI from the drop-down menu. Click OK.
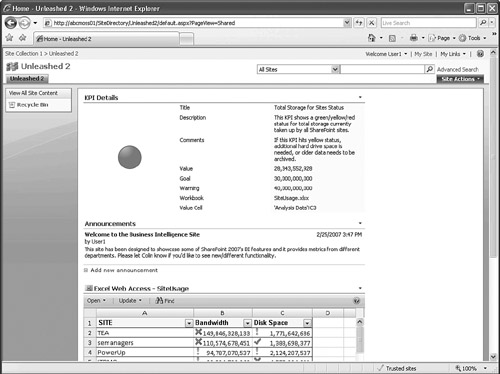
- Click Exit Edit Mode, and the results should look like Figure 22.25.
Figure 22.25. KPI Details web part added to default.aspx page.
Because this web part takes up considerable room on a 1024 × 768 resolution page, it might be better off on a web part page or in another location accessible via a link on the default.aspx page. Target audiences can be set for this web part as well, so only members of a specific SharePoint or AD group can see the web part. This helps ensure that visitors to the page only see the KPI or KPIs of importance to them.
Filter Web Parts
Filter web parts provide the capability to restrict the data that is displayed on the page. The following steps show how to add a filter web part to affect the data that an Excel Web Access web part displays. Note that this requires that cells in the Excel workbook have been assigned names using the Define Name function, and that these parameters have been published along with the worksheet. See Chapter 10 for more information on how this is completed.
1. From the default.aspx page for the site, click Edit Page from the Site Actions menu. Click Add a Web Part in the Left zone.
2. Select the Choice Filter web part and click Add. Also select the Excel Web Access web part and click Add.
3. In the Choice Filter Web Part, click the Open the Tool Pane link.
4. In the Tool pane, enter a name to identify the filter (such as Excel Services Choice Filter). Then add each named cell (also called a parameter) from the published Excel workbook in the scrolling field below, as shown in Figure 22.26. Click Apply.
Figure 22.26. Choice Filter settings.

5. In the Excel Web Access web part, click the Click Here to Open the Tool Pane link.
6. Enter the URL of the workbook that will be filtered, or click the icon to browse for the file. In this case a file was published that contained named cells (parameters) that the Choice Filter can call. In the Rows field, type 1, and in the Columns field type 1 (because there will only be one cell of data returned as defined by the parameters in Excel). In Type of Toolbar, select None. Uncheck the Parameter Modifications box. Click Apply.
7. From the Excel Web Access web part, click the Web Part menu, select Connections, Get Named Items From, and then click the name of the Choice Filter Web Part (Excel Services Choice Filter in this example).
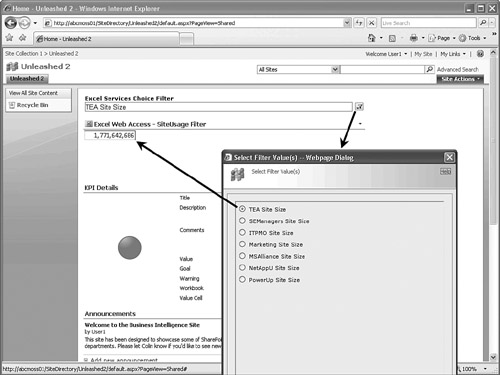
8. Exit edit mode and verify functionality. Figure 22.27 shows the functionality of the filter web part. The icon to the right of the choice filter is clicked, the user selects an option (TEA Site Size in this case), and then the Excel Web Access web part uses this value to display the named value.
Figure 22.27. Using a Choice Filter with an Excel Web Access web part.
Although this might not be the most aesthetically pleasing solution, it shows some of the capabilities of filter web parts in SharePoint 2007. It is worth noting that considerable complexity was involved in this specific example, as the designer would need to be familiar with Excel Services, naming fields in Excel 2007, publishing a suitable data set, using the Choice Filter web part and the Excel Web Access web part, modifying the configuration of the Excel Web Access web part, and then creating a connection between the two web parts. However, after this process becomes familiar to the designer, some impressive results can be generated relatively quickly.
Additional filter web parts include
- Date Filter—Users can pick a date from a drop-down calendar or enter the value into the box displayed on the Web Part page.
- Query String (URL) Filter—Allows filters to be added to a URL when adding a link on a different page and passes a fixed value that is configured in the tool pane.
- Text Filter—Users can be required to enter text and/or provide a default.
- Business Data Catalog Filter—Allows the user to choose one entity from the Business Data Catalog and then specify the Value column.
- SharePoint List Filter—A SharePoint list needs to be pointed to, and then the value of a column is specified, such as Title. Users can browse to the list and then choose from the type of item you specify.
- SQL Server 2005 Analysis Services Filter—A data connection from a web part on the current Web Part page or from a SharePoint Data Connection library or Office Data Connection library is specified. Then specify a dimension and hierarchy, and an item displays on the page for the user.
- Current User Filter—Provides either the current user’s login name or a selected SharePoint profile property.
- Page Field Filter—Provides the value of a column on the list row with which the current page is associated.
The Report Center and Sample Dashboard
The Report Center site provides a sample environment that can be used for Business Intelligence purposes and includes a number of document libraries and lists that facilitate gathering and reporting on critical business information:
- Data Connections library
- Reference library
- Reports library
- Reports calendar
- Sample dashboard and KPI definitions list
- Sample KPIs
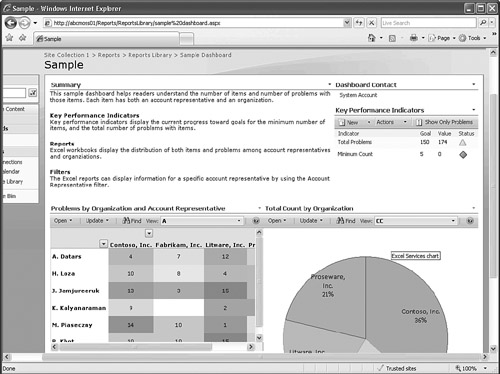
The site also includes a dashboard page (see Figure 22.28) that pulls together many of the elements discussed previously in this chapter. Now that these components have been explained and used in examples in this chapter, the dashboard concept should not be as intimidating. The following web parts are provided in the dashboard page (sample dashboard.aspx):
- Excel Web Access
- KPI List
- Apply Filters (button)
- Related Information—Links related to other page items
- Summary—Information about plans and status
- Contact Details—The name of the person to contact about the page
Figure 22.28. A sample dashboard page in SharePoint 2007.
Summary
This chapter covers the powerful features offered in InfoPath 2007 and provides an overview of the more advanced tools that allow forms designers to create adaptive, error-proof forms that can be connected to a variety of different data sources. SharePoint Forms Server 2007 is briefly covered, to show how it can be configured to support browser-based forms. These forms can be filled out by users who do not have InfoPath 2007 installed on their desktops, making this an extremely powerful product.
Time is then dedicated to components of SharePoint 2007 that allow site designers to create dashboards consisting of web parts such as Excel Web Access web parts, filter web parts, and Key Performance Indicators (KPI). KPIs play an important role in creating dashboards, as the organization needs to set specific values as goal values to know how the company is performing as a whole.
Best Practices
- When InfoPath 2007 is used to create forms and they are saved to a form library in SharePoint 2007, every user must have InfoPath 2007 on their desktop to access these forms or add a new form to the library, unless Forms Server 2007 or SharePoint Server 2007 Enterprise edition is in use and the option to enable web-based forms has been enabled in the Central Administration Application Management tab.
- By allowing fields from an InfoPath 2007 form to be displayed in a form library, content contained in the form is made available for immediate viewing, without requiring users to open the form. This data can be viewed in datasheet mode and exported to a spreadsheet or Access 2007 database for further analysis. It is worth some thought and planning to decide which fields from the form should be made available in columns in the form library and who will be able to see this data.
- InfoPath 2007 features such as Conditional Formatting, Data Validation, and Rules allow the form designer to ensure that values entered in the form meet certain requirements and reduce errors in data entry and create relationships between fields on the form. Review the examples given in this chapter for a better understanding of how these can be used effectively.
- External data sources can be connected to so that a form can display data for selection, data entered into the form can be written to the data source, or a two-way relationship can be created. The data sources supported in InfoPath 2007 are Microsoft Office Access database, Microsoft SQL Server database, web service, document library or list on a server running Windows SharePoint Services 3.0, or an XML file.
- Excel Services and the Excel Web Access web part can play an integral part in making information available to SharePoint 2007 site visitors as part of a Business Intelligence tool set. Because most knowledge workers are very familiar with Excel and use it for reporting currently, it should be a “quick win” to integrate this data in BI websites.
- KPIs also play a crucial role in delivering the right level of information to the right managers and executives in the organization. Review the example given on creating a KPI from an Excel workbook in this chapter to gain insight into their functionality.
- Filter web parts can be relatively complex to configure, but they can deliver impressive functionality without any coding. Review the example provided in this chapter to get a better sense of the steps involved.