
The WIF runtime provides out of the box configurations that can be used to configure claims support in your ASP.NET MVC 3 Web Applications and WCF 4.0 service applications with ease. This recipe explores the configuration sections provided by the Microsoft.IdentityModel assembly. You will also find out how the IClaimsPrincipal and IClaimsIdentity interfaces provided by the WIF runtime allow abstracting the identity information with claims.
You can download the WIF runtime for Windows 7 and Windows 2008 operating systems, from http://www.microsoft.com/download/en/details.aspx?id=17331 and the WIF SDK for .NET Framework 4.0 from http://www.microsoft.com/download/en/details.aspx?displaylang=en&id=4451.
Note
Windows Identity Foundation is now built into .NET Framework 4.5. No additional runtime will be necessary, if you are developing on Windows 8 Developer Preview and .NET Framework 4.5. Also, note that all the features of WIF will be available under the System.IdentityModel.* namespaces in .NET Framework 4.5.
To configure the applications for WIF runtime support, perform the following steps:
- Download and install the WIF runtime and SDK for .NET Framework 4.0.
- Create a new Visual Studio 2010 C# Console Application project. Open Project Properties and change Target framework to .NET Framework 4 from .NET Framework 4 Client Profile, as shown in the following screenshot:

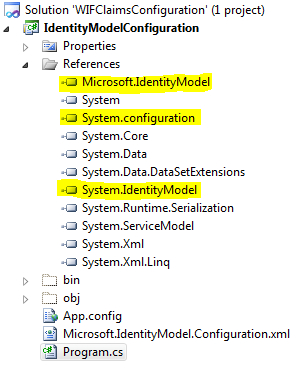
- Add reference to the Microsoft.IdentityModel, System.IdentityModel, and System.Configuration assemblies, as shown in the following screenshot:
- Right-click on the project, and by clicking on Add New Item, add a new XML file to the project. Name it as
Microsoft.IdentityModel.Configuration.xml. - Copy the contents of the file
%Program Files% Windows Identity Foundation SDKv4.0Windows.Identity.Foundation.Config.xml, and paste it in theMicrosoft.IdentityModel.Configuration.xmlfile. - Right-click on the project, and by clicking on Add New Item, add a new application configuration file to the project.
- Create the
Microsoft.IdentityModelconfiguration section in theApp.configfile by referring to the section guidance provided in theMicrosoft.IdentityModel.Configuration.xmlfile:<configSections> <section name="microsoft.identityModel" type="Microsoft.IdentityModel.Configuration. MicrosoftIdentityModelSection, Microsoft.IdentityModel, Version=3.5.0.0, Culture=neutral, PublicKeyToken=31bf3856ad364e35"/> </configSections>
- Copy the
<securityTokenHandlers>section from theMicrosoft.IdentityModel.Configuration.xmlfile, and paste it under the<service>element in the<microsoft.identityModel>configuration section. Update thetypeattribute in the<add>element to specify the fully qualified type:<microsoft.identityModel> <service> <securityTokenHandlers> <add type="Microsoft.IdentityModel.Tokens.Saml11.Saml11Securi tyTokenHandler, Microsoft.IdentityModel, Version=3.5.0.0, Culture=neutral, PublicKeyToken=31bf3856ad364e35"> <samlSecurityTokenRequirement issuerCertificateValidationMode="PeerOrChainTrust" issuerCertificateRevocationMode="Online" issuerCertificateTrustedStoreLocation="LocalMachine" mapToWindows="false" useWindowsTokenService="false"> <nameClaimType value="http://schemas.xmlsoap.org/ws/2005/05 /identity/claims/name"/> <roleClaimType value="schemas.microsoft.com/ws/2006/04/identity/ claims/role"/> </samlSecurityTokenRequirement> </add> </securityTokenHandlers> </service> </microsoft.identityModel>
- Open the
Program.csfile and modify theMainmethod to load the<microsoft.IdentityModel>configuration section from theApp.configfile using theConfigurationManager.OpenExeConfigurationmethod:Configuration appConfig = ConfigurationManager. OpenExeConfiguration(ConfigurationUserLevel.None); var identityModelConfiguration = (MicrosoftIdentityModelSection) appConfig.GetSection("microsoft.identityModel"); string identityConfig = identityModelConfiguration.SectionInformation.GetRawXml();Note
The configuration elements are available under the
Microsoft.IdentityModel.Configurationnamespace. - Create an instance of
IClaimsPrincipalusing the current Windows identity:IClaimsPrincipal claimsPrincipal = WindowsClaimsPrincipal.CreateFromWindowsIdentity (WindowsIdentity.GetCurrent()); IClaimsIdentity claimsIdentity = (IClaimsIdentity) claimsPrincipal.Identity; var nameTypeClaim = claimsIdentity.NameClaimType; if (identityConfig.Contains(nameTypeClaim)) Console.WriteLine("Claim Type {0} supported for identity {1}", claimsIdentity.NameClaimType, claimsIdentity.Name); Console.ReadLine();
The IClaimsIdentity instance is used to fetch the NameClaimType property and check whether its value exists in the SecurityTokenHandler configuration.
The Microsoft.IdentityModel configuration schema available under the SDK installation folder is a useful guide for configuring the claims-based identity using WIF. It provides an elaborate description of each section and its usage with example. The configuration schema will be used throughout the course of this book to configure the WIF runtime features and enable the claims support.
The WIF runtime exposes the IClaimsPrincipal and IClaimsIdentity interfaces inheriting from the native IPrincipal and IIdentity contracts under the System.Security namespace, providing additional methods to retrieve the claims information from the Identity object. In our solution, we use the current Windows identity (WindowsIdentity.GetCurrent() method) to create an instance of IClaimsPrincipal using the WindowsClaimsPrincipal.CreateFromWindowsIdentity method. The claims associated with the identity are then extracted and the NameClaimType property value is compared with the supported claim type specified under the SecurityTokenHandler configuration.
The complete source code for this recipe can be found in the Chapter 2Recipe 1 folder. You can also download a set of cool NuGet Packages for WIF from http://www.nuget.org/Packages. A couple of them worth mentioning are the Claims Diagnostics package, which provides the ability to inspect the claims, and the Security Token Request Validator package, which is used to prevent a request validation error in ASP.NET when claims-based tokens are assigned to the requestor using the HTTP commands.