Chapter 5
Get to Work: Creating Your First Application
In the chapters so far, we've covered a multitude of topics, including an introduction to the iOS, the iOS SDK, the different devices available, and how to use development tools such as Xcode and MonoDevelop to create your initial application. But it's going to take more than a Hello, World application to satisfy your users.
Now we will begin to build on the knowledge you've gained so far and create a compelling application that is more feature-rich and functional. We will delve into the details of objects contained within the frameworks you've read about in previous chapters and how to use those objects. You'll also learn how to structure your application within Xcode to better support the build, debug, and deploy phases of your project, along with a more detailed look at the simulator for predeployment testing.
To demonstrate all of these features and capabilities, we will create a copy of the simple Lunar Lander app, using a similar style of graphics and physics that made it famous in the 1980s. We'll start the app in this chapter and continue to enhance it throughout this book.
To get started, we will cover the following topics in this chapter:
- Designing your application, considering the key issues to address before you start to build it
- Setting up your project and its structure in Xcode, including the settings that are most relevant in building and debugging your application
- Understanding the options for presenting the user interface to the user, including how to render simple graphics with collision detection
- Exploring the different methods for navigating the features of your application, such as difficulty level and high scores
- Interacting with the outside world, both through the Internet and through interactions from the user
- Exploring the iPhone simulator to test your application
As we work through the construction of the application, I'll continue to highlight the features found in the .NET Framework for comparison. I'll also point out common “gotchas” and how to avoid them.
The App Planning and Design Process
In the previous chapters, we looked at a few factors to consider before designing your application. For example, we compared the features of each device, which you need to consider when deciding which is best suited to your application. You need to understand some of the key differences that will need to be accommodated in your application. Such considerations are important, but there are also many more aspects you should think about before you start to write code.
In most professional organizations, the process of building an application usually starts with the requirements capture stage. This involves collecting the requirements of the users, or in the case of an undetermined audience, the features of your application. These are then prioritized, enabling you to drop those features you consider to be less important if time runs out.
The nonfunctional requirements are equally important as the functional requirements. An example of a nonfunctional requirement is how fast certain actions are expected to perform, or how much data you want your application to be able to handle. The actual devices you wish to target are also noted at this point, along with the features of the devices you wish to use.
Once you've captured and documented the requirements, the next phase is to start the design process. This involves defining how the core structure of your application will look—which aspects you will write in your own bespoke code, and which frameworks you will integrate together to achieve the desired functionality. This is known as the application's architecture.
The application's architecture is like the foundation and frame of your house. It provides the necessary structure, and from there, you can create your rooms and install the wiring, water, and heating. An application is no different.
You then build up the architecture with detailed implementation of your application's functionality using code. The end result is a working application that realizes the requirements you defined—much like your house, built with the features you expected.
Capturing the requirements for your application and designing the structure of your application will provide valuable guidance for when you write code, and will ensure that your application is more flexible and robust. You won't need to keep bolting bits of code on to accommodate features you had not considered earlier. So, while it's not mandatory, following a pragmatic version of the planning and design process, as described here, is considered good practice.
Apple iOS Design Resources
The process of designing your application relies heavily on your own imagination and brainpower—that's part of the fun. However, if you're confused when it comes to understanding how to best design your user interface or use the frameworks provided in the way in which they were intended, you are not alone!
The iOS operating system exposes the core features of the devices on which it runs. Therefore, understanding the characteristics of the device and knowing how Apple intended it to be used are important. Apple has also spent a lot of time creating and tailoring user-interface elements to particular tasks, exploiting the touch and gesture user interface.
For example, date and time entry are achieved by using the Date and Time Picker control, for which a more generic Picker control is available. This allows you to spin the wheel (or wheels) of the picker until the value you want is displayed. In the case of the date, the day, then the month, then the year appear. This is a good example of a control that has been specifically developed to suit the touch and swipe gestures of the device.
This really isn't that different to the principles adopted by Microsoft when it created the Windows SDK, and the existence of different user-interface controls as part of the .NET framework. Initially, these controls were suited to the mouse and keyboard as input, and then extended to cope with the introduction of tablet devices, such as the electronic-ink (e-ink) concept. And with the introduction of Windows Mobile 7, the process continues.
Apple provides a number of helpful guides at http://developer.apple.com. For user interface design, the main resource is the iOS Human Interface Guidelines. Its guidance includes the following:
- User-Interface guidelines: For example, a focus on building applications where the emphasis is on user experience and user collaboration
- Usage guidelines on iOS user-interface controls: A breakdown of the different user-interface controls, in which scenarios they are best used, and how to use them.
iOS Human Interface Guidelines does cover many more topics. I recommend you familiarize yourself with this guide. Also, take the time to browse the site and its associated content.
Other Design Resources
Many resources on the Internet provide example applications—some simple and some very complex. A particular favorite of mine is the source code and narrative of the journey taken to port the Doom game to the iPhone, available at http://www.idsoftware.com/doom-classic/. (Using something as complex as that as our example application would be fun, but unfortunately, impossible. I hope Lunar Lander is the next best thing.)
The following are some other useful resources you may wish to reference:
- Objective-C for Absolute Beginners (ISBN 978-1-4302-2832-5) is a great book that takes you through the details of Objective-C. It serves as a useful reference as you familiarize yourself with the language.
- Pttrns.com (
http://pttrns.com/) is a useful resource for demonstrating user-interface patterns—not in a programmatic sense, but in a visual sense. It's a useful resource for giving you visualization ideas. - Pro Objective-C Design Patterns for iOS (ISBN 978-14302-3330-5) provides design patterns to help you implement some of the more complex designs that you may want to use in your applications (it's more on the advanced side).
- Many resource management tools are available, some of them open source. If you're dealing with a large number of requirements for your application, you may find these tools useful. An example is available at
http://sourceforge.net/projects/osrmt/.
Planning and Designing the Lunar Lander Application
So, let's practice what we preach. We will follow the phases of the design process described in the previous section. First, we'll capture and document the requirements, and then we'll design the application.
Requirements Specification
The requirements specification defines the scope of the application and provides the details on which the design is based. It is also usual to classify your requirements in terms of priority, allowing you to make the hard decisions should you run out of time. A common mechanism for doing this is to use what is known as the MOSCOW notation, for those requirements you Must have, Should have, Could have, and Would like to have. This is a simple but effective approach.
Table 5-1 shows a summary of requirements specification for our Lunar Lander game.
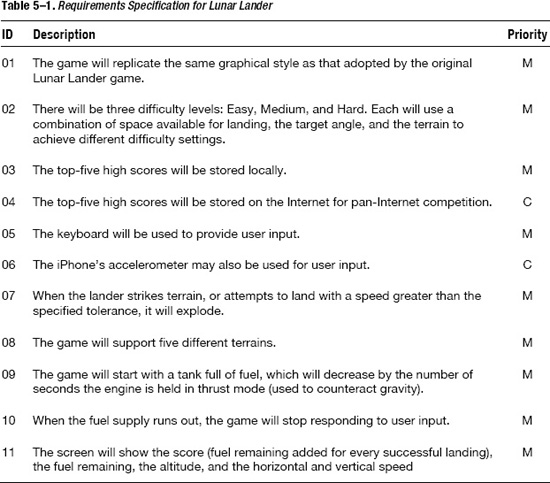
Clearly, the requirements could be elaborated to provide further details, but for brevity, I've reduced the specification to the key requirements and associated data. This is enough information to allow us to create the game, which is the focus of this chapter.
Lunar Lander Application Design
Once you've decided the type of application you're developing, and what attributes make the most sense, you are ready consider some of the details. For example, a productivity tool (such as acalculator), a game (graphical), and a messaging (textual) app will all need a different look and feel.
User Interfaces
The application will present two distinct user interfaces:
- Main menu: This will be the default screen when the application is launched, and will provide a menu from which settings such as difficulty can be chosen. Also, the game can be started through this menu system. It will show the high scores in the middle of the screen and present a graphical picture of the lunar lander cabinet as a backdrop.
- Game view: This is the main view for the game, supported by its own controller. On this screen, the terrain will be drawn and the lander will be displayed, along with the game, statistics such as score and fuel remaining, and so on.
Game States
The game can be in one of the following five states, each of which responds to user input as relevant to its state:
- Menu: At the main menu, waiting for the user to quit, select a difficulty level, or start a new game.
- Running: The game has started and is responding to any user input.
- Paused: The game has either been paused or suspended and is waiting for the user to signal a restart.
- Crashed: The game has been running but the user has crashed. A new game can be started from this menu.
- Won: The game has been running and the user has successfully landed the lander. The next level is ready to commence when the user presses a key.
Other Game Design Elements
Other elements included in the game design are as follows:
- The game will use a simple timer to manage the on-screen graphic updates. However, this could be changed later to use multiple threads, which would provide for smoother game play.
- The Lunar Lander graphic will have three core states: flying with no thrust, flying with thrust, and crashed. The rotation is managed by using the iOS's graphic API.
- The terrain is predefined as a series of points, drawn at runtime using simple line graphics.
- On-screen toolbar buttons will initially be used as user input. The left and right arrow keys rotate the lunar lander ship, and the up arrow key signals thrust. This could be changed to use the touch and gesture interface, topics that are explored in Chapter 10.
Building the Lunar Lander Application
With the requirements and design phases complete, we're ready to dive in and build the Lunar Lander game.
The Lunar Lander application will be written initially as an iOS application that targets the iPhone device. We'll talk about how you would change this to suit other devices using the iOS orientation features in Chapter 7.
We'll use the iOS View-based Application project template, allowing it to create the initial view and view controller for the main menu. We'll then create a separate view and associated view controller to manage the game's view. This will provide a head start and also build on the earlier examples we've already covered.
We'll also include other resources within the project, such as graphical images for the lunar lander image. So, let's get started.
Creating the Application Project
You know the drill: Choose a location on your disk for the project and fire up Xcode. Create a project using the View-based Application project template. I named the project LunarLander. Create the following files:
LunarLanderAppDelegate(.hand.mfiles)LunarLanderViewController(.h,.m, and.xibfiles)MainWindow.xib(which will use theLundarLanderViewController.xibview)
These will provide our single application delegate, which will launch the view controller that will use the LunarLanderViewController.xib as the view for the game's main menu. Your project structure should look like that shown in Figure 5–1.
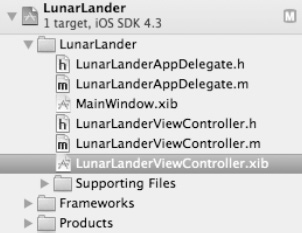
Figure 5–1. Initial LunarLander project files
Before we go any further, let's add the main game view—again, a view controller and a view. To do this, choose File ![]()
New (or use the ⌘N shortcut), and from the Cocoa Touch iOS templates, choose a UIViewController subclass. On the next few screens presented, ensure it subclasses the UIViewController class and is given the name GameViewController. Also remember to check the “With XIB for user interface” option. We'll use a NIB file to handle the game's main user interface—at least the view canvas and static items. After doing this, your folder structure should resemble that shown in Figure 5–2.
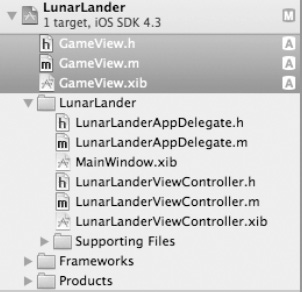
Figure 5–2. LunarLander project with GameView class
These files will provide a sufficient foundation to start the core mechanics of our Lunar Lander application. Before we add any more files, let's work with these initial files to start our game's implementation. We'll begin with the main menu view and some elements of our foundation architecture. Other resources will be added to the project as required, and we'll extend the application's logic as specific topics are introduced later in the book.
Building the User Interface and Flow Logic
The user interface uses the initial window, with a simple button that starts the game. We could also use this screen to display the high score and decorate it with pretty graphics. The main Lunar Lander view controller and XIB file will be used to manage this view. When the Start Game button is selected, it will load and display modally the game view with its own controller. This initial game screen is shown in Figure 5–3, with the Start Game button already added.
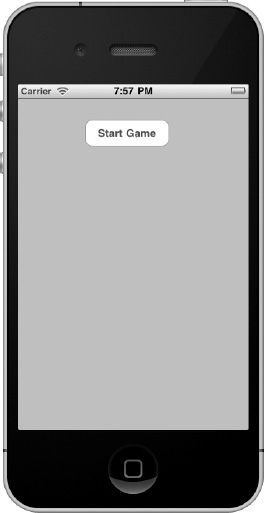
Figure 5–3. Initial Start Game screen
Our application delegate will be used to load this screen. As shown in Listing 5-1, in the header file, we declare two properties(highlighted in bold): one of type Window and the other a pointer to the LunarLanderViewController class instance. We'll use these in the application delegate code to display the window.
Listing 5-1. LunarLanderAppDelegate.h
#import <UIKit/UIKit.h>


@class LunarLanderViewController;


@interface LunarLanderAppDelegate : NSObject <UIApplicationDelegate> {


}


@property (nonatomic, retain) IBOutlet UIWindow *window;

@property (nonatomic, retain) IBOutlet LunarLanderViewController *viewController;


@end
And then we provide a supporting implementation file, in the form of LunarLanderAppDelegate.m, as shown in Listing 5-2 (relevant code in bold). Here, you'll notice we synthesize the properties, and in the dealloc() method, we free the member these resources are occupying.
Listing 5-2. LunarLanderAppDelegate.m
#import "LunarLanderAppDelegate.h"


#import "LunarLanderViewController.h"


@implementation LunarLanderAppDelegate


@synthesize window=_window;

@synthesize viewController=_viewController;


- (BOOL)application:(UIApplication *)application didFinishLaunchingWithOptions:

(NSDictionary *)launchOptions

{

    // Override point for customization after application launch.

    self.window.rootViewController = self.viewController;

    [self.window makeKeyAndVisible];

    return YES;

}


….. default implementation code goes here and is unmodified


- (void)dealloc

{

    [_window release];

    [_viewController release];

    [super dealloc];

}


@end
The interesting part is in the didFinishLaunchingWithOptions() method, where we set the rootViewController instance variable of the main window to be that of our Start Game view controller (that is, the LunarLanderViewController class), and this is then made visible as per the default implementation.
Although we start with this initial screen, it is the game view that will be used to manage the actual game playing. This very simple flow is shown in the diagram in Figure 5–4.
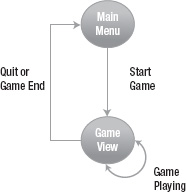
Figure 5–4. Game state flow
So, the LunarLanderViewController.xib file that we created earlier will have a simple user interface like that shown in Figure 5–3. This screen has nothing other than a view (of type UIView) and a button (of type UIButton), with the text of the button saying “Start Game.” In .NET, this would be exactly the same as creating a form using Windows.Forms and placing a button on the screen.
We will also need to attach an action for the button click to display and start the game. This is no different from how we started our simple actions in the previous chapters.
Let's now look at hooking up the Start Game button to an action that is meaningful—that is, loading our main game view so that you can provide a location for the actual game mechanics. First, take a look at Listing 5-3, which is the header file for the view controller that handles the start game interaction.
Listing 5-3. LunarLanderViewController.h
#import <UIKit/UIKit.h>


// Inform the compiler that our GameViewController reference is to a class

@class GameViewController;


// Define the main class, or interface as it's known in Objective-C, inheriting from

UIViewController

@interface LunarLanderViewController : UIViewController {


    @private GameViewController *pgameViewController;

}


// Property we'll use to refer to our ViewController

@property (nonatomic, retain) GameViewController *gameViewController;


// Event we'll use to attach to the Start Game button for the user to commence game play

-(IBAction)startGame:(id)sender;


@end
The implementation is held in LunarLanderViewController.m, as shown in Listing 5-4.
Listing 5-4. LunarLanderViewController.m
#import "LunarLanderViewController.h"

#import "GameView.h"

#import "LunarLanderAppDelegate.h"


@implementation LunarLanderViewController


// Synthesize our GameViewController pointer to the internally held variable

@synthesize gameViewController = pgameViewController;


- (void)dealloc

{

    // Release the custom controller

    [self.gameViewController release];


    // Call inherited

    [super dealloc];

}


- (void)didReceiveMemoryWarning

{

    // Release the view if it doesn't have a superview.

    [super didReceiveMemoryWarning];


    // Release any cached data, images, etc. that aren't in use.

}


#pragma mark - View lifecycle


// Implement viewDidLoad to do additional setup after loading the view, typically from

a nib.

- (void)viewDidLoad

{

    [super viewDidLoad];

}


- (void)viewDidUnload

{

    [super viewDidUnload];

    // Release any retained subviews of the main view.

    // e.g. self.myOutlet = nil;

}


- (BOOL)shouldAutorotateToInterfaceOrientation:(UIInterfaceOrientation)

interfaceOrientation

{

    // Return YES for supported orientations

    return (interfaceOrientation == UIInterfaceOrientationPortrait);

}

-(void)startGame:(id)sender{

    // Do Something


    self.gameViewController = [[GameViewController alloc] initWithNibName:@"GameView"

bundle:nil];

    [self presentModalViewController:self.gameViewController animated:YES];


}

@end
In summary, we will have achieved the following parts of our game's functionality:
- Created a
GameViewControllerproperty and managed its memory - Wrote an event handler for the Start Game button click that loads and displays modally the game view interface
These essentially allow the main game screen to be displayed. To that screen, we'll attach the menu and display the high score. We will react to the Start Game button click by displaying and starting the game.
So, creating the property uses the same method as described in previous chapters. However, here we are specific about assigning the property to the class member variable, allowing us to use different names for each.
Let's start at the beginning, in the header file:
@class GameViewController;
This tells the compiler that GameViewController is a class, and it means we don't need to include the full class declaration at this point. We just need to inform the compiler that it is a class. The semantics of the messages and attributes it supports will be provided at runtime by the iOS framework.
Next, we define our internal class member variables with the following line:
@private GameViewController *pgameViewController;
Most of this is similar to previous examples, but notice the @private declaration. This is a visibility modifier, and it defines the visibility (or scope) of the member variable. A number of options are available for specifying the visibility of the variables, which you place after the declaration. Also available are @public and @protected, which behave the same as the .NET equivalents with the same names and syntax (preceding the variable), but without the @ symbol.
Having a property allows us to control elements of that variable, such as its ability to be retained in memory until we decide it's no longer required. But we do need to remember to release it. In the dealloc() method, we release our gameViewController variable and its associated memory by sending it the release message. Also note that we call the inherited dealloc() method with the [super dealloc] call. This is known as passing the call along the chain, and using it is called being a good citizen. This behavior is provided for within the default implementation of methods created by Xcode. You can see all of this happening in the following code:
- (void)dealloc

{

    // Release the custom controller

    [self.gameViewController release];


    // Call inherited

    [super dealloc];

}
We need to react to the Start Button being pressed. So, if you have not already added the Start Game button, do that now.
Within the XIB file, you need to ensure the Start Game button's Start Touch Down event is hooked up to the startGame event property we created in code. You can do this using the drag-and-drop feature within the Connections Inspector. With the LunarLanderViewController.xib file open and the view visible (you'll see the Start Game button), you need to show the Connections Inspector to see the outlets available. From there, simply drag the StartGameIBAction (rember our definition in code) onto the Start Game button. This will wire it to the button's Start Touch Down event, which will fire when we first click the button.
The definition for the IBAction required to be visible on the Outlets page within the Interface Builder is as follows:
-(IBAction)startGame:(id)sender;
The (IBAction) declaration is key to telling Xcode 4's Interface Builder it's an action available for wiring up to an event.
Finally, we need to provide an implementation for the event, which, in our case, will load and display the GameView interface and its associated controller. This will manage the game-play mechanics for our Lunar Lander game. Here is the code:
-(void)startGame:(id)sender{

    // Set up our gameViewController pointer to our loaded GameView class

    self.gameViewController = [[GameViewController alloc] initWithNibName:@"GameView"

 bundle:nil];

    // and display it modally.

    [self presentModalViewController:self.gameViewController animated:YES];

}
Our first line allocates the memory for our GameViewController class [GameViewControlleralloc], and then we embed this within a message call to the initWithNibName method, passing the name of our XIB file. Finally, we display the window by sending the message presentModalViewController with a pointer to the view controller—in this case, gameViewController.
The syntax of this code will be more familiar to C++ developers than to .NET developers; the allocation of the GameView class is the same as calling new in C#. Indeed, the following syntax is also valid in Objective-C: [GameViewController new]. Once the class has been created, invoke the ShowDialog() method in .NET, using code similar to the following—this is the equivalent to the preceding objective-c code:
// C# Form creation and display using Windows Forms

Form MyForm = new MyForm;

MyForm.ShowDialog();
After implementing the event, go ahead and build the executable and start your application. It will display the main window with the Start Game button. If you select this button, a blank game window will be displayed. To help me make sure it was being displayed properly, I added a simple label to the game window user interface.
Implementing Navigation in Your Application
So we've built our application to display two simple forms, with a button click linking the two. But the game isn't much use if once you've completed it, you cannot get back to the main menu to start again or exit. So, we need to continue building our game screen implementation to provide a mechanism for returning to the main menu or the parent window.
We'll start by building on our existing game interface screen. We'll add a toolbar to conveniently allow us to place buttons on it. We'll also add some on-screen labels, which we'll use to display status information.
Go ahead and add the Toolbar, Button, and Label controls to create the interface shown in Figure 5–5. Use the standard features of Xcode 4's Interface Builder, as you've done in previous examples. Any code surrounding these items is automatically generated.
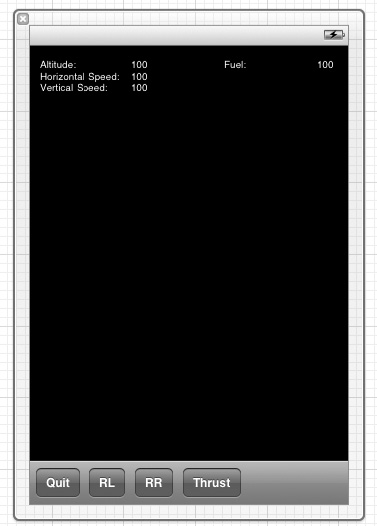
Figure 5–5. Game interface screen
We will improve this screen, but for the moment. It serves its purpose: to provide a Quit button that will return us to the main menu. To do this, we'll use techniques similar to those we've employed previously.
We need an IBAction property, which is used to provide the event property that is fired when selected. Also, we need to hook up the action on the Connections Inspector tab as before and provide the following event implementation code:
-(void)quitGame:(id)sender

{

    // No longer require the game window, go back to parent

    [ self dismissModalViewControllerAnimated:YES ];

}
This code will do the reverse of what the code that initially displayed the GameView view as a dialog box did. It will send the dismissModalViewControllerAnimated message to the view. This will cause the window to be unloaded and focus returned to the parent view from which it was launched—in our case, LunarLanderViewController. In .NET, this would be the same as calling the Close() method on the form, although no animation would be performed on the closing window, as is the case with the iOS SDK.
We won't do anything with the other buttons yet. (They will be used to test our game's physics before we look at more advanced user-interaction mechanisms in later chapters.) The labels are placeholders for the moment, and while we won't update their values yet, they start to make the game take shape.
Building the Core Game Engine and Enabling User Interaction
So far, we've displayed our initial game screen with the button that will start our game. Now we need to create the main game's mechanics. Next, we'll add to our application's functionality by starting to implement the core game engine. We will build on the GameView class, and explore some further iOS and Objective-C concepts in the process.
Examining the Game View Header
The GameView XIB files and the associated GameViewController class provide the implementation of our core game engine. First, consider the GameView.h file shown in Listing 5-5. I'll highlight the key segments of the code before we look at the code (a complete explanation follows the listing). In the header file, we do the following:
- Define our class with an
NSTimerclass member to provide a timer. - Declare a number of methods that we will use to respond to on-screen button presses, namely Quit, Rotate Left, Rotate Right, and Thrust.
- Declare a method that our timer will execute at the desired frequency.
- Define a number of enumerated types to hold state, and a number of constants, which will be used within the game's physics.
- Declare our
GameViewthat will hold three images to map onto the state of our thruster: Thrust, No-Thrust, and Crashed. - Declare instance variables that represent state or instance variables, for which we will use our already definedenumerated types and constants.
- Declare a property to hold our lunar lander image and
IBActions for each of the buttons so that we can wire them up to the methods that provide the implementation.
Phew. Now take a look at the code and see if you can spot all of these features in Listing 5-5.
Listing 5-5. GameView.h
#import <UIKit/UIKit.h>


// GameView class manages the game's view controller

//

@interface GameViewController : UIViewController {


    NSTimer *gameLoop;  // Core game timer

}


// Declare class events for our view controller

- (void)timerLoop:(NSTimer *)timeObj;   // Timer event loop

-(IBAction)quitGame:(id)sender;

-(IBAction)rotateLeft:(id)sender;

-(IBAction)rotateRight:(id)sender;

-(IBAction)thrust:(id)sender;


@end


// Declaration of some enumerated types to avoid lots of messy constant definitions

typedef enum { NOTREADY, READY, RUNNING, WON, LOST, PAUSED } GameState;

typedef enum { EASY, MEDIUM, HARD } GameDifficulty;

typedef enum { THRUSTERS_ON, THRUSTERS_OFF } ThrusterState;


// Declaration of other constants used to manage the physics

static const int FUEL_INITIAL = 200;

static const int FUEL_MAX = 200;

static const int FUEL_BURN = 10;

static const int MAX_INIT = 30;

static const int MAX_SPEED = 120;

static const int ACCELERATION_DOWN = 35;

static const int ACCELERATION_UP = 80;

static const double GRAVITY = 9.8;


// GameView class manages the main game

//

@interface GameView : UIView {


    // Images to hold the lander state

    @private UIImage            *plander_thrust;

    @private UIImage            *plander_nothrust;

    @private UIImage            *plander_crashed;


    // Other game member variables

    @private GameState          gstate;

    @private GameDifficulty     level;

    @private ThrusterState      thrusters;

    @private int                fuel;

    @private int                speed_x;

    @private int                speed_y;

    @private double             rotation;


    // Define our lander's X and Y on-screen coordinates

    @private int loc_x;

    @private int loc_y;

}


// Declare our member properties

@property (nonatomic, retain) UIImage *lander_nothrust;


// Declare our class methods

- (void) newGame;

- (void) updateLander;

- (void) rotateLeft:(id)sender;

- (void) rotateRight:(id)sender;

- (void) thrustEngine:(id)sender;


@end
Did you spot them all? If not, don't worry. We'll walk through the important parts of the implementation.
The game will support a number of states. These will be used to invoke functionality that is appropriate for its state. For example, when the game is running, we'll update the screen with the on-screen graphics. However, if the game has yet to start or a recent game has just finished, there will be no need to constantly update the screen. We will also use a timer to drive the core game, update the game physics, and invoke the code necessary to update the on-screen graphics and detect user interactions.
A more detailed view of the game's engine flow is shown in Figure 5–6.
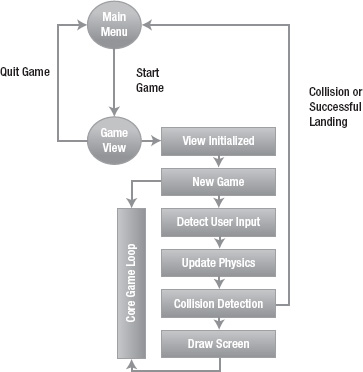
Figure 5–6. Following the core game engine flow
You can see from the flow that once the GameView is initialized, we will initialize the game settings, such as loading graphics and setting default values. Then we proceed to detect user input, update the game's physics, and check collision detection, which may indicate a successful landing or a crash.
At this point, we'll force the screen to be repainted. But this screen painting actually happens automatically by linking such updates to a timer, which will fire every one-quarter second. If the game isn't in the correct state—it's yet to start or you have crashed and it's waiting for you to reset the game—then the screen will not be updated.
As with most designs, we could improve on this application, and we'll do this as the book progresses. For now, our current design is sufficient to introduce some key topics.
Examining the Game View Implementation
Before we start to discuss some of the header code's implementation, let's look at the main source code file, which defines the header's implementation, as shown in Listing 5-6. As before, I'll introduce the key tenets of the code's implementation, and then provide a more detailed explanation following it. In the GameView implementation, we achieve the following through bespoke code:
- Provide an implementation for our timer, which will update the lander's position using the
UpdateLander()method and set the screen to be dirty to force it to be redrawn. - Provide a
QuitGame()implementation that dismisses the modal dialog box, taking us back to the Start Game screen that presented it. - Provide implementations for
RotateLeft(),RotateRight(), andThrust()button clicks, which simply call methods of the same name within the core game engine. - Provide code for the initialization of the class—in our case, display the lander after having first loaded the image.
- Provide a default implementation for
NewGame(), which resets our game variables. - Provide a placeholder for the
UpdateLander()method, which is where we would apply the games physics in response to the time spent firing and keys being pressed. - Provide empty methods for the
RotateLeft(),RotateRight(), andThrust()methods, which will implement the game mechanics.
Again, see if you can spot all of these features in Listing 5-6.
Listing 5-6. GameView.m
#import "GameView.h"


@implementation GameViewController


- (id)initWithNibName:(NSString *)nibNameOrNil bundle:(NSBundle *)nibBundleOrNil

{

    self = [super initWithNibName:nibNameOrNil bundle:nibBundleOrNil];

    if (self) {

        // Custom initialization

    }


    return self;

}


- (void)dealloc

{

    [super dealloc];

}


- (void)didReceiveMemoryWarning

{

    // Release the view if it doesn't have a superview.

    [super didReceiveMemoryWarning];


    // Release any cached data, images, etc. that aren't in use.

}


#pragma mark - View lifecycle


- (void)viewDidLoad

{

    // Create an instance of the timer every (0.025) 1/4 of a second, to fire the

 'timerLoop' function

    gameLoop = [NSTimer scheduledTimerWithTimeInterval: 0.025 target:self selector:

@selector(timerLoop:) userInfo:nil repeats:YES];


    [super viewDidLoad];

    // Do any additional setup after loading the view from its nib.

}


- (void)viewDidUnload

{

    [super viewDidUnload];

    // Release any retained subviews of the main view.

    // e.g., self.myOutlet = nil;

}


- (BOOL)shouldAutorotateToInterfaceOrientation:(UIInterfaceOrientation)

interfaceOrientation

{

    // Return YES for supported orientations

    return (interfaceOrientation == UIInterfaceOrientationPortrait);

}


// timerLoop - main Timer event function

-(void)timerLoop:(NSTimer *)timerObj

{

    // Update the lander's position

    [(GameView *)self.view updateLander];


    // Redisplay the whole view

    [self.view setNeedsDisplay];


}


// User has indicated that want to fire the thruster engines; pass this onto the game

//

-(void)quitGame:(id)sender

{

    // No longer require the game window, go back to parent

    [self dismissModalViewControllerAnimated:YES];

}


// User has indicated that want to fire the thruster engines; pass this onto the game

//

-(void)rotateLeft:(id)sender

{

    [(GameView *)self.view rotateLeft:sender];

}


// User has indicated that want to fire the thruster engines; pass this onto the game

//

-(void)rotateRight:(id)sender

{

    [(GameView *)self.view rotateRight:sender];

}


// User has indicated that want to fire the thruster engines; pass this onto the game

//

-(void)thrust:(id)sender

{

    [(GameView *)self.view thrustEngine:sender];

}


@end


@implementation GameView


@synthesize lander_nothrust = plander_nothrust;


// initWithCode - called when we programmatically initialize our XIB resource

//

- (id) initWithCoder:(NSCoder *)aDecoder

{

    if (self == [super initWithCoder:aDecoder]) {


        // Initialize the sprites

        //

        NSString *imagePath = [[ NSBundle mainBundle] pathForResource:@"lander"

ofType:@"tiff"];

        self.lander_nothrust = [UIImage new];

        self.lander_nothrust = [UIImage imageWithContentsOfFile:imagePath];


        // Set initial game state

        [self newGame];


    }

    return self;

}


-(void)dealloc

{

//    [self.lander_nothrust release];

    [super dealloc];

}


// newGame - Initializes a new game

//

-(void) newGame

{

    gstate = READY;

    level = EASY;

    thrusters = THRUSTERS_OFF;

    fuel = FUEL_INITIAL;

    loc_x = self.frame.size.width / 2;

    loc_y = self.frame.size.height / 2;


    // Set the game as RUNNING

    gstate = RUNNING;

}


// updateLander - Updates the lander positionstate based on gravity and any user input

- (void) updateLander

{

    // *TODO

}


// drawRect - Redraw the screen

-(void)drawRect:(CGRect)rect

{

    // Only draw when we're ready to draw

    if (gstate != RUNNING)

        return;


    [self.lander_nothrust drawAtPoint:CGPointMake(loc_x, loc_y)];

    self.backgroundColor = [UIColor redColor];

}


// rotateLeft - rotate the lander left

- (void)rotateLeft:(id)sender

{

    // Do Something

}


// rotateRight - rotate the lander right

- (void)rotateRight:(id)sender

{

    // Do Something

}


// thrustEngine - fire the thruster on the engine

- (void)thrustEngine:(id)sender

{

    // Do Something

}


@end
Using a Timer to Invoke Key Core Events
The first thing to notice in Listing 5-6 is that as part of the ViewController class, we defined a timer that will implement our game's core loop. Our timer uses the iOS NSTimer class, which is similar in functionality to the System.Threading.Timer class in the .NET Framework. The full definition is as follows:
NSTimer *gameLoop; // Core game timer
In the GameView class, we won't need the time initialized until the view is loaded. Remember that our GameView class encapsulates the essence of the game. While we could initialize it in other places, the viewDidLoad event is as good as any other. as it's executed after the view successfully loads (as its name suggests). Our implementation of this is as follows:
- (void)viewDidLoad

{

    // Create an instance of the timer every (0.025) 1/4 of a second, to fire the

 'timerLoop' function

    gameLoop = [NSTimer scheduledTimerWithTimeInterval: 0.025 target:self selector:

@selector(timerLoop:) userInfo:nil repeats:YES];


    [super viewDidLoad];

    // Do any additional setup after loading the view from its nib.

}
Examining the code further, you can see that we use the scheduledTimerWithTimeInterval method. We pass it the interval at which the timer is fired (in seconds, and you can use fractions), the target for the callback, and the callback method we'll use to host the bespoke code we'll execute every time the event is fired. The remaining parameters allow bespoke information to be passed in the form of userInfo and specify whether the timer event repeats or is a one-off. In our case, we won't pass custom information and the time is repeating.
You'll notice that for the callback method, we use the selector parameter and the @selector notation, passing the name of our method. It returns an object type of SEL, expected by the method for the callback. In .NET, delegates are used to provide type-safe function pointers, equivalent to our functionality here.
The end result after being successfully initialized is that the gameLoop member variable now points to an instance of an NSTimer, which when fired at the prescribed interval, will call our timerLoop class method in the ViewController class. Let's take a quick look at the implementation of this method, which is pretty straightforward.
// timerLoop - main Timer event function

-(void)timerLoop:(NSTimer *)timerObj

{

    // Update the lander's position

    [(GameView *)self.view updateLander];


    // Redisplay the whole view

    [self.view setNeedsDisplay];


}
In our game engine's main loop, whose implementation is encapsulated within the timerLoop method, we do a number of things. First, we call a method that handles the game's physics and recognizes user interaction detected by further events being called. This method will simulate the effects of gravity, fire the engines if you're telling it to, and rotate the craft as you dictate. It will also decrease the fuel being used and look for either a collision or a successful landing.
You'll notice that the method to handle all of this magic is called updateLander, but because self in this instance points to a UIView (look at your XIB file), we're going to cast it into the GameView class of which we know it's an instance. In order for the cast to work, with the GameView view open in Xcode's Interface Builder, ensure that in the Identity Inspector, the Custom Class class name is set to GameView. We can then do the cast, because the UIView class is used in the Interface Builder to define the view. In our code, we extend the functionality of this class and call it GameView. If you reexamine GameView.h, you'll see code like the following, so we know it's safe for us to perform such a type cast:
@interface GameView : UIView {

// Implementation goes here

}

@end
The notation in .NET depends on the language. But using C# as a comparator, the syntax is similar, using the colon and then the parent class to denote class inheritance. So, use a cast (GameView *) to type cast the view property of our view controller, this then allows us to refer to the defined updateLander() method.
The final point to note, and not really related to timers per se, is that once we've updated the game's physics, we will need to update the display to reflect the change in the lander's position or state. To do this, we use the setNeedsDisplay method and pass this message to the view object—in this case, our GameView object. This will force a refresh of the display (the whole display), during which we will do updates such as redrawing the lander.
Self-Documenting Code
Before we continue with the GameView class's implementation, I want to touch on the concept of self-documenting code. The principle behind this term is that your code should be self-explanatory through its implementation. A good example is the use of well-named variables and methods, employing the camelCase convention we discussed earlier in the book. Another concept is that while you can hard-code values into your code, they won't necessarily mean anything to the person who picks up the code for debugging or to extend it. To improve readability, where possible, avoid the use of hard-coded literal values by replacing them with a constant or an enumerated type.
Using Constants
An example is the best way to demonstrate the use of constants. Imagine we're setting our initial fuel tank value to its full capacity, which is actually 200 liters. We could do this by assigning the literal value of 200 to our variable, like this:
int fuel = 200;
Or, we could define a constant, like this:
static const int FUEL_INITIAL = 200;
And then use this constant to assign a value to our variable, like so:
int fuel = FUEL_INITIAL;
Notice that while it takes an extra line to define the constant, it makes our code more readable without the use of comments. Also, if we need to reset the value to use this same value within the same context, we can simple use the constant again. The syntax for C# is exactly the same.
Using Enumerated Types
Another coding method, similar but subtly different from using a constant, is to use an enumerated type. This not only provides predefined literal values with a more meaningful name, but it also supplies an object type that can only be a value in the set of values defined. This ensures your code is more reliable and robust by keeping it type-safe.
Again, let's use an example. Consider the requirement that our game can be in six different states: Not Ready, Ready, Running, Won, Lost, and Paused. We could use literal values, or even define six different constants. But, highlighting the value of type safety, if we used numbers stored in an int, as is the case with constants, nothing would stop us from setting it to a value that was an invalid state, thus causing an error. So, rather than that, we'll use an enumerated type:
typedef enum { NOTREADY, READY, RUNNING, WON, LOST, PAUSED } GameState;
When placed in the header file (not within a class definition), this will define a new type (hence the typedef command) of enumerated values (hence the enum syntax) with valid values of NOTREADY, READY, RUNNING, WON, LOST, and PAUSED. The incremental order of the set values means that NOTREADY will automatically be assigned a value of 0 (zero), with PAUSED holding a value of 5. This is then given a tagname of GameState, meaning we can use this to refer to the type.
So, after defining our enumerated type, we can create objects of that type that can only hold values defined in the set we've defined—that is, valid states. Here's an example:
GameState state = NOTREADY;
You'll notice that within our application, we use both constants and enumerated types to help create more readable code—self-documenting code. We do so not just for the GameState, but also the game's difficulty level (as GameDifficulty) and the lunar lander thruster's state (as ThrusterState).
The C# equivalent of enumerated types is very similar and uses almost exactly the same syntax. The following code line shows this, with a small difference in the exclusion of the typedef specified and the tagname in a different place:
enum GameState { NOTREADY, READY, RUNNING, WON, LOST, PAUSED }
Programmatically Initializing an XIB Resource
You know that the GameView user interface, contained within our GameView.xib file, is displayed as a result of starting the game. In our case, we want finer-grained control over this process, and so we used the initWithNibName command to load the GameView.xib programmatically. This has the effect of calling the initWithCoder method, kind of like a constructor, which we'll use to not only load the XIB file, but to also do some application initialization. Consider the following implementation of this method:
- (id) initWithCoder:(NSCoder *)aDecoder

{

    if (self == [super initWithCoder:aDecoder]) {


        //// Initialize the sprites

        //

        NSString *imagePath = [[ NSBundle mainBundle] pathForResource:@"lander"

ofType:@"tiff"];

        self.lander_nothrust = [UIImage new];

        self.lander_nothrust = [UIImage imageWithContentsOfFile:imagePath];


        // Set initial game state

        [self newGame];


    }

    return self;

}
Our implementation is pretty simple. Although it's incomplete at this stage, it's starting to take shape.
First, we call the parent method using the [super initWithCoder:aDecoder] command, which will ensure the inherited foundation object is created first and assigned to the calling class, referenced by self. If this works, and is not nil, then we move into our bespoke code and finally return the newly created object. This is typical object initialization code, and you'll see it repeated with many other objects that use inheritance to provide their own implementation.
Our initialization code does two things. First, we initialize a property of type UIImage, which will hold one of the many thruster states. In this case, it's the image of the lunar lander with no thruster being fired, hence the property called lander_nothrust. Remember in Listing 5-5 we defined our property as follows:
// Declare our member properties

@property (nonatomic, retain) UIImage *lander_nothrust;
And remember to synthesize it in our implementation, as we did in Listing 5-6:
@synthesize lander_nothrust = plander_nothrust;
However, this is an empty property and needs initializing. Once the image has been initialized, we'll also call one of our own bespoke methods called newGame, which as its name suggests, initializes the application to start a new game. This is achieved with the [self newGame] command.
Let's take a closer look at the image initialization code. At this point, we're using three separate UIImage objects to hold the different states of our lunar lander craft: with the engine thrusting, without the engine thrusting, and crashed. We could use an array of images or one of the bespoke iOS classes to achieve this, but at this point, we're keeping it simple.
So, after we've added our Lander.tiff image to the project (go ahead and do this), we can reference this resource using the pathForResource method, passing the file name, including its extension. The following command achieves this, returning a string to our image resource:
NSString *imagePath = [[ NSBundle mainBundle] pathForResource:@"lander" ofType:@"tiff"];
We can then create an instance of our UIImage using the slightly different notation of new, as follows:
self.lander_nothrust = [UIImage new];
You'll notice that this syntax is similar to C#, in that were using the new keyword to instantiate a new object. We can then use the imageWithContentsOfFile method to load our image using the fully qualified path to the resource. Here's the full line:
self.lander_nothrust = [UIImage imageWithContentsOfFile:imagePath];
If you examine the newGame method's implementation, you'll see that it'sstraightforward, It simply starts to initialize some of the class member variables to their default values for a new game.
Manually Drawing the User Interface
In most cases, you won't need to worry about drawing your user interface, because it's typically handled automatically by the iOS framework as part of the control's functionality. However, in some instances, you might want fine-grained control over your user interface. This is especially the case if your application is a game, because the controls provided as part of the iOS framework provide only some of the functionality required.
In such circumstances, you can override the method called whenever your application's window requires a refresh. This method is called drawRect and passes the region that requires redrawing as a CGRect structure. This structure contains the starting point and size of the rectangular area that requires redrawing. This area is known as dirty if it requires redrawing. Redrawing is necessary when something has changed, such as an area previously being obscured by a window or a control updating the way it looks. Consider the following method and its implementation:
// drawRect - Redraw the screen

-(void)drawRect:(CGRect)rect

{

    // Only draw when we're ready to draw

    if (gstate != RUNNING)

        return;


    [self.lander_nothrust drawAtPoint:CGPointMake(loc_x, loc_y)];


}
You'll notice that we query the state of the application first—if it's not running, there is no need to update the screen. Assuming that it is running, at this stage, we simply draw our lunar lander image at the x and y location defined during game initialization and using the lander_nothrust image. At this stage, that's all we're doing. However, as the game's physics are reflected and the user interactions are taken into account, we'll update the location of the lunar lander, check for collisions, and so on—all within this method—and draw the visuals that make sense. This will mean the lander will fall if no thrust is applied, climb if thrust is applied, and so on. So, it's pretty straightforward, but effective!
Using Bespoke Methods
As with most programming languages, the structure of your application typically uses subroutines, or class methods in an object-oriented world to define bespoke functionality. When called in the correct order, this functionality implements your application—in our case, the Lunar Lander game. The structure and naming of these routines are part of your application's architecture.
Our game provides placeholders as follows:
newGame: Initializes the game. This method is called after the user interface has been initialized.rotateLeft: Rotates the lunar lander craft to the left. This is in response to the user indicating he wants to rotate left. In the first instance, this is achieved by a toolbar button. Discussed in Chapter 7, and Later on, we'll look at swipes and gestures, discussed in Chapter 10.rotateRight: Rotates the lunar lander craft to the right. This is in response to the user indicating he wants to rotate right. Again, here we're using a toolbar button; later, we'll look at swipes and gestures.thrustEngine:Fires the lunar lander's thruster engine, which in turn will slow down the rate of ascent, and even increase altitude if held down for long enough. It will also indicate a change in the engine's state, allowing our drawing method to reflect this in what the user sees.quitGame: Quits the game by dismissing the modalGameViewdisplayed. This method andnewGameare the only ones we'll implement in this chapter.
Using Simulators to Test Your Application
Given that we are now starting to develop our application in earnest, we'll be using the simulator much more. We could start looking at deployment and testing on a real device, but we'll leave that complication for the moment, partly because it's not yet necessary.
Targeting the simulator during the early stages of application development can save you a great deal of time. You don't need to wait for applications to be installed on your physical device before seeing the effects of changes in your code. It also is not necessary to buy and install a developer certificate to run code in the simulator.
Don't get me wrong—using the simulator is not perfect and has its own challenges. For example, it can't display OpenGL graphics, simulate multitouch events, or provide readings from some of the iPhone sensors such as the GPS. That said, for most apps, it has enough features to be a valuable part of your development process.
One gotcha to be aware of is that you can't guarantee that your simulated app performance will resemble your real application performance. The simulator tends to run silky smooth, helped by the power of your Mac on which it runs. Real applications will almost certainly have more limited resources, affecting the user experience. Be sure to test your app on all the physical devices it targets, so that you know your expectations are in line with reality.
The following are some of the simulator's features:
- User input: The mouse can be used to simulate a fingertip. Holding down the option key (
 )will display two circles, which then can be used to simulate multitouch events.
 - Rotation: This can be achieved using the hardware menu.
- iOS versions: You can choose different iOS versions to test your application.
- Low memory: This can be simulated, so you can send this status to your application to see how it behaves.
- Hardware keyboard: The simulator allows you to use your Mac's keyboard to provide keyboard input.
So, after all that hard work, what does your game look like running? In Figure 5–7, you can see the game running within the simulator, with the two circles representing the touch gestures in the simulator.
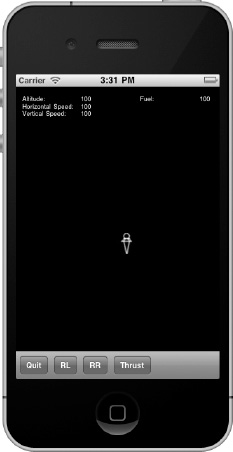
Figure 5–7. Game running within the simulator
Summary
In this chapter, we've taken the foundation provided by previous chapters and started to develop a real application—something closer to fulfilling the rich user experience expected by most iPhone and iPad users. OK, so our Lunar Lander game won't suit everyone, and yes, I'm still hankering after my youth, but mobile game applications should be fun. It also gives you a chance to build on some of the lessons you've learned so far and elaborate on them.
We covered some recommendations on how to begin application development, starting with the basics, such as capturing the requirements and thinking about application design. We then started to build on the visual and programmatic aspects of our application.
While building the application, you were introduced to the use of more than one view in presenting user interfaces, including the programmatic display of our game application. We added some navigation controls and tapped into the events these controls provide. We also looked at using utility type classes, such as the NSTimer class and the UImage class, to start to implement our functionality.
We also looked at how to write more readable, self-documenting code, as well as how to use our own bespoke methods to implement a meaningful architecture whose structure should be easily understood by most developers. Finally, we considered the simulator as a good test resource.
In the next chapters, we'll build on this application, fleshing out its functionality. In doing so, we'll explore other aspects of the iOS, such as more advanced user interfaces and data persistence.