Chapter 4
Going Deeper: .NET, Objective-C, and the iOS SDK
Understanding the capabilities of Apple's mobile devices, the features of the iOS operating system, and the different options available to you for application development is only part of the story. Creating the Hello, World application using both native Apple development tools and numerous third-party options was cool, and the submission of it to Apple's App Store is possible, but it's not going to earn you million of dollars. It is very unlikely to attract good reviews, or even any downloads!
Now we need to look at how to create a more compelling application—one that will be the next “must-have” mobile app that will help you make some money. To do this, we need to explore the runtime frameworks in more detail, and the supporting design-time frameworks in even more detail. This will help you to create a rich user experience within your application.
We'll take the existing knowledge you have in .NET and apply that to Apple's own native tooling and SDKs. This will not only allow you to create the applications you desire, but will also give you a great head start in exploiting Apple's devices to full effect. The goal is to make the transition from .NET to Apple's native development environment much easier and faster.
In this chapter, we will take a more detailed look at the iOS SDK when compared with .NET's capabilities and the different languages supported. Specifically, we'll cover the following topics:
- Compare the relative capabilities of Apple's mobile devices
- Take a look under the hood of an application, reviewing its structure and life cycle
- Consider how you should approach designing an application and what Apple has done to help
- Compare the iOS SDK and the .NET Framework, both in approach and implementation
- Compare the development tools to support application development
- Review an Objective-C and Xcode 4 primer
We will start by building on the introductions given so far, and take a more detailed look at iOS and the iOS SDK side by side with the .NET Framework and programming model.
Comparing iOS Device Capabilities
We have already touched on the types of Apple devices you are able write applications for using the iOS SDK, and noted that not all devices are equal. It is important to consider the device or devices you intend to target, their respective strengths and weaknesses, and the capabilities exposed through the operating system. Such due diligence will ensure that the customer has the user experience you intend, and that you approach your application development in a way that embraces the capabilities the target device has and ensures you have a robust and dependable application.
The focus of this book is application development for mobile applications (although some of the tools and techniques can also be used for desktop applications). When considering the mobile devices available, our targets are the iPhone, the iPod touch, and the iPad. Table 4-1 lists some of their features based on the latest generation of each device.

iOS Application Design
When starting to think about your application's design, in addition to looking at the capabilities of the devices you wish to target several other considerations, such as compatibility and tuning, are important when designing your application. Additionally, you should have an understanding of certain design patterns when working with the iOS SDK and Objective-C, as that will give you valuable insight as to why classes and APIs might be implemented in a given way. Design patterns also provide an excellent method of ensuring simplicity and elegance in your own applications.
We'll dig a little further into design considerations and design patterns in the following sections.
Design Considerations
In planning and developing your application, following a set of overarching principles not only helps to ensure that your application is well designed for its purpose, but also allows you to make the best use of the capabilities available on the device you target. As you move through this book, be sure to consider the following principles:
- Design your application to be as compatible with the broadest spectrum of devices as possible. This will maximize your market opportunity.
- Using the advanced capabilities of a device is OK, but if you can, provide options to automatically andor manually turn off these features.
- Test on as many devices as you can, and not just using the simulator—test with real devices, if possible. We will explore the topic of testing in more detail in Chapter 9.
- Don't be tempted to leave your application unchanged when moving between significant form factors, such as iPhone to iPad.
- Tune for performance. Be aware of memory constraints and multithreading capabilities.
- Remember to consider costs. If your app requires a network connection, consider periodically scanning for Wi-Fi when using 3G.
As you build your applications, you should always be cognizant of these basic considerations. Now let's move to on to some design specifics in the form of iOS design patterns.
Design Patterns
The first thing to note when designing and implementing applications using the iOS SDK and Objective-C is Apple's use of design patterns. Design patterns are not a new concept, but not all operating systems or SDKs faithfully implement them. For example, the way that .NET's Windows Forms addresses user-interface design doesn't define or prescribe any kind of design pattern. This is left to the individual designing and implementing the application, if that developer chooses to do so.
A design pattern describes an approach to a common problem for which an elegant solution design has been created. The design is expressed in written form, often with diagrams depicting objects, their relationships, and their behavior.
A good example of a design pattern is the Singleton pattern. This restricts the instantiation of a class to a single object. The first time it is called, an object is created, but subsequent calls return a reference to the existing object. Its typical usage is for an Application object, where only one instance of the class can exist per application.
The use of design patterns by Apple is fundamental in helping to provide a framework around which your applications are written, and in doing so, helping to reinforce the user experience Apple is so protective of. Additionally, the use of patterns is good practice. It makes the implementation of applications easier, as some of the decisions around how to approach designing your application are already made for you.
The practice of using design patterns isn't implicit within the .NET Framework. It provides a Class Library with a set of APIs, but the architectural structure of your application and the implementation of design patterns are left to you—well, almost! As you can imagine, the .NET community is always happy to offer support, whether this is Microsoft itself through the Microsoft Developer Network (MSDN) at http://msdn.microsoft.com or third-party sites such as the dofactory at http://www.dofactory.com/Framework/Framework.aspx.
Table 4-2 describes some important iOS design patterns that you will use with your applications.
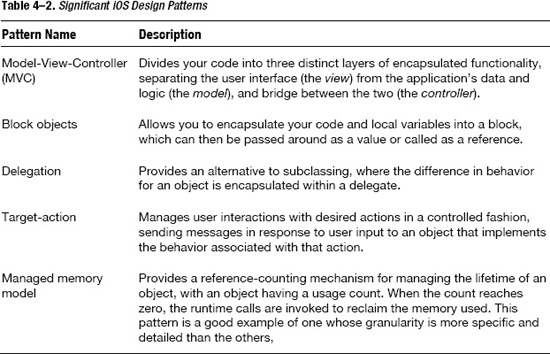
Now that you have had an overview of basic design considerations and design patterns, we'll delve into an application's structure and life cycle when running on iOS.
Looking Under the Hood of an Application
So, you've chosen which device or devices you wish to target and have an overview of their capabilities. Now let's take a look at how applications are structured on the iOS operating system, what to consider when designing them, and the fundamentals of how they are built.
Once you've designed your application, you can start to look at how to implement it. At this stage, it is important to understand how an iOS application is structured and runs internally. Consider the core application life cycle shown in Figure 4–1.
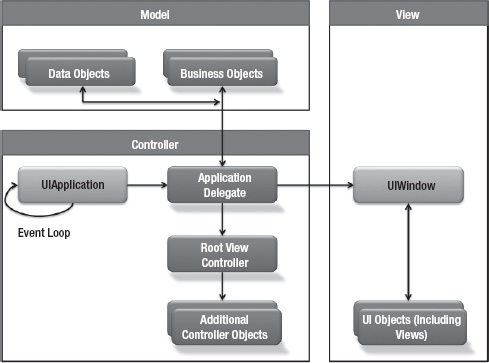
Figure 4–1. iOS application life cycle
As you can see in the diagram, the MVC pattern is at the heart of an iOS application, which is no surprise, given a user interface is displayed and human interaction is required.
Once your application has launched, the UIKit framework is responsible for managing the behavior of your application. It receives events from the operating system, and your application must respond to these events, which may be system-generated or user-generated. The behavior is similar to the Microsoft Windows messaging pattern, with a message queue from which events are retrieved and processed.
You don't need to physically process every message. A default implementation is provided for many messages, and the framework will therefore just process them. But when you require alternative behavior, or you want to change the default behavior in some way, then you can provide your own implementation for these events.
Next, let's take a look at the sequence of events that happen as part of the application's life cycle.
The Application Life Cycle
Once you have started your application, usually by tapping the icon on the screen, a sequence of events is started that should display your application on the mobile device (you can see this in the application lifecycle diagram in Figure 4–1. This is known as the application's life cycle.
We touched on some of the key functions involved in this life cycle when writing our Hello, World application in Chapter 2. After the main() function has been invoked, UIApplicationMain() is executed, and it won't return until your application exits. This class creates the application object and ensures the application delegate is instantiated, and then it looks to load the main .nib file that defines the application's main window.
The application knows which main .nib file to load by looking in the information property list file, Info.plist. This file contains a number of keyvalue pairs held in an XML file, each used to denote a configurable parameter. If you were to open Info.plist using Xcode, you would see something like the screen shown in Figure 4–2.
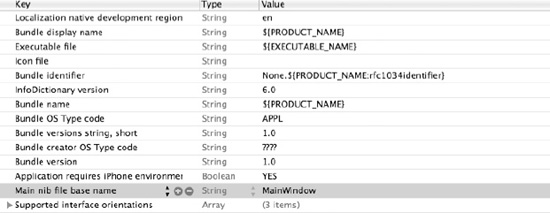
Figure 4–2. Info.plist values
You can clearly see that the “Main nib file base name” entry is defined as MainWindow. So, if we look in our directory, we will see a file called MainWindow.xib, which is the main window resource file loaded by default. You could change this, but there is rarely a need to do so.
Loading the resource file will create classes for any objects that are contained within it and assign their associated properties by deserializing their values held in the resource file. The .xib file is essentially a serialized (saved-to-disk) version of your main window, user interfaces, and objects, which can be reconstituted (deserialized) at any time (much like adding water to dried noodles).
NOTE: You can use the Info.plist file to store your own application configuration values. Just add your values, either through the user-friendly Xcode editor or some other file editor.
After your main application is running, it is looked after by the application delegate, which uses delegation to overcome some of the complexities introduced by subclassing. This typically involves creating a new class that inherits from a parent class, and then maybe overriding methods provided within its parent. Our application delegate implements the UIApplicationDelegateprotocol, which in C# terms, is the same as implementing an interface. Instead of a hierarchy of objects with inherited methods and overridden methods, we simply implement the methods specifically identified in the interfaces.
The final stage of the application launch process will see it entering the active state—one of many states the application will take on. This is indicated by the applicationDidBecomeActive method.
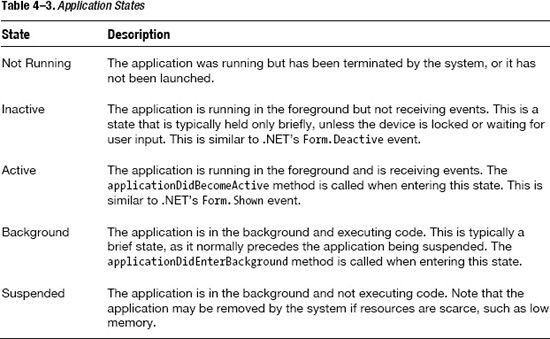
The application life cycle has a series of states that are defined by the iOS SDK, and you can manage your application's behavior based on its state. Let's take a look at the different application states that exist and how you should manage them.
Managing Application States
A key job of the application delegate is to manage the different state transitions the application goes through while it is running. Two new application states were introduced in iOS 4.0: the application can be running in the background or suspended.
Any state transitions require a response from your application as confirmation it is behaving correctly. For example, if the application state were set to the background by starting a new application, then it would make sense to stop updating its user interface.
When the application state changes, you respond accordingly using the method called within the application delegate. It is also worth noting that an application may be launched not as a direct result of the user asking it to, but through an indirect request. For example, your application might be invoked to deal with a push notification.
In all of these cases, the didFinishLaunchingWithOptions method is called with options providing a reason why it was invoked, and in some cases, such as due to a push notification, the payload of data relating to it.
All the states supported in iOS 4.0 and above are shown in Table 4-3.
An application doesn't just move from one state to another without sometimes going through transitory states. For example, if an application is interrupted because of an incoming phone call, the application will be told it's about to become inactive by calling the applicationWillResignActive method. This is your opportunity to prepare your application for being sent to the background. If you answered the phone call, the application would be sent to the background with the applicationDidEnterBackground method called. However, if you decided to ignore the call, the application would resume foreground focus and fire the applicationDidBecomeActive method again for you to handle accordingly. The same is true of an application that was previously running in the background and is sent to the foreground. In that case, the applicationWillEnterForeground method is called prior to moving to the foreground, and the applicationDidBecomeActive method is called when the application enters the foreground. These states are shown in Figure 4–3.
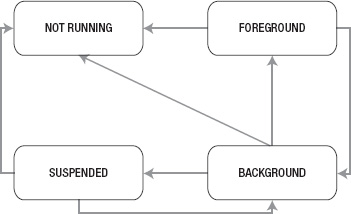
Figure 4–3. Application state diagram
Managing an Application's Behaviors
As you've seen, an application will typically spend time moving between different states, especially given typical usage. For example, it is common for a user to move between applications, checking email one minute, taking a telephone call the next, and surfing the Web after that. We've looked at handing state changes and the way the iOS SDK cleverly uses the Objective-C technique of delegation to have a method called, enabling you to provide your own implementation.
Clearly, how your application reacts to these state changes very much depends on your application, as each is different. But there are some application tasks that are the same for all applications. In this section, we'll take a brief look at these tasks, which will allow you to get started.
Dealing with Orientation Changes
Apple's mobile devices have mercury switches that understand the orientation of the device and so your application. Most iOS applications launch in portrait mode initially, and then will rotate your application to match the device's orientation; some will start in landscape mode if it makes sense for them to do so. It might not be appropriate for your application to work in different orientations, and it is up to you to manage this. For example, watching movies might suit only landscape orientation.
Before you start panicking and wondering how on earth you're going write all that inevitably complex code to rotate your application, stop! Thankfully autorotation, as it's called, is conveniently handled through a combination of the iOS and the UIKit framework—assuming you want your application to rotate. The iOS SDK supports autorotation through a method, which defines if the device has been rotated and whether your application should support it, and also through the Interface Builder, where you can define how the view manages the orientation of your user interface. We'll look further into this subject later in the book.
Files Within Your Application and the Application Sandbox
As with most operating systems, the filesystem is usually accessible by the application, although with some restrictions to ensure the security of your device. The iOS provides your application with access to an area of the filesystem that is accessible only by that application. It does this through the use of an application sandbox, which is implemented through the iOS as a security mechanism. The sandbox provides fine-grained control, limiting areas that it thinks could present a security problem if exploited, such as the filesystem and access to network resources.
The sandbox for an application is implemented when the application is first installed. The path to the Simulator's home directory is in the form <//ApplicationRoot>/Applications/ApplicationID, where <Root> is the following directory from the users home directory /Library/Application Support/iPhone Simulator/<iOS Version>/ is an area on the filesystem where the applications are installed. The ApplicationID uniquely identifies the specific application. When combined, this is called the application home directory.
A number of important application subdirectories are created, allowing your application to write data and its preferences within the constraints provided by the iOS security system. These subdirectores are installed from the application's home directory. For example, <Root>/Applications /ApplicationID/Documents is where application data and documents are stored. The /tmp directory is for files that do not need to persist between application launches.
NOTE: For more details about the sandbox, see the section “The File System” in the iOS Application Programming Guide.
Multitasking
We won't cover multitasking in this book, but this brief introduction of the capabilities made available in the iOS 4.0 may help you explore further using the online resources available.
The use of multitasking has long been supported in the .NET Framework, although for the iOS, it wasn't until version 4.0 that multitasking support was properly introduced to application developers.
Note that not all devices support multitasking. You can query the multitaskingSupported property of UIDevice to see whether the device on which the application is running supports it.
An application may process certain tasks in the background, although these are carefully controlled. The following types of background behavior are supported:
- Tracking a user's location, either continuously or periodically monitoring for updates. This is useful for location-based applications.
- Playing background audio. This is common for fitness-type applications.
- Completing finite-length background tasks. An example is saving data to disk to avoid corruption.
- Timed local notifications. This is used in alarm clock-type applications, for example.
Comparing the .NET Framework with iOS and the iOS SDK
Let's start with a comparison of the two environments and their frameworks, positioning the runtime and design-time aspects of each relative to one another. This context will be useful when understanding the architecture of your application and how the APIs are used. Take a moment to consider the diagram in Figure 4–4.
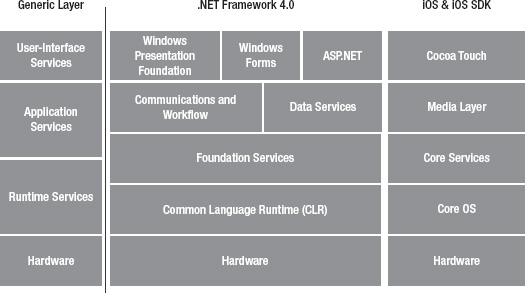
Figure 4–4. .NET and iOS framework comparison
If we consider the generic layers and which elements are covered by both the .NET Framework and the iOS operating system and SDK, you'll notice the following similarities:
- User-interfaceservices: These are the services responsible for delivering the user interface and looking after user interactions, such as device input. The iOS SDK uses the Cocoa Touch extensions as well as aspects of other layers such as the Media Layer to accomplish this, especially the multitouch input. The .NET Framework includes both Windows Presentation Foundation (WPF) and Windows Forms to achieve this.
- Application services: This category consolidates a number of component parts in both .NET and Apple's frameworks, such as the iOS SDK. In iOS, the Cocoa API, Cocoa Touch, and Media layer are included, whereas for .NET, elements such as Foundation Services, Data Services, and communications and workflow would be included. Any API aspects that deal with the user interface and user input have deliberately been separated out into user-interface services.
- Runtime services: This is functionality that is provided to an application at runtime, and is typically contained within the operating system or runtime environments that run on top of the operating system. The .NET or Java runtime environments are good examples of runtime services sitting on top of an operating system. Runtime services include memory management, disk access, graphic card APIs, and so on.
- Hardware: This remains a constant in all our architectures, although the specification of it will change depending on the device, as will its capabilities. The software-based layers above the hardware enable an abstracted way of using it.
These similarities shouldn't be surprising. Over many years of device, operating system, and application evolution, best practices have surfaced leading to such similarities. So at a high level, it's easy to draw the comparison. But the devil is in the details. If we drop down a level, we'll start to see the nuances of each framework's implementation. We'll see features included in one framework but completely excluded from the other, or in other cases, implemented through different mechanisms.
Starting at the top of the stack, let's look at the different layers, comparing the frameworks and libraries within them. This will help you to understand the terms and structure in .NET and how its counterparts work in Apple's world.
We won't delve into the specifics of classes and methods within classes, which you can find in Apple's online iOS reference. By highlighting through comparison the equivalent capabilities in the iOS SDK, the usage of these should be straightforward. This will lay the foundation for upcoming chapters, where we will walk through some working examples.
User-Interface Services
The explosion of Web 2.0-based applications has significantly raised user expectations of how applications will perform. The gap between native applications and the capabilities of web-based applications has narrowed significantly. The same is true of mobile applications. The user experience associated with early mobile applications, including new protocols at the time, such as the Wireless Access Protocol (WAP), is vastly different from the intuitive, interactive, high-definition capabilities exposed by some of today's mobile devices, blending native functionality with Internet-based web or even cloud-based services.
This is possible in no small part due to the improved capabilities of the physical hardware, which now has faster processors, more memory, and higher-resolution screens that support touch-based input. However, software is at the heart of such functionality, and how this is organized and used is where key differences appear.
.NET makes provisions for user-interface design and implementation by providing the following runtime services through which functionality is exposed:
- WPF: This provides a complete API to creating highly visual user interfaces. It was introduced some time after Windows Forms to provide support for additional areas such as 2D and 3D graphics and video and audio.
- Windows Forms: This is the name given to the API that encapsulates Microsoft Window's native Windows API. Other APIs are required to deal with more advanced aspects, such as 2D and 3D graphics.
- ASP.NET: This includes ASP.NET, ASP.NET MVC, ASP.NET, and Ajax. It is Microsoft's Active Server Pages (ASP) technology that allows you to develop web sites using server-side programming.
We'll exclude ASP.NET from our comparison, as this is Microsoft's ASP technology used to deliver web-based applications, and our focus is on native applications. So, we are left with WPF and Windows Forms. Given that WPF effectively supersedes Windows Forms, we could easily exclude Windows Forms also, but given its popularity and the relatively recent introduction of WPF, we'll cover both in our comparison.
WPF exists as a subset of .NET Framework types that are for the most part located in the System.Windows namespace, just as Windows Forms does. But you'll notice that to accomplish more advanced graphical applications in Windows Forms, you need to step outside this API into things like the Windows Media Player and the Graphics Display Interface (GDI+).
Based on the assumption that WPF at least in part can be seen as a container for Windows Forms, the closest comparison for WPF, and Windows Forms for that matter, is Cocoa and Cocoa Touch. We'll start with Cocoa Touch, which includes the following frameworks:
- UIKit (
UIKit.framework): Provides the capabilities necessary to implement graphical, event-driven applications. - Message UI (
MessageUI.framework): Provides support for composing and queuing email messages. In iOS 4.0, this extends to include Short Message Service (SMS) support. - Map Kit (
MapKit.framework): Provides support for a scrollable map interface that can be integrated into your application. - iAd (
iAd.framework): Provides support for banner-based advertisements within your application. - Game Kit (
GameKit.framework): Provides support for peer-to-peer networking capabilities. It allows you to create complex multiplayer networking games. - Event Kit (
EventKitUI.framework): Provides support for viewing and editing calendar-based events. - Address Book UI (
AddressBookUI.framework): Provides support for viewing, editing, and creating new contacts.
Application Services
The applications of today not only require a more intuitive and interactive user interface, but are generally more demanding in the features and functionality they provide. The day has long gone where an application ran on the device, isolated from the rest of the world, or where the application's interactive features were based on text and simplistic graphics.
Today's applications demand video, music, high-definition graphics, parallel processing in the form of multitasking, and a speed and responsiveness that was unheard of only a few years ago—and this is on a mobile device! Such functionality is exposed, in part, through the application services provided within the iOS, which include the following features:
- Multimedia capabilities
- Storage and management of data
- Network and communication access
- Workflow and communication
- Access to device-specific features such as the GPS
Such features are provided for within .NET through the .NET Framework Class Library. These include some of the class libraries we've already mentioned in the discussion of .NET's user-interface capabilities. The following features support application services:
- Windows Communication Foundation (WCF): Provides functionality to support service-oriented applications, which collaborate over a network connection.
- ActiveX Data Objects for .NET (ADO.NET): Provides support for accessing data and data services, such as native database libraries, or abstracted drivers, such as ODBC.
- Windows Forms and WPF: in the context of application services, WPF provides similar user-interface capabilities to those in the iOSUIKit framework, as well as multimedia and audio capabilities, along with 3D and animation support.
- Language Integrated Query (LINQ): New to .NET Framework 3.5, LINQ provides native data-querying capabilities.
In the iOS SDK, such services (and others) are encapsulated within the Media and Core Services layers. Let's take a look at the key frameworks provided within these layers to map onto the capabilities we've touched upon in the .NET Framework Class Library.
Media Layer
The Media layer contains the graphics, audio, and video technologies that support you in building applications that look and sound great. It contains the following frameworks:
- AV Foundation (
AVFoundation.framework): A comprehensive set of APIs that support playing, recording, and managing audio content in iOS. In iOS 4.0, this includes movie-editing support and precision controls for playback. - Core Graphics (
CoreGraphics.framework): Supplies support for 2D graphics by providing a vector-based drawing engine. - Core Text (
CoreText.framework): Provides a comprehensive and performant set of APIs for laying out text and using fonts. - Image I/O (
ImageIO.framework): Supports importing and exporting image data and its associated metadata. - Media Player (
MediaPlayer.framework): Allows you to embed support to play audio and video content from within your application. This includes support for accessing the iTunes library and for coping with resizable video. - OpenAL and OpenGL ES (
OpenAL.frameworkandOpenGLES.framework): Cross-platform frameworks included within iOS to provide close-to-hardware, high-performance audio and video functionality.
Core Services
Core Services provides fundamental system services that all applications use, either directly or through other frameworks. Its key frameworks are as follows:
- AddressBook (
AddressBook.framework): Provides an API that allows programmatic access to the contacts stored in the mobile device. - CFNetwork (
CFNetwork.framework): Provides high-performance and low-level access to the network protocols available to the device. - Core Data (
CoreData.framework): Provides functionality along with Xcode to manage your application data using a schema that is visually defined in Xcode and a support API to manage the data. This is ideally suited to the MVC pattern and can significantly reduce the amount of code required. - Core Telephony (
CoreTelephony.framework): Provides functionality for interacting with the telephony features of a compatible mobile device. - Event Kit (
EventKit.framework): Provides support for accessing calendar events on your device. - Foundation (
Foundation.framework): Provides an Objective-C–based API around support for core data types and functions. - Store Kit (
StoreKit.framework): Provides support for purchasing content and services from within your application, such as additional content. - Systems Configuration (
SystemsConfiguration.framework): Provides access to network configuration details of your device such as Wi-Fi or cellular connection capabilities.
Runtime Services
The frameworks and class libraries we've discussed so far can't exist without the support of a core platform on which they run. In the case of the .NET Framework, low-level runtime services are provided through a combination of the CLR, low-level Core Services, and the operating system. In the iOS SDK, such capabilities are provided by the iOS and the Core OS layer that exposes the same kind of low-level functionality supported in the low-level runtime services and the CLR.
Here, we start to see some of the key differences. For example, the .NET Framework creates applications that run in a managed environment provided by the CLR. They are not native applications, but interpreted applications. Using the iOS SDK, this creates native applications that are not interpreted by any kind of runtime, but instead rely on the operating system- and SDK-provided services directly to support the application's execution.
The following are examples of the capabilities provided within the CLR:
- Memory management: Provides the automatic allocation and reclaiming of memory used by applications. This kind of memory management goes a step further than the reference counting provided within the iOS, where you programmatically free up resources no longer required.
- Type management: Ensures the runtime type safety of core data types and is an essential ingredient in cross-platform, multilanguage capabilities.
- Security: Provides security features, such as the signing of code and access-control features.
- Multitasking: Supports multithreaded applications where multiple tasks can appear to run simultaneously and be scheduled across multiple processors.
- Exception handling: Provides support for exception trapping and handing.
- Delegation: Improves on the existing inheritance and interface capabilities to provide delegation enabling you to implement pointers to functions for runtime execution.
Similar capabilities to those just listed are provided for within the iOS SDK, but they do not completely match. This is partly due to the fact that we are dealing with native applications that run directly on top of the operating system rather than a container/runtime like the CLR—unless you're using Mono and MonoTouch!
Let's take a look at some of the key frameworks within the iOS SDK:
- System: Provides the lowest level capabilities above the operating system and exposes the kernel environment, drivers, and the UNIX interfaces of the operating system. This includes memory allocation, threading, filesystem access, math computations, locale information, and more.
- Security (
Security.framework): Enhances the built-in features of the device to provide programmatic and application security features, such as signing applications for authenticity, cryptographic key management, and support for keychain sharing. - External Accessory (
ExternalAccessory.framework): Supports communicating with external hardware connected to your device. - Accelerate Framework (
Accelerate.framework): Provides support for computationally intensive applications by providing interfaces for complex math, big number calculations, and so on.
Objective-C Primer, Part 2
Chapter 2 provided a short introduction to some of the essentials required to start developing your mobile application. Before we start to really put the iOS SDK to work and focus on the specific aspects of mobile applications, you'll need to understand a few more essentials of the Objective-C language. Learning about some of these slightly more advanced features will better prepare you to not only write your own applications, but also to understand how the iOS SDK itself is constructed.
In the following sections, in order to assist your transition from .NET, I'll introduce each by its .NET language term, rather than the Objective-C term, and make comparisons between the languages.
Class Declaration
Both .NET and Objective-C are object-oriented languages, and so the definition of a class is a key construct for the language. Consider the following Objective-C and .NET C# examples, shown together.
| .NET C# | Class AClass : Object |
| Objective-C | @interfaceAClass : NSObject |
Both of these code segments declare a new class object that inherits from an object class. It has a default integer member variable called aValue, and two methods. One method is called doNothing() and returns nothing and takes no parameters. The other method is returnString(), which returns a string but also takes no parameters.
You may also notice that different characters precede the method declarations. This is significant, as you'll learn in the next section.
Method Declaration
An obvious companion to the class is the methods that provide the necessary functionality for the class. Methods may be defined as instance methods or class methods, as indicated by the character that precedes their declaration, as follows:
- A class method is indicated by a plus (
+) character. It is the same as a C# static method. Only a single implementation exists, and it is associated with the class type. - An instance method is indicated by a minus (
-) character. Here, the method is associated with an instance object associated with the class.
The following are .NET C# and Objective-C examples.
| .NET C# | public static void aClassMethod(); |
| Objective-C | + (void) aClassMethod; |
Now let's look at how to pass parameters to the method. Consider the following examples.
| .NET C# | String addStrings( String a, String b); |
| Objective-C | - (NSString) addStrings (NSString *) a secondParm2:(NSString *) b; |
This syntax creates a method called addStrings, which concatenates strings given as two parameters and returns a string value. The way you invoke the method is important, too. The parameters are order-sensitive, and so the following call is invalid because the second parameter, indicated by the name secondParm, must be the second value passed.
// This is invalid

[ addStrings secondParm:s1, s2) ];
However, the following example demonstrates the correct invocation syntax.
// Correct invocation

[ addStrings s1, secondParm:s2 ];
Because you're working with a reflective message-driven programming language, the sequence and type of parameters passed are important.
Properties
The use of properties has long been the mainstay for accessing class objects, and in doing so, managing how they are accessed and what they return. Such class members are known as instancevariables, as the property manages access to the actual value associated when an instance of the class is created. They can also be used to control scope and to hide any complexities associated with returning the property value.
Objective-C can also help by synthesizing (automatically creating behind the scenes) the accessor methods (the getter and setter) and creating the instance variable required. It also ensures that the memory management surrounding instance variables is handled appropriately. Consider the following examples.
| Objective-C | // Definition of your property within your class header file (.h) |
You'll notice in the C# example that C# has no equivalent to the synthesis model for accessing an instance variable. You must write accessor methods manually. This is reminiscent of the Objective-C found in Xcode 3.x, which is still valid for Xcode 4 but not the best practice. I recommend writing accessor methods in Xcode 4 only when necessary, usually in cases where more complex processing is required when returning property values.
Strings
Because Objective-C is based on the C programming language, you are free to use and manipulate strings in the C way, through the use of pointers and strings essentially being character arrays. There is no C# comparison, as C# doesn't support pointers, so we'll use strings, string constants, and more advanced features, such as string localization as comparisons.
Consider the following examples for representing a string constant, which is a static string value that cannot be changed.
| .NET C# | // Define a constant string using the following syntax. |
| Objective-C | // Define a constant string using the following syntax. |
The following examples show the definition of a string using the respective string class provided within the language. Note that using the class with the @ symbol creates an immutable string—that is, a string that cannot be changed.
| .NET C# | String string1 = @"This is an immutable string"; |
| Objective-C | NSString *string1 = @"This is an immutable string"; |
In Xcode 4, you can also create a Localizable.string file that contains the string resources, assigned both a name and value, which then are referenced at runtime in your code. This allows your string values to be configured for the locale in which you're deploying your application. Store the values in your Localizable.string file in the following format:
"LOCAL_MAIN_MENU_TITLE" = Main Menu";
And then reference the string in your code using the following syntax:
NSLocalizedString(@"LOCAL_MAIN_MENU_TITLE", @"");
Interfaces and Protocols
An Objective-C interface is actually a C# class, and an Objective-C protocol is actually a C# interface—confusing, eh? Let's put these into context with some examples, and in doing so, remove the confusion.
We'll start with a C# and the definition of a class, with member variables and methods. C# uses the class keyword and syntax to define a class; Objective-C uses the @interface compiler directive. We looked at this earlier within the class declaration section.
If we focus on what C# calls an interface, which Objective-C refers to as a protocol, this uses a different syntax. In Objective-C, a protocol declares methods that can be implemented by any class, or indeed, be used as a variable.
Consider the following example. It defines an interface, which is then implemented by a class. You use angled brackets within the interface declaration to declare your class implements the named type for implementation or specialization.
| Objective-C | // Definition of your interface template |
A class definition can declare an implementation of more than one interface simply by separating the interfaces by a comma, like so:
Public classMyClass :NSObject<IEquatable, AnotherProtocol>
As you can see, it's quite similar. One key difference is where Objective-C uses protocols as variables or as an argument to a method, which is often the case when an interface's implementation is used as a callback function. Consider the example in Listing 4-1, which defines a protocol that in turn defines a method that will indicate via a Boolean value whether success was achieved.
Listing 4-1. Protocol Declaration Code
#import <Foundation/Foundation.h>


// Define our protocol, with a single method

@protocol ProcessDataDelegate <NSObject>

@required

- (void) processSuccessful: (BOOL)success;

@end


// Create an Interface using the Protocol, and notice the use of the ID type that points

// to a generic type that will be unknown at compile time and resolved at run-time

@interface ClassWithProtocol : NSObject

{

 id <ProcessDataDelegate> delegate;

}


@property (retain) id delegate;


-(void)startSomeProcess;


@end
The implementation section for the interface defined in Listing 4-1 synthesizes the delegate instance variable and then calls the method defined in the protocol as needed. Its implementation is shown in Listing 4-2.
Listing 4-2. Using a Protocol Declaration in the Class Example
#import "ClassWithProtocol.h"


@implementation ClassWithProtocol


@synthesize delegate;


- (void)processComplete

{

  [[self delegate] processSuccessful:YES];

}


-(void)startSomeProcess

{

  // Create a time which uses the processComplete interface to signal when complete

  [NSTimer scheduledTimerWithTimeInterval:5.0 target:self

    selector:@selector(processComplete) userInfo:nil repeats:YES];

}


@end
For the sake of brevity, assume you have a class that is performing some kind of action. Further, assume this class is called from another class to begin the processing. At some point, the caller will want to be notified that the class processing the data is finished, and the protocol is used for this very purpose, as shown in Listing 4-3.
Listing 4-3. Using the Class in the Example
@interface MyDelegate : NSObject <UIApplicationDelegate, ProcessDataDelegate>

{

        ClassWithProtocol *test;

}

@end


@implementation MyDelegate

-(void) processSuccessful:(BOOL)success

{

NSLog(@"Finished");

}

@end
Delegation
The use of delegation in the iOS SDK is common, predominately because it is introduced as an elegant solution to the problem of complex subclassing. Instead of having complex object hierarchies, where you need to create many more classes whose behavior may change only slightly from one another, you can pass delegates to an object to perform the modified behavior on your behalf. Modern best practice in today's programming languages is to avoid deeply nested class hierarchies, and Objective-C helps with this through delegation.
The general rule is that delegation is an alternative to subclassing, good practice is to use it, as it creates far cleaner code. Let's start by defining our protocol in Objective-C, as in the following examples.
| .NET C# | // Defining the delegate in C# is different |
| Objective-C | // Definition of your interface template |
We next define an object variable within our class pointing to the protocol defined for our delegate and name it. We'll also expose a property of the same name that we can call to reference our protocol, as follows.
| .NET C# | public class MyClass |
| Objective-C | @interfaceMyClass : NSObject { |
Our class would then invoke the delegate as a suitable point, using the following syntax, and must @synthesize the delegate property as part of its implementation.
| .NET C# | public void SomeMethod() |
| Objective-C | -(void) SomeMethod |
The only thing left to do in our class is implement the delegate's jobFinished method, as in the following, which will be called as shown previously.
| .NET C# | public void jobFinished() |
| Objective-C | -(void) jobFinished |
I encourage you to play around with some sample code to test your understanding of delegates.
NOTE: On the Apple Developer Program web site, you will find some more information about how to use delegates and delegation. If you're interested, take a look at http://developer.apple.com/library/mac/#documentation/General/Conceptual/DevPedia-CocoaCore/Delegation.html.
Comments
Last, but definitely not least, is the syntax used to embed comments within your code.
The use of naming conventions like camelCase helps, but there really is no substitute for good comments within your code. The syntax needs to conform to the form described here, but it's also important that the comments themselves describe the intent and approach taken by the developer, and not just a verbatim narrative of the syntax (the code and its naming should do that).
For single-line comment, you can use the following structure.
| .NET C# | // this is a commentor /* this is a comment */ |
| Objective-C | // this is a commentor /* this is a comment */ |
For multiple lines, in Objective-C, you can use the /* (open comment) and */ (close comment) structure, but not in C#, as follows.
| .NET C# | // this is the starting line |
| Objective-C | /* this is the starting line |
Comparing .NET and Xcode Tools
So far, we've compared the Apple devices, the application lifecycle, and the respective class libraries in both .NET and the iOS SDK. But as we've covered in previous chapters, tooling is equally important, and Xcode is a worthy equivalent to Visual Studio, as is MonoDevelop if you decide to pursue the MonoTouch path. But there are other tools to consideras you start your development journey, as listed in Table 4-4.
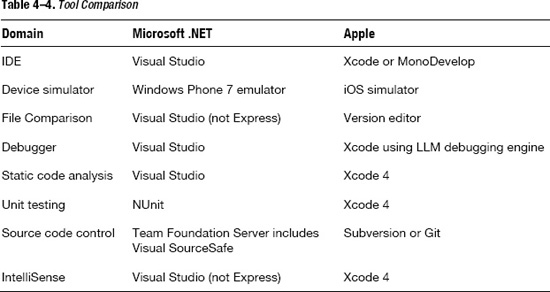
The tools listed in Table 4-4 are provided out of the box. Visual Studio and Xcode can be extended with additional tools, both commercial and opensource.
XCode 4 Primer
We've already taken a very simplistic look at the new Xcode 4 editor in Chapter 2 when creating our Hello, World application. If you were familiar with previous versions of Xcode, you'll have noticed a big difference:Xcode 4 now works within a single window and is far more integrated. If you're familiar with Visual Studio, you'll be far less impressed, and may need to take some of Xcode'sfeatures in stride.
In this section, as in the Objective-C primer, we'll dig a little deeper into Xcode 4's features, so that you are better prepared to start coding in earnest in future chapters.
We've already looked at the general structure of the Xcodeinterface, with its various functional panes, and we've created a new project, which highlights both the project templates available and the project explorer tree, which is the name given to Xcode 4's project structure view.
As noted, the IDE shipped with Xcode 4 is a substantial improvement on previous versions, and a real comparison to Microsoft's Visual Studio IDE. It includes a number of new features. One is the way in which you navigate around the application. The multiple windows of Xcode version 3.x are replaced with a single window that has different workspaces and other areas. The following sections describe the key aspects of the IDE.
The IDE Workspace and Its Editors
InXcode, every window within the IDE is a workspace, and as such, provides an elegant solution to supporting multiple projects. Each workspace has tabs, which represent a given context and, when selected, adjust the windows that appear below it, showing what you need to see.
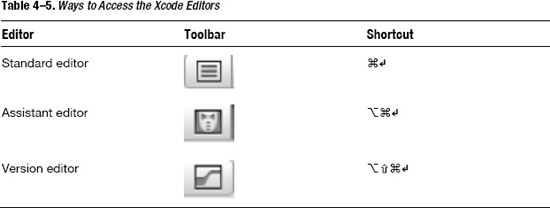
In supporting workspaces, Xcode has also introduced a number of editors, including ones for source code, property list files, rich text files, and NIB files, among others. (Editor refers to the dialog box that allows you to edit the values given against certain parameters.) To open or display any of these editors, select a file of that type in the project navigator (see the upcoming “Navigators” section). The editor opens automatically in the editor area of the workspace window. Table 4-5 shows how to access the different editors.
Code Completion and Support
Those of you familiar with VisualStudio will be right at home here, because the code-completion capabilities in Xcode 4 have been enhanced. The IDE prompts you to not only complete the statement you are typing, but if options exist, it already provides you with the options available—complete with Quick Help documentation to support any highlighted option, should you have the Quick Help Inspector open.
A useful shortcut is control-spacebar, which toggles the code-completion feature on and off. Press the escape key to cancel any operation.
If you're using the LLVM compiler to build your code, the Fix-It feature will also be enabled. As you are typing, the Fix-It feature will look for errors in your code. If it finds something that seems like an error, it will highlight the problem using a red underbar and an error symbol in the gutter bar, in the left pane of your IDE. It will also provide some suggestions on how to fix the problem, offering to repair it for you.
Schemes and Scheme Editors
Auseful addition to Xcode 4 is the concept of a scheme, which can be used to define a collection of targets to build, a configuration to use when building, and a collection of tests to execute. Each scheme is associated with a debug or release build, and changed using the scheme popup window. From this same menu, you can manage the schemes you have—editing an existing scheme or creating a new scheme.
Essentially, the creation of a scheme allows you to associate a set of configuration items to the scheme name and select it at the click of a button. The scheme editor then allows you to configure the schemes and their settings.
You can have as many schemes as you want, but only one can be active at a time. The schemes you create can be stored in a project and be available in every workspace that includes that project. Alternatively, schemes can be stored in the workspace and be available only in that workspace.
Schemes are a powerful feature. I recommend that you spend a little time playing with different scheme configurations using the scheme editor.
Project Editor
The project editor window allows you to adjust core configuration information about the project itself, under the Summary tab. You can also adjust the build settings, phases, and rules.
In most instances, the values such as those found in the summary information will not need to be changed from the default settings provided with the template. But if you do need to make any changes, you can do it here.
As noted in the previous section, you can set the target, build configuration, and executable settings using schemes. In Xcode 4, selecting a scheme will automatically provide default settings for all three areas.
Inspectors
InXcode, inspectors are panes in the utility area that you can use to read or enter data about files and Interface Builder objects. These inspectors are listed in Table 4-6 along with their shortcut keys.
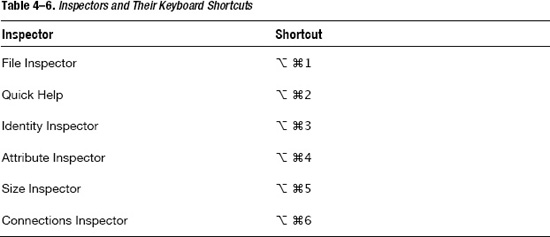
These inspectors also are available under the Utilities menu item within Xcode. Note that the menu is context-sensitive, and all of the inspectors are relevant only when you're viewing user interfaces provided in an XIB file. When viewing code, fewer inspectors are available.
Navigators
TheXcode IDE introduces a number of navigators, which display different workspaces within the main window and allow you to jump to different areas of your project with ease. Navigators are a useful tool for navigating the Xcode interface, and understanding how to use them will make developing applications within Xcode far easier.
Seven navigators are available to help you navigate to various aspects of your project:
- Project navigator:This navigator provides a standard view of your files and groups. It shows your classes, frameworks, resources, products, and so on. Xcode 4 offers some nice improvements over the previous version. At the bottom is a filter bar withthree preset filters for recently changed files, unsaved files, and files with an SCMstatus. It also includes a search field that you can use to filter files across all projects in the workspace.
- Symbol navigator: As its name suggests, this navigator allows you to view and navigate the various symbols created within your application. It lets you view the symbol in a hierarchical format (parents and children) or a flat format, displaying classes, methods, attributes, and so on.
- Search: This navigator provides a workspace-wide find-and-replace feature. The navigator itself is a standard find-and-replace panel. It also provides a feature for doing mass replacements, through the Preview button. Using this feature slides down a sheet that gives you the differences for every change and lets you select which changes to put into effect.
- Issue: As its name suggests, this navigator shows you issues that the compiler or syntax checker has detected and allows you to view the complete issue text.
- Debug: This navigator displays your program-execution information, including the stack, when you stop in the debugger. You can view multiple threads at once and have Xcode filter out threads that arenot relevant. It also has a stack-compression feature, provided by a slider at the bottom of the debug navigator. When you slide it from right to left, Xcode takes out stack frames that may not be relevant, so you can adjust the slider to show information to the level of detail you want.
- Breakpoint: This navigator displays all breakpoints set within your application, both active and inactive. If you have set a breakpoint and it is inactive, you will see the symbol, allowing you to switch it on in the code. This doesn't do any harm, since it's not affecting your code. However, if you want to remove the fact that the debug breakpoint ever existed, delete it from the navigator list.
- Log: This navigator displays the history surrounding the project's run and debug sessions. It can be used to view output sent to the debug console using the
NSLogmethod.
Figure 4–5 shows the Navigator toolbar.
Figure 4–5. The Navigator toolbar, with (from the left) Project, Symbol, Search, Issue, Debug, Breakpoint, and Log buttons
Each time you choose a navigator, the navigation window will appear on the left side of the window, along with the relevant inspector on the right side of the window, with the details displayed for the object selected (if any) in the navigation tree. The navigation tree and the inspector window are only displayed if you have already switched off the Navigator view (⌘0 to toggle). You also can choose a navigator with the shortcut keys shown in Table 4-7.

Views
In addition to the different navigators, you can manage the different views that are displayed:
- Navigator view: Provides access to navigators that let you navigate your project structure, or object hierarchy.
- Debug area view:Allows you access to breakpoints and object watchpoints as part of Xcode 4's debug functionality.
- Utilities view:Provides access to things like the help pages and object inspectors.
You can switch these views on and off, in order to free up screen space.
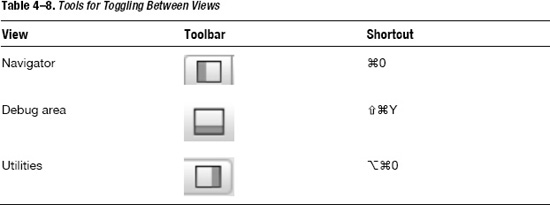
Table 4-8 shows ways for accessing the three views.
Using Other Xcode Tools
Xcode provides a number of other tools to assist in the development of your code. Here, we'll look at two: one that enables static analysis of your code and another that enables you to drag and drop code snippets.
Static Analysis
Static analysiscan help you to reduce bugs and inefficiencies within your code. The Xcode 4 IDE allows you to perform the analysis, examine your code, and take corrective actionsas necessary—all within the same workspace window. Once the project you wish to analyze is selected, simply choose Product ![]()
Analyze to start the analysis.
Once complete, Xcode opens the issues analyzer window to highlight the results of the analysis. Any problems are labeled in blue and marked. When you click one of these, Xcodewill highlight the faulty code for your analysis and correction.
Code Snippets
A useful feature, and one that has been extended, is the ability to drag code snippets into your project, thus providing a default implementation for common code features such as implementing a protocol.
This Interface Builder feature can be used to select the library of items, including code snippets. Then you can highlight and drag an item onto your source file. For example, in the case of a protocol code snippet, this will implement the default code in your editor for you to complete.
Summary
In this chapter, we began by considering the relative features of Apple's mobile devices. You'll notice that the iPhone and iPod touch are very similar, whereas the iPad starts to introduce some key differences, mainly due to its tablet form factor.
We next took a look at design patterns that are used as approaches to application development, including how the code is structured. We considered an iOS application's life cycle, mapping this on the MVC pattern, and you should have started to notice some similarities with the Microsoft Windows method of running GUI-based applications.
Then we compared the class frameworks, which again are similar in features if not in structure, and compared the Objective-C language and the Xcode tools with their .NET counterparts. Objective-C is similar to C# in many respects. However, one of the key differences stems from the fact that iOS apps are not managed applications. Because the language is based on C, you see memory management, pointers, and non-same-typing being the norm within the language.
You should now be more familiar with the Xcode 4 environment, Objective-C as a language, and the similarities with Microsoft .NET in code, framework, and tools—at least in the key areas. We didn't go through a step-by-step comparison of everything—the breadth of the language and the class frameworks is far too large—but it isn't necessary. Using a combination of the Xcode development environment, online resources, and the following chapters, we'll start to dig into the details. You'll see more specific examples of how to use both the language and the SDK's features, making the comparison with .NET's classes clearer. In doing so, the transition to Objective-C and the iOS SDK will become easier and more apparent.