Chapter 10
Extend Your Skills: Advanced Features
In this chapter you take a look at some of the more advanced features available through the SDK and as part of the associated Apple tools. These features build on the experience you've gained so far but look at capabilities specific to certain devices and, in some cases, how you can target more than one iOS-based device with a single code base. You also consider the future for iOS development technologies.
Specifically in this chapter you look at the following:
- Using your device's Global Positioning System (GPS)
- Exploiting your device's camera
- Using the accelerometer
- Detecting gestures
- Writing multidevice-compatible code
- What's on the horizon for iOS development
Using the Global Positioning System
YouriOS device, when fitted with a Global Positioning System (GPS), has the ability to determine its location anywhere in the world. There are other methods available for determining your location, but GPS is by far the most accurate. The iOS SDK exposes a variety of location-based services and determines which mechanisms to use under the hood. This means you don't have to concern yourself with the different technologies; you simply state some characteristics such as desired accuracy, and the device does its best.
Overview of Location Services
The SDK provides a class called the LocationManager, which through a simple API exposes location-based services while hiding which technologies it uses. However, you should still carefully consider the way you use these services. For example, you should not allow your application to constantly poll for your location, because this affects not only application performance but also battery performance. Your application's implementation should therefore poll for location updates as required; but if you do not need continuous updates, you can simply wait for the location update event to be fired and then stop updates until you are ready to start and determine the location again.
As you may have guess by now, you can control whether the location manager sends updates about location changes. You do so by calling startUpdatingLocation when you want updates to start and stopUpdatingLocation when you want the event updates to stop.
Once you've created an instance of the class and started the location-event polling, one of two events is fired: either didUpdateToLocation or, if an error is encountered, didFailWithError.
When a new location event is fired, it passes two variables, each of type CLLocation—one for the old position and one for the new position. This provides you with the current location and has the added benefit of giving you the ability to calculate the distance travelled by using the old position.
Each CLLocation parameter contains the location coordinates, the altitude, and the speed of travel. It also provides the methods necessary to calculate distance.
Let's look at how to use this class.
Implementing Location-Based Services
Start by creating an instance of the LocationManager class. This class encapsulates some of the location-based services provided by the SDK. The syntax is shown here:
CLLocationManager *lm = [[CLLocationManager alloc]init];
To provide a hook for notification events, you also need to provide a delegate to receive key location-based events, such as a location change. You essentially use the delegate to host callback methods to receive the event and process it. In order for this to work, you use CLLocationManagerDelegate, ensuring that it conforms to the protocol signature that defines two optional methods (more on these later). So, the easiest mechanism is to create a container class for this purpose, as shown in Listing 10-1 (the header file) and Listing 10-2 (implementation).
Listing 10-1. LocationManager.h
#import <Foundation/Foundation.h>

#import <CoreLocation/CoreLocation.h>


@interface LocationManager : NSObject <CLLocationManagerDelegate> {

    CLLocationManager* lm;

        CLLocation* l;

}


@property (nonatomic, retain) CLLocationManager* lm;

@property (nonatomic, retain) CLLocation* l;


@end
Listing 10-2. LocationManager.m
#import "LocationManager.h"


@implementation LocationManager

@synthesize lm,l;


// Default Constructor which allocates the CLLocationManager instance

// assigns the delegate to itself and sets maximum accuracy

//

- (id)init

{

    self = [super init];

    if (self != nil) {

        self.lm = [[[CLLocationManager alloc] init] autorelease];

        self.lm.delegate = self;

        self.lm.desiredAccuracy = kCLLocationAccuracyBest;

    }

    return self;

}


// Event : didUpdateToLocation

//

- (void)locationManager:(CLLocationManager*)manager

didUpdateToLocation:(CLLocation*)newLocation

fromLocation:(CLLocation*)oldLocation

{

    // Handle your events as required here

}


// Event: didFailWithError

// TODO: This is left for you to implement in this example


@end
You can therefore change your class instantiation to use this class instead of CLLocationManager, as follows:
LocationManager* lm = [[LocationManager init] alloc];
In your constructor you not only set up the delegate to point to itself but also set the accuracy for the services by using the desiredAccuracy property with one of the predefined constants that indicates the level of accuracy you desire. Setting this to a value of kCLLocationAccuracyBest gives you the best location within 10 meters; additional settings are available to an accuracy of 100 meters, 1 kilometer, and 3 kilometers. Although you have the option of setting a desired accuracy, the accuracy is not guaranteed; and the higher the accuracy setting, the more battery power and device performance are impacted.
What's in a Location?
The location-update event is fired with the new and old locations passed as instances of the CLLocation class. This class contains a number of properties of interest. Suppose that, in your application, you declare an instance of the LocationManager class called lm, and then at a suitable point you create an instance of the object and start updating the location as shown:
LocationManager* lm =[[LocationManager alloc] init];

[lm.lmstartUpdatingLocation ];
You can then provide an implementation for this event in your code. For example, let's output the location to the log file using the following example code:
// Handle your events as required here

NSLog(@"Long %f Lat %f",newLocation.coordinate.longitude,

 newLocation.coordinate.latitude);
If you execute your application in the simulator, after a short delay you should see output like this:
2011-08-24 15:50:51.133 locationExample[607:207]

Long 115.848930 Lat -31.952769
It updates every time your location changes. My simulator isn't fitted with a GPS, but if you have access to a network, then the simulator determines the location where you are. I used Google Maps to test this functionality, entering the latitude and longitude as a search string as follows:
-31.952769, 115.848930
This correctly returned my current location in Australia, as shown in Figure 10–1.
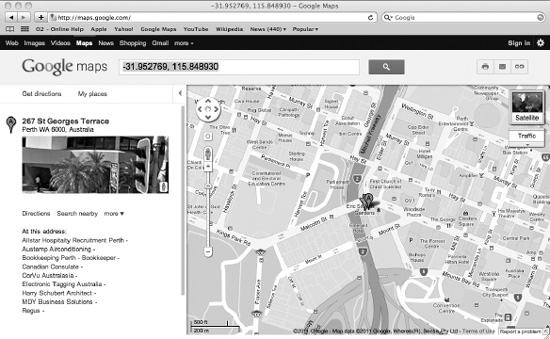
Figure 10–1. Using Google Maps to test the simulated GPS
You can do other things when the event is fired, using the CLLocation class. For example, you can calculate speed:
double gpsSpeed = newLocation.speed;
You can also look up the timestamp at which the coordinate was taken, or view the altitude in meters above (positive) or below (negative) sea level.
The .NET framework provides for similar capabilities as part of its System.Device.Location namespace, although as you'd expect, its implementation differs slightly. For example, you use the GeoCoordinateWatcher object to acquire data from the .NET location service, similar to your delegate class. The CLLocation class is replicated by the GeoCoordinate class in .NET, providing similar properties relating to location. Finally, the GeoPositionAccuracy property in .NET controls accuracy with the same effect on device performance, but it has two options: default (optimized for accuracy and device performance) and high accuracy.
As you can see, both SDKs have comparable features, and converting the code semantics from one to the other is relatively straightforward. You can find the .NET documentation at http://msdn.microsoft.com/en-you/library/system.device.location.aspx.
The iOS SDK's equivalent is at http://developer.apple.com/library/ios/#documentation/UserExperience/Conceptual/LocationAwarenessPG/Introduction/Introduction.html.
These are SDK-based capabilities, but other options always exist. If you are developing a web-based application, you can also consider HTML 5'sGeoLocationcapabilities.
Using the Camera
Another much-used capability in the iPhone and iPad is the device camera. In the case of more recent devices, there are two cameras—one front facing and one rear facing to support videoconferencing. Thankfully, as with the location-based services you've seen, the SDK provides methods for accessing these features. It is very easy to create an application to take advantage of the camera; the SDK provides a class called UIImagePickerController that provides access to the camera and the ability to take a photo and preview the results.
Let's take a look at the basics of implementing the camera and then walk through an example application.
Camera Basics
Create a simple project that employs a view controller, and then, in the didLoad method, enter the following code:
if (([UIImagePickerController isSourceTypeAvailable:

      UIImagePickerControllerSourceTypeCamera] == YES))

{

        UIImagePickerController *cameraUI = [[UIImagePickerController alloc] init];

        cameraUI.delegate = self;

        cameraUI.sourceType = UIImagePickerControllerSourceTypeCamera;

        cameraUI.allowsEditing = NO;


         [self presentModalViewController: cameraUI animated: YES];


} else NSLog(@"Camera not available");
This presents the camera, assuming one is available, and allows you to use the dialog to take photos—or video, if you switch to video using the picker. The mediatypes property controls which options the picker presents to you, and this can be set to kUTTypeMovie for movies, kUTTypeImage for camera, or as follows for a choice of both (where supported):
cameraUI.mediaTypes = [UIImagePickerController

 availableMediaTypesForSourceType:

UIImagePickerControllerSourceTypeCamera];
NOTE: On the iPad 2, you can also use a popover as the view controller.
The controller provides you with basic editing features such as scaling and cropping. Also, you can pass back to the delegate an image the user takes or selects from the library. It is then the responsibility of the delegate to dismiss the controller and process the image.
The following example provides a delegate method that retrieves the original image as passed back from the picker:
- (void)imagePickerController:(UIImagePickerController *)

 didFinishPickingImage:(UIImage *)image

editingInfo:(NSDictionary *)editingInfo

{

// Your processing code goes here

        // processing code


        // Dismiss the picker

         [p dismissModalViewControllerAnimated:YES];

}
You manage the same functionality on a camera-enabled Windows Mobile device in a similar way using the Microsoft.Devices.PhotoCamera class, along with a MediaLibrary object to hold the video/images captured from the camera. It's more complex than it is on the iPhone because a single class isn't provided, but you can argue that it gives you more flexibility.
Writing an Example Camera Application
You can easily piece together the example code fragments for a camera application. Start by creating a new project that uses the view-based template. This creates a project with the standard view controller and interface as you've done before many times in this book.
You need to add the appropriate framework to use your camera, so again as you've done before, go to the project's Build Phases tab (accessed from the root project settings) and add MobileCoreServices.framework to the Link Binary with Libraries setting. This provides access to the library that contains your camera code. Before you create your user interface, include the UTCoreTypes.h file in your header, ensure that two delegates are implemented for your image picker and navigation, and add the IBActions and IBOutlets for your Image property and the Camera and Roll buttons. Your code should resemble Listing 10-3, all of which should be familiar to you.
Listing 10-3. Camera Example ViewController.h File
#import <UIKit/UIKit.h>

#import <MobileCoreServices/UTCoreTypes.h>


@interface CameraExampleViewController : UIViewController

<UIImagePickerControllerDelegate, UINavigationControllerDelegate>

{


    UIImageView *imageView;

    BOOL newMediaAvailable;

}

@property (nonatomic, retain) IBOutlet UIImageView *imageView;

- (IBAction)useCamera;

- (IBAction)useCameraRoll;

@end
Open the view controller's Interface Builder file, and add your UIImageView control along with a toolbar that has two items: Camera and Roll. After you open the Connections Inspector in Xcode and connect the image and the Camera and Roll buttons, it should resemble the screen shown in Figure 10.2.
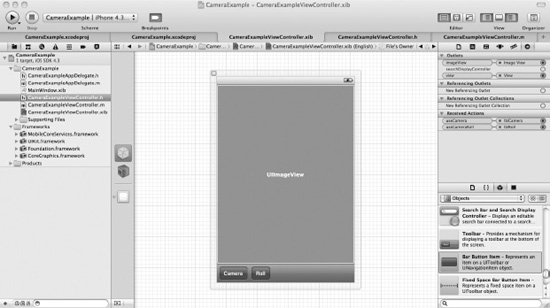
Figure 10–2 . The camera example user interface with connections made
You can now implement the code against both your Camera and Roll buttons, but don't forget to @synthesize your newMediaAvailable in your implementation. Let's start with the Camera button, using the code in Listing 10-4.
Listing 10-4. Implementing the useCamera Method Attached to the Camera Button
- (void) useCamera

{

    if ([UIImagePickerController isSourceTypeAvailable:

         UIImagePickerControllerSourceTypeCamera])

    {

        UIImagePickerController *imagePicker = [[UIImagePickerController alloc] init];

        imagePicker.delegate = self;

        imagePicker.sourceType = UIImagePickerControllerSourceTypeCamera;

imagePicker.mediaTypes = [NSArray arrayWithObjects:

(NSString *)kUTTypeImage, nil];

        imagePicker.allowsEditing = NO;

        [self presentModalViewController:imagePicker animated:YES];

        [imagePicker release];

        newMediaAvailable = YES;

    }

}
Its implementation is pretty straightforward. The useCamera method checks that the device on which the application is running has a camera. On the simulator this isn't the case, so you need to run this application on a real device to test it thoroughly. It creates a UIImagePickerController instance, assigns the cameraViewController as the delegate for the object, and defines the media source as the camera. The property that specifies supported media types is set to images only. Finally, the camera interface is displayed and the UIImagePickerController object is released. You set the newMediaAvailable flag to YES to indicate that the image is new; this is used to differentiate a dirty camera roll.
You next need to provide an implementation for the camera roll functionality, accessed from the Roll button. See Listing 10-5.
Listing 10-5. Implementing the Camera Roll Code Attached to the Roll Button
- (void) useCameraRoll

{

    if ([UIImagePickerController isSourceTypeAvailable:

         UIImagePickerControllerSourceTypeSavedPhotosAlbum])

    {

        UIImagePickerController *imagePicker = [[UIImagePickerController alloc] init];

        imagePicker.delegate = self;

        imagePicker.sourceType = UIImagePickerControllerSourceTypePhotoLibrary;

        imagePicker.mediaTypes =

[NSArray arrayWithObjects:(NSString *) kUTTypeImage,nil];

        imagePicker.allowsEditing = NO;

        [self presentModalViewController:imagePicker animated:YES];

        [imagePicker release];

        newMediaAvailable = NO;

    }

}
Again the functionality is pretty straightforward and very similar to the userCamera method, with the exceptions that the source of the image is declared to be UIImagePickerControllerSourceTypePhotoLibrary and the newMediaAvailable flag is set to NO, because it has already been saved.
You now need to implement a couple of important delegates. The first is the didFinishPickingMediaWithInfo method that is called when the user has finished selecting images. Its implementation is shown in Listing 10-6.
Listing 10-6. Saving an Image with a Delegate
-(void)imagePickerController:(UIImagePickerController *)picker

didFinishPickingMediaWithInfo:(NSDictionary *)info

{

    NSString *mediaType = [info objectForKey:UIImagePickerControllerMediaType];


    [self dismissModalViewControllerAnimated:YES];


    if ([mediaType isEqualToString:(NSString *)kUTTypeImage])

    {

        UIImage *image = [info objectForKey:UIImagePickerControllerOriginalImage];

        imageView.image = image;


        if (newMediaAvailable)

            UIImageWriteToSavedPhotosAlbum(image, self, @selector(image:finishedSavingWithError:contextInfo:), nil);

    }

}
Extract the mediaType, dismiss any open image-picker dialog boxes, and check that you are dealing with images (as opposed to video). Then, save the image to the image roll, providing it's a new image. When the save operation is complete, you call another method that displays an error if the save fails. This method is shown in Listing 10-7, along with the image-picker-cancel delegate that dismisses the open dialog box.
Listing 10-7. Trapping Errors and Dismissing the Picker Window
-(void)image:(UIImage *)image

finishedSavingWithError:(NSError *)error contextInfo:(void *)contextInfo

{

if (error) {

        UIAlertView *alert = [

[UIAlertView alloc]

initWithTitle: @"Image save failed"

message: @"Failed to save image"

             delegate: nil

cancelButtonTitle:@"OK" otherButtonTitles:nil];

        [alert show];

        [alert release];

    }

}

-(void)imagePickerControllerDidCancel:(UIImagePickerController *)picker

{

    [self dismissModalViewControllerAnimated:YES];

}
Finally, you need to tidy up. When you initialize the form, you set your image to nil; and when you deallocate memory, you release any memory the image may be taking up. These actions are achieved with the methods in Listing 10-8.
Listing 10-8. Tidying Up
- (void)dealloc

{

    [imageView release];

    [super dealloc];

}

// Implement viewDidLoad to do additional setup after loading

// the view, typically from a nib.

- (void)viewDidLoad

{

    [super viewDidLoad];

    self.imageView = nil;

}
If you try debugging the application using the simulator, then as mentioned, nothing happens, because the camera isn't supported. The camera roll is supported but in this case is empty; so if you choose this option the screen in Figure 10–3 is shown and the Cancel button should dismiss the dialog box as expected.
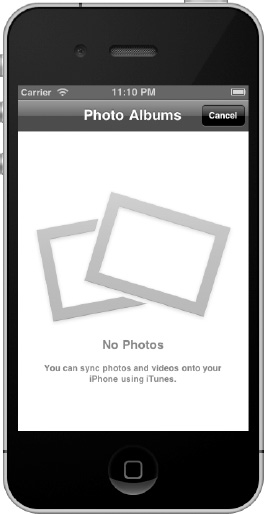
Figure 10–3. Viewing the camera roll in the iOS simulator
Using the Accelerometer
The iPhone and the iPad are capable of measuring both gravity and device acceleration by detecting the inertial force on a device in a given direction. In layman's terms, this means you can tell the orientation of the device, the speed of change, and whether the force of change is greater on one axis than the other, and therefore direction.
This three-axis detection capability means the device can detect these movements in all directions. Thus if you have your device facing you, moving it left/right is the x axis, moving it up and down is the y axis, and tipping it forward or backward is the z axis. You can see how this affects the x, y, and z axis values in Figure 10–4. (Note that the arrow points to the top of the device.) Zero represents no movement, and a positive or negative value represents force in a given direction. The trouble with diagrams is that representing z is a little difficult, so I describe it as the amount of acceleration your device is exhibiting. At a standstill, it represents gravity; and when you're lifting the device up or down, it's a positive or negative value proportionate to the acceleration.
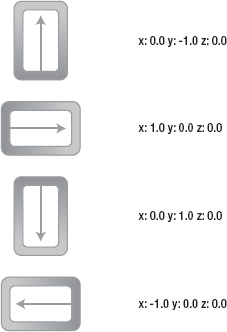
Figure 10–4. Axis values with rotation
The SDK provides access to the accelerometer feature using the Quartz 2D framework, although you have the option of using the OpenGL ES API that provides a finer level of control. The simulator doesn't support accelerometer functionality, so rather than take you through an example, I leave you to explore its capabilities using the example code provided and a real device.
With the default SDK implementation, you can implement a UIAccelerometer class instance as a singleton (only one instance). To retrieve this class, you use code like this:
UIAccelerometer *accelerometer = [UIAccelerometer sharedAccelerometer];
To then receive events that reflect a change in orientation, you use a pattern similar to that for the GPS. You set the delegate for the class to point to a class that conforms to the UIAccelerometerDelegate protocol. A difference, however, is that you have the ability to control the frequency of the updates by using the updateInterval property, which defines how many times per second the device is polled and so fires events, although it's not precise and isn't guaranteed. This lack of precision is a byproduct of the hardware engineering and the device's ability to raise events with a sufficient latency for you to capture and interpret. But in most circumstances, including complex GPS-based applications such as road navigation, it's perfectly appropriate. There is a solution, but it's not simple and involves capturing the events and using algorithmic functions to sample the data and predict the location with higher fidelity. You can find more information about such filters at http://en.wikipedia.org/wiki/Low-pass_filter#Algorithmic_implementation.
Let's look at this in code, first you implement the class that uses the required protocol; this could be your viewController. It looks like this:
@interface MainViewController : UIViewController<UIAccelerometerDelegate>

{

        // Header declaration here

}
You then provide its implementation, specifically the didAccelerate method to capture the events, as follows:
- (void)accelerometer:(UIAccelerometer *)accelerometer

didAccelerate:(UIAcceleration *)acceleration

{

        // Implementation to deal with the events goes here

        NSLog(@"%@%f", @"X: ", acceleration.x);

        NSLog(@"%@%f", @"Y: ", acceleration.y);

        NSLog(@"%@%f", @"Z: ", acceleration.z);

}
You've looked at instantiating your accelerometer class and seen how to define the delegate to capture the events, but you need to enable the accelerometer to do so. Choose a suitable location within your code to initialize the delegate and the update frequency—for example, in the application's view controller's DidLoad event. When you have a reference to the singleton class as shown earlier, you can use the following code to set the delegate and the update interval:
accelerometer.delegate = self;         // imps. UIAccelerometerDelegate

accelerometer.updateInterval = 1.0f/60.0f;        // every 60 seconds
There's not much more too it, other than to interpret the data as required in your code. Clearly, trying to bridge this code against a .NET counterpart is going to be difficult for two reasons: it is device dependent, and therefore the SDK will change. However, Windows Mobile devices have joined the iPhone and iPad in offering capabilities that let developers do everything from determining how often someone drops their phone to allowing users to control applications and games. If you were using an HTC-based device and managed code such as C#, you might access the API in the appropriate dynamic link library directly, which isn't nice; or if you were using Windows Mobile 7, you could use Microsoft.Devices.Sensors and the Accelerometer class, which is much better. Its implementation is very similar to that in iOS and is exposed through the Microsoft.Devices.Sensors namespace. As with the iOS accelerometer framework, the .NET implementation uses the Accelerometer class, which provides to its internal compass and gyroscope sensors through the Compass and Gyroscope properties, respectively. The Motion class is then used to capture data from the sensors, with different structures holding the data for the accelerometer, compass, gyroscope, and motion.
Overview of Gesture Detection
One of the most innovative features of the iPod Touch, iPhone, and iPad is the user interface's ability to detect gestures. This has given the device appeal to users of all ages and has brought one step closer the virtual-reality interface seen in movies. Cocoa Touch provides the UIKit framework that allows you to take advantage of this capability through features such as the UIGestureRecognizer class and the events it enables. Let's take a look.
Detecting Touch Events
The starting point is to capture the touch events sent by the user interface as you touch the screen. Using a standard view controller (UIViewController) or view (UIView), start by implementing the touchesBegan method:
-(void)touchesBegan:(NSSet *)touches withEvent:(UIEvent *)event

{

UITouch *touch = [touches anyObject];

NSUInteger        notouches = [tounches count];

gestureStartPoint = [touch locationInView:self.view];

}
All of the touch-related methods, including this one, are passed an NSSet instance called touches and an instance of UIEvent. The number of fingers currently pressed against the screen can be determined by getting a count of the objects in touches. Every object in touches is a UITouch event that represents one finger touching the screen.
The touch-event mechanism chains the touch events from different controls: this means you may receive a set of touches among which not all belong to your view. In this instance, you can retrieve a subset of touches that are relevant to your view by using a command similar to the following:
NSSet* touches = [event touchesForView:self.view];
When the fingers are removed from the screen, the reverse event is fired: touchesEnded:withEvent. Or if an event occurs that distracts the gesture, such as the phone ringing, then the touchesCancelled:withEvent is fired. The following code traps these touch events and writes some text to the debug console to suggest which one has taken place:
- (void)touchesBegan:(NSSet *)touches withEvent:(UIEvent *)event

{

    NSLog(@"Touches Began");

}


- (void)touchesCancelled:(NSSet *)touches withEvent:(UIEvent *)event

{

    NSLog(@"Touches Cancelled");

}


- (void)touchesEnded:(NSSet *)touches withEvent:(UIEvent *)event

{

    NSLog(@"Touches Ended");

}
When I first touch the screen, I see the following:
2011-08-25 21:47:23.044 Gestures[350:207] Touches Began
Then, when I let go, I see this event:
2011-08-25 21:47:23.116 Gestures[350:207] Touches Ended
Detecting Swipes
Detecting swipes is very similar to detecting touches. For a start, the code required is again included in the UIViewController or UIView class. In your view, implement the two events matched to swipes:
-(void)touchesBegan:(NSSet *)touches withEvent:(UIEvent *)event

{

        // Event processing to go here

}


-(void)touchesMoved:(NSSet *)touches withEvent:(UIEvent *)event

{

        // Event processing to go here

}
Once you have trapped the starting event, you can revert to the iOS SDK to capture the existing positions and then perform some calculations to determine the direction of the swipe. For example:
UITouch *touch = [touches anyObject];

CGPoint currentPosition = [touch locationInView:self.view];


CGFloat deltaX = fabsf(gestureStartPoint.x - currentPosition.x);

CGFloat deltaY = fabsf(gestureStartPoint.y - currentPosition.y);


if (deltaX >= kMinimumGestureLength && deltaY <= kMaximumVariance)

{

        NSLOG(@"Horizontal swipe detected");

}

else if (deltaY >= kMinimumGestureLength &&

  deltaX <= kMaximumVariance)

{

label.text = @"Vertical swipe detected";

       NSLOG(@"Vertical swipe detected");

}
Upon execution, you can use this information to detect direction and react to it as you would any other application event. Give ita try!
Targeting Multiple Devices with Your Code
If you want to write a single application that targets both the iPhone and the iPad, it's certainly possible—especially given that they both use iOS and the SDK framework. You need to detect the device and adapt your application dynamically to some obvious differences such as screen size; otherwise, your application will look very strange. You can also target more specific capabilities such as the iPad's ability to use popover view controllers, but again you need to detect this in code in order for your application to adapt.
There are a number of options to achieve this. You can of course use iOS SDK to target multiple iOS devices such as the iPhone and iPad. Additionally, if you want to target non–iOS-based devices, you can use one of the multiplatform third-party solutions discussed in Chapter 3—these even target non-Apple devices, but, as discussed, have their limitations. Another option is to write a web application, which is delivered to the device through the browser; but this limits the functionality available to you and doesn't work if you don't have connectivity to the web server hosting the application, unless you use some of the more advanced offline features of HTML 5.
Throughout the book, you've touched on a variety of mechanisms used for targeting different devices. Let's recap them:
- Orientation: Typically, all iPad applications support different orientations, and you should cater to this in your code. However, on the iPhone, it's not essential but advisable for your application to support different orientations.
- Layout: The large screen of the iPad provides more real estate for your application to use, and it should.
- Split views: An iPad-specific view controller allows you to split your application into two views, each of which is configurable.
- Popovers: In the same vein as split views, a popover is a unique way of presenting data on the iPad.
- Device features: Both devices have different hardware characteristics, and you should remember these when designing your application.
Here is a summary of considerations and techniques to keep in mind when you're writing code that is universal for both the iPhone and the iPad:
- Device: The iPad is the odd one out compared to other iOS devices, at least at the moment, because its screen is much larger than the iPhone or iPod Touch. Always consider how best to use this realestate.
- User interface: To create a user interface in your code that can target both devices, it's often easier to create an Interface Builder file (
.nib) for each device type and dynamically load the appropriate file for each device. - Classes: You should check to see whether a particular class exists for the device you are targeting before going ahead and using it. You can use the
NSClassFromString()method to see if a class exists in your device's library. It returnsnilif the class doesn't exist. - API capabilities: In some cases, classes exist on both devices but their capabilities differ. For example,
UIGraphicson an iPad has support for Portable Document Format (PDF), whereas the iPhone does not. - Publishing multidevice-capable apps: It's important to highlight to your customer base that your application is multidevice capable. You can do this when you submit your application. A plus sign (+) is shown in the App Store next to such applications.
- Images: The iPhone 4, the latest iPod Touch, and future iOS generations have the Retina display built in, which has increased resolution. This means apps look much sharper. iOS does everything it can to use the higher resolution; for example, text is automatically upscaled properly, as are all built-in UI components (buttons, sliders, navigation bars, toolbars, and so on). But it can't upscale images and graphics that you provide without help. Either use specific graphics for both devices and add the
@2xsuffix to graphics for Retina displays (for example,MyGraphic.pngfor non-Retina and[email protected]for Retina), or in your code use manual upscaling based on points.
What's New and on the Horizon?
So what's next? It's a million-dollar question, and Apple fans are always keen to find out. Even if Steve Jobs has decided to step down as CEO, you can bet that as Chairman he will still be involved in the future direction of the company.
This section considers what might be on the horizon for Apple and for general development on both the iPhone and iPad. There are no guarantees, of course, but I hope you find it an interesting insight into what may come next. Other sources for such information include Apple's World Wide Developer Conference (WWDC) 2011 and the industry press.
The iCloud
As is the case in most of the industry, the cloud is playing far more of a part in Apple solutions today. No longer are the capabilities of the device the only thing your application can use—if you're connected to a network of some description, including the Internet, then you can consume and use capabilities provided via the network on your device. For example, this might be storage, or a network-based service that streams video content. Your application can use the cloud to extend its reach beyond the local device's capabilities to embrace such technologies and, for example, bring a catalogue of thousands of films onto your device.
Apple's iCloud contains a suite of applications that represents Apple's functionality in the cloud. iTunes in the cloudis one such application, allowing you to stream content. It can store all your content and push it to all your devices, all from the cloud.
One way of using the iCloud is to enable your code to take advantage of the user's iCloud account (they need to be logged in) to synchronize data from the local device to the storage provided by iCloud, allowing your application to carry state between devices. For example, the Safari Reader stores articles you've saved for offline reading in the iCloud, making them available to both the iPhone and iPad you may be lucky enough to own.
iOS 5
It's not like iOS 4 is a slouch—it's still a very good mobile operating system. However, as is true for the entire industry, there is always somebody trying to do better. In the case of mobile devices, that is Microsoft and Google—especially Microsoft, with the release of its new Windows Phone 7 platform. Apple hasn't sat back and relaxed; it's been working on iOS 5, which despite an increase in features can still run on all the same devices as iOS 4.3.
A major change is in the space of notifications, which instead of interrupting the flow of your application are now captured centrally on the device's Notification Center. Here you can view all your notifications at your conveniencewith a downward swipe of the screen, clearing them when you're finished.
Another cool feature is the Newsstand, an application that is very similar to iBook but allows you to manage digital publications such as magazines and newspapers.
Social networking is certainly nothing new, but native integration into iOS 5 of features such as Twitter has been introduced. A single application supports all the features you'd expect, such as uploading photos and videos, tweeting, and so on, and integrates them into other iOS applications such as your contacts. Yes, Twitter existed as an app on previous versions of iOS, but not with such tight integration.
Other applications have been upgraded to better compete with Apple's competitors and to allow better use of the device's capabilities. The Camera app is one such example, with more editing features, and the Mail application has been enhanced.
Some of the other device-wide features introduced include an OS-wide dictionary, wireless syncing with iTunes, and split keyboards for ease of use.
Let's take a look at some of the new additions to the iOS family in a little more detail.
Notification Center
Both a unique feature and an irritation for many is the fact your iOS device raises notifications for all kinds of events and against all kinds of applications. Whether it's a new e-mail, an SMS message, or a Facebook update, notifications are the way of the world on your iOS device. The Notification Center doesn't remove this functionality—far from it. It simply allows you to keep track of your notifications in one convenient location. You can still configure which ones you are interested in, but they present themselves subtly on your screen, much like the iAds in applications of today; and they fade if you do nothing with them—or you can swipe to interact with them.
iMessage
This new messaging service, built into the existing Messaging App, lets you hold single or group-based conversations and exchange text, photos, and video as part of those conversations. You can see when someone is typing at the other end of your conversation, recover delivery and read receipts, and even hold conversations that span devices—for example, starting on an iPhone and picking up on aniPad.
Newsstand
The use of the iPhone, and especially the iPad, for reading magazines and newspapers has grown significantly, and it's no surprise that Apple has released an app that helps you manage these different subscriptions. Your subscriptions are updated automatically in the background, so the Newsstand looks just like a shelf in a magazine store with each subscription showing the cover of the latest issue. Very neat!
Reminders
This simple little app enables you to manage your to-do list, allowing you to set reminders and due dates. It even works with iCloud and Outlook, meaning you can ensure that updates are reflected on any other devices you may have.
The growth of social media has taken many by surprise, and Twitter's popularity has been recognized by Apple via its inclusion in iOS 5. It's no longer just an app, but an integrated capability. Once you've logged on, you can tweet from many of the default iOS apps including Safari, Photos, the Camera, and more.
Other Updated Features
The updates just mentioned are a taster of the features introduced in iOS 5. Many other improvements are included, such as the following:
- Camera: This is now available from the Lock Screen, allowing you to capture moments you might previously have missed while unlocking the device. You can also synchronize your photos with the iCloud if you have Photo Stream enabled; it's a cloud-based photo storage capability in iCloud.
- Photos: You can now frame, crop, and rotate your photos, allowing you greater on-device control of the photos you've taken. A red-eye reduction feature has been included as well, as well as integration with iCloud, so you can synchronize your photos in the iCloud.
- Safari: The browser has been upgraded with features that allow you to focus on web surfing and not be distracted. Safari Reader lets you read articles offline and even keep them in the iCloud for storage, so you can access this information from any of your devices that have access.
Summary
In this chapter, you looked at some of the more advanced features found in iOS and the SDK. You took a tour of how to use the GPS on your device to create location-aware applications. You saw how to use the accelerometer to detect movement and orientation of the device. You also looked at the camera and what support has been included in the SDK for you to embrace its capabilities for taking photos and video.
The ability to target multiple devices without writing two different applications may be important to you, and you looked at the ways you can do this and the considerations involved when undertaking this task. Finally, you examined what Apple may have in store in the future.
At the beginning of the book, I took you from understanding the capabilities of iOS-based devices such as the iPhone and iPad to the features available through Apple's own native toolset, such as the iOS SDK and Xcode. You also looked at third-party tool options and even built simple “Hello World” apps with some of them. You then stepped through an Objective-C primer, drawing parallels with the .NET C# language; and over a series of chapters, you walked through numerous iOS SDK frameworks that implement functionality similar to that found in the .NET Framework. Examples in the chapters got you started building a Lunar Lander example application, and you looked at means of extending that application's features through libraries. You finished with overviews of testing, deploying, and publishing iOS applications, and considered several advanced features in this chapter.
Now that you've completed the main body of the book, please take a look at Appendix A for suggestions for completing the Lunar Lander example app on your own. I look forward to seeing the App Store full of Lunar Lander variants built on the back of this book. Good luck!