
Chapter 8. Dynamic security
This chapter is recommended for
| Business analysts | |
| Data architects | |
| Enterprise architects | |
| Application developers |
In chapter 6 you saw how Adventure Works was able to use roles and grants to restrict access to data based on a user’s role. Most small and medium businesses that use Mondrian for internal only purposes can usually get by with such standard features. But as the numbers of users, roles, cubes, and clients grow, managing a Mondrian installation can become an administrative challenge. In a previous example from chapter 6, you saw how Adventure Works wanted to limit the state sales manager to only see the data from their state. The solution was to create a separate role for each state and assign managers to those roles, a tedious and error-prone solution. Additionally, many companies want to be able to provide Mondrian data to their clients. It’s imperative that each client only sees their own data and not data from other clients.
This chapter will discuss the solutions to these challenges. Although there are many approaches to solving these problems, the examples provided in this chapter are specific to Pentaho because most enterprise users of Mondrian use it as part of Pentaho. The examples in this chapter involve Java code and are mainly aimed at the software developer, but it’s important for the enterprise architect to understand these concepts as well.
Figure 8.1 shows the high-level process we’ll use to restrict data in this chapter. First, we’ll set some values in the user session to restrict data. Then we’ll use two approaches to restrict access to data. The first is to modify the schema to restrict data based on the database query. The second is to assign users a custom connection and role that Mondrian uses to evaluate whether a user has access to certain data. The rest of this chapter will focus on implementing dynamic security.
Figure 8.1. Dynamic security process

8.1. Preparing for dynamic security
Before data can be restricted, you need a way to determine which data a user is allowed to see. The approach we’ll use in this chapter involves setting session attributes for the users when they log in and then checking the values of these attributes when queries are made to Mondrian—the values will indicate whether the user is allowed access to the data.
There are two common approaches to setting session attributes for the user. In scenarios where Pentaho is part of a larger infrastructure with single sign-on, the values are often set during the sign-on process. In other cases, the values are set using action sequences when a user logs in.
8.1.1. Creating an action sequence
An action sequence is an XML document that the Pentaho runtime engine knows how to run. It causes various components to execute, it provides access to information about the user, and it can write to the user session. Finally, there’s a special configuration that can cause the action sequences to run when a user logs in.
Action sequences will eventually go away
Pentaho 5.0 will dramatically reduce the use of action sequences in favor of using Kettle transformations. But startup action sequences will still be supported.
Listing 8.1 shows the main part of a simple action sequence, set_session_vars.xaction, that sets some session attributes in the user session. The first attribute is USER_REGION _CODE, which will be used with a dynamic schema processor (described in section 8.2) to restrict the region for the user. The second is USER_STATE_PROVINCE_NAME, which is used to restrict the state for the user. In this example we’re using fixed values. In a real system, this value would come from a database, as a parameter or in some other way. For our purposes, it doesn’t matter how the data ends up in the session, so long as it does.
Listing 8.1. Setting user session values

8.1.2. Configuring and running the action sequence
Now that the action sequence is written, it needs to be run. If the action sequence is inside a visible Pentaho folder, it can be run by double-clicking it, the same way you can run saved analyses and reports. This is very convenient for testing because it’s easy to see what the results of the action sequence are.
If you run the preceding action sequence, you should see something like figure 8.2.
Figure 8.2. Results showing values from the action sequence

The final step is to make the action sequence run when a user logs in. Pentaho has a special configuration file called sessionStartupActions.xml in the pentaho-solutions/system folder that allows you to specify action sequences to run when the server starts or a user logs in. To configure a new action sequence, you just need to add the XML in listing 8.2 into the sessionStartupActionsList bean’s constructor list.
Listing 8.2. Configuring the action sequence to run on session start
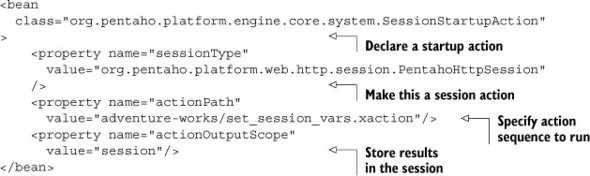
Now any time a user logs in, they’ll have session attributes of USER_REGION_CODE and USER_STATE_PROVINCE_NAME that can be used by code in the system.
Testing the action sequence
If the action sequence is in a visible solution folder in Pentaho, you can run it like a report from the Pentaho User Console. The displayed content will show the output of the report. This is very useful for initial testing to make sure the action sequence is working as desired.
In the next section, we’ll look at how you can use a dynamic schema processor to restrict data based on the region value. Finally, we’ll use a different approach and modify the user roles to restrict data based on the state value.
8.2. Restricting data using a dynamic schema processor
A dynamic schema processor (DSP) is a custom processor that’s run whenever Mondrian makes a connection, such as when a user starts a new Analyzer report. Prior to Mondrian using the schema, the DSP can modify the schema. There are no restrictions on what modifications can be made, but the two most common uses of a DSP are to support localization and to restrict access to data in multi-tenanted environments. We’ll demonstrate the second use of restricting data in this section.
The DSP is a Mondrian feature
The DSP is not specific to Pentaho, although the way we’ll configure it here is. Any system that includes Mondrian as the analytics engine can use dynamic schema processors.
8.2.1. Modifying the schema to support a DSP
A multi-tenanted environment is one in which data is stored for multiple different customers (tenants) in the same database. Each of the tables contains a column that specifies which tenant the data is for. For example, Company A might have a 1 in the tenant ID column for records that relate to Company A. Company B would have a 2, and so forth.
The advantage to this approach is that there’s only one database to manage for all tenants, rather than a separate database for each tenant. The major concern, however, is that you must ensure that tenants only see their own data. The solution is to make sure all queries use the ID of the tenant.
The Adventure Works database isn’t multi-tenanted, so we’re going to restrict data based on the region. The technique is the same for tenants; we’re just using a different column. This same approach can be used to restrict on any column in the database.
Chapter 4 introduced the PhysicalSchema with the Table and Query elements for declaring tables. In this example, we’ll need to use the Query element to restrict the data because it’s the only one that allows you to specify the where clause.
Listing 8.3 shows the Query with a SQL element. Notice that the element contains a WHERE clause and %USER_REGION%. At runtime we’ll modify the query to replace %USER_REGION% with the value for the specific user.
Listing 8.3. Virtual table using a query
<Query alias="dim_customer_geography" keyColumn="CustomerKey">
  <ExpressionView>
    <SQL>
    select c.CustomerKey,
           g.CountryRegionCode, g.StateProvinceName, g.City
    from dim_customer as c
    join dim_geography as g on c.GeographyKey = g.GeographyKey
    where g.CountryRegionCode = %USER_REGION%;
    </SQL>
  </ExpressionView>
</Query>
Schema change from Mondrian 3
If you’re familiar with this technique in Mondrian 3, you’ll notice a change. In Mondrian 3, a SQL element could be applied to the Table element to specify a where clause. This functionality was removed in Mondrian 4.
8.2.2. Example dynamic schema processor
Now that the schema has been modified for use with the dynamic schema processor, you need to create the code to make the runtime modifications. The dynamic schema processor only requires a single class and method, as shown in listing 8.4. This class extends the LocalizingDynamicSchemaProcessor, which is the default schema processor used with Mondrian and which provides support for internationalization of schemas (such as changing column names). Any class that implements the DynamicSchemaProcessor interface can work as well.
Listing 8.4. Dynamic schema processor

The Java code should be compiled to bytecode and deployed in a JAR file to the Pentaho server lib file, usually under tomcat/webapps/pentaho/WEB-INF/lib if you’re running in the default configuration with Tomcat. The core requirement is that the class be in a location that can be found by the Java classloader at runtime.
Where to put the new code
If you’re using the DSP with Analyzer, you should put the JAR file in the tomcat/webapps/pentaho/WEB-INF/lib folder. If you’re using the DSP with Saiku in its default deployment, put the JAR file in the pentaho-solutions/system/saiku/lib folder.
This example is straightforward. You first localize the schema by calling the parent. Then you get the region for the user and substitute it everywhere it occurs in the schema. Finally, you return the schema as a string to the caller.
8.2.3. Configuring the DSP
The last step required to get a DSP to work is to tell Mondrian to use the dynamic schema processor for this schema. This configuration is done in the datasources.xml file located in the pentaho-solutions/system/olap directory.
Listing 8.5 shows the catalog declaration using the dynamic schema processor. DynamicSchemaProcessor is the full class name for our new class, and it must be in the classpath of the Pentaho server as described previously. UseContentChecksum should always be set to true—this property tells Mondrian to use the checksum of the schema to determine uniqueness and map to the cache. If this is false, it’s possible to get incorrect values for a particular user.
Listing 8.5. Dynamic schema processor configuration
<Catalog name="AdventureWorks">
  <DataSourceInfo>Provider=mondrian;
    DataSource=AdventureWorksDW;
    DynamicSchemaProcessor=
      mondrian.in.action.DynamicSchemaProcessor;
    UseContentChecksum=true
  </DataSourceInfo>
  <Definition>
    solution:adventure-works/adventure_works.mondrian.xml
  </Definition>
</Catalog>
Pentaho 5.0 Changes
In Pentaho 5.0, you will no longer use the datasources.xml file to configure Mondrian catalogs. Instead, you will set the properties when importing a Mondrian schema into the Pentaho repository.
Figure 8.3 shows some of the original data without the filter, and figure 8.4 shows the data with the filter. In the latter case, only the data where the user region is US is shown. The next step is to restrict at the state level using custom roles.
Figure 8.3. Unfiltered data

Figure 8.4. Data filtered by region

8.3. Restricting data using dynamic role modification
Adventure Works wants to restrict sales managers so they can only see information about customers in their state. For example, the sales manager for the state of Washington should only see the sales for Washington. As you saw in chapter 6, Adventure Works could create a separate role for each sales manager and assign each manager to that role, but this adds fifty roles in just the United States. That alone would be very complex to manage. Now imagine an organization that wants to filter thousands of stores and limit managers to see only data for their store. The management of roles would become quite complex.
Most organizations already have information about users that defines what roles they have, where they work, who their clients are, and so on. This information can be used at runtime to dynamically create roles for users and restrict data access. This is possible because Mondrian supports the concept of a delegate role that determines access.
In section 8.1 you saw how to set session variables for a user. In a production environment, these action sequences would retrieve data about the user from a database or other location and put it into the session. In our example, we manually set the state via the action sequence for testing. Now we’ll use the session variable to restrict the data.
Custom roles are not combined
Normally if a user belongs to multiple roles, the roles are combined. But when you use a custom role as described here, it’s the only role that’s applied for the user. It’s not combined with other roles.
With the dynamic schema processor, we only needed to create one class. For this approach, three classes are needed; they’re all simple, but each provides a different customization. These are the three classes:
- CustomMDXConnection replaces the defined role with a custom role.
- CustomRoleDelegate controls access to member data.
- CustomHierarchyAccess is an inner class of CustomRoleDelegate and helps with access control.
In the rest of this section, we’ll look at preparing the schema for the custom delegate role and at each of these three classes.
Cache considerations
One consideration when deciding to use a dynamic schema processor instead of a custom role is the cache. Mondrian uses the checksum of the schema to distinguish caches, and because the DSP modifies the schema, there’s a separate cache for each resulting schema. The custom role is applied at a higher level than the schema, so cache data can be shared even if the results are different for each user. The downside is that the custom role can be slower than the dynamic schema processor.
8.3.1. Preparing the schema
Before you can apply a custom role, you need an existing role to modify. This can be any role that the user will have, but you should consider the access for users who don’t have that specific role. As shown in listing 8.6, we’re limiting the sales manager role. When the connection is made, the existing role will be replaced with the custom role. Keep in mind that you may need to limit other users who aren’t in the sales manager role by restricting access to the cube, because those users won’t be affected by the custom role and won’t have their data restricted.
Listing 8.6. Predefined role
<Role name="Sales Manager">
  <SchemaGrant access="all">
    <CubeGrant cube="Internet Sales" access="all">
      <HierarchyGrant hierarchy="[Customer Geography].[Geography]"
                      access="custom" rollupPolicy="partial">
        <MemberGrant member="[Customer Geography].[Country].[US]"
                     access="none"/>
        <MemberGrant member="[Customer Geography].[State].[California]"
                     access="all"/>
      </HierarchyGrant>
    </CubeGrant>
  </SchemaGrant>
</Role>
One additional aspect of this role is that it must include a valid MemberGrant that has a legitimate member that exists in the database. If the MemberGrant isn’t included or the member doesn’t exist, the call to check for access is optimized away and the code will never be invoked.
Note that as this is written, the user will never see any members in the given hierarchy because access specified for the MemberGrant is none. This effectively disables access by default so the custom role can give it back.
Restricting all dimensions
A role only restricts access to the dimensions that it’s told to restrict. In Analyzer you can drag a dimension to the canvas and see all of the members. If there’s an unrestricted role, all members are shown unless the restricted dimension or a measure is included. For example, if a user is restricted only by state and they drag only the customer names to the canvas, they would see all customer names, even those for other states, until a measure or the state level is added. If this is a problem, customers also need to be restricted.
8.3.2. Custom MDX connection
The custom MDX connection is what allows the custom role to be used by Mondrian when determining access. Listing 8.7 shows the custom MDX connection class.
Listing 8.7. Custom MDX connect

The class extends the MDXConnection that’s normally used and overrides the init method. This method is called whenever a connection is made to Mondrian. All this class does is create a new custom role and assign it to the connection.
One important thing to note about the example is that you must have an Authenticated role already defined. You could use any role, but the role should already exist as a starting point, and it must be a role that the user will have.
8.3.3. Custom delegate role and custom hierarchy access
Now that you have a custom delegate role assigned to the connection, you need to create the role and its helper class. Listing 8.8 may appear complex, but most of it is boilerplate code that routes the decision to the getAccess method.
Listing 8.8. Custom role delegate

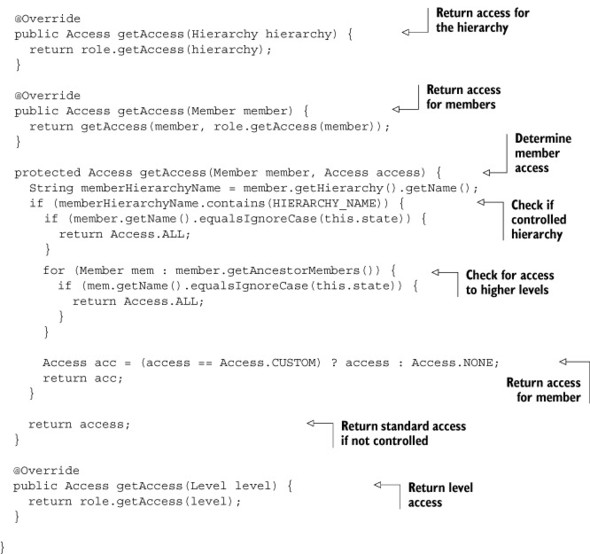
The getAccess method is where the decision is made as to whether or not the user has access to the data member. The first check determines whether this is the member the user is allowed to see. If not, a check is made to see if the member is in the hierarchy of the restricted member. Finally, the original access is returned if the access is custom, or NONE if not.
8.3.4. Configuring the custom MDX connection
The final step in getting the custom delegate role to work is to configure it in pentaho-Objects.spring.xml. Simply replace the existing MDX connection declaration with one like that in listing 8.9. This configuration tells Pentaho to use the custom class whenever a connection to Mondrian is made.
Listing 8.9. Configure custom MDX connection
<bean id="connection-MDX"
      class="mondrian.in.action.CustomMDXConnection"
      scope="prototype">
  <property name="useExtendedColumnNames" value="true" />
</bean>
Figure 8.5 shows the data without the restriction by state. As you can see, the user sees all states and not just those they should be restricted to. Figure 8.6 shows the results when the dynamic roles are applied. In this case, the user can only see the state they’re granted access to.
Figure 8.5. No restriction on state

Figure 8.6. Restricting by state

The custom delegate role approach is very powerful because it allows you to dynamically modify a role at runtime. You can implement virtually any customization, but you have to understand how the role will be invoked. There are currently plans to simplify and improve dynamic roles in a future version of Mondrian, but this approach works with the existing version.
8.4. Deciding which security approach to use
The dynamic schema processor and custom roles are two different ways you can achieve the same goal of restricting data, but which approach you should use is not always obvious. This section describes some factors to consider when making your decision.
To use a DSP for data security, you must have something in your data to restrict on. This is usually an ID for the user or the group the user belongs to. The nice thing about using a DSP is that it can significantly reduce the amount of data returned to Mondrian for processing. The drawback is that each DSP causes a separate in-memory cache that can impact performance and lead to complexity in clearing the caches.
The custom-role approach requires that you know what you want to restrict for the user. Usually the restriction is at the member level, so you must have all of the members available for restriction. If you want to restrict members within more than one dimension, you’ll have to restrict all of them, which can lead to some fairly significant data being stored in the user session.
Although custom roles share a common cache, possibly improving performance, they also require that all data be brought back from the database for a given user. If there is a large number of users who all have custom views of the data, this may not be faster than reducing the data returned by using a DSP. You’ll have to think about how the data will be returned and possibly experiment to see which approach provides security while maintaining performance.
8.5. Summary
This chapter showed you how to apply custom security when running Mondrian in Pentaho. We first looked at one approach to setting values in the user session that can be used to restrict data access. Then we looked at two approaches to restricting data:
- A dynamic schema processor that rewrites the schema to restrict access to data
- A custom role that restricted data at runtime to a single state
Both of these scenarios are common for enterprise users of Mondrian as well as for multi-tenanted environments.
In the next chapter, we’ll examine various ways that Mondrian data can be presented to users with Pentaho. The security techniques in this chapter apply in all of those cases as well. No matter what the presentation is—table, report, chart, or dashboard—the same security restrictions will be applied in all cases.