14. Discovering the GoPro QUIK Desktop Software

This chapter introduces the free QUIK Desktop and GoPro Studio software, which is powerful video-editing software for the PC and Mac. Here’s what’s covered:
![]() Getting an overview of the GoPro QUIK Desktop software and how to use it to quickly preview, edit, and share videos
Getting an overview of the GoPro QUIK Desktop software and how to use it to quickly preview, edit, and share videos
![]() Learning about the more advanced GoPro Studio software’s key features and functions, and discover why this free PC and Mac software is the perfect companion for GoPro cameras
Learning about the more advanced GoPro Studio software’s key features and functions, and discover why this free PC and Mac software is the perfect companion for GoPro cameras
![]() Discovering how to import content from your camera into the QUIK Desktop and GoPro Studio software for editing
Discovering how to import content from your camera into the QUIK Desktop and GoPro Studio software for editing
![]() Understanding video-export options offered by the GoPro QUIK Desktop and GoPro Studio software
Understanding video-export options offered by the GoPro QUIK Desktop and GoPro Studio software
You can use a GoPro camera to shoot HD video. However, the video you shoot then needs to be edited prior to being presented to your intended audiences. Although there are many versatile video-editing software applications available for PCs and Macs, the free GoPro QUIK Desktop and GoPro Studio software was developed by GoPro, and it’s designed specifically for editing video shot using the GoPro cameras.
As a result, this software, which you can download from GoPro’s website (https://shop.gopro.com/softwareandapp), offers many editing and video-enhancement tools that you will not find in most other video-editing software or mobile apps. For example, as you’re importing raw video content into GoPro Studio, you can automatically remove the unwanted fish-eye effect from your video content with just a few mouse clicks. It’s also possible to import raw (unedited) video footage shot at different resolutions, frames per second (FPS) rates, and varying field of view (FOV) settings, and edit them together into one seamless video presentation.

The QUIK Desktop is ideal for quickly creating professional-looking videos from your raw video footage. This software offers much the same functionality as the QUIK Mobile app, which can be used for editing and sharing video while on the go via your smartphone or tablet.
For more advanced video editing, the GoPro Studio software, also for the PC and Mac, provides a complete toolkit with a broader range of features and functions. For example, using GoPro Studio, you can add scene transitions and customized titles to your videos.
Without investing a tremendous amount of time in editing your videos, it’s possible to achieve professional-quality results, which can include adding visual special effects, titles, captions, background music, sound effects, voiceovers, and other post-production elements into your video projects. Then you can export and save your video in a variety of industry-standard video file formats. This includes sharing your videos online by uploading them directly to Facebook or YouTube.
Video Editing Is Both a Skill and an Art Form
Understanding the Video Editor’s Role
Learning to become an amateur video editor is an entirely different skillset than being a videographer. Your goal as the video editor is to analyze the raw (unedited) video that’s been shot and then choose the best shots and scenes to include in the final video presentation.
Your responsibilities include creatively piecing the best of the raw content together into a presentation that’ll appeal to the intended audience. A good videographer will always shoot plenty of extra raw video footage, so the video editor has as much content as possible to work with. As the video editor, you might start with an hour or more of raw video footage, but you need to select only the best content to showcase within your much shorter video presentation, which may only be three to five minutes long.
During the video-editing process, you’ll need to utilize the video-editing software’s tools to seamlessly blend various shots and scenes together so that they tell a coherent story in the least amount of time possible. Most videos on YouTube, for example, are between three and five minutes in length, and they’re seldom longer than 10 minutes.
When necessary, you also choose the best visual special effects, animated scene transitions, frame/image enhancements, and audio (music, sound effects, prerecorded audio, and/or voice overs, for example) that can be used to enhance the quality of your project.
Learning to effectively and efficiently use a powerful video-editing software application or mobile app will take time, dedication, and practice. This chapter offers a brief overview of what’s possible using the GoPro QUIK Desktop and GoPro Studio software on your PC or Mac.
Overview of Video Editing
Regardless of which video-editing software you use, after you’ve filmed your video, your post-production efforts can be broken down into several key steps. All creative decisions you make from this point forward should be based on what you believe will appeal to your intended audience, and how you can effectively capture and hold their attention as your video entertains, informs, or achieves its ultimate goal.
These key video-editing steps include
• Transferring the raw video content from your GoPro camera’s memory card into your video-editing software.
• Gathering other production elements that will be included within your video project, such as digital photos, sound effects, and music tracks.
• Storyboarding your video project and deciding which shots or scenes will be edited together, and in what order. You can do this in your head, or you can actually draw it out on paper using a storyboard format. See the nearby sidebar for more information.
• Using the video-editing software to trim or edit each video scene, shot, or clip, and then placing that content into your video project in the best sequence.
• Adding special effects or visual enhancements to the video footage, as needed.
• Incorporating visually interesting shot or scene transitions to help your video flow smoothly.
• Editing or enhancing the video’s audio and deciding when and where to include sound effects, appropriate background music, and/or voiceover narration.
• Creating and inserting text-based titles and/or captions into your video.
• Previewing the edited video and making any final editing decisions that will help the project appeal even more to its intended audience.
• Saving the edited video and exporting it to an appropriate file format and resolution, based on how it will be utilized, distributed, or presented.
Getting Started with the GoPro QUIK Desktop Software
QUIK Desktop is GoPro’s video-editing application and is designed to be easy to use. It offers a small collection of features that allow you to quickly import your content, edit it into a cohesive video production, and then save and/or share it. But first you have to download and install the software.
Download and Install the Software
If you’ve chosen to use the GoPro QUIK Desktop software as a video-editing tool, begin by downloading the latest version of the software to your PC or Mac:
![]() Using your favorite web browser on your Internet-connected PC or Mac, visit https://shop.gopro.com/softwareandapp.
Using your favorite web browser on your Internet-connected PC or Mac, visit https://shop.gopro.com/softwareandapp.

![]() Scroll down to the QUIK Desktop software description, and click on the Learn More button.
Scroll down to the QUIK Desktop software description, and click on the Learn More button.

![]() Click the Download Now button. The webpage automatically determines whether you’re using a PC or Mac and downloads the correct version of the software to your computer.
Click the Download Now button. The webpage automatically determines whether you’re using a PC or Mac and downloads the correct version of the software to your computer.

GoPro Studio Is Included
When you click the Download Now button to download and install the QUIK Desktop software, the GoPro Studio software also gets downloaded and installed. These are two separate software packages, but they can work with each other to provide you with a comprehensive video-editing toolset.
![]() After the download completes, double-click the downloaded file’s icon to install it. (Shown here on a Mac.)
After the download completes, double-click the downloaded file’s icon to install it. (Shown here on a Mac.)

![]() Follow the on-screen prompts to continue the installation process. When installation is complete, launch the software to begin using it.
Follow the on-screen prompts to continue the installation process. When installation is complete, launch the software to begin using it.

![]() The first time you launch the software, you see the QUIK Welcome screen. Click the Get Started button to continue.
The first time you launch the software, you see the QUIK Welcome screen. Click the Get Started button to continue.

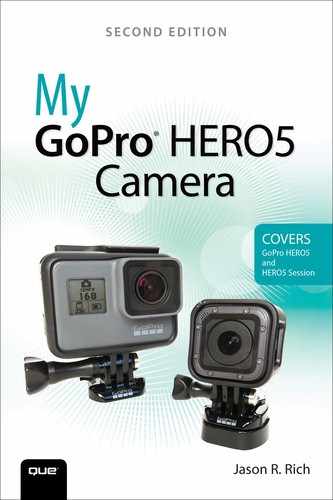
![]() Create a free GoPro online account (which is separate from a GoPro Plus account), and then log into that account. If you already have a GoPro online account, click the Sign In option and then enter your username and password when prompted.
Create a free GoPro online account (which is separate from a GoPro Plus account), and then log into that account. If you already have a GoPro online account, click the Sign In option and then enter your username and password when prompted.
GoPro Plus
GoPro Plus is a subscription-based online-based service operated by GoPro that, among other things, allows you to upload your photo and video content, archive it, and the sync it between all of your computers and mobile devices that are also connected to the Internet. If you have a GoPro HERO5 Black, it can be set up so content is automatically uploaded to your GoPro Plus account.
Import Your Content into the QUIK Desktop Software
The first step involved with using QUIK Desktop (or GoPro Studio) is to transfer your content to your computer and then import it into QUIK Desktop’s Media Library. The steps here are shown on a Mac, but the process is similar for a PC:
![]() Using the supplied USB cable, connect your GoPro camera to your computer’s USB port. Alternatively, remove the camera’s memory card and insert it into a memory card reader, and then connect the memory card reader to your computer via its USB port.
Using the supplied USB cable, connect your GoPro camera to your computer’s USB port. Alternatively, remove the camera’s memory card and insert it into a memory card reader, and then connect the memory card reader to your computer via its USB port.

![]() Turn on the computer and launch the QUIK Desktop application (not shown).
Turn on the computer and launch the QUIK Desktop application (not shown).
![]() Turn on your GoPro camera (not shown). The QUIK Desktop software identifies the camera and displays The Device Window screen.
Turn on your GoPro camera (not shown). The QUIK Desktop software identifies the camera and displays The Device Window screen.
![]() Begin importing the camera’s memory card contents by clicking on the Import Files option.
Begin importing the camera’s memory card contents by clicking on the Import Files option.

Changing the Default Location
If you want to import to a location other than the default location, click the Edit icon.
![]() The progress indicator displays the number of files that have been successfully transferred, along with the total number of files to be transferred. Depending on how much content needs to be transferred, this import could take between several minutes and an hour or two.
The progress indicator displays the number of files that have been successfully transferred, along with the total number of files to be transferred. Depending on how much content needs to be transferred, this import could take between several minutes and an hour or two.

![]() When the transfer process is completed, thumbnails representing each image or video clip are displayed within the software’s Media Library screen. The View tab at the top of the screen is selected by default. Your content is sorted by the time/date it was created. In general, you can access this screen anytime by clicking the Media option.
When the transfer process is completed, thumbnails representing each image or video clip are displayed within the software’s Media Library screen. The View tab at the top of the screen is selected by default. Your content is sorted by the time/date it was created. In general, you can access this screen anytime by clicking the Media option.
![]() Sort the content by clicking the Filter By option and choosing All, Photos, Videos, or HiLights.
Sort the content by clicking the Filter By option and choosing All, Photos, Videos, or HiLights.
![]() Click the Add Media option to import additional content from other sources (such as your computer’s hard drive).
Click the Add Media option to import additional content from other sources (such as your computer’s hard drive).
![]() GoPro cameras that are turned on and connected to the computer are displayed below the Connected Devices heading.
GoPro cameras that are turned on and connected to the computer are displayed below the Connected Devices heading.
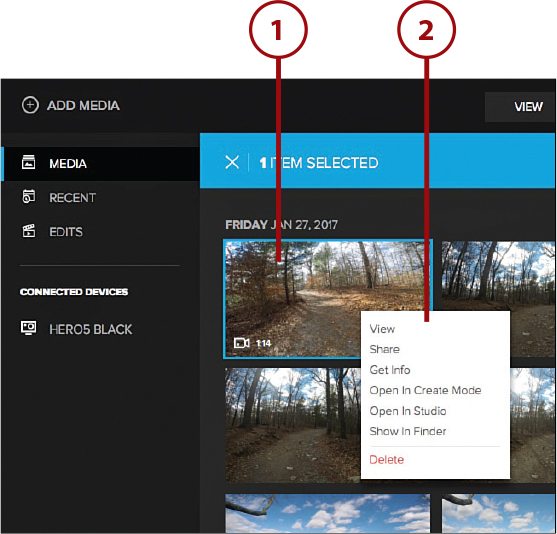
![]() Begin editing a new video project by either clicking the Create tab, or by selecting and highlighting one or more thumbnails and then right-clicking one of the thumbnails.
Begin editing a new video project by either clicking the Create tab, or by selecting and highlighting one or more thumbnails and then right-clicking one of the thumbnails.

![]() You see a context menu for the thumbnail you right-clicked. For example, if you right-clicked a video thumbnail, your choices are View, Share, Get Info, Open in Create Mode, Open In Studio, Show In Finder, and Delete. Create a new video production starting with the selected video clip by clicking Open in Create Mode or Open in Studio. To trim a specific video clip and do some basic editing, you can also click on the View option.
You see a context menu for the thumbnail you right-clicked. For example, if you right-clicked a video thumbnail, your choices are View, Share, Get Info, Open in Create Mode, Open In Studio, Show In Finder, and Delete. Create a new video production starting with the selected video clip by clicking Open in Create Mode or Open in Studio. To trim a specific video clip and do some basic editing, you can also click on the View option.

>>>Go Further: Adjusting the Camera Settings Options

Getting to Know the QUIK Desktop Software
In addition to the Media Library screen, much of what you do in QUIK Desktop is handled from the Player screen. In the center of the screen (shown here on a Mac) is the preview/playback window. It’s surrounded by detailed information about the selected video clip, as well as a series of command icons.

From the Player screen, you’re able to quickly access a handful of basic video-editing tools, including the Clip tool. Use this to clip or shorten a video by selecting and deleting content from the beginning, middle, or end of the clip. After you’ve trimmed the video clip, click the Save button to save your changes. You can then share the standalone clips or edit together several clips into a produced video using GoPro Studio.

Capture a Still Image from a Video
As you’re viewing a video clip, you can quickly take a photo of one frame within the video and save it as a standalone digital image:
![]() Open the video file in QUIK Desktop.
Open the video file in QUIK Desktop.

![]() Move the playhead to the frame you’d like to capture as a digital image.
Move the playhead to the frame you’d like to capture as a digital image.

![]() Click the Extract Photo icon.
Click the Extract Photo icon.
![]() Preview the selected image in the Graph a Photo window and then click the Save button. The digital image is saved in the same folder as the original video clip. (Click Cancel if you don’t want to save this image.)
Preview the selected image in the Graph a Photo window and then click the Save button. The digital image is saved in the same folder as the original video clip. (Click Cancel if you don’t want to save this image.)

![]() Immediately share the newly captured photo by clicking <Media in the upper-left corner of the screen to return to the Media Library, and then click Edits to locate the newly captured image.
Immediately share the newly captured photo by clicking <Media in the upper-left corner of the screen to return to the Media Library, and then click Edits to locate the newly captured image.

![]() Double-click the thumbnail for the image to open it in the Player screen and then click the Share button.
Double-click the thumbnail for the image to open it in the Player screen and then click the Share button.
![]() Choose the Facebook option, and follow the on-screen prompts.
Choose the Facebook option, and follow the on-screen prompts.

Making More Edits
Prior to sharing the photo on Facebook, you can import it into any photo-editing software to edit, enhance, rotate, or crop it, just as you would any other digital photo.
Add a HiLight Tag to a Video Clip
Another feature built into the QUIK Desktop software is the ability to add HiLight tags to a video clip as you’re previewing it on the computer’s screen:
![]() Double-click a video’s thumbnail to view the video in the Player screen of QUIK Desktop.
Double-click a video’s thumbnail to view the video in the Player screen of QUIK Desktop.

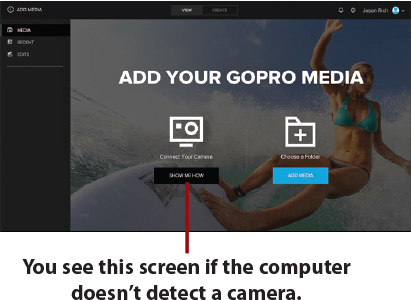
![]() Click the Play icon to begin playing the video and then click the HiLight icon when the video reaches the point where you want to add a tag. Alternatively, move the playhead to the desired location within the video clip and then click the HiLight icon.
Click the Play icon to begin playing the video and then click the HiLight icon when the video reaches the point where you want to add a tag. Alternatively, move the playhead to the desired location within the video clip and then click the HiLight icon.
![]() You see a tiny orange dot on the playback slider indicating the HiLight tag has been added.
You see a tiny orange dot on the playback slider indicating the HiLight tag has been added.

![]() Click <Media in the upper-left corner of the screen to return to the Media Library screen (not shown).
Click <Media in the upper-left corner of the screen to return to the Media Library screen (not shown).
Create a Mini-Video Production in Create Mode
There will likely be situations when you have one or more video clips that you want to quickly edit before uploading them to Facebook or YouTube. The fastest way to do this from the Media Library screen of QUIK Desktop is to right-click a desired video thumbnail. Select Open in Create Mode.

The Create Mode screen opens, and your selected video clip(s) are imported. From under the Videos heading, click the desired video clip, and move it to the Timeline.

Click the Duration option and choose how long the mini-video production should be. Options include 15, 30, or 60 seconds.
Next, click the Music option if you want to add music. (This is optional.) From the music selection menu, choose the music you want to add to the mini-video production. If you’re a GoPro Plus subscriber, you’ll have more music selections to choose from. Select a music track by clicking on it to highlight your selection, and then click the Add To Video button.

The QUIK Desktop software automatically adjusts the music and your video clip to fit within the selected length. Click the Preview icon to watch your mini-video production within the Player window or in full-screen mode. Click the Save button to save your edited mini-production.
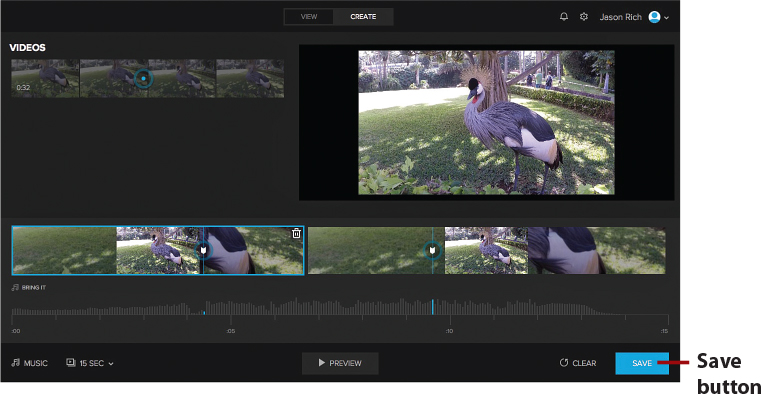
Give your mini-production a title, and click the Save button again. The digital file for your mini-production is added to the Media Library. To view all of your edited video clips, click the Edits option in the left navigation. You can now share the file via Facebook or YouTube, or, if you want to add titles or other special effects, you can edit it within GoPro Studio.
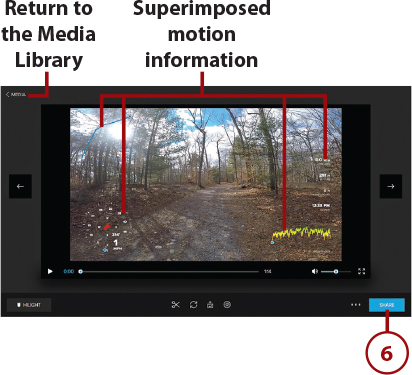
Add GPS Details to Action Scenes
When you’ve shot an action scene using the GoPro HERO5 Black (with the GPS feature turned on), you can add graphics to the screen that identify the GPS path, location, travel speed, altitude, acceleration, and g-force. To choose what information to display, and add it to your video, follow these steps:
![]() From the Media Library screen, right-click the thumbnail for the video clip where you’ll be superimposing the GPS data.
From the Media Library screen, right-click the thumbnail for the video clip where you’ll be superimposing the GPS data.
![]() Select the View option from the pop-up menu.
Select the View option from the pop-up menu.

![]() Click the individual virtual switches to turn on the gauges for GoPro Logo, Info Cluster, Speed Tracker, GPS Path, Speedometer, and/or G-Force. Each feature you turn on superimposes different information over the action video sequence.
Click the individual virtual switches to turn on the gauges for GoPro Logo, Info Cluster, Speed Tracker, GPS Path, Speedometer, and/or G-Force. Each feature you turn on superimposes different information over the action video sequence.

![]() Click the Save button.
Click the Save button.
![]() Continue using the QUIK Desktop editing tools from the Player screen and then click <Media to save your changes and return to the Media Library screen. You can also click the Share button to access the Share menu and share your video via YouTube or Facebook, or click the More menu icon (...) for options that allow you to delete the video clip, open the clip in Create Mode, or view information about the clip.
Continue using the QUIK Desktop editing tools from the Player screen and then click <Media to save your changes and return to the Media Library screen. You can also click the Share button to access the Share menu and share your video via YouTube or Facebook, or click the More menu icon (...) for options that allow you to delete the video clip, open the clip in Create Mode, or view information about the clip.
Continue Editing in GoPro Studio
Once the GPS-related metadata is superimposed over the video clip and you save the clip, you can edit that clip within GoPro Studio or any other video-editing software, and the superimposed information remains part of the clip. Of course, you also can select multiple (separately edited) video clips and edit them into a longer, fully produced video presentation using GoPro Studio.
Getting to Know GoPro Studio’s Layout
The GoPro Studio software offers many more advanced video-editing tools than the QUIK Desktop software. GoPro Studio breaks up the editing process into three main steps: View & Trim, Edit, and Export. You can quickly move between these separate work spaces by clicking one of the appropriate tabs near the top-center of the screen.

What’s displayed on the right and left sides of the center Preview window varies based on which workspace you’re using. Initially, the left side is the Import New Files area. From here, you access the tools to import raw video footage from your GoPro camera (and other sources) into the editing software.
The middle portion of the screen contains your Preview window and playback controls. The other components of the center of the screen vary based on whether you’re in View & Trim mode, Edit mode, or Export mode.
For example, when in Edit mode, you see the Storyboard window as well as icons for various other tools needed to piece together your raw video clips and other content.
What’s displayed on the right side of the screen also varies. When in Edit mode, for example, many of your available editing tools and Effect Presets are available.

When it comes to exporting your content, the screen includes the tools needed to choose your file export options. The software offers a selection of Export Presets (Mobile, HD720p, HD1080p, Archive, Vimeo, and YouTube), but you can also choose the Custom option to select your own export options and resolution.

It’s important that you acquaint yourself with each of the GoPro Studio’s video-editing steps and tools so you can best use them to meet your needs. As you’re getting to know the software, you’ll save a lot of time and potential frustration by using a GoPro Studio Edit Template rather than editing the entire video from scratch.
Transferring Raw Video Content to Your Computer
You already know that your GoPro camera is capable of shooting HD video in a variety of different resolutions, and each resolution has associated FOV and FPS settings. These are all options that determine what is actually captured by your camera in your raw video footage.
When it comes to importing your raw video content into the GoPro Studio software, you may keep your original video files intact or combine video clips shot with different camera settings to make everything look consistent and smooth within your edited video project.
The first step involves using the Importer to transfer your raw video content from your camera’s microSD memory card to the video-editing software. There are three options:
• Connect your camera directly to your computer using the supplied USB cable (which plugs into the USB-C port of your camera and the USB port of your computer).
• Connect an optional memory card reader to your computer via its USB port, and then remove the microSD memory card from the camera and insert it into the card reader. You can also use an optional QUIK Key accessory from GoPro as a memory card reader for your computer if it’s equipped with a micro USB port or USB-C port. (Be sure to purchase the correct version of the QUIK Key.)
• If you’re using the HERO5 Black or HERO5 Session, have your content automatically upload to the GoPro Plus online service, have the QUIK Desktop or GoPro Studio software download the content from your online account to your Internet-connected computer, and then import it into the software. How the auto-upload feature works on your camera is explained in Chapter 16.
Using Photos in Videos
Editing in GoPro Studio
The video-editing process begins after your raw video content has been imported into the software. From there, you’re able to preview and trim content as needed.
First you create a new project and piece together your video clips, raw video footage, and/or scenes and convert these files into the GoPro Studio Software’s CineForm file format. If necessary, you need to make the files compatible before incorporating them into your project. Details about each raw clip you have imported and that are being converted will be displayed on the right side of the screen in the View & Trim workspace.

As you’re editing your video, the software allows you to do things such as speed up playback, create a motion blur effect, or use a slow motion effect. These effects work really well when presenting action scenes, which the GoPro cameras are so good at filming.
Using the Editing Tools
In Edit mode, you can modify (crop) your video frame, enhance the visual quality of selected content, trim and combine multiple video clips on the storyboard, add scene/shot transitions, add music and sound effects, add titles, add fade in or fade out effects, and add Effect Presets to your footage to alter its look.
As you edit, be sure to preview your work in progress (or sections of your video) within the Preview window. If necessary, you can advance frame by frame. You can also use the full-screen Preview option by clicking on the full-screen icon.
Enhancing Flawed Video Footage
If a particular portion of your video is overexposed, underexposed, or somehow needs to be enhanced, the GoPro Studio software offers editing tools that allow you to re-frame and rotate your content and manually adjust things like white balance, exposure, contrast, saturation, and sharpness. These controls are in addition to the Effect Presets that you can add to video footage to subtly or dramatically alter its appearance.
In this first example, a frame from a video sequence that has not yet been enhanced is shown. In the second example, that same video sequence has been enhanced using the Saturation and Sharpen tools. Notice how all of the colors in the scene are much more vibrant. These tools took just seconds to use, but they can have a dramatic impact on your video.

Effect Presets built into GoPro Studio include 1970s, 4X3 Center Crop, 4X3 To Wide, Candy Color, Day For Night, Hot Day, Night Vision, ProTune, Sepia, Vignette Large, Vignette Medium, and Vignette Off. You can also customize these Effect Presets or create your own using the editing tools built into the software.
Shown here is the difference between an unedited video sequence and one that has the Candy Color effect added to it.

Using Sound
In almost any video project, the sounds your audience hears while watching your video can be as important as what’s actually being shown. Music, for example, can set a mood. Sound effects can add a sense of realism or authenticity to your video, or help to capture someone’s attention, and voice-over narration can be used to explain or convey information.
These audio elements can be used in addition to or instead of the audio that was recorded as you filmed the footage. The GoPro Studio software allows you to edit the recorded audio track separately from the video, plus add music, sound effects, or voice-over tracks.
As the video editor, you ultimately decide what’s heard and when it’s heard, just as you determine what your audience will see. Keep in mind that it’s important to adjust the audio levels within your video so that they’re at the appropriate volume. If you’re mixing different types of audio, each audio element needs to be audible at the appropriate volume. For example, if there’s talking during a scene, the music you add should not overpower the voice tracks, and whatever music you decide to add should be appropriate for that scene.
Saving, Exporting, and Sharing Your Video Projects
After you’ve become proficient using the GoPro QUIK Desktop and/or GoPro Studio software (and especially if you use Edit Templates), you should be able to create professional quality results on a relatively short video in well under one hour using QUIK Desktop and within several hours (or less) using GoPro Studio. How much time and effort you invest in your projects is entirely up to you.
When you’re satisfied with the result of your editing work (and you’ve viewed your video in the Preview window with the Full-Screen Preview option), the next step is to export your video using a file format and resolution of your choosing. How you plan to share your video determines what format and resolution you should save it in. Click the Export tab and then select the file format and resolution you want to use. When using the GoPro Studio software, click the Preset option and choose from Mobile, HD 720p, HD 1080p, Archive, Vimeo, YouTube, or Custom. If you plan to upload the video file and share it on YouTube, select the YouTube option. If you plan to play back the video on a high-definition 1080p flat-screen television, select the HD 1080p export option. If the video will be viewed only on the screens of mobile devices (smartphones or tablets), choose the Mobile option.
After choosing your export options, follow the on-screen prompts to complete the file export and saving process. You’re prompted to select a destination where the edited video production will be saved. You can choose a specific folder on your computer’s hard drive, a specific folder on an external hard drive that’s connected to the computer, or a cloud-based service.
Video-Editing Tips
Like any art form, there are no strict rules when it comes to editing video. There are, however, strategies that can help you create video projects that your audience will truly enjoy and appreciate. Your first task should be to identify your audience, and then put yourself in their shoes when making all creative decisions. Consider how each of your editing decisions will affect your audience.
A good rule of thumb for deciding what content to include within your video is to get right to the point. Never overwhelm your viewers with too much visual eye candy or distracting audio. Just tell your story or convey your message in the most straightforward and entertaining way possible. Allow the stunning visuals you’ve captured by your GoPro camera to speak for themselves.
Keep in mind that the attention span of your audience is relatively short. If your video drags on, is repetitive, or becomes dull to watch, people will simply stop watching, tune out, or surf elsewhere on the Internet.
Focus On Your Intended Audience
Set a primary goal for each video you create, and determine how long the video should be. Are you creating a video just to entertain your audience, or is the goal to convey a message, share information, educate, illicit an emotion, showcase an adventure from a first-person perspective, and/or to tell a story?
Take an Organized Approach to Editing
When you first begin editing, the work that’s ahead might seem daunting. It’s a good idea to first create a “rough cut” of your video, and then add the additional production elements. Begin by watching all your raw video footage and gathering the content you know you’ll want to use.
Then create a rough cut by simply collecting the most desirable raw footage, trimming those video clips, and then placing them in order using your video-editing software. Next, get rid of the unusable shots and ancillary raw footage you know you won’t be using.
Now, watch your rough cut to determine whether the video makes sense, conveys the right message, or achieves your goals. Then start adding the various production elements, such as scene transitions, titles, background music, and special effects.
After you’ve chosen your footage, think about how you can be more concise and take less time getting to the point of your video. Remember, your audience probably will not be anywhere near as emotionally invested in your video’s subject matter as you are. Although you might think that every second in your video is pure gold, your audience might not agree.
Use Shots That Will Keep Your Audience’s Attention
Ever notice how television shows and movies switch camera angles or shots every 5 to 10 seconds in order to keep things visually interesting for the audience? This is a good strategy to follow as you edit your own videos. However, you might not have footage that showcases multiple camera angles for each shot or scene to choose from, so you need to focus on using your most compelling content.
If your scenes or shots are too short and strung together using animated transitions, for example, your edited video will wind up looking choppy or filled with too much eye candy and too little substance. Conversely, if each scene is too long, your audience will find that watching your video becomes boring. Again, make decisions that work well for your content, allow you to showcase a smooth-flowing video, and have appeal for your audience.
Figure out which shots are the most compelling and decide how you’ll use them in a way that tells your story and keeps the attention of your audience. Try to avoid using the same shot for too long, especially if there’s little or no action happening in that shot. When action is taking place, consider overlaying GPS-related information on the screen.
Use Titles and Captions to Your Advantage
Most videos benefit from an animated title sequence at the beginning that sets the scene and tells people what they’re about to watch. Then, as needed, you can add text captions to help move your story along or convey your message.

Don’t Expect Hollywood-Style Results Immediately
Learning to be a skilled video editor, regardless of which video-editing software you use, takes time and practice. This learning curve can be shortened a bit if you take advantage of the QUIK Desktop software and/or the themed templates that allow you to simply drop your content into the GoPro Studio software. Even when this is possible, chances are you’ll need to fine-tune the template to achieve the results you desire.
Start by editing a few very short and simple video projects with minimal special effects. As you become comfortable using your video-editing software, start experimenting with its more advanced features and functions.
If possible, look online for sample videos that were created using the video-editing software and study them to see firsthand what’s possible. Then try to emulate what you see as you’re editing your own projects.
Reading the user’s manual for a video-editing software package helps you learn the “skill” aspect of video editing and educates you about what menu options to choose or which command icons to click, but you have to tap into your own creativity and get hands-on experience to see the quality of your video projects improve over time.