15. Using Mobile Devices with Your GoPro Camera

In this chapter, you discover how to use the GoPro Capture, QUIK, and Splice mobile apps with your camera, smartphone, tablet, and/or smartwatch. Topics include:
![]() How to pair your camera with a mobile device that’s running the Capture mobile app
How to pair your camera with a mobile device that’s running the Capture mobile app
![]() What the Capture, QUIK, and Splice mobile apps are used for
What the Capture, QUIK, and Splice mobile apps are used for
![]() How to remotely control your camera via the Capture mobile app instead of using the Smart Remote
How to remotely control your camera via the Capture mobile app instead of using the Smart Remote
![]() How to wirelessly transfer photos or video content from your camera’s memory card to your mobile device
How to wirelessly transfer photos or video content from your camera’s memory card to your mobile device
Thanks to the built-in wireless capabilities of your GoPro camera, as well as the Wi-Fi and Bluetooth functionality built into your smartphone or tablet, running the optional (and free) GoPro Capture, QUIK, and Splice mobile apps from your mobile device enables you to accomplish a variety of tasks, including
• Remotely controlling the camera from your mobile device (using the Capture app). It’s possible to adjust the camera’s settings and quickly switch between camera modes or shooting modes, for example, without physically touching your camera.
• Using the screen on your mobile device as your camera’s real-time and full-color viewfinder (using the Capture app). Because the HERO5 Session and HERO Session cameras don’t have a touchscreen, having a live viewfinder can be extremely beneficial when it comes to framing your shots and then seeing exactly what you’re shooting. Whatever you see within the viewfinder window on your smartphone, tablet, or smartwatch is what will ultimately appear in your photos and/or video.
• Wirelessly transferring photos or video from the memory card in your camera to your smartphone or tablet, where you can view, edit, and then share that content. The Capture app enables you to import content from the camera. You can then access your content from other apps. The QUIK and Splice apps enable you to edit and share video productions.
The GoPro Apps Work with Most Mobile Devices
Getting to Know GoPro’s Mobile App Trio
The Capture, QUIK, and Splice mobile apps are designed to help you handle a wide range of tasks with your smartphone, tablet, and, in some cases, your smartwatch.
Capture enables you to
• Remotely adjust the camera’s settings
• Control the camera while shooting
• Transfer content between the camera’s memory card and your mobile device
• Export content to other compatible apps
• Share content with other people or publish it online
• Use the Apple Watch edition of the app to remotely control the camera and serve as a live viewfinder
Like the QUIK Desktop software, the QUIK mobile app offers basic tools for quickly editing and sharing video productions from your smartphone or tablet. Use this app for editing video clips, merging video clips (and photos) into a single video production, and then uploading the edited productions to Facebook, YouTube, or other social media services.
Splice is a more comprehensive tool for editing video while on the go. It offers more powerful tools than QUIK and allows you to handle more post-production tasks directly from your mobile device. Although Splice works fine on a smartphone, you’ll definitely find the larger screen of a tablet makes this app easier to work with.
Capture and QUIK are both available for the iPhone, iPad, and Android smartphones and tablets. Splice is currently only available for the iPhone and iPad. Regardless of what mobile device you’re using any of these apps with, you’ll find the functionality and tools available to you are very similar. In other words, what’s possible using Capture on your iPhone is almost identical to what’s possible on an iPad or any Android-compatible smartphone or tablet. This is also true for QUIK, although the layout of the app screens and menus may be slightly different in some situations.
As you can see in the figures, the Viewfinder screen of the iPhone version of the Capture app looks almost identical to the Android smartphone version of the app.

Installing the Apps on Your Mobile Device
Before you get started with using the mobile apps, you need to find and install the Capture, QUIK, or Splice app onto your smartphone or tablet.
Install on an iPhone or iPad
![]() Turn on your iPhone or iPad, and make sure it’s connected to the Internet via a Wi-Fi for cellular data connection (not shown).
Turn on your iPhone or iPad, and make sure it’s connected to the Internet via a Wi-Fi for cellular data connection (not shown).
![]() Launch the App Store app.
Launch the App Store app.

![]() Tap the Search icon, and type the keyword GoPro in the search field. Tap the Search key.
Tap the Search icon, and type the keyword GoPro in the search field. Tap the Search key.

![]() Tap the Get button for the Capture app in the search results.
Tap the Get button for the Capture app in the search results.

![]() Tap the Install button.
Tap the Install button.

![]() If prompted to do so, enter your Apple ID password, or use the Touch ID sensor that’s built into your mobile device to confirm your account information and identity (not shown).
If prompted to do so, enter your Apple ID password, or use the Touch ID sensor that’s built into your mobile device to confirm your account information and identity (not shown).
![]() The selected mobile app will automatically download and install onto your iPhone or iPad. When the process is done, tap on the Open button to launch the app (not shown). Alternatively, tap the Capture app icon on the Home page.
The selected mobile app will automatically download and install onto your iPhone or iPad. When the process is done, tap on the Open button to launch the app (not shown). Alternatively, tap the Capture app icon on the Home page.

![]() Repeat steps 2 through 7 to download the QUIK and/or Splice app (not shown).
Repeat steps 2 through 7 to download the QUIK and/or Splice app (not shown).
Install on an Android Device
To download and install the Capture or QUIK app on your Android smartphone or tablet, follow these steps:
![]() Launch the Google Play App Store app on your mobile device (not shown).
Launch the Google Play App Store app on your mobile device (not shown).
![]() Type the keyword GoPro in the Search field.
Type the keyword GoPro in the Search field.
![]() Tap the listing for the app you want to acquire. This example uses Capture.
Tap the listing for the app you want to acquire. This example uses Capture.


![]() Follow the on-screen prompts to download and install the app. When the process is completed, launch the app by tapping the Open button, or tap the app icon on the device’s Home screen. Repeat this process to download and install additional GoPro-related apps, such as QUIK.
Follow the on-screen prompts to download and install the app. When the process is completed, launch the app by tapping the Open button, or tap the app icon on the device’s Home screen. Repeat this process to download and install additional GoPro-related apps, such as QUIK.

Update Google Play Services
Depending on which Android device you’re using, and what version of the operating system is installed, you may be prompted to install the latest version of the Google Play Services software onto your mobile device. Follow the on-screen prompts to complete this process in less than one minute.
Pairing the Capture App with Your Camera
After you have installed the Capture app onto your mobile device, you establish a wireless connection between your mobile device and the camera by pairing these two devices. This pairing process theoretically needs to be done only once. After that, anytime you turn on the Wireless mode of your GoPro camera, launch the GoPro Capture mobile app on your mobile device, and then connect the mobile device to the camera’s Wi-Fi/Bluetooth signal, you’ll be able to use the Capture app to communicate directly with your camera.
Your mobile device determines how far away you can be from the GoPro camera in order to remotely control it via the Capture app). This varies based on the smartphone, tablet, or smartwatch model you’ll be using. To ensure the strongest possible connection, and to consume less of the camera’s battery power, allow the camera and your mobile device to establish both a Wi-Fi and Bluetooth connection.
Pair the HERO5 Black with Capture
![]() Launch the Capture app on your mobile device (not shown). If it’s your first time using the app, sign into your GoPro account or set up a new (free) account.
Launch the Capture app on your mobile device (not shown). If it’s your first time using the app, sign into your GoPro account or set up a new (free) account.
![]() Tap Connect Your Camera.
Tap Connect Your Camera.

iOS Versus Android
For this example, an iPhone was used. The steps for pairing the HERO5 Black with the Capture app on an Android device are similar to what’s shown here, but some things might vary slightly.
![]() Tap Add New.
Tap Add New.

![]() Select the HERO5 Black.
Select the HERO5 Black.

![]() Press the Power/Mode button on your HERO5 Black camera (not shown).
Press the Power/Mode button on your HERO5 Black camera (not shown).
![]() Place your finger near the top of the touchscreen and swipe down.
Place your finger near the top of the touchscreen and swipe down.


![]() Tap Connect New Device.
Tap Connect New Device.

![]() Tap Capture App.
Tap Capture App.

![]() The camera’s wireless mode turns itself on, and you see the animated pairing icon, the Camera Name (starting with the letters GP), and a password for the Wi-Fi hotspot that the camera is creating.
The camera’s wireless mode turns itself on, and you see the animated pairing icon, the Camera Name (starting with the letters GP), and a password for the Wi-Fi hotspot that the camera is creating.

![]() Return to your mobile device, and exit the Capture app by pressing the Home button (not shown).
Return to your mobile device, and exit the Capture app by pressing the Home button (not shown).
![]() Launch Settings (not shown), and tap the Wi-Fi option from the main Settings menu.
Launch Settings (not shown), and tap the Wi-Fi option from the main Settings menu.

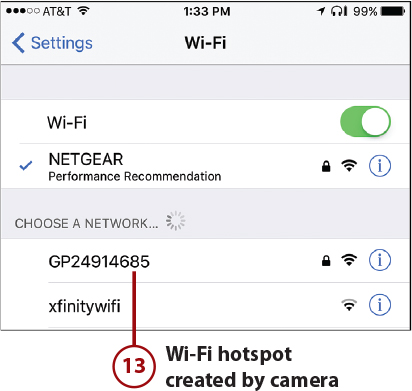
![]() Your camera’s name (starting with the letters GP) is listed under the Choose a Network section. This is the listing for the private, password-protected Wi-Fi hotspot being generated by your camera. Tap this hotspot listing.
Your camera’s name (starting with the letters GP) is listed under the Choose a Network section. This is the listing for the private, password-protected Wi-Fi hotspot being generated by your camera. Tap this hotspot listing.
![]() When prompted, type the password displayed on your camera’s screen into the Enter the Password for [insert camera name] window on your mobile device’s screen. Tap Join.
When prompted, type the password displayed on your camera’s screen into the Enter the Password for [insert camera name] window on your mobile device’s screen. Tap Join.

![]() A check mark appears next to the Wi-Fi hotspot listing. Exit the Settings app and launch the Capture mobile app.
A check mark appears next to the Wi-Fi hotspot listing. Exit the Settings app and launch the Capture mobile app.

No Internet Connection Is Okay
On your mobile device that’s running iOS 10 or later, you’ll see a message that says “No Internet Connection” underneath the GoPro’s hotspot listing. This is okay. When your GoPro camera and mobile device have a wireless connection established via Wi-Fi, the mobile device is not able to access the Internet via Wi-Fi. It can, however, continue to access the Internet via its cellular data connection, if applicable.
![]() Within a few seconds, the camera requests that you allow for a Bluetooth connection to also be established with your mobile device. Tap the Continue button on your mobile device.
Within a few seconds, the camera requests that you allow for a Bluetooth connection to also be established with your mobile device. Tap the Continue button on your mobile device.

![]() Tap the Pair button.
Tap the Pair button.

![]() Once the camera and mobile device have been successfully paired, on the mobile device’s screen you see a the live preview of what can currently be seen through the GoPro camera’s lens. Your mobile device is now remotely controlling the camera via the Capture app.
Once the camera and mobile device have been successfully paired, on the mobile device’s screen you see a the live preview of what can currently be seen through the GoPro camera’s lens. Your mobile device is now remotely controlling the camera via the Capture app.

Taking Control of Your Camera Using the Capture App
Each time you launch the Capture app, from the app’s main screen, tap the Connect Your Camera option to remotely control the camera, adjust its settings, or access and work with your content.
When your mobile device is connected to the Internet, tap the Photo of the Day option to see curated images published by GoPro and other GoPro users, or tap the GoPro Channel option to watch streaming, curated videos shot with GoPro cameras.

The Camera Screen
After you tap Connect Your Camera to access the app’s Camera screen, you see your GoPro camera that’s already been paired with the mobile device. If you’ve paired multiple GoPro cameras with the Capture app, swipe your finger horizontally across the screen (right to left) to scroll between cameras.

The center of the Camera screen displays your GoPro camera, along with three icons: Memory Card, Wireless, and GoPro Plus. Here’s how you use each:
• Memory Card—Transfer content from your camera’s memory card wirelessly to the Capture app running on your mobile device.
• Wireless—Wirelessly control the GoPro camera while shooting and/or adjust its settings. Tap this icon to turn on the camera and start remotely controlling the camera.
• GoPro Plus—Access the GoPro Plus online service by tapping on the cloud-shaped icon. Read Chapter 16, “Getting to Know the GoPro Plus Online Service” for more information on this service.
Along the bottom of the Camera screen are the following additional icons:
• Home—Returns you to the Capture app’s Home screen.
• Camera—Access the Camera screen to remotely control the camera.
• Media Gallery—Access, preview, and share content that’s been transferred from your camera’s memory cards to the Capture app.
• App Settings—Adjust Capture app-related settings on your mobile device. Options include tools for managing your online-based GoPro account and managing your GoPro Plus subscription.
The Media Screen
Tap on the Memory Card icon on the Camera screen to remotely access and preview content that’s stored on your camera’s microSD memory card. From this screen, you’re able to select all or some of the content to wirelessly transfer to your mobile device so you can view, edit, and share it.
Tap any thumbnail in the Media Gallery to preview it.

Transfer Content from the Memory Card to the Mobile Device
To transfer selected content to your mobile device, from the Media Gallery screen, follow these steps:
![]() Tap the Select icon.
Tap the Select icon.

![]() Select the thumbnails representing the content you’d like to transfer.
Select the thumbnails representing the content you’d like to transfer.
![]() Tap the Share icon.
Tap the Share icon.

![]() The content downloads from the camera’s memory card to the internal storage of your mobile device. Depending on the size of the content file, this process could take several minutes. A progress meter indicates which file is downloading.
The content downloads from the camera’s memory card to the internal storage of your mobile device. Depending on the size of the content file, this process could take several minutes. A progress meter indicates which file is downloading.

![]() Tap the Media Gallery icon to access, view, and share the transferred content.
Tap the Media Gallery icon to access, view, and share the transferred content.
![]() Tap the Local tab to see content that’s stored within your mobile device’s internal storage. Use the Cloud tab to access content stored online in your GoPro Plus account.
Tap the Local tab to see content that’s stored within your mobile device’s internal storage. Use the Cloud tab to access content stored online in your GoPro Plus account.
![]() Tap any thumbnail to view, share, or export it to another app.
Tap any thumbnail to view, share, or export it to another app.


![]() Tap the Facebook, YouTube, or Instagram icon. Alternatively, tap the More (...) icon for additional options, such as exporting a photo file to the Photos app on your iPhone or iPad or exporting a video file to the QUIK app (or any third-party video-editing app, such as Apple’s iMovie).
Tap the Facebook, YouTube, or Instagram icon. Alternatively, tap the More (...) icon for additional options, such as exporting a photo file to the Photos app on your iPhone or iPad or exporting a video file to the QUIK app (or any third-party video-editing app, such as Apple’s iMovie).

Delete Content from the Memory Card
To select one or more pieces of content to transfer to your mobile device or delete from the memory card, tap the Select icon (see the figure for step 1 of the preceding task) and then tap each thumbnail you want to delete. After you’ve selected all the thumbnails you want to delete, tap the Trash icon (located in the bottom-left corner of the screen). Tap Delete in the confirmation box.
The Viewfinder Screen
From the Camera screen, tap on the Wireless icon or the photo of your GoPro camera to re-establish a wireless connection between your mobile device and camera.
With the wireless connection established, in the center of the Viewfinder screen is the camera’s remote viewfinder. Along the top and bottom of the screen are various command icons for controlling the camera remotely.

From the Viewfinder screen of the Capture app, remotely controlling your camera is a rather straightforward process because more information is displayed on the smartphone or tablet’s screen than can be displayed on the camera or Smart Remote’s status screen.
To remotely power on or off the camera, once it’s in Wireless mode, tap the Power icon that’s displayed in the top-right corner of the app screen. Within the center area of the screen, you’ll see your real-time viewfinder. To turn off the camera’s power, tap the Power icon again.
Just below the viewfinder window is information about the capacity of your memory card and how many photos or how much additional video the memory card can hold, assuming you do not change any camera settings.
The Shutter button is represented by a red circular icon. To the right of the Shutter button is an icon representing the active shooting mode. This icon is similar to the camera mode icon on the camera’s status screen (or the touchscreen of the HERO5 Black). Quickly change the shooting mode by tapping on the Camera Mode icon. An icon-based menu opens, and you can choose a different mode.
Toggling Between Camera Shooting Modes via the App
The icon-based Camera Mode menu has three main options: Video, Photo, or Time Lapse. Tap one of these three icons to reveal a submenu.
Tap the Video camera mode icon to choose between the Video, Video+Photo, or Looping shooting modes.

Tap the Photo camera mode to switch between the Photo, Night, or Burst shooting modes.

Tap the Time Lapse camera mode icon to switch between the Time Lapse Video, Time Lapse Photo, and Night Lapse Photo shooting modes.

Adjust Shooting Mode-Related Settings
After selecting a camera mode and a shooting mode, you can adjust specific settings related to the selected shooting mode by tapping the wrench-shaped Settings icon. The Settings menu opens.

The Settings menu remains the same, regardless of which camera mode and shooting mode is selected; only settings and options available for the current mode are accessible. This Settings menu is divided into sections. Scroll down to see each section and the options displayed within each.
The sections of the Settings menu include
• Video Settings—Adjust the resolution, frames per second (FPS), and field of view (FOV) for the shooting mode selected, and then decide whether to turn on or off Video Stabilization, Low Light, Auto Audio Mode, and the Protune features. If you turn on the virtual switch associated with Protune, additional options are displayed within the Settings menu.

• Photo Settings—Adjust the Rate and Resolution for the Photo shooting mode, and then opt to turn on/off WDR, RAW, and/or Protune. Once again, if you turn on the Protune feature, additional Protune-related settings are displayed within the Photo Settings section of the Settings menu. If Night shooting mode is active, additional Shutter and Rate options are displayed as part of the Settings menu.

• Multi-Shot Settings—Related to the Time Lapse shooting mode, adjust the Resolution, and decide whether to turn on and adjust the Protune features. By turning on Protune, additional options get displayed within the Settings menu.
• Setup—Within this section of the Settings menu are more than a dozen customizable options, ranging from Auto Rotation to Set Date and Time. Based on which GoPro camera model you’re using, the options displayed here vary.
• Delete—Use the two options displayed within the Delete section to manage the contents of your camera’s memory card. Delete Last File allows you to delete only the last file shot, whereas Delete All Files from SD Card deletes all the contents of the card. Warning: There is no “undo” feature associated with these two options, so proceed with caution, and only delete content you are 100 percent sure you no longer want or need.
• Camera Info—This section of the Settings menu displays information about your GoPro camera and the version number of the Camera Software that’s installed. There’s also a tool that allows you to locate the camera if you misplace it.
• Connections—The options in this section of the Settings menu allow you to manage the optional Smart Remote or pair a new Smart Remote with the camera.
• Camera Status—Near the bottom of the Settings menu, below the Camera Status heading, are two additional options: Battery Level and SD Card Capacity. Battery Level displays the current status of the camera’s internal battery. Tap the SD Card Capacity option to see a screen that displays information about content stored on the memory card, as well as available storage capacity.

Start Shooting By Operating the Camera Remotely
Once you’ve adjusted all of the settings, the camera is ready to start shooting. If you haven’t already done so, follow these steps:
1. Place the camera within a housing.
2. Attach the housing to a mount.
3. Securely attach the mount to yourself, your equipment, or an object.
4. Frame your shot.
5. Press the Shutter button in the Capture app to begin shooting.
Overview of the QUIK Mobile App
The QUIK mobile app (shown throughout this section on an iPhone) is a mobile version of the QUIK Desktop software. As its title suggests, this app is designed to help you quickly create a slick-looking video production on your mobile device, without having to deal with any highly customizable and complex tools or options.
Want More Features?
Using this app, it’s possible to wirelessly import video content or photos you’ve shot on your GoPro camera and use some basic editing tools to create an impressive video production. Once edited, you can share the content directly from the QUIK app. This includes publishing it on Facebook or YouTube.
The first time you launch the app, you see the Welcome screen. Tap the Get Started button to continue. The app requests access to the Photos app. Tap the Allow Photos Access button to continue, and then tap the OK button to confirm your decision.
Next, you’re prompted to turn on the Weekly Video Memories feature. This allows the app to automatically create edited videos for you, based on content shot within the past week. Every Sunday, a new video is created. To turn on this feature, tap the Turn On button. To leave it turned off, tap the No, Thanks option.
The Main QUIK screen displays four icons: Settings, For You, Create, and My Videos.
• Tap the gear-shaped Settings icon to access the app’s Settings menu and adjust app-specific options. For example, decide whether to save your video productions in 1080p by default by turning on the virtual switch associated with the Save Videos in 1080p HD option.
• Tap on the For You icon to view the Weekly Video Memories that the app creates for you.
• Tap the My Videos icon to access all of the video productions you’ve created and saved using the QUIK mobile app.
• To begin creating a new video production, tap the Create icon located near the bottom-center of the screen.
Edit Videos Using the QUIK Mobile App
Prior to launching the QUIK mobile app to create a video, use the Capture app to transfer photo and video content from your GoPro camera’s memory card to your mobile device. You can also use an optional QUIK Key accessory as a memory card reader that plugs into your smartphone or tablet.
Next, export the content from the Capture app to the Photos app. Your digital photos will be stored in the Photos album (and in whichever custom album you create), and your Videos will be stored in the Videos album, by default.
You begin creating your video production by tapping the Create icon. In the following steps, the process is shown on an iPhone. If you’re using an Android-based mobile device, the editing process is very similar, but your saving and export options vary.

![]() Select the location from which photos and video for your production will be pulled. You can use photos and videos that are already stored within your smartphone or tablet’s Photos app, but it’s also possible to access content in your GoPro Plus, Facebook, or Instagram accounts.
Select the location from which photos and video for your production will be pulled. You can use photos and videos that are already stored within your smartphone or tablet’s Photos app, but it’s also possible to access content in your GoPro Plus, Facebook, or Instagram accounts.

![]() Tap the thumbnails for the photos and/or video clips you want to add to your video production, and then tap Add. The selected content is imported into the QUIK app.
Tap the thumbnails for the photos and/or video clips you want to add to your video production, and then tap Add. The selected content is imported into the QUIK app.

![]() The Quik mobile app automatically begins to create a video for you. Use the on-screen tools to customize your production. Choose a theme by scrolling through the theme options and tapping one of the icons. As you choose a theme, a live preview of your video production (showcasing the selected theme) is displayed on the mobile device’s screen.
The Quik mobile app automatically begins to create a video for you. Use the on-screen tools to customize your production. Choose a theme by scrolling through the theme options and tapping one of the icons. As you choose a theme, a live preview of your video production (showcasing the selected theme) is displayed on the mobile device’s screen.
![]() Tap the Music icon to select a music track for your production.
Tap the Music icon to select a music track for your production.

![]() Tap Change This Music to choose one of the music tracks built into the app or any music from your mobile device’s music library.
Tap Change This Music to choose one of the music tracks built into the app or any music from your mobile device’s music library.

Delete the Music Track from Your Production
To remove the music track that was automatically added to your production, tap the Music icon and then tap on the Trash icon associated with the listed music track’s title. Unless you select a different music track, no music will be used.
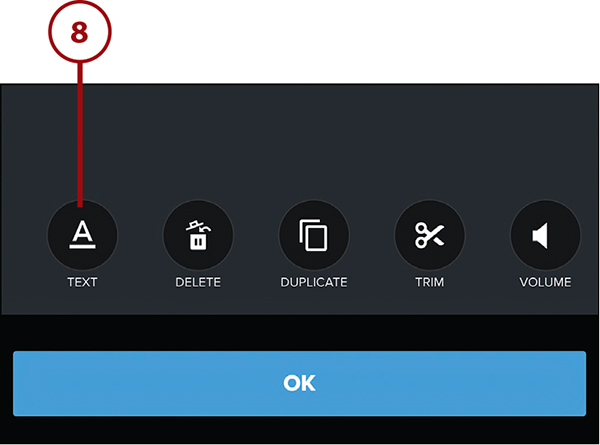
![]() Tap the Play/Edit icon, and then choose an editing tool icon to add text-based titles to your production, trim the video clip(s), or add additional photos or video content to the production.
Tap the Play/Edit icon, and then choose an editing tool icon to add text-based titles to your production, trim the video clip(s), or add additional photos or video content to the production.

![]() Tap the Text icon to add titles.
Tap the Text icon to add titles.
![]() Type the text you want to display and choose where in the production it should appear. Tap OK to confirm your addition.
Type the text you want to display and choose where in the production it should appear. Tap OK to confirm your addition.

![]() Tap the Options icon (the wrench) to further customize your video. For example, you can choose the format of the presentation; options include Cinema or Square.
Tap the Options icon (the wrench) to further customize your video. For example, you can choose the format of the presentation; options include Cinema or Square.
![]() Tap the Duration icon to adjust the length of the production.
Tap the Duration icon to adjust the length of the production.

![]() Drag the large white dot on the slider to the right to increase the video’s length or to the left to decrease it. As you do this, the app automatically adjusts the edits and music track to time everything perfectly. Tap OK.
Drag the large white dot on the slider to the right to increase the video’s length or to the left to decrease it. As you do this, the app automatically adjusts the edits and music track to time everything perfectly. Tap OK.

![]() Tap Save to save the changes you’ve made to your production.
Tap Save to save the changes you’ve made to your production.

![]() Tap the option for how you want to share or publish the newly edited video. Options include Instagram, Facebook, Facebook Messenger, Messages, Email, or Twitter. Tap Photo Library to store the video file within the internal storage of your mobile device. Tap Other Sharing Options to see additional saving, exporting, and sharing methods.
Tap the option for how you want to share or publish the newly edited video. Options include Instagram, Facebook, Facebook Messenger, Messages, Email, or Twitter. Tap Photo Library to store the video file within the internal storage of your mobile device. Tap Other Sharing Options to see additional saving, exporting, and sharing methods.

Copy and Paste the Production’s Link
Tap Copy Link to copy the link for the video production you just created into the mobile device’s virtual clipboard. Then open any other app that supports the Paste command. Within that other app, press and hold your finger on the screen where you want to insert the link for the video, and then tap the Paste tab that appears. The link (website URL) for the video will be displayed. For example, you can paste the URL into an outgoing email or within a Notes or Word document.
![]() The video is saved and becomes accessible from the My Videos section of the QUIK app. Depending on the length and complexity of the video, it could take several minutes to save, and then additional time to upload to the designated social media network.
The video is saved and becomes accessible from the My Videos section of the QUIK app. Depending on the length and complexity of the video, it could take several minutes to save, and then additional time to upload to the designated social media network.

![]() You see the Success! message that indicates the video has been saved and/or shared. Tap Done to return to the app’s main menu.
You see the Success! message that indicates the video has been saved and/or shared. Tap Done to return to the app’s main menu.

Acquainting Yourself with the Splice Mobile App
GoPro’s Splice app (shown throughout this section on an iPhone) is a more advanced video-editing app that gives you a greater selection of tools with which to create a more customized video production. You can use the Splice app to create a professional-looking video production in as little as 15 to 30 minutes. Then you can share it with individuals or publish it online—all without using a computer!
When you launch the app for the first time, you’ll have no projects created yet, so click the Start New Project button to begin.

The first time you use the app, it asks permission to access the iPhone or iPad’s Photos app. Tap the Allow Access button to continue, and then tap OK to confirm your decision.
Choose an Album from the Photos app, and then tap the thumbnails that represent the photos and video clips you want to incorporate into your video production. It’s also possible to acquire content from GoPro Plus, Dropbox, and a variety of other sources.

Select the content you want to include within the video production, and then tap Add in the top-right corner of the screen.
Next, choose audio you want to use as background music. Select a music track from the options in the app, or import music from your own digital music library on your mobile device. If you don’t want to add music, tap Skip.

You see the Project Settings screen. From here, you can
• Give the project a name
• Choose a format
• Select a default background color
• Decide which default transition you want to use between scenes
• Determine how long still photos will be displayed (in seconds) during video playback
• Adjust your outro
• Turn on or off the Ken Burns animated effect when still photos are displayed as part of the video production
Customize Your Outro

After you’ve adjusted each option you want to change, tap Done in the top-right corner of the screen to continue. You see the preview screen. From here, you can further edit your video production.
Tap one of the content thumbnails below the preview window to edit, duplicate, or delete that content; you can also add more content to the production.

Tap a thumbnail for an image or video clip in the video’s timeline and then tap the Edit Video option. A selection of on-screen icons, displayed at the bottom of the screen, grant you access to a plethora of editing tools, including the Trim tool, Special Effect Filters, ability tool to increase or decrease the playback speed of the video, a tool for adding text-based titles (in a choice of fonts, font sizes, and font colors), options for adding special effects to still photos (including the animated Ken Burns effect), and controls for fading audio in and out.

Work with each editing tool to customize your video production. Tap the < icon in the top-left corner of the Edit Video screen to exit Edit mode and preview your video.

Preview or Playback Your Video
When you’re happy with the production, tap the Share icon to save and share your edited video production. Tap your selection, and the video is saved to your mobile device in the Splice apps’ Projects area and exported. This process could take several minutes.
