1. Getting Started
In this chapter, you learn about the components that come with your PlayStation Vita handheld and how to set up the system.
Before you can enjoy your PlayStation Vita handheld and its rich multimedia capabilities, you need to free it from its packaging and set it up. Although this task isn’t difficult, handling such an expensive, high-tech device might feel overwhelming at first. Having a good understanding of all the features and goodies that come with your system can make this task considerably less daunting. In this chapter, you familiarize yourself with all the physical components of your PlayStation Vita handheld and find out how to set it up so that in no time you’ll be on your way to playing games and having fun with its powerful applications.
Unboxing Your Vita
Taking your PlayStation Vita out of the box can be a surprisingly exhilarating experience, and, belying its high-tech nature, setup is fairly straightforward. However, before you start trying to set it up, familiarizing yourself with your model and all its components is wise so that you can plan accordingly. For instance, if you don’t have the 3G/Wi-Fi model, you probably want to make sure you’re within range of a usable Wi-Fi network before beginning setup (see Chapter 3, “Settings and Networking on Your Vita,” for more on this). Also, although your Vita comes partially charged, locating and assembling the AC adapter and USB cable and leaving it plugged in while going through setup is a good idea (see “Charging the Vita” later in this chapter).
Understanding the Vita Models
This book outlines the two current, basic PlayStation Vita models: PlayStation Vita 3G/Wi-Fi (PCH-1101) and PlayStation Vita Wi-Fi (PCH-1001). Each model might also be available in one or more bundle variations, which might include select extras such as a game or memory card.
The PlayStation Vita 3G/Wi-Fi and PlayStation Vita Wi-Fi are nearly identical, except for a SIM card slot on the former that enables it to work with AT&T’s 3G network with purchase of a data plan and a built-in GPS feature that allows it to obtain more accurate location data. The 3G-enabled Vitas cost approximately $50 more than their Wi-Fi–only counterparts, with optional monthly data plans of 250MB or 3GB costing $14.99 or $30, respectively. As such, even if you don’t plan on accessing 3G much over the life of the system, for those times when you’re out of range of a Wi-Fi network and need to be connected, having the option available might be worth the extra $50 initial investment.
Breaking Down the Components
Before you set up your system, familiarizing yourself with the various ports and plugs on the Vita handheld and its other included components, namely the power supply, USB cable, and AR Play Cards, might be helpful.
PlayStation Vita Handheld
Your PlayStation Vita includes numerous buttons, ports, and other components, including a control setup that’s reminiscent of the original PlayStation 3 SIXAXIS wireless controller. Let’s review the external anatomy of your PlayStation Vita handheld to get a better handle on its parts.
• Power button—Push and hold the Power button to turn your handheld on or off. Tap this button to wake or put your handheld to sleep, which helps conserve battery power. See Chapter 3 for information on tweaking sleep mode.
• Touchscreen—The touchscreen is both your Vita’s display and one of its primary forms of input. To get technical for a moment, it’s a 5-inch organic light-emitting diode (OLED) capacitive multi-touch screen with a resolution of 960×544 pixels, and it’s capable of displaying a range of approximately 16 million colors. Simply put, it’s a beautiful, touchable, state-of-the-art display.
• PS Vita card slot—If this were an earlier time in videogame history, the Vita card slot would simply be called a cartridge slot. Regardless of what it’s called now, this is where you plug in the tiny game cards that you buy from retail stores.
• Accessory port—This port provides future expansion possibilities for the Vita. Some theoretical possibilities include a better camera and video out for connecting to a TV.
• Volume + and – buttons (VOL)—Press + to increase volume and – to decrease volume. Press and hold both the + and – volume buttons at the same time to mute, then press either button to turn the sound back on.
• Front camera—Although the Vita’s touchscreen displays a 960×544-pixel resolution, its camera only captures a relatively paltry 640×480 pixels, which is known as VGA resolution. The front camera is used primarily to take stills and video of the person playing, say for a self-portrait or video chat.
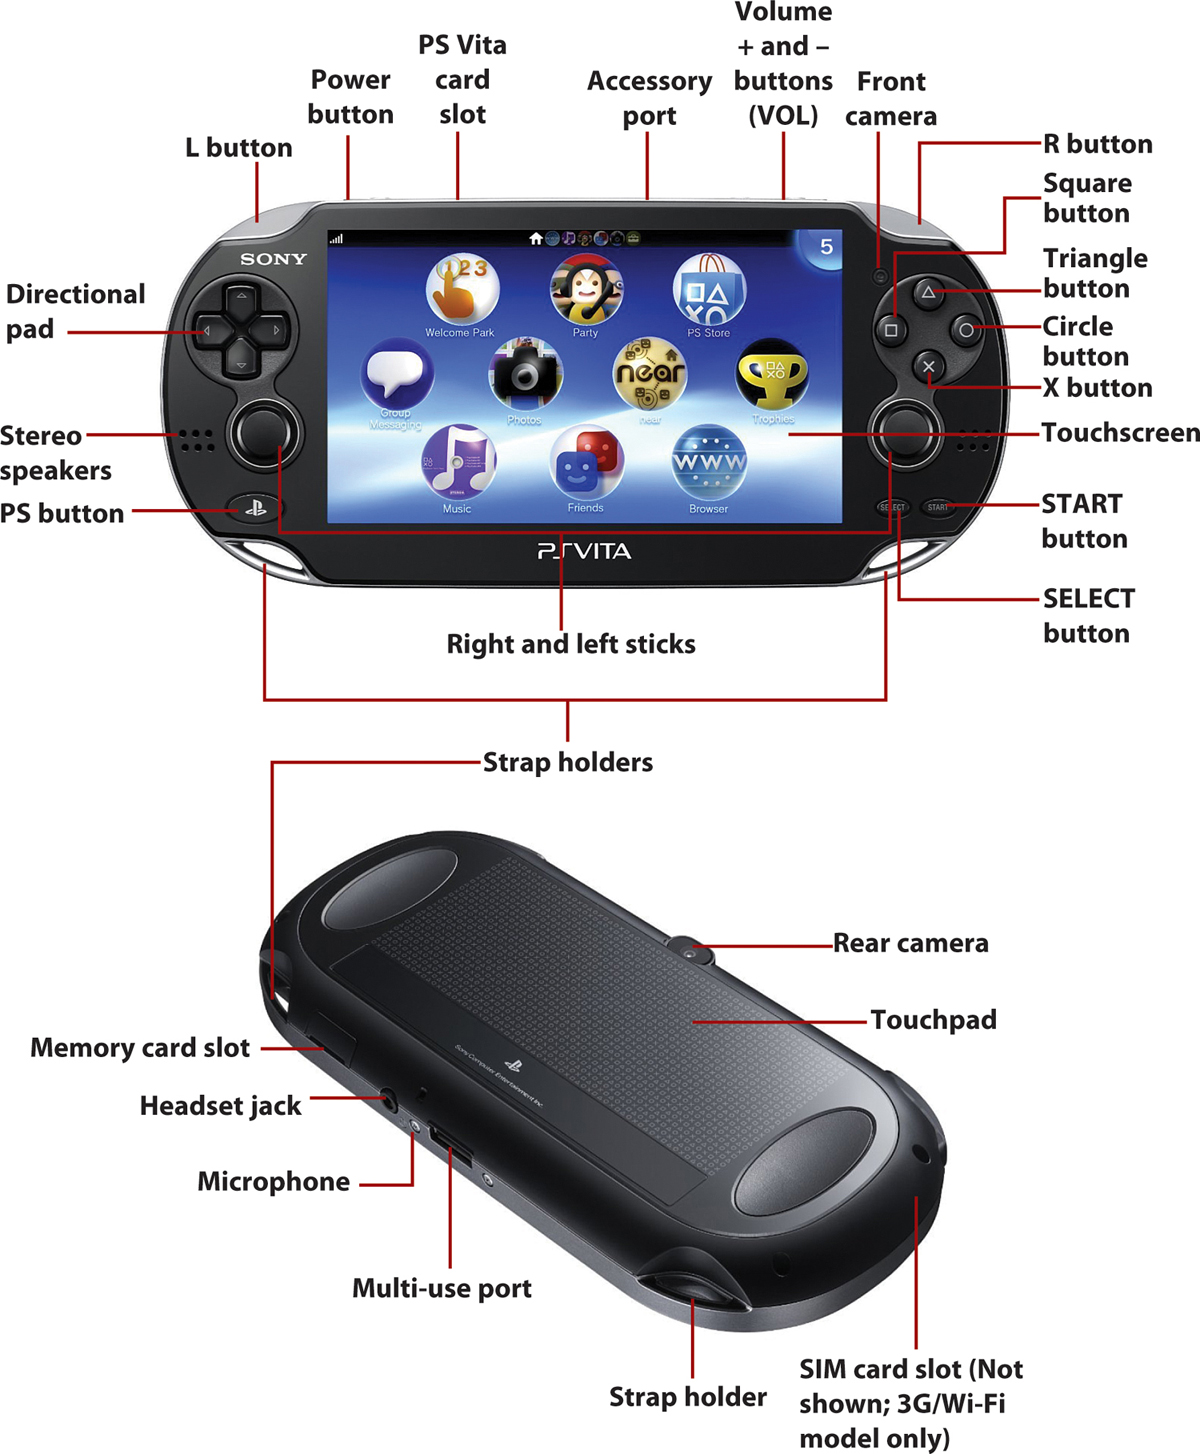
• R and L buttons—The right shoulder button is typically used as an accelerator in racing games, while the left shoulder button is used as a brake. Either shoulder button can be used as the camera trigger when snapping photos.
• Triangle button—This is an action button that you often use to bring up menus and menu options.
• Circle button—This is an action button that you often use to go back to a previous screen or option.
• X button—This is the primary action button that you often use to select or confirm a command.
• Square button—This is an action button that, like the Triangle button, you often use to bring up menus and menu options.
• Right and left sticks—The right stick is the secondary analog stick and you often use it to look around and adjust the camera angle in games. The left stick is the primary analog stick and you often use it to control onscreen characters.
Understanding Digital and Analog
You’ll probably hear a lot about “digital” and “analog” with regard to your Vita’s controls. Digital uses discrete values, and analog uses a continuous range of values. The Vita’s directional pad and all of its buttons are digital and register a press as on or off. For instance, with the directional pad, if you move an in-game character left, it simply moves left. The right and left sticks are analog and enable a finer degree of control. For instance, with the left analog stick, you can control how quickly an in-game character moves left depending upon how far left you move the stick.
• Stereo speakers—Unless you use headphones or external speakers, the sound comes out of these built-in speakers. When counting on the built-in speakers, you want to take care not to block them with your fingers when playing particularly intense games.
• SELECT button—You typically use this button for additional menu functions.
• START button—You use this button to pause and restart games.
• Strap holder—Either side is primarily meant to hold an optional wrist strap, which is recommended even if you’re just a little bit of a butterfingers. Naturally, there’s nothing stopping you from looping other items onto either of the Vita’s holders, for instance, making it the world’s largest keychain attachment.
• PS button—The PS button is one of the most useful buttons on your Vita. Pressing it wakes your system from sleep, returns a running application to its LiveArea screen, provides an alternative look at the menus, and also shows all the applications that are presently open via an index screen (for more information on your Vita’s various screens, turn to Chapter 2, “Understanding and Working with the Interface Screens”). In addition to these functions, use the following to understand what the Vita is trying to tell you when the PS button lights up or blinks:
• Lights up blue—The system is on or power is being supplied.
• Blinks in blue—The system is entering standby mode.
• Blinks slowly in blue—There are new notifications, such as when new messages arrive.
• Lights up orange—The system is charging, either in standby mode or when turned off.
• Blinks in orange—The system is charging, but the battery charge is too low to turn the Vita on until the light stops blinking.
• Directional pad—This is sometimes also referred to as the D-pad. You can push this in one of eight directions and use it to move within menus when you aren’t using the touchscreen or to access additional in-game functionality. You can also use it in select games for movement over the left stick when extra precision is needed.
• Touchpad—This is the rear touchpad with the same type of capacitive input capability as the touchscreen, just without the fancy display. Useless fact: The touchpad’s surface contains 1,638 X, Triangle, Square, and Circle icons.
• Rear camera—This has exactly the same capabilities as the front camera; it just faces out the back of your Vita. The rear camera is primarily designed for playing augmented reality games, but it can also take low-resolution stills and videos of the outside world.
• SIM card slot (3G/Wi-Fi model only)—This slot contains the SIM, which stands for Subscriber Identity Module, and it’s what enables your Vita to work on AT&T’s 3G cellular network.
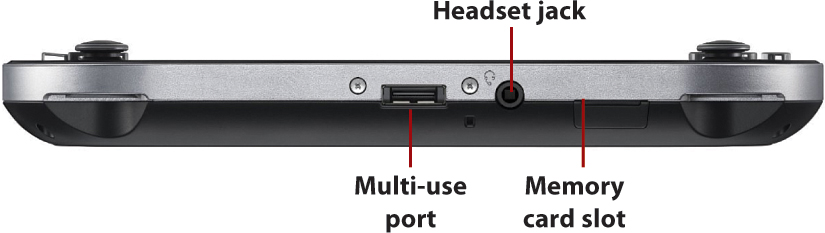
• Multi-use port—This versatile port has three major functions: DC IN for both power and charging the internal battery, data communication for transferring information to and from your Vita, and stereo out/mono in audio, which enables your Vita to interact with, for instance, a speaker dock.
• Microphone—Your Vita uses the microphone to listen for and record sounds, such as when you’re capturing video or conducting a video chat.
• Headset jack—This stereo mini jack outputs stereo to speakers and headphones, as well as accepts mono audio input for headsets with integrated microphones, such as the type used with most cell phones.
• Memory card slot—This slot accepts one of several sizes of the PlayStation Vita memory card, which is a requirement for operation of your system.

Power Supply
The power supply, which provides electrical energy to your PlayStation Vita handheld and recharges its built-in battery, comes in two parts: a small brick-like AC adapter and a two-prong AC power cord that goes from the AC adapter to a standard wall outlet. To make a connection from the AC adapter to your Vita, the USB cable is required.

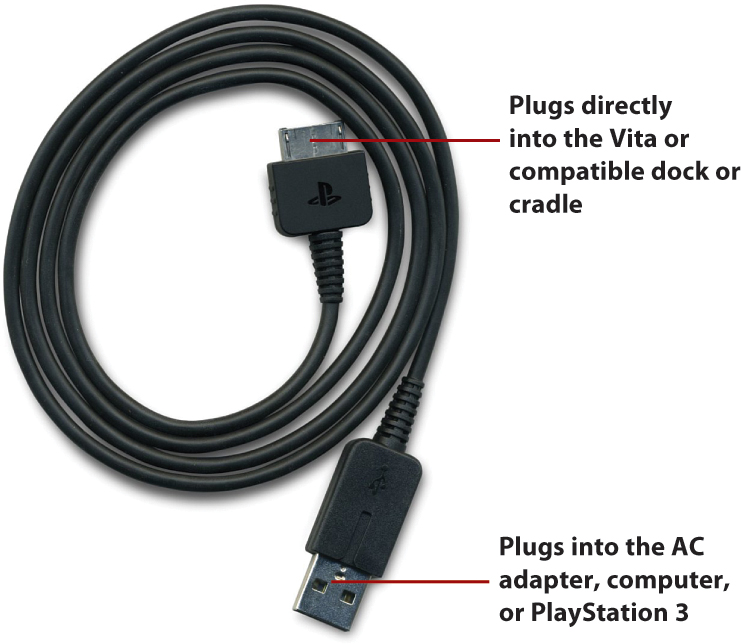
USB Cable
USB stands for Universal Serial Bus, and is an industry standard for supplying electric power and establishing communications between devices. It’s no surprise then that the included USB cable is used to charge your Vita, either directly in conjunction with the AC adapter or a powered USB port like the ones found on most computers, or indirectly through a cradle. The USB cable also syncs information between your Vita and a computer or PlayStation 3.
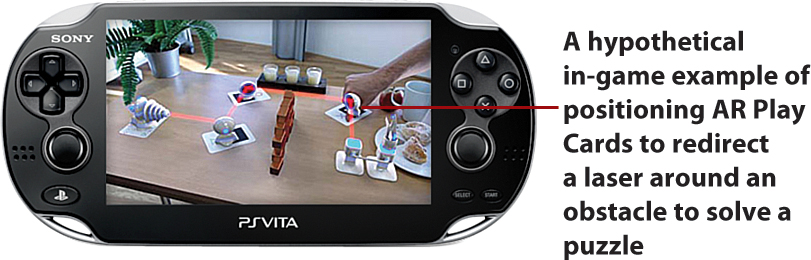
AR Play Cards
AR, or augmented reality, aims to merge the real world with the virtual world. By overlaying game graphics in real time on top of what your Vita’s camera sees, new ways to play are presented. Many of the augmented reality game experiences on your Vita require one of the six AR Play Cards that came with your system in order to more precisely place virtual objects.
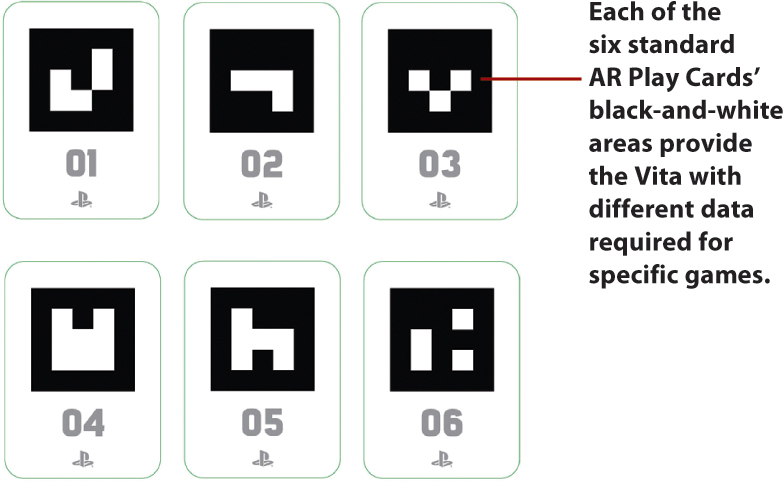
Select retail software, such as the mini-game heavy Little Deviants (SCE, 2012), have AR play components. The PlayStation Store (see Chapter 5, “Shopping in the PlayStation Store”) also features downloadable AR games, several of which are free, such as Cliff Diving (SCE, 2012), Fireworks (SCE, 2012), and Table Soccer (SCE, 2012).
Charging the Vita
The Vita has a non-removable DC3.7V 2200mA internal battery that takes from 2½ to 3 hours to fully charge from empty via AC power. When fully charged, the Vita can provide approximately 3 to 5 hours of game play, roughly 5 hours of video play, or about 9 hours of music listening when there’s no screen activity. Typical usage with various combinations of these activities will err on the lower side of those estimates, with more processor-intense actions, such as 3D gaming, draining the battery the fastest. System settings such as volume level, screen brightness, and how standby time is set also affect maximum battery life (see Chapter 3).
While your Vita is charging via an AC adapter or dock, the remaining battery charge icon on the Info bar (for more on the Info bar, turn to the “Info Bar” section in Chapter 2) shows an animation of flowing electricity.

If your Vita is in standby mode or turned off completely when charging, the PS button lights up orange. When charging is complete, the PS button’s light goes out. If the PS button blinks orange during charging, the battery charge is too low and you’ll have to wait until the orange light stops blinking to turn the Vita on.
Using the AC Adapter
Using the AC adapter is the quickest and most efficient way to charge your Vita. This method also enables you to keep on using your system while it charges.
Although you can continue to use your PlayStation Vita while charging it on the AC adapter or dock, the estimated charging time will likely increase.
To charge your Vita with the AC adapter, follow these steps:
1. With the Vita’s touchscreen facing up, plug the flat end of the USB cable into the multi-use port.
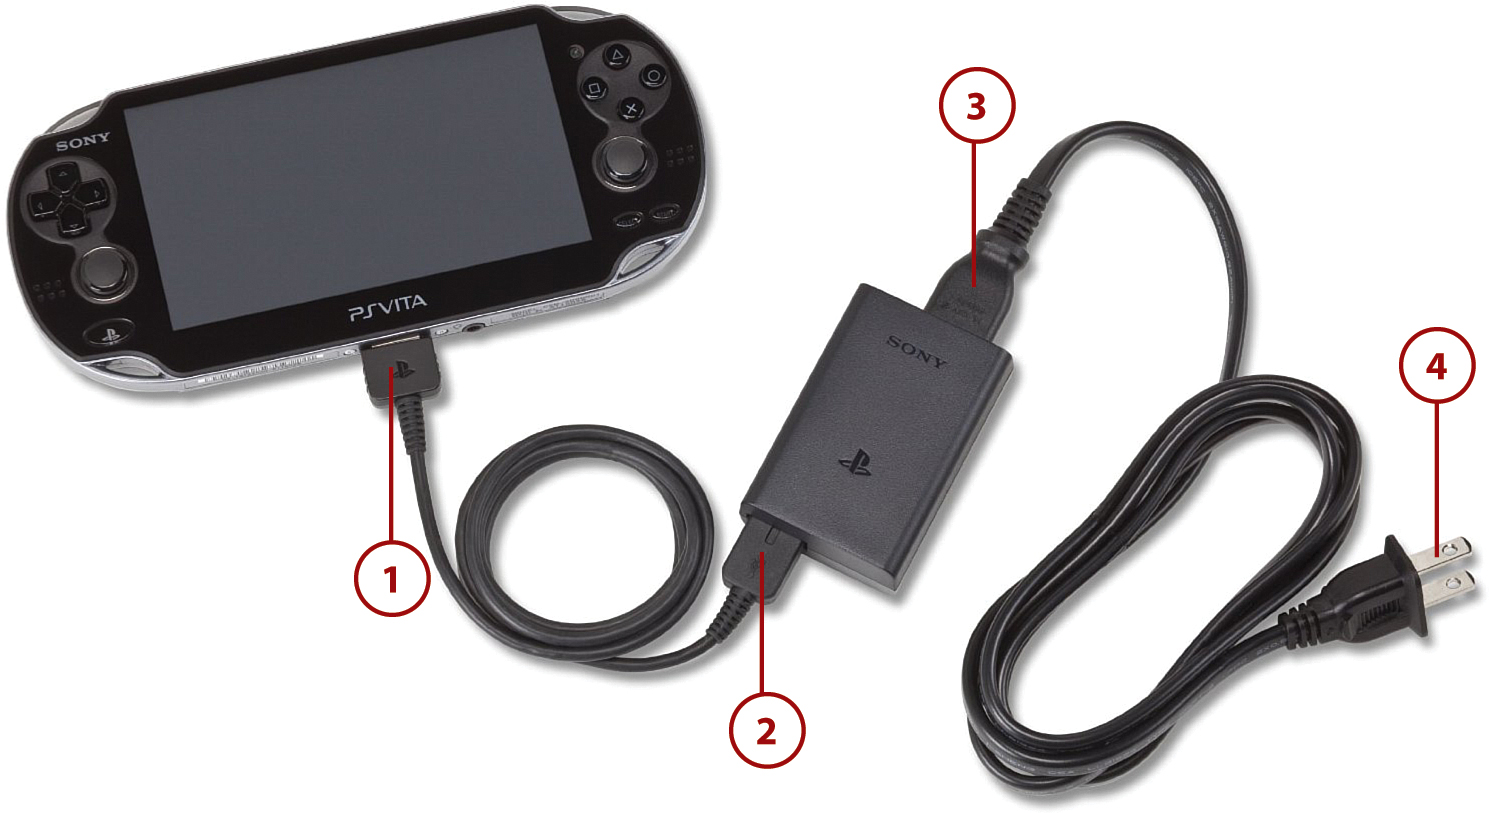
2. With the AC adapter’s PS symbol facing up, plug the other end of the USB cable into the flat slot located on the bottom left. Make sure the cable’s USB icon is facing up.
3. Plug the flat end of the AC power cord into the top of the AC adapter. It doesn’t matter which way you plug it in.
4. Plug the other end of the power cord into a power outlet.
Vita Showing No Signs of Life?
If your Vita doesn’t turn on even with a long press of the power button, it’s likely the battery no longer has a charge. You can turn the Vita back on after connecting it for a few minutes to the charger.
Using the USB
You can also supply power to the Vita using just the USB cable when the system is connected to a device with a powered USB port. This is accomplished by plugging the USB end of the USB cable into a powered USB port instead of the AC adapter from step 2 under “Using the AC Adapter.” Although this might seem more convenient than using the AC adapter, keep in mind it takes much longer to charge and can only be done when the Vita is completely powered off.
To completely power off the Vita, press and hold the Power button for about 2 seconds, then tap Power Off on the screen. For more on power settings, including turning off the ability to charge via USB, see Chapter 3.
Setting Up Your Vita
Your Vita comes with a fold-out Quick Start Guide that does a pretty good job of taking you through initial setup, although it’s not perfect. For instance, it doesn’t tell you that before you begin, it’s probably a good idea to set up your Vita in a location where you have Wi-Fi access, even if you have a 3G/Wi-Fi model, because you aren’t able to set up a 3G data plan without some critical info that you can’t even access until after you finish setup. It also doesn’t mention that you likely can’t sign up for a new PlayStation Network account during setup because your Vita probably needs to update itself first, requiring you to completely skip that step.
PlayStation Network Versus Sony Entertainment Network
In August 2011, Sony unified all of its entertainment brands under the Sony Entertainment Network banner. The Sony Entertainment Network consists of the PlayStation Network, or PSN, which covers videogames; Video Unlimited, which covers film and TV; and Music Unlimited, formerly Qriocity, which covers music. Although you usually see your login associated with the PlayStation Network on your Vita, Sony is not always consistent with its references. The easiest way to look at it is that your PlayStation Network login is the same as your Sony Entertainment Network login, which also encompasses video and music services.
Beginning First-Time Setup
Before beginning the first-time setup, verify that your Vita is either sufficiently charged or on AC power and that you have your memory card handy. Follow these steps:
1. Open the memory card slot cover and insert the memory card in the memory card slot.
When inserting the memory card, the arrow should point at the rear touchpad; it only goes in one way. Push the card into the slot until it clicks into place. Close the memory card slot cover.
2. Press and hold the Power button for approximately 5 seconds until the power comes on and the PS button lights up blue.
3. Follow the prompt to “peel” the screen by placing your finger at the top-right corner of the screen and sliding to the bottom left at a 45-degree angle.
4. Tap to select your language and then tap Next.
5. Select your time zone and then tap Next.
6. Drag your finger to select the correct date and time. You can scroll quickly by “flicking” the list of items (see “Using Touch Controls” under the “Operating the Vita” subsection, which appears later in this chapter). Tap Next.
7. If you have the 3G/Wi-Fi Vita model, select Sign Up Later because you need to note your device’s IMEI and ICCID numbers, which are not accessible from initial setup.
8. If you do not have an existing PlayStation Network account or have access to a Wi-Fi connection, skip to step 10 to set up trial usage (refer to “PlayStation Network” in Chapter 3 to learn how to set up a new account at a later date). Otherwise, tap Yes, I Do, Use, and then Next.
9. Select an access point on the Wi-Fi settings screen to connect to the Internet. After successfully connecting, you might be presented with a mandatory system software update message. If this happens, you are not able to enter your PlayStation Network account information at this time; skip to step 10. Otherwise, to log into your PlayStation Network account, tap the text entry field, and then enter text using the onscreen keyboard. Skip to step 13.
10. Tap No, I Don’t, and then tap Next. Tap Next again.
11. Tap your country/region of residence. Tap Next.
12. Set your date of birth by dragging your finger to select the correct numbers. Tap Next.
13. You have now completed initial setup. Tap OK. After the introductory video plays, you see the Home screen (for more information on the Home screen, see “Home Screen” in Chapter 2).
You’re now ready to start enjoying your Vita!
Operating the Vita
When you’re on the Home screen, tapping Welcome Park, which is covered in Chapter 2, is a great way to practice working with the interactive features of your Vita. Two of the most prominent features, touch and motion, are discussed next, as well as entering information with the virtual keyboard. Finally, we’ll talk about what you can do with the physical controls.
Using Touch Controls
Both the front touchscreen and the rear touchpad support one- or two-finger gestures. The gestures the Vita recognizes are familiar to users of most touchscreen smartphones and tablets, and, like those other devices, you don’t need to press hard to register a command.
The following are the standard gestures used to perform the Vita’s various operations:
• Tap—Touch the surface lightly with your finger, then raise your finger. Tap once to select an icon or item.
• Double tap—Tap the surface twice in rapid succession.
• Drag—Touch the surface and move your finger slowly while still maintaining contact. Drag to scroll up and down or right and left.
• Flick—Touch the surface and move your finger rapidly while still maintaining contact. Flick to rapidly scroll up and down or right and left.
• Touch and Hold—Touch and maintain contact.
• Pinch In/Pinch Out—Touch with two fingers and then move those fingers closer together or further apart. Pinching in makes things smaller and shows more on the screen. Pinching out makes things larger and shows less on the screen.
Not every function is supported in every app or situation, and in some cases the two touch surfaces are disabled completely, requiring you to use the traditional directional pad, sticks, or buttons.
Using Motion Controls
Your Vita packs three key motion-sensing components within its compact frame: a three-axis accelerometer, a three-axis gyroscope, and a three-axis electronic compass. The accelerometer and gyroscope work in conjunction to optimally detect the Vita’s relative orientation, or tilt, and how quickly it’s moving. You primarily use them with entertainment applications, such as games. The electronic compass, or magnetometer, allows detection of magnetic north and the Vita’s absolute orientation, which is useful for location-aware applications, such as GPS navigation and augmented reality.
Using the Virtual Keyboard
If you’ve performed first-time setup yourself, you’ll have already been introduced to the virtual keyboard, which appears whenever text entry is requested. Although you’ll no doubt have noticed that entering text on the virtual keyboard is as simple as tapping the appropriate keys, additional features are available.

• Auto complete suggestions—When you enter text within some applications, suggestions for completing what you’re entering appear. If one of the suggestions is correct, tap it to have it automatically entered. To see the full list of suggestions, tap the down arrow. To return the expanded list of suggestions back to a single line, tap the up arrow.
• Delete—Tap to delete the characters to the left of the current cursor position.
• Enter—Tap to enter a line return or line break, which moves the cursor to the next line. Tapping Enter also submits entered text in an application.
• Move the cursor—Tap to move the cursor one character left or right, respectively. You can also move the cursor directly to a specific onscreen location by tapping within text you’ve already entered in the text-entry field.
• Enter uppercase letters—Tap this key once to turn its indicator light green, which means you can now tap a single uppercase letter.
To enter a string of uppercase letters, touch and hold the key and enter the letters.
In many cases, double tapping this key enables Caps Lock, which allows for continuous capital letter entry. Tapping the key again disables Caps Lock.
• Numbers/Symbols—Tap this key to switch to a keyboard of symbols and numbers. Tap the down and up arrows at the bottom of the keyboard to show a different page of symbols. Tap what is now the ABC key instead of the Numbers/Symbols key to return to the default keyboard layout.
• Switch keyboards—This key only appears on your keyboard if you have multiple languages enabled in Settings. Tapping this key provides access to switch to one of the keyboard languages presently installed.
• Change character types—Tap to access alternate character sets, which are useful when entering letters that require special symbols, such as accent marks used in languages other than English.
• Close—Tap this key to close the keyboard.
See the “Language” section in Chapter 3 to configure your virtual keyboard, including saving commonly used words and optimizing it for use with languages other than English.
Using Physical Controls
If you would rather use your Vita’s physical controls to move around the Home screen and select applications, you can enable Control with Buttons on PS Vita System under System settings. Refer to “System” in Chapter 3 for more information on enabling this feature.

Once enabled, the circular blue pointer on the Home screen can be controlled with the directional pad or left stick. The X button selects the highlighted option. Additional buttons may also provide functionality in specific applications. Refer to the application’s documentation for more information on possible support for physical controls.
Standby Mode and Powering On or Off
Under normal operating conditions, you can put your Vita into a very low-power standby mode, rather than completely powering it down, for quicker system access. To enable standby mode, press the Power button until the touchscreen turns off and the PS button blinks blue. To exit standby mode, press either the Power button or the PS button. After a few seconds, the touchscreen turns on again and displays the Unlock screen.
When your Vita is in standby mode, Wi-Fi and, if available, mobile networking, remains enabled. In addition, the PS button blinks slowly whenever there are new notifications, such as finding Game Goods or receiving a message. Both the networking and notification features drain additional power in standby mode, so depending on what you have enabled, your system can remain in standby from a few days to a week or more before completely draining a fully charged battery.
If you will be away from a power supply for an extended period of time, you can power your Vita completely off. Press and hold the Power button for approximately 2 seconds and then tap Power Off on the touchscreen.
To turn the Vita back on from a completely powered off state, press and hold the Power button for approximately 5 seconds. You’ll know the Vita is powered on when the PS button lights up blue.
Understanding Card Media
All Vitas have two card slots, one for the required memory card and the other for an optional PlayStation Vita card, which typically contains a single retail game. Also, a third card slot is specific to 3G/Wi-Fi models for a SIM card to enable the Vita to work on AT&T’s 3G cellular network.
Memory Cards
The PlayStation Vita lacks onboard storage, so a proprietary, Vita-specific memory card is required to store applications downloaded from the PlayStation Store, saved data from games, and other content, including photos, video, and music. Certain system-specific settings and preferences are also stored on the memory card. Present memory card sizes range from 4GB to 32GB.

Depending upon your usage patterns, including how much you want to download from the PlayStation Store and how you manage your media, getting the largest possible memory card you can afford is generally a good idea. Sony estimates downloadable retail PlayStation Vita games at 1.75GB to 3.5GB on average, 1.3GB on average for movies, 3.5MB on average for songs, and 5MB on average for photos. On a 16GB card that would equate to being able to hold 4 to 8 full games, 12 movies, 4,568 songs, or 3,200 photos, or any combination thereof, which is obviously a more typical scenario. Examples of downloadable games without any additional content are Plants vs. Zombies (SOE, 2012) at 74MB, Super Stardust Delta (SCEA, 2012) at 208MB, and Hustle Kings (SCEA, 2012) at 325MB. Apps tend to run on the smaller side, with both Facebook and Netflix clocking in at 12MB, for instance, and Paint Park (SCEA, 2012) at 36.9MB.
With the Vita’s touchpad facing up, you insert memory cards with their indicator arrows facing up and push them into the open memory card slot. The memory card can only go in one way and clicks securely into place.
You should only remove memory cards when the Vita is completely powered off; otherwise the card’s database might become corrupt and require repair (see “Using Safe Mode to Troubleshoot” in Chapter 3 on the steps needed for repair). To remove the memory card, open the memory card slot cover and push on the card until it clicks out of place. After the memory card clicks out of place, it should offer no resistance when you slide it out of the slot.
Although you might want to have multiple memory cards to store different sets of content, keep in mind that every time you change a memory card, its database has to be rebuilt. Tangibly, this means that you will have to reorganize your Home screen icons (see Chapter 2) each time you switch cards. To move contents from one memory card to another, such as when upgrading from a 4GB card to one with a higher capacity, use Content Manager, which is described in Chapter 8, “Managing Media with Content Manager.”
Every time you insert a new memory card and are signed into your PlayStation Network account, that card is linked to your specific account. You can then only use that memory card in Vita systems that are linked to the same PlayStation Network account, unless the card is first formatted (see “Format” in Chapter 3).
PlayStation Vita Cards
PlayStation Vita cards contain Vita-specific software, typically games, that require no space on a memory card other than for its saved data. Select PlayStation Vita cards can even store saved and add-on data without need of a memory card. At present, PlayStation Vita cards can hold up to 4GB of data, which is about the same capacity as a single-layer DVD.

With the Vita’s touchscreen facing up, you insert a PlayStation Vita card label-side out, with the indicator arrow pointing to the PS Vita card slot as it’s pushed in. The PlayStation Vita card can only go in one way and clicks securely into place.
Unlike with memory cards, as long as the PlayStation Vita card is not in active use, you can safely shut off the system or remove the card without incident. To remove the PlayStation Vita card, open the PS Vita card slot cover and push on the card until it clicks out of place. After the PlayStation Vita card clicks out of place, it should offer no resistance when you slide it out of the slot.
Starting a Game
After inserting a PlayStation Vita card into your system, the game’s icon appears on the Home screen and pulsates to draw your attention. Tap the game’s icon to go to the game’s LiveArea. Tap Start (often referred to as the Gate) to begin the game.
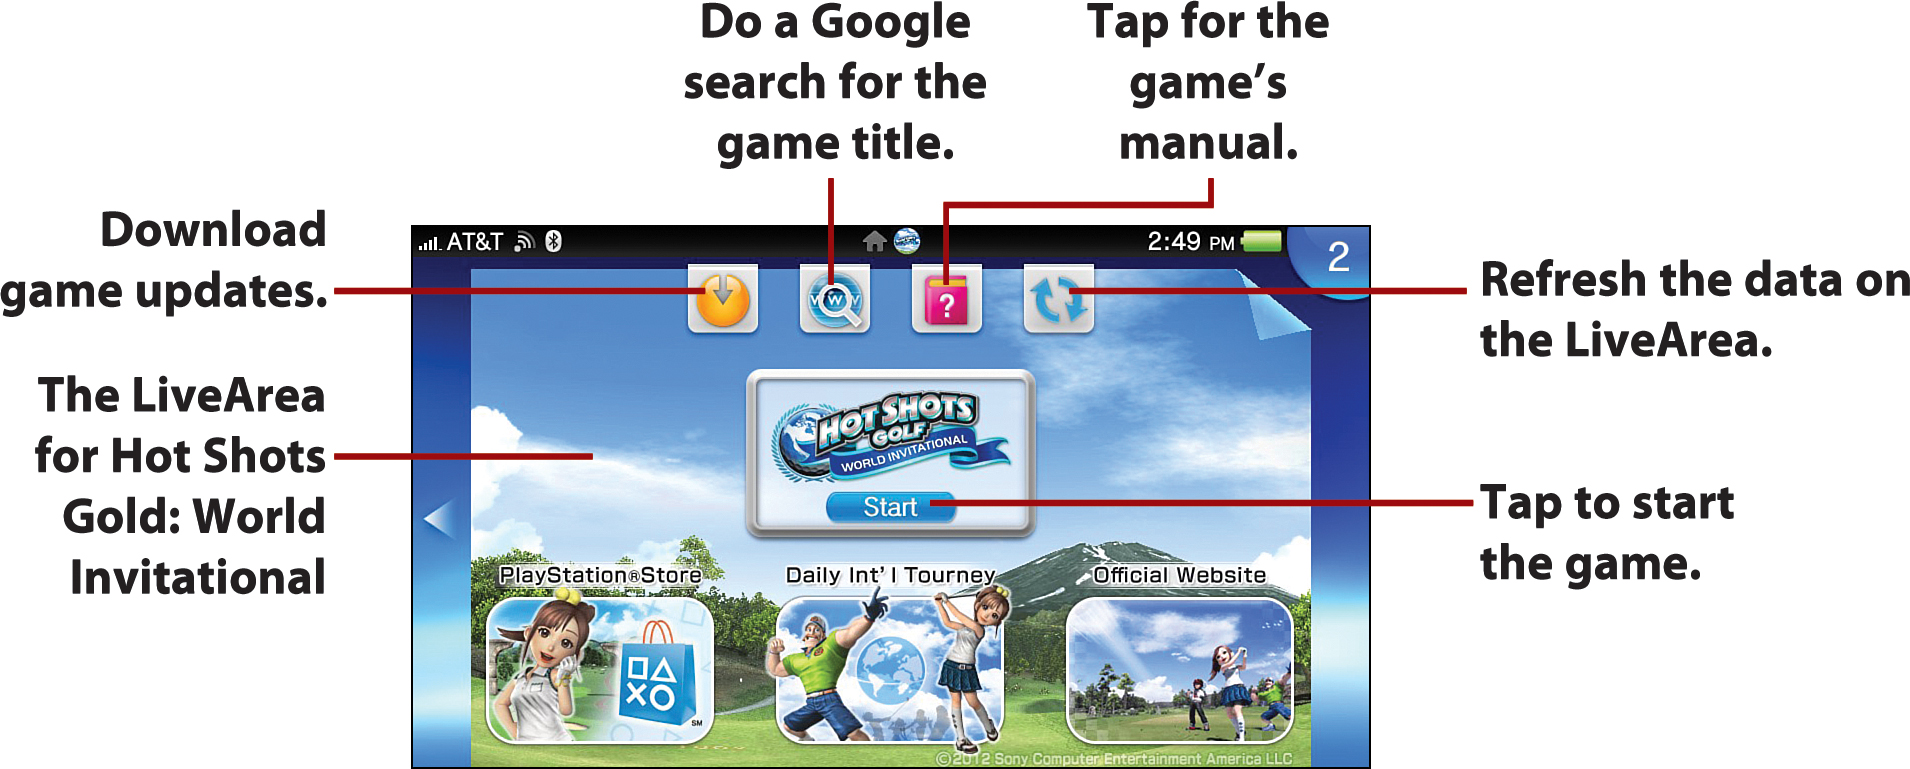
Game manuals, which you can select from the top of the game’s LiveArea, are preinstalled on the Vita card. Other sections of the LiveArea include links to the game’s official website and to the PlayStation Store so you can purchase additional game content.
Pausing and Resuming
To pause a game, press the PS button. You go back to the game’s LiveArea. To resume the game, tap Continue in the middle of the LiveArea.
It’s always a good practice to regularly save your game progress in case of a system crash, running out of battery power, or other unforeseen disaster, but it’s particularly important if you plan to keep your game paused for a while. If you accidentally close a paused game at its LiveArea by peeling it off the screen, you will lose any unsaved progress!
Quitting
To quit a game, press the PS button. At the game’s LiveArea, peel the LiveArea screen from the top right. You are now back to the Home screen.
After you quit a game, the game’s icon remains on the Home screen, even if you remove its card. Tapping the icon opens the game’s LiveArea, but you cannot start the game without the card inserted.
SIM Card
If you own the 3G/Wi-Fi model of the PlayStation Vita, chances are the SIM card that accesses AT&T’s mobile network came preinstalled. If it didn’t or you need to insert a new SIM card, make sure your Vita is completely powered off and then follow these steps:
1. Turn the Vita over so its touchscreen faces down.
2. Locate and open the SIM card slot cover.
3. Place the SIM card into the SIM card tray. It only fits one way.
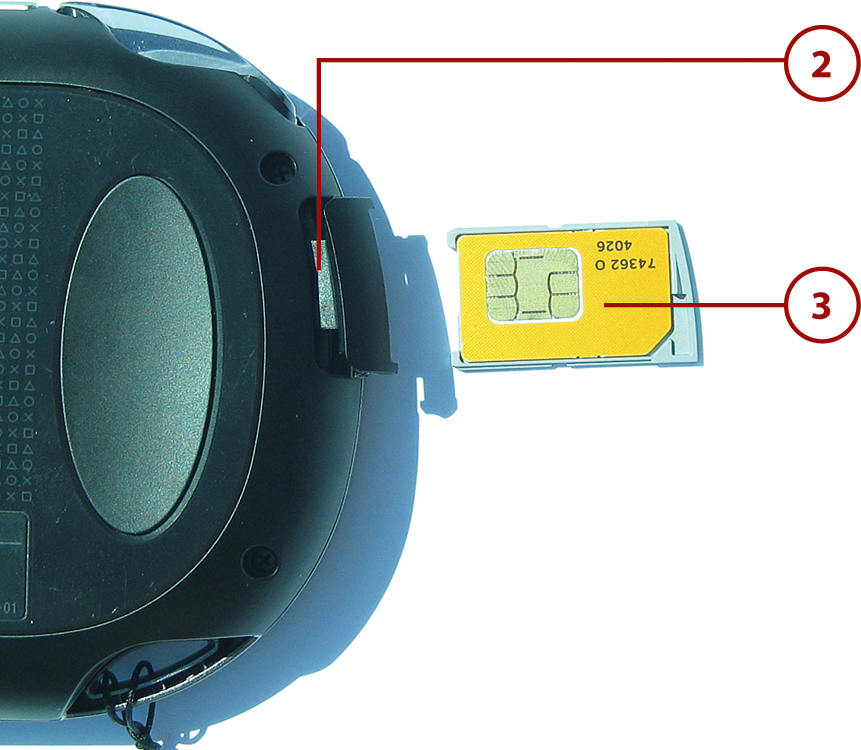
4. Slide the secured SIM card into the SIM card slot until it clicks into place.
5. Close the SIM card slot cover.
You are now ready to power on your Vita and follow the necessary steps to set up 3G network access (see “Establishing 3G Connections” in Chapter 3). As with memory cards, inserting or removing a SIM card with the Vita powered on can cause data corruption or loss.
Understanding Your Warranty
Your PlayStation Vita comes with a standard one-year warranty direct from Sony. This means that Sony will, at its discretion, repair or replace a defective Vita or its parts with similar new or factory-recertified components. As is always the case with portable products, when contacting the manufacturer with an issue, being honest is best. For instance, the Vita has the same type of moisture-sensitive detector located inside it that many smartphones utilize to identify when a defect has been caused by exposure to water.
If you have an issue with your Vita, visit http://www.us.playstation.com/support to access the PlayStation Knowledge Center. Alternatively, you can call Sony at 1-800-345-7669 to try to resolve your issue, or to receive a return authorization and shipping instructions.
Accessorizing Your Vita
Even though your Vita comes with almost everything you need to make it work directly out of the box, a variety of accessories are available that can make your experience even better. As a bonus, some of these accessories can even work with other mobile devices you might have, such as a smartphone or tablet.
Cases
Three basic types of cases are available for the Vita: soft pouches, hard cases, and exterior wraps. Soft pouches are padded cases that typically hold your Vita and several cards, often with enough additional room for other items such as cleaning cloths, cables, or even the complete AC adapter setup. Two popular soft pouches are the PlayStation Vita Travel Pouch from SCE and the PS Vita Travel EVA Protective Case from CTA Digital.
Hard cases have similar capabilities as soft pouches, but feature solid, mostly inflexible exteriors that are more resistant to crushing, keeping your Vita safer in high-stress situations, such as at the bottom of a backpack. Two hard cases of note are the PS Vita Hard Case by Hori and the VG S.P.F. Case for PlayStation Vita by Thrustmaster.
Finally, exterior wraps are available, where you literally affix a protective casing to the Vita. This adds some bulk to the system, but also provides more direct protection than the other case types while still allowing you to access most or all of the system’s functionality. Although all exterior wraps are designed to be removable, some are easier to put on and take off than others, so do plenty of research before committing to this case type. Exterior wraps comes in several variations, including the PS Vita Crystal Case from CTA Digital, which has an integrated stand; the PS Vita Face Cover from Hori, which has a flip-up cover; and the PS Vita Silicone Protector, also from Hori, which not only protects the Vita’s exterior, but also provides a more comfortable, grippable surface area for those of us with butterfingers.
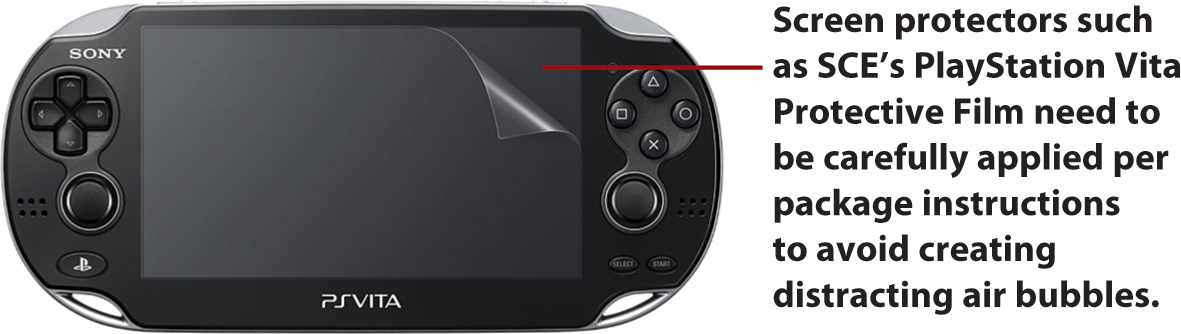
Screen Protectors
Screen protectors for the Vita are different types of clear film applied to either the front touchscreen, rear touchpad, or, if you’re really concerned about scratches, both. One example of this class of product is SCE’s PlayStation Vita Protective Film, which includes two fingerprint- and smudge-reducing touchscreen overlays. Another example, Hori’s PS Vita Screen Protective Filter, fits over the entire front of the device.

Docks
Thanks to the multi-use port on the bottom of your PlayStation Vita, you can easily plug your handheld into a dock, which not only holds the system upright to make watching videos a more enjoyable and ergonomic experience, but also charges its battery and redirects its audio to an external source, such as headphones or speakers. SCE offers the PlayStation Vita Cradle, which provides all of this functionality but does require the AC adapter and USB cable that came with your system to function. As such, if you do purchase this cradle and want to set it up only once, picking up at least a second USB cable for syncing or charging over USB might be wise.
An alternative to Sony’s cradle is Nyko’s PS Vita Speaker Stand, which also lacks its own AC adapter or USB cable but does have built-in stereo speakers, which are particularly useful in conjunction with the Wake-Up Club (SCE, 2012) alarm clock app, available as a free download from the PlayStation Store (see Chapter 5 for more on the PlayStation Store). Nyko’s stand also provides an audio input to plug in an additional audio source, such as an MP3 player.

Headphones
Along with a good carrying case, headphones are the most common Vita accessory. Whether your priority is portability, audio quality, or video calling features, a headset is available for every budget and interest. The best part is that the Vita is compatible with the same types of wired and wireless Bluetooth headsets that are used with most cell phones and tablets, so a good bet is that you can leverage what you already enjoy using.
Wired
Most wired headphones with a standard 3.5mm plug work immediately after you plug them into the Vita’s headset jack, so the possibilities are practically endless. The Vita’s headset jack supports stereo plus microphone input, so the same type of headset used with a cell phone for hands-free calling also works with the Vita, which is particularly handy when making Skype video calls (see Chapter 6, “Exploring Social Apps”), for instance. For those who want a dedicated pair of headphones for their Vita, a good place to start might be with Sony’s official PlayStation Vita In-ear Headset, which features an integrated microphone with in-line mute switch.

Wireless
The PlayStation Vita can support a wide range of Bluetooth devices, including headsets. Just as with wired headsets, the same type of headset you use with your cell phone is likely to also work on your Vita, though you’ll want to make sure the headset supports multiple profiles so it can pair to more than one device at a time. Be sure to check out “Setting Up Bluetooth Connections” in Chapter 3 for tips on configuring Bluetooth on your handheld.
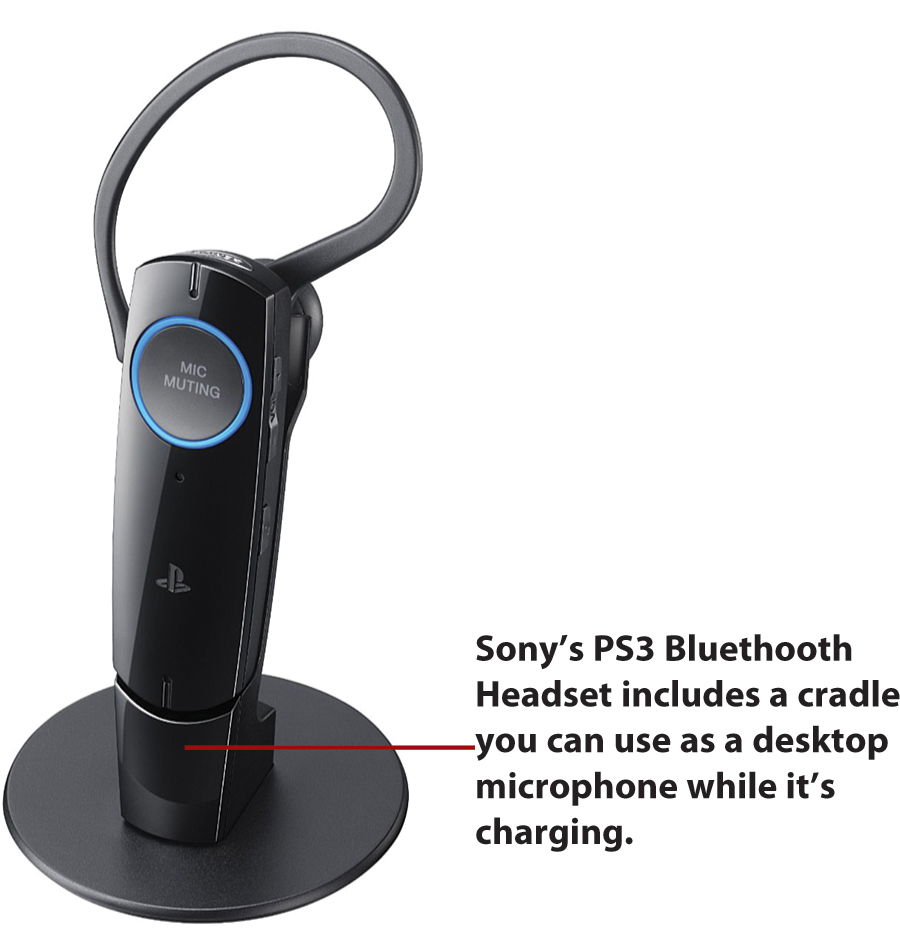
If you want a branded Bluetooth headset, it’s hard to go wrong with Sony’s PS3 Bluetooth Headset. As the name implies, Sony’s headset is optimized for the PlayStation 3, but it also happens to work great with the Vita and most cell phones because it features excellent microphone technology.
If you prefer a stereo option, check out the slightly less portable, but highly versatile Jabra HALO2 Bluetooth Stereo Headset. Although the stereo listening experience is not necessarily up to par with a good pair of wired headphones, it’s hard to beat the freedom of wireless, although it’s yet another device to keep charged. Along with stereo Bluetooth headphones, your Vita also works great with stereo Bluetooth speakers, such as the popular Jawbone JAMBOX, so consider all the options carefully before committing to one or more headphone or external audio solutions.
Styluses
Before Apple’s original iPhone popularized touch as the primary input method for touchscreens back in 2007, the stylus ruled. With modern touchscreens, the need for a stylus has been greatly minimized, but at times using a pen is ergonomically preferable over using a finger. For instance, although it’s fun to use your fingers for the free PlayStation Store downloadable app, Paint Park (SCE, 2012), which turns Vita’s impressive screen into a sketch pad, complete with virtual markers and onscreen color palette, it works even better with a good stylus.
Because today’s touchscreens—including the one found on your Vita—are capacitive, meaning designed to register distortions generated by an electrical conductor like your finger, only a capacitive stylus works. Luckily, as touchscreen smartphones and tablets have gained in popularity, so, too, have a wide range of compatible styluses. These include Ten One Design’s inexpensive Pogo Sketch Stylus and Wacom’s Bamboo Stylus, which is pricier, but features slightly smaller, replaceable tips.

Along the same lines as a stylus, you might wonder how you’ll use your Vita’s finger-centric touchscreen while wearing gloves. The simple answer is you can’t. However, outside of fingerless gloves, many sellers of special capacitive gloves have interwoven conductive fibers to maintain electrical contact with your skin. One popular example of touchscreen gloves is NSquare’s TouchMate Gloves, or, for the do-it-yourselfer, check out GloveTips, which are dime-sized flexible disks that you can easily sew into an existing pair of gloves.