
Using Network Security Tools, Scripts, and Code
In the previous chapters, we learned about network and security protocols. In this chapter, we will provide a comprehensive overview of the various security tools that we will work with later in this book. We will start by describing the main open source and commercial tools. Then, we will look at tools that are used to gather information on our target network (which can be a network that we want to protect), followed by tools for discovering vulnerabilities and network weaknesses.
In this chapter, we're going to cover the following main topics:
- Commercial, open source, and Linux-based tools
- Information gathering and packet analysis tools
- Network analysis and management tools
- Vulnerability analysis tools
- Exploitation tools
- Stress testing tools
- Network forensics tools
Some tools fulfill tasks in several categories, such as when a tool can be used both as a vulnerability tool and for exploitation, and in these cases, we will look at these capabilities in each of the categories they're a part of.
Commercial, open source, and Linux-based tools
We will start with a general category – open source and commercial tools. In addition to this, some of us are used to working with Windows, while others are used to Linux (and laugh about the former). We will talk about both Windows and Linux while focusing on open source tools and, when required, tools that we need to write ourselves.
We can divide security tools according to their objectives, what they do, what we test, and what we are trying to protect. For example, some tools are used to test communications servers, and we can use them to protect these servers.
Our book is about network protocols, so we will focus on network-oriented attacks and protection. The first type of tool that we will work with is open source tools.
Open source tools
All the tools we recommend in this book are free. Some of the tools are open source, some are commercial tools available for free in basic versions, and most of them are fully functional for a limited number of devices. In addition to this, we will learn how to work with Kali Linux, a Linux distribution with many tools intended for network scanning and penetration tests.
To use Kali Linux, you can use a dedicated machine or install it on a virtual machine on your PC/laptop. The following screenshot shows Kali Linux being installed on VirtualBox, installed on Windows 10:
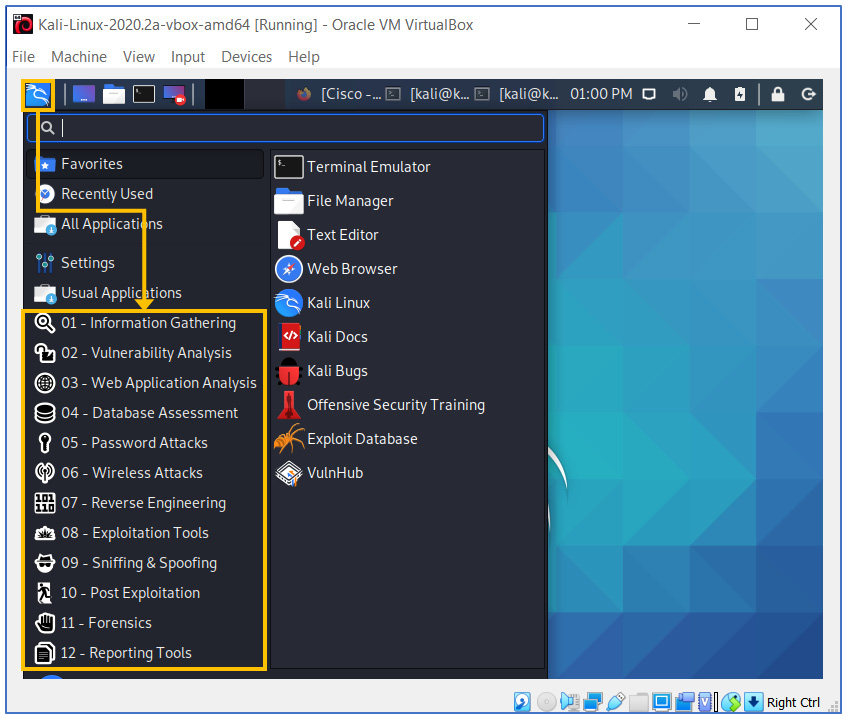
Figure 4.1 – Kali Linux main window
There are many commercial tools we can use for the same purpose. Let's look at some examples.
Commercial tools
There are various types of commercial tools available. The biggest advantage of using a commercial tool is the ease of use and technical support. Some commercial tools provide a limited free edition – in many cases, a fully functional version with a limited number of IPs or devices. We will come back to this later. For now, let's look at some information-gathering tools.
Information gathering and packet analysis tools
The first step in hacking into a network is to gather information about it. In many cases, connecting your laptop to the network and starting some basic tools will provide you with enough information to move forward. Let's start from the simple and obvious and continue with the tricky ones.
In this category, you have tools divided into four levels:
- Basic network scanners: Tools for gathering information on devices connected to the network, their IP addresses, MAC addresses, DNS names, open TCP/UDP port basic information, and so on.
- Network management tools: These are SNMP tools that were created to provide network management, though they can also be used for information gathering. Although communications devices should be configured with passwords (in SNMPv3) or community strings (in SNMPv1/2c), this doesn't always occur. In these cases, you will be surprised by the amount of information we can get from non-protected communication devices – IP addresses, routing tables, services that run on the device, and more.
- Network analysis tools: When we connect a network analyzer to the network, even when connected without any extra configuration on the network, we will see broadcasts as well as multicasts being sent over the network. For example, ARP broadcasts will give us the IP addresses of the devices that send them, routing protocol broadcasts and multicasts will identify the routers that send them, NetBIOS broadcasts will identify network services, and more.
- Protocol discovery tools: These are used to discover servers and services running in the network. These tools will discover open TCP/UDP ports and what is running on them, operating system (OS) types, and more.
Let's discuss these tools one by one.
Basic network scanners
The first and most basic tools to use are network scanners. There are simple scanners that scan IP address range port numbers and names, and some of them are more sophisticated than others.
Angry IP Scanner
In the following screenshot, we can see an example of a simple scanner called Angry IP Scanner, an open source tool from https://angryip.org/:

Figure 4.2 – Simple IP scanner
With Angry IP Scanner, you simply configure the address range and the ports or port ranges you want to scan and click Start. Google searching for IP Scanner will give you a large number of software similar tools for Windows, Linux, and macOS.
NMAP
These simple scanners are usually used to see who's on the network. For smarter scanning, the most common tool is NMAP, which can be downloaded from https://nmap.org/.
Running NMAP on our PC gives us the following window:
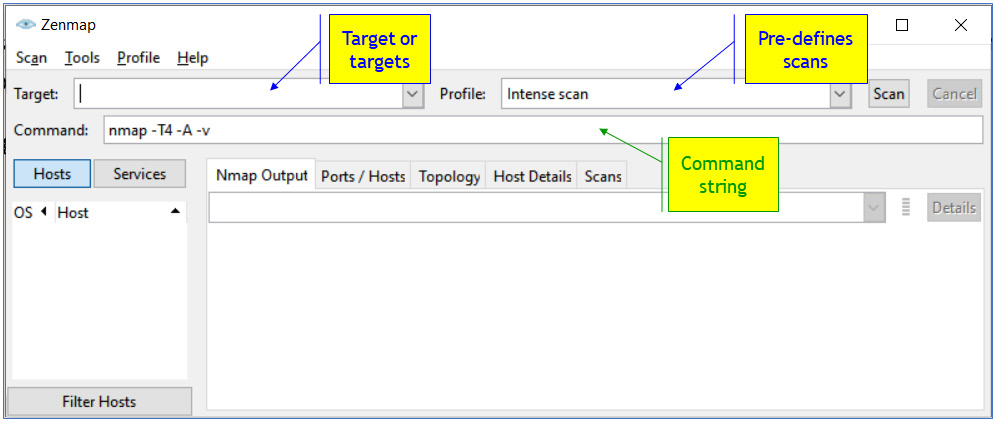
Figure 4.3 – NMAP start window
NMAP is a lot more than a network scanner. In NMAP, we can configure Layer 3 IP scans and ICMP scans, configure Layer 4 scans such as TCP and UDP scans, and configure application scans such as HTTP GETs, DNS queries, brute-force scans (password guessing), smart scripts, and more.
There are predefined scans and scripts that you can configure manually. In the following screenshot, we can see these predefined choices:

Figure 4.4 – Basic scans with NMAP
In the Target bar, we fill in our target(s). A target can be configured as a single IP address, such as 10.1.1.1 or any other IPv4 address.
It can be configured as an IP address range; see the following examples:
- 10.0.0.0-15/24 will scan the address range of 10.0.0.0 to 10.0.0.15.
- 192.168.1-2.0/24 will scan the address range of 192.168.1.0 to 192.168.2.255.
- 10.0-1.0-255.0-255 will scan the address space of 10.0.0.0 to 10.1.255.255.
It can also be configured to scan DNS names, such as www.ndi-com.com, www.cisco.com, and so on.
Scanning the 10.0.0.0 to 10.0.0.255 address range using the 10.0.0.0/24 target will give us the following output:
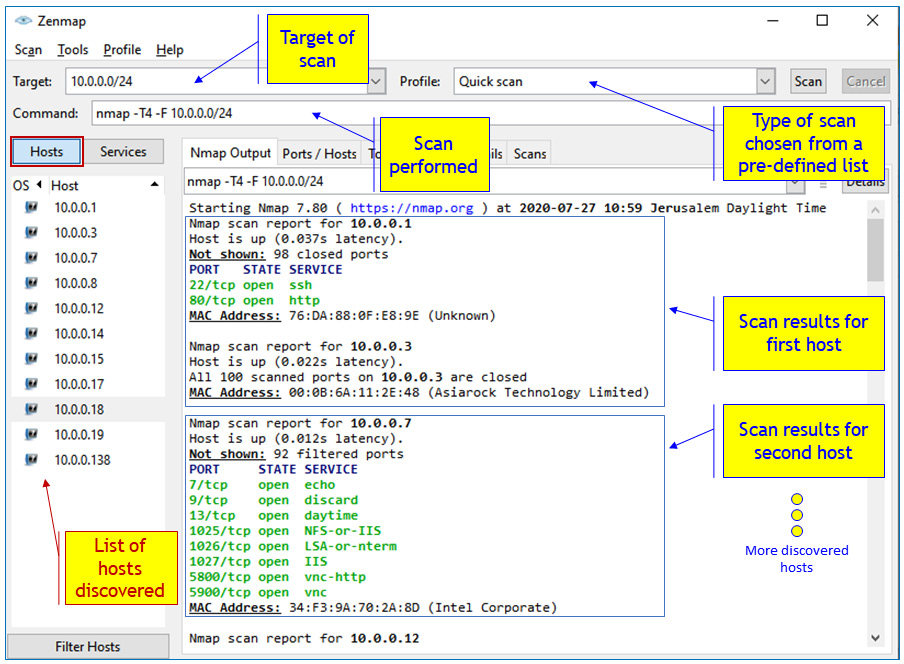
Figure 4.5 – Scan results from network 10.0.0.0/16
In the second result (the scan of 10.0.0.7) we have several open ports. Among them is TCP port 1027 with a service called IIS; that is, Microsoft Internet Information Server (the former name for Microsoft Web Server).
Browsing to http://10.0.0.7:1027 opens the connection to it and sends a GET command. We can see this in the following screenshot of the Wireshark capture to 10.0.0.7:
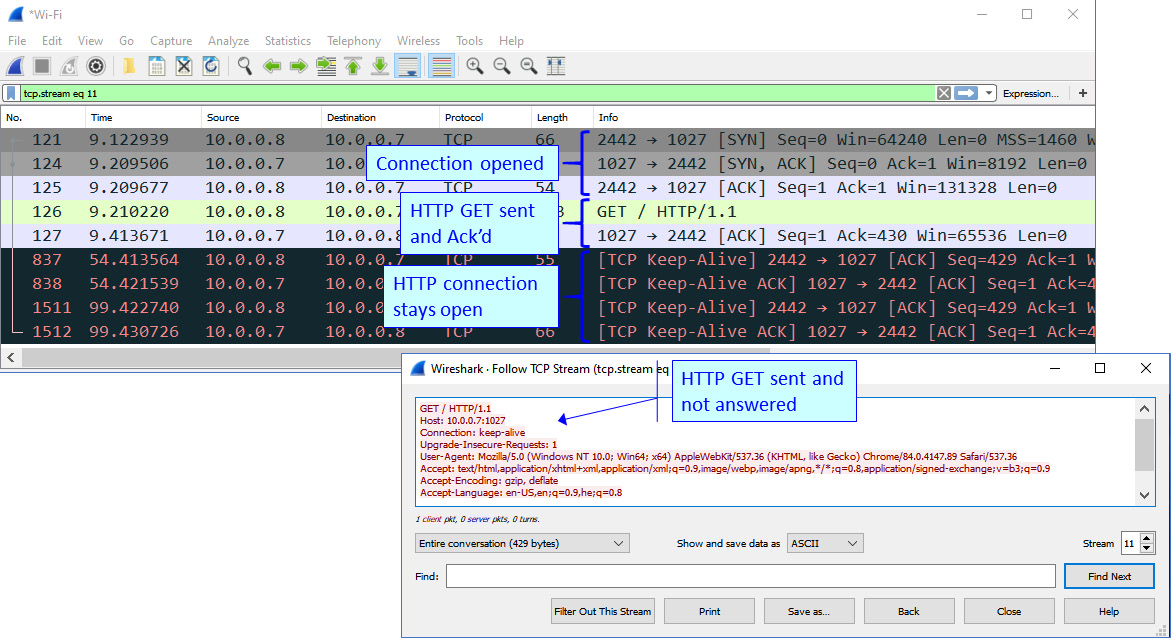
Figure 4.6 – HTTP connection results
We will talk about Wireshark in Chapter 8, Network Traffic Analysis and Eavesdropping.
In the results, we can see that the connection to 10.0.0.7 on the 1027 port is open, a GET request has been sent and acknowledged, and then nothing happens. We can see this due to the keep-alive messages that are sent, meaning that the connection stays open. In Chapter 14, Securing Web and Email Services, we will see what to do with these open connections.
The next way we can configure NMAP is to use scan options, as shown in the following screenshot:
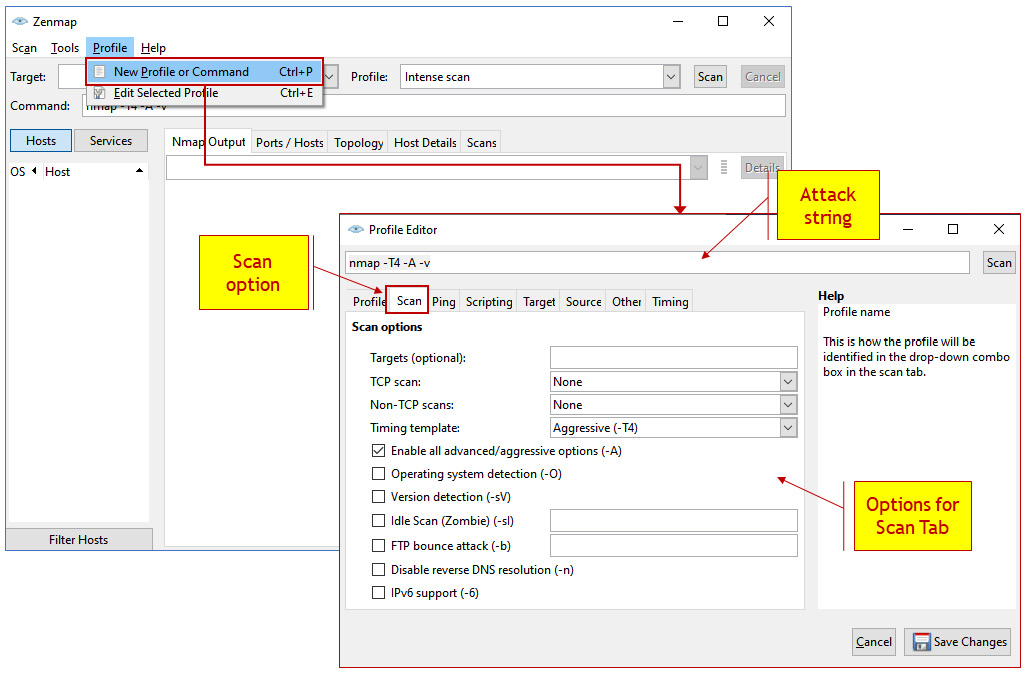
Figure 4.7 – NMAP options
As we can see, in the Scan tab, we have various options for TCP and UDP scans. In the tabs to the right of the Scan tab, we have the Ping tab for ICMP scans, the Target tab to make changes in the targets we scan, the Source tab for setting source addresses, the Other tab for various options, and the Timing tab for setting time variables.
You can use NMAP in Linux by using the standard Linux CLI, as shown in the following screenshot:
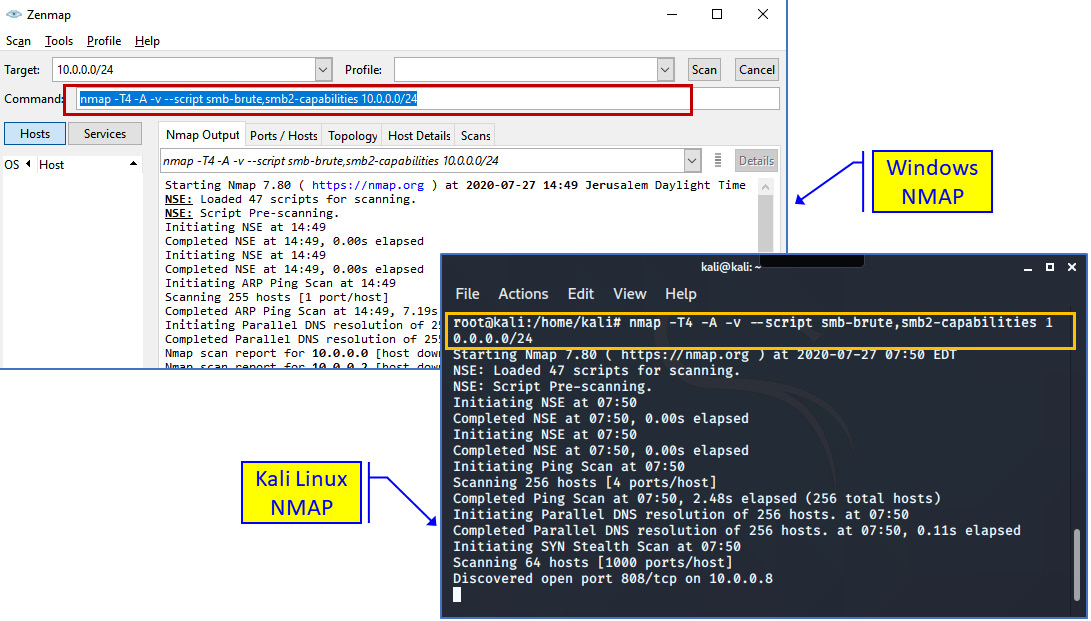
Figure 4.8 – Windows NMAP versus Linux NMAP
Here, we can see a brute-force attack being performed on SMB services and SMB capabilities attacks. In Chapter 15, Enterprise Applications Security – Databases and Filesystems, we will talk about the NetBIOS and Server Message Block (SMB) protocols.
Network analysis and management tools
In this category, we have two types of tools:
- Network analysis tools
- SNMP and agents-based tools
Let's see what they do.
Network analysis tools
For network analysis, the most common tool is Wireshark. When connecting to a network, especially when you have permission to configure a port mirror or install it at points in the network where you can see network traffic passing through, you will get a lot of information about what is happening in the network.
In the following screenshot, you can see that from a simple capture using Statistics | Conversations, we can see a lot of information about what is going on in the network:
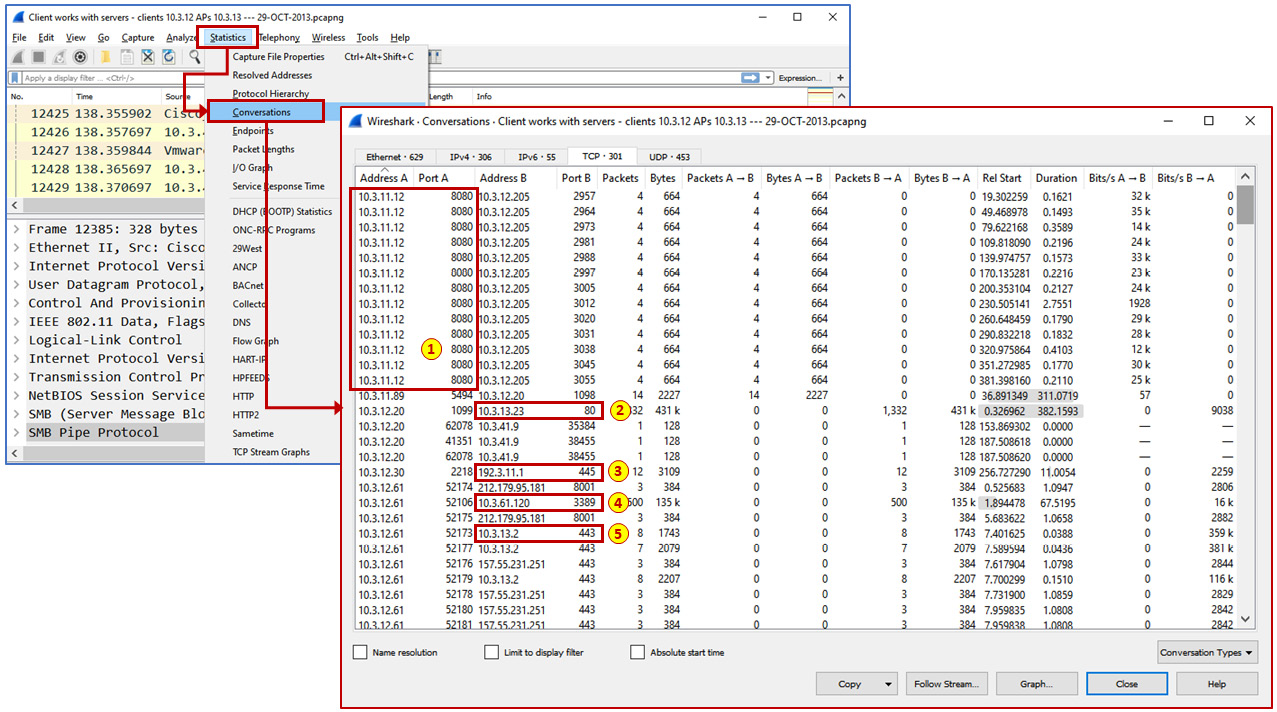
Figure 4.9 – Wireshark
From this capture, we can see that host 10.3.11.2 is running TCP port 8080, so it is a web proxy (1), 10.3.13.23 is running TCP port 80, so it is running an HTTP server (2), host 192.3.11.1 is running TCP port 445, so it is running SMB (3), someone is connected to host 10.3.61.120 on port 3389 (!), so this host is answering to RDP (4), and 10.3.13.2 is answering on port 443, so it is running an HTTPS service that can be connected to.
Gathering more details and digging into these packets will give us a lot more information, as we will learn in Chapter 8, Network Traffic Analysis and Eavesdropping.
SNMP and agent-based tools
Although SNMP tools are usually used for management and control, we can use them for network and service discovery as well. There are open source tools such as MRTG, OpenNMS, Nagios, Zabbix, and others we can use, and there are also some commercial tools that provide limited functionality, and in some cases full functionality for a limited amount of time.
PRTG from Paessler provides you with an unlimited license and functionality for 30 days and then continues with a limited number of 100 sensors for free. Running it will give you a scan of the network divides and the open services that are running on them. An example of this can be seen in the following screenshots:
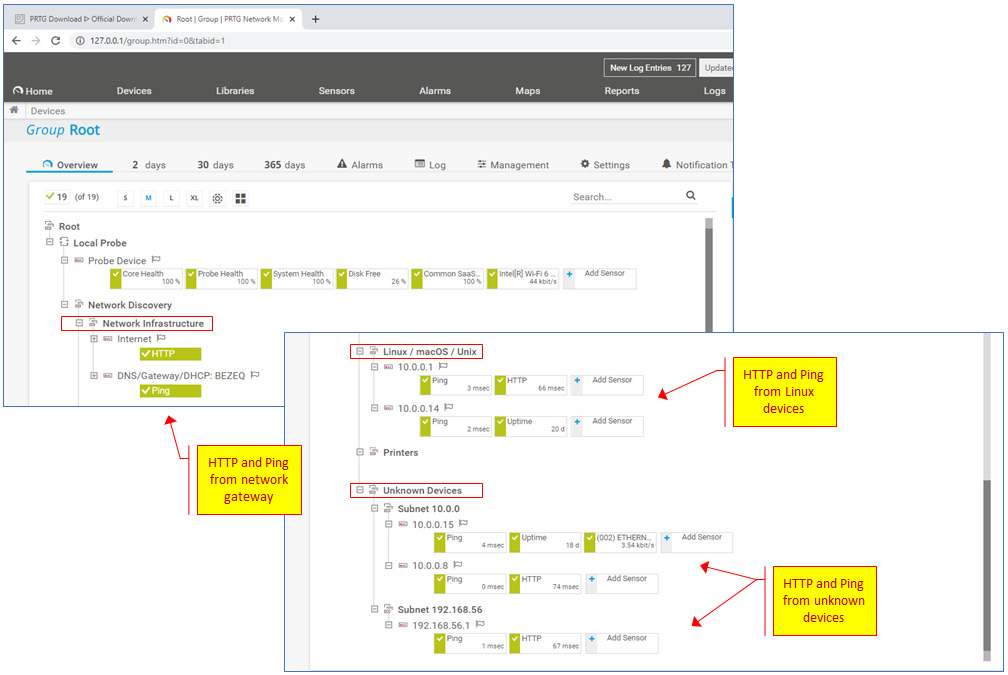
Figure 4.10 – PRTG discovery
Here, you can see the network infrastructure devices that were discovered, Linux devices, and even devices that are marked as unknown. You will be surprised at how many times these unknown devices are also unknown to the system administrator.
Now that we've learned about network discovery tools, let's go deeper and find out what we can learn about the protocols that run in the network.
Protocol discovery tools
Protocol discovery tools are tools that are used to discover protocols that are running on network devices, and in smart protocol discovery tools, you will see additional information about these protocols.
NMAP
NMAP is one of the most popular tools for network scanning, and one of its simple features is port scanning. There are predefined scripts that can be used for smart scanning. In the following screenshot, you can see some ports that have been discovered on network devices:
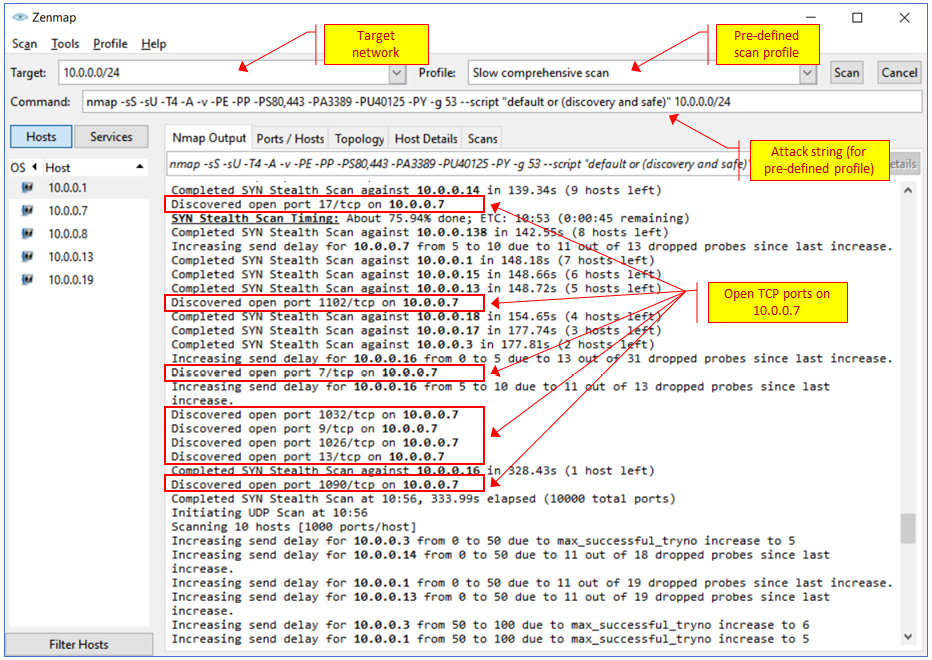
Figure 4.11 – Port scan with NMAP
You can see that several ports were found open on 10.0.0.7 – ports 17, 1102, 7, 1032, and others. Now, we will be able to use exploit tools and try to break into this device.
Now that we've discovered the IP addresses in the network and the open TCP and UDP ports, let's see what we can do with them. For this purpose, we can use vulnerability analysis tools. We will learn about these in the next section.
Vulnerability analysis tools
First, before we look at how to discover vulnerabilities, let's see what can cause them. In this category, we have the following:
- Network devices that have not been configured according to the vendor's security procedures: Vendors provide precise and detailed procedures on how to secure the equipment, but unfortunately, not very many organizations follow them. Hackers know them, read them, and will use them to attack your network.
Important Note
You can search Google for hardening procedures and find them on vendor websites, such as Cisco (https://www.cisco.com/c/en/us/support/docs/ip/access-lists/13608-21.html), Juniper (https://www.juniper.net/assets/kr/kr/local/pdf/books/tw-hardening-junos-devices-checklist.pdf), and others.
- Network devices should be updated periodically: When Cisco, Extreme Networks, HPE, Juniper, or other vendors issue upgrades or software fixes, they know why they are doing so. Don't skip them.
- Unknown devices on the network: This sounds stupid but in many cases, I have seen a network device, PC, or a server that has been forgotten over the years. This could be a server that connected to the network many years ago or a simple router that someone connected to in one of the R&D labs because they needed more Ethernet ports. In an organized organization, this will not happen, but not all of us are organized.
In this section, we talked about vulnerability analysis; later, we will look at exploitation tools. There's a very thin line between them. Regarding vulnerability analysis, we find the vulnerability, while in exploitation, we attack it. If we look at a simple example, a vulnerability tool will discover that TCP port 80 is open on a device and you will see that you can connect to it, while exploitation tools will use scripts that will try to take advantage of this vulnerability and, for example, take control of the attacked system. In this section, we will talk about tools for exploiting various vulnerabilities in computer systems while emphasizing communication systems.
There are various types of vulnerabilities exploitation tools we can use, depending on the device and the protocol we plan to attack. Various tools can be used both for finding vulnerabilities and exploiting them.
As a general-purpose tool, we have tools such as NMAP, which we talked about in the previous section, and Nikto, which can scan and exploit multiple protocols. For web server scanning, we have tools such as Burp, theHarvester, and many others. Most of these are easier to use from Kali Linux, though some also have Windows versions.
To run some of these tools, you will need to have basic knowledge of scripting and code. For those of you that are networking people, don't be afraid of it – only basic knowledge is required. In the following chapters, whenever scripting will be required, we will provide clear and easy explanations.
Nikto
Nikto is a vulnerability scanner that targets mostly web servers and can discover thousands of vulnerabilities. It is included in Kali Linux and can be also installed on Windows platforms. The following screenshot shows a basic Nikto command sent on www.ndi.co.il:

Figure 4.12 – How to use Nikto
From the results, you can see that a Microsoft IIS/8.0 server is hosting the website, the allowed HTTP methods are GET, HEAD, OPTIONS, and TRACE, and some information about headers. In Chapter 14, Securing Web and Email Services, we will look at better ways to use it.
Legion
Legion, which originated from SECFORCE's Sparta, is an open source network penetration testing framework that uses various scanners, including NMAP, Nikto, Hydra, and many others. Although Legion comes with more than 100 built-in scripts for penetration tests, the framework allows additional external tools to be integrated with it.
You can run Legion from the main Kali Linux menu, as shown in the following screenshot:
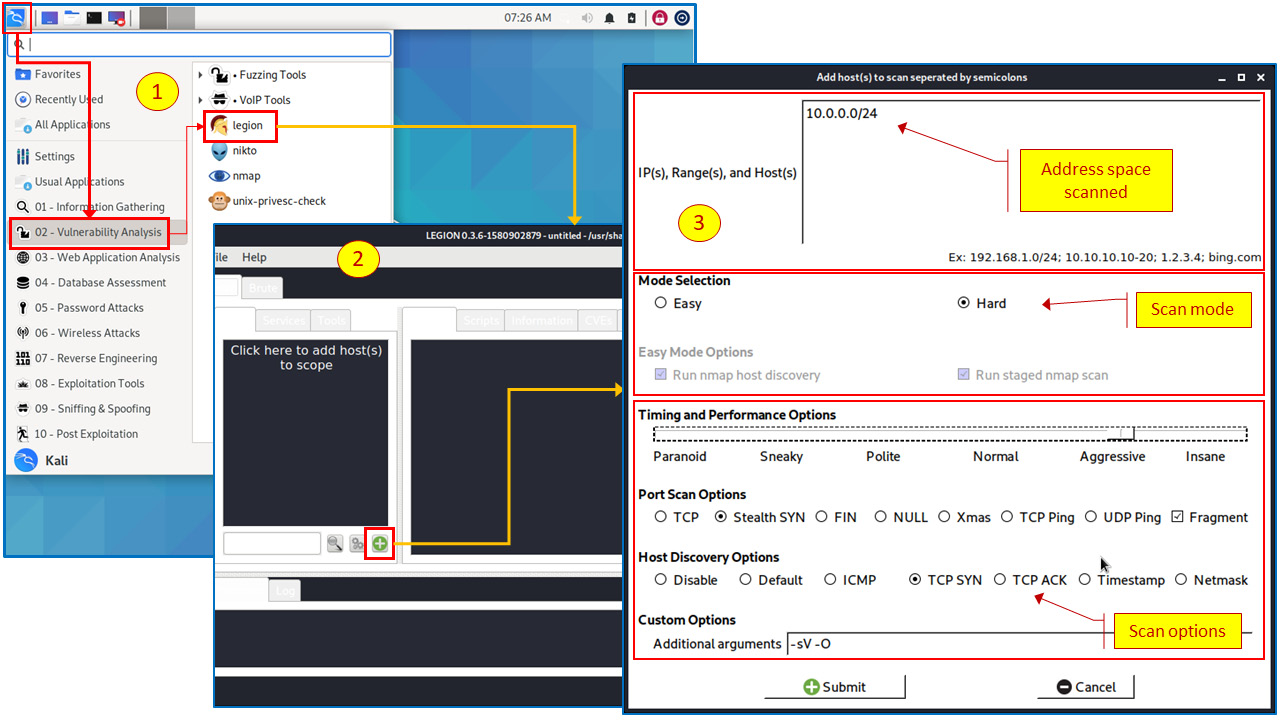
Figure 4.13 – Working with Legion applications
In the results, you can see that the beautiful thing about a framework is that you can use multiple tools such as standard NMAP, Nikto, and others:
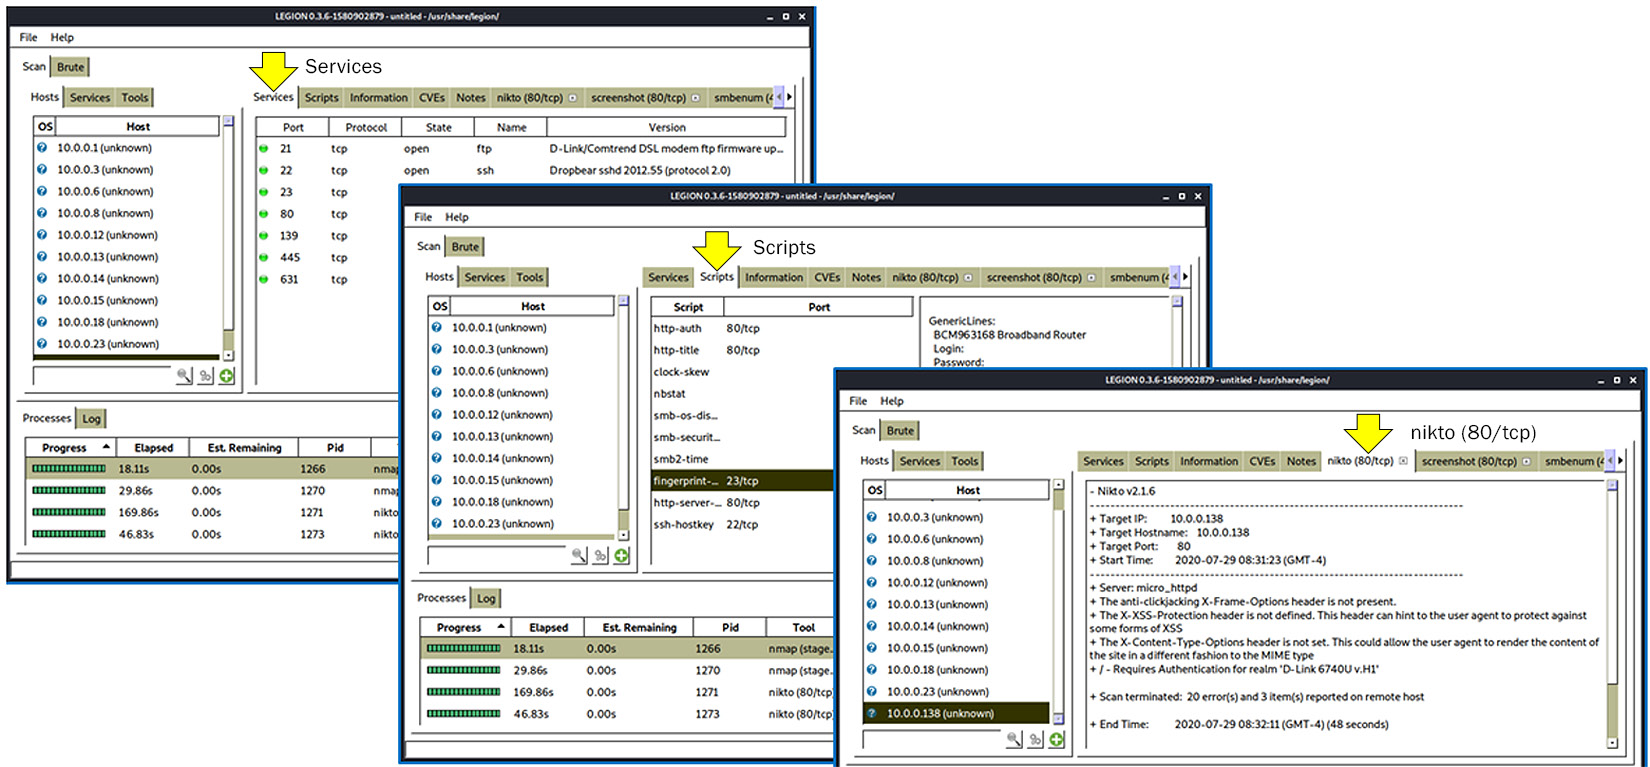
Figure 4.14 – Legion scanning results
The preceding figures show how to run Legion. You start it from the Kali Linux menu, choose 02 – Vulnerability Analysis, and then click on legion. When the application opens, you add a scan. At this point, a new window opens, and you configure it. We will see advanced usage of this application in the protocols chapters in Part 3, Network Protocols – How to Attack and How to Protect – Methodologies and Tools.
Exploitation tools
Exploitations tools are tools that have been designed to take advantage of vulnerabilities that have been discovered in network devices. In this section, we will talk about one of the most important tools in this category: the Metasploit Framework.
The Metasploit Framework (MSF)
MSF is a platform for writing, testing, and using exploit code. It is a smart framework that enables you to write complicated scripts but requires the know-how to do it.
First, you must understand the following terms surrounding MSF:
- Exploit: A piece of code that is designed to take advantage of a vulnerability in a software system.
- Payload: A piece of code that is delivered to the victim system or application via the exploit. Payloads can be single or in multiple components called stages.
To install Metasploit on Kali Linux, use the following command from GitHub.com (in the Kali Linux shell):
curl https://raw.githubusercontent.com/rapid7/metasploit-omnibus/master/config/templates/metasploit-framework-wrappers/msfupdate.erb > msfinstall &&
chmod 755 msfinstall &&
./msfinstall
Source: https://github.com/rapid7/metasploit-framework/wiki/Nightly-Installers.
To run Metasploit, type the msfconsole command in the Kali Linux shell or choose 08 – Exploitation Tools from the Kali Linux main menu and click on Metasploit Framework. Running msfconsole -q will make you run in quiet mode, which means that you won't see messages that are not sent to the console. Running it, you will get the following window, which is the start window of the framework:
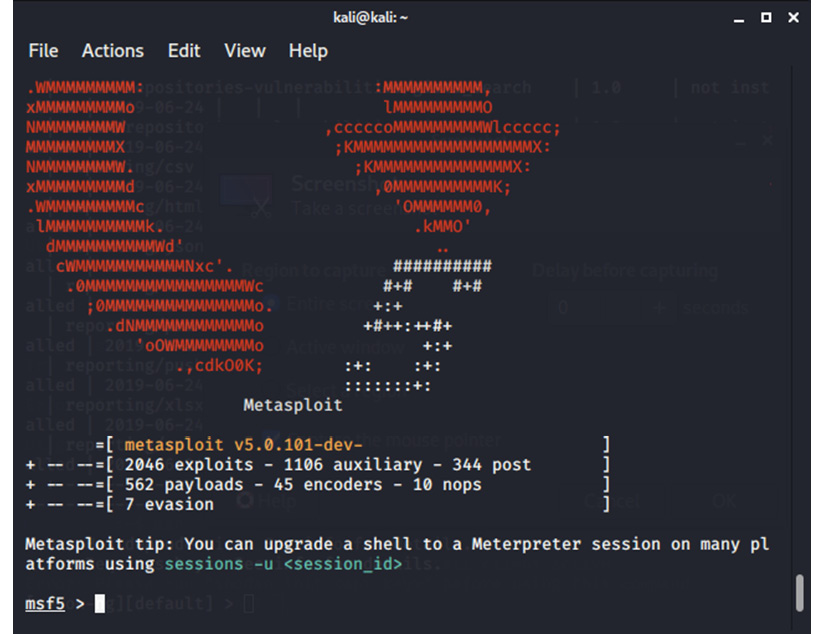
Figure 4.15 – Metasploit main window
MSF will be used in the upcoming chapters to test and exploit network devices and protocols.
Stress testing tools
Stress testing tools are tools that are used to test the network and network devices against several types of attacks. Let's look at them in more detail:
- Tools for loading the network: These tools simulate heavy traffic that can be due to, for example, DDoS attacks.
- Tools for loading network devices: These tools load network device interfaces and the control management and control planes.
- Tools for loading software elements: These tools simulate heavy loads on software components – firewalls, management systems, and so on.
There are tools for each of these purposes, so let's look at some examples.
Windows tools
There are many open source ping tools for Windows. One popular tool for Windows (and Linux) is Nping, which can be downloaded from https://nmap.org/nping/.
Kali Linux tools
Using Nping in Kali Linux is a part of the operating system. To run it, use the following command:
nping [Probe mode] [Options] {target specification}
Here, we have the following:
- Probe mode: TCP, UDP, ICMP, ARP, or traceroute.
- Options: Various options for setting traffic parameters. Here, you can change every field in Layer 3/Layer 4 packets. For example, -- tcp generates TCP packets, -- udp generates UDP packets, -- flags sets TCP flag values, and so on.
- target specification: The target or target's specification.
Typing the nping command provides a full list of the probes and options that are available.
The following is an example of this:
nping -c 1 --tcp -p 80,433,25,110 www.ndi-com.com
The preceding command generates one request to www.ndi-com.com on each of the requested ports:
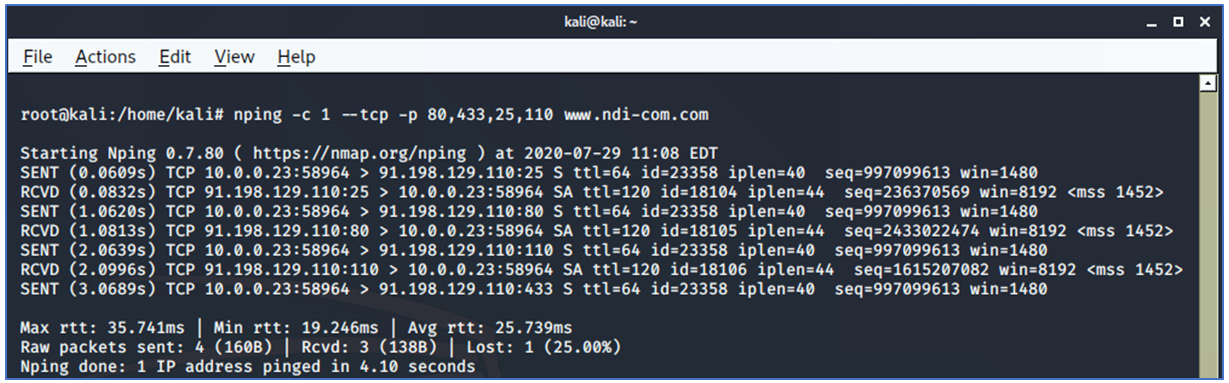
Figure 4.16 – Linux Nping
Changing -c (count) to -c 4 will generate four requests to each of the ports:
nping -c 4 --tcp -p 80,433,25,110 www.ndi-com.com
To generate a large amount of traffic, you can, for example, configure the packets per second and increase their sizes:
nping -c 5000 -rate 500 -mtu 800 --tcp -p 80,433,25,110 10.0.0.138
In this command, we have the following:
- -c 5000: Sends a total number of 5,000 packets
- -rate 500: 500 packets per second
- -mtu 800: Packet size is 800 bytes
- --tcp: Sends TCP packets
- -p: Sends TCP to ports 80, 433, 25, and 110
This will give us a load that looks as follows (go to Wireshark | Statistics | IO graphs):
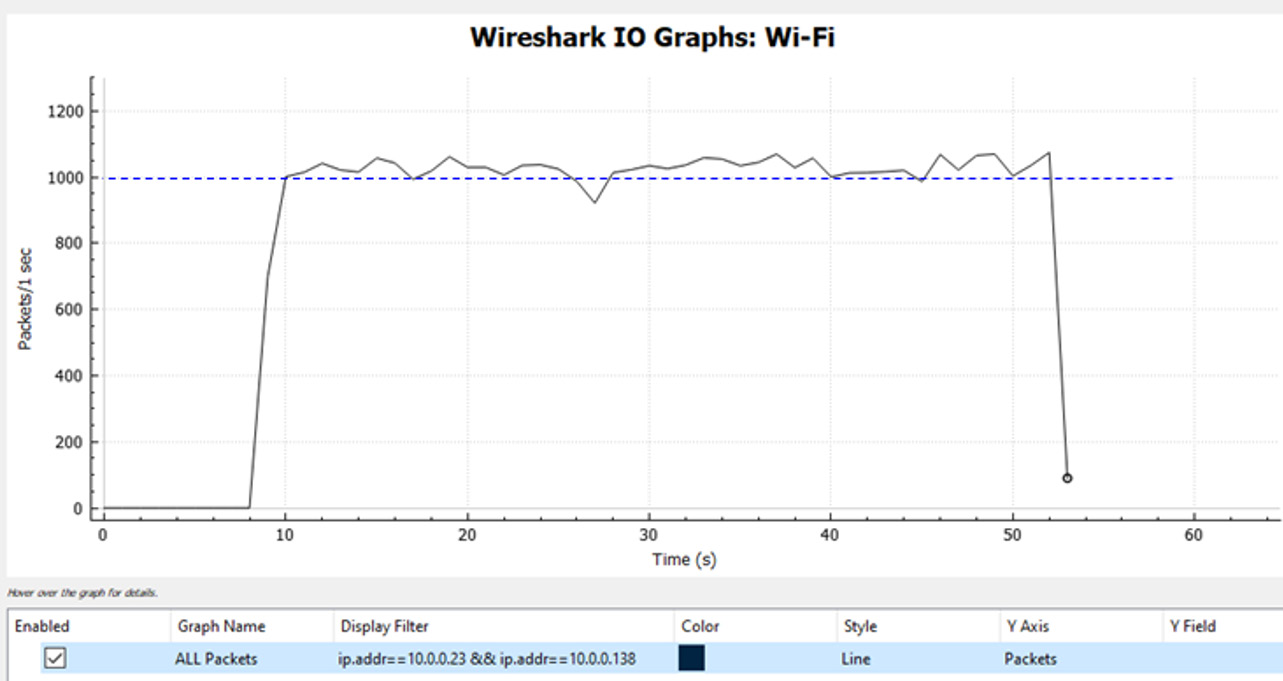
Figure 4.17 – Loading the network with Nping
As we can see, we have roughly 1,000 packets per second (PPS). The reason we have 1,000 PPS while we have configured 500 is that we generated 500 PPS, but the destination replied with 500 PPS. So, adding both, we get roughly 1,000 PPS.
You can find a good Nping manual at https://www.mankier.com/1/nping.
Network forensics tools
Although there are various tools for network analysis, the best tool for network forensics is good old Wireshark. With Wireshark (and knowledge of your network and network protocols), you can identify suspicious patterns on the network based on a very simple principle – whatever you don't know can kill your network.
In Chapter 9, Using Behavior Analysis and Anomaly Detection, we will look into abnormal behaviors and suspicious behavior patterns.
Wireshark and packet capture tools
Wireshark, along with its command-line interface (CLI) programs – TShark for Windows and TCPdump for Linux – provides strong analyzing capabilities, and tools such as pyshark can be used as plugins for Python for this purpose.
Summary
In this chapter, we talked about common tools for scanning and information gathering, vulnerability analysis, stress tests, and exploitation tools. Using these tools, along with similar tools, will allow you to perform these tasks in the next chapters, and as well as help you test your networks, understand the vulnerabilities you have discovered, and use protection mechanisms to protect yourself against them.
In the next chapter, we will learn how to use the tools that we learned about in this chapter to find protocol vulnerabilities.
Questions
- What is the difference between a vulnerability and an exploit?
- A vulnerability and an exploit are the same thing in different stages of the forensics procedure.
- Vulnerabilities are weak points, whereas exploits are how you take advantage of these weak points.
- A vulnerability and an exploit use the same tools, so they are the same.
- Vulnerabilities are about how to break into the network, while exploits are about how to protect against this.
- A vulnerability can be discovered by which of the following?
- IP/TCP/UDP scanners
- Layer 5-7 scanners
- MAC layer scanners
- All of the above