
Set your shutter speed at 1/50th second and the video to 1920×1080 24fps to mimic a motion picture film look. You can use other settings as well, but it’s a good idea to adhere to the 180-degree rule, whereby your shutter speed is double your frames per second. In this case, 1/50th is as close to 1/48th (24fps × 2) as you can get.
Most DSLR digital chips have what are called native ISOs. This means that there’s an incremental range of ISO settings where the electrical charge on the photosites is electrically charged to change the sensitivity to light. To get the best quality video exposure, you will need to set your ISO to one of the following increments: 160, 320, 640, or 1250. The settings in between (100, 200, 400, and so on) are taken from the nearest increment of 160 using mathematical algorithms to boost or lower the exposure. You can verify the best ISO settings by leaving the lens cap on and shooting a black frame at each ISO setting. When you look at the final images, it will be clear which ones have less noise and fewer artifacts.
This section discusses the following menu items you’ll come across in your camera:
Quality setting
White balance
Picture style
Auto power
Format
LCD brightness
Live view/movie functions
AF mode
Movie rec size
Sound recording
Star menu
The first menu item you come to is the Quality setting. This setting affects only your still images. A lot of HDSLR shooters like to capture stills of the video scenes to use in Adobe Lightroom as a reference for the colorist. Set this up as you normally do for stills.

Canon 5D Quality setting setup
White Balance (WB) is the next setting that will affect your video. For stills, AWB (Auto White Balance) works really well in a lot of situations, but for video, you need to set the WB manually. Having the WB change in the middle of a scene because you move in and out of daylight by a window or get too close to a tungsten practical (lamp or light fixture used as a light in the scene) will not only be distracting, but it will also make consistent color grading very difficult in post.
Choose a degree of Kelvin by rotating the thumb dial on the back of the camera. In the camera menu, a visual clue is often given as to which wheel to use to change the setting. In this case, a half wheel is shown to indicate the thumb wheel on the back of the camera.

Set the white balance to the desired temperature or look you want to achieve using the Kelvin setting to change the white balance numerically. The lower the number, the warmer (orange) the look. Higher numbers produce cooler (bluer) images.
Tip
You can also adjust WB when in Live mode, whereby you can see the corrections applied to the LCD screen as you make changes.
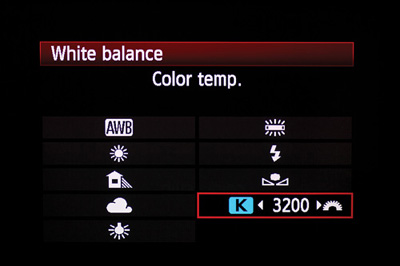
Change the Kelvin setting manually
If you are shooting under a controlled lighting situation that isn’t going to change, you can use either AWB or the custom White Balance setting just like you do for stills. Fill the frame with a white card in the desired light and take a still picture. Choose Custom WB from the Camera menu and navigate to the white card shot and select it. Finalize the setting by pressing OK. As long as you don’t change your lighting situations, the WB will be neutral and fairly accurate on all stills and video you shoot.
Setting the picture style requires you to make a major workflow decision. There is much discussion about which picture style to use. Everyone seems to have his own secret sauce—shoot super flat, shoot neutral and lower contrast/sharpness, bake the look in like you would a JPEG, and so on. You can even use the Canon Picture Style Editor to create your own in-camera picture styles, or you can load settings created by others.
After working with Snehal Patel, I’ve taken his advice and gone over to using Faithful as my picture style. It seems to be the most linear setting with the least amount of corrections applied. It gives you a strong video image, the exposure of which is easier to judge on the camera LCD screen. It can also hold up to color correcting. Remember that it’s easier to correct your image in post when there is consistency to the files. However, by choosing a picture style that needs to be corrected, you open yourself up to needing additional support, software, and training in order to achieve the final look in post.
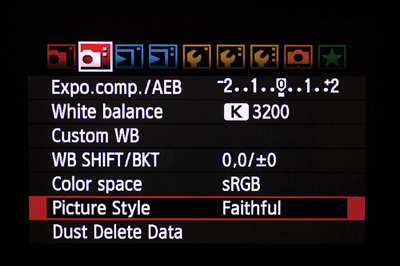
The Faithful Picture Style setting is a good bet
The next menu item to address while shooting video is Auto Power. You don’t want your camera to be constantly going into sleep mode in the middle of framing up a shoot. It’s a good idea to turn this off or set it at 30 min.

It’s best to turn Auto Power off or to set it to 30 minutes
Formatting your cards when shooting video is even more important than when shooting stills. Your folder structure becomes very important when managing your data in post production, especially when using a log and transfer tool like the EOS plug-in, which looks for and requires a clean camera setup folder hierarchy.
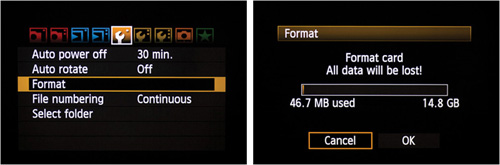
Format your cards prior to shooting video
The LCD Brightness setting is designed to make the camera adjust to the lighting in your environment. This can be problematic when trying to make critical exposure adjustments.
Therefore, it’s a good idea to change this setting from Auto to Manual and move the adjustment slider to the center setting, which is 4.
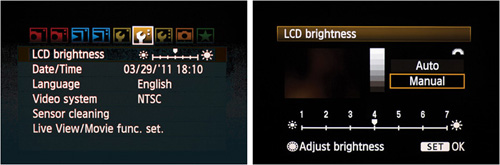
Set LCD Brightness to Manual
In the Camera menu, choose Live View/Movie Func. Set. and then scroll down and select the LV Func. DSLR video has basically evolved out of the Live View mode, which sends a video feed to your LCD screen as a focusing/composition aid.
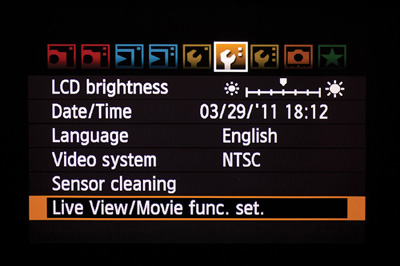
The Live View/Movie Function Settings option
Choose Stills+Movie or Movie. Note that if you choose Stills+Movie, you can release the shutter while recording video by pressing the shutter release button. This will create a roughly one-second gap in the video when the mirror mechanism engages and exposes the full frame sensor for still image capture.
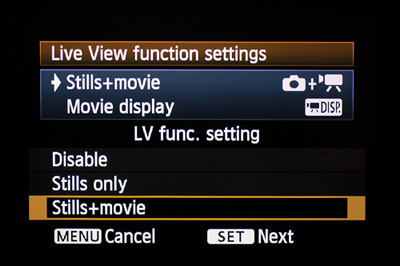
Choose Stills+Movie or Movie
Set the Movie Display to play back on the camera’s rear LCD screen

Set Movie Display so that the recorded video will play back on the camera’s rear LCD screen.
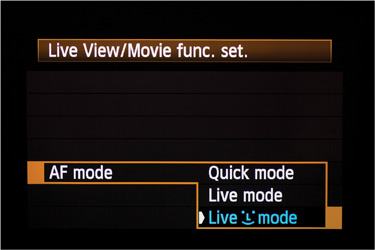
Another setting to be aware of in the same section as Live View mode is the AF mode. This setting determines how your autofocus lenses (particularly Canon L lenses) utilize autofocus.
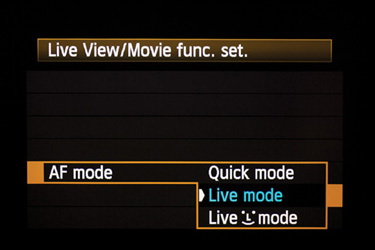
Set AF mode to Live mode
I recommend setting AF mode to Live mode, which will enable you to check focus before starting the video. Autofocus works differently in Live mode than it does in Stills Only mode. In Live mode, the camera stops down to allow more light in so that the contrast focusing mechanism can do its job. This is separate from the fast multi-point autofocus it uses when shooting stills. If you autofocus during video capture, you see the exposure change and the lens moving to find the focus.
A quick note about the face detection Live mode. When chosen, the camera uses facial recognition software to find a face in the frame and tracks the subject’s face with a focusing-indicator square. This setting works only with Canon lenses. It’s a pretty cool feature that point and shoots have had for a while, but in its current incarnation, it’s not very helpful for shooting video.
The next setting under the Live View menu is the Movie Rec Size. This is where you choose the size and frame rate of your video footage. Full HD is considered to be 1920×1080. Most cinematographers choose 24P as the frame rate because it is what our eyes are used to seeing on movie screens. You can use other sizes and frame rates if you want to experiment, but you can’t really go wrong with 1920×1080, 24fps.
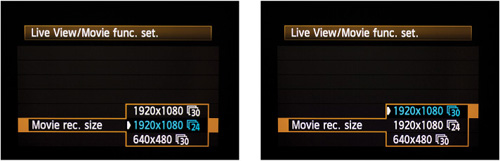
Full HD is considered to be 1920×1080
As was covered in previous chapters, the sound capabilities of most DSLR cameras are limited at best. If you are capturing sound directly into the camera via the on-board mic or via an external mic, you will want to change the setting from Auto to Manual.
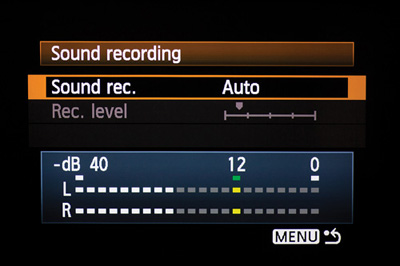
Change the Sound Recording setting from Auto to Manual
Auto Gain Control (AGC) works by turning up the sensitivity (volume) when the camera can’t hear anything. During natural breaks in dialogue, AGC will crank up the volume. This can lead to hissing and other noises. When the dialogue starts up again, the first syllables are too loud until it turns the gain (volume) back down again. For these annoying reasons, you should never use AGC.
After changing the Sound Rec. level to Manual, you also want to pay attention to the Rec. Level and to the meter.
Sound on DSLR cameras that shoot video was really an afterthought that grew out of audio-annotation capabilities, whereby the photographer could speak her notes into the camera while shooting. It’s a good idea to turn the Rec. Level setting down so that the poor quality amplifier in the camera isn’t used too much.

Turn the Rec. Level setting down so that the poor quality amplifier in the camera isn’t used as much
The meter gives you a visual reference to the sound levels. Unfortunately, you can see the meter only when you are in the menu, which makes it less useful than it could be. You should test the effectiveness of the Rec. Level before beginning. Have your subjects say their dialogue, making sure that they deliver it as loud as they will during the take. Watch the meter and make sure that it doesn’t go all the way to the right into the red. This is where the sound will clip and is equivalent to blowing your highlights in a still image. Adjust the sound level until no dialogue hits the red markers.
Because there are so many settings that affect video capture and the fact that they are spread out in the menu system, it’s a good idea to use the Star menu to keep them all in one place.

The Star menu organizes your settings into one place
Select My Menu Settings and navigate to the Register option.

The Register option
On the next screen that says My Menu Registered Item, scroll through the available camera settings and choose the functions that you would like to have access to from the Star menu. In this instance, I’ve chosen White Balance.
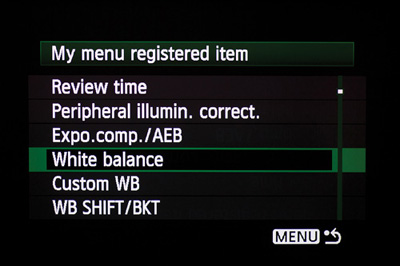
Choose the functions to add to the Star menu
Once an item is selected, the next window asks you to confirm your choice.

Confirm your choice
You can customize this list however you like. I suggest going through and adding the following settings to the Star menu for easy access when shooting video:
White Balance
Picture Style
Format
LCD Brightness
Live View/Movie Func. Set.
