
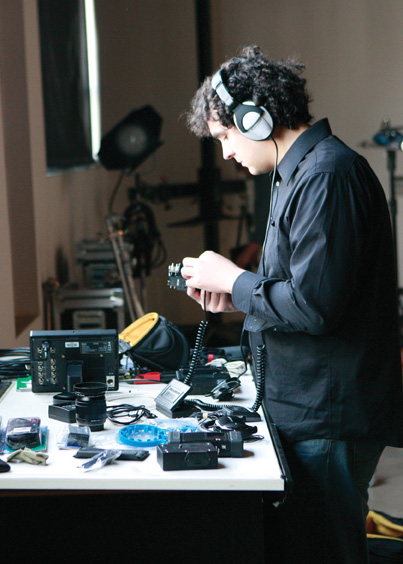
Once you create your wonderful-looking video and make a backup of the footage, it’s time to edit it. For the newbie, editing can seem daunting and confusing. There are so many choices of software, and they all look complicated. Is Mac better than PC and is Unix better than both? Don’t worry! It’s not that bad, especially if you already have experience with photo-editing or audio-editing software. You can use any computer type you have and edit just fine as long as the hardware is fairly modern (that is, bought in the last few years).
This chapter briefly covers a few of the popular non-linear software titles for both the Mac and PC. This includes Final Cut Pro for the Mac, AVID for the Mac and PC, Adobe Premiere for the Mac and PC, and Sony Vegas Pro for the PC. They all operate in similar ways and share a lot of functions. Your choice just depends on your computer type, budget, and preference. This won’t be a comprehensive look at editing, but an overview on how to handle DSLR footage. Lets start with getting the footage into your edit.
A lot of filmmakers are using Final Cut Pro. It works flawlessly on a MacBook Pro, making it perfect for on-set footage review and quick rough edits. Plus it’s robust and supported by enough plug-in makers to make it a great end-to-end solution for one-man-band filmmakers.

Final Cut Pro works well on a MacBook Pro
The common practice is to use Apple’s ProRes format to edit with. As mentioned, the native H.264 format of the Canon DSLRs requires a lot of decompression on-the-fly while playing back, so it bogs down editing software, especially when dealing with multiple clips and multiple layers of video. That’s why you have to transcode your footage into ProRes files and create a new set of QuickTime video files.
You can convert your camera footage a number of ways, but this section will talk about two methods—using the Canon EOS plug-in and the Compressor, a software program that comes included in the Final Cut Studio package. Either way will create the same quality video file. I’ve tested other methods, including a lot of third-party software, but I prefer these two to the rest.
Basically, the EOS plug-in adds a function called Log and Transfer to Final Cut. Instead of using Log and Capture, which is reserved for tape-based media, Log and Transfer enables you to take video from file-based cameras and convert it into editing files.
Tip
The Canon EOS plug-in is free and can be found on the Internet. You can get it from my blog here: http://fearlessproductions.tv/canon-eos-plugin-new-version-11.
Make sure you save your project first, as any video that is transcoded will be saved in a capture folder labeled by project name. You can see from the image here that the folder name used to label the folder containing your footage now becomes the reel name of your transcoded file. That’s why it was important to separate files correctly in the beginning. It’s also very important to preserve the folder structure of the original files, because the plug-in assumes you are transcoding straight from the camera media card. It looks for a DCIM folder with specific contents, including the .thm files (or thumbnail) files (which are the first frames of each video file). The .thm file is also used by the EOS plug-in to get a “time of day” from the metadata in order to create timecode for the video clip (a function that is not available in any other method of transcoding).
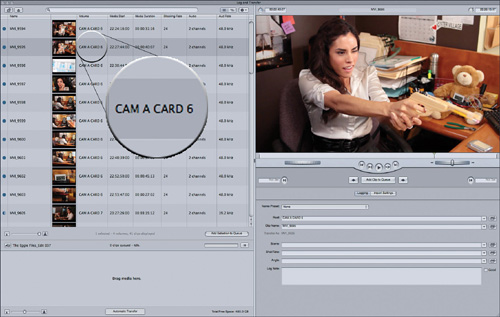
Log and Transfer uses the folder name as the new reel name
You can use the preferences in the Log and Transfer window to change what kind of ProRes File you want to create. I tend to use ProRes 422 most of the time. ProRes 422 HQ will just blow up your footage to double the frame size (adds to the file size too) without adding quality. ProRes 4444 adds an alpha channel and has a larger color space to work with, which may come in handy for high-end graphics and compositing work. ProRes LT is more compressed than 422, and ProRes Proxy is actually your H.264 footage with a new wrapper on it. Proxy doesn’t work as well as the other flavors. You can even trim your clips by adding in and out points. Then it’s just a matter of choosing which clips to process. Keep in mind that your ProRes 422 footage will take up three to four times as much space as your original files, so be prepared with lots of fast drive space.
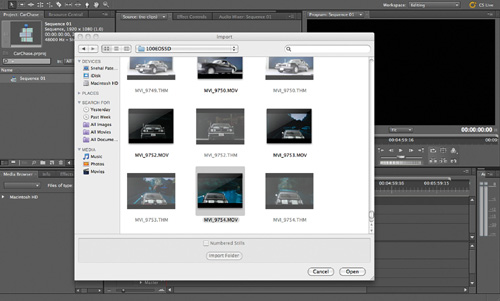
The second method for converting DSLR footage to ProRes files is using Apple Compressor. If you installed Final Cut Studio, you already have Compressor, which is a file-conversion tool that will allow you to create files for editing and also for DVD/Blu-ray creation or for preparing web video files for uploding to sites like YouTube and Vimeo. For the purposes here, you’ll learn to convert to ProRes 422.
First, add one of your DSLR footage files to the batch. Then select the Apple ProRes 422 preset from the QuickTime folder, which is under Formats. Apply it to your clip. There is no need to change any options, as this preset only changes the video codec and not the frame rate, frame size, or interlacing of the original file. Pick an output location and name for the final file. I like to create a new folder for the transcoded material. Add more video files to the batch if needed and then press the Submit button to start the transcode. You might notice that this method is a bit slower than using the EOS plug-in in Final Cut.

Using Apple Compressor to convert your files
The great thing about the Apple ProRes codec is that even AVID supports it. AVID is one of the oldest non-linear editors and usually the workflow involves importing and transcoding to AVID’s DNxHD format. Recently, AVID has added support for many popular video file formats through the AVID Media Access (or AMA for short) plug-in, which allows you to work in the native file format when using the RED, XDCAM, P2, and QuickTime (including ProRes and Canon H.264 footage).

Proof of AMA support
For AVID AMA use, first start a new project with the appropriate settings and save the project. Then use the AMA function to pick the clips you want to import. If you used Compressor, your ProRes footage will be in the folder you specified. If you used the EOS plug-in, then look in your hard drive’s Capture Scratch folder. The clips will come into the bin but will be denoted as linked files. You can go ahead and start editing right way.
ProRes works without rendering in AVID and can be used by filmmakers who might be going back and forth between editing software. The ProRes/AMA workflow is regarded as superior to using AVID’s DNxHD codec, which a lot of people think is noisier and has more artifacts and less color accuracy. Keep in mind that there are a number of functions that will not be available for video that is linked through AMA. See the AMA plug-in guides on AVID’s website for more details. H.264 footage from the camera works in AMA, but you will notice a lot of performance problems trying to edit this way.
One software program that does a pretty good job of editing DSLR files natively is Adobe Premiere Pro CS5. That is because the new Premiere uses something called the Adobe Mercury Playback Engine, which utilizes 64-bit operating systems and NVIDIA CUDA chips to offload the processing of video files from the computer CPU to the video processor chip on higher-end graphics cards and chipsets. You need to have a specific GeForce or Quadro graphics card from NVIDIA in your computer system for the system to work, but it does deliver on its promise if you meet the specs.
In Premiere CS5, you can import your DSLR footage in H.264 format directly into the timeline. Be sure to start a new project with the appropriate settings and save your project. Then just import the footage from your hard drive by using the Import function.
The video clips will show up in the bin. You can start editing right away without waiting for conversions or transcoding. What happens is that when the footage is dropped in the timeline (more info about editing timelines in the next chapter), the Mercury Playback Engine uses the video graphics card to automatically transcode the footage in the background to a higher-quality editing format. The footage plays back in real time and can be layered, trimmed, and edited like normal.
Sony Vegas Pro is another exciting software because it’s inexpensive compared to the competitors and works really well on most PCs. With version 10, you can now edit with native DLSR footage, so the process is very similar to using Premiere CS5. Sony Vegas also utilizes NVIDIA CUDA technology to accelerate rendering in better-than-real-time.
Note that if you have any slow-downs or performance problems while using the native H.264 footage in either Premiere or Vegas Pro, you should convert the footage into another format. Premiere supports ProRes as stated earlier, but you can also use the .avi file format. For Sony Vegas, the native format of choice is .mxf.