
The need to bring database development lifecycle management alongside application lifecycle management
Using Visual Studio 2010 to work with databases in an "offline" manner
Making changes to your database schema
Testing a database schema, including the automatic generation of pseudo-random test data
Deploying updates to your database schema
Until now, this book has dealt with tools and techniques that can be used to help you build and test software applications. But databases are a critical component utilized by many (if not most) software applications. And yet, they are traditionally underserved by tools that can facilitate development, testing, and deployment. Database developers are usually left to cobble together disconnected tools for developing and deploying database changes. Furthermore, database developers often follow a process that is disconnected from the process followed by the application development team, resulting in an error-prone and labor-intensive system of collaboration. With Visual Studio 2010, you can finally bring the process of managing changes to your database into the same toolset and process framework used by the other members of your software development team.
In this chapter, you will see how Visual Studio allows you to track and manage changes to database schemas using source control, generate test data, create database unit tests, utilize static analysis for database code, and automatically create deployment scripts based on the changes modeled in your development environment. You will see how Visual Studio can remove the traditional boundaries that exist between database development teams and application development teams, enabling better coordination and, ultimately, allowing you to produce higher-quality software.
Warning
The features covered in this chapter will work with Microsoft SQL Server 2005 and SQL Server 2008 databases, and Microsoft is working with third parties to create add-ins that will extend this support to other databases as well. As of this writing, Microsoft has announced partnerships to deliver support for both Oracle and IBM DB2, with support for additional databases expected in the future.
Database developers face unique challenges not generally faced by their application developer counterparts. Such challenges include (but are not limited to) the following:
It can be difficult to create development and test environments that accurately mimic the schema of production databases. Even when a development or test database is created from an exact snapshot of the production database, these environments can quickly drift out of sync.
Because of privacy or compliance concerns, organizations must often restrict access to the data contained within a production database. Lack of realistic data can prevent a team from being able to accurately test a database, causing bugs to surface later only after changes have been applied to a production database.
Bugs experienced in a production database can be exponentially more expensive to diagnose and repair than the same bugs caught during the development or testing phases, and may result in costly interruptions to business functions (for example, lost or incorrect customer orders, corrupt records, or even a breach of sensitive data).
At the risk of oversimplifying application deployment, deploying an update to an application usually just involves replacing the older version with a newer version of that application. When a user launches the application again, he or she will load the newer version of that application. But managing updates to a database can be much more complex. A database is a stateful engine containing existing data that must be preserved, as well as relationships and constraints that must be maintained. Usually, an experienced database administrator must handcraft scripts for applying updates while also ensuring that operations are performed in a proper order. This is both a costly and error-prone process. Errors during this process can result in extended periods of downtime, and may introduce additional bugs.
The process of deploying an update to one production database may be different than the process required to make the same changes to another production database. This is caused when production databases drift out of sync, and is especially true for software vendors who must distribute upgrades to their customers who are running their own copies of production databases. Those production databases may be running different versions of a database schema, may contain custom fixes or modifications, and could even be running on different database engines (for example, SQL Server 2005 versus SQL Server 2008). The variety of possible production database configurations can require very complex deployment scripts with conditional branching logic. This, in turn, introduces another opportunity for deployments to fail, or for bugs to creep into the system.
The remainder of this chapter examines the approach offered by Visual Studio 2010 for solving these (and other) problems associated with database development.
The approach used by Visual Studio 2010 for database change management has been described by Microsoft as offline schema development. Offline schema development allows you to work on changes to your database schema without maintaining a connection to the production database. In many organizations, access to a production database is only granted to database administrators, not the development teams. Being able to develop and test offline in an environment resembling that of the production environment is crucial. It's also highly advisable to develop and test in isolation from the production environment so as to minimize the risk of untested or unauthorized changes from being deployed into production.
As changes are made in the development environment, Visual Studio can help you test those changes in the development environment and/or in a dedicated test environment. Visual Studio can also generate pseudo-realistic data for conducting your tests, all without requiring access to actual production data. It is only when changes have been sufficiently tested and are deemed ready for deployment that a connection is then re-established to the production database. Visual Studio then generates the necessary scripts required to upgrade the production database to match what has been modeled in the development environment.
Following are the four main steps that make up this database development lifecycle:
Taking the schema offline
Iterative development
Schema testing
Build and deploy
These four phases of the database development lifecycle are explored conceptually in the following discussions. You should notice that these stages match the stages of an application development lifecycle quite nicely, and can even be performed in conjunction with changes made to your application.
The first step toward enabling database change management with Visual Studio is to create a new project that will store the offline representation of your database schema. As discussed earlier, the term offline is used to describe the notion of building and testing changes to your database in isolation from the production database. The mechanics of creating a project and importing your database schema are detailed later in this chapter in the section "Creating a Database Project."
The process of taking a database schema offline is a task that will usually be performed by a database administrator. This process could also be performed by a database developer, provided that he or she has sufficient permissions to access the production database.
While it is recommended that you store your database project in a version control system such as Visual Studio Team Foundation Server 2010, this is not a requirement.
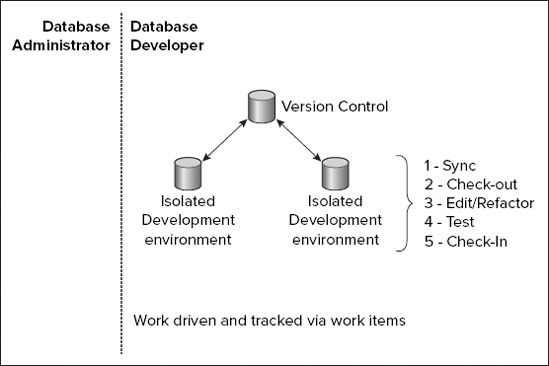
Figure 10-1 shows the process of taking a database schema offline and storing it in version control.

With the schema offline, you are now free to work on changes to your database schema. Later in this chapter in the section "Making Schema Changes," you will see that Visual Studio provides several ways of making changes, ranging from hand-editing individual .sql files to making sweeping changes at once by using built-in refactoring tools. If you choose to store your project in a version control system (such as Team Foundation Server), then you can have multiple people working on changes to the database schema, even simultaneously (known as parallel development). Changes can be checked-in, checked-out, branched, merged, and compared just like any other file under source control.
Figure 10-2 shows the process of iterative development.
As with any software development project, changes that you make to your database schema should be tested prior to being deployed into a production environment. But testing a database can be a bit more complicated than testing a traditional software application. Effectively testing the database schema usually relies on first having a certain amount of data in the database.
If you are lucky, then you may be able to import existing data from an existing production database to aid in your testing efforts. But, for a brand new database, or when making such changes as adding or changing tables, this data may not yet exist in a production database. And, if your database contains sensitive data (for example, customer contact information, health records, or financial data), then it is unlikely that you will be permitted to use production data for your testing purposes.
The solution to this problem lies in Visual Studio's capability to generate data that conforms to your database schema. For a given database schema, Visual Studio can generate an unlimited amount of data that matches the data types and column relationships defined in your schema. This data can be injected into a test database and used as the basis for conducting your tests. You will become familiar with Visual Studio's data generation capabilities later in this chapter in the section "Data Generation."
After you have established a set of data with which to run your tests, Visual Studio can also be used to author and execute database unit tests that exercise your database functions, triggers, and stored procedures. As with other unit tests you might write with Visual Studio (such as those used for testing C# or Visual Basic code), database unit tests can be executed as part of an automated build, which can be used to quickly determine if changes made to a database schema have introduced any bugs.
Figure 10-3 shows the process of building a test database, populating it with test data, and executing database unit tests. Database testing is discussed later in this chapter in the section "Database Testing."

After database schema changes have been sufficiently tested, you are now ready to apply those changes to your production environment. Traditionally, at this stage, a database administrator (DBA) might be called upon to hand-code a .sql script. But hand-coding scripts can be time-consuming, error-prone, and may require extensive conditional logic to account for customizations or versioning differences between different instances of production databases. Furthermore, many database changes must be made in a precise order to preserve the integrity of the schema and prevent data loss.
Visual Studio eliminates the need to ever hand-code database deployment scripts again. Visual Studio first compiles your database project into a handful of files known as the build output. When you are ready to deploy those changes to a target database, Visual Studio then analyzes the differences between your target database and the changes you have modeled in your database project (as represented in your build output). Based on these differences, Visual Studio then automatically creates a script for you that can be used to upgrade your target database. The process of comparing your build output with your target database and producing an upgrade script is known as the deployment phase.
The deployment phase can be run multiple times if you are deploying changes to multiple target databases. The deployment tools can even be run on machines that do not have Visual Studio installed, and Microsoft permits free redistribution of these deployment tools to your customers. (You will learn more about this later in this chapter in the section "Redistributable Deployment Engine.")
Now you no longer need to hand-code multiple upgrade scripts or write conditional logic to account for the different versions of a database your customer might be running. You must simply distribute your project's build output along with the deployment tools, and the proper scripts will automatically be generated based on whatever target database is specified. You may even wish to package this functionality along with the installer for your application, thus ensuring that matching versions of your software application and the corresponding database are deployed in sync.
Figure 10-4 shows the build and deployment processes.

Now that you have a conceptual understanding of the database deployment lifecycle employed by Visual Studio, it's time to see how this works with a sample project.
The walkthrough in this chapter uses Microsoft's classic Northwind sample database running on a local instance of SQL Server 2008 Express Edition. Instructions for installing the Northwind sample database and attaching it to a running instance of SQL Server 2008 Express Edition can be found on this book's companion Web site (www.wrox.com). The steps outlined in this chapter should also work with Northwind running on SQL Server 2005, or any of the higher-end (non-Express) editions of SQL Server (such as Standard or Enterprise).
The first step toward enabling database change management with Visual Studio is to create a new project for your database. Close any existing solutions you have open, and then click on File

The New Database Project Wizard appears and will guide you through the process of configuring your database project. Click on Project Properties on the left-hand pane and you will see the page shown in Figure 10-6.

Visual Studio 2010 supports the capability to manage the changes made to both your user-defined databases (a database project) and changes to the configuration of the database server itself (a server project). A server project can help you manage and deploy changes to your master database (for example, logon accounts or linked servers) and validate that database server settings are correct at deploy time. In this walkthrough, you will manage changes to a user-defined database, Northwind, so retain the default setting for this option.
The remaining options on this page are mostly a matter of personal preference. They affect the way that your database schema files are named and stored within your database project. Keep the default settings and click Next.
The Set Database Options page will vary based on the version of SQL Server you are working with. Figure 10-7 shows options for SQL Server 2008. For this walkthrough, you can keep the default settings, but you can read more about each option in the SQL Server Books Online documentation for your version of SQL Server. Click Next.

You should now see the Import Database Schema page shown in Figure 10-8. If you were creating a database from scratch, you could simply skip this page and Visual Studio would create a database project with an empty database schema. But, since you want to use the schema from the existing Northwind database, enable the "Import existing schema" checkbox, which will enable the rest of the options on this page.

If this is your first time connecting to the Northwind database from within Visual Studio you will need to define a new connection by clicking the New Connection button. The Connection Properties dialog shown in Figure 10-9 appears. Begin by specifying the name of the database server where you installed the Northwind database. If you are using a local instance of SQL Server 2008 Express Edition, then, by default, this database instance can be accessed by typing LOCALHOSTSQLEXPRESS into the "Server name" textbox. Now, type Northwind into the box labeled "Select or enter a database name." Click the Test Connection button to ensure that you have entered the correct settings. After the test passes, click OK to close the test notification window. Click OK again to confirm your connection settings.

Once your connection to Northwind is configured, select it in the "Source database connections" drop-down list shown in Figure 10-8. Note that Visual Studio will fully qualify your database name (for example, replacing LOCALHOST with your machine's computer name). For this walkthrough, you can keep the defaults on the rest of this page and click Next.
Note
Database projects in Visual Studio expose a myriad of advanced configuration options, especially during the schema import, build, and deployment phases. Databases themselves can be very complex, and Visual Studio attempts to account for these complexities by providing configuration options for working with practically any database configuration you might encounter.
For right now, try not to get overwhelmed with all of the additional settings you will see. The most important settings will be covered in this chapter, and the rest are detailed in the product's documentation, should you ever need to work with more complex databases.
The final page of the New Project Wizard (Figure 10-10) allows you to configure your project's initial build and deploy settings. You can always change these settings later, so for now, just click Finish.

Visual Studio will now attempt to connect to your target database server (SQL Server 2008 Express Edition) and import the schema from your database (Northwind). When the schema has been successfully imported, you should see a completion summary like that shown in Figure 10-11.

Note
This step can fail if you don't have the requisite permissions for accessing the target database. The full list of required permissions for working with database projects in Visual Studio can be found in the documentation. Some operations will require different sets of permissions based on the version of SQL Server you are using.
Click Finish again to close the New Project Wizard. Your database project is now ready to use.
A database project varies slightly from other projects you may have worked with in Visual Studio. In this section, you will become familiar with the structure of a database project, and will learn some ways of visualizing the dependencies within your database schema.
As shown in Figure 10-12, you can examine the on-disk layout of your project files from Solution Explorer (View
Accessing files via Solution Explorer is a legitimate way of accessing your database project, but Visual Studio also includes a special Schema View (View


Schema View should feel very familiar if you are used to managing databases within SQL Server Management Studio. Spend a few minutes now exploring the Schema View by expanding and collapsing some nodes of the object tree.
Schema View can be used to quickly browse all of your schema objects and can help you explore some of the relationships within your database schema. But a faster and more comprehensive way of visualizing relationships between objects is to use the Schema Dependency Viewer.
To access the Schema Dependency Viewer, first select the object within the Schema View for which you want to analyze the dependency relationships. One example might be the Customers table (Schemas

The Schema Dependency Viewer is helpful for determining the potential impact of proposed changes. For example, you can see that changes to the Customers table may require you to make changes to the "Customer and Suppliers by City" view, since it is referenced as a dependency. Later in this chapter, in the section "Making Schema Changes," you will learn how Visual Studio can help make many changes to dependent objects automatically, but there are still some cases where you must still manually manage changes to related objects. The Schema Dependency Viewer can help you understand where to make necessary changes.
Now that you have looked at a few ways of exploring the structure and relationships of your schema objects, you should next inspect the contents of the files on disk that make up your schema objects. Return to Schema View, and find the Customers table (Schemas
CREATE TABLE [dbo].[Customers] (
    [CustomerID]   NCHAR (5)     NOT NULL,
    [CompanyName]  NVARCHAR (40) NOT NULL,
    [ContactName]  NVARCHAR (30) NULL,
    [ContactTitle] NVARCHAR (30) NULL,
    [Address]      NVARCHAR (60) NULL,
    [City]         NVARCHAR (15) NULL,
    [Region]       NVARCHAR (15) NULL,
    [PostalCode]   NVARCHAR (10) NULL,
    [Country]      NVARCHAR (15) NULL,
    [Phone]        NVARCHAR (24) NULL,
    [Fax]          NVARCHAR (24) NULL
);
If you are familiar with Transact SQL (T-SQL), then you are already familiar with how Visual Studio stores objects in a database project. The above T-SQL script defines a new table, Customers, containing 11 columns with the specified data types.
At this point, you may be wondering why Visual Studio uses T-SQL for defining all objects from scratch. What if you were working with an existing database, as is the case with the Northwind database? If you executed the previous T-SQL script on the Northwind database, it would cause an error. Attempting to create a new table called Customers would fail because of a naming collision, since there is already a table called Customers.
As you will see later in this chapter in the section "Deploying Database Changes," Visual Studio's deployment engine is responsible for interpreting the schema objects in your database project (such as the Customers table) and generating the appropriate T-SQL scripts for applying changes to your target database. The fact that this object is a CREATE script within your database project will be irrelevant when you build and deploy your changes.
The actual deployment script generated in the deployment phase will depend on the pre-existing state of the Customers table in your target database, as compared with the state of this table as modeled in your database project. In the deployment script, this object will either be represented by an ALTER TABLE statement (for example, if you made changes to columns), a DROP TABLE statement (if you deleted this table from your database project), a CREATE TABLE statement (if this table doesn't yet exist in the target database), or would be omitted entirely from your deployment script (if you didn't make any changes to the Customers table).
Microsoft's choice of T-SQL for storing database objects is convenient, since T-SQL is an established and well-documented language for working with SQL Server. Additionally, many third-party and Open Source tools also operate on T-SQL files, and some even advertise compatibility with Visual Studio.
Now that you have a database project that is an offline representation of your database schema, you are ready to make some changes. One way to make changes to your database schema is by directly manipulating the T-SQL files that make up your database objects.
Begin by opening the Customers table again. From within Schema View, expand Schemas
[Phone] NVARCHAR (24) NULL,
Immediately after this line, add a new line:
[WorkPhone] NVARCHAR (24) NULL,
In Schema View, expand the Columns node below Customers. You should still only see the original Phone column in this list. Now, save the Customers.tables.sql file. Saving the file causes Visual Studio to perform a background analysis of your changes and make the appropriate changes to its in-memory model of your database. These changes should now be reflected in Schema View. Expand the Customers
Now you will see how Visual Studio can help protect the integrity of your database schema by analyzing the syntactical correctness of your schema. Change the name of the Customers table to Clients. Find the following line:
CREATE TABLE [dbo].[Customers] (
Change this to the following:
CREATE TABLE [dbo].[Clients] (
Now, trigger another refresh of Visual Studio's in-memory model of your database schema by saving the file. After the analysis of your changes has finished, you will see a long list of errors and warnings in Visual Studio's Error List. (If the Error List is not already open, click View

Visual Studio has detected that the changes you made to the Customers table have caused other parts of your schema that depended on the Customers table to break. In the previous section, "Schema Dependency Viewer," you saw that there are dependency relationships that existed between the Customers table and other objects in your database (for example, indexes, views, and stored procedures). To successfully rename the Customers table to Clients, you would need to update all of those references as well. This is an example of where Visual Studio's database refactoring capabilities are useful.
Visual Studio includes tools for automatically conducting common database refactoring operations. If you are familiar with using Visual Studio to refactor source code files (for example, C# or Visual Basic), then this process will already be familiar to you. Refactoring can save you a great deal of time by automatically finding and updating all relevant sections of your database project with a given change. Automatic refactoring also greatly reduces the chances of introducing bugs caused by human error as compared with manual refactoring.
Undo the last change you made by renaming the Clients table back to Customers. The first line of your T-SQL file should once again be as follows:
CREATE TABLE [dbo].[Customers] (Save this file, which should cause Visual Studio to reanalyze your database project and eliminate all errors and warnings. For the best results, you should always attempt to eliminate any errors and warnings prior to attempting a database refactoring.
One of the most basic types of refactoring operations is that of performing a rename. Consider the impact of renaming a table within your database schema. In addition to updating the actual table definition, you must also update any references to that table (such as indexes, stored procedures, and so on). Even a simple rename can be a laborious exercise, and failing to correctly update every reference can result in a broken schema. Visual Studio can perform these updates for you automatically by using the built-in support for rename refactoring.
Right-click the Customers table from within the Schema View and select Refactor

Visual Studio will now attempt to discover all of the objects within your schema that must be updated so that they reference your table by its new name. The Preview Changes dialog shown in Figure 10-17 allows you to inspect the changes before they are made. Click on a few schema objects and examine the proposed changes.

When you are finished previewing this list, click the Apply button. Visual Studio will now automatically make all of the previewed changes, save your files, and update the in-memory model of your schema. You should not have any errors or warnings in your Error List, since you have now successfully renamed your table using Visual Studio's refactoring functionality.
Visual Studio also provides support for a handful of other refactoring operations that you should consider using instead of making updates manually. In addition to rename refactoring, Visual Studio offers the following built-in refactoring types:
Move to Schema — Used for moving objects between schemas within your database, such as between the
dboschema and theguestschema. Using different schemas can be a way of logically breaking down different areas of your database or implementing granular security.Expand Wildcards — Wildcard expansion can be used to speed up transactions and to create more robust views or stored procedures. For example, consider the following:
SELECT * FROM CLIENTS
The Expand Wildcards refactoring operation will convert this stored procedure to the following:
SELECT [dbo].[Clients].[CustomerID], [dbo].[CLIENTS].[CompanyName],
     (other columns here) FROM CLIENTS
Now, even if you add columns to the
Clientstable, it will not affect the results of this stored procedure, since you are no longer using a wildcard.Fully Qualify Name — Fully qualifying object references within your schema is a best practice for improving readability and eliminating ambiguity. For example, you might have two objects with the same name in different schemas. Fully qualifying these references helps to ensure that you are referring to the right object. For example, consider the following:
[CustOrderHist]
The Fully Qualify Name refactoring operation will convert this reference to the following:
[dbo].[CustOrderHist]
Now, even if you have another object called
CustOrderHistin another schema, there is no ambiguity about which instance you are referring to.
Not all refactoring operations apply to each type of object within your database schema. For example, the Expand Wildcards refactoring type can be used with stored procedures, but wildcards are not valid syntax for a table definition; hence, this refactoring operation won't be available in the refactoring drop-down list for a table.
As you will see later in this chapter in the section "Deploying Database Changes," Visual Studio will automatically create a database deployment script by comparing the differences that exist between your source (your database project) and your deployment target (the physical database you are updating). If an object exists in your source database project, but not in your target database, this will result in a CREATE statement in your deployment script. Likewise, if an object does not exist in your source database, but is present in your target database, it will result in a DROP statement in your deployment script (although this behavior can be overridden, as you will see later).
In most cases, the behavior just described works as expected, and will result in a successful deployment. However, consider the process of renaming an object using Visual Studio's built-in refactoring tools.
In the earlier example, you renamed the Customers table to Clients. When Visual Studio conducts a comparison of your source database to that of the pre-existing Northwind database during the deployment phase, it will determine that Customers no longer exists, and that there is a new table called Clients. Without any further information, this would result in a DROP of the Customers table and a CREATE of the Clients table. The problem with this approach is that it would result in data loss, since none of the data from the original Customers table would be preserved, and you would be left with an empty Clients table.
Visual Studio's solution to this problem is to maintain a refactoring log that is responsible for providing the deployment engine with the information necessary to distinguish between a DROP/CREATE and a Rename or a Move to Schema refactoring operation.
Switch to the Solution Explorer and open the file called MyDatabaseProject.refactorlog. A snippet of that file is included here:
<Operation Name="Rename Refactor" Key="..." ChangeDateTime="...">
<Property Name="ElementName" Value="[dbo].[Customers]" />
<Property Name="ElementType" Value="ISql100Table" />
<Property Name="ParentElementName" Value="[dbo]" />
<Property Name="ParentElementType" Value="ISql90Schema" />
<Property Name="NewName" Value="[Clients]" />
</Operation>
This XML snippet will instruct the deployment engine that, instead of dropping the Customers table and creating the Clients table, what you really want to achieve is a rename of Customers to Clients. This capability is known as preservation of intent, and is a sophisticated way that Visual Studio helps maintain the integrity of existing data within your database.
Note
The database refactoring log only gets created (or maintained) if you use Visual Studio's built-in refactoring tools. This is another reason why using automated refactoring is superior to trying to implement equivalent changes by hand-coding the T-SQL project files.
Generally speaking, you won't have to maintain the database refactoring log by hand. The one exception can occur if you are managing your database project using source control. If you are merging code from different branches or from different contributors, then you must merge changes to the database refactoring log in sync with the corresponding changes in the T-SQL in your database project.
Another way that Visual Studio facilitates making changes to your database project is by providing you with a few dozen T-SQL script templates for representing common database constructs. You can access script templates from Schema View by right-clicking on an object, then selecting either Add or Append. Figure 10-18 shows the list of script templates that can be applied to a table object.

After selecting your desired script template, you will be prompted to name the object. After you name the object, Visual Studio will create the appropriate T-SQL code as a template for you to complete.
Insert a new check constraint on the Clients table named CK_PostalCodeLength, which will result in the following T-SQL template:
ALTER TABLE [dbo].[Clients]
     ADD CONSTRAINT [CK_PostalCodeLength]
     CHECK  (column_1 > 0)
Left unchanged, this check constraint will result in a schema validation error, because column_1 is meant only as template code and must be replaced by your desired constraint logic.
In the United States, ZIP codes can either be represented as five digits or nine digits (plus a hyphen separator after the fifth digit). The following code will ensure that the length of data in the PostalCode column is either five or ten characters:
ALTER TABLE [dbo].[Clients]
     ADD CONSTRAINT [CK_PostalCodeLength]
     CHECK ((LEN(PostalCode) = 5) OR (LEN(PostalCode) = 10))
Save this file. The Check Constraint script template is a very simple example, but Visual Studio ships with a diverse set of script templates that you can use for accelerating the development of your development schema.
Now that you have made some changes to your database project, it's time to deploy those changes to an actual database. In this section you will begin by deploying your changes to a test database. After you have tested your changes (as described in the later section "Database Testing"), you will deploy your changes to the original Northwind database.
From Solution Explorer, right-click the MyDatabaseProject project and select Properties. Click the Deploy tab. If this is your first time configuring your database project deployment settings, you must click on Edit, next to the Target Connection textbox. Configure the Connection Properties dialog to connect to the localhostSQLEXPRESS server and type TestMyDatabaseProject as the database name. Click on OK.
Enter the following settings on the Deploy tab:
Deploy action — Create a deployment script (
.sql)Deployment script name —
TestMyDatabaseProject.sqlTarget database name —
TestMyDatabaseProject
When you are finished, your project deployment settings should resemble Figure 10-19. Save these settings.

These settings instruct Visual Studio to create a deployment script (called TestMyDatabaseProject.sql) capable of deploying the schema modeled in your database project to a database (called TestMyDatabaseProject) running on your local instance of SQL Server Express.
You must make one additional change before you can deploy this database. Currently, your database project specifies the name and settings for the MDF and LDF files that make up your original Northwind database. Since you are deploying to a test database on the same database server as your original Northwind database, you must change your database project to prevent filename conflicts with the existing MDF and LDF files being used by your Northwind database.
From Solution Explorer, open Schema Object
Now, click Build

You (or your database administrator) now have an opportunity to make any desired changes to this .sql deployment script prior to executing it against your database. Don't make any changes now, but spend a couple of minutes browsing the T-SQL logic in this script. You will notice that the majority of the script is composed of CREATE statements. This is because the TestMyDatabaseProject database did not exist previously, so the database objects must be created for the first time.
You can execute this script manually (using SQL Server Management Studio or Visual Studio), or you could have also instructed Visual Studio to automatically execute your deployment script for you. Do that now by returning to the project properties dialog (right-click on MyDatabaseProject and select Properties) and opening the Deploy tab. Change the Deploy action setting to "Create a deployment script (.sql) and deploy to the database". Save the project properties and click Build

Later in this chapter, in the section "Redistributable Deployment Engine," you will learn how to use Visual Studio's redistributable database deployment engine to create a deployment package for your database project. This deployment package can be used on machines without Visual Studio installed to analyze a target database and create a .sql deployment script specifically for a given SQL Server instance.
Visual Studio exposes dozens of advanced configuration options for changing the way your project gets built and deployed. For purposes of this walkthrough (and for most databases you will likely encounter), you can accept the defaults provided by Visual Studio. However, you should be aware of these options; spend a few minutes clicking through the database project properties dialogs now to browse the available options.
For example, from the Deploy tab, click on the Edit button underneath Deployment configuration file. There are two options on this page worth pointing out:
Block incremental deployment if data loss might occur — By default, this setting is enabled. With this setting enabled, Visual Studio will avoid making changes to your database if it detects that data will be possibly lost to the schema. One example of this is if you change the data type for a column to one with less storage or precision (for example, from
char(100)tochar(50), or frombiginttoint). If you are making such changes and are comfortable with the potential for data loss, then you can disable this option.Generate DROP statements for objects that are in the target database but that are not in the database project — By default, this setting is disabled. With this setting disabled, Visual Studio will refrain from deleting objects that reside in the target database, even if they are not specified in your project schema. If you are certain that you want to delete objects that are not specified in your schema, then you can enable this option. This can be an effective way of cleaning up obsolete objects from your database, but should only be utilized if you are certain that those objects are not necessary. One example of where you would probably want to leave this option disabled is if you are creating a redistributable deployment package to send to customers of your software package (see the section "Redistributable Deployment Engine," later in this chapter). Then, you may not want to enable this feature in the event that your customers have additional schema objects that may be required for their specific deployment customizations.
These are just two of the many advanced build and deployment options you will find throughout the database project properties. All of these settings are detailed in the product documentation should you need them later on. But you don't have to change any of these settings for the walkthrough in this chapter.
Now that you have successfully deployed your database schema to a test database, you will need some sample data with which to author and execute your tests. If you have access to the data in a production database, then you might be able to import the data from the production database into your testing database. However, since most development teams aren't allowed to work with production data (because of privacy or other regulatory concerns), this may not be an option. Furthermore, as your schema evolves, the data in the production database may not conform to the new schema you are testing.
Another option is to generate sample data by hand, entering data row by row. For all but the simplest databases, however, this can be an extremely time-consuming process, and it requires a thorough knowledge of the underlying schema to create data that conforms to the constraints of your schema.
Visual Studio has built-in data generation capabilities that can simplify this task by rapidly generating data that conforms to your database schema.
To begin creating test data, you will need a data generation plan. A data generation plan (represented as a .DGEN file) contains all of the settings necessary for Visual Studio to create data that conforms to your database project's schema.
From within Solution Explorer, right-click the MyDatabaseProject project and select Add

The uppermost portion of this view lists all of the tables within your schema. Selecting a table will show a list of the columns in that table. You can enable the Data Generation Preview window by clicking Data
The values for each column are generated using a pseudorandom algorithm based on the data type for each column and other constraints (such as foreign key relationships). Visual Studio uses a seed value as the input for the pseudorandom algorithm. In most cases, you will want to leave the seed value unchanged so that you have predictable data generation results with each data generation execution. But you can change this value on a column-by-column basis by changing the Seed value for each column in the Properties Window. You can also change the Default seed under Tools
You can also specify the number of rows to insert into each table by changing the "Rows to Insert" value for each table. You can represent this value directly, or as a ratio to another table. For example, you may wish to more realistically simulate your production data by declaring that every client has placed ten orders. Do this now by changing the Related Table value of the Orders table to [dbo].[Clients]. Now change the "Ratio to Related Table" value to 10:1. Note that Orders now has a "Rows to Insert" value of 500, which is ten times that of Clients.
Press F5 to instruct Visual Studio to execute your data generation plan. You will be prompted to define a connection to your database. Use localhostSQLEXPRESS as the database server and TestMyDatabaseProject as the target database.
Warning
Be careful not to accidentally generate data for the original Northwind database during this step.
After clicking OK, you will be asked whether you would like to delete existing data from your test database. Since you are deploying to an empty database at the moment, it doesn't matter what you answer here, but for the rest of this chapter, you should always answer Yes to this dialog. This will delete any existing rows from the test database prior to generating new data.
In a few moments, Visual Studio will display the results of your data generation. You should notice that your data generation plan actually failed. This is because you defined a constraint earlier in this chapter to ensure that the PostalCode column of the Clients table is either five or ten characters long. Unfortunately, Visual Studio's data generation plan doesn't implicitly understand this type of constraint when it is generating data. But you can easily customize your data generation plan by configuring data generators.
A data generator essentially corresponds to an algorithm that Visual Studio will use to create test data. By default, Visual Studio will automatically choose a data generator for each column based on the column's underlying data type. For example, a column data type of nvarchar or nchar will, by default, be mapped to the String data generator. The String data generator will automatically generate pseudorandom alphanumeric values up to the maximum number of characters specified for the data type. Because the values are pseudorandom, they will not be human-readable, but, depending on your testing purposes, they might be sufficient.
Visual Studio also has several more advanced data generators that can be used to generate more realistic data, if you desire. For example, you may wish to generate human-readable data if you plan on exposing your test data to manual testers or for end-user acceptance testing. You can also use data generators to create data that conforms to certain constraints in your database. You will do this now to create data that conforms to the PostalCode column constraint you defined earlier.
Start by selecting the Clients table in the top pane of the TestMyDatabaseProject.dgen designer. Now, find PostalCode in the list of columns in the bottom pane of this designer and change the Generator value to Regular Expression. A regular expression is a very effective way of describing the structure of string data. Regular expressions are commonly used to describe and validate data formats such as telephone numbers, Social Security Numbers, and email addresses. You can find several tutorials for learning regular expressions online.
Now, view the Properties Window (View
[1-9]{5}(-[1-9]{4})?Press Enter and you should instantly see the effect that using this regular expression will have on your data generation plan. In the Data Generation Preview window, you should now see a mix of 5-digit ZIP codes (for example, 98052) and 5+4-digit ZIP codes (for example, 98052-6399).
This data will conform to your PostalCode column constraints, and it is human-readable, using ZIP codes that match the structure of those used in the United States. Press F5 and instruct Visual Studio to generate data for your TestMyDatabaseProject database. The data generation should now complete successfully. You can validate your sample data by viewing the TestMyDatabaseProject database within SQL Server Management Studio.
Data generators each have their own set of properties that can be used to control the shape of the values they produce. For another example, select the Products
But this isn't very realistic, and might confuse a user who is examining a test database. It might also cause user interfaces (for example, Web pages or smart client applications) being tested along with your database to break because the values are too large. To fix this, from the Properties Window, change the Distribution to Normal, Max to 1000, and Min to 1. Your preview data should now be normally distributed between 1 and 1000, which is probably much more representative of your actual production data.
You can create very sophisticated data generation plans with Visual Studio by continuing to refine your use of data generators. Another useful data generator is the Data Bound Generator, which can be used to import data from another data source. For example, you might wish to bind the Country field of the Clients table to a data source that contains an actual list of countries where your clients are located, or the ProductName column of your Products database to an actual list of products, and so on.
Finally, you can define your own custom data generators for creating even more complex patterns of data. More information on each data generator, as well as data generator extensibility, can be found in the product documentation.
Now that you have generated some sample data for your database, you are ready to begin testing your schema. Visual Studio provides the capability to author and execute database unit tests that can provide validation directly against objects within your database schema.
Visual Studio makes it easy to create unit tests for functions, table-level triggers, and stored procedures. Visual Studio can automatically create T-SQL stubs that exercise these objects. You can then use one of several built-in test conditions for verifying that you received correct results.
Start by opening Schema View and expanding Schemas

You will now be prompted to configure your test project, as shown in Figure 10-24. Apply the following settings:

Execute unit tests using the following data connection — Select the same connection you used previously for connecting to the
TestMyDatabaseProjectdatabase on your local SQL Server Express instance. Note that for some testing scenarios, you may wish to define a lower-privileged account to verify (for example) that users can't get access to secure data. But for this walkthrough, you can keep the existing connection settings.Use a secondary data connection to validate unit tests — Leave this checkbox unchecked, but note that if you chose to use a lower-privileged account for the previous connection, then you may wish to use a higher-privileged account when validating unit test results.
Deployment — Enable this checkbox and select your database project (
MyDatabaseProject.proj). Select Debug as the Deployment configuration.Generate test data before unit tests are run — Enable this checkbox and select the data generation plan you created earlier.
Clear the database before test data is generated — Enable this checkbox.
From Solution Explorer, delete the UnitTest1 file that is included by default with new test projects. This file will either end in a .vb or .cs extension, depending on the language you selected for your test project.
The unit test stub for testing the Ten Most Expensive Products stored procedure will now appear as shown in Figure 10-25. The top pane, the T-SQL editor, is the logic that calls the stored procedure you are testing. You might choose to customize this unit test stub, such as by providing test values for parameters. This particular stored procedure doesn't have any parameters, so you don't need to modify anything.

You can declare pre- and post-test scripts that should be executed before and after any given unit test. Pre-test scripts are usually used to prime a database with test data, such as inserting a row into a table of orders. Post-test scripts are usually used to clean up this test data, or to undo changes made during the execution of the test.
You can insert pre- and post-test scripts by clicking on the drop-down at the top of the screen that says Test and selecting Pre-test or Post-test. You can also define global test initialization and cleanup logic by first selecting (Common Scripts) from the leftmost drop-down and then selecting "Test initialize" or "Test cleanup." These scripts will be executed for each test.
Return to the unit test stub for the Ten Most Expensive Products stored procedure. You will now add validation checks to help ensure that the execution of this stored procedure is successful. In the Test Conditions pane, click on the red X to remove the InconclusiveCondition1 validation result. This result is included by default to remind you that you haven't yet defined any validation logic for this test.
Now, click the Test Conditions drop-down and select Row Count. Click the green plus sign icon to add this condition to your test conditions. From the Properties Window (View
You can add multiple test conditions to a given unit test. For example, you might want to use the Execution Time test condition to verify that a given stored procedure takes no more than 5 seconds to execute.
You can use the Scalar Value test condition to verify that a given row and column matches a specific value. To use the Scalar Value test condition effectively, you would need to know what the state of your database should be at the time the test is executed.
For example, you might be testing a stored procedure that returns a list of items in a customer's online shopping cart. One way to achieve this is to write a pre-test script that first adds rows of data to a table that defines the shopping carts in a system. After the appropriate items were added to the shopping cart, your test script would invoke a stored procedure for returning a list of the shopping cart contents. You would then use one or more Scalar Value test conditions to verify that the ResultSet returns the appropriate data as defined by your pre-test script.
You can also create your own test conditions that can be used with evaluating database unit tests. Information on creating a class that extends the Microsoft.Data.Schema.UnitTesting.Conditions class can be found in the documentation.
Execute your database unit test by clicking Test

The process just outlined works well for testing stored procedures, table-level triggers, and functions. As you have seen in the previous discussion, Visual Studio allows you to author these tests using a familiar database scripting language (T-SQL) and provides a simple properties grid for defining test conditions. But there are times when you may wish to write more complex tests.
Visual Studio allows you to write more advanced tests using the power of the .NET Framework and either C# or Visual Basic. In fact, everything you did earlier using the database unit testing designer was actually utilizing C# or Visual Basic in the background. (The actual language used depends on the language you picked for your test project in Figure 10-23.)
Explore the structure of your existing test project to learn how Visual Studio executes your database unit tests. From within Solution Explorer, right-click on TenMostExpensiveProductsUnitTest (the file extension will be either .cs or .vb), and click View Code. This class contains a method (marked with a TestMethod() attribute), which is responsible for executing the test you designed earlier, along with any additional pre- or post-test scripts. These scripts will be executed using ADO.NET.
The actual T-SQL scripts for your test class are stored in a resource file with the same name as your test class. To view the resource file, you may need to first click the Show All Files button at the top of the Solution Explorer pane. Next, expand the node for your database unit test by clicking the plus (+) sign next to the source code file in Solution Explorer. This will expose a file by the same name, but with a .resx extension. You can double-click this file (to view it in a grid-based designer), or right-click and choose Open With to select Visual Studio's built-in XML Editor.
Visual Studio will store your connection strings, data generation plan, and other settings in the app.config file for your test project. Finally, the file DatabaseSetup.vb (or .cs) is responsible for deploying your database project and executing your data generation plan based on the settings in the app.config file (which you declared using the dialog in Figure 10-24).
Spend a few minutes exploring the structure of these files. You can later customize unit tests you created with the database unit test designer, or create entirely new database unit tests from scratch, simply by writing C# or Visual Basic code and manipulating the appropriate T-SQL scripts. For example, you may choose to data-bind your database unit tests so that they are created dynamically based on data from another source. Or, you may wish to define more complex test conditions than the ones exposed via the database unit test designer (for example, basing the expected results for one test off of the actual results for another). These scenarios and more are possible.
For an excellent article describing Visual Studio's database unit testing framework in greater detail, see http://msdn.microsoft.com/en-us/magazine/cc164243.aspx.
Designing an effective plan for testing your database is not too unlike the process of putting together a test plan for other software applications. Your test plan should seek to maximize test coverage while minimizing wasted effort by automating tasks that will be executed repeatedly. Ultimately, a good test plan is one that finds bugs early on in the development process so that they can be fixed before they ever creep into a production environment.
The following sections that describe database testing tenets are not comprehensive, but should give you an idea of things to consider when compiling your database testing plan.
Database testing often involves the injection of some data (for example, inserting a customer order), the execution of some database logic (for example, calling a trigger, stored procedure, or function) that uses or modifies that data, and analysis of the results of the test to determine whether or not the test was successful. However, if you aren't careful, the results of setting up and executing one test may have unintended consequences on other tests.
One approach for preventing tests from impacting one another is to wrap each test in a transaction. This is done by structuring your test script as follows:
begin transaction

  -- Author your test script here

rollback transaction
This approach will restore your database state after your test is executed. However, the drawback of this approach is that it won't undo any pre- or post-test scripts you may have written, since those scripts are executed using a different connection. You can write additional logic in your post-test script to clean up this data, but this might be a rather labor-intensive process. Another approach is to wrap your entire test (including the pre- and post-test scripts) in a transaction and rely on SQL Server's Distributed Transaction Coordinator (DTC) to roll back the entire set of operations.
A detailed example of wrapping your database unit test in a transaction using DTC can be found at http://msdn.microsoft.com/en-us/magazine/cc164243.aspx.
Like any unit tests, database unit tests should be fairly constrained in scope to help you quickly pinpoint where problems might exist in your database. For example, you would never write one large database unit test that tests your entire database schema. Instead, you would write a series of smaller tests, each responsible for testing a piece of your database schema. This way, if a test fails, you can quickly correlate that test to the section of your database schema that must be fixed.
However, pieces of your database schema may be highly reliant on one another. For example, the process of fulfilling a customer order could first require that you receive a request from a customer, then that you verify your inventory, process payment, generate a shipment, update the inventory, and so on. You may wish to have one or more database unit tests for each step in this workflow so that, if a test fails, you can quickly pinpoint the broken step. But rather than cleaning up the database after every step, you can simply execute the tests in order, so that the expected completion state of one test becomes the expected beginning state of another.
You can use Visual Studio's built-in Ordered Test test type as a container for managing multiple database unit tests in a particular sequence. Ordered Tests are covered in Chapter 12. The downside of using an Ordered Test is that you won't be able to wrap the entire Ordered Test in a transaction as described in the preceding section, so you would need to write your own cleanup scripts or simply re-deploy your original test data after each end-to-end test.
An effective database test plan will likely employ several different approaches for validating the integrity and intended behavior of a database schema. Database unit testing with Visual Studio provides a very direct way of probing and validating your database schema, but it shouldn't be the only method that you employ. For example, you may want to author and execute unit tests directly against a Web application that, in turn, makes calls to a database. This ensures that the integration of your database with your application code works as intended. For example, you may discover that changing the shape or name of a table in your database schema causes certain database calls in your application to fail.
Another type of testing you may wish to employ is that of load testing the database. Load testing a database can ensure that a database will continue to perform adequately under stress, such as during a high volume of retail transactions during the holiday season. You can use Visual Studio to conduct database load testing by first creating database unit tests, and then adding these tests to a Visual Studio load test. (Load tests are described in Chapter 13.)
Your database testing plan may benefit from manual testing as well. For example, how does a user interface behave when it is connected to a back-end database filled with test data? Are text fields big enough to display long strings of data? What happens when a query (for example, show all customer records) returns many rows of data? Can the user easily navigate through multiple pages of data? (Manual testing is covered in Chapter 14.)
These are a few of the considerations you should plan for when building out your database test plan, and this list is by no means exhaustive. But by using Visual Studio, you can stage a test database, fill it with sample data, and utilize a variety of testing frameworks (for example, unit testing, load testing, and manual testing) to author and execute a wide range of tests with Visual Studio.
So far, you have seen how Visual Studio can help you develop, test, and deploy your database schema. Visual Studio can also help you improve the overall quality of your T-SQL scripts by using its built-in static code analysis engine. T-SQL static analysis can help you identify several potential problems with your scripts, such as performance bottlenecks, brittle queries and object references, or even poor naming conventions.
There are two ways to run T-SQL static analysis. You can right-click on your database project within Solution Explorer and select Run Code Analysis. Alternatively, you can enable code analysis to be run every time you build your project. Do this now by right-clicking your MyDatabaseProject project from within Solution Explorer and selecting Properties. Click on the Code Analysis tab and enable the checkbox labeled Enable Code Analysis on Build. Expand each of the ruleset nodes to see the full list of static analysis rules, as shown in Figure 10-27.

From this properties window, you can choose which static analysis rules will be run when your project is built. If you find that the number of warnings you receive on a project is overwhelming at first, disabling some rules is one way you can scope the warnings down to the ones you care the most about.
You can also enable the "Treat Warning as Error" checkbox to cause any failed rule to result in a build failure. By default, rules that fail will display a warning but will not prevent a build from succeeding. Treating static analysis rules as build errors can be an effective way of getting team members to take them more seriously. Lastly, static analysis can be run and enforced during automated builds, as discussed in Chapter 21.
Save your project settings and build your solution (press Ctrl+Shift+B, or click Build
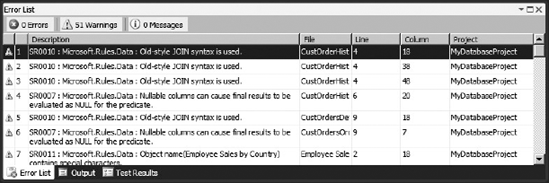
Start by fixing a file with a single, simple error. Click on the File column within the Error pane to sort this list of warnings based on the names of your T-SQL script files. Find the warning for the file named CustOrdersDetail.proc.sql, which indicates that the "Old-style JOIN syntax is used." Double-click on this warning to automatically open the offending T-SQL file. This also places the cursor at the line of script where this warning was discovered by the static analysis engine — although note that, depending on the type of rule, this won't always correspond to the exact place where the script must be updated.
One of the most valuable aspects of static analysis is that it not only finds problems in your scripts, but each warning is documented with additional information about the cause of the problem and suggestions on how to fix it. Right-click the warning for this file in the Error List and choose Show Error Help.
Read the help topic to understand why this script triggered this rule to fail, along with instructions on how to make the appropriate changes. Change this script to use the new SQL JOIN syntax as follows. Note that you are updating the FROM clause, and changing the WHERE clause to ON.
CREATE PROCEDURE CustOrdersDetail @OrderID int
AS
SELECT ProductName,
    UnitPrice=ROUND(Od.UnitPrice, 2),
    Quantity,
    Discount=CONVERT(int, Discount * 100),
    ExtendedPrice=ROUND(CONVERT(money, Quantity * (1 - Discount)
         * Od.UnitPrice), 2)
FROM Products AS P INNER JOIN [Order Details] AS Od
ON Od.ProductID = P.ProductID and Od.OrderID = @OrderID
Save this file and build your project again. This should cause the static analysis warning for this file to disappear. There are several such "Old-style JOIN" warnings that you could fix in this project, but since this is just a sample database, you can ignore the rest of these warnings.
Sometimes, static analysis rules can be fixed by using Visual Studio's database refactoring tools. Find the warning in "Alphabetical list of products.view.sql" with a description of "SR0001 : Microsoft.Design : The shape of the result set produced by a SELECT * statement will change if the underlying table or view structure changes." Double-click on this warning to open the file.
You can read the help for this static analysis warning to learn more about why using a wildcard (*) in a SELECT statement can be problematic. The fix is simple. From Schema View, expand Schemas
You should also notice another warning for this file with a description of "SR0011 : Microsoft.Naming : Object name(Alphabetical list of products) contains special characters." This warning is occurring because there are whitespace characters within the name for this view. If you read the help for this warning, you will discover that this is a relatively low-priority warning. There's nothing technically wrong with using whitespace characters in the name of a view, but it does make it more difficult to reference, since you will need to encapsulate the name of the view in quotes (" ") whenever you reference it.
You can choose to resolve this warning by choosing Refactor
For example, there might be applications that refer to this database view by its original name, and you don't want to risk breaking those applications. In that case, you can right-click the warning message and choose Suppress Static Code Analysis Message(s). When you choose to suppress a warning, an entry is added to a file called StaticCodeAnalysis.SuppressMessages.xml, and you will no longer receive this warning for this file. If you wish to enable this warning again in the future, simply delete the corresponding <SuppressedFile> entry from this file.
By utilizing static analysis for your T-SQL scripts, you can quickly identify ways of improving your overall database schema. As you can see from the list of warnings, even Microsoft could have benefited from having T-SQL static analysis capabilities when it originally shipped Northwind as a SQL Server database sample!
Visual Studio also ships with a few other tools that may be useful when working with databases. The following sections examine these tools.
Earlier in this chapter, you used Visual Studio to build and deploy your database project to a target database. This is a viable option when you have access to the target database. But there are times when you may want to package up your database schema so that someone else can perform the actual deployment.
For example, as a database developer, you may not have access to the production database, so you rely on a database administrator to deploy changes. In that example, your database administrator may not have Visual Studio installed. Or, maybe you sell packaged software to other organizations, and those organizations could be upgrading from various versions of your software. In that case, you want to defer the comparison of the source and target databases so that an appropriate script is generated based on the state of the target database.
These scenarios are enabled by Visual Studio's redistributable deployment engine. Visual Studio 2010 allows you to build and redistribute your database project along with the deployment engine so that it can be deployed later, such as by a database administrator or a customer of your packaged software. The deployment engine is responsible for comparing your target database with your database project and generating the appropriate deployment .sql script.
For this example, you will perform a deployment against the original Northwind database running on your local instance of SQL Server Express, but the steps would be identical if you were going to package this and deploy it on a remote machine.
Start by creating a folder for your redistributable package, such as C:DeployPackage. Copy all of the files from [Program Files]Microsoft Visual Studio 10.0VSTSDBDeploy to this folder (replace [Program Files] with the actual path to your program files directory). Next, copy all of the .dll files from [Program Files]Microsoft SQL Server Compact Editionv3.5 to this folder.
Warning
Take care to ensure that you are only copying files during these steps, and not moving them, or else you can break existing Visual Studio and SQL Server functionality.
You have now copied all of the files that make up Visual Studio's database deployment engine. The next step is to copy a built version of your database project. Return to Visual Studio and build your project (Build
This folder essentially contains a compiled version of your database project. The file <ProjectName>.dbschema is an XML representation of your database schema. The .deploymanifest file contains information from your project properties, such as the target database you were deploying and the database connection string. Previously, you were deploying to the TestMyDatabaseProject database, so, in a moment, you will override this value to target the Northwind database. Also note that the Transaction.refactorlog is included here, which is important to ensure the preservation of intent, as covered earlier in the section "Preservation of Intent."
Create a subfolder in your deployment folder to make it easier to organize these files. For this example, name the subfolder NWv2, so your folder will be something like C:DeployPackageNWv2. Copy the contents of the sqldebug folder into this subfolder.
You now have everything you need to deploy your database project to the original Northwind database. You could even copy the contents of this folder onto a memory stick or a network location, and use it from a remote machine, even if that machine didn't have Visual Studio installed. You could also invoke this deployment package from your application's installation program.
Open a command-prompt and navigate to your deployment folder (for example, C:DeployPackage). The executable file at the heart of Visual Studio's redistributable deployment engine is called VSDBCMD.EXE. Type VSDBCMD and press Enter to see a list of command-line options. These options are further explained in the product documentation, and you will discover that you have a great deal of flexibility when invoking the deployment engine.
Now you will deploy your project to the Northwind database. Type the following and press Enter:
VSDBCMD /a:deploy /dd /Manifest:.NWv2MyDatabaseProject.deploymanifest
     /p:TargetDatabase=Northwind
Visual Studio will now analyze your target database (Northwind) against your source database (MyDatabaseProject.dbschema). Note that you did not need to specify the name of your .dbschema file here because Visual Studio read this value from your .deploymanifest file. However, your .deploymanifest file currently points to the TestMyDatabaseProject target database. Hence, you overrode this value using the /p: option to point to Northwind instead. You could have used similar syntax to override the connection string or other values from the .deploymanifest file.
Also note that the /dd switch tells the deployment engine to deploy your database to your target immediately. If you had instead used /dd-, then it would generate a deployment .sql file for you to preview and make any changes to prior to deployment.
If you have followed this tutorial correctly, then this deployment will actually fail with the following error message:
*** TSD01268    .Net SqlClient Data Provider: Msg 547, Level 16, State 0, Line 1
 The ALTER TABLE statement conflicted with the CHECK constraint
"CK_PostalCodeLength". The conflict occurred in database "Northwind",
table "dbo.Clients", column 'PostalCode'.
This failure was caused by the constraint you added earlier, which requires that the PostalCode column is either five or ten characters in length. While this constraint is correct for addresses in the United States, it turns out that Northwind has non-U.S. data that causes this constraint to fail. This type of failure is one that is important to look out for, since your database is now in a half-deployed state. Some operations succeeded, such as renaming the Customers table to Clients. But once this failure was encountered, the deployment script halted. This error highlights the need to generate test data that realistically simulates that of your production database.
In this example, this problem is easily bypassed by simply removing the check constraint. Return to Visual Studio and, from Solution Explorer, expand MyDatabaseProject
Next, you will need to re-copy your built project to your deployment folder. Copy the contents of sqldebug to your deployment subfolder (for example, C:DeployPackageNWv2), overwriting the original files.
Return to the command prompt and run the same command you ran earlier. Your deployment should now succeed without any warnings or errors. You have successfully updated the Northwind database with the changes you modeled in production.
Visual Studio allows you to perform ad hoc comparisons of schemas using the built-in Schema Compare tool. Click on Data
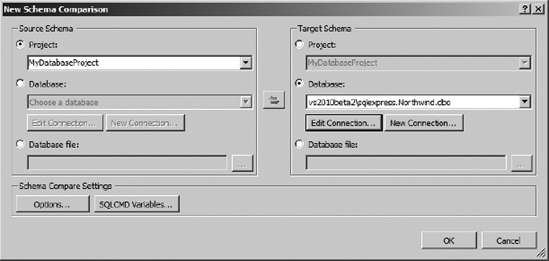
You can choose to compare any combination of database projects, live databases, or compiled database projects (.dbschema files). For your source database schema, select your MyDatabaseProject database. For your target schema, choose the Northwind database. Click OK.
Figure 10-30 shows the Schema Comparison results. This view allows you to quickly determine which differences exist between two schemas. You can even choose to use these results to produce a script that would modify the target database to resemble the source database.

Warning
Be careful if you are using Schema Compare to generate change scripts. Schema Compare does not benefit from the refactoring transaction log required to maintain preservation of intent during certain refactoring operations (for example, renames or schema moves). If used improperly, data loss may occur.
You might notice in this example that there are different values for the IsFullTextEnabled property of the database. You will encounter this difference if you are not running SQL Server Express with Advanced Services, since the other flavors of SQL Server Express do not support full text search. You can optionally disable this in your database project properties via the Project Settings tab. In the Catalog properties file section of this page, select Edit and remove the checkbox for the "Enable full text search" option.
The only other difference detected during the schema comparison should be that you are no longer specifying the properties for the MDF and LDF files. This difference is to be expected, and can be ignored.
Data Compare allows you to compare two live databases to detect differences that exist in rows of data. Click Data

You can now see a table-by-table breakdown of the differences that exist in the data between the two tables, as shown in Figure 10-32.

For this example, you should expect that all of the data would be different, since you generated pseudorandom test data for your test database. But you might encounter a real-world scenario where it is helpful to determine if data from a table in one database matches data from a table in another database. You can use this tool to detect any differences, and to quickly generate a .sql script for executing the changes necessary to make the data in your target database match the data in your source database.
You have seen how Visual Studio 2010 can help you bring your database development lifecycle into the same toolset and process utilized by the rest of your software development team. With Visual Studio, you can develop changes to your database in an offline environment, test those changes, and automatically create scripts for deploying those changes. You can even version-control your database schema and enable parallel development by using a system such as Team Foundation Server. And you have explored some of the built-in tools Visual Studio offers for refactoring your database, analyzing schema dependencies, creating remote deployment packages, comparing schemas, and even comparing the data within two databases.
For many teams, this may represent a dramatic paradigm shift in the way database development is performed. This may require you to invest in significant changes to your process in the short term. But the longer-term results can pay dividends in terms of increased productivity for your developers, testers, and administrators, as well as the increased level of quality and predictability you can bring to your database development activities.
Chapter 11 explores some of the advanced debugging capabilities in Visual Studio 2010 that can be used to analyze code behavior and help fix bugs.