
Understanding Team Foundation version control
Setting up version control
Using the Source Control Explorer
Understanding basic version control operations
Understanding check-in policies
Viewing the history of files and folders
Understanding labels
Understanding shelvesets
Understanding to branching and merging
Getting to know command-line tools
If you are a developer or a tester, you are basically living in a world of source code. When you have more than one person working on a project, versioning becomes an issue. If two developers work on the same assembly, how do you merge their code together? How do you prevent accidentally overwriting files? Incredibly, many organizations still use file shares to store source code. Others push Microsoft Visual SourceSafe to the limit with 150 active users or more, or use third-party solutions or Open Source solutions that integrate poorly with Visual Studio.
One of the key features of Visual Studio Team Foundation Server 2010 is its version control management system. It offers a number of features, including the capability to branch, merge, and shelve your source code, atomic check-ins, policies, security — all the features you would expect from an enterprise version control solution. The core engine for this tool is Microsoft SQL Server 2008. As such, the performance of Team Foundation version control will greatly depend on your server's hardware and the size of your SQL Server 2008 database.
Note
You'll notice that the title of the feature is Team Foundation "version control." However, when you start using the feature, a lot of the tools and windows will say "source control," such as in the "Source Control Explorer." The version control title is there to indicate that the product can handle much more than source code. You can upload manual tests, work products, build files — anything you want, really.
Once you install Visual Studio Team Explorer 2010 alongside Visual Studio 2010, you will get access to a nicely integrated Source Control Explorer. You can also manipulate the version control system using the Team Foundation command-line client called tf.exe. In this chapter, you will learn how to use both tools.
If you have used version control in Team Foundation Server 2005/2008, then you are in for a nice surprise. While all the original features are still there, many of them have been updated or enhanced. There are new tools for visualizing branching and to assist with merging, including better conflict-resolution tools. Branches are now considered to be first-class citizens, and have their own security permissions.
In this chapter, you will learn about features such as branching and merging, checking in and checking out code, setting check-in policies, and temporarily shelving your code for easy access at a later date. The Team Foundation version control system also supports a number of other features, such as atomic check-ins, workspaces, and changesets, all of which will be covered in this chapter.
Note
One of the common misconceptions about Team Foundation version control is that it is a new version of Microsoft Visual SourceSafe (VSS). This is completely untrue — Team Foundation version control was written from scratch. And, unlike SourceSafe, it has been designed to scale well to a large number of developers (more than 2,000). They are completely different products.
As Visual SourceSafe (VSS) 2005 reaches end of mainstream support in 2011 and extended support will end in 2016, no new versions of the product will be released. With the 2010 release of Team Foundation Server, Microsoft has made several changes to both the product and its licensing to make it suitable for all sizes of development teams.
Team Foundation version control is part of a greater Software Configuration Management (SCM) solution. Unlike VSS, Team Foundation version control is designed to scale to large development teams and can support distributed and outsourced teams in remote locations. Plus, you will avoid problems such as the occasional corruption of your source code files (since the data is written to a real database, rather than flat files).
Like VSS before it, Team Foundation Server is now available in all MSDN subscriptions including Visual Studio. Retail prices for the product work out around the same or even less than VSS. Therefore, it is now time to consider moving away from any existing VSS databases towards Team Foundation Server.
Assuming that you've never used a version control system, where do you start? Even if you have used other version control systems, how do you effectively set up and use Team Foundation version control? Let's walk you through the process step-by-step.
When you create a new team project (by clicking on File

In this window, you have the following two options:
You can create a brand-new parent version control folder (based on the name of your project). For most occasions, you will choose this option.
You can create a branch based on a pre-existing project. This option is especially compelling if you want to create another version of an existing application or implement a new process to develop an existing application.
Before you start using the version control features of Team Foundation Server, you should determine who on your team will take on the responsibility of an administrator. The rest of the individuals on your team will be typically classified as contributors. Keep in mind that the way you organize your roles should be determined by a matter of convenience and organizational requirements.
The following roles and responsibilities are configured appropriately for a large organization:
Team project administrator — The team project administrator is responsible for setting up version control permissions for each contributor (either directly, or through the IT staff). He or she also sets the security and policies for your code check-in and co-ordinates with the build team.
Development or test lead — The lead could be granted certain additional permissions above a contributor, but still less than an administrator.
Contributor — The contributor's role is as an end user, to check in and check out code, shelve and create changesets. Typically, you would assign this role to a tester or developer.
Think of a workspace as your personal sandbox to work on source code. A workspace is the bridge between code on the server and your client machine. A workspace has one or many folders mapped in Team Foundation version control with your local file system. Whenever you check out code, the code from the repository is placed in your workspace, and vice-versa. The core advantage is isolation — workspaces allow you to work on an application without affecting any changes the rest of your team might be making.
The workspace itself is bound to a machine and owner. If you move to a different machine you have to create a new workspace. Files checked out in your workspace live on the associated machine only. This is an important difference to keep in mind with some other version control systems.
Note
There are two primary restrictions in setting up your workspaces. You can't map two local folders to one folder in the repository. Likewise, you can't map two repository folders to a single local folder. As a rule of thumb, stick to one local folder mapped to a single folder in the version control system.
To set up a new workspace, click on File
The next step involves adding a new workspace. Note that within each workspace, you can create several one-to-one mappings between local folders and repository folders. Click the Add button on this window to open the Add Workspace window, as shown in Figure 19-3.

In the example shown in Figure 19-3, the Code folder on the local C: drive will synchronize with the VSTS2010 folder in Team Foundation version control.
Note
Notice that you have a Status field next to the Source Control Folder path. There are two statuses that can be set: Active and Cloaked. When you cloak a folder, you exclude it from certain synchronization tasks (such as add, get, and others). Note that cloaking is not an alternative to deleting a workspace. It's a way to cut down on the amount of disk space used, as well as bandwidth for files that you don't have an interest in or need for. It will also provide better performance because only Active mappings are synchronized.
The Source Control Explorer is similar to other explorers in Visual Studio. It enables you to browse and manage entire projects and individual folders in the repository. You can add and delete files; check in, check out, and view any of your pending changes; and view the status your local code compared to the code in Team Foundation version control. Think of it as your master control area for all tasks related to source code management. Following are some of the important tasks it will allow you to do:
Note
As you will learn later in this chapter, a shelveset is a collection of changes stored in a "shelf," or area, to temporarily store your source code without committing it to the repository.
Many of these topics will be examined later in this chapter. To access the Source Code Explorer, simply click View
Another way you can open your source code is by clicking File
Figure 19-4 shows the Source Control Explorer interface. It is divided into three main areas: the source tree view on the left (which enables you to navigate and select source files from your project), the details view on the right, and the "Source location" bar. The Workspace drop-down list enables you to easily jump from one workspace to another.

When you create a project or solution, you can automatically add it to Source Control, as shown in Figure 19-5. Note that a workspace is created only if you don't already have one. Think of the workspace as your local copy of the source files and folders contained on the server. It enables you to work on an application without affecting any changes the rest of your team might be making.
Each of the changes you make to these files will be pending until you check them in or undo them. Once they are checked in, they will be committed into the main repository.
You can manipulate your workspace from the GUI by selecting File
> tf.exe workspace /new MobileExplorerProject
In the preceding example, a new workspace is created called MobileExplorerProject. Anyone can create his or her own workspaces, but you must be logged in as an administrator to create and assign workspaces for other people.
Table 19-1 describes common workspace options.
Table 19.1. Common Workspace Options
WORKSPACE OPTIONS | DESCRIPTION |
|---|---|
| Tag a workspace with a comment |
| Specify the target computer for the workspace |
| Delete a workspace |
| Create a new workspace |
| Rename an existing workspace |
| Change the owner of the workspace |
| Execute workspace commands without prompts |
| Set the workspace permission: |
| Specify a workspace to be used as a template to create brand-new workspaces |
The workspaces (plural) command provides you with a holistic view of the workspaces on your Team Foundation Server. Note that the workspaces command will update the local cache file. It will cause the server to update its user cache when /updateUserName is used. The /updateComputerName option will change the computer name that is associated with the workspace on the server.
Table 19-2 describes Workspaces options.
Table 19.2. Workspaces Options
WORKSPACES OPTIONS | DESCRIPTION |
|---|---|
| Indicate what workspaces you want to view or manipulate from the repository, filtered by computer name. |
| Specify the format in which you would like to see the reports. You have two possible values at your disposal: |
| Specify the creator of the workspace. |
| Specify the name or URL of the Team Foundation Server project collection. |
| Instruct Team Foundation Server to refresh because the client computer has changed name. It is typically written out as |
| Instruct Team Foundation Server to refresh because one (or more) network users have changed names. |
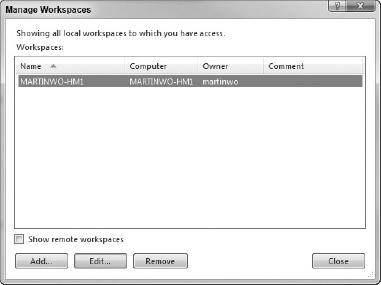
In addition to the command line, you can also use Visual Studio to manage your workspaces. Figure 19-6 shows the Manage Workspaces window. You can access this window by clicking File

From this window, you can add new workspaces, edit existing workspaces, or remove old workspaces. Click the Add button to display the Add Workspace window, as shown in Figure 19-7.
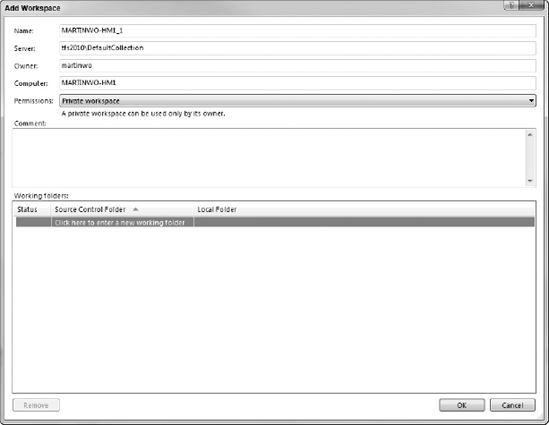
Visual Studio Team Foundation Server 2010 has added a new feature called permissions to workspaces. This feature allows you to control access to a workspace.
Table 19-3 shows the different permission features available.
Table 19.3. Permission Features
PERMISSION | DESCRIPTION |
|---|---|
Private workspace | A private workspace can be used only by its owner. |
A limited public workspace can be used by any valid user, but only the workspace owner can check in or administer the workspace. | |
Public Workspace | A fully public workspace can be used, checked in, and administered by any valid user. |
Public workspaces now make it easier for teams to collaborate when sharing a single machine. One specific example would be merging bug fixes into a mainline branch. By utilizing a public workspace, multiple team members can work together on a common machine to resolve merge conflicts, thereby making the merge process run faster and smoother.
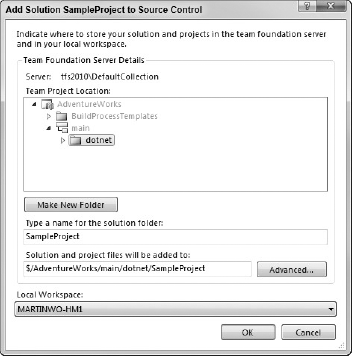
Once you have created workspaces, you can import the associated source files into the repository. The process of putting code in Team Foundation Server is called checking in. (You'll learn more about the check-in/check-out process in the next section.) To open the "Add to Source Control" window, simply right-click on your solution in the Solution Explorer and select "Add Solution to Source Control."
First, select which Team Foundation Server team project and workspace you want to use. Also, enter a name for the solution folder (it will default to the name of the solution). Click the Advanced button to invoke a window in which you can specify the locations for the solution and project files, as shown in Figure 19-8.

Click the OK button on this window. Then, click OK again, and your solution will be marked as a pending change to Team Foundation version control. However, your solution has not yet been officially "added" into the version control system.
In the next section, you will learn how to check in and check out code from the source repository. You also find out about changesets and how to configure team check-in policies.
Daily check-ins and check-outs are an essential part of a developer's workflow. Checking out simply means that you are operating with the files you already have in your personal workspace. Checking in refers to items that are re-inserted into the repository. The source code is represented as a tree structure, with branches and other logical elements.
Warning
Unlike VSS, Team Foundation version control does not necessarily retrieve the latest version of files from the source repository when performing a check. Team Foundation version control, by default, checks out the version of the file that you had in your workspace, and then will warn you to merge with the latest version when performing a check-in. This is an important point to consider.
A changeset contains all of the information related to a check-in, such as work item links, revisions, notes, policies, and owner and date/time details. Team Foundation version control bundles all of the information together into this logical container. A changeset is created once you check code into the repository, and, as a container, it reflects only the changes you checked in at a particular time and date. You can also view it as the state of the repository at a particular time and date. The usefulness of a changeset comes from the fact that you can, on a very atomic level, return to any point in time and troubleshoot your code.
Note
Team Foundation Server contains four types of artifacts: work items, changesets, source code files, and builds. For example, you can associate a work item to a source code file. You can also link builds to work items if you wish. This is a really powerful concept. Imagine that you are having trouble with a build. You can automatically call up the changeset with the problem code. You can also generate a work item to get a developer to fix the problem. The integration possibilities are endless.
All developers forget to check in their code at one point or another. You can implement automatic check-ins by changing the environment settings in your project. Specifically, you can check an option called "Check-in Everything When Closing a Solution or Project."
The Pending Changes window enables you to view all of the checked-out files in your project. After your solution has been added to version control, the window shown in Figure 19-9 will appear on the bottom half of the screen. You can also access this window via the View

To check in your changes, select the files you wish to check in from the bottom pane, then click the Check In button. Assuming no check-in polices are being violated, your code will be added to Team Foundation version control.
But that is just the beginning of what you can do on this window. There is a toolbar called the channel on the left-hand side of the window. Selecting an item in the channel changes the contents of the pending changes window, increasing its functionality and allowing you to take full advantage of the different features in Team Foundation Server. Following are the channel options (in order from top to bottom):
Source Files — This is the default channel option. This channel option allows you to select the files you want to check in, add a comment to the changeset, check in the changeset, or shelve/unshelve the changeset.
Work Items — Team Foundation version control is integrated with the work item tracking system. This integration allows you to associate a changeset with one or more work items. This channel option allows you to run work item queries, and select the work items to associate with this changeset.
Check-in Notes — Check-in notes are free-form text fields that can be associated with a changeset. These fields can be required or optional. For example, you may require code reviews of all code before it is checked into version control. You can specify a Code Reviewer check-in note and make it required, so that someone must enter his or her name into the field before the changeset can be checked in.
Policy Warnings — This channel will show any check-in policies that you are currently violating. Check-in polices are discussed later in this chapter.
Conflicts — This channel is new to Visual Studio 2010. This channel is used to handle any conflicts or issues during the check-in process, such as trying to check in a file when a newer version exists on the server.
Checking out an item means that you are working with your local repository for the purpose of editing or manipulating it. There are several ways you can check out an item within Visual Studio 2010. Items that are under version control are represented in the Solution Explorer with small padlocks at the left of the program icon, as shown in Figure 19-10.

To check out an item in a solution that is under version control, simply open and edit the item. Visual Studio automatically checks out the item as you begin your edits and replaces the blue lock icon with a checkmark icon. This visually confirms that the file has been checked out.
You also have the capability to check out files from Source Control Explorer. In Source Control Explorer, find the file or files you want to check out, right-click on them, and select "Check Out for Edit." This opens the Check-Out window. In this window (in addition to selecting/deselecting which files you want to check out), you can specify a Lock Type for the files you are checking out. Following are the three lock options you can configure:
Check-In — This option allows other users to check out the files, but they can't check them in.
Check-Out — This option prevents other users from checking in/out the corresponding source files.
Unchanged — This option allows other users to pend changes to the source files and keeps any existing locks on the files.
Check-in policies provide a way for the team and individuals to effectively manage quality and workflow to the source management process used by the team. To configure your check-in policies, right-click on your Team Foundation project and select Team Project Settings

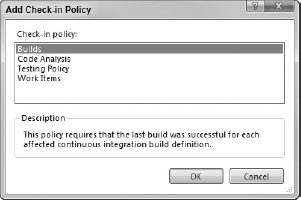
If you click the Add button in the Source Control Settings dialog box (see Figure 19-11), you will be prompted to select a check-in policy type. Select one of the four options shown in Figure 19-12 and click the OK button. Following are the default policy types included in Team Foundation version control:
Builds — This option requires that the last build of the project was successful. If it was not, then new changes cannot be checked in until the offending code has been fixed.
Code Analysis — This option adds a static code analysis quality check before source code can be inserted into the code repository. The code analysis check will be dependent on the project-level settings. For example, if you selected code analysis for C/C++ in your project, the engine will automatically use that test as a "quality gate" (or quality assurance) before code is reintroduced into the source.
Testing Policy — You can apply testing policies to check the correctness of your code before it is checked in. For example, you may want to require unit testing to verify the default values in your application. For more information about testing policies, see the chapters in Part III of the book.
Work Items — You may want to require that a work item must be associated with every check-in. That way, changes can be documented, which will make it easier to track any problems.
Once the check-in policy has been created, try checking in code without complying with the new policies. The Policy Failure window shown in Figure 19-13 will appear. At this point, you will have the option to override the policy requirement and comment on the failure.

Note
Overriding the check-in policy should only be done when absolutely necessary; otherwise, it will start to negate the reason for introducing the policy in the first place. The check-in policy overrides are reported into the data warehouse so that these can be acted on by the team. If it is found that a particular check-in policy is frequently overridden, then you may way to question why it is enabled in the first place. If a particular individual or group of individuals is found to be frequently overriding a check-in policy, then you may want to consult with them to help them understand the reason that the policy is in place.
Viewing the history of files, folders, and changesets has been updated and enhanced in Visual Studio 2010. While previous versions of Visual Studio allowed you to view the history of a file or a folder, the experience was less than satisfying. The old history window was a docked tool window in Visual Studio, and, while it served its purpose, it did not help the user visualize and understand the changes that were taking place in the version control system. As such, the history window was redesigned to help users more fully understand the history of changes made in Team Foundation version control.
To view the history of a file or folder, in Source Control Explorer, right-click on the file or folder, and select View History from the context menu. This opens a new document tab, as shown in Figure 19-14.

The new History window is now a tabbed document window in Visual Studio. This allows you to open multiple History windows for research, something that was not possible in previous versions of Visual Studio. Notice that the window has two sub-tabs: Changesets and Labels. The History window now gives you a view of both the changesets associated with the file or folder, as well as any labels.
You have several options from the Changeset sub-tab. You can select a changeset and click the View button to view the file version for that particular changeset. You can click the Changeset Details button to view the details for a particular changeset, including all the files that make up the changeset and any associated work items. You can compare two different versions of a file or folder to see the differences. Clicking the Annotate button allows you to see, line by line, who made what changes to a particular file.
Finally, you can select a changeset and click the Get This Version button. This will replace the current version of this file in your workspace with the selected version, enabling you to easily return to an earlier version of a file.
The History window also allows you to track the changes across multiple branches, merges and renames. This will be discussed later in this chapter.
A label is a marker that can be attached to files and folders in Team Foundation version control. This marker allows all the files and folders labeled together to be retrieved as one collective unit. Labeling was available in previous versions of Visual Studio, but it had some issues. Labeling an item could sometimes be a tedious and complex process, and labeling a large number of files could be very slow.
With Visual Studio 2010, labeling has been updated to make it easier to use and manage. To create a new label, in Source Control Explorer, right-click on the file or folder you want to label, and from the context menu, select Apply Label. This opens the New Label window, as shown in Figure 19-15.

In this window, you can enter the label name and a comment. You can also select the version that you want to label. You can choose to label by Changeset, Date, Label, Latest Version, or Workspace Version. Click the Create button to create the label.
Notice next that the Create button is a drop-down arrow. Clicking the arrow provides you with two options. You can create the label as is, or you can create the label and then edit it. If you select Create and Edit, the label will be created, and you will be presented a new tab, as shown in Figure 19-16.

This tab allows you to make multiple changes to the label. You can add new files to the label. You can change the version of a file that the label is currently applied to. And you can remove files from the label. All of this is made easily accessible by using a tree-view control. Managing labels in Visual Studio 2010 is now a much easier process.
There are times when you won't be ready to commit your source code into the core repository. For example, say that you are working on solving a bug and you want to share the changes you have made with a colleague to get their assistance on a particular issue. Shelving enables you to store files and code aside on a temporary basis. The collections of stored pending changes that haven't been committed to the server are called shelvesets.
Warning
The security settings for a shelveset are determined by the item permissions. You must have read and pending change permission for the item changes you wish to unshelve.
The process of creating a shelveset is fast and easy. To begin, access the Pending Changes window by clicking View
The Shelve dialog box appears with the files you have selected. (Be sure to give it a descriptive name to differentiate it from the other shelvesets.) You now have the option of unchecking the items, preserving pending changes locally, or clicking the Shelve button. You also have the option of evaluating policies and check-in notes before shelving.
Shelvesets contain the same level of information as a changeset, including associated work items, comments, and check-in notes. Keep in mind that, unlike with a changeset, the changes are not versioned. Shelvesets can be permanently deleted (which is something you can't do with changesets). You can't link directly to a shelveset from a work item, and policies can't be enforced on shelving.
When would you want to use this feature? There are a few scenarios. Say that a project manager asks you to drop what you are doing and work on a bug fix. Your current work can be set aside temporarily. Say that you have code that isn't quite ready to be checked in, but needs a code review. You can shelve your pending changes to allow other team members to work with it. Shelving is also useful as a backup mechanism, and is used as a way to reassign unfinished code to another team member.
Unshelving source files is as easy as shelving them. First, bring up the Pending Changes window and click the Unshelve button. The Unshelve window appears with the option to select an owner and the name of a shelveset (Figure 19-17). You also have the option of deleting shelvesets or reading more details.
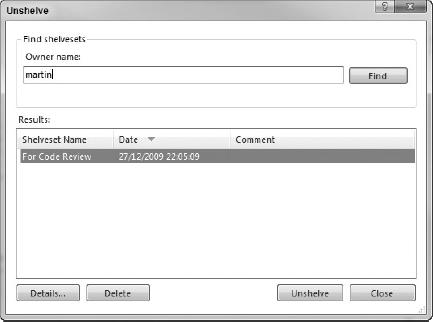
Once you select a shelveset, you then have the option of preserving the shelveset on the server. You can also choose whether you want to restore the work items and check in. When you unshelve your code, all the pending check-in information is also restored. If you made any changes to your workspace (for example, renamed or moved a folder in your workspace), the unshelved folder will also be renamed and moved. Shelved files that are marked for deletion are deleted in the workspace.
Branching and merging are two important functions of any version control system. During the process of building a piece of software, you may find the need to release a stable version for beta testing, or you may want to work in parallel on bug fixes without interrupting the main development process. To better manage this process, you can create many development versions of the same code base (called branching) and re-integrate them into the main tree (merging).
You might have heard of the terms forward integration and reverse integration. In the context of branching and merging, forward integration is the process of merging changes from the main development line into a branch. Reverse integration is the complete opposite — you integrate or merge the changes in your branches back down to the main branch. Figure 19-18 shows a few common scenarios you might encounter where you would need branching and merging.

A branch was created from version 1.0 of the application to create a release or preview version for customers or beta testers. In version 1.1, a critical bug was found, and a separate branch was created with incremental fixes. The fixes were completed in version 1.1.1.2 and reintegrated into version 1.4 of the main branch.
Note
Chapter 20 dives deeper into several of the more popular ways to use branching and merging. That chapter examines both the concepts around those strategies, and how to configure Team Foundation Server to implement these strategies.
Branching enables you not only to create copies of your source files, but also maintain a history of your changes in case you want to do a merge in the future. You can use the Source Control Explorer to navigate between different branches. To create a branch, simply right-click on the folder or branch containing your solution in the Source Control Explorer. Select Branch and Merging, and then Branch from the context menu. The dialog box shown in Figure 19-19 will appear on screen.
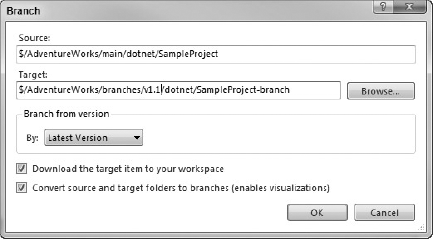
The Branch dialog box has several options. The Target field enables you to set the name of your branch. The "Branch from version" option enables you to select which version of the branch you would like to use (the latest version or an older version). You can opt to create a local copy of a branch by selecting the "Download the target item to your workspace" option. It will download the newly created branch files to your workspace.
At this point, the branch has only been pended to Team Foundation version control. To complete the branch process, open the Pending Changes window and click the Check-In button.
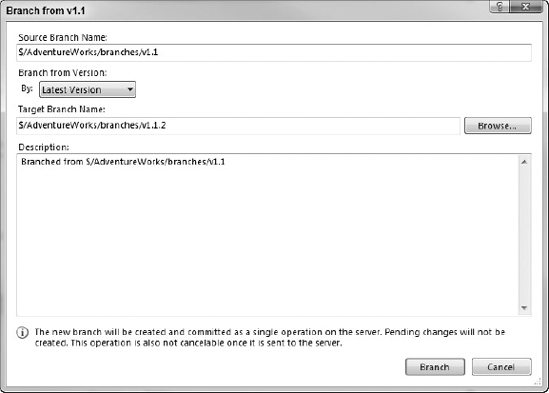
Note that a faster way to create the branch is to right-click on a folder that is marked as a branch (denoted by a separate branch icon in Source Control Explorer). Creating a branch of a branch will bring up a separate dialog as shown in Figure 19-20. When you press the branch button, the files will be branched and checked in with a single server operation. Not only does this save you the check-in step, the process is significantly faster when performing a branch of several thousands of files.
One of the great new features regarding branching in Visual Studio 2010 is the capability to do branch visualization. In earlier versions of Visual Studio, there was no nice, clear, concise way to view branch information. This issue was addressed in Visual Studio 2010. To take advantage of this, the first step is to turn your branched folders into Branch objects. To do this, right-click on the branched folder in Source Control Explorer, select Branching and Merging, then "Convert Folder to Branch." This opens the Convert Folder to Branch window, as shown in Figure 19-21.
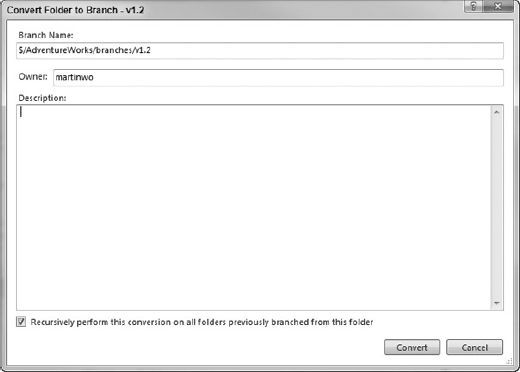
One nice feature of this window is the capability to recursively perform this conversion for all branched child folders. If you have an extensive branching structure, this allows you to easily turn all the child folders into Branch objects.
Note
Turning a folder in version control into a Branch object does not affect your capability to check items in and out. You still access the information in version control using the folder metaphor. Converting the folder to a Branch object simply allows you to make use of the branch visualization options.
To visualize your branching structure, right-click on a branch. From the context menu, select Branching and Merging, then View Hierarchy. A new document tab named Hierarchy will open, as shown in Figure 19-22.
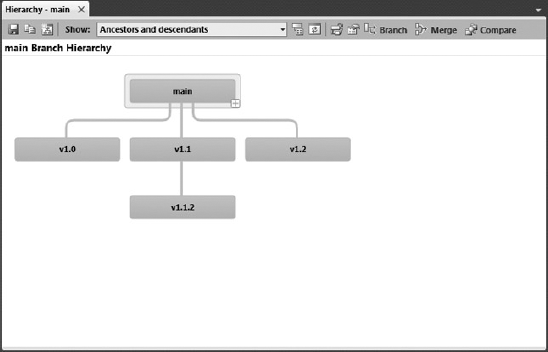
This tab provides a nice hierarchical view of the branching structure that has been implemented in Team Foundation version control. You can easily tell which branches are parents and children of other branches.
From this tab, you can save this visualization out to a graphics file to share with others. Using the drop-down box, you can adjust the view of the hierarchy in the tab. You can also select a branch in the visualization, open it, compare it to another branch, branch it again, or merge the branch back into its parent.
Merging means to combine changes from two or more branches. This functionality is very useful for teams of developers working in parallel. During a merge, many changes are integrated, including add/edit/delete operations. If there are merge conflicts between branches, you can resolve them in a variety of ways, including the use of a diff-merge tool.
There are two ways you can merge files: using the Source Control Explorer and via the command line. You can also specify whether you want to incorporate all the changes or just specific versions.
When you merge, Team Foundation version control uses the history behind the scenes to find files and folders that have been changed in another branch. Changes that don't exist in the target branch will be merged. If any of the files or folders has been changed in the target branch, a merge conflict will occur.
You can access the Merge Wizard in the Source Control Explorer by right-clicking the folder that you want to merge. If you click Branching and Merging, and then the Merge option on the context menu, you will be presented with the Source Control Merge Wizard, as shown in Figure 19-23.

The Source Control Merge Wizard presents you with a preset list of target branches you can merge to and offers you the option to commit all changes in the source branch or only selected changes. Once you click the Next button, you will be presented with the option to select the changes you want to merge. Once all of the options have been set, all you must do is click the Finish button to execute the merge process.
Visual Studio 2010 also provides you with a graphical way to perform the merge process, as well as with the capability to drag and drop changesets across branches. When viewing the history of an object in the version control system (as discussed previously), one of the options on the History tab is the Track Changeset option. Right-clicking on a changeset and selecting Track Changeset opens the Changeset Tracking tab for that particular changeset. By clicking the Timeline Tracking button on this tab, you are able to view the different branches in version control, and see how a changeset has migrated between those branches, as shown in Figure 19-24.

This is a nice visualization because you can easily tell whether a particular changeset has been fully or partially merged into a branch. You can also perform merges from this view by dragging and dropping a changeset from one branch to another. Performing this action will open the Merge window (described earlier).
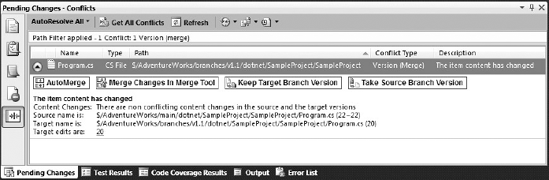
As you begin branching and merging, at some point in time, you will encounter conflicts that must be resolved. Visual Studio 2010 has revamped its conflict-resolution mechanism to make it simpler to use. In the previous discussion of the Pending Changes window, you learned about the different channels of that window. A new channel on that window is the Conflicts channel, shown in Figure 19-25. This is where you work to resolve any conflicts related to a merge.
You can manipulate any part of the version control system using the Team Foundation command-line tool. The tool itself is called tf.exe (short for Team Foundation). For example, to create a new workspace, simply type the following command:
> tf.exe workspace /new MobileExplorerProject
In the preceding example, a new workspace is created, called MobileExplorerProject. You can exercise a great deal of control over the version control system using the tool. For example, you can manipulate workspaces, permissions, changesets, labels, and much more.
You can also use the command-line tool to monitor how long files have been checked out. To get a report about the changes in your workspace, simply type the following:
> tf.exe status /collection:http://YourTFSServerName:8080/tfs/
     YourProjectCollection /format:detailed
The Team Foundation version control command-line tool will enable you to perform operations that you can't perform using the Source Control Explorer. One such operation is a rollback to a previous changeset. You may have the occasion where you need to roll back your version control system to a previous changeset version. This is not possible using Source Control Explorer, but can be done using the command-line tool, as shown here:
> tf.exe rollback /changeset:27~23
The previous command tells Team Foundation version control to roll back from changeset 27 to changeset 23.
To view a list of all possible commands using the command-line tool, run the following command:
> tf.exe /?
This will provide a list of all options, along with some help information. You can also refer to the MSDN online documentation for more information.
In this chapter, you found out the core differences between Visual SourceSafe and Team Foundation version control. You examined the configuration options for Team Foundation version control.
You found out how to use the Source Control Explorer and how to check in and check out code, showing you the concepts of workspaces and changesets. You learned how to view the history of files and apply labels. The chapter also covered advanced concepts such and branching, merging, and shelving, including the new visualization tools available in Visual Studio 2010.
Version control is an important tool to help you manage your development process by providing an effective way of organizing your source code. In Chapter 20, you will learn some branching and merging strategy best practices, and how to configure Team Foundation Server to implement those strategies.