
Understanding branching and merging
Looking at common branching strategies
Walking through a basic branching plan implementation using Team Foundation Server 2010
One of the biggest problems that developers of software projects encounter is the understanding of the software that is being built. How are all the different aspects of your software project organized and accounted for? Does everyone understand the organization of the code base and the ramifications of making certain changes?
Many people are afraid of branching in version control, because of the additional complications that this brings into the management of your files. Do your developers know when they are allowed to create a code branch, and when they are supposed to merge their changes back into the MAIN line? If not, you are asking for certain trouble as team members begin modifying the code.
There are trade-offs with any branching and merging strategy. The biggest trade-off is in the areas of risk versus productivity. Developers sometimes look at branching as having a low overhead, and don't see anything wrong with creating a branch of the code any time they must make a change. The capability to quickly and easily create branches can make developers more productive. However, creating branches in an ad hoc manner also adds more risk to your project.
One of the major risk areas surrounding branching is merging changes from branches back into the MAIN line. The more branches you have, the more merging that must occur, the more complex the merging may be, and the more chance for introducing errors into the merge process.
Don't just jump into branching because you have heard it is a good idea. You must have a plan, strategy, and reason for creating branches and performing merges. When creating your branching/merging strategy, ask yourself the question, "How does this branch support my development project?" Before creating any branch, you should be able to justify why you are wanting to branch. The same goes for merging as well.
This chapter is all about branching and merging strategies with Visual Studio Team Foundation Server 2010. The discussion begins by covering some of the basic terminology around branching and merging. Next, you will take a tour of some of the common branching strategies. And then you'll learn some details about two branching strategies as used with Visual Studio Team Foundation Server 2010. While most branching strategies can be implemented with Team Foundation Server, these two strategies are easy to use for people new to branching and merging, as well as people who have been using branching and merging for a while.
These strategies help to show you the features and tools inside Team Foundation Server supporting branching and merging, and, therefore, they should help you to understand how to apply any other branching strategy with the product. However, do not take those strategies as strategies recommended by the authors for all projects all the time. You must first understand the concepts of branching and merging, learn what support the tooling gives you, and then decide on a branching strategy suitable for your situation at the current time.
Note
For more general branching guidance, also consult the excellent Visual Studio TFS Branching Guide 2010, freely available from http://tfsbranchingguideiii.codeplex.com.
There is a lot of terminology involved with configuration management, branching, and merging, which can be daunting to people new to it. To be able to really understand branching and merging, there are several terms that must be defined.
Branching and merging is just one aspect of a larger topic referred to as Software Configuration Management (SCM).In his book Software Engineering: A Practitioner's Approach (New York: McGraw-Hill Science/Engineering/Math, 2009), Roger Pressman defined SCM as "a set of activities designed to control change by identifying the work products that are likely to change, establishing relationships among them, defining mechanisms for managing different versions of these work products, controlling the changes imposed, and auditing and reporting on the changes made."
SCM is important because it helps all the members of the team collaborate and communicate more effectively.
It's apparent that SCM covers a large range of topics, all of which Visual Studio and Team Foundation Server help to address.
Following are some definitions of basic terms used when discussing branching and merging:
Branch — The easiest way to think about branching is that, when you branch your code, you are making a copy of it. And, in Team Foundation Server, that is exactly what you are doing — you are making a copy of your files. When you branch your files in Team Foundation Server, you create a separate physical copy of the files in a different location. You can then work on this branch, and when you are ready, you can merge your changes back with the original folder.
Merge — This is the process of taking all the different branches, and combining them back into one code base. The main reason for this is to create a stable
MAINline of code that can be used for testing and release management. When you branch your code from theMAINline, there is a relationship path established between theMAINline and the branch. During the merge process, the files from theMAINline are compared to the files in the branch. If possible, any changes will be integrated automatically. There will be occasions where the changes must be manually integrated. When you merge code from the parent branch into the child branch to push changes that have been made in that parent branch into the child branch, this is called a forward integration (FI). When you merge code from the child branch back into the parent branch to pull all the changes back into the parent branch that have been done in the child, then this is called a reverse integration (RI).Baseless merge — This is the process of merging items that are not directly branched from each other. While this process is available in Team Foundation Server 2010, it can lead to a confusing number of conflicts, and is generally not considered a good practice.
Release — At some point, you are going to want to move your code from your development environment to its next stage, be that quality assurance or general release. A release is defined as a distribution of your code for some specific purpose, such as quality assurance testing or general availability to your clients.
As you can imagine, there are many different ideas and strategies involving how to branch your source code. All of them have their good points and bad points. You will find that different people will defend their branching strategies with a religious fervor.
This section examines popular branching strategies that are currently being used.
Let's start with the most common and basic branching strategy, which is not to branch at all! Believe it or not, this is a valid branching strategy, and one that is perfectly suitable in many situations. Remember that the first rule of branching is to only create branches when you need them. This strategy is the easiest to understand, but is not a particularly interesting one to examine in detail in a chapter all about branching. Therefore it is included here to help to build off this strategy into other strategies.
Figure 20-1 shows an example of no branching.
In this branching strategy, you only have one area of code, the MAIN line. All development is done directly against this code base. Code files are checked in and out directly from the MAIN line. As bugs are found, they are fixed and checked into this line.
When a release is ready, it is labeled (V1, V1.1, and so on) and development continues on this line toward the next release.
Note that you are still working in a MAIN branch. This means that if you want to introduce branches later on, then the option is still open to you. If you are not sure if you need to have a more complex branching strategy, start by creating a MAIN branch, and then you know you can create more if (and when) you need them. When creating a branch, you can specify a Label, Date, or Changeset to create the branch from. Therefore, you can create branches later for the code as it was at the V1 release if you find you need to.
This strategy is okay for a small team that is consistently working on the same codebase, a team that only releases and supports a single version of the application at any one time. That said, managing the release process in this way can mean that you have long periods of time when no development can be carried out, because the code base is being stabilized ready for a release.
The key thing about branching is that it enables parallel development on a code base. Even for a one-person development shop, some of the other branching strategies discussed here may be useful.
Branching per release is the second most common branching strategies used. The idea is to create branches that hold all the code for a particular release, as shown in Figure 20-2.

Each release of the software has its own branch. As you can see from Figure 20-2, Release 1 starts off on its own. Around the time of the release of Version 1.1, coding begins on Release 2. At that point, Release 2 is branched off of Release 1. Release 1 and Release 2 continue their development process. Occasionally, bugs or other critical fixes are merged from the Release 1 branch into the Release 2 branch, but this is rarely done. And, in general, when a release is discontinued, the branch for that release is just abandoned.
Branch per release is easy to understand because people are familiar with the concept of labeling the source code on a particular release, and this is just taking that one step further. It allows you to easily get the code that is running in a particular version of the application, and is well-suited to organizations that need to support more than one version of an application that is running in production at any given time. However, for each release, there is still no more parallelism of development than in the standard "no branching" strategy.
Code promotion branching (or promotion level branching) breaks your branches off into different promotion levels, as shown in Figure 20-3.

The initial development begins on the Dev line. Once the Dev line thinks Version 1.1 is complete, it is branched to the Test line. As bugs are found during testing, they are fixed in the Test branch, and merged back into the Dev branch.
Once the code has been tested, and is deemed ready to be released, it is branched again, this time from the Test line to the Production (Prod) line. In the Prod branch, the code base is stabilized and readied for release. Once it has been released, any final changes that were made are merged back into the Test and Dev branches.
This branching model is well-suited to controlled environments that have a single version of the application running in production at any one time. It allows development to continue in the Dev branch while stabilization is occurring in the in Test branch, and also allows you a very high degree of visibility of changes moving over to production.
Branching per feature is used to isolate specific features into separate branches, thereby avoiding overlapping with other features. Figure 20-4 shows an example of branching per feature.
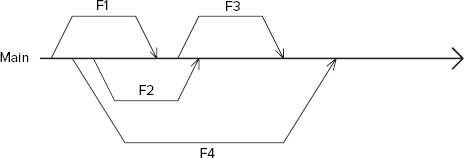
From the MAIN line, different branches are created depending on the feature. In Figure 20-4, you can see that, during the development cycle, four different branches were created: F1, F2, F3, F4. Each branch was created for a different feature. The feature was completed, and then the results were merged back into the MAIN line.
If you decide to use branching per feature, be sure to keep the life of your feature branches as short as possible, and ensure that you merge your changes back into the MAIN line as soon as you are finished. If you allow your feature branch to become stale (that is, old), then the merging process could become more complex, and undo any productivity gain you might have had by using this branching strategy.
If a feature is particularly long running, or has overlapping elements to another feature that has been completed, then you may want to merge changes from the MAIN branch into the feature branch (that is, have a forward integration) so that the code in your feature branch is updated with the latest code from the Main branch.
The advantage of branch per feature is that it increases the parallelism of your development. Multiple teams can split off and work on separate features at the same time. You are free to ship regular releases of code from your Main branch because you know the code in that branch is well-tested and features only get added to that branch once they are finished.
The downside is that you must ensure the areas that are being worked on are well-isolated. Otherwise, there will be a large number of conflicts when merging features together back into the MAIN branch. This only tends to be suitable for large code bases with a big team working on them. For smaller teams and codebases, the lack of isolation when implementing features, and the lack of resources to work on a particular feature, often mean that dealing with the problems of merging the code back together will offset productivity gains obtained from working in parallel.
That said, it is still sometimes useful to conduct a feature branch even in a small team when two or more developers must work on a particular feature that may be disruptive to the rest of the team during the development, or if there is a high risk associated with the feature being achievable and the developer(s) want to experiment in isolation from the rest of the team.
So far, you have learned a lot of theory concerning branching and merging. You have learned what branching and merging are, and about some of the different branching models that you can implement.
Now, let's put some of this theory into action. This section and the next, "Advanced Branching Plan," discuss how to implement two different branching scenarios using Team Foundation Version Control.
Let's begin with a basic simple branching plan, which provides a good starting point for anyone who is new to branching.
For this example, let's say that an organization has decided to install and use Team Foundation Server 2010 for version control needs. The organization has been reading a lot about software configuration management, best practices applicable to the use of version control, and has decided that it must implement some sort of branching strategy with Team Foundation Server 2010.
Currently, the development process in the organization is plagued by problems and inefficiency. Code is being checked in that has not been accurately tested, and there is usually a very lengthy process involved in releasing a version of an application, during which time everything is "frozen" and no one is allowed to make changes. This leads to developers who can't work on anything, which is very inefficient. This organization is hoping that, by implementing a good basic configuration management plan, it will be able to remove some of the inefficiencies from the process.
Figure 20-5 shows the basic branching plan that the organization has decided to adopt.

The following will be the three branches:
MAIN— This is theMAINline of the code, where all the testing and quality assurance will take place. As such, it must remain very stable. Nightly builds will be run against this branch, to ensure that no code has been checked in that breaks theMAINline.DEV— This is a branch of theMAINbranch, which is used by the developers for writing code. Changes on theMAINbranch are forward-integrated (represented asFIin Figure 20-5) into this branch and, at certain milestones (such as the end of an iteration/sprint in an agile methodology), changes from theDEVbranch are reverse-integrated (represented asRI) into theMAINbranch.PROD— This is the production/release branch. Once the code in theMAINbranch has reached a certain milestone, and it is time to release the application, this branch is created. This branch is where the final clean-up and stabilization of the code takes place. Once the release occurs, the branch is marked as read-only, and any changes made to the branch are reverse-integrated back into theMAINbranch.
Let's say that you have been hired to implement this process. You would start by creating the MAIN branch, and loading the existing code base (V1.0) into it. Next, you would branch that code base into the DEV branch. At that point, development work will begin in the DEV branch on V2.0. Developers will begin writing code, and checking it in and out.
At the end of the first iteration, there are no priority 1 bugs left in the DEV branch, and the code will be reverse-integrated (represented in Figure 20-5 as RI) back to the MAIN branch. The code is demonstrated to the project sponsor and real business users also use it. Any important bugs or minor changes based on feedback from the project sponsor that are found will be fixed in this branch. Once testing is completed, it is decided that this iteration is not ready for release yet until additional features (or user stories) have been implemented. All the changes from the MAIN branch are forward-integrated (represented in Figure 20-5 as FI) to the DEV branch, and development continues.
The next iteration is completed in the DEV branch and it is once again reverse-integrated back into the MAIN branch. More testing is performed, and the business decides that it is ready to be released. A new branch called PROD is created from the MAIN branch. In the PROD branch, any remaining issues are ironed out, and any show-stopping bugs are fixed. Once the code is ready, it is released. The PROD branch is set to read-only, and all the bug fixes and stabilization changes are reverse-integrated back into the MAIN branch. Those changes are then forward-integrated into the DEV branch, to be used as development begins on the next release.
Now, let's see how to implement this scenario.
You would start off by creating a new team project in Team Foundation Server 2010. This will create an area in the version control system for storing your code. For this example, create a team project named MyProduct.
From within Team Explorer, double-click the Source Control icon to open the Source Control Explorer window. In the Source Control Explorer window, click the New Folder button and add a folder under the MyProduct team project called MAIN. You check in the source for V1.0 of your application (AcmeApp), and load it into the MAIN folder in version control. The easiest way to do this is to open the application in Visual Studio, right-click on the solution, and select "Add Solution to Version Control." A wizard will walk you through the process.
Once you have added the solution to the version control system, you must still check it in. To do this, you open the Pending Changes window, ensure that all your solution files are selected, and click the Check In button.
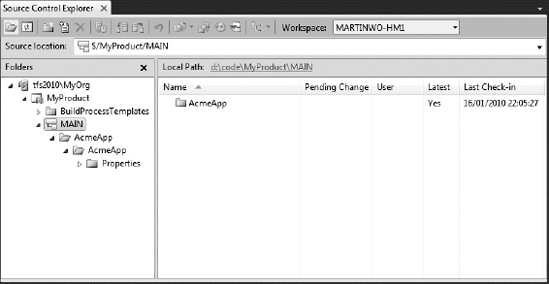
At this point, you have now added V1.0 of the application to the MAIN branch and the Source Control Explorer looks as shown in Figure 20-6.

Before proceeding any further, you must tell Team Foundation Server 2010 which of these folders should be treated as branches. Right-click on the MAIN folder to view the options in the context menu, as shown in Figure 20-7.

Selecting "Convert Folder to Branch" in the Branching and Merging menu opens the window shown in Figure 20-8.

Branches in Team Foundation Server 2010 have owners. So, in this window, you can specify the owner of the branch. You can also give the branch a description (which is recommended). Click the Convert button, and the folder is converted to a branch, as shown in see Figure 20-9. You can see the folder icon has been changed to a branch icon, giving a visual indication that this is now a branch.
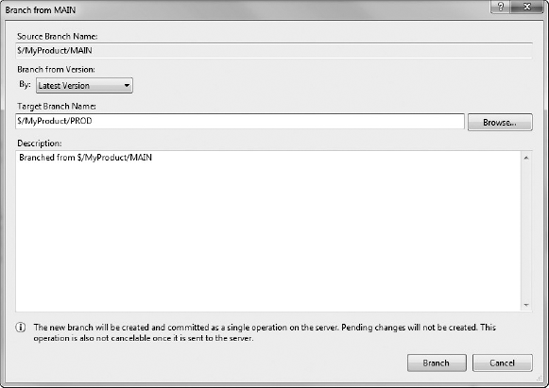
Now, to begin development on the first iteration of V2.0 of the application you take the V1.0 code from the MAIN branch, and create a DEV branch. You right-click on the MAIN branch and, from the context menu, select Branching and Merging

You want to branch by the latest version, which takes the latest version of the code from MAIN and branches it into DEV. You'll need to specify the target branch name as shown in the figure. The Description will default for you (as shown in the figure), but you should always add more description as to the purpose of your branch.
This description is used as the description of the branch, as well as the comment on the changeset when creating this branch in source control. Note that creating a branch in this way does all the work on the server in a single operation, which is very efficient — especially if you are branching a large code-base containing thousands of files. It does not create all the individual file branch operations on your machine, or download the new branch to your machine as part of this branch operation.
Figure 20-11 shows how things look in Source Control Explorer:

At this point, you are ready to begin work on your first iteration of the application. The developers get the code from the DEV branch and begin to make changes. At the end of the iteration, you now want to reverse-integrate changes back into the MAIN branch for testing.
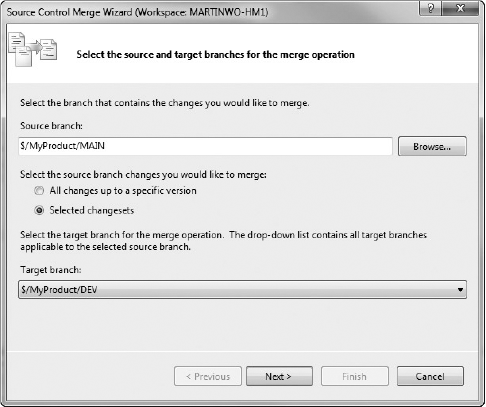
To do this, you right-click on the DEV branch and select Branching and Merging

The "Source branch" contains the changes that you want to merge, in this case, the code from DEV. The "Target branch" contains the branch where you want to merge the changes. This drop-down box will default to the branch that DEV was created from, in this case, the MAIN branch. You can also choose whether to merge all the changesets up to a specific version or to merge just a selected range of changesets (called a cherry-picked merge).
You want to merge all the changes that were made so far, so you select the first radio button; then click the Next button. This takes you to the second page of the merge process (Figure 20-13).
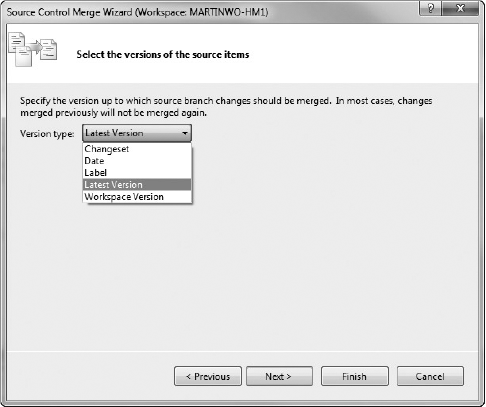
On this step of the wizard, you specify which version of "Source branch" changes should be merged into the "Target branch." You have several different options:
Changeset — You can merge up to a specific changeset in the version control system.
Date — You can merge all changes up to a particular date/time.
Label — If you have applied labels to your code in the version control system, you can grab specific labels and merge the code associated with those labels.
Latest Version — This gets the latest version of your code and merges it.
Workspace Version — This takes the code at the version you have in your local workspace and merges it.
You want to merge all the code changes you have made so far, so you select Latest Version from the drop-down list, and click the Next button. This takes you to the final step of the wizard, which is a confirmation page (Figure 20-14).
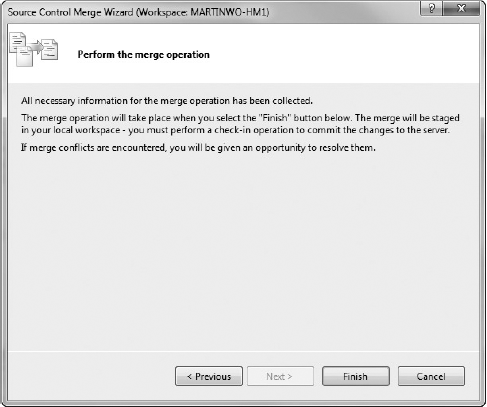
By clicking the Previous button, you have the option to return and make any changes you want to the merge process. Once you are ready to proceed, click the Finish button to begin the merge.
The merge itself happens in your local workspace, not on the server. At this point, you have no merge conflicts (because all the editing was done in the DEV branch — no edits made in parallel in the MAIN branch), so the merge is successful. Once the merge process is complete, all the merged changes are located on your local machine, in your workspace.
To finish the actual merge, you must check the merged changes in your workspace into version control. Figure 20-15 shows the Pending Changes window with the merged changes waiting to be checked in.

It is good practice to review the changeset with all the merges in place, and to compare the files with the latest version in version control for that file to ensure you are merging what you expect to. In addition, if you have a set of unit tests available, it is often useful to execute those to ensure that the system is working as expected, and will build correctly.
Because you can see from your source control history that all changes were made in the DEV branch and no parallel edits have been made in the MAIN branch, it is safe for you to check your merge in.
You click the Check In button in the pending changes view to check these merges into Team Foundation Version Control.
Once the code has been checked into the MAIN branch, you demo the application to your project sponsor and some business users. Some important bugs are found and the business users have feedback regarding wording in a particular area. These changes are made in the MAIN branch, and the business is suitably impressed about how responsive you are being to their needs. At the end of this phase, it is determined that more features are needed before you can release the product into production. All the bug fixes that have occurred in the MAIN branch must now be merged back into the DEV branch.
While the demo and associated changes were occurring in the MAIN branch, development continued on in the DEV branch. So, you can expect there to be some conflicts between the two branches that you must resolve as part of the merge process.
You start the merge process as you did previously, but this time, you select the MAIN branch, right-click on it, and select Branching and Merging
Notice how the source and target branches are different from the previous merge. For this merge, the source branch is the MAIN branch, while the target branch is the DEV branch. For this merge, you want to move a selected range of changesets (which represent the bug fixes) back into the DEV branch, so you select the "Selected changesets" radio button, and then click Next.
The Merge Wizard now shows a different second screen (Figure 20-17) from what it showed in the previous merge.

On this screen, you can select an individual changeset that you want to merge from MAIN to DEV, or a range of changesets. In this case, you want to merge all three changesets, so you select all three. This is, in effect, the same as doing a merge of all changesets and selecting the Latest Version. However, there will be times when you only want to merge specific changesets. Once you have selected all the changesets you want to merge, click the Next button. This takes you to the final window of the Merge Wizard. From there, you can go back and make changes or click the Finish button to start the merge process.
Remember, development has continued in the DEV branch while the testing and bug fixing was occurring in the MAIN branch. During this time, the same file in both the DEV branch and the MAIN branch has been modified (ClassA.cs). When this happens, and you attempt to merge from one branch to another, you encounter merge conflicts.
Merge conflicts appear in the Pending Changes window of Visual Studio. (Remember, all merges happen in your local workspace, so all conflicts happen in your local workspace, and must be resolved there before they can be checked into Team Foundation Version control.) In this example, you have one merge conflicts, as shown in Figure 20-18.

To resolve the conflict, you use the Merge Tool that comes with Visual Studio 2010. In the Pending Changes window, you click the "Merge Changes in Merge Tool" button. This opens the default merge tool, shown in Figure 20-19.

Note
As well as the one that ships with Visual Studio, there are a number of commercial, free, or Open Source diff/merge tools available that you may want to choose from. You can change the merge tool used by Visual Studio by going into the Options menu of Visual Studio. Go to Source Control
Using the built-in merge tool, you can navigate to each conflict found in the file. Once you have analyzed the conflict, you select which version of the code to include in the final file by clicking on it in the upper-left or upper-right pane (or both, if you want both changes). You can even edit the resulting file directly in the merge tool if you need to. You can see the results of our merging process displayed in the bottom pane. Figure 20-20 shows the results of the merge.

Once you are finished with the merges for this file, you click the OK button to save your changes and return to the Pending Changes window. As you resolve each conflict, they are removed from the Conflicts channel in the Pending Changes window.
In addition to using the merge tool, you have three other options for performing merges of this type of conflict:
AutoMerge — If the changes in the two files can be merged into a single file without overwriting each other, the AutoMerge button will be enabled. Clicking this button will automatically merge the two files.
Keep Target Branch Version — This will keep the version of the file from the target branch (in this case, the
DEVbranch).Take Source Branch Version — This will use the version of the file from the source branch (in this case, the
MAINbranch)
Now you are finished resolving all the merge conflicts, you click the Check In button on the Pending Changes window to complete the merge process back to the DEV branch.
At this point, development continues in the DEV branch. Once the next iteration is finished, the code is merged back into the MAIN branch. Another round of testing and bug fixes occur in the MAIN branch, and it is decided that the product is ready to be released.
A new branch is created off the MAIN branch called PROD. Figure 20-21 shows the branching window from MAIN to PROD, and Figure 20-22 shows how things look in Source Control Explorer after the branching is complete.
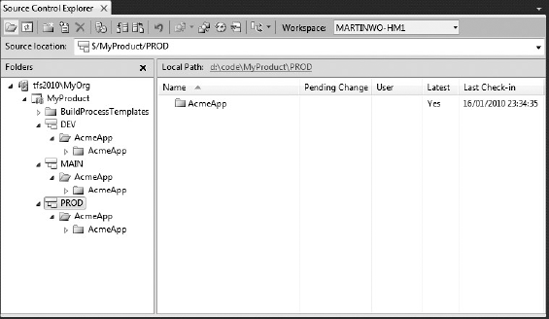
At this point, the code is stabilized in the PROD branch for release. Final show-stopping bugs are found and resolved. Finally, the code is ready to be released. At this point, all the bug fixes from the PROD branch are merged back into the MAIN branch, and then into the DEV branch, to be incorporated into the V3.0 development that is ongoing.
As a final step, the PROD branch is set to read-only to ensure that no one accidentally edits this code, and so that you always have an accurate representation of what code is running in production. You right-click on the PROD branch in Source Control Explorer and select Properties. This opens the Properties window for the branch. You select the permissions section, as shown in Figure 20-23.

To make this branch read-only, you un-check the "Inherit security settings" check box on the bottom of the dialog. Then you select each group listed in the "Users and Groups" pane. In the Permission pane below, you remove all permissions, and then click Allow to set Read permissions.
Note
Do not modify the permissions for the Team Project Collection Administrators. If you do, they won't be able to come back into this branch and turn off read - only permissions, if that were needed in the future.
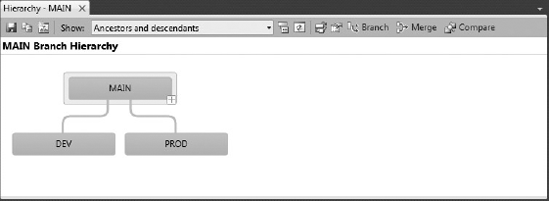
Let's take a quick look at how this branch structure would show using the new Branching Visualization features of Team Foundation Server 2010. You right-click on the MAIN branch, and select Branching and Merging
In the previous section, you saw how to implement a simple branching plan using Team Foundation 2010 Version Control. That plan will be more than satisfactory for a number of scenarios. But your organization may require a configuration management strategy that is more granular.
For example, in addition to just releasing your software, your organization may also create software patches for previously released versions of the application, while also working on the next version of the application. The basic branching plan presented previously does not lend itself to creating, integrating, and releasing these patches. What you need is a configuration management plan that is a little more advanced.
For this example, let's say that an organization has decided to install and use Team Foundation Server 2010 for version control needs. The organization has past experience using a version control system, but is interested in using Team Foundation Server 2010 for its version control, work item tracking, and reporting capabilities. This organization releases software patches for its released software, while continuing development work on the next version of its product. The organization plans to implement a new branching strategy with the Team Foundation Server 2010 implementation to support this process.
Figure 20-25 shows the basic branching plan that the organization has decided to adopt:
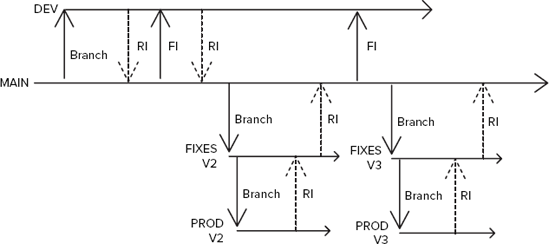
There will be four types of branches:
MAIN— This is theMAINline of the code, where all the testing and quality assurance will take place. As such, it must remain very stable. Nightly builds will be run against this branch, to ensure that no code has been checked in that breaks theMAINline.DEV— This is a branch of theMAINbranch, which is used by the developers for writing code. Changes on theMAINbranch are forward-integrated into this branch, and, at certain milestones, changes from theDEVbranch are reverse-integrated into theMAINbranch. The organization may create multipleDEVbranches for different teams, or may decide to implement feature branching, or some other branching strategy, off theDEVbranch.FIXES— This is a branch of theMAINbranch. Once the code in theMAINbranch has reached a milestone, and it is time to release the application, this branch is created, along with thePRODbranch. Each version of the application (V1,V2,V3, and so on) will have its ownFIXESbranch. This branch is where any software patches for this version of the application will be created. Those software patches can then be released from this branch and also integrated into the appropriatePRODbranch, as well as theMAINbranch.PROD— This is a branch of theFIXESbranch. Once the code in theMAINbranch has reached a milestone, and it is time to release the application, this branch is created, along with theFIXESbranch. This branch is where the final clean-up and stabilization of the code takes place. Once the release occurs, the branch is marked as read-only, and any changes made to the branch are reverse-integrated back into theMAINbranch.
The organization starts by creating the MAIN branch, and loading the existing code base (V1.0) into it. Next, the organization branches that code base into the DEV branch. At that point, development work will begin in the DEV branch on V2.0. Developers will begin writing code and checking it in and out.
Once a stability milestone has been hit for V2.0 in the DEV branch, the code will be reverse-integrated (RI) back to the MAIN branch. Testing will be performed on the code in the MAIN branch, and any bugs that are found will be fixed in this branch. Once testing is completed, it is decided that V2.0 is not ready for release yet. All the bug fixes from the MAIN branch are forward-integrated (FI) to the DEV branch, and development continues.
Once the DEV branch hits another milestone for V2.0, it once again reverse-integrates its changes back to the MAIN branch. More testing is performed, and it is decided that V2.0 is ready to be released. Two new branches are now created: FIXES (which branches from the MAIN branch) and PROD (which branches from the FIXES branch).
In the PROD branch, the code is stabilized and any show-stopping bugs are fixed. Once the code is ready, it is released. The PROD branch is set to read-only, and all the bug fixes and stabilization changes are reverse-integrated back into the FIXES and MAIN branch. Those changes are then forward-integrated into the DEV branch, to be used as V3.0 begins development.
As fixes are needed to the V2.0 release, those fixes are created and released in the FIXES branch (remember, the PROD branch has been set to read-only now). Those fixes are then integrated back into the MAIN and DEV branches.
The implementation of this plan is very similar to the implementation of the basic plan, but combined with elements of the Branch By Release model and Code Promotion model. In this implementation, you have the addition of the FIXES branch between the MAIN branch and the PROD branch. Just remember, when you are ready to create a production release, create a branch from MAIN to FIXES, and then a branch from FIXES to PROD. This will preserve the branch hierarchy for this configuration management strategy.
Merges may be performed from parent to child and child to parent — one up, one down. If you accidentally created the PROD branch from the MAIN branch, then, to merge changes from FIXES to PROD, you would first have to go via the MAIN branch. By creating PROD as a branch of FIXES, you can work as per your plan.
As you can see from this chapter, software configuration management, and branching and merging strategies, can become very complex, depending on the needs of the organization. This chapter familiarized you with software configuration management and defined the different terms related to configuration management. Next, the chapter examined some of the different branching and merging strategies that are in use today.
The discussion then moved on to show how to implement a basic branching strategy using Team Foundation Server 2010 and how to use the tools provided with Team Foundation Server and Visual Studio to perform branch and merge operations. Also discussed was a slightly more complex branching strategy, showing that you can create hybrid branching models to meet the needs of your organization from the basic branch strategies outlined at the beginning of the chapter.
Chapter 21 examines how you ensure the code quality of each of these branches via the use of the build automation tools provided by Team Foundation Server 2010.