
2
MQTT in Detail
This chapter touches on one of the main topics of this book: MQTT. As you saw in the previous chapter, when we used our Raspberry Pi as an MQTT client, it was straightforward and included just one command that needed to be executed. But the question is, how does the client connect to the broker, and how does it send the message to the intended client?
This chapter will address that exact point. It will significantly help you learn what MQTT is and how it works under the hood. You will gain a clear understanding of this communication protocol, along with the ability to use your laptops and computers as local MQTT clients, which is a bonus.
We’re going to cover the following main topics in this chapter:
- Introducing MQTT clients
- Understanding the MQTT protocol packet structure
- Practical demonstration of MQTT in action
Let’s go ahead and begin.
Introducing MQTT clients
MQTT communication flow consists of a client (which can be a publisher or subscriber and in certain instances, both) and the broker, which manages the flow of all information across different clients. The following diagram provides an overview of how the MQTT message flow works:

Figure 2.1 – MQTT overview
As discussed earlier in this book, MQTT stands for Message Queuing Telemetry Transport. Simply put, it is a communication protocol designed for constrained devices with network limitations. It is designed as a lightweight publish/subscribe messaging protocol. But what does this mean? For this, we need to be familiar with the concepts of messages, topics, clients, and brokers. Let’s cover each and how they work.
MQTT messages
A message is a term given to the data that’s shared between different MQTT clients. It can be some text, sensor readings, and so on.
MQTT topics
Topics are one of the essential components of this protocol. They provide you with a unique address for where your message should go. An MQTT topic is a series of strings separated by forward slashes. Each string before a forward slash indicates a new topic level. This gives you a lot of options for unique topics. Here is an example of a topic:
- Bedroom/Lighting/Lamp
In this example, the topic is interpreted as follows: under the main topic, Bedroom, there is a sub-topic called Lighting, and under that, there is a subtopic called Lamp. If we send any message to this topic via a client, any clients connected to this particular topic via our broker will receive this message.
There may be cases when you would want to subscribe to multiple topics from a single client. For instance, if you want to connect to 30 such topics, it would be very tedious to write each topic name. There is where Wildcards come into play. They let you subscribe to multiple topics with a single statement. There are two types of wildcards in MQTT: single-level and multi-level.
Single-level wildcards
In the case of single-level wildcards, you can use them to substitute a single sub-topic hierarchy. This can be done by simply using the + symbol instead of the subtopic’s name:
Bedroom/+/Lamp
In this case, you can create any topic with the main topic as Bedroom and the third subtopic as Lamp. The value of the second topic can be anything:
- Bedroom/Lighting/Lamp
- Bedroom/State/Lamp
However, you can use the following code because the third subtopic in the hierarchy changes:
Bedroom/Lighting/LED
Multi-level wildcards
Now, consider a case when you have multiple possible values in the third subtopic hierarchy as well. In that case, using the single-level wildcard won’t be enough. Here, we must use the multi-level wildcard, #, which allows you to subscribe to all the subtopic levels. Consider the following code:
Bedroom/Lighting/#
In this case, all the topics that start with Bedroom/Lightning/ will be subscribed (all the subtopic levels will be included).
Now, the question is, how does our broker distinguish between clients? The answer is using client IDs. Every MQTT client has a client ID that should be unique according to the protocol rules. In most libraries that we will be using, the system’s client ID would be an auto-generated random string to keep the IDs unique.
In the next section, we will discuss MQTT clients in detail.
MQTT clients
MQTT clients were discussed briefly in the first section, but we will go into a little more detail here. I’ve simplified the definition of an MQTT client as any device that runs an MQTT connection package and connects to an MQTT broker over a local or internet network.
Note that no specific device type is mentioned in the definition. This indicates that a client can be a small microcontroller or microprocessor-based device, or that it can be a full-fledged server. For example, the MQTT client can be a tiny and portable device that connects wirelessly (Wi-Fi) and has a basic MQTT library (for instance, a NodeMCU board). The MQTT client can even be a computer running an MQTT client program for testing purposes. Any device that can use MQTT over TCP/IP can be called an MQTT client.
Next, an MQTT client can either be a publisher, subscriber, or both. This depends on the application. For example, a computer dashboard would most likely be a subscriber to several MQTT topics as its main task is to show a visual representation of collected data. On the other hand, a sensor node will most likely be a publisher who constantly sends the collected sensor data.
We discussed what an MQTT broker is in the previous chapters, so let’s move on to the next section, which answers a fascinating question.
How does an MQTT client connect to a broker?
The MQTT broker is another component of an MQTT connection. Its main task is to manage all the incoming and outgoing messages. This includes handling all the topics of the network. Moreover, it stores some missed messages if a particular client has opted for the corresponding Quality of Service (QoS). Hence, a single broker can simultaneously handle thousands of clients or more if it is a large-scale implementation.
Now, how exactly does a client connect to a broker either as a subscriber, publisher, or both?
The answer is using something called MQTT control packets (in simple terms, this involves exchanging specific information via a network) – a connect packet in this case. Whenever a client wishes to connect to a particular MQTT broker, it sends a connect packet to the broker with the necessary attributes. In response, a broker sends a connect acknowledgment (CONNACK) packet that contains a status code indicating if the connection was successful and, if not, the reason why it failed. The following diagram visualizes how this process works:

Figure 2.2 – Client-broker connection initiation
Important Note
Please note that in actuality, what happens is that after a client establishes a connection to the broker in a network, the CONNECT message is the first message it sends.
Moreover, only one CONNECT message can be sent by a single client. If it attempts to send another one, it results in a protocol violation and disconnects from that client.
Now that we know the basics of how MQTT works, we will dive deeper by covering the essential control packets that act as the building blocks of this protocol.
Understanding the MQTT protocol packet structure
MQTT control packets are how the data is managed within an MQTT network. For instance, as discussed in the previous section, when a client wants to connect to a broker, it sends a connect packet and, in response, gets a connack packet from the broker.
Similarly, when a client wants to publish something on a given topic, it sends a publish packet. When a client wants all the data arriving on a particular topic, it achieves that by subscribing to the specific topic using the subscribe packet.
In this section, we will provide a detailed discussion of each of the packets. Please note that we will be discussing MQTT v3.1.
Connect packet
The previous section mentions that parameters need to be passed along with a connect packet. The attributes of this message are as follows.
- Fixed headers:
The fixed headers only contain the MQTT control packet type (which is the code for CONNECT); the remaining length will have a 10-byte variable header, plus the payload.

Figure 2.3 – Connect packet fixed headers
- Variable headers: The variable header for the connect packet has four fields that are in the following order:
- Protocol Name is a UTF-8 encoded string representing the word “MQTT” (in caps).
- Protocol Level is an 8-bit value representing the restriction level of the protocol used by the client. For MQTT v3.1.1, the protocol level value is 0x04. If the broker does not support that protocol, it should send a 0x01 return code in the CONNACK packet. The 0x01 return code indicates that the server’s protocol level is unacceptable and unsupported.
- Connect Flags has a byte that contains several parameters specifying the behavior of the MQTT connection. It also indicates the presence or absence of fields in the payload.
- Keep-Alive is a time interval measured in seconds. It is expressed as a 16-bit word; it is the maximum time interval permitted to elapse between the point at which the client finishes transmitting one control packet and the point it starts sending the next.
Please refer to the following table to see what the order of each flag in a byte is:

Figure 2.4 – Connect packet flags
All the flags have a binary value. Username and Password are two essential attributes that contribute to providing better security to our MQTT network through authentication. The Username and Password flags indicate whether the payload will contain the username and password.
Will Flag is set to 1. This indicates that if the connect request is accepted, a Will Message must be stored on the server and associated with the network connection. The Will Message must be published when the network connection is subsequently closed unless the server has deleted the Will Message on receipt of a disconnect packet.
Situations in which the Will Message is published include, but are not limited to, the following:
- An I/O error or network failure has been detected by the server
- The client fails to communicate within the Keep-Alive time
- The client closes the network connection without first sending a disconnect packet
- The server closes the network connection because of a protocol error
There are two bits for QoS flags. This is because there are three possible values of QoS, as discussed in Chapter 1, Introduction to the Raspberry Pi and MQTT. So, 0x00 means that the Will Flag is set to 0. If the Will Flag is set to 1, the value of Will QoS can be 0 (0x00), 1 (0x01), or 2 (0x02). It must not be 3 (0x03). The Will Retain flag indicates whether it is to be retained when published. If Will Flag is set to 0, then the Will Retain flag must be set to 0.
If Will Flag is set to 1, then a few scenarios can occur: If Will Retain is set to 0, the server must publish the Will Message as a non-retained message. If Will Retain is set to 1, the server must publish the Will Message as a retained message.
Finally, the Clean Session bit specifies how the session state will be handled.
The client and server can store a session state to enable reliable messaging to continue across a sequence of network connections. This bit is used to control the lifetime of the session state.
If Clean Session is set to 0, the server must resume communications with the client based on the current session’s state (as identified by the client identifier). If Clean Session is set to 1, the client and server must discard any previous session and start a new one.
The following diagram shows a typical CONNECT packet:

Figure 2.5 – A typical MQTT connect packet
Next, we will look at the acknowledgment packet, which the broker must send due to this connect packet. Then, only the client can publish or subscribe to particular topics.
CONNACK packet
When a broker receives a CONNECT message, it must respond with a CONNACK message. The CONNACK message contains two entries:
- The session’s present flag
- A connect return code
The following diagram shows a typical CONNACK packet:

Figure 2.6 – A typical MQTT connack packet
Now, let’s understand what the contents in the preceding diagram mean:
- sessionPresent: This flag tells the client if there is an existing session available from any previous interactions with that particular client. If a clean session (the Clean Session flag in the CONNECT packet is set to true), this flag is set to false. If the clean session flag is not set, the ACK packet will either return the session present flag as true if it finds session information for the given client ID or false if no session information is available.
- returnCode: This flag helps the client determine whether the connection attempt to the MQTT broker was successful or not.
PUBLISH and SUBSCRIBE packets
In a typical MQTT network, there are two basic types of clients:
- Publishers
- Subscribers
A particular client can be either a subscriber, such as a virtual dashboard, or a publisher, such as a sensor node, or both, which can be a mobile application that can be used to control appliances and also monitor certain sensor values.
The following diagram shows what a potential application could be:
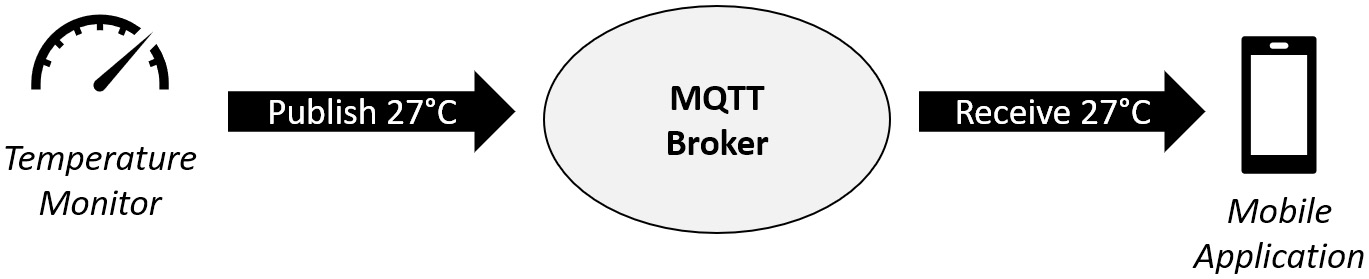
Figure 2.7 – Example of an MQTT application
When it comes to publishers, their primary task is to send the data to the broker on a particular topic. This happens through a PUBLISH packet, which is something similar to an HTTP POST API.
When the data is collected by a client, it initiates a publish message, which contains several headers and the actual data in the payload of this message.
These headers help the broker keep track of all the publishers and data. In the next section, we will discuss the publish packet in more depth and how a client and the broker use them within an MQTT network.
The same goes for the subscriber. It uses the SUBSCRIBE packet to receive all the data or messages on a particular topic. We will also learn about this packet in the next section.
Publish packet
The main purpose of this packet is to send or publish data to a particular channel. The following diagram shows the contents of a general publish packet in MQTT. It has three basic components:
- Variable headers
- Fixed headers
- Payload
A typical MQTT packet is shown in the figure below.

Figure 2.8 – Contents of an MQTT publish packet
Now, let’s discuss each of the components of the packet.
Fixed header
This is a 2-byte fixed header that is sent with every publish packet that’s initiated either by a client or the server. It contains the following information:
- MQTT Control Packet Type: This is a 4-bit value that specifies the type of MQTT packet we are sending. The value for the publish packet is 0x0011.
- The DUP flag specifies whether it is the first time this packet is being sent or not (0 means the first time, 1 means resent). Its value is also dependent on the QoS flag. If QoS is 0, this flag is always 0.
- The Retain flag specifies whether the message should be retained after being published. This is only available for QoS levels 1 and 2.
- The QoS Flag is a 2-bit value that specifies what QoS value the publish packet is sent with. The following table explains this value convention in detail:
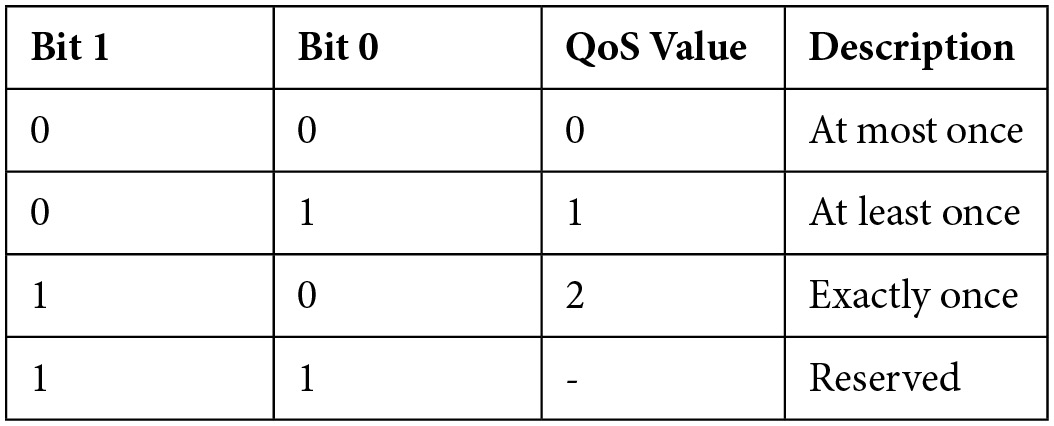
Table 2.1 – Possible values for QoS flags
Variable header
The size of these headers is not fixed as the topic name can be anything and the packet identifier is only specified for packets with a QoS level of 1 or 2. The following list describes the contents of the variable header in detail:
- Topic Name: This specifies what topic the message is being published on. An example of a topic is test-topic/temperature.
- Packet Identifier: This is a unique value that’s given to a packet with QoS levels 1 and 2 so that the server can recognize if the message has been sent for the first time or resent.
Payload
The payload contains the actual data of the PUBLISH packet. The size of this data is variable and depends on the type of data being published. Before we look at the next control packet, let’s have a look at an example PUBLISH packet to know more about its contents:

Figure 2.9 – Sample PUBLISH packet
Please note that a response to a PUBLISH packet is required. There are three basic types of responses according to the QoS level, as follows:
- None: When the QoS level is 0
- PUBACK: When the QoS level is 1
- PUBREC: When the QoS level is 2
The subscribe packet will be discussed in detail in the next section. Please note that these are the two main control packets of the MQTT network, so we will limit ourselves to a detailed explanation of these two packets only. You can always check out the original documentation of MQTT for additional details about each control packet:
http://docs.oasis-open.org/mqtt/mqtt/v3.1.1/os/mqtt-v3.1.1-os.html
Subscribe packet
The main purpose of this packet is to receive data that’s been published on a particular topic. Please keep in mind that this data is sent by the broker and not the publishing client directly. Moreover, a client can subscribe to more than one topic.
The following diagram shows the components of the MQTT SUBSCRIBE packet:

Figure 2.10 – Components of the SUBSCRIBE packet
These components are quite different from the ones in the PUBLISH packet. The reason is that we are not sending any data in the payload, but the topic name that we would like to subscribe to and the QoS level for this subscription.
Now, let’s cover each component of this packet in detail.
Fixed header
The fixed header just contains a single attribute the MQTT Control Packet Type.
This is a 4-bit value that tells the broker that the packet that’s been received is a subscribe packet. The value of this attribute for this particular packet is 0x1000. The rest of the bits of byte 1 are reserved. Byte 2 contains the remaining length of the rest of the packet. This means (length of variable header + length of payload).
Variable header
The variable header also contains two attributes, but they make a single value together: the most significant bit (MSB) and the least significant bit (LSB) values of the Packet Identifier.
Payload
The payload of a SUBSCRIBE packet contains a list of topic filters indicating the topics that the client wants to subscribe to, followed by an additional byte with the QoS level for each subscription.
Some important points to note are as follows:
- Topic Filter contains the topic names. Hence, they are UTF-8 encoded string values that support wildcard characters.
- The SUBSCRIBE packet must contain at least one topic and QoS value pair. If an empty payload is received, it will be considered a violation of the MQTT protocol and it will throw an error.
- The Requested QoS byte has 6 reserved bits and only the last 2 bits are used to specify the QoS level for a particular topic.
A sample SUBSCRIBE packet looks something like this:
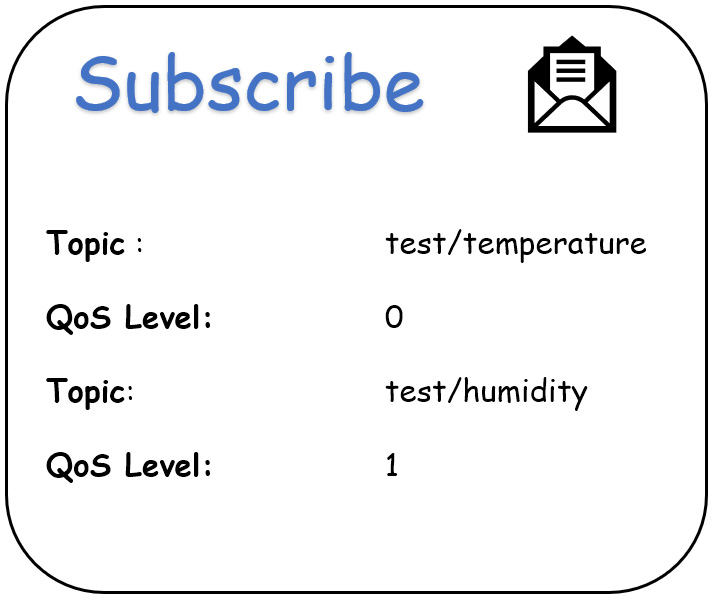
Figure 2.11 – Sample SUBSCRIBE packet
After a SUBSCRIBE packet has been sent to the broker, according to protocol, it must respond with a SUBACK packet. Here are some important points to know about the behavior of the SUBACK packet:
- The SUBACK packet must have the same packet identifier as the SUBSCRIBE packet that it is acknowledging.
- The server is permitted to start sending PUBLISH packets that match the subscription before the server sends the SUBACK packet.
- The SUBACK packet sent by the server to the client must contain a return code for each Topic Filter/QoS pair. This return code must either show the maximum QoS that was granted for that subscription or indicate that the subscription failed.
This is the end of the MQTT control packets subsection. Now comes the most important section of this chapter, which is seeing how the process works.
Practical demonstration of MQTT in action
In this section, we will look at how the communication protocol works under the hood. For this, we will use an additional software called Wireshark, which lets us capture all the incoming and outgoing MQTT packets from our broker hosted on the Raspberry Pi.
Here, we will look at how a subscriber or a publisher connects to and sends the message through our MQTT broker. So, let’s get started:
- The first step is to install Wireshark on our Raspberry Pi. To do so, open your Terminal and type in the following command:
sudo apt install wireshark
It will ask you to confirm that you wish to install the package. Just type Y and press Enter. This will start the installation process. When this happens, you will see a configuration screen appear in front of you, as shown in the following screenshot. It will ask if you want to allow any user to have maximum privileges for the Wireshark application. I suggest that you choose No for this part as it is a very bad practice to do so:

Figure 2.12 – Wireshark configuration screen
This will complete the installation process.
- Next, we will add a new user group specifically for this application so that we can add the users for which access to this application is allowed. I will name the group wireshark and add the pi user (please use the hostname) to this group using the following commands:
sudo groupadd wireshark
sudo usermod -a -G wireshark pi
- Next, we will need to execute a series of commands so that we can grant the necessary permissions to our user group for all the required files. Just follow the given instructions to achieve this. What these commands do is grant read and write execution of the dumpcap file to our group (where all packet captures are stored) and configure certain capabilities:
sudo chgrp wireshark /usr/bin/dumpcap
sudo chmod 750 /usr/bin/dumpcap
ls -al /usr/bin/dumpcap
sudo setcap cap_net_raw,cap_net_admin=eip /usr/bin/dumpcap
sudo getcap /usr/bin/dumpcap
- Now, reboot your Raspberry Pi. With that, you have finished configuring Wireshark. You should be able to run this application by simply entering wireshark in your Terminal.
- Once you execute the wireshark command on your Terminal, a new window will open with a heading stating The Wireshark Network Analyzer.
It will show all the available network interfaces that can be analyzed. The following screenshot shows what the home screen looks like:

Figure 2.13 - Wireshark home screen
- Next, select the wlan0 option as that is the option where we can capture all the packet captures that are sent or received wirelessly over our Wi-Fi network.
- With that, we are all set up, but there are still things that will greatly help us. The first thing you will want to do is add a display filter as if you are using your Pi over VNC. You will see several packets being captured every second, which makes it very difficult to look for the captures that are of interest to us. For that, simply type mqtt in the Apply a display filter text box and press Enter.
You can use the following screenshot as a reference:

Figure 2.14 – Applying a display filter in Wireshark
- Upon doing this, an empty screen will appear with no captures as we have not connected any clients to our broker. We will need to connect with remote clients so that data packets can be transferred via the wireless network. If you have a Linux or Mac system, this is very easy to do. Just type in the following command:
sudo apt install mosquitto-clients
This will let you access the mosquitto_pub and mosquitto_sub commands from your Terminal. For Windows, the process is a little different. First, head to the official Mosquitto website’s download page: https://mosquitto.org/download/.
Just download the Windows .exe file for your Windows system (32 or 64-bit) and run the installer. Just keep pressing Next and then install all the required components. It will take some time, so please be patient. Once it is complete, you will be able to use the mosquitto_pub and mosquitto_sub commands on your Windows system.
Please note that to run these commands, you will have to navigate to the mosquitto directory, whose path you will have mentioned during installation. If you kept the default path, you would find the mosquitto folder under C:Program Filesmosquitto.
- To test if the installation was successful, we will open two Command Prompt or Terminal windows on our main system (according to the OS you have) and type in the following commands, respectively:
mosquitto_sub -h <ip of your pi> -v -t sensors/temperature
mosquitto_pub -h <ip of your pi> -t sensors/temperature -p “27”
Upon entering these commands, the number 27 will appear on the window where you ran the mosquitto_sub command when you execute the mosquitto_pub command.
If this was successful, then you have successfully set up mosquitto on your main system. Now, let’s look at how MQTT works by looking at the packets that are generated after executing each command.
- To do so, open the desktop of your Raspberry Pi. You should have the Wireshark window open with the MQTT display filter already applied. To start the packet captures, just press the button marked in the following screenshot:

Figure 2.15 – Press the marked button to start the packet captures
- Now, the application will capture and show all the MQTT packets. Next, go to your main system and repeat Step 6, executing the two commands mentioned. You will see the output shown in the following screenshot on the Wireshark application:

Figure 2.16 – Packet captures for the experiment
- Next, we will dissect the packet captures to understand how the process works. The software will assist us in doing so. We will break down the packets into two parts: the subscribe packets and the publish packets. Starting with the subscribe packets, please refer to the following screenshot, which shows all the corresponding packets:

Figure 2.17 – MQTT subscribe packets
Here, we can see that four packets are listed. The first two are the Connect and Connack packets, which help the client (in this case, our main system) establish a connection with our broker. We will start with these first.
CONNECT packet
This packet is sent from the client to the broker requesting a connection. To see more information about the contents of this packet, just double-click on the first row, which states Connect Command; this will open a new window where you will be able to see a breakdown of the packet. Expand the MQTT part and you will be able to see all the contents in detail. The following screenshot shows the relevant MQTT contents that are a part of this packet:

Figure 2.18 – MQTT CONNECT packet dissection
Now, let’s dive deeper into the meaning of the preceding code. We’ll cover this in a similar format to when we covered the CONNECT packet.
Fixed header
The fixed header is a single byte that specifies the control packet type. In the case of the CONNECT packet, its value is 0001 0000 (10 in hex format), which is the value of the header flags. It even displays the interpretation, which is a plus point for us.
Variable header
Next are the variable headers, which contain the following information:
- Protocol Name
- Protocol Level
- Connect Flags
- Keep-Alive
As shown in the preceding screenshot, all this information is listed. Protocol Name is MQTT (the hex value is 4d 51 54 54), while Protocol Level is the version of MQTT our broker is using – that is, MQTT v3.1.1. For that, the protocol version of 4 has been given. This is one of the reasons why MQTT may have skipped MQTT v4 and went straight to v5 – to avoid any confusion in protocol levels.
Then, comes Connect Flags, which is a single byte that carries a lot of information. We discussed the significance of each flag when we discussed this packet, so you can just refer to the screenshot for the values. The outcome is an unprotected request (no username and password) with no retention, QoS value of 0, no At Will behavior, and a new session is started (the clean session flag is set to 1).
Finally, the next two bytes will give you the duration for which this connection will remain active, which is 60 seconds by default. After that, a ping request will be sent by the client; if it receives a ping acknowledgment, the connection persists. The following diagram shows the ping packets, along with their contents, that have been captured by Wireshark:

Figure 2.19 – Ping packets dissected for ease of understanding
Payload
This is yet another variable-length component of this packet. It contains the username and password, provided their corresponding control flags have been set and the client ID length and the actual client ID are also a part of the variable component. Only the last two components are present for our test case, as shown in Figure 2.18 (the last two lines).
CONNACK packet
This is the acknowledgment package that’s sent by our broker to the client. It consists of an acknowledgment message that says whether the connection has been established or not.
As we know, this packet has three components, as follows:
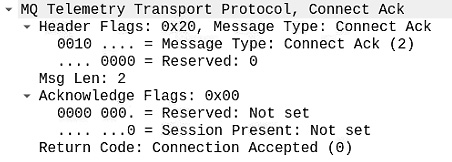
Figure 2.20 – MQTT CONNACK packet dissection
Fixed header
This contains the same 2 bytes that tell you the type of the MQTT control packet. In this case, the value will be 20 (0010 0000 – byte value).
Acknowledgment flags
These 2 bytes only give you the value of the session’s present flag, which states whether an existing session is going on for that client. It is not set in our case.
Return code
Finally, we have the return code, which states whether a connection has been established with the broker. A 00 2-byte value suggests that the connection was accepted by the broker.
SUBSCRIBE and SUBACK packets
Once the connection has been established, the client will send a packet requesting to be a subscriber, along with all the relevant information.
Refer to the following screenshot to see what the main components of this packet are:

Figure 2.21 – MQTT SUBSCRIBE packet dissection
As you can see, there is a lot of information in this packet. Let’s look at this information in more detail.
Fixed header
The header value for the SUBSCRIBE packet is 80 (1000 0000 in binary format). This is a compulsory inclusion in each MQTT packet so that the broker and clients know the type of control packet that’s being used.
Variable headers
Next are the variable headers, which contain the message’s length (the length of the rest of the message). Including the message identifier and payload, we have 24 bytes. The message identifier is a 2-byte value with a value of 0001 (hex format).
Payload
Finally, the payload contains the topic’s name, its length, and the requested QoS by the client.
Once the broker receives this SUBSCRIBE request packet, it will reply to the client with a Subscribe Ack packet, which will contain the same information as the CONNACK packet but with some exceptions (the message length and message identifier bytes). The following screenshot shows what data this packet conveys:
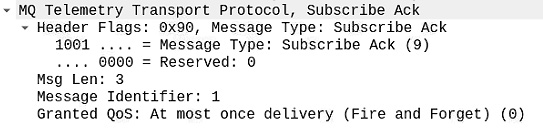
Figure 2.22 – Subscribe Ack packet dissection
With that, you know how a client subscribes to a particular topic. Now, let’s see how a client publishes a message on a specific topic:
- First, we will analyze all the packets that are sent after executing the publish command. As we have already executed the command, you should have the captured packets listed in Wireshark after the SUBSCRIBE packets.
The following screenshot shows the packets that are of interest to us:

Figure 2.23 – MQTT publish command packet capture
The CONNECT and CONNACK packets will be the same as they were for the SUBSCRIBE packet. They will contain the same information as this is a common process that happens whenever a client, be it a publisher or subscriber, tries to establish a connection with the MQTT broker, which is the Raspberry Pi in our case.
So, we won’t explain these packets as they have already been covered. Just for reference, please refer to the following screenshot, which shows the contents of both the CONNECT and CONNACK packets for the publish command:

Figure 2.24 – The CONNECT and CONNACK packets for the publish command
We will discuss the PUBLISH packet now, which is the packet that commands the broker to publish a message on a particular topic. We discussed the structure of this packet in the previous section. Before we look at each component of the packet, please refer to the following screenshot, which shows what the components of this packet are:
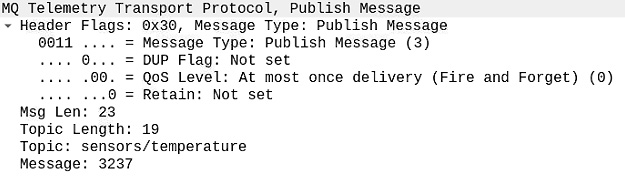
Figure 2.25 – MQTT PUBLISH packet breakdown
As you can see, there are some changes compared to the previous packets that we have covered. Let’s explore them together.
Fixed header
The most noticeable change is that in the header flags or the fixed header, along with the MQTT control packet type, whose value is 0x30 (the code for the PUBLISH packet), we have three additional flags. DUP Flag indicates if this is the first time this packet is being sent by this client. Its value depends on the QoS value. For a QoS value of 0, this flag will always have a value of 0, as shown in the preceding screenshot. QoS Level is shown by 2 bits. Currently, we are operating on a value of 0, which means it will execute this command once and that’s all. No reply is required. Finally, we have the Retain flag, which tells the broker if they have to retain the message after sending it. Please note that it is only for QoS levels 1 and 2 and hence it is set to 0 now.
Variable header
The variable header consists of the various components, as shown in the preceding screenshot – it conveys the message and topic length (in bytes) and also contains the topic name.
Payload
This is the last component of this packet, and it contains the message content that we want to publish on the aforementioned MQTT topic name (that is, sensors/temperature). In our case, the message we sent was 27. Now, if you refer to the breakdown, you will see that the value of the message was printed as 3237. Why is that?
The answer is the encoding of this message. All the messages follow UTF-8 encoding, and according to that, the value of hex code 32 means digit 2, while the value of hex code 37 means digit 7. Let’s refer to the following UTF-8 encoding table:
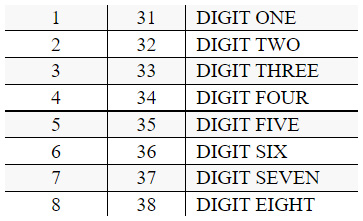
Figure 2.26 – Hex code to UTF 8 value conversion
Finally, once the publish packet has been sent, the client will send the Disconnect-Request packet, which means that all the required transactions are over, so it would like to disconnect from the broker.
It sends a packet that has a similar structure to an acknowledgment packet. Its content can be seen in the following screenshot:

Figure 2.27 – MQTT Disconnect-Request packet breakdown
This topic completes this chapter. Now, let’s summarize what we covered.
Summary
We covered a lot of content about MQTT in this chapter. This will help you a lot in the upcoming chapters, especially the two projects that we will be creating since you will be aware of how devices are communicating with the Raspberry Pi’s MQTT broker.
In this chapter, we started by introducing the communication protocol, and we explored the main components or building blocks of MQTT. Next, we understood how the protocol works and covered some important control packets, which are the building blocks of MQTT.
Finally, we explored a practical scenario and understood how the actual communication happens under the hood by using a packet capturing software called Wireshark on our Raspberry Pi.
In the next chapter, we will cover some popular development boards manufactured by Espressif – the ESP8266-based NodeMCU development board and the ESP32 development board. We will demonstrate how to use these boards as an MQTT client and communicate with our Pi.