
9
Responsive Images
We should always aim to build websites and applications to be as lean as possible. The benefits of faster sites are well documented for all meaningful metrics. As far back as 2009, Google was publishing its findings on the importance of page speed: https://services.google.com/fh/files/blogs/google_delayexp.pdf.
Images are by far the biggest contributor to website “weight,” a significant contributor to web page speed, or lack thereof. Looking at the data from the 2021 Web Almanac at https://almanac.httparchive.org/en/2021/page-weight#images, we can see images accounting for almost twice as much weight as the next largest resource, JavaScript:

Figure 9.1: A bar chart showing that images are far and away the largest resource
Furthermore, research carried out by Google in 2017 suggested that “the probability of bounce increases 32% as page load time goes from 1 second to 3 seconds” and that “…53% of visits are abandoned if a mobile site takes longer than three seconds to load.”
Read more from that research here: https://www.thinkwithgoogle.com/intl/en-gb/marketing-strategies/app-and-mobile/mobile-page-speed-new-industry-benchmarks/.
As such, it is incumbent upon us to do everything in our power to make our images as lean, and relevant, for the screen viewing them as we can. This, in essence, is the aim of responsive images.
For the purpose of this chapter, let us make a distinction between the two different but related goals: how to serve the leanest image we can to our user, and how to serve the most relevant image to our user. While these two ideals overlap and sometimes share the same technical solution, the distinction may make digesting the ideas simpler.
In this chapter, we will be covering the following:
- Why we should use modern image formats where possible
- The AVIF image format
- The WebP image format
- How to progressively enhance modern image formats
- Understanding the responsive images problem space
- Using
srcsetfor resolution switching - How to achieve art direction with
picture - Practical considerations for responsive images
Let’s begin by looking at image formats and how different formats alone can significantly reduce the amount of data our website needs to send down the wire.
Modern image formats
Historically, it was simple to choose the correct image format to use in a given scenario.
If the image needed to animate and for some reason a video wasn’t a viable option, you would opt for an animated GIF. If it was a photo, JPG was the logical choice, and if it was anything that needed transparency, it would be PNG as, unlike JPG, it supports alpha transparency.
However, if you want to save yourself and your users bandwidth, it is no longer so simple. Let’s consider two newer image formats and where they might be applicable and advantageous to use.
AVIF and WebP are formats that, given the same image as a starting point, almost always produce a smaller file size and preferable quality than an equivalent JPG file.
AVIF image format
AVIF, the image counterpart of AV1 video, is an open-source image format for still and, crucially, animated images. It supports an alpha channel, which JPG doesn’t, and compresses data far more effectively than JPEG or even WebP (which we will look at shortly). It also supports greater color depth, allowing the use of wide gamut colors in images (you’ll want to look at Chapter 7, CSS Color, for more info on color gamut). On top of that, it supports animations and “live” photos with image sequences.
If that wasn’t enough, it almost always, to my eyes at least, produces a better-looking image when compared with, say, a JPG. So what’s the catch? There are two. Firstly, the ease with which you can create an AVIF image, and then, secondly, the support in browsers for actually viewing them.
To create AVIF images you typically need a plugin for your graphic editor of choice; few graphic programs natively support AVIF currently. If you want a straightforward browser-based tool to do a conversion, look at Squoosh: https://squoosh.app/
When it comes to viewing AVIF images in the browser, as of 2022, there is only support for Chrome and Firefox. Not even Edge, itself with the same Chromium underpinnings as Chrome, supports it. Safari is also missing support on macOS. This is despite the fact that the WebKit engine Safari runs on is capable of using AVIF. This is because Safari uses the host operating system’s image decoding capabilities – and macOS currently lacks support.
However, this doesn’t mean we can’t utilize AVIF; we just need to employ it where we can, and use a different format when we can’t. We will come to the practicalities of doing that shortly. Before that, let’s also consider WebP.
WebP image format
WebP was a format created by Google. Roughly speaking, a WebP image will tend to give you a 25% file saving against a comparable PNG or JPG.
It also supports alpha and animation, so it can be a good replacement for GIF.
Making and viewing WebP is a little easier than AVIF, if only because it has been around for longer and, as such, enjoys wider support. All modern operating systems and browsers now support WebP. Even Mac-only graphics applications such as Sketch allow a native export to WebP.
While not offering quite the file savings of AVIF, WebP is a solid second choice. But, unless you only need to support the latest browsers, you will still need something in place for users on older systems.
Image format comparisons
Let’s consider an example to illustrate the possible savings. In the code that accompanies this chapter, you will find a file called scones.jpg. This is the same picture of scones we used in Chapter 1, The Essentials of Responsive Web Design, completely unmodified. On my computer, it tells me it has a file size of 199KB. If I load that file into the aforementioned Squoosh and leave the defaults, it tells me it can optimize the file down to a JPG of only 122KB. That file is in the code as squoosh-scones.jpg. That 39% saving in itself should be enough to show how much unneeded weight our images contain.
How does image optimization work?
By default, an image from an application like Photoshop or straight out of a camera contains heaps of extra information we just don’t need when destined for the web. Things like the location the image was taken, the date and time, camera used, aperture and lens settings, focal depth, and heaps, heaps more. Plus, the image can almost always have its data rewritten in a more optimized manner. That by itself would be the general idea of lossless optimization. At this point, we would be taking no detail from the image. However, we can often go further, removing image data with no reduction in perceived quality. That process is known as lossy optimization.
The trick is to find the “sweet spot” where you are saving significant extra data but not diminishing the perceptual quality of the image. At the very least, for any serious work, you should be trying to automate lossless compression of images, where no human analysis of the output will be necessary.
Let’s save that same file as a WebP file; this gives us a file of only 79.4KB, a 60% saving on the original file size. You can find that file as squoosh-scones.webp.
Lastly, let’s save it as an AVIF file as shown in Figure 9.2. By default, Squoosh sets the quality slider on AVIF to only 30, but if I move the comparison line across onto the lovely strawberry jam of that image (gosh, this is making me hungry), we can see that some of the detail is being lost. But even if I move it up to a quality of 40, which I feel gives an acceptable visual, it still creates a file that is only 52.1KB, a 74% improvement on the original! You can find that file in the code as squoosh-scones.avif.

Figure 9.2: The Squoosh app lets you see in real time the effect of your changes
With our example file, with a few seconds’ work, we were able to create a version of the image that was almost a quarter of the original size. This is but one image and one set of choices, but it should prove to you just how much unneeded data we are often serving up to our users.
And that brings us to how we actually serve up different file versions of an image. The answer is that we can use the picture element.
Using the picture element to progressively enhance images
We will soon see how to use the picture element for “art direction,” serving up different images for different situations. However, I have actually found the greatest practical utility in the picture element is for providing alternative image formats. Let’s look at that first.
The most common use case I find myself currently needing is providing an AVIF version of an image, if possible, then a WebP version for users if they can’t make use of AVIF, and then a JPG if a user can’t make use of an AVIF or a WebP. Here is how we can do that with picture:
<picture>
    <source srcset="scone.avif" type="image/avif" />
    <source srcset="scone.webp" type="image/webp" />
    <img
        src="scone.jpg"
        alt="A delicious scone, baked to perfection"
        loading="lazy"
    />
</picture>
The essence of the picture element is wrapping a number of images up, with the preferred options first, and the browser chooses the first one it is able to make use of. If you have already read Chapter 2 on Writing HTML Markup, you will recognize the source element from the Providing alternate media sources section. The principle is identical: we specify different versions of a piece of media, and the browser chooses the first one it can make use of.
In our example code above, we would prefer the browser to use the scone.avif image, but if it can’t use that, it uses the scone.webp. If even that cannot be understood, it falls back to scone.jpg. Crucially, in this situation where all the images are of the same thing, you don’t need to write the alt text for the image more than once. Whichever image the browser chooses, it will only download that one image.
In addition, back in Chapter 2, we covered the loading attribute, and noted that if we were happy for images to download in their own time, we could add loading="lazy" to them. The same is true here, but like the alt tag, you can see in our example code that we only have to specify it on the img tag; the two source elements in our picture are merely alternate src values for the img.
So that is how we can provide modern images for browsers that support them, and older, more broadly supported formats to those that don’t, all the while providing solid accessibility and meaning with the alt tag in case the image doesn’t load or the user can’t make use of the visuals.
In the prior code, we are just dealing with a single image and different formats of it. That addresses our problem of file weight. Now let’s look at how to deal with serving the best image given the situation. For that, we will put aside picture momentarily and make use of another tool, srcset. But first, let’s be certain we understand the problem we are trying to solve.
The inherent problem of responsive images
As an author, you cannot know about every possible device that may visit your site now or in the future. Only a browser knows the particulars of the device viewing a website; its screen size and device capabilities, for example.
Conversely, only the people making the website know what versions of an image we have at our disposal. We may have three versions of the same image: small, medium, and large, each with increasing dimensions to cater for the anticipated screen size and screen density eventualities. The browser does not know this. We have to tell it.
To summarize the conundrum, we, as the website authors, have only half of the solution, in that we know what images we have. The browser has the other half of the solution, in that it knows what device is visiting the site and what the most appropriate image dimensions and resolution would be.
How can we tell the browser what images we have at our disposal so that it may choose the most appropriate one for the user?
In the first few years of responsive web design, there was no specified way. Thankfully, now we have the Embedded content specification: https://html.spec.whatwg.org/multipage/embedded-content.html.
The Embedded content specification describes ways to deal with the simple resolution switching of images—to facilitate a user on a higher resolution screen receiving a higher resolution version of images. It also facilitates “art direction” situations for when authors want users to see a totally different image depending on a number of device characteristics (think media queries). For example, a close-up image of something on smaller viewports and then a wide-angle image of the same thing for larger viewports.
Demonstrating responsive image examples is tricky. It’s not possible to appreciate on a single screen the different images that could be loaded with a particular syntax or technique. Therefore, just as when we looked at serving up different file versions of an image, the examples that follow will be mainly code, and you’ll just have to trust me that it’s going to produce the result you need in supporting browsers. Let’s look at two further scenarios that you’re likely to need responsive images for. These are switching one image for another when a different resolution is needed and changing an image entirely depending on the available viewport space.
Simple resolution switching with srcset
Let’s suppose you have three versions of the same image. One is suitable for standard pixel density displays, commonly referred to as “1x”. Another image is higher resolution, to cater for higher density, or “1.5x” displays, and, finally, the third is a high “2x” resolution version for very high-density displays. Here is how we can let the browser know that we have these three versions available:
<img
  src="scones_small.jpg"
  srcset="scones_medium.jpg 1.5x, scones_large.jpg 2x"
  alt="a delicious looking baked scone"
/>
This is about as simple as things get with responsive images, so let’s ensure that the syntax makes perfect sense.
First of all, the src attribute, which you will already be familiar with, has a dual role here; it’s specifying the small 1x version of the image, and it also acts as a fallback image if the browser doesn’t support the srcset attribute. That’s why we are using it for the small image. This way, older browsers that will ignore the srcset information will get the smallest and best-performing image possible.
For browsers that understand srcset, with that attribute, we provide a comma-separated list of images that the browser can choose from. After the image name (such as scones_medium.jpg), we issue a simple hint.
I’ve specifically called it a hint rather than an instruction or a command, and you will see why in a moment. In this example 1.5x and 2x have been used, but any integer would be valid. For example, 3x or 4x would work too (providing you can find a suitably high-resolution screen).
However, there is an issue here; a device with a 1440px wide, 1x screen will get the same image as a 480px wide, 3x screen. That may or may not be the desired effect.
Advanced switching with srcset and sizes
Let’s consider another situation. In a responsive web design, it wouldn’t be uncommon for an image to be the full viewport width on smaller viewports, but only half the width of the viewport at larger sizes. The main example in Chapter 1, The Essentials of Responsive Web Design, was a typical illustration of this. Here’s how we can communicate these intentions to the browser:
<img
  srcset="scones-small.jpg 450w, scones-medium.jpg 900w"
  sizes="(min-width: 280px) 100vw, (min-width: 640px) 50vw"
  src="scones-small.jpg"
  alt="Lots of delicious scones"
/>
Inside the img tag, we are utilizing srcset again. However, this time, after specifying the images, we are adding a value with a w suffix. This tells the browser how wide the image is. In our example, we have a 450 px wide image (called scones-small.jpg) and a 900 px wide image (called scones-medium.jpg). It’s important to note that this w-suffixed value isn’t a “real” size. It’s merely an indication to the browser, roughly equivalent to the width in “CSS pixels.”
What exactly defines a pixel in CSS? I wondered that myself. Then, I found the explanation at http://www.w3.org/TR/css3-values/#reference-pixel and wished I hadn’t wondered.
This w-suffixed value makes more sense when we factor in the additional sizes attribute. The sizes attribute allows us to communicate the intentions for our images to the browser. In the example above, the first value is equivalent to “for devices that are at least 280px wide, I intend the image to be around 100vw wide.”
If some of the units used, such as vh (where 1vh is equal to 1% of the viewport height) and vw (where 1vw is equal to 1% of the viewport width), don’t make sense, be sure to read Chapter 6, CSS Selectors, Typography, and More.
The second part is, effectively, “Hi browser, for devices that are at least 640px wide, I only intend the image to be shown at 50vw.” That may seem a little redundant until you factor in dots per inch (DPI) (or DPR for device pixel ratio). For example, on a 320px wide device with a 2x resolution (effectively requiring a 640px wide image, if shown at full width), the browser might decide the 900px wide image is actually a better match as it’s the first option it has for an image that would be big enough to fulfill the required size.
Did you say the browser “might” pick one image over another?
An important thing to remember is that the values given in the sizes attribute are merely hints to the browser. That doesn’t necessarily ensure that the browser will always obey. This is a good thing. Trust me, it really is. It means that, in the future, if there is a reliable way for browsers to ascertain network conditions, it may choose to serve one image over another because it knows things at that point that we can’t possibly know at this point as the author. Perhaps a user has a setting on their device to “only download 1x images” or “only download 2x images.” In these scenarios, the browser can make the best call.
The alternative to the browser deciding is to use the picture element. Using this element ensures that the browser serves up the exact image you asked for. We looked at this element earlier in the chapter to solve the problem of serving the best image format for the user’s needs. This time we are going to use it to serve different images in different scenarios. Let’s take a look at how that works.
Art direction with the picture element
The final scenario you may find yourself in is one in which you have different images that are applicable at different viewport sizes. For example, consider our cake-based example again from Chapter 1. Maybe on the smallest screens we would like a close-up of the scone with a generous helping of jam and cream on top. For larger screens, perhaps we have a wider image we would like to use. Perhaps it’s a wide shot of a table loaded up with all manner of cakes. Finally, for larger viewports still, perhaps we want to see the exterior of a cake shop on a village street with people sitting outside eating cakes and drinking tea (I know, sounds like nirvana, right?).
We need three different images that are most appropriate at different viewport ranges. Here is how we could solve this with picture:
<picture>
  <source media="(min-width: 480px)" srcset="cake-table.jpg" />
  <source media="(min-width: 960px)" srcset="cake-shop.jpg" />
  <img src="scones.jpg" alt="Lots of cakes" />
</picture>
Be aware that when you use the picture element, it is merely a wrapper to facilitate other images making their way to the img tag within. If you want to style the images in any way, it’s the img tag that should get your attention. Similarly, you can’t change the alt tag contents by depending on which image gets loaded, so make sure you provide text that covers all eventualities as best you can.
Secondly, the srcset attribute here works exactly the same as in the previous example.
Thirdly, the img tag provides your fallback image and also the image that will be displayed if a browser understands picture but none of the media definitions match.
Just to be crystal clear, do not omit the img tag from within a picture element or things won’t end well!
The key difference with picture is that we have a source tag. Here, we can use media query-style expressions to explicitly tell the browser which asset to use in a matching situation. Our first one in the preceding example is telling the browser, “Hey you, if the screen is at least 480 px wide, load in the cake-table.jpg image instead.” As long as the conditions match, the browser will dutifully obey.
A practical note on providing alternate image formats and sizes
Writing a picture element every time you want to include alternate versions of an image on a page is an awful lot of boilerplate code. As such, many content management systems and static site generator tools will add responsive image code for you behind the scenes. For example, when you upload an image into WordPress for use in a blog post, it automatically makes alternate sizes and serves those up as options in a srcset attribute inside an img tag:
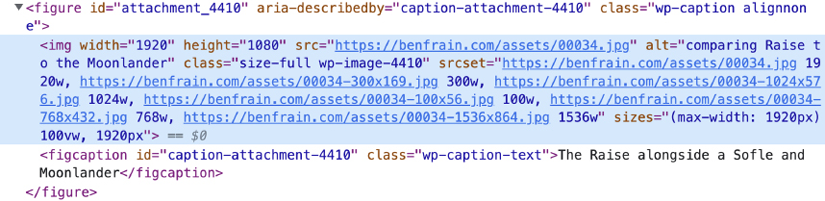
Figure 9.3: The kind of markup WordPress adds when I insert an image into my blog
Summary
Hopefully, the terminology, techniques, and appropriate applications for responsive images are now a little clearer.
In this chapter, we looked at new image formats like AVIF and WebP, and the massive economies they can offer in terms of file size. We considered their shortcomings in terms of support and looked at how we can use the picture element to serve up both those image types alongside a suitable fallback.
We also looked at srcset and how that allows us to provide the browser with a number of possibilities alongside our preference, enabling the browser to make an informed choice about which to use.
We then looked at picture again, considering how to use it to serve entirely different images based on things like viewport width.
The techniques we have covered in this chapter apply to bitmap images — photos and such. But that’s just one side of the image coin. In the next chapter, we will take a deep dive into Scalable Vector Graphics (SVG), and how to embrace the vector image format made for the web.
Join our book’s Discord space
Need clarity on using the leanest, most relevant images? Join the book’s Discord workspace to discuss all your responsive web design concerns directly with the author and interact with other readers:
