Access lists are probably misnamed these days. As the name implies, the original intention of an access list was to permit or deny access of packets into, out of, or through a router. Access lists have become powerful tools for controlling the behavior of packets and frames. Their use falls into three categories (see Figure B-1):
Security filters protect the integrity of the router and the networks to which they are passing traffic. Typically, security filters permit the passage of a few, well-understood packets and deny the passage of everything else.
Traffic filters prevent unnecessary packets from passing onto limited-bandwidth links. These filters look and behave much like security filters, but the logic is generally inverse: Traffic filters deny the passage of a few unwanted packets and permit everything else.
Packet identification is required for many tools available on Cisco routers, such as dialer lists, route filters, route maps, and queuing lists. The tools must be able to identify certain packets to function properly. Access lists might be linked to these and other tools to provide this packet identification function.

Figure B-1. Access lists are used as security filters, as traffic filters, and for packet identification.
An access list is a sequential series of filters. Each filter comprises some sort of matching criteria and an action. The action is always either permit or deny. The matching criteria might be as simple as a source address; alternatively, they might be a more complex combination of source and destination addresses, protocol types, ports or sockets, and specifications of the state of certain flags, such as the TCP ACK bit.
A packet is “dropped into” the top of the stack of filters. (See Figure B-2.) At each filter, the matching criteria are applied. If a match occurs, the specified permit or deny action is executed. If a match does not occur, the packet “drops down” to the next filter in the stack, and the matching process is applied again.
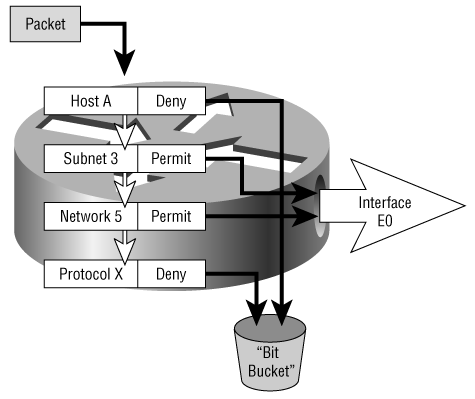
Figure B-2. An access list is a sequential list of filters, each of which defines a matching criterion and an action.
In Figure B-2, a permit means that the packet will be allowed to exit on interface E0; a deny means that the packet will be dropped. For instance, a packet with a source address of HOST A will be dropped at the first filter. Suppose the packet’s source address is Host D of Subnet 2 of Network 5. The first filter specifies a match criteria of Host A, so the packet will not match and will drop to the second layer. The second filter specifies Subnet 3—again, no match. The packet drops to the third filter, which specifies Network 5. This matches; the action at layer three is permit, so the packet is allowed to exit interface E0.
What happens if a packet drops through all the filters and a match never occurs? The router must know what to do with a packet in this situation; that is, there must be a default action. The default action can be either to permit all packets that don’t match or to deny them. Cisco chose to deny them: Any packet that is referred to an access list and does not find a match is automatically dropped.
This approach is the correct engineering choice, particularly if the access list is being used for security. It is better to drop some packets that shouldn’t have been dropped than to permit packets you inadvertently neglected to filter.
This last filter is called an implicit deny any (Figure B-3). As the name implies, the line does not show up in any access list you build. It’s simply a default action, and it exists at the end of any and all access lists.

Figure B-3. All access lists end with an implicit deny any, which discards all packets that do not match a line in the list.
This default can be overridden by making the last line of the list an explicit permit any. The implication here is that packets dropping through all the other filters will match the permit any before they get to the default deny any; therefore, all packets not matching anything else will be permitted—nothing will ever reach the implicit deny.
Access lists are executed sequentially, from the top down. This concept is important: Perhaps, the most common cause of malfunctioning access lists is putting the individual filtering lines in the wrong sequence. The first match encountered in the sequenced access list is always taken. After the first match is made, the rest of the access list is ignored.
In Figure B-4, subnet 10.23.147.0/24 should be denied and the rest of network 10.0.0.0 should be permitted. The list on the left is out of sequence; network 10.0.0.0, including its subnet 10.23.147.0, will match the first line and will be permitted. Packets with the subnet to be denied will never reach the second line.
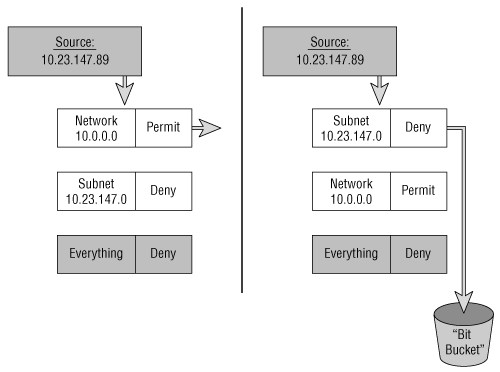
Figure B-4. If the individual filter layers of an access list are not configured in the correct sequence, the access list will not function correctly.
The list on the right is correct. Subnet 10.23.147.0 matches the first line and is denied, whereas all other subnets of 10.0.0.0 drop to the next line and are permitted.
The actual configuration lines for the access list shown graphically at the right of Figure B-4 are displayed in Example B-1.
Example B-1. The access list configuration for sequence 2 of Figure B-4 shows one line for each filter layer.
access-list 9 deny 10.23.147.0 0.0.0.255
access-list 9 permit 10.0.0.0 0.255.255.255
Every filter layer of an access list is represented by one configuration line. The various components of an access list line are discussed shortly, but for now, notice the number 9 in both lines. This number is the access list number, and it serves two purposes:
It links all the lines of this list together and makes the list distinct from any others that might exist in the router’s configuration file. (It is common to have several access lists on a single router.)
The router must have a way to distinguish the access list type. Cisco IOS Software has access lists for IP, IPX, AppleTalk, DEC, NetBIOS, bridging, and many other protocols. Further, many of these protocols have multiple access list types. The access list number tells the router what type of list it is.
Access list types can be identified by either a number or a name. Table B-1 shows some of the numbered access list types and the range of access list numbers available for each. For example, as shown in the table, access-list 1010 is identifying IPX SAPs because the number is between 1000 and 1099.
Table B-1. Cisco access list numbers
Access List Type | Range |
|---|---|
Standard IP | 1–99, 1300–1999 |
Extended IP | 100–199, 2000–2699 |
Ethernet type code | 200–299 |
Ethernet address | 700–799 |
Transparent bridging (protocol type) | 200–299 |
Transparent bridging (vendor code) | 700–799 |
Extended transparent bridging | 1100–1199 |
DECnet and extended DECnet | 300–399 |
XNS | 400–499 |
Extended XNS | 500–599 |
AppleTalk | 600–699 |
Source-route bridging (protocol type) | 200–299 |
Source-route bridging (vendor code) | 700–799 |
Standard IPX | 800–899 |
Extended IPX | 900–999 |
IPX SAP | 1000–1099 |
NLSP route summary | 1200–1299 |
Standard VINES | 1–99 |
Extended VINES | 100–199 |
Simple VINES | 200–299 |
Within a range, access list numbers do not need to follow any particular sequence. That is, the first standard IP list on a router does not need to be 1, the second 2, and so on. They can be any number between 1 and 99, or 1300 and 1999, just so each list is uniquely numbered on a single router.
Also, notice that some number ranges are the same for different protocols: Ethernet Type Code, Source Route Bridging, and Simple VINES, for instance. In these cases, the router differentiates between access list types by the format of the access list lines themselves.
The following access list types can be identified by names instead of numbers:
Apollo domain
Standard IP
Extended IP
ISO CLNS
Source-route bridging NetBIOS
Standard IPX
Extended IPX
IPX Sap
IPX NetBIOS
NLSP route summary
An example of an access list named Boo, identifying IPX NetBIOS, is displayed in Example B-2.
Example B-2. The access list named Boo denies various NetBIOS devices.
netbios access-list host Boo deny Atticus
netbios access-list host Boo deny Scout
netbios access-list host Boo deny Jem
netbios access-list host Boo permit *
Note that although standard and extended IP access lists normally are numbered, they can also be named access lists. This convention is supported in IOS 11.2 and later. In some environments, a router might be configured with a large number of IP lists. By using names instead of numbers, individual lists might be more easily identified.
Named IP access lists currently can be used only with packet and route filters. Refer to the Cisco configuration guides for more information.
Anyone who has edited an access list longer than a few lines from the console will tell you that this process can be an exercise in frustration. Before 12.2(14), there was no way, from the console, to add a line to the middle of the list. All new lines were added to the bottom. And if you had typed a mistake and tried to eliminate a particular line by typing, for instance,
no access-list 101 permit tcp 10.2.5.4 0.0.0.255 192.168.3.0 0.0.0.255 eq 25this line, and all of access list 101, would have been deleted!
A far more convenient technique is to cut and paste the list to the notepad of your PC, or upload the configuration to a TFTP server, and do the editing from there. When finished, the new access list can be loaded back into the router. A word of caution, however: All new lines are added to the bottom of an access list. Always add no access-list #, where # is the number of the list you’re editing, to the beginning of the edited list. Example B-3 shows a sample.
Example B-3. no access-list is added to the beginning of an access list that is created and edited on a PC or server, so the access list is created anew each time it is loaded into the router.
no access-list 5
access-list 5 permit 172.16.5.4 0.0.0.0
access-list 5 permit 172.16.12.0 0.0.0.255
access-list 5 deny 172.16.0.0 0.0.255.255
access-list 5 permit any
The line no access-list 5 deletes the old list 5 from the configuration file before adding the new one. If you omit this step, the new list is simply added onto the end of the old one.
The command show access-list displays currently configured lists, as Example B-4 demonstrates.
Example B-4. show access-list displays configured access lists on the router.
Router#show access-list 5
Standard IP access list 5
    10 permit 172.16.5.4
    20 permit 172.16.12.0, wildcard bits 0.0.0.255
    30 deny 172.16.0.0, wildcard bits 0.0.255.255
    40 permit any
Router#
Notice the numbers before each access list entry. These are sequence numbers. Sequence numbers are automatically added to access-list entries, as of IOS 12.2(14)S. The sequence numbers allow you to insert an entry into the middle or top of the list. If you don’t specify a sequence number, the first entry will be assigned number 10, and the sequence number of every subsequent entry will be incremented by 10. When a router is reloaded, the sequence numbers are reset, to 10, 20, 30, and so on. Sequence numbers also allow you to delete specific entries from an access list.
The entry in access list 5 that permits all hosts on subnet 172.16.12.0 can be replaced with an entry that permits all hosts on subnet 172.16.20.0 with the configuration in Example B-5.
Example B-5. Access lists can be modified by replacing entries or adding entries using sequence numbers.
ip access-list standard 5
no 20
20 permit 172.16.20.0 0.0.0.255
The existing entry with sequence number 20 must first be deleted before a new entry with sequence number 20 can be added, or you will get a duplicate sequence number error.
There are two ways to enter access lists. One format of a standard access list line is
access-list access-list-number {deny | permit} source[source-wildcard]
The other way to configure the access list is to enter a global access-list command, which takes you into access-list configuration mode. In the access-list configuration mode, packets are permitted or denied, sequence numbers are specified and remarks are made:
ip access-list standard {access-list-number | name}
This puts you into the access-list configuration mode. Further configuration options for standard IP access lists are
[sequence-number] {{{deny | permit} source [source-wildcard]} | {remark up-to-100-
   characters-of-a-remark}}
This command specifies the access list number, which according to Table B-1 is between 1 and 99, and between 1300 and 1999; the action (permit or deny); a source IP address; and the wildcard (or inverse) mask. Example B-6 shows a standard IP access list.
Example B-6. Standard access list 1 permits and denies various hosts and subnet addresses.
access-list 1 permit 172.22.30.6 0.0.0.0
access-list 1 permit 172.22.30.95 0.0.0.0
access-list 1 deny 172.22.30.0 0.0.0.255
access-list 1 permit 172.22.0.0 0.0.31.255
access-list 1 deny 172.22.0.0 0.0.255.255
access-list 1 permit 0.0.0.0 255.255.255.255
The first two lines of the example permit passage of packets whose source addresses belong to two specific hosts, 172.22.30.6 and 172.22.30.95. This seems quite obvious from looking at the lines, although the inverse mask of 0.0.0.0 might not make sense yet. The third line denies all other hosts on subnet 172.22.30.0. Again, it’s fairly intuitive. The purpose of the fourth line is not so obvious. It permits all hosts with addresses in the range of 172.22.0.1 to 172.22.31.255. The inverse mask is what allows the specification of this range of addresses with a single line. The fifth line denies all other subnets of the Class B network 172.22.0.0, and the last line permits all other addresses.
The alternative way to configure the same list is displayed in Example B-7.
Example B-7. The same standard IP access list as shown in example B-6 is written here using the access list configuration mode on the router.
ip access-list standard 1
 10 permit 172.22.30.6 0.0.0.0
 15 permit 172.22.30.95 0.0.0.0
 20 deny 172.22.30.0 0.0.0.255
 permit 172.22.0.0 0.0.31.255
 deny 172.22.0.0 0.0.255.255
 permit 0.0.0.0 255.255.255.255
The sequence numbers of the first three entries are specified. The fourth, fifth, and sixth entries are automatically assigned a sequence number 10 greater than the previous entry, or 30, 40, and 50. A new statement can be added between two entries simply by specifying a sequence number that falls between the sequence number of the entry above and below the desired location. Example B-8 shows a sample of this.
Example B-8. A new entry is added to the middle of a standard IP access list using sequence numbers.
ip access-list standard 1
 17 permit 172.22.30.100 0.0.0.0
Example B-8 adds the new entry after the entry that permits 172.22.30.95 and before the entry that denies the rest of the subnet, deny 172.22.30.0 0.0.0.255.
This entry can simply be deleted as well. Example B-9 deletes the entry with sequence number 17.
Example B-9. An entry is deleted from the middle of a standard IP access list using sequence numbers.
ip access-list standard 1
 no 17
Comments can be added to access lists before or after any entry to make understanding the list easier in the future. The access list configurations in Example B-10 and Example B-11 contain remarks.
Example B-10. Remarks are added to a standard IP access list.
access-list 1 remark permit the 2 management hosts
access-list 1 permit 172.22.30.6 0.0.0.0
access-list 1 permit 172.22.30.95 0.0.0.0
access-list 1 remark deny everyone else on the subnet
access-list 1 deny 172.22.30.0 0.0.0.255
access-list 1 permit 172.22.0.0 0.0.31.255
access-list 1 deny 172.22.0.0 0.0.255.255
access-list 1 permit 0.0.0.0 255.255.255.255
Example B-11. Remarks are added to a standard IP access list using the router’s access-list configuration mode.
ip access-list standard 1
 remark permit the 2 management hosts
 10 permit 172.22.30.6 0.0.0.0
 15 permit 172.22.30.95 0.0.0.0
 remark deny everyone else on the subnet
 20 deny 172.22.30.0 0.0.0.255
 permit 172.22.0.0 0.0.31.255
 deny 172.22.0.0 0.0.255.255
 permit 0.0.0.0 255.255.255.255
Example B-10 and Example B-11 are two ways to configure the same lists. Remarks don’t have any functional affect, but they can make a complicated access list a little more friendly to future readers.
To fully understand the functionality of this access list, you need to understand inverse masks.
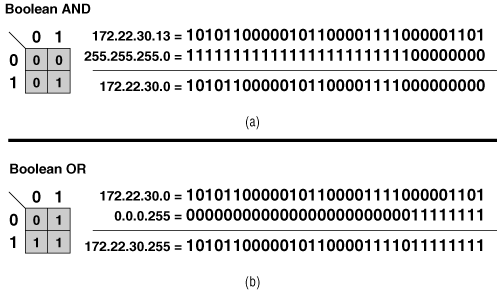
Recall how IP address masks function: To derive a network or subnet address from a host address, a one is set in the mask corresponding to each bit of the network address, and a zero is set for each bit of the host address. A Boolean AND is performed on each bit, and the result is the network or subnet number. Figure B-5(a) includes a truth table for the AND function; in English, the function states the following:
Compare two bits. The result is one if and only if both bits are one.
A Boolean OR is the inverse of this function, as its truth table in Figure B-5(b) shows:
Compare two bits. The result is zero if and only if both bits are zero.
An inverse mask (Cisco prefers the term wildcard mask) sets a zero for each bit of the address that should be exactly matched and a one for each bit where anything will match—the one bits are frequently referred to as “don’t care” bits. The inverse mask is then ORed with the address.
Notice the result of the OR example in Figure B-5(b), 172.22.30.255. In IP terms, this result means “all host addresses on subnet 172.22.30.0.” Any specific address from 172.22.30.0 will match this address/inverse mask combination.
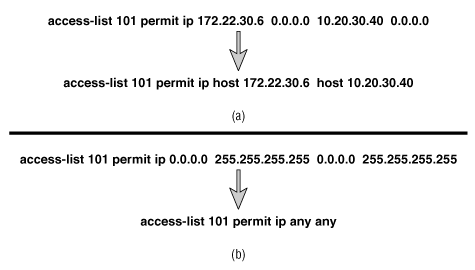
Figure B-6 shows two shortcuts that might be used when writing standard IP access lists. Figure B-6(a) shows an inverse mask of all zeros to indicate that all 32 bits of the address in question must match 172.22.30.6 exactly. The default mask for a standard IP access list is 0.0.0.0. So, the alternative statement shown, with no mask specified, is the same as the first statement. Note that this default does not apply to extended IP access lists, which are covered in the following section.
Figure B-6(b) shows the permit anything address/inverse mask combination. The address of 0.0.0.0 is actually just a placeholder; the mask, 255.255.255.255, actually does all the work. By placing a 1 in all 32-bit positions, this mask will match anything. The alternative statement shown uses the keyword any, which has the same meaning as the first statement.
Extended IP access lists provide far more flexibility in the specification of what is to be filtered. The basic syntax of the extended IP access list line follows:
  access-list access-list-number [dynamic dynamic-name [timeout minutes]]
      {deny | permit} protocol source source-wildcard
      destination destination-wildcard [precedence precedence] [tos tos]
      [log | log-input] [time-range time-range-name] [fragments]
You can configure extended access-lists using the global access-list configuration mode in the same way it is done with standard lists.
Sequence numbers can also be used with extended access lists. They are entered the same way as standard lists. Reflexive access lists can be configured only using the global access list configuration mode and can be configured only with named IP access lists. Reflexive access lists are discussed in a later section of this appendix.
Some of the features here are familiar, and some are new:
access-list-number, for extended IP access lists, is between 100 and 199, or 2000 and 2699.
dynamic identifies this list as a dynamic access list. Dynamic access lists are used by the “Lock-and-Key” security feature. A user uses Telnets to access the router, gets authenticated by an authentication server such as TACACS+ or RADIUS, and then is permitted or denied access based on the source and destination information in the dynamic entry.
timeout defines the maximum amount of time, in minutes, a temporary entry can remain in a dynamic list. The default is not to time out the entry at all. It remains forever.
protocol is a new variable that looks for a match in the protocol field of the IP packet header. The keyword choices are eigrp, gre, icmp, igmp, igrp, ip, ipinip, nos, ospf, tcp, or udp. An integer in the range 0 to 255 representing an IP protocol number can also be used. ip is a generic keyword, which matches any and all IP protocols, in the same way inverse mask 255.255.255.255 matches all addresses.
Notice that both the source and destination packet addresses are examined for matches; each has its own inverse mask.
precedence and tos are optional variables that look for a match in the Precedence and Type of Service fields of the IP packet header. Precedence can be an integer from 0 to 7, and TOS can be an integer from 0 to 15, or either field can be described by one of several keywords. Refer to the Cisco documentation for a list of available keywords.
log is an optional specification that turns on informational logging. The router attempts to include the list number or name that logged the match, source and destination address, upper layer port number, and number of packets logged.
log-input adds the input interface and source MAC address or virtual circuit number to the log output.
time-range creates temporary access lists. Time-range defines the time interval that the access-list entry is valid. The time-range parameter in the extended access list references a global time-range command. The global time-range defines the actual time parameters.
fragments keyword defines how fragmented packets are handled by the access-list entry. Fragments are handled in different ways depending upon if Layer 3 or Layer 3 and Layer 4 information is specified in the access-list entry, and depending upon if the entry is to permit or deny the packet. The default behavior (no fragments keyword specified) for entries that contain Layer 3 (IP addresses, IP port numbers) information is to apply the entry to all nonfragmented packets, initial fragments, and noninitial fragments of packets. For entries that contain Layer 3 and 4 (TCP or UDP port numbers in addition to IP addresses) information, the entry is applied to nonfragments and initial fragments. The entry is also applied to noninitial fragments in the following way: If the noninitial fragment’s Layer 3 information matches the Layer 3 information of the entry (the IP addresses, IP port number), and it is a permit statement, the fragment is permitted. If the entry is a deny statement, the next access-list entry is processed. If fragments is specified, the entry is applied only to noninitial fragments. The fragments keyword cannot be configured for entries that contain Layer 4 information, such as TCP or UDP port numbers.
A sample extended IP access list is displayed in Example B-12.
Example B-12. An extended IP access list permits and denies packets in various ways.
access-list 101 permit ip 172.22.30.6 0.0.0.0 10.0.0.0 0.255.255.255 time-range
morning
access-list 101 permit ip 172.22.30.95 0.0.0.0 10.11.12.0 0.0.0.255
access-list 101 deny ip 172.22.30.0 0.0.0.255 192.168.18.27 0.0.0.0
access-list 101 permit ip 172.22.0.0 0.0.31.255 192.168.18.0 0.0.0.255
access-list 101 deny ip 172.22.0.0 0.0.255.255 192.168.18.64 0.0.0.63
access-list 101 permit ip 0.0.0.0 255.255.255.255 0.0.0.0 255.255.255.255
time-range morning
periodic weekdays 08:00 to 11:59
The following is an explanation of the lines in Example B-12:
Line 1—. IP packets with a source address of 172.22.30.6 and with a destination address that belongs to network 10.0.0.0 are permitted during a specific time range. The time range is defined in lines 7 and 8. During other times, the access-list entry is inactive. An inactive entry means that the entry is ignored as if it weren’t in the list at all.
Line 2—. IP packets with a source address of 172.22.30.95 and with a destination address that belongs to subnet 10.11.12.0/24 are permitted.
Line 3—. IP packets with a source address that belongs to subnet 172.22.30.0/24 and with a destination address of 192.168.18.27 are dropped.
Line 4—. IP packets with source addresses between 172.22.0.0 and 172.22.31.255 and with a destination address that belongs to network 192.168.18.0 are permitted.
Line 5—. IP packets with a source address that belongs to network 172.22.0.0 and with a destination address whose first 26 bits are 192.168.18.64 are dropped.
Line 6—. IP packets from any source to any destination are permitted.
Lines 7 and 8—. The time range called “morning,” which is referenced in line 1, is defined to be weekday mornings, from 08:00 to 11:59.
Figure B-7 shows two shortcuts that can be used when writing extended IP access lists. Recall that standard IP access lists have a default mask of 0.0.0.0. This default does not apply to extended access lists; there would be no way for the router to interpret it correctly. An alternative exists for extended lists, however. In Figure B-7(a), packets are permitted if their source is host 172.22.30.6 and their destination is host 10.20.30.40. Any time the mask in an extended IP access list is 0.0.0.0, it can be replaced by adding the keyword host before the address.
The example in Figure B-7(b) permits any IP packets from any source to any destination. Just as with standard access lists, the any keyword can be used in place of the 0.0.0.0 255.255.255.255 address/inverse mask combination for the source, the destination, or both.
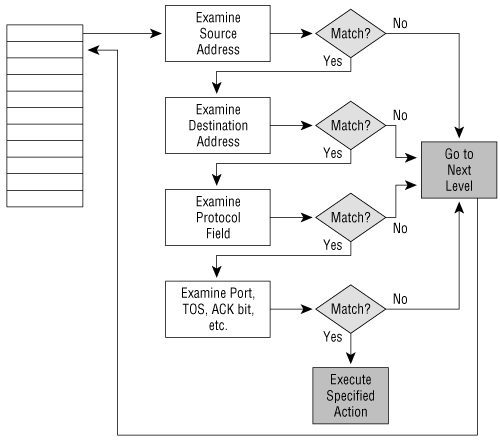
Extended access lists can be more powerful than standard access lists because the former examine more than the packet’s source address, but everything has a price. The price you pay with extended lists is increased processing (Figure B-8). Because each line of the access list is examining multiple fields within the packet, multiple CPU interrupts can occur. If the access list is large or the router is busy, this requirement can affect performance adversely.
Keeping access lists as small as possible reduces the processing burden on the router. Also notice that when a match occurs, the specified action is invoked and processing stops. Therefore, if you can write your lists so that most matches occur in the first few lines, performance will be improved. This approach isn’t always feasible, but it is something to keep in mind when designing access lists.
Some router platforms support a function called “Turbo ACLs,” which are compiled access lists. The configured access lists are compiled into a lookup table. The sequence of the entries is maintained, but the lookup time and CPU required for lookup is greatly reduced. Certain entries, such as time ranges, cannot be included in a compiled list. To configure the router to use turbo access lists, enter the command access-list compiled.
As an exercise, try making the access list given in Example B-12 more elegant. That is, rewrite the list with as few lines as possible without losing any of its functionality. (Hint: A list with the same functionality can be written with only four lines, not including the two time commands at the end.) An answer is given in the next paragraph. Try to rewrite the list before reading further.
Line 1 can be removed. Line 1 permits host 172.22.30.6 access to the 10.0.0.0/8 address, during the weekday mornings. Without this line, access from this host to the 10.0.0.0 address is still permitted by line 6, which permits anything that is not previously denied.
Line 2 can also be removed. The host 172.22.30.95 is also permitted access to 10.11.12.0/24 in line 6.
You might be tempted to think that line 4 can also be removed, but notice that line 5 denies a larger range of addresses that includes those permitted in line 4. Therefore, line 4 is necessary to permit a small subset of addresses before the rest of the addresses specified in line 5 are dropped.
The syntax for an extended access list line that examines a TCP segment follows:
access-list access-list-number [dynamic dynamic-name [timeout minutes]]
    {deny | permit} tcp source source-wildcard [operator [port]]
    destination destination-wildcard[operator [port]] [established]
    [precedence precedence] [tos tos] [log | log-input]
    [time-range time-range-name] [fragments]
Notice that the protocol variable is tcp. Probably the most significant feature here is that the access list can examine the source and destination port numbers in the TCP segment header. As a result, you have the option of filtering packets not only to and from a particular address, but also to and from a particular socket (an IP address/application port combination).
The features of the TCP access list that have not yet been explained are operator and port:
operator specifies a logical operand. The options are eq (equal to), neq (not equal to), gt (greater than), lt (less than), and range for specifying an inclusive range of ports. If the range operator is used, two port numbers are specified.
port specifies the application layer port to be matched. A few common port numbers are for Telnet (23), FTP (20 and 21), SMTP (25), and SNMP (169). A complete listing of TCP port numbers can be found in RFC 1700.
What happens if you implemented an access list to prevent TCP sessions from being established into your network, but you want to ensure that the access list passes the responses if your network establishes a TCP session? The established keyword allows this event by checking the ACK and RST flags in the TCP segment header. If one of these flags is set, a match occurs. If neither bit is set, the source is trying to establish a TCP connection to the destination, and a match will not occur. The packet will be denied on a subsequent line of the access list.
A sample TCP access list is displayed in Example B-13.
Example B-13. This TCP access list permits established sessions and permits certain addresses access for SMTP and Telnet.
 access-list 110 permit tcp any 172.22.0.0 0.0.255.255 established
 access-list 110 permit tcp any host 172.22.15.83 eq 25
 access-list 110 permit tcp 10.0.0.0 0.255.255.255 172.22.114.0 0.0.0.255 eq 23
The following is an explanation of the lines in Example B-13:
Line 1—. Permit TCP packets from any source to network 172.22.0.0 if the connection was established from that network.
Line 2—. Permit TCP packets from any source if the destination is port 25 (SMTP) of host 172.22.15.83.
Line 3—. Allow any TCP packet with a source address from network 10.0.0.0 to telnet (port 23) to any address on subnet 172.22.114.0/24.
All other packets will be dropped by the implicit deny any.
The syntax for an extended access list line that examines a UDP segment follows:
 access-list access-list-number [dynamic dynamic-name [timeout minutes]]
    {deny | permit} udp source source-wildcard [operator [port]]
    destination destination-wildcard [operator [port]]
    [precedence precedence] [tos tos] [log | log-input]
    [time-range time-range-name] [fragments]
This format is similar to the TCP format, except that the protocol variable now is udp. The other difference is that there is no established keyword. The reason is that UDP is a connectionless transport service, and no connections are established between hosts.
In Example B-14, three lines have been added to the previous TCP example.
Example B-14. This access list permits TCP and UDP packets.
 access-list 110 permit tcp any 172.22.0.0 0.0.255.255 established
 access-list 110 permit tcp any host 172.22.15.83 eq 25
 access-list 110 permit tcp 10.0.0.0 0.255.255.255 172.22.114.0 0.0.0.255 eq 23
 access-list 110 permit udp 10.64.32.0 0.0.0.255 host 172.22.15.87 eq 69
 access-list 110 permit udp any host 172.22.15.85 eq 53
 access-list 110 permit udp any any eq 161
The following is an explanation of the lines in Example B-14:
Line 4—. Permit UDP packets from subnet 10.64.32.0/24 to the TFTP port (69) on host 172.22.15.87.
Line 5—. Permit UDP packets from any source to the Domain Name Server (port 53) on host 172.22.15.85.
Line 6—. Permit all SNMP packets (port 161) from any source to any destination.
The implicit deny any still drops all packets not finding a match in the list.
The syntax for an extended access list line that examines an ICMP packet follows:
 access-list access-list-number [dynamic dynamic-name [timeout minutes]]
     {deny | permit} icmp source source-wildcard destination destination-wildcard
     [icmp-type[icmp-code] | icmp-message] [precedence precedence] [tos tos]
     [log | log-input] [time-range time-range-name] [fragments]
icmp is now in the protocol field. Notice that there are no source or destination ports here; ICMP is a network layer protocol. This line can be used to filter all ICMP messages, or you can use the following options to filter specific ICMP messages:
icmp-type is a number between 0 and 255. All ICMP type numbers can be found in RFC 1700.
The granularity of filtering can be increased by specifying icmp-code. An ICMP code specifies a subset of ICMP packet types; the codes are a number between 0 and 255 and are also found in RFC 1700.
Instead of an ICMP type and ICMP code, an ICMP message name can be entered.
A sample of an ICMP access list is displayed in Example B-15.
Example B-15. This ICMP access list denies specific packets and permits all others.
 access-list 111 deny icmp 172.22.0.0 0.0.255.255 any 0
 access-list 111 deny icmp 172.22.0.0 0.0.255.255 any 3 9
 access-list 111 deny icmp 172.22.0.0 0.0.255.255 any 3 10
 access-list 111 deny icmp 172.22.0.0 0.0.255.255 any traceroute
 access-list 111 permit ip any any
The following is an explanation of the lines in Example B-15:
Line 1—. Deny ICMP ping responses (Echo Reply, ICMP type 0) from network 172.22.0.0 to any destination.
Line 2—. Deny ICMP destination unreachable packets (type 3) with a code number of 9 (Network Administratively Prohibited) from network 172.22.0.0 to any destination.
Line 3—. Deny ICMP destination unreachable packets (type 3) with a code number of 10 (Host Administratively Prohibited) from network 172.22.0.0 to any destination.
Line 4—. Deny ICMP traceroute from network 172.22.0.0 to any destination.
Line 5—. Permit all other IP packets.
An access list does nothing unless packets are sent to it by a calling command, which defines how the access list is to be used. One such command is
ip access-group access-list-number {in | out}
This command is configured on an interface to create security or traffic filters and can be applied to incoming or outgoing traffic. If neither the in nor the out keyword is specified, the filter defaults to outgoing. The access list number, of course, is the access list to which this command will send packets. Figure B-9 shows two configurations of this command.
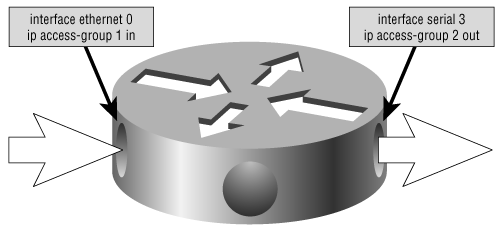
Figure B-9. The ip access-group command uses the specified access list to create a filter on an interface for either incoming or outgoing packets.
Access list 1 in Figure B-9 filters incoming IP packets on interface E0. It has no effect on outgoing IP traffic and no effect on packets originated by other protocols, such as IPX. Access list 2 filters IP packets going out interface S3. It has no effect on incoming IP packets and no effect on packets originated by other protocols. Denying as much as possible on the inbound access list instead of the outbound list alleviates the need for the router to perform work on traffic that will be dropped.
Multiple interfaces can make calls to the same access list, but any one interface can have only one incoming and one outgoing access list for each protocol.
In Figure B-10, the TCP, UDP, and ICMP access lists given earlier as examples are used as filters. Access list 110, from the previous two examples, has been applied to the Ethernet 0 interface to check incoming traffic. Access list 111 is applied to the same interface to check outgoing traffic. Analyze the two access lists carefully, including their interrelationship, and consider the following:
A ping response from 172.23.12.5 to 10.64.32.7 wants to exit interface Ethernet 0. Will it be allowed to pass?
Someone on 172.22.67.4 wants to ping a device at 10.64.32.20, exiting Ethernet 0. Will the ping be successful?
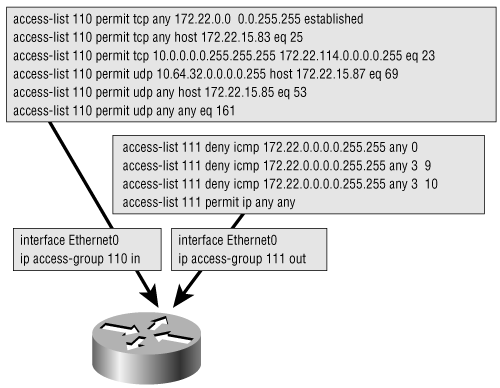
Figure B-10. Access list 110 is used here to filter incoming packets on the Ethernet interface. Access list 111 is used here to filter outgoing packets on the same interface.
The ping response from 172.23.12.5 will be allowed to exit interface Ethernet 0. Ping responses are denied for packets from 172.22.0.0/16, not 172.23.0.0/16. The ping from 172.22.67.4 to 10.64.32.20, exiting Ethernet 0, will not be successful. The ping request will successfully exit the interface, but the response will be denied by the inbound access list.
Another command that makes calls to an access list is the access-class command. This command is used to regulate Telnet sessions to and from the router’s virtual terminal lines, not for packet filtering. The format of the command is
access-class access-list-number {in | out}
Figure B-11 shows an example of the access-class command. Access list 3 regulates the addresses from which the router’s VTY lines will accept Telnet sessions. Access list 4 regulates the addresses to which the router’s virtual terminal lines may connect.

Figure B-11. The access-class command uses an access list to regulate Telnet traffic to and from the router’s virtual terminal lines.
The access-class command has no effect on Telnet traffic transiting the router. It influences only Telnet sessions to and from the router itself.
Reflexive access lists are automatically populated, temporary, session-based filters. If a router permits a session to be initiated from within a network to an external host, a reflexive list permits return session traffic. Reflexive lists are used with extended named IPv4 access lists. Session filters using reflexive lists can be compared to the established keyword used with TCP filters. Using the established keyword, a TCP session is initiated from within a network. If the return traffic has the ACK or RST flag set, the packet is part of a previously established session, and the packet is permitted. This entry with the established keyword is a permanent entry in the access list.
Reflexive access lists use different parameters to determine if the packet is part of a previously established session. For TCP and UDP packets, reflexive access lists use source and destination IP addresses and source and destination TCP or UDP port numbers.
When a session is initiated from within a network, a reflexive access list is populated with the session information gleaned from the initial packet. The source and destination IP addresses and the source and destination port numbers are swapped and added, along with the upper layer protocol type (such as TCP and UDP) as a permit statement to the temporary reflexive list. This entry remains active until there is no longer any traffic for the session and the timeout value expires, until two FIN-flagged packets are received, or until the RST flag is set on a TCP packet.
Example B-16 shows an example of a reflexive access list configuration.
Example B-16. This reflexive access list is named infilter.
interface Serial0/0.1 point-to-point
 ip address 172.25.150.65 255.255.255.192
 ip access-group infilter in
 ip access-group outfilter out
!
ip access-list extended infilter
 permit eigrp any any
 permit udp any any eq rip
 evaluate sessiontraffic
ip access-list extended outfilter
 permit tcp any any reflect sessiontraffic
 permit icmp any any echo time-range morning reflect sessiontraffic
!
time-range morning
 periodic weekdays 9:00 to 12:30
In this example, the filters are applied to an interface that connects to an external network. The outfilter list permits all TCP packets and ICMP echo requests on weekday mornings between 9:00 and 12:30 only, initiated from the internal network. The outfilter list is applied outbound on serial0/0.1. The reflect keyword is used on the permit statements. This creates the reflexive access list called sessiontraffic. The reflexive access list is populated when packets match the permit entries that use the reflect keyword.
Packets coming inbound to interface serial0/0.1 are filtered by the infilter access list. These would be the packets sourced from an external network. In this case, infilter permits EIGRP and RIP packets. After the incoming packet is matched against the EIGRP and RIP entries, the reflexive access list sessiontraffic is evaluated sequentially. The reflexive access list does not have an implicit deny-all at the end, but the extended access list in which the reflexive list is nested does.
Example B-17 shows the access lists before TCP and ICMP traffic has exited serial0/0.1. Example B-18 shows the access lists after TCP and ICMP traffic has exited serial0/0.1.
Example B-17. show ip access-list displays all the configured permanent and temporary IP access lists configured on a router.
Router#show access-lists
Extended IP access list infilters
  10 permit eigrp any any
  20 permit udp any any eq rip (1074 matches)
  30 evaluate sessiontraffic
Extended IP access list outfilter
  10 permit tcp any any reflect sessiontraffic (45 matches)
  20 permit icmp any any echo time-range morning (active) reflect sessiontraffic
Reflexive IP access list sessiontraffic
Ping and Telnet have been initiated from the internal network to the external network. Example B-18 shows the access lists after this traffic has been initiated.
Example B-18. The show ip access-list displays dynamically created entries in a reflexive access list.
Router#show ip access-list
Extended IP access list infilters
    10 permit eigrp any any
    20 permit udp any any eq rip (1101 matches)
    30 permit udp any any eq 521
    40 evaluate sessiontraffic
Extended IP access list outfilter
    10 permit tcp any any reflect sessiontraffic (188 matches)
    20 permit icmp any any echo time-range morning (active) reflect sessiontraffic (9 matches)
Reflexive IP access list sessiontraffic
     permit tcp host 192.168.16.225 eq telnet host 192.168.50.130
     eq 11002 (55 matches) (time left 293)
    permit icmp host 192.168.16.225 host 192.168.50.130 (19 matches) (time left 270)
The output in Example B-17 displays the access list’s infilter and outfilter and their configured parameters. Notice that the ICMP entry in the outfilter says it is active. This means the time and day of the week on the router falls within the configured time range. The output also displays the nonpopulated reflexive access list, sessiontraffic.
After ICMP pings and a Telnet session have been initiated and packets have exited serial0/0.1, the access lists are displayed again in Example B-18. This time there are entries in the reflexive access list. These entries will be matched against all packets arriving into serial0/0.1 from the external network, until the timer expires or the session has been closed. Telnet session and ICMP echos are not successful when initiated from the external network.
Reflexive access lists do not work for protocols that change port numbers during a session, such as FTP.
Most networking professionals know some of the more commonly used TCP port numbers, and maybe a few UDP port numbers. Fewer can say what the ICMP type is for a ping or a destination unreachable, much less what the ICMP codes are for destination unreachable types. Beginning with IOS 10.3, access lists can be configured with keywords in place of many port, type, or code numbers. Using keywords, the access lists 110 and 111 from Figure B-10 are displayed in Example B-19.
Example B-19. Keywords can replace port numbers in access lists.
access-list 110 permit tcp any 172.22.0.0 0.0.255.255 established
access-list 110 permit tcp any host 172.22.15.83 eq smtp
access-list 110 permit tcp 10.0.0.0 0.255.255.255 172.22.114.0 0.0.0.255 eq telnet
access-list 110 permit udp 10.64.32.0 0.0.0.255 host 172.22.15.87 eq tftp
access-list 110 permit udp any host 172.22.15.85 eq domain
access-list 110 permit udp any any eq snmp
!
access-list 111 deny icmp 172.22.0.0 0.0.255.255 any echo-reply
access-list 111 deny icmp 172.22.0.0 0.0.255.255 any net-unreachable
administratively-prohibited
access-list 111 deny icmp 172.22.0.0 0.0.255.255 any host-unreachable
administratively-prohibited
access-list 111 permit ip any any
A word of caution: If you upgrade a router from a pre-10.3 image, the new IOS, upon bootup, will rewrite the access lists in the configuration file to the new syntax, including keywords. If you subsequently need to reload the original pre-10.3 image, the revised access lists will not be understood. Always upload a copy of the original configuration file to a TFTP server before upgrading.
The limit of 798 standard access lists or 799 extended IP access lists per router would seem to be more than enough; however, there are cases, such as with dynamic access lists,[1] in which these maximums might not be sufficient. Named access lists, available beginning with IOS 11.2, extend these limits. The other advantage is that descriptive names can make large numbers of lists more manageable.
To use names, use the following syntax in the first line of the access list:
ip access-list {standard | extended} name
Because there are no numbers to differentiate list types, this line specifies the list as IP and either standard or extended.
Below the beginning line, go the permit and deny statements. The syntax for the standard list is
{deny | permit} source [source-wildcard]The syntax for the basic extended list is
{deny | permit} protocol source source-wildcard destination destination-wildcard
    [precedence precedence][tos tos][log]
In both cases, the access-list access-list-number portion of the command has disappeared, but everything else remains the same. Standard and extended access lists on the same router cannot share the same name. The command for establishing a named access list on an interface refers to the name instead of a number but in all other ways remains the same. Figure B-12 shows the access lists of Figure B-10 converted to the named format.
Prefix lists are used to specify an address or range of addresses to be permitted or denied in route updates. The BGP routing protocol uses prefix lists for IPv4. All IPv6 routing protocols can use prefix lists when exchanging IPv6 addresses between protocols or when filtering updates.
Prefix lists are named lists. An entry in the list permits or denies an address or range of addresses, as in Example B-20.
Example B-20. Prefix lists permit and deny IPv6 addresses.
ipv6 prefix-list v6_addr_filt permit 2001:db8:0:1::/64
ipv6 prefix-list v6_addr_filt permit 2001:db8:0:10::/60 le 64
ipv6 prefix-list v6_addr_filt permit ::/0 ge 62 le 64
The first entry permits prefix 2001:db8:0:1:: with the prefix length exactly 64 bits. The second and third entries permit a range of addresses. The keyword le indicates that the range of prefix lengths to be matched is from the length specified, after the prefix to the length specified after the le keyword. The second entry in the prefix list v6_addr_filt permits prefixes which match 2001:db8:0:10:: and have a length in the range 60 to 64. The ge keyword specifies the minimum length of the prefix in a range of addresses. If it is used with no le keyword, it is assumed that the maximum length for the range of prefixes matched is 128 bits, the maximum number of bits in an IPv6 prefix. When used with the le keyword, the maximum matched length of the range is specified after le. The third entry in prefix list v6_addr_filt permits any prefix with a length between 62 and 64 bits.
For the best performance, you must consider not only the efficient design of the access list itself, but also the placement of the filter on the router and in the network.
As a rule of thumb, security filters usually are incoming filters. Filtering unwanted or untrusted packets before they reach the routing process, prevents spoofing attacks—wherein a packet fools the routing process into thinking it has come from somewhere it hasn’t. Traffic filters, on the other hand, usually are outgoing filters. This approach makes sense when you consider that the point of a traffic filter is to prevent unnecessary packets from occupying a particular data link.
Aside from these two rules of thumb, another factor to consider is the number of CPU cycles the combined access list and routing processes will use. An incoming filter is invoked before the routing process, whereas an outgoing filter is invoked after the routing process (Figure B-13). If most packets passing through the routing process are to be denied by the access list, an incoming filter might save some processing cycles.
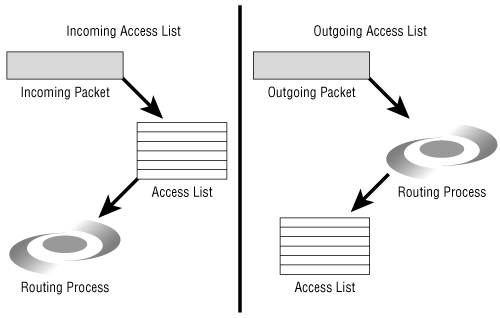
Figure B-13. Incoming packet filters are invoked before the routing process, whereas outgoing packet filters are invoked after the routing process.
Standard IP access lists can filter only on source addresses. Consequently, a filter using a standard list must necessarily be placed as close to the destination as possible so that the source still has access to other, nonfiltered destinations (Figure B-14(a)). As a result, bandwidth and CPU cycles might be wasted delivering packets that will ultimately be dropped.
Extended IP access lists, because of their capability to identify specific packet characteristics, should be placed as close to the source as possible to prevent wasting bandwidth and CPU transporting “doomed” packets (Figure B-14(b)). On the other hand, the complexity of extended lists means more of a processing burden. These tradeoffs must be considered when deciding where on the network to place a filter.
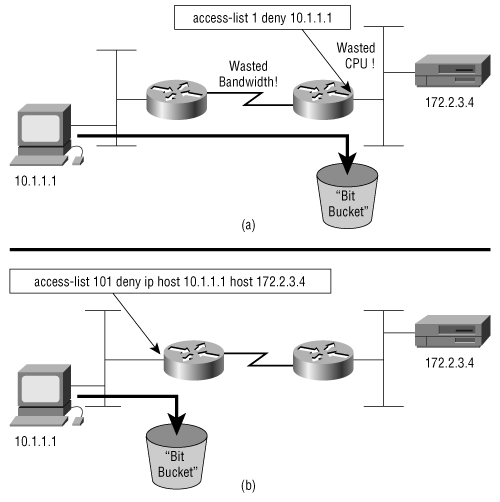
Figure B-14. Filters that use standard access lists generally must be placed close to the destination (a), whereas extended access lists can be placed close to the source (b).
You must also understand how your access list will affect switching on the router. For instance, an interface using an extended IP access list cannot be autonomously switched; dynamic access lists cannot be silicon-switched and might affect silicon-switching performance. Named access lists are not supported at all before IOS 11.2.
The effect of an access list on switching might be critical on backbone or core routers. Be sure to fully research and understand the effects an access list might have by reading the Cisco Configuration Guide for the IOS being used on your router. In some cases, a packet filtering router—a smaller router dedicated to nothing but packet filtering—can be used to offload the filtering burden from a mission-critical router.
It is useful to examine an access list, or even all access lists, without having to display the entire router configuration file. The command show ip access-list displays an abbreviated syntax of all IP access lists on the router. If a specific access list is to be observed, the list can be specified by name or number (Example B-21). If you leave off the ip keyword (show access-list), all access lists will display.
Example B-21. The show ip access-list command displays an abbreviated syntax of the access lists.
Woody#show ip access-list 110
Extended IP access list 110
    10 permit tcp any 172.22.0.0 0.0.255.255 established
    20 permit tcp any host 172.22.15.83 eq smtp
    30 permit tcp 10.0.0.0 0.255.255.255 172.22.114.0 0.0.0.255 eq telnet
    40 permit udp 10.64.32.0 0.0.0.255 host 172.22.15.87 eq tftp
    50 permit udp any host 172.22.15.85 eq domain
    60 permit udp any any eq snmp
Woody#
It is also useful, as part of a security plan or a capacity planning strategy, to track packets that have been denied by an access list.
The command ip accounting access-violations might be configured on individual interfaces to create a database of all packets that have been denied by any access lists on that interface. To examine the database, use the command show ip accounting access-violations. The source and destination addresses, the number of packets and number of bytes matching these addresses, and the access list number that denied the packet will be shown (Example B-22). The command clear ip accounting clears the accounting database.
Example B-22. The access list accounting database can be observed with the command show ip accounting access-violations.
Woody#show ip accounting access-violations
   Source          Destination             Packets          Bytes     ACL
  10.1.4.1       255.255.255.255                13            936     110
  10.1.4.1       172.22.1.1                     12           1088     110

Accounting data age is 10
Woody#
Accounting disables autonomous and silicon switching on an interface. Do not use accounting on an interface where these switching modes are required.
As a final “trick,” be aware that its accounting does not track packets discarded by the implicit deny any at the end of the list. To track these packets, simply configure a deny any at the end of the list as in Example B-23.
Example B-23. A deny any entry is added to the end of the access list to track packets discarded because they did not match any other entry in the list.
access-list 110 permit tcp any 172.22.0.0 0.0.255.255 established
access-list 110 permit tcp any host 172.22.15.83 eq smtp
access-list 110 permit tcp 10.0.0.0 0.255.255.255 172.22.114.0 0.0.0.255 eq telnet
access-list 110 permit udp 10.64.32.0 0.0.0.255 host 172.22.15.87 eq tftp
access-list 110 permit udp any host 172.22.15.85 eq domain
access-list 110 permit udp any any eq snmp
access-list 110 deny ip any any 1
[1] Dynamic access lists are not covered in this tutorial. Refer to the Cisco IOS Security Configuration Guide—Configuring Lock-and-Key Security (Dynamic Access Lists) for more information.

