Lesson 1. Getting Started with iTunes Match
In this lesson, you learn to sign up for iTunes Match, begin the matching process, add columns to your iTunes library to better see how Match works, master the different iTunes Match labels and icons, and understand why certain tracks will never match and why others won’t even upload.
What Is iTunes Match?
iTunes Match is a $24.99/year service from Apple. With an iTunes Match subscription, you can access the entirety of your music library from any Mac, Windows PC, or iOS device.
iTunes Match stores all the music you own—whether you bought it from Apple, ripped it from CDs, or acquired it elsewhere—in iCloud. Once your music is stored in iCloud, you can play those songs on other computers, iPhones, iPads, or iPod touches, as if the songs were already stored on those devices, even when they’re not.
Some competing music cloud-storage services—Amazon and Google each offer their own—require a longer, slower setup time. That’s because Apple’s iTunes Match offering doesn’t upload every song in your library. If iTunes Match can successfully identify the tracks in your library, and if Apple sells those tracks in the iTunes Music Store, it won’t bother uploading those songs into iCloud. Instead, Apple simply notes that you own those songs and relies on its own masters instead of uploading your copy.
The service essentially gives you complete access to your music library without using all of your storage space from multiple devices.
To make a good thing even better, you can use iTunes Match to upgrade your existing music tracks to higher-quality versions, sync audiobooks, and more.
Signing Up for iTunes Match
To get started with iTunes Match, you first need to sign up for the service. There’s only one way to do that: via iTunes. So, fire up iTunes on your Mac or PC.
Note: Where to Find iTunes
If you don’t yet have iTunes, it’s a free download from the Apple website (www.apple.com/itunes).
Once you have iTunes installed, launch it. Let’s briefly review the key elements of the iTunes interface, just to make sure that we’re on the same page (see Figure 1.1).
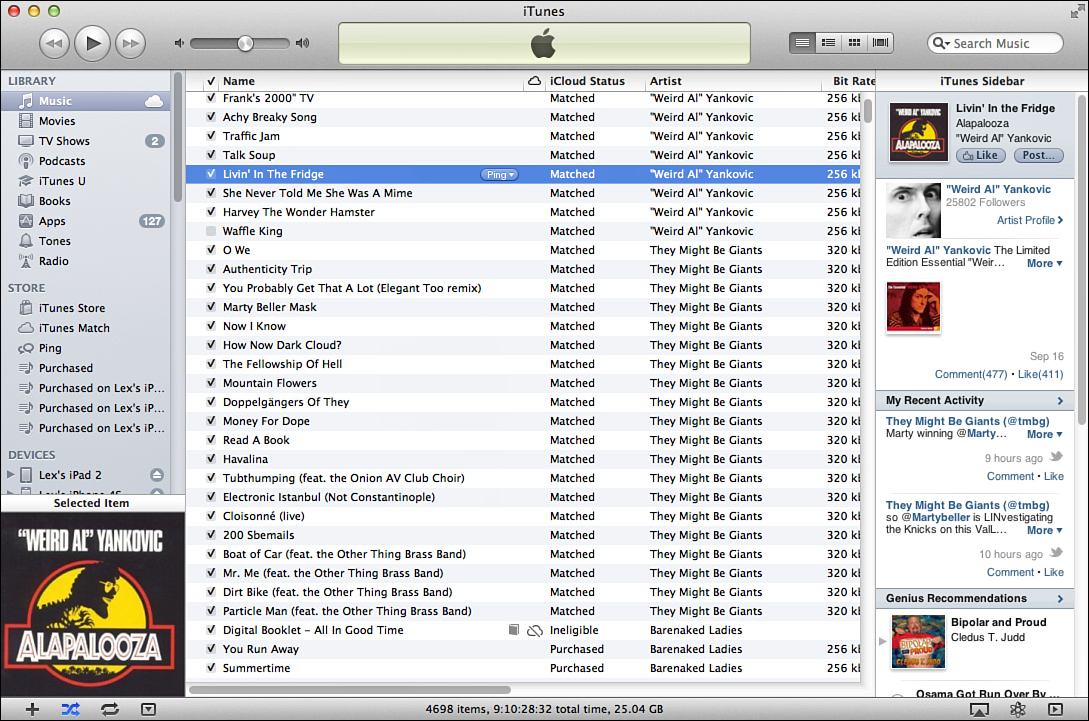
Figure 1.1 The main iTunes window interface.
There’s obviously plenty more to the iTunes interface, but the most important pieces to recognize are the source list and the main browsing window:
• On the left is a column labeled Library. This slim left pane is called the iTunes source list. From here, you can click through the various media types in your library (music, movies, TV shows, podcasts, and so on), dive into Ping or the iTunes Store, or navigate through your playlists.
• The main browsing window is where you see the content associated with whichever source you select on the left. That is, if you click Music in the source list, you see all the songs in your library in the browsing window.
Purchasing and Setting Up iTunes Match
Now, let’s walk through the process of purchasing and setting up iTunes Match, which is the service you really want to know about. To use iTunes Match on a Mac, you need to run Mac OS X 10.6.8 or later; on a PC, you need Windows Vista or later. You also need to run iTunes 10.5.1 or later.
If you want to use iTunes Match in connection with an iOS device, make sure that your device runs iOS 5 or later; the device itself must be an iPhone 3GS or newer, a third-generation iPod touch or newer, or any variant of the iPad.
You must have a computer to sign up for iTunes Match; iOS devices need not apply.
1. Fire up iTunes on your Mac or PC and look for iTunes Match in the source list. Click it.
2. If you don’t see iTunes Match, go to the Store menu and choose Turn on iTunes Match.
3. iTunes displays some information about it, along with a “Subscribe for $24.99” button (see Figure 1.2). Click that button.
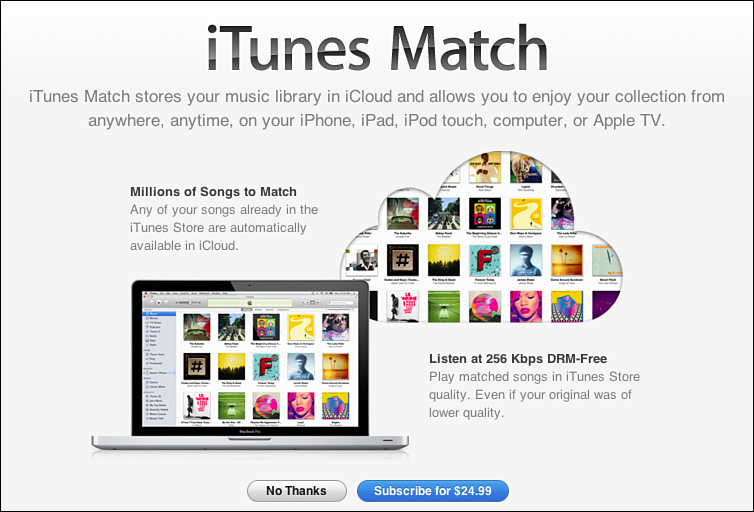
Figure 1.2 Click the blue Subscribe button to start the process.
4. You are prompted to log in with your Apple ID (discussed previously). iTunes will likely prompt you to confirm your billing information before continuing the transaction. If you don’t yet have a billing method linked to your iTunes account (such as a saved credit card or PayPal account), you are prompted to provide one.
Although you’re required to have a payment method on file before you can upgrade to iTunes Match, you can still use iTunes store credit (from gift cards and the like) to purchase a subscription to the service. Apple requires that you have a separate billing method on file because, as we discuss shortly, iTunes Match automatically renews itself after each year of subscription.
You have one more screen to click through before Apple accepts your hard-earned money in exchange for iTunes Match: You need to agree to the iTunes Match terms of service. (Said terms are no more scintillating than any other agreement you’ve barely ever skimmed through.)
Once you agree, your payment is made, and iTunes Match starts working its magic. Several things happen, and you can monitor the status in the iTunes Match section of iTunes, which is accessible at any time by clicking iTunes Match in the source list. (You can continue to use iTunes for other purposes—like rocking out to your music library—while iTunes Match does its thing.)
The service starts scanning your entire music library. (Yes, even your Right Said Fred.) iTunes Match identifies several kinds of tracks. You can review the status of individual tracks very simply. The easiest and smartest way to do so is to add two columns to your iTunes library view. Here’s how:
1. In iTunes, click Music at the top of the iTunes source list. This displays your entire music library.
2. Right-click (on a Mac, Control-click) the header bar—the one that contains headers like Name, Time, and Artist.
3. From the drop-down menu, check iCloud Status and iCloud Download. The new columns should now appear (see Figure 1.3).
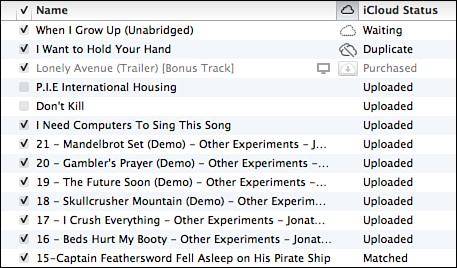
Figure 1.3 The iCloud Status and iCloud Download columns show useful information about the iTunes Match status for your tracks.
We dive deeper into how best to use the iCloud Status column later in this book, but for now, let’s just define the different statuses:
• Purchased. Purchased tracks are the easiest for iTunes Match to work with. Any songs that were previously purchased from the iTunes Store are automatically made available in your iTunes Match cloud-stored library; the company knows that you already purchased those tracks and doesn’t need to do any further checking on those songs’ status.
• Matched. For many tracks, whether you ripped them yourself from CDs or purchased them from other sources (such as the Amazon MP3 Store), iTunes Match finds a positive match for the identical track in the iTunes Store. Apple hasn’t clearly defined how iTunes Match matches tracks in this way, and likely never will spell it out completely. But, an educated guess is that Apple gives some minimal weight to the metadata on your tracks (information like the song title), and far more weight to an “acoustic fingerprint,” which is a waveform analysis of the content of the audio track itself. So, you can’t just duplicate your copy of “In-A-Gadda-Da-Vida” to “Stairway to Heaven” and hope that iTunes matches it.
Matched tracks, like Purchased tracks, are wonderful: iTunes won’t waste time or bandwidth by uploading those tracks to Apple’s servers. Instead, iTunes Match identifies the song on your computer and automatically adds it to your iTunes Match library on the company’s end.
• Uploaded. Tracks that you didn’t purchase from the iTunes Store and that iTunes Match is unable to identify are instead uploaded to Apple’s services. These songs are the only ones to count against your iTunes Match storage quota; you’re limited to uploading just 25,000 songs, and no songs larger than 200MB are uploaded.
Now, you can’t even sign up for iTunes Match if your music library contains more than 25,000 songs. But, we show you how to work around that limitation later.
This is the slow, time-consuming part of the initial iTunes Match setup process. How long the process takes, of course, depends on how many songs you need to upload, your Internet connection, and similar factors:
• Waiting. Tracks shouldn’t be waiting for very long. If you see tracks with this designation, it theoretically indicates that those tracks simply haven’t been evaluated by iTunes Match yet to determine whether they can be matched or must be uploaded. Obviously, when you first turn on iTunes Match, many songs display the Waiting status. After your initial iTunes Match setup is complete, only newly added tracks should bear that designation—and never for long. If you still see new tracks stuck on Waiting after a few days, nudge iTunes Match to evaluate those tracks by clicking the Store menu and choosing Update iTunes Match.
• Ineligible. iTunes Match simply won’t match these tracks—it won’t upload them, either. There can be several reasons: iTunes Match skips over songs that are very short (think fewer than 5 seconds); songs that require more than 200MB of storage space; and songs that are encoded with lower bit rates or with variable bit rates that include large sections of low bit-rate encoding. (If you’re unfamiliar with bit rates, think of them as audio quality. If your song files were initially encoded by you or someone else at lower quality, iTunes Match refuses to match or upload tracks encoded at 96kbps or lower.)
• Duplicate. One of the more self-explanatory iTunes Match statuses, this indicates tracks that Apple believes it has already added to your iTunes Match library, either via matching or uploading. If you see tracks with the Duplicate status, you most likely have another copy of the same song in your library. If you want to remove the duplicated track from your library, hold the Option key (on a Mac) or the Alt key (on a PC) and press Delete with the duplicated song selected.
• Error. The vaguest of all the iTunes Match statuses, this designation indicates only that iTunes Match encountered some sort of error while working with the track in question. The Error label can mean that your track is corrupted; you can check whether that’s the case by playing the song all the way through and verifying that there’s no funny business; if the song cuts off prematurely or plays back with digital skips or distortion, you know that your track is the problem.
But, Error can also indicate only that iTunes Match encountered some sort of issue uploading your song to Apple’s servers. The only thing you do for tracks with such an issue is ask iTunes Match to try again. To do this, go to the Store menu and choose Update iTunes Match.
• Removed. We cover this in detail later, but this unique status is given to songs that are in your computer’s local music library (that is, stored on your computer itself), but which you’ve deleted from iCloud from another device connected to your iTunes Match library.
Although iTunes Match scans your music library and matches or uploads tracks, all is not lost if you manually stop the process (from the iTunes Match screen within iTunes) or quit the iTunes application completely. You can get back to iTunes Match at any time from the iTunes source list or the Store menu, and instruct the service to continue its slog through your songs.
Before we move on to getting the most out of your new iTunes Match subscription, let’s discuss a few other caveats.
One of the biggies, discussed in Lesson 2, “Upgrading Your iTunes Library and Fine-Tuning Your Matches,” is the fact that, when iTunes Match matches songs in your library in the MP3 or Advanced Audio Coding (AAC) formats, and those songs are in your library at any quality less than 256kbps (but more than 96kbps), iTunes Match provides you with 256kbps-encoded AAC versions of those files. When iTunes Match uploads a song (because it fails to match it), you can instead only download your exact copy of the song again—in the same audio format and bit-rate encoding.
If you have music in your library encoded in other formats, like ALAC, WAV, or AIFF, iTunes Match uses your computer to temporarily create 256kbps AAC versions of those files before uploading those files to Apple’s servers.
Here’s another important note: Remember that, by default, your iTunes Match subscription renews automatically at the conclusion of your initial one-year subscription. To turn off auto-renewal, visit the iTunes Store within iTunes on your computer. Click and hold your Apple ID in the upper-right corner of the window and choose Account. Enter your account password if prompted, and scroll down to the iTunes in the Cloud section of the Account screen that appears (see Figure 1.4).

Figure 1.4 Within iTunes, you can turn off automatic renewal if you prefer to handle paying for your annual renewal manually.
You should see a line that says iTunes Match, along with a sentence indicating when your iTunes Match subscription is set to auto-renew. Click the Turn Off Auto-Renew button to, well...you know.
Other Cloud-Related iTunes Services
Unlike other elements of iCloud, iTunes Match comes with an annual fee, which is U.S. $24.99 per year (at the time of this writing). Before you decide to use iTunes Match, you need to understand the other two iCloud-based services that Apple offers, both of which are free.
iTunes in the Cloud
iTunes in the Cloud is the first of the other two cloud-related services Apple offers in connection with iTunes. iTunes in the Cloud is comprised of a pair of core features:
• The music, books, and apps you purchase from the iTunes Store, iBookstore, and App Store appear automatically on all of your devices—including other computers, your iPad, iPhone, and/or iPod touch.
• You can download your past iTunes purchases again, as long as the items are still available within the iTunes Store.
Again, iTunes in the Cloud is free. Here’s a quick primer on how it works. First, let’s look at Automatic Downloads, wherein all of your iTunes purchases automatically appear on all of your devices.
When you purchase a song or album—whether on your computer or from an iOS device—from within the iTunes Store, it appears on all other devices linked to your Apple ID. Your Apple ID is the email address linked to your iTunes account; if you’ve ever made a purchase from within iTunes (including a song, movie, or app), you have an Apple ID.
If you’re not sure what your Apple ID is, and you know you purchased at least a single item from the iTunes Store, there’s an easy way to find out your ID. On your computer, launch iTunes and click iTunes Store in the source list. At the upper right of the window, you see an email address—yours! That address is your Apple ID.
No computer handy? That’s OK. Just grab your iPhone or iPad. Launch the Settings app, scroll down, and tap Store. At the bottom of the Store screen, you see your Apple ID (see Figure 1.5).

Figure 1.5 The iPhone’s Store settings screen.
While you’re there on your iOS device, look at the three Automatic Downloads buttons listed there: Music, Apps, and Books. As long as all three are in the On position (the word On appears in blue), your device is set to automatically download the media you purchase from your Mac or PC or other iOS devices.
If your iOS device can get online without a Wi-Fi network—for example, if it’s an iPhone or an iPad 3G—the Store Settings screen includes another option: Use Cellular Data. With that switch toggled On, your device automatically downloads music, apps, and books purchased on your account from other devices, even when your device is using your carrier’s 3G network. If you purchase lots of media and are concerned about going over your allotted data plan, turn this toggle off. If your data usage is moderate at best, or if your iTunes purchasing isn’t excessive, you can probably leave this switch turned on.
To ensure that your Mac or PC syncs the music, apps, and books you purchase from your iOS device, launch iTunes and navigate to its Preferences window (see Figure 1.6). (On the Mac, go to the iTunes menu and choose Preferences. On Windows, go to the Edit menu to find Preferences.)

Figure 1.6 The iTunes Store Preferences window for configuring automatic downloads.
Within Preferences, click the Store tab, which is marked by a green shopping bag. Once you’re there, review the status of all the available checkboxes. My recommendation is to leave all of them checked, unless you have an explicit reason not to. That way, all purchases you make from iTunes, regardless of when or where, sync back to your computer.
Now, let’s briefly discuss the second element of iTunes in the Cloud—Past Purchases. Automatic Downloads help you sync your new purchases, but it doesn’t help you with older iTunes purchases or other purchases, such as TV shows. With iTunes in the Cloud, your entire iTunes purchase history is stored, which gives you access to the complete list of prior purchases, whether they came from your computer or iOS device (see Figure 1.7). What’s more, you can re-download any purchased songs, albums, or TV shows from any device linked to your Apple ID.
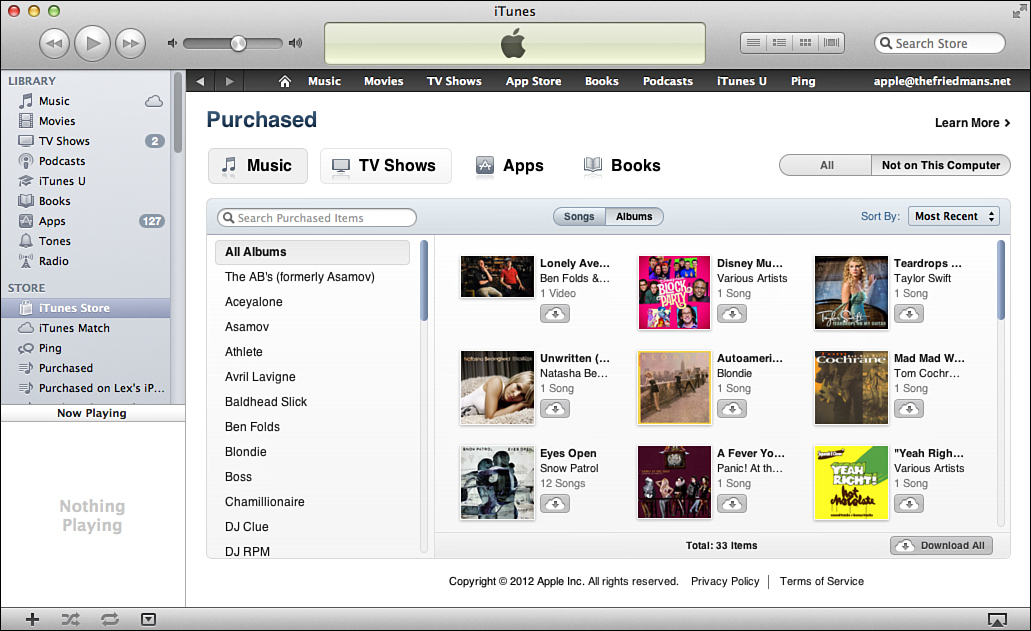
Figure 1.7 Your past iTunes purchases can be re-downloaded thanks to iTunes in the Cloud.
Here’s where to find it. In iTunes on your computer, click the iTunes Store in the sidebar. Verify that you’re on the main screen of the iTunes Store by clicking the Home icon (shaped like a house) in the Store’s thin black menu bar.
On the far right of the window, click the Purchased option in the Quick Links section. iTunes offers several convenient ways for you to browse your prior purchases: Not only can you navigate by media type (music, TV shows, apps, books), by artist or show, and by searching, you can also narrow the options to list only that media not on your current computer. This provides a simple way to reclaim purchases that you deleted in error or, for some other reason, are missing from your Mac or PC.
You can also get to your purchase list from your iOS device (see Figure 1.8). Fire up the iTunes app and tap the Purchased tab. Here, media is broken down into music and TV shows; past book purchases can be rediscovered via the iBooks app. Your purchases are divided into two tabs: All and Not On This Device, where Device is either iPhone, iPad, or iPod touch.
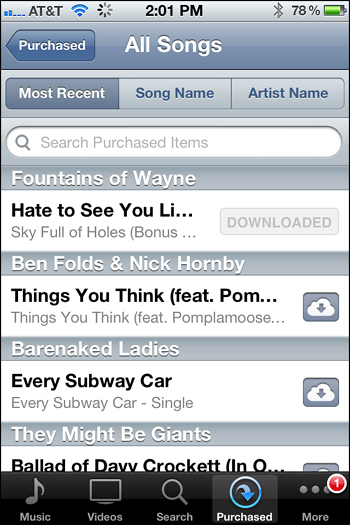
Figure 1.8 Browsing purchased tracks on the iPhone looks different, but it works much the same as within iTunes on the desktop.
iCloud
The rest of iCloud is a separate entity. It syncs documents, photos, emails, contacts, calendars, bookmarks, and more between computers and iOS devices. Its breadth and depth are beyond the scope of this book and only minimally relate to iTunes.
iCloud, in its base offering, is free, although you can pay for increased storage. (Apple gives you 5 gigabytes [GB] of free storage space.) That’s decidedly different from iTunes Match, which requires an annual fee of $24.99.
Summary
In this lesson, you signed up for iTunes Match, got the matching process started, and learned the different statuses that iTunes Match can indicate.