Lesson 2. Upgrading Your iTunes Library and Fine-Tuning Your Matches
In this lesson, you learn to create special Smart Playlists to find songs that are matched, songs that are ineligible, songs that are uploaded, and songs with Match errors. You also learn to update tracks with lower bit rates that iTunes Match claims it can’t match to fool it into doing so, weed out Match-found duplicates, and remove songs that you don’t want in the cloud (or anywhere else).
Upgrading Your Matched Tracks
You can start reading the tutorials in this chapter before iTunes Match finishes its initial scan through your music library, if you’re eager. But you must wait until iTunes Match is finished working through your music before you actually start following these steps.
One of the multiple great features that iTunes Match offers is the ability to upgrade your music library. When iTunes matches your tracks, or when it identifies your iTunes-purchased tracks, you’re entitled to high-quality, 256kbps-encoded versions of those tracks. Those files may be larger (in terms of file size) than your lower-quality versions, but the boosted audio quality may well be worth the increase—and that’s often true whether you use higher- or lower-quality speakers. Feeding the best possible source audio to your speakers or headphones means that your music sounds better, no matter how you listen to it.
Upgrading your music with iTunes Match does come with a cost: The file sizes are larger when you’re done. iPods, iPhones, and iPads have limited storage space, and larger files obviously require more disk space to fit. An advantage of iTunes Match is that you don’t need to keep all your song files on your iOS devices, but that advantage doesn’t extend to iPods. If you’re worried that upgrading your music library might eat into your iPod’s available disk space, enable the Convert Higher Bit Rate Songs to 128 kbps AAC option. That way, you get the highest-quality tracks on your computer, but smaller tracks on your portable devices.
iTunes Match’s ability to upgrade your music library effectively replaces Apple’s iTunes Plus program, which charges 30 cents per track to upgrade your iTunes Store-purchased music to DRM-free, 256kbps tracks. What’s more, iTunes Match offers the higher-quality DRM-free tracks, even for music you purchased or acquired outside of iTunes.
Unfortunately, Apple doesn’t make upgrading your library as straightforward as you could. The good news, however, is that you can use iTunes Smart Playlists to make simple work of the upgrade process. In fact, I recommend that you create four unique Smart Playlists to help you get the clearest picture of your own iTunes Match situation.
Smart Playlists are playlists that can employ simple algorithms to determine which songs they contain. For example, you can limit a Smart Playlist to tracks that you’ve rated with five stars, or tracks whose albums contain “live,” or any combination of these and varied other rules.
To create a Smart Playlist, go to the File menu and choose New Smart Playlist. (You can also hold the Option or Alt key, which changes the plus [+] icon at the bottom left of the iTunes source list into a circular gear icon; clicking that button also opens the New Smart Playlist window.)
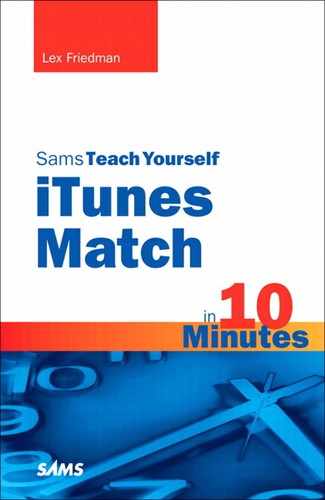
The first Smart Playlist could be titled iCloud Upgradeable. It assembles an always current list of the songs in your music library for which iTunes Match provides higher-quality versions.
Create a Smart Playlist where all these rules must be met:
1. The bit rate should be less than 256kbps. (If you’re new to Smart Playlists, here’s how to set this requirement; the others should then be easy to follow: Use the drop-down at the left to find Bit Rate; the drop-down in the middle should read “is less than,” and you type 256 into the text field.) This rule ensures that your playlist contains only those tracks that are lower quality than what iTunes Match offers. But, we need to add more rules to ensure that the playlist is further limited to tracks that are available in higher-quality versions from iTunes Match.
2. Next, click the plus (+) icon to the right of the Bit Rate rule; that adds another line of requirements for your Smart Playlist. With this one, specify that Media Kind is Music. That limits the playlist to only contain music tracks.
3. Click the plus (+) icon again, and add an additional requirement: Location is on this computer.
4. Now, you need to add a conditional entry to this iCloud Upgradeable playlist. You want to further limit this playlist to contain only those songs that iTunes Match identified as either matched or purchased. To add this conditional section, instead of merely clicking the plus (+) icon to the right of your Media Kind rule, hold the Option or Alt key when you click it. Doing this adds a conditional block—a nested subset of rules within a Smart Playlist. You want Any (not All) of these conditions to be met: iCloud Status is Matched or iCloud Status is Purchased.
You don’t want to limit the playlist to a specific number of tracks, and you want live updating enabled so that the playlist is always current. Your completed Smart Playlist should look like what’s shown in Figure 2.1.
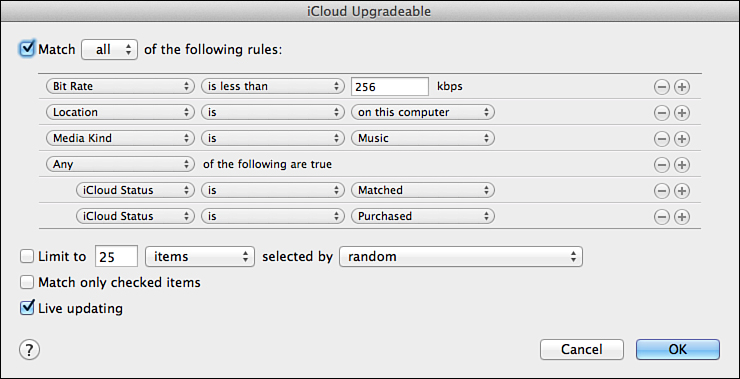
Figure 2.1 The iTunes iCloud Upgradeable Smart Playlist.
Click OK to create your new Smart Playlist. Give it a name in the iTunes source list; again, iTunes Upgradeable is the suggested option, but the choice is yours.
This playlist now contains all the songs in your library of which iTunes Match can offer you higher-quality versions.
Before we start the process of instructing iTunes Match to provide those better versions, let’s create another Smart Playlist. One suggested title is iCloud Downloadable.
The iCloud Downloadable playlist is the counterpart to your Upgradeable Smart Playlist. It lists the songs that you can download from Apple at a higher quality.
The rules are Location is not on this computer, Media Kind is Music, and Location is iCloud (see Figure 2.2).
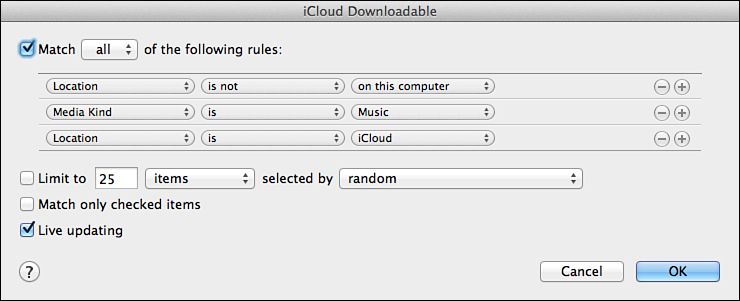
Figure 2.2 Here are the three rules you need for the iCloud Downloadable Smart Playlist.
Now comes the fun part:
1. Go to your iCloud Upgradeable list.
2. Select all the tracks it contains—perhaps the easiest way to do that is to go to the Edit menu and choose Select All.
3. Next, take a deep breath. Why? Because now you must hold the Option or Alt key and press Delete. Don’t panic.
iTunes asks you to confirm that you want to delete all the selected songs (see Figure 2.3). It also adds that the songs will be deleted from other devices that sync with iTunes. Don’t fret. Here’s the most important rule: Do not check the “Also delete these songs from iCloud” checkbox. It is only because those songs remain in iCloud that this move is a safe one.

Figure 2.3 Keep your songs in iCloud by leaving this box unchecked so that you can download the upgraded versions.
Once you confirm that you do want to delete the tracks, iTunes asks another question: “Do you want to move the selected songs to Trash or keep them in the iTunes Media folder?” Choose to move the songs to Trash, which isn’t the default option. Note that this won’t really delete the songs; it merely moves them to your computer’s recycle bin, so it’s an added safety net if something goes wrong. (It won’t.)
After you confirm the deletion, the songs vanish from your iCloud Upgradeable playlist immediately. But, thanks to the magic of iCloud, the songs remain in your library; they’re simply stored in the cloud instead of on your Mac or PC.
In the iTunes source list, switch from your iCloud Upgradeable playlist to your iCloud Downloadable one. All the tracks you just deleted should appear there. They match the Downloadable Smart Playlist, because they are no longer on your computer. In this playlist, go to the Edit menu and choose Select All. Then, right-click (or Control-click on a Mac) any of the songs in the list and choose Download from the contextual menu that appears.
Of course, if you don’t want to download upgraded copies of all the tracks you could conceivably grab, you don’t need to force yourself to do so. Feel free to select only those songs you would actually like to upgrade.
A new, temporary item is added to your iTunes source list under the Store section: Downloads. Here, you can watch as iTunes downloads your upgraded tracks. Alternatively, if you keep your eye on the iCloud Upgradeable playlist, you can watch as song after song is removed as it downloads.
Want to verify that your new tracks are indeed higher quality? Click any of your freshly downloaded tracks and choose Get Info (from the File menu). Click the Summary tab of the window that appears, if it’s not already selected. Note that the bit rate is listed as 256kbps.
Here’s more good news: If you are a Smart Playlist devotee, your track play counts, last played date, and similar metadata is important to you. This process of removing song files from your computer and then downloading them again from iTunes Match doesn’t wipe out that data; it’s maintained in its entirety (see Figure 2.4).
Figure 2.4 The Get Info screen indicates that the bit rate is listed at 256kbps. It also shows that, although this track was purchased from Amazon, Apple successfully matched it.
While you view that screen, note one other important detail: Matched tracks—tracks that you purchased outside of iTunes—are now uniquely linked to your Apple ID. Though the upgraded versions of these externally acquired tracks remain DRM-free, they link to your name. Share such a track with millions of other Internet users, and record companies could painlessly identify you as the source of the illegal file sharing. You can find more on this topic in Lesson 4, “Removing Personalization from Your Upgraded Library.”
The two Smart Playlists that you created are the most important ones. But, a few more are worth creating.
Getting More Tracks to Match
Now, let’s create an iCloud Uploaded Smart Playlist. The purpose of this playlist is to assemble those tracks that iTunes Match couldn’t (or wouldn’t) match and chose to upload to Apple’s servers instead (see Figure 2.5). By creating this list, you can isolate tracks that might still be matchable (and thus upgradeable, which no longer counts against your iTunes Match quota). You may be able to “fix” these tracks in various ways, which in turn could cause iTunes Match to go ahead and match them.

Figure 2.5 This Smart Playlist lists songs that iTunes Match uploaded instead of matched.
For the iCloud Uploaded Smart Playlist, you only need one condition: iCloud Status is Uploaded. However, you can add a second one—Media Kind is Music—for purity’s sake. Go to the playlist, right-click the header, and add the bit rate column. Next, click your newly added bit rate column to sort by that field; you want the lowest bit rates on the top of the list.
Remember that iTunes Match refuses to match tracks at lower encoding levels (bit rates below 96kbps). Sometimes, it’s similarly stumped by tracks with higher bit rates—when those tracks use variable bit-rate encoding. The truth, however, is that you can convince iTunes Match that such tracks are worth a second look—with minimal effort.
First, let’s check some settings in iTunes. Go into your Preferences window (from the iTunes menu on a Mac, or the Edit menu on a PC). Click the General tab and choose Import Settings; it’s on the bottom right next to the CD-ripping options. The Import Settings dialog box appears (see Figure 2.6). To potentially save yourself time and bandwidth, choose 256kbps AAC tracks to rip any new tracks at precisely the quality iTunes Match offers.

Figure 2.6 Within the Import Settings screen, you can set how your tracks are imported.
Which encoder you use (MP3, AAC, WAV, AIFF) is up to you. But, you should select (or stick with) the AAC option and the iTunes Plus setting, because that’s the format that iTunes Match offers. If you leave your settings there, CDs you rip later should not need to be upgraded, which saves you both bandwidth and time.
Regardless, the significance of the iTunes Plus setting is this: It encodes tracks at 256kbps. Click OK and OK again to close out your iTunes settings and go back to the iCloud Uploaded Smart Playlist.
Look at the tracks that list lower bit rates. In theory, iTunes Match only ignores tracks encoded below 96kbps, but the reality is that the service sometimes ignores variable rate tracks encoded with peaks that are slightly above the 96kbps mark.
Select the tracks that you think iTunes Match should be able to match, but hasn’t. In effect, that means you ought to select those tracks that Apple sells in the iTunes Store. Certainly, any song encoded below 96kbps stands a chance of getting matched successfully—were it only encoded at a higher bit rate—and again, higher encoded tracks may match two after this trick.
With all the potential tracks selected, right-click any one of them (or Control-click on a Mac) and choose Create AAC Version from the contextual menu. This creates duplicate versions of those tracks, but that’s okay. Although iTunes converts the tracks to a higher bit rate now, the audio quality isn’t improving; this, in essence, does the equivalent of pointing a DSLR camera at a Polaroid photograph.
But, iTunes Match doesn’t realize that. Once your conversion process finishes, with your original tracks still selected, press Option-Delete (on a Mac) or Shift-Delete (on Windows). iTunes asks you to confirm that you want to delete the selected tracks. You do. This time, because iCloud already has the uploaded versions, you also want to check the box to remove those tracks. You want to attempt to match these tracks instead. (iTunes then asks you if you want the selected songs moved to Trash. Go for it.)
After the songs are removed, select your freshly created converted versions. Then, after right- or Control-clicking, choose Add to iCloud. iTunes thinks for a few seconds. Often, the songs show the iCloud status Removed, which indicates that iTunes Match still thinks you want those songs completely out of iTunes Match. If that Removed label appears, just bring up the contextual menu again and reselect Add to iCloud. If iTunes Match can now match your upgraded tracks, it does.
If it matches the tracks, select them all and delete the files again, but this time, make sure not to check the box about removing the songs from iCloud. Then, with the songs still selected, bring up the contextual menu again and choose Download. That way, you get the highest possible quality copies of those tracks.
You can repeat this same process looking at only ineligible tracks—those tracks that iTunes Match says that it won’t match or upload—with still one more Smart Playlist. For your iTunes Ineligible playlist, set iCloud to Status is Ineligible and Media Kind is Music (see Figure 2.7). After you up-convert tracks from that Smart Playlist, you can delete the originals from this playlist. This time, iTunes won’t prompt you about removing them from iCloud, because those songs aren’t in iCloud in the first place. iTunes may not match all of your up-converted formerly ineligible tracks, but it should at least upload them, provided they’re longer than 5 seconds.

Figure 2.7 The iCloud Ineligible playlist shows those tracks that iTunes refuses to convert.
Summary
In this lesson, you learned how to use iTunes Match to upgrade your music library when possible, how to convince iTunes Match to match tracks it otherwise would not, and how to get it to upgrade tracks that it would otherwise deem ineligible.