
17
Visual Studio: When SharePoint Designer Is Not Enough
WHAT’S IN THIS CHAPTER?
- How you should be planning for taking advantage of new capabilities for building workflow in SharePoint 2010 with Visual Studio 2010
- How to import existing SharePoint Designer workflow into Visual Studio
- Creation of custom event receivers
- Creation of custom actions for SharePoint designer
- Creation of a custom SharePoint workflow in Visual Studio
The goal of this chapter is not necessarily to give you many step-by-step instructions on how to develop SharePoint workflow in Visual Studio. Rather, the goal is to dig into your options and give you some guidance as to how you should be thinking and planning for taking that next step of functionality after you have exhausted all your other options with out-of-the-box workflows as well as SharePoint Designer. With that in mind, this chapter tells you what’s available in Visual Studio 2010 for SharePoint workflow. A big thank you to Ruben D’arco and Steve Thomas for helping out with the code samples provided in this chapter.
THE SHAREPOINT WORKFLOW DEVELOPER EXPERIENCE
Once you start investigating the abilities Visual Studio gives you to create workflow even outside SharePoint, you’ll find that the sky is truly the limit. You can literally do anything with enough time and resources. Even after reading this book you will need to take time to understand all the different parts of workflow and leveraging the parts, all in such a way that they work well together. This is not a task for the faint of heart; you’ll need to understand and account for a great many complexities.
As you probably know, the goal of any development project is typically to get the most bang for your buck. In this case that means to get the most functionality out of your workflow with the least amount of work in developing it. Most people believe in the keeping-it-simple methodology. For SharePoint workflow this can mean that you should not develop a complex workflow when all you have to do is build a basic workflow in SharePoint Designer and add in a custom action and/or an event receiver to link things together. Taking advantage of two specific pieces of SharePoint for workflow is relatively easy and doesn’t usually require a long development cycle. These pieces are:
- Developing custom actions for use in SharePoint Designer 2010
- Developing event receivers for use in SharePoint
You should consider these two pieces for potential use in SharePoint workflow — they’re the SharePoint workflow sweet spot.
If you have done any research or work in previous SharePoint and/or Visual Studio versions, the 2010 pairing will be a welcome change. For more information on this see Chapters 7, 8, and 9 in this book. For now you need to know what your options are in Visual Studio when it comes to SharePoint workflow.
This section should help you focus on a few important pieces before you dive in and take the next step in developing workflow for SharePoint 2010.
Within Visual Studio 2010, the project templates you’ll focus on will be Import Reusable Workflow, Event Receiver, Sequential Workflow, and State Machine Workflow. These four templates, capsulized in this section, along with the Workflow Activity library in the workflow template section of Visual Studio 2010, should make up the vast majority of any SharePoint workflow development you perform. When you get started with building either State Machine or Sequential workflow, you’ll find that, as with SharePoint Designer, you can target lists, libraries, and sites for any workflow you develop. You can also take advantage of all of the typical SharePoint workflow activities (actions that were in SharePoint Designer). The workflows you develop in Visual Studio can be built as Sequential workflows or alternatively as State Machine workflows. Within each template are also item templates you can use. These can be important because they will assist you in building Workflow Association and Initiation forms. The available new items are shown in Figure 17-1.

Importing Reusable Workflow
Your typical first step in building a new SharePoint workflow from scratch will be to start with one of these project templates. However, with SharePoint and Visual Studio 2010 you no longer need to start from scratch. That’s because you now have the ability to import a reusable workflow. This ability is probably one of the most talked-about new abilities in the Visual Studio 2010 release specifically for SharePoint 2010. You now can import a reusable workflow that’s been published via SharePoint Designer.
Importing the reusable workflow into Visual Studio converts this from a declarative workflow into a code-based workflow. Once the workflow is imported you can then add code and do any other customizations necessary. You can work through the details of this import by following examples later in this chapter.
Event Receivers
Another important ability in Visual Studio 2010 is that of building your own event receivers. As noted before, this is one of the project templates that you should become familiar with, because it could become a core pillar of your workflow strategy. For our purposes an event receiver is a programmed response to any SharePoint events that are fired. Taking advantage of these events and event receivers in SharePoint workflow can be extremely powerful.
This ability allows you to kick off workflows or even just quickly respond to the variety of different events that are available out of the box with SharePoint 2010. These events can be such simple things as adding items, moving items, deleting items, and checking in or checking out items. To drive home some of the possibilities, consider that this enables you to take action on a delete of not only a document but also a list or even a site. You could build in an event handler to prevent this or get very creative with other options. Additional events are web events such as sites being deleted, provisioned, or moved. These events and event receivers can also be leveraged to build off other workflows. Events available for this are workflows that are starting, started, postponed, or completed.
As you can see you have a great many options available when you progress up the functionality ladder into Visual Studio. At the same time this can be overwhelming. To help you better understand how these pieces work it’s time to get your hands on them.
When you read about templates for Sequential and State Machine workflow the first thing you may be thinking is, what’s the difference? You may be saying, “I just want workflow.” The difference is fairly simple — and keep in mind that in most cases you will only use Sequential. The basic differentiation is where the decision logic for the workflow is to be housed — within the workflow itself or externally. Before moving on, you should understand more about these options.
Sequential Workflow
This is the typical workflow you’re probably used to seeing and discussing. This workflow follows a predictable path much like a flow chart. When developing this type of workflow, you specify each decision point and what that decision is. Though the path of the Sequential workflow may have numerous branches and loops, the workflow still has this predefined path.
State Machine Workflow
The State Machine workflow is purely an event-driven workflow. It relies on external events to drive each step or change in state. When building the workflow you define the available states and the different transitions between states. The workflow will always be in one of these defined states. In order to move from one state to another some event has to occur. The decision-making happens outside the workflow.
By now you should have already gotten into Visual Studio as a result of reading the earlier chapters. Now you need to dig more into what you should know for taking advantage of workflow. Once you make your way into Visual Studio to build workflows, you will have many options including the use of your own custom assemblies and of web services. Those topics are beyond the scope of this chapter, but you need to know some basics of the different workflow support abilities you have in Visual Studio.
To build SharePoint workflow you’ll also need to familiarize yourself with the Workflow Activity library. This project template will allow you to create custom workflow activities that can be surfaced in SharePoint Designer for use by your SharePoint Designer users. The combination of the event receiver and the custom workflow activity should be considered the sweet spot for the best ratio of functionality to amount of effort.
IMPORTING A REUSABLE WORKFLOW TO VISUAL STUDIO
There may be times when you’ve worked hard building a process in SharePoint Designer, as well as customizing it. Then at some point you realize you’ve hit the limit for what you can do using the tool. You determine that you need to move up the ladder and begin adding additional functionality that’s going to be available only with Visual Studio 2010. You also determine that you don’t want to lose any of the work you have already done. With SharePoint and Visual Studio 2010 you have an option to help you with this. You can import the workflow as long as it was created as a reusable workflow. You learned about these different workflow types in the previous chapter. Keep this requirement in mind as you plan the workflows you may build with SharePoint Designer. To get a reusable workflow into Visual Studio you must follow these steps:
1. Ensure you have a published workflow from SharePoint Designer.
2. In SharePoint Designer, highlight the workflow you want to import and select Saveas Template. This will save the workflow as a WSP file and place it into the Site Assets library.
3. Save the resulting WSP file from the Site Assets library to somewhere local where you can open it with Visual Studio.
4. Run Visual Studio 2010 (2010 is required) and create a new project with a project type of Import Reusable Workflow.
5. You will be presented with a wizard that will walk you through the basics of different project options such as the Sharepoint Site URL as well as the path to the WSP file you should have just saved locally from the Site Assets library. Fill in these details as appropriate.
6. Select your workflow from the list of workflows to be converted, and click Finish. (If your workflow doesn’t show up, make sure that the workflow you saved as a template was the correct one and was already published to SharePoint.)
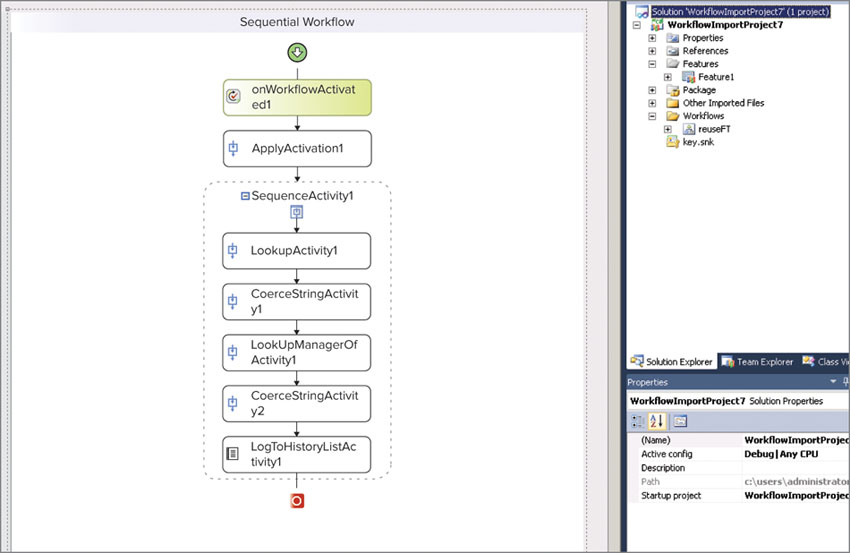
At this point your workflow has been imported and you can immediately begin using it, or you can start making modifications and additions right from here. Assuming the import was successful, you should see an interface that looks like Figure 17-2.
Globally reusable workflows created in SharePoint Designer can’t be imported. If you need to import one of these workflows, take advantage of the copy and edit functionality and then republish the workflow.
Following are some items to note when thinking of doing a reusable workflow import:
- It imports only one Task form.
- It cannot deploy a sandboxed solution.
- Debugging does not work for any declarative content.
Basic reusable workflows are easy to import and modify. However, as you will see if you import larger and more complex workflows (especially those that take advantage of the powerful task processes in SharePoint Designer), the resulting import can be overwhelming. You may find starting over is actually a better alternative than importing these. Note that Figure 17-2 shows a basic workflow that doesn’t make use of the task processes built into SharePoint. Figure 17-3 shows that same workflow, with the only difference being that an approval process is added at the end. (The left side of Figure 17-3 is not intended to be read here, but simply to show the complexity of the workflow.)
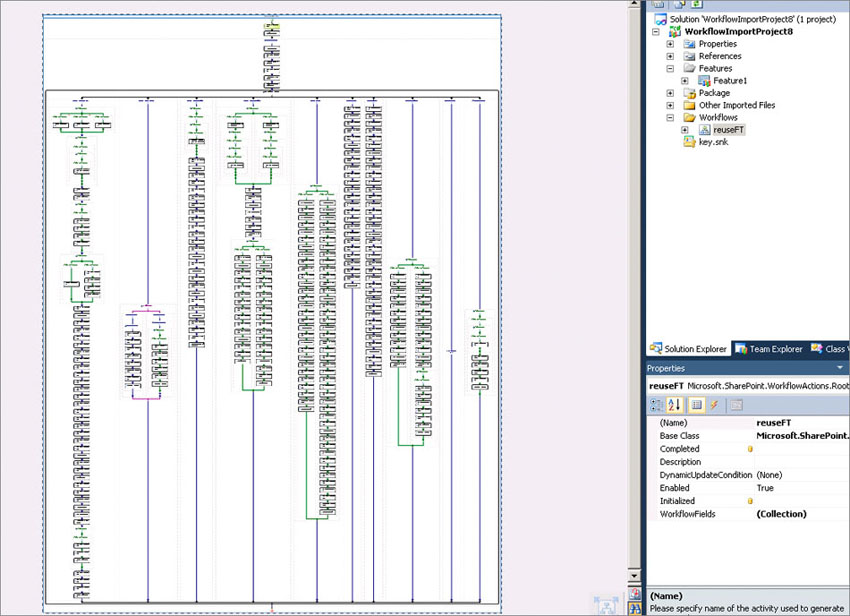
The overwhelming nature of the imported result is primarily because of the power and flexibility that the task and approval processes provide for your workflows. As you inspect your new workflow in Visual Studio you will notice that each of the options surfaced in SharePoint Designer is also surfaced in Visual Studio. SharePoint Designer is shown in Figure 17-4, and the corresponding functionality in Figure 17-5 shows the corresponding function in Visual Studio.


Being able to take full advantage of all these individual pieces will definitely take some time and research. If this is something you believe you will be using, you should take a significant amount of time to experiment broadly with the different options. Digging in and having some hands-on experience is the best way to gain a better understanding. (Obviously, you should not do this experimentation on a production system.) Now that you understand how to import a workflow from SharePoint Designer, you should understand how to make one from scratch.
EXAMPLE: TAKING ADVANTAGE OF EVENT RECEIVERS
As you previously read, event receivers and the event model for SharePoint got a huge boost in 2010. Not only has the list of events been expanded, but you now can create your own events and event receivers with ease. Table 17-1 gives you a good picture of the entire set of out-of-the-box events you can take advantage of. (Entries with asterisks are new in SharePoint 2010.)
Table 17-1: Out-of-the-Box Events
| LIST EVENTS | LIST ITEM EVENTS |
| A field was added. | An item is being added. |
| A field is being added. | An item is being updated. |
| A field was removed. | An item is being deleted. |
| A field is being removed. | An item is being checked in. |
| A field was updated. | An item is being checked out. |
| A field is being updated. | An item is being unchecked out. |
| *A list is being added. | An attachment is being added to the item. |
| *A list is being deleted. | An attachment is being removed from the item. |
| *A list was added. | A file is being moved. |
| *A list was deleted. | An item was added. |
| An item was updated. | |
| An item was deleted. | |
| An item was checked in. | |
| An item was checked out. | |
| An item was unchecked out. | |
| An attachment was added to the item. | |
| An attachment was removed from the item. | |
| A file was moved. | |
| A file was converted. | |
| *The list received a context event. | |
| List-Based Workflow Events | Feature-Based Events |
| *A workflow is starting. | A feature was activated. |
| *A workflow was started. | A feature is deactivating. |
| *A workflow was postponed. | A feature was installed. |
| *A workflow was completed. | A feature is being upgraded. |
| Web Events | List-Based E-mail Events |
| A site collection is being deleted. | *A list received an e-mail message |
| A site is being deleted. | |
| A site is being moved. | |
| *A site is being provisioned. | |
| A site collection was deleted. | |
| A site was deleted. | |
| A site was moved. | |
| *A site was provisioned. |
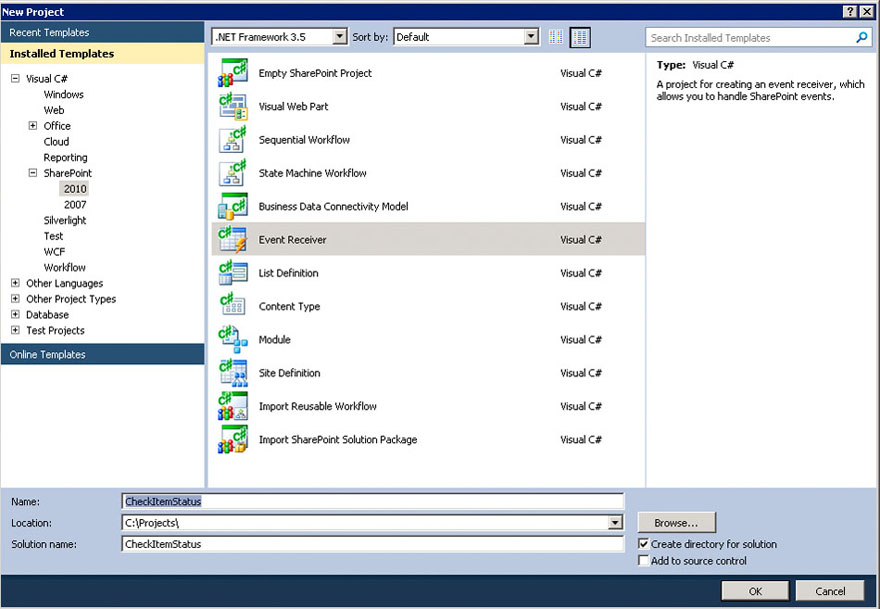
Some of the most powerful abilities provided by leveraging the events of SharePoint are those that respond to different workflow events. For now you need to understand the basics of creating an event receiver. Fortunately, Microsoft has made your life easier by baking a lot of this into Visual Studio 2010 with the Event Receiver project type shown in figure 17-6. For this example you create an event receiver that listens to the ItemChanged event and then checks a column in the list for the item status. If that item status is completed it sends an e-mail. To accomplish this, start by launching Visual Studio 2010 and creating a new project with the type of Event Receiver.
The name and location don’t matter much, but in this case the new project is called CheckItemStatus and is saved to the local C drive in a folder called Projects. This will launch the wizard you will have become familiar with for all SharePoint-based projects in Visual Studio 2010. Ask for the URL and whether this will be sandboxed. Next you will see the selection screen where you can select the type of event receiver you want to create as well as the event source and selection of events to act on, as shown in Figure 17-7.

In this case select the Issue Tracking List type and the event to monitor when an item is updated. You can select as many events as you like, which will then create additional methods for you to add code for (and you’ll have different actions for each item). The screen is shown in Figure 17-8.

For now just select ItemUpdated. After you do this, you should see a basic Visual Studio canvas like the one in Figure 17-9.

This is essentially a blank canvas. You can place your custom code here, and anytime the specified event occurs your code will run. However, keep in mind that you want to stay within the bounds of reason and not use event receivers for long-running items. If you need longer running ability, use workflow. On this blank canvas you now need to add some code, so take the code in Listing 17-1 and add it just underneath the base.ItemUpdate(properties); line.
 Listing 17-1: SharePoint Event Receiver (CodeSamples.VS2010.EventHandler.csproj)
try
{
string revisionStatus = GetFieldValue(properties.ListItem, "CheckComplete");
if (revisionStatus.CompareTo("Complete") == 0) SPUtility.SendEmail(properties.Web,
false, false,
GetCurrentUserEmail(properties),
"Event Handler Email",
GetFieldValue(properties.ListItem,
"EmailBody"));
}
catch
{
//bypass exception-since this is test code;
}
}
private string GetFieldValue(SPListItem item, string fieldDisplayName)
{
return (item[fieldDisplayName] != null) ? item[fieldDisplayName].ToString() : string.Empty;
}
private string GetCurrentUserEmail(SPItemEventProperties properties)
{
string userEmail = properties.Web.CurrentUser.Email;
return userEmail;
}
This example is pretty simple, but it gives you insight into what you need to do before taking the next step. Take this example and experiment with different options. If you wanted to take this event receiver and associate it with a specific list or library, you could do so through PowerShell as shown in Listing 17-2.
Listing 17-2: Associating an Event Receiver with a Specific List (Associate Workflow,ps1)
[System.Reflection.Assembly]
::Load("Microsoft.Sharepoint, Version=14.0.0.0, Culture=neutral,PublicKeyToken=71e9bce111e9429c")
$url = "http://url to document library";
$spsite = new-object Microsoft.SharePoint.SPSite($url);
$spweb = $spsite.OpenWeb();
$splist = $spweb.GetListFromUrl($url);
$splist.EventReceivers.Add([Microsoft.SharePoint.SPEventReceiverType]::ItemAdded,
"CodeSamples.VS2010.EventHandler, Version=1.0.0.0, Culture=neutral,
PublicKeyToken=64a56f09eb241aa2",
"CodeSamples.VS2010.EventHandler.EventReceiver1.EventReceiver1");
$spweb.Dispose();
$spsite.Dispose();
One key piece of this example is the sending of an e-mail. Users must have an e-mail address specified in SharePoint for this to properly get the e-mail address it needs to send to. Keep this in mind in your SharePoint environment.
CUSTOM WORKFLOW ACTIVITIES WITH VISUAL STUDIO FOR USE IN SHAREPOINT DESIGNER
In this section you learn how to create a custom activity in Visual Studio and publish that to be consumed by a SharePoint Designer workflow.
By now you have seen the power available to you in SharePoint Designer for workflow. You also should now understand the limits imposed when using out-of-the-box as well as SharePoint Designer-based workflows. But these limits don’t mean that your users cannot use SharePoint Designer to create workflows. They can, with a little help from you. You have the power to extend the functionality of SharePoint Designer by building custom actions that you can then publish to SharePoint for use by your users in SharePoint Designer. Better enabling your users with the tools they need to help themselves will go a long way toward increasing the adoption of SharePoint as well as making a happier user community.
In previous discussions about SharePoint Designer, one of the key points in its favor was that it does not let users cause significant damage to your site. There is no action for deleting a site or for running custom code that could contain a worm of some kind. This means that all the actions that are available in SharePoint Designer can be trusted. Taking this a step further, Microsoft has given you the ability to write out actions that you are comfortable with publishing and having used by your users in SharePoint Designer. This ability can help to extend the product to overcome many limitations.
The example activity in this section may not be the most conventional, but it is one that gets the point across. This activity will give you the ability to send out a tweet through Twitter as an action.
The process of building custom actions is easy once you understand the basics. What you get in return is also very appealing and rewarding. Once you publish actions they are available for all your users to take advantage of. This approach is a “code once and reuse often” proposition.
When you launch SharePoint Designer, the program queries the SharePoint Server to determine what actions should be available during your design process. This list of available actions is stored as a series of .actions files in the %SPRoot%Template1033Workflow folder. Each .actions file is an XML file that will define different sets of actions that are available, as well as how each should be configured and what options are exposed for each action. Copy one of these .actions files to your desktop, open it up with Notepad or your favorite XML editor, and take a look. Once you read through one it should be self-explanatory how they work. You will see more on this shortly as you deploy your first custom activity.
You begin by creating a new project in Visual Studio. For this example you are going to use the Workflow Activity Library project type. You can use other projects such as the Empty SharePoint project. Once you create this project and give it a name and save location, you will be presented with a blank canvas. Because you will not be dragging and dropping any items from the toolbox onto the canvas at this point, you can simply switch to code view and start adding in the code you need to use.
While the code you put in there can take virtually any form and function, this example shows some important aspects to call out that may not be part of the code you would actually use.
You need two important things in this code. They are:
- The DependencyProperty: This is the information you enter into the action line of the SharePoint Designer activity.
- The execution code: This code actually performs the action you need done.
The dependency property consists of two parts:
- A static variable: public static DependencyProperty TwitterUsernameProperty = DependencyProperty.Register("TwitterUsername", typeof(string), typeof(TwitterActivity));
- A property that exposes the real value.
The *NAME* of the DependencyProperty variable is important. It needs to be <property>Property. That is, if you want the property to be TwitterUserName, the static variable needs to be TwitterUserNameProperty. Otherwise, it won’t compile.
So in the previous line, the name is TwitterUsername. That means the static variable needs to be TwitterUsernameProperty. If this is not correct the project will not compile. The same goes for the property. It should be named TwitterUsername. As you can see from the code in Listing 17-3 it simply exposes the static variable. From the execution code, you always call this property.
The execution of this activity is done by overwriting the Execute method (protected override ActivityExecutionStatus Execute(ActivityExecutionContext executionContext)).
In the execute code, do what you want to do, but always use This.property, so you don’t talk to the static variable directly. Using “this.” will ensure you’re always talking to the property, and not the public static DependencyProperty. The code for this action follows in Listing 17-3.
Listing 17-3: SharePoint Designer Custom Activity (SP2010CustomActivities.sln)
using System;
using System.ComponentModel;
using System.ComponentModel.Design;
using System.Collections;
using System.Linq;
using System.Workflow.ComponentModel.Compiler;
using System.Workflow.ComponentModel.Serialization;
using System.Workflow.ComponentModel;
using System.Workflow.ComponentModel.Design;
using System.Workflow.Runtime;
using System.Workflow.Activities;
using System.Workflow.Activities.Rules;
using TweetSharp.Twitter.Fluent;
using TweetSharp;
using TweetSharp.Twitter.Model;
using System.Diagnostics;
using System.Security;
namespace CustomActivities
{
public partial class TwitterActivity : SequenceActivity
{
#region Private fields/constants
private const string EventLogSource = "SP2010 Twitter Activity";
private const string EventLogLogName = "Application";
#endregion Private fields/constants
#region Public Static DependencyProperty
public static DependencyProperty TwitterMessageProperty =
DependencyProperty.Register("TwitterMessage", typeof(string), typeof(TwitterActivity));
public static DependencyProperty TwitterUsernameProperty =
DependencyProperty.Register("TwitterUsername", typeof(string), typeof(TwitterActivity));
public static DependencyProperty TwitterPasswordProperty =
DependencyProperty.Register("TwitterPassword", typeof(string), typeof(TwitterActivity));
#endregion Public Static DependencyProperty
#region Constructor(s)
public TwitterActivity()
{
InitializeComponent();
}
#endregion Constructor(s)
#region Public properties (for Dependency Property)
[Category("Twitter Actions"), Browsable(true)]
[DesignerSerializationVisibility(DesignerSerializationVisibility.Visible)]
public string TwitterMessage
{
get
{
return base.GetValue(TwitterActivity.TwitterMessageProperty) as string;
}
set
{
base.SetValue(TwitterActivity.TwitterMessageProperty, value);
}
}
[Category("Twitter Actions"), Browsable(true)]
[DesignerSerializationVisibility(DesignerSerializationVisibility.Visible)]
public string TwitterUsername
{
get
{
return base.GetValue(TwitterActivity.TwitterUsernameProperty) as string;
}
set
{
base.SetValue(TwitterActivity.TwitterUsernameProperty, value);
}
}
[Category("Twitter Actions"), Browsable(true)]
[DesignerSerializationVisibility(DesignerSerializationVisibility.Visible)]
public string TwitterPassword
{
get
{
return base.GetValue(TwitterActivity.TwitterPasswordProperty) as string;
}
set
{
base.SetValue(TwitterActivity.TwitterPasswordProperty, value);
}
}
#endregion Public properties (for Dependency Property)
#region Protected overridden methods
protected override ActivityExecutionStatus Execute(ActivityExecutionContext
executionContext)
{
try
{
TwitterClientInfo info = new TwitterClientInfo() { ClientName = "SP2010 Designer Activity", ClientVersion = "1.0.0.0" };
IFluentTwitter iTwitter =
FluentTwitter.CreateRequest(info).AuthenticateAs(this.TwitterUsername, this.TwitterPassword);
ITwitterLeafNode node = iTwitter.Statuses().Update(this.TwitterMessage).AsJson();
TwitterResult result = node.Request();
if (result.IsTwitterError)
{
WriteEventLog("An error occurred when posting to twitter. {0}",
result.Exception);
return ActivityExecutionStatus.Faulting;
}
}
catch (Exception ex)
{
WriteEventLog("An exception has occurred within the Twitter activity: {0}; {1}", ex.Message, ex.StackTrace);
return ActivityExecutionStatus.Faulting;
}
return ActivityExecutionStatus.Closed;
}
#endregion Protected overridden methods
#region Private helper methods
private void WriteEventLog(string msg, params object[] args)
{
string text = string.Format(msg, args);
this.WriteEventLog(text);
}
private void WriteEventLog(string msg)
{
try
{
if (!EventLog.SourceExists(EventLogSource))
{
EventLog.CreateEventSource(EventLogSource, EventLogLogName);
}
EventLog.WriteEntry(EventLogSource, msg);
}
catch (SecurityException ex)
{
// I know this is a bad thing to do, but where else should we log if we simply are not allowed to log to the event log?!
// AKA: you're SP user needs to have access for this.
}
}
#endregion Private helper methods
}
}
At this point you have the code that performs your action. You now need to make sure that you compile this as a strong named assembly and copy the resulting DLL to the Global Assembly Cache (GAC). For more information on doing this see http://msdn.microsoft.com/en-us/library/dkkx7f79.aspx. Once this is complete you are ready to build your actions file that will surface this functionality in SharePoint Designer. The actions file for this example is shown in Listing 17-4.
Listing 17-4: Custom Activity Actions File (Twitter.Actions)
<?xml version="1.0" encoding="utf-8" ?>
<WorkflowInfo Language="en-us">
<Actions Sequential="then" Parallel="and">
<Action Name="Tweet a message"
ClassName="CustomActivities.TwitterActivity"
Assembly="CustomActivities, Version=1.0.0.0, Culture=neutral,
PublicKeyToken=a62143cda0ae4f3f" AppliesTo="all" Category="Twitter Actions">
<RuleDesigner Sentence="Send a tweet message %1, by user %2 and password %3">
<FieldBind Field="TwitterMessage" DesignerType="TextArea" Id="1"/>
<FieldBind Field="TwitterUsername" DesignerType="TextArea" Id="2"/>
<FieldBind Field="TwitterPassword" DesignerType="TextArea" Id="3"/>
</RuleDesigner>
<Parameters>
<Parameter Name="TwitterMessage" Type="System.String, mscorlib" Direction="In" />
<Parameter Name="TwitterUsername" Type="System.String, mscorlib" Direction="In" />
<Parameter Name="TwitterPassword" Type="System.String, mscorlib" Direction="In" />
</Parameters>
</Action>
</Actions>
</WorkflowInfo>
Following are a few points to better understand what you are seeing in this .actions file.
You can see the Action Name and category, which affect how this action is displayed in the Actions drop-down menu inside SharePoint Designer and as shown in Figure 17-10.

You can also see that there are configurable fields that can be inserted into the description. These are labeled as the Rule Designer Sentence followed by variables %1, %2, %3. Each of these variables will appear as links when you add the action to a workflow. These variables can then be configured with the default configuration tools SharePoint Designer makes available and you are used to using when you created your previous workflows (Figure 17-11).

Next the value of the Field attribute determines which parameter the configured value should be bound to. The Parameters section specifies parameter values that are to be bound to the action.
Once you have this .actions file complete, copy it to the %SPRoot%Template1033Workflow folder.
You are not done yet, because you have to tell SharePoint that this new assembly you have added is safe. You need to open the web.config file for the web application on which you want to use this new action and scroll down near the bottom of the file. Here you will find a section called <System.Workflow.ComponentModel.WorkflowCompiler>.
Add a new line that describes your assembly. In this case the following line was added:
<authorizedType Assembly="CustomActivities, Version=1.0.0.0, Culture=neutral,
PublicKeyToken=a62143cda0ae4f3f" Namespace="CustomActivities" TypeName="*" Authorized="True" />
Now perform an IISRESET and this new action will be ready to go! You should be able to see your new action surfaced inside SharePoint Designer.
EXAMPLE: BASIC WORKFLOW CREATION IN VISUAL STUDIO
For this basic example, you will be creating Sequential workflow. Some of the basic steps would be the same if you wanted to create a State Machine workflow but for these purposes just stick with Sequential.
Before you get starting building Sequential workflow for SharePoint, you need to be aware of and plan for a few issues. These are:
- Concurrent user task actions
- onTaskCreated issues
- onWorkflowItemChange listening issues
These are all relatively complex issues, but you should know some of the basics at work.
Issues arise with respect to concurrent user task actions when two users involved in a workflow take action on a task at the same time. For example, suppose I have a workflow that sends a task to a group of managers to approve a capital expenditure request. Two managers open the task and approve it at the same time (this has to be pretty exact). Assuming that a workflow task action takes 500 milliseconds to process, the second action would have to come in within that 500 milliseconds. For small-scale workflows that do not send out to groups or even multiple users at once, this will not pose any issues for you. However, for more enterprise-scale workflows, especially large-scale ones that are complex and can route to numerous users, this needs to be planned and accounted for.
For the onTaskCreated issue, you must first understand that when you create a task you ask for a task to be created, but the engine does not do so immediately. Rather it creates a request to create a task. The request to create that task will not be fulfilled until the workflow is serialized. This won’t cause a problem in the majority of workflows, but it could if you need the task created in order to use the information in a condition. If I am checking this condition in a while loop that may immediately follow the CreateTask, the while loop will never be entered because the condition will not be able to see the task. For this reason Microsoft recommends not using the onTaskCreated event. You can find more information at http://support.microsoft.com/kb/970548 and also on Rob Bogues’s blog at http://www.thorprojects.com/blog/archive/2010/02/07/ontaskcreated-delayactivity-and-persistonclose-–-how-you-can-force-the-creation-of-a-task.aspx.
The onWorkflowItemChanged issue is a bit more involved. This problem is about how actively a workflow pays attention to events such as changes in workflow items. Suppose you created a workflow like the one in Figure 17-12.

Then suppose you set the workflow to watch the workflow item during the While activity but also have it go on its merry way to do other things, like the next watch item for onTaskChanged. In a sense the workflow is not paying attention anymore to the onWorkflowItemChanged event.
So how would this look in practice and what problem would it cause? Take the situation where you start a process on a document in a document library, then tell the workflow to watch for changes to that document, while at the same time you are assigning a task, processing some variables, collecting some information, and so forth. Then suppose you tell the workflow to watch for a change to that task you just assigned. Now the workflow is no longer watching the document for changes; it is just paying attention to the task. But someone is still working on the document, and when that event fires the workflow is watching the task and cannot process the item change event. At this point the workflow is no longer viable in this state. But don’t fret; Rob Bogue has a solution for you, on his blog post at http://www.thorprojects.com/blog/archive/2010/02/22/onworkflowitemchanged-and-workflow-event-delivery-problems.aspx.
Though each of these potential workflow issues can cause serious effects, each needs specific situations to occur, and you can take these into account. Taking the time to do proper planning for both your workflow strategy and each individual workflow will help reduce the issues you run into along the way. Additionally, being well versed in best practices and keeping up on bugs will also help you be more proactive. To help you in this research, you’ll find some good reference sites at the end of this chapter.
Throughout the previous sections, and even in previous chapters, you have been learning about different kinds of workflow, including different supporting technologies like event receivers. You have also read that there are pros and cons to each component. The big pro for creation of workflow with Visual Studio is also a con — the flexibility and power that come with it. It never fails that the more features, power, and flexibility a software company builds into a product, the more complicated it gets and the more time it takes to learn. Workflow is no exception to this. This chapter doesn’t envision that the reader will walk away, jump right into Visual Studio, and create complex workflows. That may or may not happen. If you walk away from this book with one thing, it might be good if this were the advice to take a step back and properly analyze what you want to do and what you’re trying to accomplish — then properly lay out a workflow strategy that may or may not involve creation of workflows inside Visual Studio 2010. With that understood you still need to walk a few steps in the workflow developer’s shoes. This section will give you the opportunity to do so.
As you no doubt have gathered, building a workflow in Visual Studio 2010 is a little more complicated than doing so in SharePoint Designer. To better explain this difference, the walkthrough that follows will take a different format. Walking through a workflow tends to get more confusing the more steps it has, thus requiring more screenshots and descriptions of each screenshot. For this exercise you will be presented with some prerequisite information, as well as a screenshot of the entire workflow itself. There will be a reference table that describes each step that you see in that workflow. From this, I hope, you’ll be able to understand the workflow and to reconstruct it on your own. This workflow as built has the following prerequisites:
- This workflow must be associated with a document library.
- The document library should have a column named Expense Approver that will be used by the workflow to determine who should get the approver task for the workflow.
- The task list content type Workflow Task should have a new list column associated with it, called Revision Status, which is a choice field with the following options: Pending Approval (default), Approved, Rejected, and Require More Info.
Once completed, this workflow will operate as follows:
1. The user creates a document, in this case a Word-based expense report. The user submits it by uploading it to a document library in SharePoint.
2. This causes the workflow to start off the insert event.
3. The workflow routes the document to the user’s manager, which for simplicity’s sake is determined by a Columns value in the document library.
4. The manager looks at the document and has the choice to approve, reject, or say that more information is needed.
5. If approved or rejected, an e-mail goes to the person who submitted the document.
6. If the manager selects Require More Info, the workflow will route the document back to the person who submitted it. Once this person has revised it, it can be resubmitted and will go back to the manager.
Once completed the workflow should look like Figure 17-13.

In tabular form, the information looks like that shown in Table 17-2.
Table 17-2: Workflow Components and Descriptions
| COMPONENT TITLE | COMPONENT TYPE | USAGE |
| onWorkflowActivated1 | onWorkflowActivated | Checks if the “Expense Approver” metadata field contains a value. If there is not a value, the workflow sets a Boolean variable to continue to check its value until it is filled or not null. |
| ItemChangedSequence | Sequence | This is the owner activity for callExternalMethodActivity1, handleExternalEventActivity1, and whileItemPropertiesAdded. This activity helps in grouping these three activities and limits the scope of the workflow listening to the WorkflowItemChanged event. |
| callExternalMethodActivity1 | callExternalMethod | This activity subscribes to the InitializeEvent method raised by the Microsoft.SharePoint.Workflow.IListService interface on the workflow parent item. This subscription will be used by the handleExternalEvent1 activity to tap into the ItemChanged event. |
| handleExternalEventActivity1 | handleExternalEvent | This event is fired each time the workflow parent is updated. Here the process checks to see if the “Expense Approver” field is set. If it is set, a Boolean variable is set to False so that whileItemPropertiesAdded does not continue to execute. If “Expense Approver” is empty, whileItemPropertiesAdded continues to wait for handleExternalActivity1. |
| whileItemPropertiesAdded | While | This loop waits until the “Expense Approver” field is not null. This is required because the workflow is associated with the ItemAdded event and when a document is uploaded the first time this field is blank until the next screen appears asking the user to fill in metadata. By this time workflow is invoked and a Null exception is raised. It is driven by a Boolean variable, which is set by HandleExternalEventActivity1 after checking the “Expense Approver” field each time the document is modified. |
| CreateApproverTask | CreateTask | This activity creates a task for the approver mentioned in the “Expense Approver” field of the item. |
| LoopCheckCondition | While | Checks for Boolean variable “breakloop” to proceed. Continues execution of loop until this value is True. |
| LoopSequence | Sequence | Groups all components to be executed in the LoopCheckCondition loop. |
| onApproverTaskChanged | onTaskChanged | SharePoint workflow component that handles TaskChanged events. The code block checks if the “Revision Status” field of task is approved or rejected and sets the “breakloop” variable to True. It also sets Boolean properties (flags) for “Require More Info,” “Approved,” or “Rejected” based on the status of the revision field. |
| PendingInfoCheck | If-Else | This is the main If-Else condition. |
| PendingInfoSeq | If-Else Branch | This is the If-Else condition which checks the Boolean variable to decide if “Revision status” is set to “Require More Info.” |
| PendingInfoSequence | Sequence | Groups together activities to be performed if “Revision Status” is “Require More Info.” |
| PendingInfoLog | LogToHistory | This logs status to workflow history. |
| PendingInfoEmail | SendEmail | Sends e-mail to user who uploaded the document (CreatedBy) that some more information is required. |
| CompleteApproverTask | CompleteTask | This activity is used to complete a task. |
| ConditionChecks | If-Else | Main If-Else activity to decide if document was approved or rejected. |
| CheckApproved | If-Else Branch | Condition that checks if approved flag is set. |
| CheckRejected | If-Else Branch | Condition that checks if rejected flag is set. |
| ApprovalEmail | SendEmail | Sends approval e-mail to current item’s CreatedBy user. |
| RejectionEmail | SendEmail | Sends rejection e-mail to current item’s CreatedBy user. |
Once you assemble the workflow shown with the components described, you will also need to ensure there is some actual code behind each component. The code is shown in Listing 17-5.
Listing 17-5: Visual Studio Sequential Workflow (CodeSamples.VS2010.SQWorkflow.sln)
namespace CodeSamples.VS2010.SQWorkflow.Workflow1
{
public sealed partial class Workflow1 : SequentialWorkflowActivity
{
public Workflow1()
{
InitializeComponent();
}
public Guid workflowId = default(System.Guid);
public SPWorkflowActivationProperties workflowProperties = new
SPWorkflowActivationProperties();
public bool isApproved = false;
public bool isRejected = false;
public bool RequireInfo = false;
public bool breakLoop = false;
public bool waitForItemPropertyUpdate = false;
private void onWorkflowActivated1_Invoked(object sender, ExternalDataEventArgs e)
{
if (workflowProperties.Item["Expense Approver"] == null) waitForItemPropertyUpdate = true;
if (workflowProperties != null)
{
subscriptionID = new Guid();
itemID = workflowProperties.ItemId;
listID = workflowProperties.ListId;
}
}
private void ApprovalEmail_MethodInvoking(object sender, EventArgs e)
{
SendEmail ApprovalEmail = (SendEmail)sender;
ApprovalEmail.To =
GetUserEmail(workflowProperties.Item[SPBuiltInFieldId.Created_x0020_By].ToString());
}
private string GetUserEmail(string user)
{
if (string.IsNullOrEmpty(user)) return string.Empty;
string userEmail = workflowProperties.Web.SiteUsers[user].Email;
return userEmail;
//return (string.IsNullOrEmpty(userEmail)) ? "test user email" : userEmail;
}
private void RejectionEmail_MethodInvoking(object sender, EventArgs e)
{
SendEmail RejectedEmail = (SendEmail)sender;
RejectedEmail.To =
GetUserEmail(workflowProperties.Item[SPBuiltInFieldId.Created_x0020_By].ToString());
}
private void InfoRequiredEmail_MethodInvoking(object sender, EventArgs e)
{
SendEmail RequireInfoEmail = (SendEmail)sender;
RequireInfoEmail.To =
GetUserEmail(workflowProperties.Item[SPBuiltInFieldId.Created_x0020_By].ToString());
}
private void LogActivity_MethodInvoking(object sender, EventArgs e)
{
LogToHistoryListActivity logger = (LogToHistoryListActivity)sender;
if (isApproved) logger.HistoryDescription = "Document Approved";
else if (isRejected) logger.HistoryDescription = "Document Rejected";
else if (RequireInfo) logger.HistoryDescription = "Document required more info";
logger.HistoryOutcome = "Workflow Completed";
}
private void CheckDocRevisionStatus_Invoked(object sender, ExternalDataEventArgs e)
{
string revisionStatus = (workflowProperties.Item["Revision Status"] != null) ?
workflowProperties.Item["Revision Status"].ToString() : string.Empty;
isApproved = false;
isRejected = false;
RequireInfo = false;
switch (revisionStatus)
{
case "Approved":
{
isApproved = true;
breakLoop = true;
break;
}
case "Rejected":
{
isRejected = true;
breakLoop = true;
break;
}
case "Require more info":
{
RequireInfo = true;
break;
}
default:
break;
}
}
private void createApproverTask_MethodInvoking(object sender, EventArgs e)
{
this.ApproverTaskID = Guid.NewGuid();
this.ApproverTaskProperties.Title = string.Format("Please approve {0}",
workflowProperties.Item.Name);
this.ApproverTaskProperties.StartDate = DateTime.Now;
this.ApproverTaskProperties.DueDate = DateTime.Now.AddDays(3);
string approver = workflowProperties.Item["Expense Approver"].ToString();
this.ApproverTaskProperties.AssignedTo =
GetUserLoginName(Convert.ToInt32(approver.Substring(0, approver.IndexOf(";#"))));
this.ApproverTaskProperties.Description = "Approver Task";
this.ApproverTaskProperties.SendEmailNotification = true;
this.ApproverTaskProperties.TaskType = 0;
}
private string GetUserLoginName(int userID)
{
return workflowProperties.Web.SiteUsers.GetByID(userID).LoginName;
//return (string.IsNullOrEmpty(userEmail)) ? "[email protected]" : userEmail;
}
private void onApproverTaskChanged_Invoked(object sender, ExternalDataEventArgs e)
{
SPListItem task =
workflowProperties.TaskList.GetItemById(ApproverTaskAfterProperties.TaskItemId);
string revisionStatus = task["Revision Status"].ToString();
isApproved = false;
isRejected = false;
RequireInfo = false;
switch (revisionStatus)
{
case "Approved":
{
isApproved = true;
breakLoop = true;
break;
}
case "Rejected":
{
isRejected = true;
breakLoop = true;
break;
}
case "Require more info":
{
RequireInfo = true;
break;
}
default:
break;
}
}
public SPWorkflowTaskProperties ApproverTaskProperties = new
Microsoft.SharePoint.Workflow.SPWorkflowTaskProperties();
public Guid ApproverTaskID = default(System.Guid);
public SPWorkflowTaskProperties ApproverTaskAfterProperties = new
Microsoft.SharePoint.Workflow.SPWorkflowTaskProperties();
public SPWorkflowTaskProperties ApproverTaskBeforeProperties = new
Microsoft.SharePoint.Workflow.SPWorkflowTaskProperties();
public Guid subscriptionID = default(System.Guid);
public Int32 itemID = default(System.Int32);
public Guid listID = default(System.Guid);
private void callExternalMethodActivity1_MethodInvoking(object sender, EventArgs e)
{
}
private void handleExternalEventActivity1_Invoked(object sender, ExternalDataEventArgs e)
{
if (workflowProperties.Item["Expense Approver"] != null)
this.waitForItemPropertyUpdate = false;
}
}
}
Keep in mind that you can download all code and samples from the Wrox.com website. Once you have this code inserted appropriately, you can deploy this workflow by running a Deploy solution from the Build menu within Visual Studio.
You will now have created a workflow, deployed it, and tested it. Don’t be frustrated if you had issues. As I said, there’s is a learning curve with workflow development. But now you have had some exposure to the process and may at least understand what you don’t understand.
WRAPPING UP WORKFLOW IN SHAREPOINT
You now have learned what SharePoint has to offer with respect to all things workflow. You’ve gone from the basic out-of-the-box experience to using SharePoint Designer and even diving into Visual Studio and banging out some code. I hope by this point you understand what your needs may be, and what’s possible. You should put a fair amount of effort into this process to see just where you are now and where you think you will be in the near future. If you reach the point where what’s offered meets some of your needs but not all, or you realize that you may be spending a lot of time in Visual Studio, you have to make a decision. That decision at its core (most of the time) is a “build or buy” one. Microsoft has empowered IT pros and developers with a tremendous number of tools to configure, assemble, and build just about anything they can dream up.
However, this assumes that you have the skill, time, and will to sit down and do what’s necessary to accomplish your goals with the tools provided. What does your organization need, and is it willing to invest the time to train its developers on all the tools required? Will it invest the time to build, test, and deploy, and then continue to invest the resources to continually support its user base over time? If the answer is no, then you fall into the “buy” category, and that means that you will be shopping for a third-party tool that helps you accomplish your goals with respect to workflow and maybe even Business Process Management (BPM) without having to build it all yourself. Fortunately for you, many vendors out there specialize in helping companies like yours. These vendors range from those filling very basic needs to those that can handle huge enterprise BPM projects spanning groups, systems, and even organizations. Your job is to understand which ones fit your needs the best.
The first step in evaluating these vendors is to determine and document your requirements, needs, must-haves, and nice-to-haves. This will help you distinguish between vendors’ offerings. Document the reasons why you are looking to buy rather than build. Do the out-of-the-box features work, so that you just want a better interface for design, management, and reporting? Does your organization need much more power in terms of functionality, system integration, and management? Answering these questions helps you correctly place yourself on the spectrum of workflow and BPM. Once you are correctly placed you can list the vendors that address your need level and are typically priced accordingly. If the basic functionality is close to enough but not quite, you probably are not going to be shopping for a high-end BPM platform or spending hundreds of thousands of dollars. Conversely if your needs are much greater than those provided, you’re probably not going to get away with a low-end solution costing only a few thousand dollars. This section will get you started on this search by profiling a few of the top vendors out there and where they may fall in this grand spectrum.
Whether you feel that the real need to buy is to get a better design or authoring environment for you and your users, or you have seen the light and want to reap the benefits of a true BPM implementation, the following vendors will help you achieve your goals.
- Bamboo: http://store.bamboosolutions.com/sharepoint-workflow-conductor.aspx
- Nintex: http://www.nintex.com/en-US/Products/Pages/NintexWorkflow2010.aspx
- K2: http://www.k2.com
- Global 360: http://www.global360.com
Bamboo Workflow Conductor
Bamboo’s Workflow Conductor provides a simple, yet powerful way to let the users who best know the existing processes create workflows that automate those business functions. Designing workflows in Conductor is a simple drag-and-drop experience that lets users create workflows that range from short and simple to large and complex, whichever suits the process at hand. Conductor even allows users to save workflows as templates that can then be reused across the farm.
Nintex Workflow 2010
Nintex Workflow 2010 adds a drag-and-drop workflow designer, connectivity, and advanced workflow features to the Microsoft SharePoint 2010 document management and collaboration platform, empowering business users and IT professionals alike to quickly and easily automate business processes; from a simple leave approval request, to complex integration across external applications and data sources
K2
K2 will give you process-driven applications — fast. It offers three software products to help you increase business efficiency and simplify work. K2’s visual tools allow people of various technical and non-technical backgrounds to create applications that automate processes and streamline operations. And when something in the business changes, modifying the applications to keep up is easy.
K2 applications can be set up to manage simple business processes — such as document approval or inventory tracking — and they can be set up to pull together processes, people, services, information, and systems into a single application that helps drive business. Then what’s been built can be used like building blocks to assemble new applications.
Global 360
Here is some information as well as the answers to questions about Global 360:
- What makes Global 360 different? Think of how much faster a new process will be adopted — and how often it will be adhered to — if it actually helps people get their work done. Forcing an unfamiliar, non-intuitive user interface on staff can hurt productivity more than it helps. This is why Global 360 spent over 18 months and $1 million to ensure that its applications were actually easy to use. Looking at “the other side” of BPM — the people side — is where Global 360 stands out. Its user-centric approach — from the initial assessment to how the technology gets implemented — delivers a solution that users love and truly changes how work gets done.
- What is the Global 360 solution? Global 360 is well respected in the BPM market. The technology is “high and right” in both the Forrester and Gartner BPM quadrants and Global 360 is the only vendor to lead in both case and process management. Global 360 has made a strategic commitment to leveraging and enhancing the Microsoft platform. Its solution is comprised of five key components:
- Sophisticated business process analysis and optimization: For continuous process improvement, Global 360 is built on the world’s most popular modeling tool, Microsoft Visio. Business analysts and process owners can easily model, analyze, and improve their business processes. Using real data to provide a baseline, users can model the impact of process improvements and clearly understand process variances and cost drivers. Additionally the Visio Business Process Modeling Notation (BPMN) models can be easily imported into the Global 360 process modeling environment for execution.
- Visual process modeling environment: This allows you to collaboratively design business processes, and connect to back-end systems without a single line of code. You can build everything you need — diagrams, forms, rules, services, and your data model — all in one place while developing a platform for ongoing process improvement.
- Pre-built, persona-based user applications: This makes it easier for people to get their work done. Because the process has to work for people and not the other way around, Global 360 spent over 18 months and $1 million to develop highly intuitive “userView” applications that deliver the information needed to help users get their jobs done.
- Extensive process analytics and management dashboards: These provide business insight and the ability to change on the fly. From simple, easily digested views of all process information to real-time reporting, managers can make smarter, faster business decisions. And if there is unexpected demand or changing workloads, they can simply and dynamically re-allocate work until service levels are brought back into balance.
- Rich document repository: Provided by the Global 360 repository or Microsoft SharePoint. Whereas some vendors allow you to add documents as attachments, Global 360 integrates documents as an integral part of the process. This enables rules to be applied to managing documents, audit trails to be established, and tasks to be assigned. From receipts and e-mails to voicemail messages, every “document” is treated as a full participant in the process.
For further study consider the following resources:
http://msdn.microsoft.com/en-us/vstudio/dd441784.aspx#Sharepoint
http://technet.microsoft.com/en-us/library/cc298653.aspx
http://channel9.msdn.com/learn/courses/Office2010/ClientWorkflowUnit/
Blogs:
Forum:
That brings us to the end of this workflow section of the book. I hope you’ve enjoyed your journey and have found the information in it to be useful. In this chapter you have learned about the new ability in SharePoint 2010 to import reusable workflow that was built with SharePoint Designer. You’ve also learned about the different pros and cons of taking this approach as well as different items to be aware of. You also learned about an approach to some workflow-like functionality through the use of event receivers and how those can play a role in your overall workflow strategy. Next you learned about the ability to create your own custom activities/actions for use inside SharePoint Designer. Lastly, you were able to see how you can create a custom workflow inside Visual Studio 2010 using Workflow Foundation. Workflow Foundation is at the core of all the workflows you build for SharePoint in Visual Studio and at some level all workflows that are hosted in SharePoint.