14
My Site
WHAT’S IN THIS CHAPTER?
- Introduction to the new My Site structure in SharePoint 2010
- Walkthrough of how activity data is presented to the enterprise
- Uncovering best practices for configuring My Site
- Exploration of the service applications used behind the scenes with My Site
- Learning how to administer SharePoint 2010 profiles
- Understanding what level of planning is needed for large-scale My Site deployments
The previous chapter discussed how to rate and tag items inside SharePoint 2010. This activity is great; however, it won’t matter if no one can view this social data. Like a chef, you need a high-quality product but you should never neglect the final presentation. SharePoint 2010 does a great job of presenting social data with My Site. Social data is now easy to consume and use because of how the data is aggregated and presented.
SharePoint collects aspects of social data, like tagging and ratings. My Site opens the floodgates for social data related to the individual user.
In essence, the name My Site broadcasts immediately the intent of the product. This is a home for each user, a place to store information and share with others. Think of My Site as having three sections: My Newsfeed, My Content, and My Profile (Figure 14-1).

If you already are using My Site in MOSS 2007, you have a head start on understanding what SharePoint 2010 has to offer. My Newsfeed is a new addition that My Site didn’t have in MOSS 2007. This is the section that displays what is happening around you, in a familiar newsfeed format. This is where you will view activity of your colleagues: their profile updates, tagged items, and blog entries. Depending on what your interests are, you will see activity that has been tagged with keywords that match your interests as well.
My Content is a space to place your content, whether it is meant for personal consumption or to be shared with your colleagues. Personal Documents is a private document library that can house items that only you (and administrators) can view. This location is ideal for replacing file shares or (even worse, since it’s not backed up) your desktop. This immediately sounds perfect for storing OneNote files and other miscellaneous files. This location has the same capabilities as every other document library, such as versioning of files and automatic backup (to name a couple). Shared Documents is a library that can be used to save content that is then viewable by everyone who views your profile.
My Profile is essentially the landing page for a SharePoint 2010 My Site personal site. This is the gateway to viewing essentially every piece of social data regarding an individual. Profile information includes individual attributes, interests, and organizational team structure. Microsoft is taking an approach with My Site that’s very similar to Facebook and other social networking sites. The intent of adding personal identifiers to your profile is to assist in helping others inside your organization find you. The ability to automatically find like-minded people who share your expertise or skills is completely new to SharePoint 2010. Earlier chapters discussed why social data is important. Imagine working in a large corporation with employees whom you might never get a chance to talk with because they are not on the same project. Now you can find people who can share expertise and experience in subject matter (such as C#), and these experiences might uncover a shortcut for your daily routines or help solve challenges.
CONFIGURATION AND ADMINISTRATION
SharePoint 2010 underwent a huge fundamental shift in regard to service architecture. Services are now managed with service applications, which can be created by three methods:
- Configuration wizards inside Central Administration
- PowerShell commands
- Programmatically with Visual Studio 2010
A service application consists of many individual pieces. By abstracting these pieces into applications, it is now possible to scale out services inside your SharePoint farm. Because it’s not possible to discuss all the aspects of service management in this chapter, see the article from MSDN titled “Service Application and Service Management (SharePoint Server 2010)” at http://technet.microsoft.com/en-us/library/ee704547%28office.14%29.aspx.
Social data with My Site in SharePoint 2010 relies on three items: a profile sync process to bring in profiles, a process to manage tagging, and a process to search for people.
Profiles are imported into SharePoint 2010 from Active Directory (or other compatible user store) with the User Profile Service application, which relies on the User Profile Synchronization service.
Social data that consists of tags and ratings is also managed by the User Profile Service application. The tags and ratings depend on the Managed Metadata Service. The ability to search for people inside My Site is dependent on the Search Service application.
You can manage these service applications inside Central Administration under Application Management. In the Service Applications section, click the Manage Service Applications link to request a complete list of all service applications running in your farm.
You can view the services that these service applications use inside Central Administration. Navigate to the System Settings page and click the Manage Services on the Server link in the Servers section to view the status of all services running in your farm.
The following sections in this chapter outline creating these service applications. You can find additional information on creating, editing, or deleting a User Profile Service application in these articles: “Create, Edit, or Delete a User Profile Service Application (SharePoint Server 2010)” at http://technet.microsoft.com/en-us/library/ee721052%28office.14%29.aspx; and “Create, Update, Publish, and Delete a Managed Metadata Service Application (SharePoint Server 2010)” at http://technet.microsoft.com/en-us/library/ee530392%28office.14%29.aspx.
Accounts Needed for Administration
SharePoint 2010 needs a few service accounts to be created to succeed with configuration. Table 14-1 outlines what accounts are needed and what permission levels are necessary, but the table should not be a replacement for thorough planning of permissions. The information is a combination of the two TechNet articles that follow the table. It’s very easy to have the SharePoint synchronization status stuck at Starting. The first two accounts can be configured ahead of time as a managed account, and Managed Metadata allows the administrator to select these accounts from a drop-down list. This chapter addresses Managed Metadata in the next section.
Table 14-1: Administration Accounts
| LOCATION | DESCRIPTION | MANAGED ACCOUNT? |
| Application pool for My Site (Figure 14-9) | Domain User Account, not member of the farm administrators group | Yes |
| Application pool for User Profile Service application (Figure 14-16) | Domain User Account, not member of the farm administrators group | Yes |
| Administrator for User Profile Service application (Figure 14-28) | Domain User Account used to administer SharePoint farm | It could be a managed account, but it typically should be an individual user, since this is not for a running service. |
| User Profile Synchronization Service (Figure 14-18) | Local administrator, replicate Directory Changes permission inside Active Directory | Not an option |
| Account used in Synchronization Connections (to get to Active Directory) (Figure 14-21) | No |
The following resource articles are available: “Configure Profile Synchronization (SharePoint Server 2010)” at http://technet.microsoft.com/en-us/library/cc678863.aspx#Section3; and “Account Permissions and Security Settings (SharePoint Server 2010)” at http://technet.microsoft.com/en-us/library/cc678863.aspx#Section3.
What Are Managed Accounts?
Username/password management and identities are not typically discussed when reviewing My Site. Because this chapter reviews the process of setting up services and synchronizing them with Active Directory, it is important to understand the huge improvement in how SharePoint 2010 handles service accounts.
In the past, with MOSS 2007 (or WSS 3.0), it was always a huge pain to change the passwords for the service accounts used inside SharePoint. Certainly it was possible with help from a TechNet article, but it was not a trivial task. From the management standpoint, service accounts were a security risk as well. Because the process was tedious, the service account passwords were probably never set to expire. And if consultants were hired to install the platform, they probably knew all your passwords. To be fair, the same held true for internal resources as well. Typically when people left the company, all the passwords were changed. SharePoint added another level of complexity to this change process related to turnover. To make things worse, some “create” actions inside SharePoint required the knowledge of both the service account and the password — for example, creating a web application with a unique application pool or altering the search crawler.
This process has been greatly improved with SharePoint 2010 by the inclusion of Managed Accounts. SharePoint can now manage Active Directory accounts. What this means is that an administrator or “password keeper” can create Managed Accounts ahead of time that someone else can reference by selecting from a drop-down list (Figure 14-2).

By using existing accounts, this eliminates the possibility of “fat-fingering” passwords or forgetting to put the domain in front of the username.
Eliminating user error is one added benefit of Managed Accounts. The other benefits involve credential management and automatic password change. It is possible to change passwords with either a generated password, user-supplied password, or existing password through Central Administration. Creating a schedule to automatically change the passwords is an option as well (Figure 14-3).

The password that SharePoint 2010 attempts to generate is based on the complexity settings detected from network or local policy. For more information on the credential change process, bing “Plan Automatic Password Change (SharePoint Foundation)” or visit http://technet.microsoft.com/en-us/library/ee428296.aspx.
Auditing of managed accounts is available through Central Administration. Administrators can view which applications or services use a particular account and when the password was last changed.
To get a list of all managed accounts, use Get-SPManagedAccount. You can configure a managed account inside SharePoint 2010 by using Set-SPManagedAccount. For information on how to create or change a password using Set-SPManagedAccount, run Get-Help in front of the command (Figure 14-4).

MY SITE WEB APPLICATION CONFIGURATION
You have two methods for configuring My Site in SharePoint 2010: automatically through the Farm Configuration Wizard or manually inside Central Administration. If the intent of the installation is for demo purposes, My Site configuration through the wizard is by far the quickest and easiest method to get started. Unfortunately, best practices are not followed when using the wizard to configure the User Profile Service/My Site. In a production environment, My Site should be configured for the user’s own web application, content database, application pool, and application pool identity. Combining My Site with the main content web application will throw a configuration warning inside the SharePoint 2010 Health Analyzer. In order to follow best practices the following section walks through the creation of a dedicated My Site Host inside SharePoint. Several new features are included with creating a new web application that all SharePoint administrators should understand.
Inside Central Administration, navigate to Application Management and select Manage Web Applications. In the Ribbon toward the top left, select New to bring up the Create New Web Application modal pop-up.
In the Authentication section, Microsoft introduces a new type of authentication called Claims-Based Authentication (Figure 14-5).

The authentication mode that was carried over from 2007 is called Classic Mode Authentication. Classic Mode is probably the most common scenario at this time. To find out more about Claims-Based Authentication, consult the article “Plan Authentication Methods (SharePoint Server 20101)” at http://technet.microsoft.com/en-us/library/cc262350.aspx.
Forms-Based Authentication (FBA) is not supported with Classic Mode Authentication. To use FBA, Claims-Based Authentication must be used.
The My Site web application should also run in a separate IIS website. This section (Figure 14-6) creates a new IIS website.

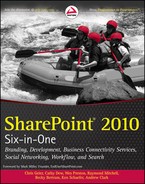
SharePoint will attempt to assign the site a random port number. Typically. web servers expect to listen to traffic on Port 80. This doesn’t mean that SharePoint needs to run all the web applications on Port 80. However, in the example of setting up My Site, the port number should be changed to Port 80. When changing the port number to 80, it is imperative that a host header be used. Host headers allow IIS to map multiple applications to one IP address and one port number. For example, host headers provide SharePoint the ability to set up contoso.com and mysites.contoso.com using the same IP address and port number. Typically, the default values will not be changed in the Security Configuration section (Figure 14-7).
My Site personal sites are not normally open to anonymous users nor is an SSL connection used. However, these values are important when setting up an external SharePoint site. For example, if an external SharePoint site is being used with Forms-Based Authentication, SSL should be used. If SSL is being used, the port number should also be updated to Port 443.
The information in the Public URL section (Figure 14-8) will be automatically refreshed after making changes in the IIS website section. Because we are creating a new application and not extending an existing application, the Zone drop-down list is marked as Default without the option of changing it.

The settings located in the Application Pool section (Figure 14-9) are extremely important in regard to IIS worker process isolation. Do not share or use an existing application pool such as the application pool associated with Central Administration. Replace the generated application pool name with a more descriptive name such as SharePoint – My Site. Lastly, the security account for the application pool is basically the identity used for the newly created application pool. This security account should be unique from all the other application pools as well. This ensures that if an identity is compromised for one application pool, the other app pools will be isolated. This last attribute might look different for people who are experienced with MOSS 2007. This uses Managed Account, a concept described earlier in this chapter.

The fields in the Database Name and Authentication section (Figure 14-10) will be pre-generated as well. The database name will have a generic name of WSS_Content with a random GUID attached to it. To make maintenance and documentation easier, remove the GUID and add in my sites after WSS_Content_. The authentication mode to communicate to the database will be defaulted to Windows Authentication. It is possible to change this to SQL Authentication, but this change will not work unless the SQL instance is configured to use Mixed Mode Authentication. Microsoft recommends Windows Authentication, but to read more information on SQL Authentication and setting up SQL server for Mixed Mode, you can consult “Choosing an Authentication Mode” at http://technet.microsoft.com/en-us/library/ms144284.aspx.

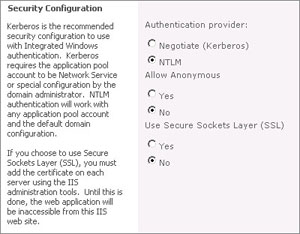
The Failover Server option (Figure 14-11) is new to 2010. SharePoint 2010 has a more seamless approach to SQL Server Database mirroring. If mirroring is already set up in your SQL instance, then this step is self-explanatory. To explore high availability and learn what the options are, search for the TechNet article “Plan for Availability (SharePoint Server 2010)” at http://technet.microsoft.com/en-us/library/cc748824.aspx.
The Service Application Connections section (Figure 14-12) can be left at default for My Site. It is important to understand what this means in regard to creating other web applications. This is the area where an administrator can specify if an application should be wired up to service applications (for example, the PerformancePoint service application). Not all applications will have the need to access every single service. More importantly, if the farm has multiple segregated web applications, they should have their own User Profile Service.

After clicking OK, the new application will appear in the web applications list with the description that was specified earlier under the Name column. At this point, SharePoint has a web application that is devoid of any site collections. The next step is to create a site collection as a My Site Host. Click Application Management and then Create Site Collections in the Site Collections section. Ensure that the newly created web application is selected as the web application in context. All the fields are self-explanatory, except for Template Selection and Quota Template. For Template Selection, you must select My Site Host under the Enterprise tab (Figure 14-13).

If the Enterprise tab is not available, confirm exactly what version of SharePoint is installed in your farm. In Central Administration, navigate to Upgrade and Migration and click Convert Farm License Type.
For Quota Template, change the drop-down list to Personal Site. This will tell SharePoint that the storage limit for each individual My Site will be 100 MB. If at any time these limits need to be changed, it’s possible to increase or decrease the storage limits using Central Administration or PowerShell. See “Manage Site Collection Storage Limits (SharePoint Server 2010)” at http://technet.microsoft.com/en-us/library/cc263480.aspx for more information.
Before moving on to configuring the User Profile Service, the implications of self-creating My Site personal sites should be explored. By following the previous steps, you have isolated the main content web application from the My Site web application. This is best practice for many reasons, but one of the main concerns is related to the size and growth of the actual content database. With MOSS 2007, the recommended limit for a content database was 100 GB. This recommendation has been raised to 200 GB with SharePoint 2010. Keep in mind that if this limit is reached, the farm will not crash. The performance of the SharePoint farm will start to gradually degrade when recommended limits are exceeded.
The quota template mentioned earlier is a set limit for how large one person’s My Site personal site can grow to. The default value set by SharePoint is 100 megabytes (MB). These sites are stored by SharePoint inside content databases that reside inside SQL Server. Since we know what the My Site quota template is (100MB), and we know the preferred growth limit of a content database (200GB), we can start to plan or stage the content databases ahead of time. Chances are high that the number of My Site personal sites created by employees will not fit inside one content database if your goal is to keep the size of the content database under 200GB. Table 14-2 attempts to visualize how to stage databases. The figure of 200 GB is equal to 204,800 MB, which based on the boundary that was set earlier (the default value of 100 MB) is equal to 2,048 My Site personal sites.
Table 14-2: Plan for My Site Limits
| STORAGE LIMIT | MAX SIZE DATABASE | MAX MY SITES |
| 50 MB | 204,800 MB | 4,096 |
| 100 MB | 204,800 MB | 2,048 |
| 200 MB | 204,800 MB | 1,024 |
| 800 MB | 204,800 MB | 256 |
Regardless of the number of employees at an institution, the number of My Site personal sites that should be hosted in one content database decreases dramatically as the storage limit for each site increases. Table 14-3 displays how the number of databases increases as the number of employees and the storage limit increase. Remember that My Site personal sites will not be generated or provisioned until the individual user clicks the My Site link for the first time. It is possible to calculate how many content databases are needed when looking at the number of employees and the storage limit.
Table 14-3: Plan for My Site Content Databases

It is possible to pre-stage the content databases in the My Site web application so that when users start to trickle in, the max number of sites will never exceed the recommended limits. Inside Central Administration, navigate to Application Management, then select Manage Content Databases in the Databases section. Ensure that the appropriate web application is selected (Figure 14-14). Depending on what the determined storage limits are, change the Maximum Number of Site Collections to your calculated figure. Also remember to change the Site Collection Level Warning to a figure less than the figure entered as the max. The last step is creating the appropriate number of content databases based on the number of employees in the institution. Use the same database capacity settings that were just used, and use a logical naming convention for the database name (Figure 14-15).


The one-time page-load hit that users receive when creating their My Site might seem like a long time to wait. It is possible to programmatically create a My Site personal site in SharePoint. Resist the urge to iterate through the Active Directory structure or User Profile Store to pre-generate My Site personal sites. It isn’t necessary to take on the extra burden for users who might not even use the functionality. The pre-generate process also assumes that the institution’s AD environment is squeaky clean. However, creating a handful of My Site personal sites ahead of time might be a good idea.
CREATING THE USER PROFILE SERVICE APPLICATION
At this point, the My Site web application is configured. With luck, the information in the previous section will start an open dialog regarding planning and user adoption. The next step is configuring the User Profile Service.
To use the My Site host that was just created, the web application has to be associated with a User Profile Service application. If this User Profile Service application has already been created, the service application will have to be deleted and then re-created. Inside Central Administration, navigate to Application Management and click Manage Service Applications in the Service Applications section. In the top-left portion of the Ribbon, click New and select User Profile Service application (Figure 14-16). Similar to creating a new web application, SharePoint will ask for application pool, profile database, and even failover database server information. To attach this application to the newly created My Site web application, enter the URL into the My Site Host URL textbox. SharePoint also provides options for how the URL will be constructed with managed paths and site-naming format. After the creation of the User Profile Service application, you will be redirected to a complete list of all service applications in the farm. Before continuing, confirm that the newly created User Profile Service is on the list and the service is started.

Select the newly created User Profile Service application and click Permissions in the Ribbon. Verify that the account currently used (inside Central Administration) has been granted full control of the service application. If this step is skipped, attempting to click Manage will display an expected error.
CONFIGURING THE USER PROFILE SERVICE AND THE USER PROFILE SYNC SERVICE
Profiles are synchronized between the SharePoint User Profile and Active Directory by the User Profile Synchronization Service. Getting this service to run without issues was problematic in pre-RTM releases of SharePoint. The good news is that the process to successfully start this service has become relatively easy. This service needs to be started with a specific set of steps and a little bit of patience.
Before you can start the User Profile Synchronization Service, you must create a User Profile Service application. You can do this by running the configuration wizard, by running a PowerShell script, or by using the GUI in Central Administration. You must configure a valid My Site Host as well.
Inside Central Administration, click System Settings then Manage Services on Server in the Servers section. Toward the bottom of the list (Figure 14-17), find User Profile Service and start the service (assuming the status is not at Started). Directly under that service is User Profile Synchronization Service. Click Start for the sync service and the screen shown in Figure 14-18 will appear.

For the User Profile Application drop-down list, select the User Profile Service application created in the previous steps. After entering the password for the service account, click OK to be returned to the list of services on the server.
Do not proceed any further until the User Profile Synchronization Service status has changed from Starting to Started (Figure 14-19). Some in the SharePoint community recommend an iisreset/noforce and even a server reboot at this point (http://www.harbar.net/articles/sp2010ups.aspx).

Once the User Profile Synchronization Service is started, it will be time to set up a synchronization connection inside SharePoint. Go back into the administration screen for the User Profile Service.
SharePoint 2010 has numerous navigation improvements. However, navigating to the various administration sites can become tedious. On the Central Administration homepage, add a link to the Manage Profile Service page to the Resources link library. The management screen is attached to a particular service application. Inspect the query string value for applicationid in the URL to confirm that the management screen is unique. Keep this in mind when saving links or bookmarks in case new profile service applications are created or deleted (Figure 14-20).

Inside the Manage Profile Service page, click Configure Synchronization Connections inside the Synchronization section. The connections page will list all current connections. Click Create New Connection to create a new connection for the User Profile Sync Service. The following screen will ask for information regarding the connection source (Figure 14-21). After selecting the connection type, account name, and password click the Populate Containers button. It is not necessary to click the entire domain; just select the organizational units that are needed (Figure 14-22). After clicking OK, the connection will be saved and viewable on the connection list. Navigate back to Manage Profile Service and click Start Profile Synchronization in the Synchronization section.


Do enough research on this topic with the SharePoint community, and it will be clear that the consensus regarding this process is to have a high level of patience. Luckily, you have two different ways to view the progress of synchronization. In the Profile Synchronization Settings located toward the right-hand side of the Manage Profile Service page, a Profile Synchronization Settings hyperlink will appear. Clicking the link brings up another browser window with updates regarding additions, updates, successes, and failures. This approach can be somewhat slow. The other option involves opening Forefront Identity Manager. Forefront Identity Manager is located at C:Program FilesMicrosoft Office Servers14.0Synchronization ServiceUIShellmiisclient.exe. FIM seems to be quicker in regard to displaying updates. Attempting to run FIM before having the synchronization service configured will display an error (Figure 14-23).

For more information regarding Forefront Identity Manager and the role that it plays with the User Profile Synchronization Service, visit “Rational Guide to Implementing SharePoint Server 2010 User Profile Synchronization” by Spencer Harbar. The following link is probably the most important resource right now in regard to User Profile Synchronization: http://www.harbar.net/articles/sp2010ups.aspx.
Managing Profiles
After successfully synching to Active Directory or a user profile source, statistics regarding the number of profiles and properties collected will appear in the Profiles section on the Manage Profile Service page (Figure 14-24). To manage individual profiles, click Manage User Profiles. By default, none of the profiles will be displayed when first visiting this page. Start out by typing in the last name of a user or entering the first letter of a name; SharePoint will then display a list of matching results. On an individual basis, it’s possible to edit a user’s properties and My Site. By selecting Manage Personal Site, the administrator will be redirected to the user’s My Site Site Settings page. As administrator, you can alter features, permissions, or content just as with any regular SharePoint site. When visiting other profile My Site personal sites as administrator, remember that the site is associated with the user but the navigation area (My Site, My Newsfeed, My Content, and My Profile) is attached to the administrator (or whatever account is currently being used). Multiple-item select is once again available on this list. However, in this example multiple select only allows the administrator to delete.

Because a My Site is considered a site collection, it can be configured much the same as other SharePoint sites. A My Site can also be configured for site use confirmation and deletion (Figure 14-25). SharePoint can be configured to detect unused sites so that administrators can manually alter or delete these sites. SharePoint can also automatically delete the unused sites as well. This functionality depends on configuring outgoing e-mail settings. For more information, see “Manage Unused Web Sites (SharePoint Server 2010)” at http://technet.microsoft.com/enus/library/cc262420.aspx.

Configure People Search
After configuring the User Profile Service, not only will My Site personal sites be functional but so will People Search. This means that the search service (assuming it has been configured) should be able to crawl the profile store. If People Search is not working in your farm, you have two configuration items to double-check. Navigate to the Search Administration site for the Search Service application.
To visit the search administration page, navigate to Application Management inside Central Administration. In the Service Applications section, click Manage Service Applications. This should be another link to include in the Resources link library.
In the Crawling section, click Content Sources (Figure 14-26) to verify which sites are being crawled. This property page will verify that the crawler is looking at the User Profile Store. Depending on the farm, numerous content sources could be listed. In most cases, there will be one entry in this list entitled Local SharePoint sites. Click Local SharePoint sites to view which start addresses are included (Figure 14-27). Verify that sps3://inserthostnamehere exists as a start address. For example, if the main application is http://contoso.com, the entry will be sps3://contoso.


Once you have confirmed that the crawler has been configured to look at the User Profile Store, the next step will be verifying that the crawler has permission to enter the User Profile Store. Navigate back to Manage Service Applications on Application Management. Highlight User Profile Service and click Administrators in the navigation Ribbon (Figure 14-28). Verify that whatever account is currently being used for the crawler has access to Retrieve People Data for Search Crawlers.

Lastly, verify that a full crawl has actually been conducted in the farm. After a complete full crawl, inspect the Crawl History in the Search Administration page. Click the content source to view more details on the log. Verify the number of errors and top-level errors. Click Error Message to view the exact errors. Use the Host drop-down list to filter the errors to determine the exact root of the error. For more information, see “Post-Installation Steps for Search (SharePoint Server 2010)” at http://technet.microsoft.com/en-us/library/ee808863.aspx.
Planning for Large-Scale My Site Deployments
Earlier in this chapter, a solution regarding planning content databases — based on the number of users inside a corporation — was discussed. Managing content databases is just one aspect of planning for a large user base for My Site usage. The other side of the coin is ensuring that the SharePoint farm can handle the network load behind social computing. Discussions regarding scaling a SharePoint farm could easily fill an entire book. This section briefly describes options for planning and monitoring performance inside your SharePoint 2010 farm.
Performance is dictated by how efficiently SharePoint handles requests per second. RPS extends further than just page loads. A single page could include several requests to the server. Social computing adds even more requests to the stack:
- Users creating keyword tags, ratings, and notes
- Generating data for activity feed listviews
- User-generated profile property updates
- Storing and displaying My Site status updates
- Tagging activities that trigger security trimming
- Traffic generated by the Outlook Social Connector
- Incremental and full crawls to detect social data updates/changes
Microsoft has released a white paper that discusses social computing capacity planning for SharePoint 2010. The white paper outlines the effect of scaling a SharePoint farm to accommodate increased RPS. Microsoft lists in detail what to expect when adding multiple web front-ends or application servers to the farm. It also helps predict when and where bottlenecks might occur. For example, if a client is rolling out the Outlook Social Connector to 100,000 users, the administrator must use three front-end web servers to support the traffic. For more information, see “SharePoint Server 2010 Performance and Capacity Test Results and Recommendations” at http://www.microsoft.com/downloads/details.aspx?FamilyID=fd1eac86-ad47-4865-9378-80040d08ac55&displaylang=en.
It’s possible to monitor an existing SharePoint farm with System Center Operations Manager 2007 (SCOM 2007). Installing the SharePoint 2010 Products Management pack will enable administrators to collect SharePoint-specific performance counters. As opposed to manually searching for issues, SCOM 2007 will send out e-mail alerts based on custom rules or events related to outages and performance monitoring. You can find an article on “Microsoft SharePoint 2010 Products Management Pack for System Center Operations Manager 2007” at http://www.microsoft.com/downloads/details.aspx?FamilyID=5c73415d-97ba-4bdc-8e92-2c4ea4507f91&displaylang=en.
Manage User Properties
The process of mapping Active Directory properties to the User Profile Store is generally handled automatically. However, it is possible to deviate from default behavior and present AD data differently inside SharePoint. To edit individual user properties, go to the Manage Profile Service and click Manage User Properties in the People section. Navigate to a property and select Edit. The following screen will show numerous property values. From here it is possible to hide attributes in the Policy Settings and Display Settings. Administrators can also mark properties as read-only in the Edit Settings section.
The big change with SharePoint 2010 and Active Directory is the ability to synchronize information from My Site back to Active Directory. Before the AD administrator gets angry, remember that it is possible to sync only a few fields. Very few environments are set up where users can refresh corporate information such as changed phone numbers, addresses, and images. Allowing SharePoint to handle this update process should alleviate some of the daily operational pains for the AD administrator. For more information about mapping user profile properties and what permissions are needed, see “Map User Profile Properties” in “Configure Profile Synchronization (SharePoint Server 2010)” at http://technet.microsoft.com/en-us/library/ee721049.aspx#section3.
What Are Audiences?
The use of audiences is not a new concept for SharePoint; they were around for MOSS 2007. Audiences allow SharePoint to deliver specific data to a subset of users. The SharePoint administrator has to configure audiences inside Central Administration. Audiences are extremely powerful in regard to usability. For example, a homepage can have a Content Query Web Part that looks at the current user’s audience membership and delivers content that applies to just that audience. This helps cut the clutter on SharePoint pages, because the page designer doesn’t have to include multiple Web Parts to display data that might not apply to each group of people. Content Query Web Part, or CQWP, is just one example that uses audience targeting. Edit the properties of most Web Parts and the Target Audience property will be available. Unlike MOSS 2007, the audience property has a People Picker–like control to assist in finding audiences.
Audiences are generated by rules set up inside Central Administration (Figure 14-29). To create audiences, navigate to the User Profile Service management page and click Manage Audiences in the People section. The rules are based on properties being returned from Active Directory (or whatever source is used for user profiles). Once rules are created, it is necessary to compile the audience to insert users into the newly created audience. It’s hoped that no compilation errors will be displayed, and that the number of members will be greater than zero. Because audiences are based on rules that look at AD properties, the SharePoint administrator needs to set up a schedule to compile audiences. This will ensure that new members are added and removed from the appropriate audience.

Personalizing Site Links
SharePoint 2010 carried over the ability to create custom links in the My Site top navigation area from SharePoint 2007. To create custom links inside the Manage Profile Service page, click Configure Personalization Site in the My Site Settings section. By adding new links here, they will appear in the top menu navigation after My Profile (Figure 14-30).

Now that audiences are created, it is possible to display links in this section depending on audience membership. For example, sales members will have a link displayed for them to the Sales team site inside SharePoint. Members of the development audience will have a completely different team site visible, along with an additional link to TechNet.
Managing Permissions
By default, everyone who is authenticated can participate with social networking inside SharePoint 2010. It is possible to limit the level of which groups of people can use My Site. Assuming these groups of people reside inside an Active Directory group, it’s relatively easy to restrict access to groups of people by visiting the Manage Profile Service web page. Inside the People section, click Manage User Permissions to change the permission sets for either individual users or Active Directory groups.
Use Personal Features allows users to alter their profiles, membership, and colleagues. Create Personal Site Permission enables users to create their My Site personal sites. Use Social Features can limit users from adding ratings and social tags to SharePoint items (Figure 14-31).

SHAREPOINT 2010 MY SITE WALK-THROUGH
Social data appears in a SharePoint 2010 My Site in a couple locations. The first location to concentrate on is the Recent Activity area under My Profile (Figure 14-32). As tags and notes are added to SharePoint items, these actions will be broadcast to the entire company. The Recent Activity section will display the most current actions under individual profiles but also in the Activity Feed of others.

The Tags and Notes area under My Profile (Figure 14-33) is yet another view of your social activity. This section provides the ability to filter by All, Tags, Notes, Private, and Public. In addition, it is possible to view social data by individual months as well. In fact, the monthly view is the default refinement. It is also possible to refine the results by tags. Selecting a refinement tag will remove the month view. The individual items displayed in Activities will appear slightly different if you are viewing your own profile as opposed to someone else’s profile. If you are visiting your own profile, you will have the ability to delete items or mark items as private/public. Naturally it is not possible to delete other people’s items when visiting their pages.

Show Different Views of My Site Data
SharePoint 2010 displays My Site information differently based on a few factors. The most recognizable factor is public or private. Public and private are two refinements that are visible in the Tags and Notes section of My Profile. Data that is stored under My Content can also be protected or public. The labeling of the My Content section might be misleading because it is possible to do much more than public and private data storage. This area is just like any other SharePoint site, so it is possible to create document libraries or lists and apply security on those artifacts so that just your colleagues or teammates can view them.
Going back to My Profile, SharePoint 2010 allows the owner to see exactly how the profile will be displayed to others. The options are Everyone, My Manager, My Team, My Colleagues, and Only Me. Similar to other networking sites, SharePoint allows users to modify the security of their profiles. Facebook is a great example for this. Facebook and Picasa allow their users to display photo albums to a group of designated friends, but hide the photos from another group that contains co-workers. SharePoint 2010 follows the same idea with My Site but goes into greater detail.
To manage permissions on the individual user’s properties, navigate to My Profile and click the Edit My Profile link under the photo. User properties in the Basic Information section will not be editable in regard to security, but most of the fields under Contact Information, Details, and Newsfeed Settings will be available for changes (Figure 14-34). Most of the properties will have the default setting set to Everyone. The SharePoint administrator can change the default security setting for each user property inside Central Administration by clicking Manage User Properties on the Manage Profile Service web page.

What Are the Organization Chart and Colleagues?
Based on Active Directory properties (or whatever data source is used to synchronize people), the My Organization Chart is populated with the current user being displayed along with co-workers and supervisors on the My Profile page. The organization browser is another way to visually see the people who comprise a team (Figure 14-35). This control is dynamic and based on Silverlight. This may sound gimmicky but according to what has been posted on the SharePoint Team blog, browsing the organization with the address book is one of the most popular features inside Outlook.

You now know that the organizational chart is dictated by the relationships that exist from the user store or Active Directory. There will be instances where users will want the ability to add co-workers or relationships to other people. This request is handled by the inclusion of colleagues. Clicking the Colleagues tab on My Profile lists all the colleagues who are attached to the current user. It’s possible to add, edit, and remove colleagues. SharePoint also has privacy filters on these relationships as well, so that only a subset of people can view what your colleagues’ relationships are. Manually adding colleagues is one example of the social aspect that SharePoint now embraces. The addition of colleagues will add more data to your newsfeed. This includes not only SharePoint activity but also personal information like birth dates or status updates.
The People Connections functionality is back with SharePoint 2010 but with an expanded role. Integration with Office Communicator is still there and will display the current status of the user. However, SharePoint now integrates with Outlook so it is easier to view contact info and to schedule a meeting. The organization chart is also visible from this People Connection menu as well. Not only did the visuals improve in SharePoint but the administration also did. Inside Central Administration, go to Application Management and click Manage Web Applications. In the next list, select the web application and click General Settings in the Ribbon. The following menu (Figure 14-36) will turn off this functionality.

Review the Newsfeed
The SharePoint 2010 Newsfeed is similar to most popular networking sites. This is the homepage where all the activity from your colleagues is consolidated. Expanding on this idea further is the inclusion of Interests. As items are tagged with metadata that matches any of your interests, that activity will be shown in your newsfeed. This allows you to uncover new artifacts that could become useful to your day-to-day activities. More importantly, this is where social computing separates itself from search engines. In the past users had to search for data; now it is possible for data to find you.
Each individual view of a newsfeed will look different because each user can alter what data is displayed in the newsfeed. Newsfeed settings allow users to change the activities that are followed (Figure 14-37). It is possible to create custom gatherers inside SharePoint as well. To dive into the creation of custom gatherers, see “Microsoft Office Server ActivityFeed Namespace MSDN” at http://msdn.microsoft.com/en-us/library/ee584594.aspx.

The Activity Feed Job is located in Central Administration under Monitoring ⇒ Review Job Definitions. Verify that the status of the job is not set to disabled. Click the Activity Feed Job to set the recurring schedule for when this job runs. The default value is set to run on an hourly basis.
Colleague Mining with Outlook 2010
The integration of Outlook 2010 and SharePoint 2010 has taken another forward step with the Colleague add-in product. This is standard functionality that is available out of the box with Outlook 2010 (Figure 14-38). This add-in is an optional tool that can be configured on each individual computer. When activated, the tool scans the user’s sent-items folder to uncover colleague recommendations. For more information on this tool and how to disable it using Group Policy, consult “Enable SharePoint Server 2010 Colleague in Outlook 2010” at http://technet.microsoft.com/en-us/library//ff384821.aspx. Outlook supports connecting to other social networks such as Facebook, Linkedin, MySpace, and Windows Live Messenger. To view the complete list of connectable social networks, bing “Outlook Social Connector Partner Listing – Microsoft Office.” Before installing any additional connectors, please test the functionality and understand the privacy concerns.

Troubleshooting
When visiting the Central Administration Site, the SharePoint Health Analyzer will display either a yellow bar to indicate warnings or a red bar to indicate critical issues. If the Activity Feed Job is not enabled, the Health Analyzer will report this as a warning (Figure 14-39). Some of these warnings and errors can be fixed by clicking the Repair Automatically button. It is preferable to fix items manually, especially when attempting to learn how to administer SharePoint. This error can be fixed by navigating to Monitoring ⇒ Review Job Definitions in Central Administration. Then click Activity Feed Job to enable the job.

SharePoint administrators might field support calls when users report issues altering their My Site profiles because certain fields are reported as having a problem retrieving data (Figure 14-40). Inspect the fields more carefully, and you should start to realize that these fields are all related to Managed Metadata. The previous chapter discussed this along with the administration of Managed Metadata. When you navigate to the management screen for Managed Metadata, another error is displayed (Figure 14-41). This error message is more descriptive and informs the user that the Managed Metadata Web Service needs to be started. This can be confirmed and fixed by navigating to System Settings ⇒ Manage Services on the server (Figure 14-42). Find the Managed Metadata Web Service and change the status to Started.


If the errors are still not resolved after making these changes, either run an iisreset/noforce or restart the machine.
In the previous chapter, the importance of an active Folksonomy was discussed. This chapter revealed how the Folksonomy activity will be exposed to SharePoint users. More importantly, you now know how to effectively leverage My Site using best practices. Yet again the recurring theme with SharePoint is planning. Every aspect of SharePoint will be impacted by the level of planning that is pursued. A poorly implemented My Site scheme will result in not only performance degradation but also low user adoption. My Site with the ability to bring content based on interests directly to the user is a fundamental shift in how we interact with data. This reason alone is why My Site and social computing should be at least considered in every corporate setting.