19
Administering and Customizing
WHAT’S IN THIS CHAPTER?
- Search administration configuration
- How to crawl content with crawl settings
- Enhancing the search results with query configuration
In any search server, many moving parts must be configured for your environment, and SharePoint search is no different. The search service application enables you to configure and tweak nearly every aspect of search, along with the tools to monitor the search health of your system. Success in large measure depends on your understanding of the content that your users will search. By understanding, I am referring to a deep and detailed knowledge of data locations, data formats, sizes of items, quantity of items, who uses the content, how often it is used, and where items should appear in search results relative to other results. It’s not easy to become a search expert in your environment, but a well configured search system goes from being a useful tool to being a business-critical application.
This chapter addresses each of the search configuration interfaces in the order they appear in the search service application navigation bar. Although this order is generally the order in which you configure search initially, you will not always follow this specific flow when trying to configure or troubleshoot your search settings once your system has been in production for a period of time. On the other hand, the order of this presentation will help you understand the dependencies between search components: you must first crawl before you can query.
In SharePoint 2010, search is a service application that can be found on the Service Application Management page of Central Administration (Figure 19-1). All SharePoint search products use the base search service application, but FAST introduces two additional service applications for FAST content and FAST query. There is a great deal of consistency between the layout and pages of the search service application and the FAST service applications. It is essential that you learn the content of this chapter before moving on to the more advanced world of FAST.

The left navigation of the search service application is divided into four major sections that represent the four major administration activities you will perform with search: Administration, Crawling, Queries, and Results/Reports. The Administration section provides farm-level and search service application-level settings for your search installation. Under normal circumstances you will configure these settings during the installation of search, and you will revisit them only when making major topological changes to your search infrastructure, such as scaling out servers.
Search Administration
The Base Search Administration page (Figure 19-2) that appears when you open the search service application provides statistical information about your search installation, a crawl history, topological information, and shortcut links to common search administration activities that you will perform. For the most part, you will use this page as a quick sanity check to see how things are going in your search application. You will also use this page if you ever need to change the default content access account. This is the account that the crawler will use to read content at all content sources when no other credentials have been provided through crawl rules.

Farm Search Administration
The Farm Search Administration page (Figure 19-3) contains configuration settings that are specific to your SharePoint farm. Whether or not you work with these configuration settings usually depends on your infrastructure. If your crawler must move through a proxy server to get to Internet content or other content sources, you will configure the proxy settings here. You will also decide whether the crawler will continue to index content when the site name does not match the SSL certification registration. Finally, the time-out setting determines how long the crawler will attempt to make a connection to a content source.

Under normal circumstances, once you have set your farm-level configuration you will not need to revisit this page. Most of your configuration effort will occur in the Crawl and Query sections of the search service application.
Crawl and Query are two sides of the same search coin, and you will often find that your work and/or troubleshooting occur on one side or the other. The crawl configuration is the side that determines what content will ultimately end up in your search index and therefore be available for search queries. To be successful with configuring crawl, you need to have an intimate understanding of the content that you want to crawl, how you want it crawled, and any rules or exclusions that you want to apply to the content as the crawler is doing its work.
Content Sources
A content source is an administrator-defined set of instructions that the crawl server uses to execute crawl operations and index search content. Each search service application can support many content sources, which are configured to search types of locations such as SharePoint sites, websites, file shares, line-of-business applications, and e-mail folders. The configuration and rules associated with content sources determine how content is introduced into the index. The content sources are the first step in the search process — gathering data.
How to Add a Content Source
Adding a content source to the crawl configuration is a straightforward process that involves identifying the type of content source and the location of the source, setting some parameters for the crawler, and establishing a schedule for the crawler to follow. The challenge to creating content sources is in understanding how each type of content source affects the crawler. There is also a bit of an art to selecting and building content sources for your search solution.
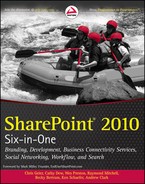
To begin adding a content source, open the SharePoint 2010 Central Administration site, then follow the links from Application Management ⇒ Manage Service Applications ⇒ Search Service Application ⇒ Content Sources (Figure 19-4). The Content Sources link is located in the left navigation section under the Crawling heading.

The Content Sources link brings up a page that shows a listing of all defined content sources in this farm (Figure 19-5). You will visit this page frequently as you define content sources for your search solution, as well as when you are monitoring the performance of search in your environment. This page not only provides you with the link to create a new content source, but it also provides you with a lot of very important information.
The content source list shows the status of the crawler for each content source. If the crawler is working, the status will read “Crawling Full” or “Crawling Incremental” to let you know what kind of crawl is being performed on that content source. You also get a feel for how long each crawl takes on this page, which will be important information when you begin considering performance scenarios that involve breaking up content sources.
The page also gives an immediate view into the scheduler by showing when the next full and incremental crawls are scheduled for execution. Finally, across the top of the list is a button to start all crawls, which will cause all defined content sources to execute their crawlers. Once you select this button, it is immediately replaced with Pause and Stop buttons. There is also a Create New Content source button, which you will click to begin the process of defining a content source.
Out of the box, SharePoint defines a single content source called Local SharePoint Sites that includes all site collections defined in this farm. SharePoint does not create a crawl schedule for this content source. This means that SharePoint search is effectively turned off when it is installed.
The name (Figure 19-6) that you give a content source is an arbitrary identification, but you should keep in mind that the title you enter here will appear in the content sources list. In many cases, when you have only a handful of content sources defined in your farm, the names of the sources may not be an issue with you. On the other hand, if you have more than a few content sources, you will want to make sure that your names are descriptive. It is a very good idea to include text in the name that will help you to know, at a glance, what type of content source it is. The default content source, Local SharePoint Sites, is a great name for a content source because it not only tells you the type (SharePoint) of source; it also tells you the location (Local) of the content source. Months after you have defined your content sources when you are trying to troubleshoot a crawling issue, you will be thankful that your content source names are descriptive.

SharePoint and the Search Server products support six types of content sources (Figure 19-7). Each type is discussed in detail later on. The content source type that is supported by all search products is the SharePoint Sites type, and it represents the most fundamental content source type that you will define.

Although we have been referring to content sources in the singular, a single content source may be responsible for crawling many content locations. The start addresses (Figure 19-8) are a list of the starting URLs for each location defined as part of this content source. If you open the out-of-the-box Local SharePoint Sites content source, you will likely have starting URLs for the entire set of site collections defined in your farm.

There is an art to defining content sources and start addresses because SharePoint imposes some limitations. The recommended maximum number of content source definitions is 50 per search service application. The actual maximum number of content sources is 500. The recommended maximum number of start addresses per content source is 100 but can go up to 500. The trick to configuring is that these two numbers should be in balance. If you have a lot of start addresses, you should have fewer overall content sources.
A workaround to an extremely high number of start addresses is to create an index HTML page consisting of links to the start addresses. The single address of this index page is then entered as the start address of a Websites Content Source type. The crawler will follow the links to index the content. In this way, you can substantially reduce the number of start addresses.
The crawl settings (Figure 19-9) change depending on the content source type that you select. For the most part, the settings define the behavior of the crawler as it moves through each start address. In most cases, the default settings are to crawl all content under each start address; however, this is not often a desirable setting because you run the risk of crawling the world. You will want to use the crawl settings to strike a balance between amount of content crawled and crawl efficiency.

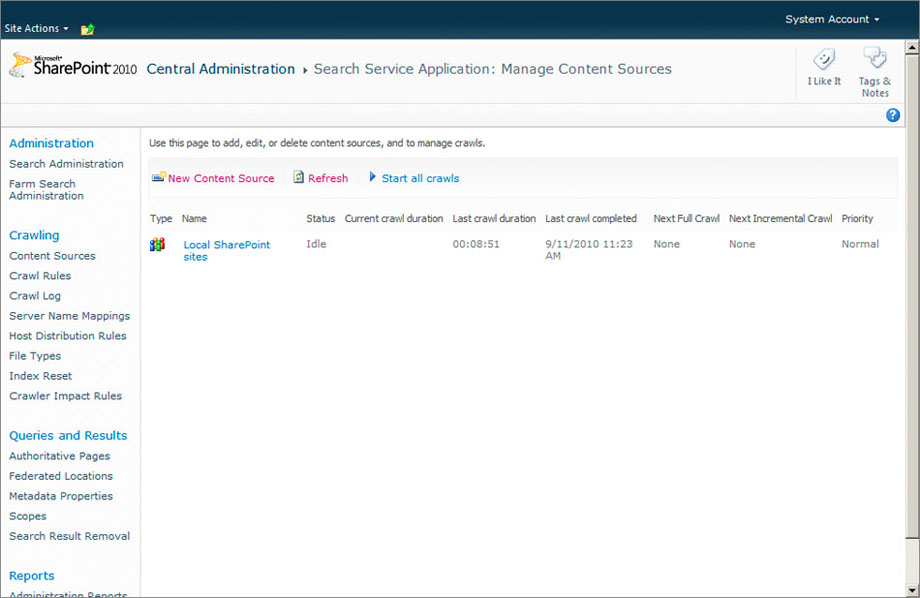
The Crawl Schedules section (Figure 19-10) allows you to either create a new schedule for both full and incremental crawls or to select a previously defined schedule. Like everything else in SharePoint search, there is an art to defining schedules. At the very least, you should define three schedules for each type of crawl: one each for high-, medium-, and low-frequency sites. Content sources that change a lot will need to be crawled with higher frequency than sites that consist mostly of static content.
An example of a high-frequency content source is a collaborative team site where users are uploading and editing documents, engaging in discussions, and adding list content many times a day. With high-frequency sites like a collaborative site, users will often want to search for content from the site within the same day in which it was added to the site. Therefore, it is necessary to have a crawler that is indexing this content multiple times throughout the business day. The schedule manager allows you to set up this kind of crawl, which will run frequently during business hours and less frequently at night. The tricky part is that you must define what the business day is in number of minutes.
At the other end are low-frequency content sources like document repositories or archives for reference documents such as a policies and procedures library. Because these are the types of content that typically do not change often, perhaps only once a year, you don’t need to have a crawler using cycles to crawl this content frequently. Perhaps in the case of a site that holds mostly policies and procedures, it could be acceptable to set up a monthly crawl of the content.
I often get objections to setting up low-frequency crawls when content has been added to the site, but the next scheduled crawl will not occur for many weeks. Often this coincides with the release of annual enrollment documents. In these one-off cases is it often more efficient to coordinate with the SharePoint administrator to manually launch a crawl immediately after the new content is uploaded.
Once you have created the three basic crawl schedules for full crawls and three schedules for incremental crawls using the Manage Schedules page (Figure 19-11), you can select them from the drop-down lists for every content source that you define.

Deciding the schedules for incremental and full crawls depends on the frequency of content change and size of the content. You will want to balance thoroughness of the crawl with efficiency of performance. If you have a frequently changing content source like a team site, one you are crawling daily or many times a day, you will want to define those crawls as incremental in order to manage performance. Yet incrementally crawling with such a high frequency often introduces anomalies in the index that need to be resolved with a full crawl. Thus it is often necessary to define more frequent full crawls, such as weekly ones, to keep the indexes clean.
In the case of low-frequency sites, the deciding factor is more a function of the size of the content. In document repositories, the size of the content typically gets extremely large over time. As the size grows, so too does the time it takes to complete a full crawl. In these cases, you will find that you can eliminate full crawl schedules and rely on incremental crawls because the risk of introducing anomalies is lower and you can easily manage any needed full crawls on a manual basis.
In cases where you have many content sources using the same crawl schedule, or you click the Start All Crawls button on the Content Source List page, SharePoint uses the content source priority setting (Figure 19-12) to determine the order in which content sources are crawled. With this kind of setting, you will use your best judgment initially and then come back later when you have some solid usage statistics. Setting a priority will be a balance between the relative value of crawled content and the potential for crawl sources to slow down the crawler. You can use the crawl priority to put the faster content sources ahead of the slower.

Although content source priorities helped in SharePoint 2007 installations, major architectural improvements in SharePoint 2010 may make this a less important component. In SharePoint 2010, you can separate crawl servers and content sources so that each crawler is responsible for a select set of content sources. This allows you to separate your high-priority content sources onto different crawl servers that can execute simultaneously. Each crawl server is responsible for indexing and propagating the content, independent of other crawl servers, which means that content from multiple crawlers indexing multiple sources will be available almost immediately on the query servers.
Content Source Crawl Settings
The Crawl Settings section of the content source configuration is different for each type of content source that you can define in SharePoint search. The crawl settings determine the depth and breadth of the crawl at each of the defined start addresses.
SharePoint Sites
The default crawl behavior for SharePoint sites (Figure 19-13) is to crawl everything under the hostname at each start address. Usually the hostname is defined with the web application, which means that the crawler will index every site collection and every site within the web application. This is the broadest and deepest SharePoint site crawl.

In many cases you want greater control over the crawling of SharePoint sites for scheduling, performance, or authentication reasons. For example, you may have a site collection whose content changes frequently, requiring more frequent crawls. You may also have a site collection with unique security requirements in which the default crawl account is not allowed read access to the content. In these cases you will use crawl rules and crawl schedules to control the crawl, but you will need separate content sources for these specialized cases. For these one-off content sources, you will need to use the crawl setting that limits the crawl to the site collection. Otherwise, you may risk crawling the entire web application with rules or a schedule that you do not intend.
Websites
Website crawls are a content source type where you can get yourself into a lot of trouble. When the crawler indexes a source as a website, it will follow all hyperlinked paths from the start page of the start address. For a small site that has only internal links, this may not be a concern; but, what if the site contains links to heavily linked sites like YouTube, Flickr, or Facebook? This is why the default setting limits a web crawl to the server on which the start address lives (Figure 19-14). With this limitation, if the crawler encounters a link that points to an external site, such as Flickr, it will not follow the link and index that content.

At times your web search requirements will go beyond the server. In these cases, you will use the custom web crawl settings, which enable you to control how many pages down in the hierarchy the crawler will go and how many servers it will follow links to. As stated before, if you do not limit the page depth and server hops, you potentially expose yourself to crawling the whole Internet.
When you use custom configuration, it is essential that you understand the content that is located at the configured path and how far and deep you really need to crawl. The first time that you conduct a crawl after configuring this type of crawl rule, it’s a very good idea to keep a close eye on the crawl log so you can kill the crawl if it begins to index too much content.
File Shares
Most organizations have a substantial amount of content stored in file shares. In many cases the amount of content located on shared drives is so substantial that it is impractical to migrate that content onto the SharePoint servers. Setting up file-share content sources allows you to keep large amounts of binary content on the file shares yet still serve it up in search results.
As with a web crawl, you will need to make decisions about crawl depth when crawling file-share sources. In this case, you are only concerned with depth in the file structure; you will not need to worry about the crawler moving to other servers. As with every other content source, you will need to have a thorough understanding of the file-share structure and the content contained therein. By default, search will recursively crawl through every folder and subfolder within the start address (Figure 19-15).

Exchange Public Folders
Exchange public folders are configured exactly the same way as file shares (Figure 19-16); even the crawl settings section contains the same options and the same instructions. The difference between the two is that exchange public folders are a part of the Exchange server product and are managed by it, whereas the file share content source is pointing to a network address that is managed by a file server. You will determine the depth to which the crawler accesses and indexes content within Exchange. The configuration that points the crawler to your Exchange server is the start addresses that you enter for the content source.

Line-of-Business Data
External data sources (Figure 19-17) allow you to search line-of-business data. Unlike the other content sources in SharePoint, setting up line-of-business data for search is not a task for the faint-hearted. The process begins by configuring your business data connectivity services by developing a custom Profile page for showing database results along with external data connections. Once configured in the Business Connectivity Services (BCS), you will configure and crawl the content source in the search service application. If crawling line-of-business content is something you need right away, you should read Eric White’s post in the MSDN blog site at http://tinyurl.com/22owsh8.

Crawl Rules
Crawl rules allow you to specifically include or exclude content that is located in the content source. Content sources by their very nature are an inclusive approach to indexing content; the only limitation to what the crawler indexes is in starting points and the depth of the crawl. Provided that the content resides within the context of the start address and is within the depth of the definition, the content will be indexed.
Consider a scenario in which you want to index a SharePoint site collection that consists of 10 subsites and you need to prevent the crawler from indexing a single subsite. Crawl rules allow you to configure an exclusion that will prevent the single site from being indexed.
There is a critical difference between a crawl rule and a search scope (covered later in the chapter). A crawl rule prevents content from entering the index, whereas a search scope is a filter on the index content. If you create an exclusion rule in a search scope, the content remains in the index and is available to all other search scopes.
How to Add a Crawl Rule
To begin adding a crawl rule, open the SharePoint 2010 Central Administration site, then follow the links from Application Management ⇒ Manage Service Applications ⇒ Search Service Application ⇒ Crawl Rules. In the Manage Crawl Rules page, click the New Crawl Rule button to add a crawl rule to the end of the crawl rules list.
The crawl rule path defines the URLs to which this crawl rule will apply. The path (Figure 19-18) can include as many URLs as you require, separated by semicolons. Crawl rule paths work much like the start address of a content source in that each path defines the starting point where the exclusion or inclusion rules will apply. You are able to refine the path by selecting the options to match the case of the path and/or to use a Regular Expression to define the path. Both of these options allow you to create rules that are very specific to your crawling requirements.

The crawl configuration is where you indicate whether to exclude content or to include content (Figure 19-19). Exclusion rules tend to make sense to most beginning search administrators, but inclusion rules tend to confuse beginners (and many seasoned administrators as well). The most common question that I hear is, “Doesn’t the content source cover that?” Technically, the answer is yes, until you take a closer look at the inclusion options and consider the situations in which you will specifically add inclusion rules. The most common situation is to change the crawl account.

In the search service application’s farm-level settings you will establish a crawling account for the current service application. This is the account that the crawler will use to access all content in all defined content sources. If this account does not have at least read access to the content of the source, it will fail to index the data. In these situations, you may use an inclusion crawl rule to tell the crawler to use different account credentials to access content in a specified path. The Authentication section (Figure 19-20) allows you to define a variety of settings for crawling with different accounts.

Configuring Crawl Paths
The two most common search requirements for which you’ll create crawl rules are to exclude sensitive content from the index and to include content using specific credentials. The crawl path is the uniform resource identifier (URI) that identifies the location of the excluded or included content.
The most basic approach to defining crawl paths is to enter the protocol and URL of the content. This approach requires that you create crawl rules for all content in the corpus that you want to exclude or include in the index. This can be a daunting task if you have a large number of search requirements that require crawl rules. To make the process of defining rules easier, SharePoint supports the use of wild cards in the definition of crawl paths. This allows you to define a path such as http://mysitecollection/hrsite/* to cover all content in the site.
Although the wild card is helpful in covering large amounts of data with little effort, it does not allow for a granular definition. At times you will want to crawl content within a location, such as a document library, but you will want to exclude a specific set of content based on some very detailed criteria. For example, consider a Human Resources site that may contain documents whose filenames begin with Social Security numbers. Because the site also contains documents that you want indexed, you cannot use a general wild-card crawl rule to exclude these files. This is where Regular Expression–based crawl rules come into play.
SharePoint 2010 allows you to define a crawl path using a Regular Expression. The details for defining Regular Expressions are out of the scope of this chapter, but a quick Bing search will provide you with nearly any Regular Expression pattern to match your needs. Using Regular Expressions to define the path enables you to specifically target content that the crawl rule will apply to. For example, if you want to exclude all content that contains a Social Security number in its path, you can use a Regular Expression to construct a path that will exclude this content.
Crawl Logs
Crawl logs are a very powerful tool and are essential not only to the initial setup of search but also to the daily operation of search. The crawl logs are your first point of reference to validate that the crawler is, in fact, indexing content into your search solution. It is also the first place you should look when you have situations where content is not appearing in search results. The logs will not only provide you with a glimpse into the content that is being added to your index, but it will also show you error messages when content is not added to the index.
Using the crawl logs is not a difficult task; the challenge is using them in the right way to help you identify and solve problems. The Crawl Log section provides five major sections to help you drill into the content of the logs in the most efficient way, depending on what you need. For day-to-day monitoring, the content source and hostname logs will provide you with basic crawling stats. For troubleshooting specific errors, the error message, content source, and hostname logs allow you to drill into specific crawl errors. Lastly, for drilling down to specific content, all the logs allow you to get to individual items to examine how they were indexed.
Content Source Report
The Content Source report (Figure 19-21) is the log that appears by default when you open the Crawl Logs page. This log shows all your content sources with statistics regarding the success or failure of the crawler to add content to the index. One thing to note about all crawl logs is that you can view them while the crawler is running. This is a handy technique when you are first setting up your search server or when you are adding content sources for the first time. After launching a full crawl on the content source, you can redirect to this page and then begin clicking the browser’s Refresh button to see the statistics iterate as the crawler works.

Hostname Log
The hostname log (Figure 19-22) is similar to the content source log; rather than display the crawl statistics for each content source, this log lists the statistics by hostname URL. This is a very useful log when you are troubleshooting missing data, and you know where the data should reside. By following the hostname, you can drill down into the errors to find problems with specific items, or drill into the successes to see that the content is in the index.

URL Log
The URL log (Figure 19-23) is the log in which you will spend most of your troubleshooting and validating time. When users report that they are not finding content in their search queries, this is your first stop. It’s important always to check items to ensure that the crawler indexed the content. In my experience, most cases of missing content in search queries are either the result of a crawl error or not waiting for the crawl schedule to execute.

The URL log is itself a search form that allows you to search for and filter crawl results. Like the other logs, this report will update while the crawler is performing a crawl; therefore, it is a very useful tool for monitoring the crawler as it indexes content.
Monitoring this log during the first full crawl of a content source is usually the time when I realize that I forgot to add a crawl rule to use a different account. I have many times watched the access-denied errors fill up a page while the crawler works.
Crawl History Log
The crawl history log (Figure 19-24) is a useful tool for tracking trends and ensuring that crawls are running according to the expected schedule. This is a very useful tool for tweaking your crawl schedules based on the statistical results that you see over time.

Error Message Log
The error message log (Figure 19-25) is useful for identifying substantial issues with your crawls. The error messages are sorted by frequency with the most frequently occurring errors at the top. This is where you’ll find things like access issues, DNS issues, and time-out issues.

File Types
As the crawler indexes content in the content sources, it opens each item, reads the contents of the item, creates a text index of the content, and indexes crawled properties for the item. To complete this activity, the crawler uses an iFilter for each file type that provides it with instructions for opening, reading, and indexing content within the file type.
Out of the box, SharePoint includes iFilters for most common web-file formats, images, media, and office documents. This means that with no additional configuration your crawler will be able to index the majority of your content. The one glaring omission is the Adobe PDF iFilter. This filter does not come installed and is the one filter that nearly every search solution requires.
How to Add a PDF iFilter to Search
Adding the PDF iFilter is more than simply adding an entry to the File Type page in the search service application (Figure 19-26). To begin the process, you will first need to get the current 64-bit PDF iFilter from the Adobe website (http://tinyurl.com/a5gjyd) and install it on your SharePoint application server.

The next step is to get an icon image and register it with SharePoint. This image will appear next to search results to indicate the file type for the end user. A quick Bing image search for 16x16 PDF image icons should yield a suitable gif image that you can download. Save the image to the TEMPLATEimages folder located in the SharePoint root folder. To register the icon, open the docIcon.xml file (Figure 19-27) located in the TEMPLATEXML folder in the SharePoint root and add the following line in the mappings:

<Mapping Key="pdf" Value="pdf16.gif"/>
After registering the image, you will need to register the file type with the system in the registry editor (regedit.exe). In the registry editor open the HKEY_LOCAL_MACHINESOFTWAREMicrosoftOffice Server14.0SearchSetupContentIndexCommonFiltersExtension node, right-click the node, and add a new Key node: name the key node .pdf. This creates the registration with a default string. Double-click the default string and enter {E8978DA6-047F-4E3D-9C78-CDBE46041603} in the Value data field, which will complete the file type registration.
The last step is to return to the search service application and add a new file type for the PDF file type. You will need to restart the search service either from the command line or in the services application on your server. Once the service has been restarted, the crawler will know how to properly crawl PDF content. This does not mean that PDF content that was located in content sources will automatically appear in your search results because you installed the iFilter. To see indexed content for PDF files, you will need to first conduct a full crawl of all content sources that may contain PDF files. After the full crawl is complete, the indexed content will show up in search results.
Index Reset
Index reset (Figure 19-28) is the “do over” function in the crawl configuration. When you initiate an index reset, SharePoint removes all indexed content from the index. When the reset is complete you will need to conduct a full crawl of all content sources to refresh your search index.

Resetting your index may seem like an extreme measure, but in distinct situations it is called for. It is a recommended best practice to reset your index and recrawl your content after adding content sources to your server. This will ensure that the new content source does not introduce unnecessary noise into the index. Likewise, over time your index will begin to acquire extra noise that will ultimately impact crawl performance. Resetting your index will clear out unnecessary garbage. Lastly, sometimes content gets introduced into your index that you do not want to be there. Resetting the index ensures that the content is removed completely after you have created the appropriate crawl rules.
Crawler Impact Rules
Crawler impact rules (Figure 19-29) are performance enhancers that you utilize when you have large amounts of content or when content is of considerable size. When there is a large amount of content at the source, you can configure a number of documents that the crawler will request in batches. This reduces network traffic but can add a burden on both the crawl server and on the content source host. On the other hand, handling a large number of documents serially may be less burdensome on resources, but it will take considerably longer to execute.

In some cases, you will have content sources that host large files, such as file shares containing Computer-Aided Design (CAD) files. Setting a delay between crawl requests both gives the crawler time to index the large file as well as reduces the burden on the network and the host server. Whether batching requests or setting up a delay, crawler impact rules should be added with care and monitored closely for a period of time after implementing. Just as they can help search performance, they can also hurt it.
QUERIES AND RESULTS CONFIGURATION
The query side of SharePoint search is the side that most people think of when they think about search. The query server processes search requests and returns the results to the end user in the form of a rank-order listing. The way in which the server constructs the rank-order listing is governed by a very complex algorithm. The nature of the algorithm and the calculations that it performs are secret.
The question that naturally arises is this: if the algorithm is secret, how can you modify it to serve your own search needs? SharePoint provides a number of query configuration options that allow you to create configurations that will ultimately modify the way in which search results are returned by the search engine. These configuration settings combined with the information that we do know about the query algorithm will allow you to change the query and result configurations to make your search results more relevant to your end users.
Authoritative Pages
One of the factors the SharePoint query engine uses to rank the relevance of search results is to calculate the click distance of content from the start address of the content source. In practical terms, this usually means the root of the site collection or web server on which the content resides. The query server assumes that content closer to the top of the hierarchy is more relevant than content located further down in the hierarchy.
What if you want to be sure that content in a subsite dedicated to benefits data appears at the top of the search results before benefits-related data from other sites? For example, consider that there is a page in the root of the site collection that contains a news item about the annual benefits enrollment period, and that the actual benefits documents are located in the Human Resources team site. Immediately, the new item will appear to be more relevant than the actual benefits documents.
Authoritative pages (Figure 19-30) in SharePoint resolve this problem by promoting the relevance of links contained within specified URLs. This means that the configured Authoritative page is a preferred page from a relevance point of view. In SEO terminology, these are called canonical pages. By including the URL of http://intranet.contoso.com/hr/benefits.aspx, you influence the query server’s ranking of benefits data. It is important to remember that you are influencing the query engine because click distance is only one factor. But when you carefully construct your authoritative pages, you will find that this is a powerful influence.

Not only can you make content more relevant by setting up authoritative pages, but you can also demote sites to make the content they hold less relevant in the search results. Unlike authoritative pages, which are specific pages with links to content, the non-authoritative sites (Figure 19-31) are websites.

Federated Locations
Federated locations in SharePoint are external search engines that you configure to serve up search results along with the results that SharePoint serves in response to a search request. SharePoint passes the search query to all the configured federated locations, gathers the search responses from those locations, and returns the federated results along with the SharePoint results. The user interface in SharePoint includes a Federated Results Web Part. You configure this Web Part to display the results of the Federated Search.
Although federated locations are technically a query function, they will influence how you configure your search crawls. Many times it is impractical to crawl all the content that you need delivered in search results. This may be a factor of limited access to the content or of the corpus size, or it may simply reflect that some other search engine has already indexed the content for you. When you configure a content source, the crawler indexes all the content at the content source and saves the indexed results in your SQL server: more content means a bigger index, which means larger topologies. A federated location, on the other hand, stores no data at all in your SQL server; it is merely conveying search results from the federated location to the Federated Results Web Part. Leveraging federated locations will help you to minimize the size of your search topology and offer you the ability to serve up large amounts of search content to the end users.
Adding a Federated Location
The Federated Locations Management page (Figure 19-32) provides you with a listing of all federated locations defined on your search service application. It also provides the usage statistics for each location. This is a useful set of statistics because you can monitor it to see if the federated location is being used by the query server, and if so, whether your users are using the results. If either of these columns remains at 0 or a very low number for a long time, you may want to consider removing the federated location for performance purposes.

You can add federated locations in SharePoint in two ways. The first way is to add the location manually and the second is to import a location definition. For most search installations you will probably want the imported locations available in the TechNet Search Connector gallery, but in some cases you may want to federate results with a non-public search engine. Perhaps your organization is running a stand-alone FAST server or has Google configuration installed. In these cases, you will need to manually add the location.
The location information (Figure 19-33) provides the query information with the basic configuration that it needs to communicate with the remote search engine. The location type tells the query server what kind of search server it is communicating with. The query template tells the query server how to pass search terms to the remote engine. And the More Results template tells the query engine what URL to expose when a user clicks the More Results link in the Federated Results Web Part.

The Display Information section (Figure 19-34) is a set of XSL style sheets that define how federated results are displayed. Working with the contents of this section is generally a development task handled by someone well-versed in both search results and XSL.

SharePoint allows you to control what sites can use this federated location in its Federated Results Web Part. You may need to utilize this functionality in some cases. For example, you may have a research and development department that has its own FAST server crawling confidential and trade secret information. You also have a research and development team site in your intranet and would like to serve federated results from the R&D server to users of the R&D team site. Using restrictions (Figure 19-35) on the federated location, you can ensure that non-R&D users of search will not see results that could potentially contain sensitive data.

Lastly, when working with stand-alone search engines, you may need to provide specific credentials for making query requests. The Specify Credentials section (Figure 19-36) provides options for configuring nearly any type of security credential that an external search engine may require.

How to Import an Online Location
Microsoft provides a large number of preconfigured federated locations through its Federated Search Connector gallery at the TechNet Enterprise Search website (http://technet.microsoft.com/en-us/enterprisesearch/default.aspx) The link to the gallery appears just under the menu bar at the top of the Enterprise Search site (Figure 19-37).

In the Federated Search Connector gallery, you simply select the search engine (Figure 19-38) that you would like to federate with and save the FLD file to a location on your local system. The FLD file is a federated location definition file that contains all the settings that you need to use these search engines.

After you download the FLD file, select the Import Location button from the Federated Locations Management page and upload the FLD file (Figure 19-39). When the upload is complete, the location will appear in your configuration and you will be able to select the imported location in the Federated Results Web Part.

Adding Federated Results to the Search Center
Configuring the federated locations in Central Administration will not cause federated results to automatically appear in your end user’s search results. For end users to see the results, you will need to configure the Federated Results Web Part on the search results page. Assuming that the search results Web Parts are located in the Search Center, open the Search Center and conduct a search. The content of the search is irrelevant because you only need the results page.
Once the results page is displayed use the site actions menu to edit the page. If this is the first time that you are editing the search results page, look around the Web Part zones at each of the search Web Parts. You will notice that the search results page consists of a number of connected Web Parts that perform very specific tasks in search. This gives you the flexibility to make substantial changes to the Search Center.
The Federated Results Web Part is located above the Core Search Results Web Part that is located in the bottom Web Part zone. This is the default location for the Web Part but is often the least optimal placement for this Web Part because it ensures that federated results will always appear above your local search results. If the search also produces a Best Bet match, you could have a situation where the core search results served by your SharePoint server are located “below the fold” on the web page, forcing your users to scroll down to get to the core results. In most cases, you will want to drag and drop the Federated Results Web Part to another zone (the right zone is the most common) or below the Core Search Results Web Part.
To assign a federated location to the Web Part, open the Web Part properties panel (Figure 19-40) by selecting the edit Web Part option in the Web Part menu. The federated Web Part is an extremely flexible Web Part with properties that allow you to modify nearly every aspect of the search results display. This section covers only the fundamental settings.

The Location Properties drop-down boxes contain a listing of the federated locations that are available to this site. To assign the location to this Web Part, simply select the location from the drop-down. You will also want to take a careful look at the display properties and make sure that the settings are best for this Web Part. The Web Part will look very different based on which zone you place the Web Part in. The bottom Web Part zone is wider and can accommodate more text per search entry. The right Web Part zone is much narrower, which requires that you set the character limits to smaller amounts to keep the Web Part from extending far beyond the bottom of the browser window.
If you make substantial use of the Federated Results Web Part in your search solution, you will want to consult TechNet and other online resources to learn about the other properties that are available in this Web Part.
Metadata Properties
When the crawler indexes content from the content sources, it reads each piece of content and creates entries in the Properties database. The properties that the crawler defines while it indexes are the crawled properties. Crawled properties are used exclusively by the search server and are not exposed to the end user through the user interface. To make properties available to the end user, you will need to define managed properties.
Managed properties and the mapping of crawled properties to them is a very important concept for you to understand because it will directly impact your search results. When a user submits a search request, the keywords contained in that request are processed using managed properties. If a managed property does not exist, the query engine will not return metadata results for that term, and this will ultimately affect the page rankings in the content. In my field, for example, statements of work are a common content artifact and the term SOW is often used to refer to them. As the crawler indexes content on our servers it will at some point index the term SOW as a crawled property. To make search results for terms such as “SOW” and “statement of work” more relevant, it is important to map the crawled properties to a managed property.
The importance of managed properties does not end with search relevance. Managed properties are used in search scopes, advanced search, and search facets. The previous chapter discussed how to create search queries using property search syntax and how to follow facets that appear on the left-hand side of the search results page; all these features are directly related to defined managed properties.
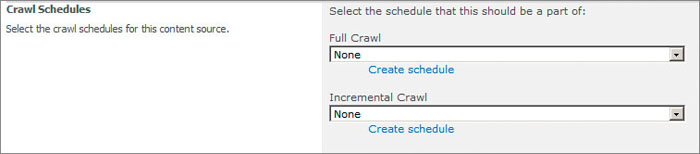
The Metadata Properties page (Figure 19-41) in the search service application provides a list of managed properties along with the crawled properties they are mapped to. Out of the box, SharePoint contains managed property mappings for the most commonly used properties. What it does not have are the crawled properties that will be unique to the content in your index.

The Crawled Properties (Figure 19-42) and Categories pages (Figure 19-43) will provide you with a listing of all crawled properties that exist in your index. You’ll want to monitor these pages regularly to ensure that new business terms are being converted to managed properties as soon as the crawler begins identifying them. You will also spend a lot of time on these pages after you crawl your content for the first time. The goal in using these pages is to identify crawled properties that users will enter as search terms or that you will want to use for search scopes, facets, or advanced search properties, and then to map them to a managed property.


Add a Managed Property
From the Metadata Properties page (Figure 19-44), you can create a new managed property. Each managed property has a name and description. The name is the keyword phrase that the query engine will match against search terms entered by the end user. Therefore, you must carefully name the managed property.
You will also select a data type for the managed property, which tells SharePoint how to store the values associated with this managed property. Selecting a data type for the property requires intimate knowledge of the content of the crawled property and the content of your corpus. In many cases, you will be mapping more than one crawled property to this managed property and may have a situation where you have multiple data types associated with this property. In these cases, you can select the Multiple Value checkbox to accommodate the additional values.
Many business terms in organizations are used in different ways or can be grouped together. As you monitor the crawled properties on the system, it will be commonplace to find groupings of crawled properties that either go together categorically or syntactically. The mapping section of the managed property is where you will add groups of crawled properties to this managed property and order them in relevance.
Clicking the Add Mapping button displays the crawled property selection dialog (Figure 19-45) where you can select from one of the crawled properties of your system. The nicest feature of this dialog is that you can select the category in which the crawled property is located to get a filtered set of properties in the dialog. Most of the time, you will be defining a managed property after viewing the crawled properties in the Categories page. The match-up between the Categories page and this dialog will make your life much easier as you set up your managed properties.

The last setting that you’ll pay particular attention to when defining a managed property is whether to expose the property to search scopes (Figure 19-46). As you see in the next section, you can define a search scope using a specific managed property, which will limit the search results in the scope to only those results that have this metadata associated with them. Leveraging managed properties to define search scopes will make your life much easier and provide you with a great deal of control over how search results are delivered to your users.

Scopes
In their most basic form, search scopes are filters for search results. Impacting scope does not affect the relevance of the results that the Query engine returns; rather it impacts what the user sees rendered in the search results Web Parts by filtering out search results according to the rules of the scope. For this reason, scopes are often confused with crawl rules, which impact what content is indexed. When you define a search scope, the filtering that is defined for the scope is applied only when a search is conducted using that search scope. If the user conducts a search with any other search scope, the search results will be filtered in a different way.
I once helped a managing partner of a firm I worked for resolve this very issue. He was using a scope to filter out sensitive content that he did not want served in search results. He was very frustrated by the fact that the content appeared when using other search scopes. I pointed out that scopes do not prevent content from appearing in search results; they simply provide a filtered view of the content. To prevent content from appearing, he needed to apply a crawl rule. Further, because the content was already in the index, he needed to use the search result removal function to both create the crawl rule and clear the sensitive information out of the index.
It is easier to understand search scopes in the context of where they are used in search. The end user can select a search scope in three key places: in the Simple Search box, in advanced search, and as a tab in the Search Center. In each of these cases, the user selects the search scope and enters the search query. The query server gathers all the content that matches the search term and then applies security trimming rules to the content. Finally, the query server applies the scope rules to filter the results. In all cases, the query server begins the process with the entire set of search results that match the entered query.
Out of the box, SharePoint defines two search scopes (Figure 19-47). The first is the All Sites search scope that is the default scope for all searches. This is an open filter that allows all content to pass through to the results page. For lack of a better term, this is the generic search. The second scope is the People search scope, which filters the search results so that only people profiles appear in the results.

Adding a Scope
Adding a scope to your search server consists of two steps. First you define the scope, and then you apply rules to the scope. You define the scope in the new scope page (Figure 19-48) by giving the scope a name and a description. Keep in mind that the title you assign to the scope is the title that will appear in the drop-down lists or as a tab in the Search Center. You should carefully name the scope so that it conveys to the end user what the scope will do.

The scope definition also allows you to define a target results page. To understand how powerful this capability is, think about the processing of out-of-the-box search results. The query server responds to a search request by passing the search results to the default search results page. The default search page consists of a set of connected Web Parts that consume the search results and display them to the end user. Because the default results page is nothing but a Web Parts page with the search parts, you can create any number of variations of the results page in your own search results pages.
Once you add the search scope definition, it will appear in the Search Scopes page. This means that you can begin to utilize the search scope in your search solution by adding it to a site collection and exposing it to the Simple Search box, advanced search, and the search tabs. That said, the definition that you created is nothing more than a placeholder for scope rules. Until you add a rule to the scope, using it in search will have no effect on the search results. Initially, you can add rules to the scope by clicking the Add Rules link in the Search Scopes page (Figure 19-49). After you have defined rules, you can modify or add rules using the item drop-down menu.
Each search scope can have multiple scope rules applied to it. The specific configuration of each rule (Figure 19-50) will depend on the type of rule that you are creating, but in essence each rule tells SharePoint how to filter the search results and what the filter does. You can use a rule to include all search results that match the rule or you can filter out and exclude all search results that match the rule. The configuration pane allows you to enter the filter information (how to conduct the filter) defined by rule type and the action (whether to include or exclude filtered results) by the rule behaviors. The next section details each of the rule types and how to configure them.

Scope Types
The four scope types that are available offer different configuration settings that affect the way in which the scope will filter the search results. As with everything in search configuration, a deep knowledge of the content will allow you to define scope types that maximize the efficacy of the search scope.
Web Address Rules
The web address rule (Figure 19-51) filters search results based on the URL associated with each item of content. SharePoint allows you to filter the URL from the very general domain down to the specific folder in which content resides.

Property Query Rules
Property query rules (Figure 19-52) use managed properties to create a filter for the search results. The previous section discussed how to convert crawled properties into managed properties and how to make a managed property available to a search scope. In the property query rule, you select a managed property and then enter value criteria that the query server will match to filter the results. This type of search scope rule is no different than conducting a property-based query using advanced search or property search syntax, but it is a more top-driven search, meaning that the user does not have to go into advanced search to select the properties; instead you, the administrator, provide a pre-configured search query.

I worked on a search project at a major food manufacturer where we set up a property-based search scope that matched a “product” managed property with the value of a certain type of cookie product. This allowed end users to use the search scope to locate content and assets related to that particular cookie line.
Content Source Rules
The content source rule is the only direct method for mapping a content source to search results (Figure 19-53). To understand this, think about a search solution in which you create a content source that points to a set of file shares that contain documents and files related to policies and procedures. You have carefully constructed the content source from more than one start address; these map to file share locations all over your network. Now you want to be able to search just the policies and procedures documents in that content source alone without mixing it in with results from other content sources. To do this, you will need to use the content source rules in a scope. You can then create a custom search results page that will display only policies and procedures results; or you can add a policies and procedures tab to the search Web Part; or you can add the scope to one of the scope drop-down boxes.

All-Content Rule
The all-content rule is a catch-all rule that will include all index content in the search scope. Recall that, out of the box, SharePoint includes two scopes that specifically filter search results for people profiles and local SharePoint content. There is no search scope that will deliver all search results from all content sources. This crawl rule allows you to create that scope.
Scope Behavior
Scope behavior defines how SharePoint will apply the search scope rule to the search results. The “include” behavior (Figure 19-54) will show any results that match the rule criteria to the end user in the search Web Parts; however, the search results may be overridden by a rule that is lower down in the list. You may have a search scope rule that includes all policies and procedures documents from a content source but excludes those policies related to a specific plant by using a property-based rule.

The “require” behavior works the same as the “include” behavior except that the results delivered by the “require” behavior cannot be overridden by an exclusion rule. Finally, the “exclude” behavior filters out search results that match the rule. The “exclude” behavior is what most people think of when you talk about filters. For this reason, the default setting of Include tends to feel backwards to some administrators.
Search Result Removal
At times, despite best efforts, search results show up in a query that you never intended to be in a results set. In these cases, you usually realize immediately that you are missing a crawl rule that will prevent this content from being crawled; but what do you do when the content has already been crawled and is located in the index? The Search Results Removal page (Figure 19-55) is the “kill two birds with one stone” solution to this problem.

Search results removal will remove results that match the provided URLs from the index and ensure that the content will no longer appear in search results. It will also create a crawl rule for each URL that will prevent the content from re-entering the index at the next crawl. If the time comes when you would like to have those search results added back into the index, you simply remove the crawl rule and complete a full crawl of all content sources.
Though search results removal is a handy tool when you overlook content that should not be in the index, it is not always the best way to handle these situations. If the content that accidentally entered into the index is of an extremely sensitive nature, such as trade secrets or personnel data, you should create the crawl rules, then reset the index and conduct a full crawl. Resetting the index is a much more thorough way of dealing with sensitive content appearing in search results.
Configuring a search server is initially a labor-intensive project that requires you to understand more about your organization’s content than any other person in the organization. Armed with this knowledge, you will begin exposing the content to the crawler, which will lead to making it available to the query server to present in search results. Configuring search will become an iterative process where you crawl content, watch the search logs, tweak query settings, and test in the Search Center — and then go back and do it all over again. At times it can be frustrating and tedious, but a well-configured SharePoint search server will perform better and provide better results than any other search product on the market.
This chapter provided the foundational knowledge for successfully configuring your search server. There is a lot more to learn and Wrox has fantastic titles that will provide you with more in-depth discussion of these topics. But you now have the functional knowledge you’ll need to begin tackling FAST search configuration, which is the subject of the next chapter.