
Upgrade to Ventura
In previous years, I wrote an entire book on the process of upgrading to the latest Mac operating system. Now, rather than offering a separate Take Control of Upgrading to Ventura book, I’ve condensed all my upgrading instructions into just this one (admittedly rather long) chapter. Although I’ve deliberately left out some details and background information from the book-length text, what follows should be more than enough to get you through the process.
If you’ve already upgraded to Ventura, you can skip ahead to Adapt to Ventura Changes.
Update Your Third-Party Software
Every major upgrade to the Mac operating system results in software compatibility problems, where some apps work poorly or won’t launch. Most of us will have to update at least a few apps to make them work correctly under Ventura. If history is any indication, some incompatible apps won’t have an update available right away, and a few might never have one. But many developers work hard to ensure that their software is ready for each new version of macOS, and “Ventura-compatible” software updates have already been appearing for months.
Check for 32-Bit Apps
If you’re already running Catalina or later, there’s nothing to see here—skip ahead to Update Your Remaining Apps. But if you’re using Mojave or earlier, you should check for 32-bit apps.
Like Monterey, Big Sur, and Catalina before it, Ventura requires 64-bit apps; older, 32-bit apps simply won’t run. As a user, you don’t need to know or care about the technical details differentiating 32-bit apps from 64-bit apps. What is relevant, however, is that if you’re upgrading from Mojave or earlier, there’s a good chance that one or more apps you use regularly won’t work under Ventura, and some of them may never work on any future version of macOS.
Thus, before you upgrade to Ventura, you should find out which of your apps are still 32-bit apps and then, depending on what you learn, decide on appropriate steps. The easiest way to do so is to download the free Go64 app. Open the app and click OK. After a few seconds, it lists all your 32-bit apps (including those, marked with an alert ![]() icon, which contain one or more 32-bit components), along with helpful information like the date you last used each one and a link to each developer.
icon, which contain one or more 32-bit components), along with helpful information like the date you last used each one and a link to each developer.
Once you’ve identified which apps won’t run under Ventura, you’ll have to upgrade them to newer versions, replace them with comparable 64-bit apps, or remove them and simply do without them. (If you’re so inclined, you could put Ventura on a separate volume so that you can switch back and forth between operating systems, but you shouldn’t think of this as a long-term solution.)
Update Your Remaining Apps
The Ventura installer looks for, and disables, certain types of incompatible software—but there’s no guarantee it will find everything (and I should note that it does not remove any remaining 32-bit apps—they’ll still be present, they just won’t work). Given the choice, you’re usually better off upgrading third-party software before you install a new version of your operating system. (You may occasionally run into an app with a newer version designed to run only on Ventura; in such limited cases, you may have to install the updated software after upgrading to Ventura.)
Apple built an update mechanism into the App Store, so any apps you downloaded from the App Store can also be updated there—and App Store updates are free. To check for and apply App Store updates:
Open the App Store app by choosing Apple > App Store.
Click Updates in the sidebar or on the toolbar (depending on your version of macOS) to display a list of available updates.
To update a single app, click the Update button next to it. Or, to update all the listed apps at once, click Update All.
If prompted to do so, enter your Apple ID and password, and click Sign In.
The App Store downloads and installs the updates automatically.
Software that doesn’t come from the App Store requires a separate update mechanism. Happily, most modern apps contain some sort of update feature. In each non–App Store app that you use frequently, look for a Check for Updates command (the wording may vary). Such commands usually appear in the application menu, the Help menu, or the Preferences window.
Back Up Your Disk
I consider a solid backup plan to be essential for every Mac user. I hope you already perform backups regularly, and if you don’t, this is a perfect time to start.
For many years, I said that when you’re about to install a new version of macOS, you should make sure you have a specific type of backup: a bootable duplicate, which is a complete copy of everything from your Mac’s startup volume stored on an external drive in such a way that you can boot from that drive if the need arises. The main reason I advocated bootable duplicates over other sorts of backups was that they provided the cleanest, quickest, and most reliable way of downgrading to your previous version of macOS should anything go wrong during or after your upgrade.
You may notice my use of the past tense here: I’m not recommending bootable duplicates anymore. It feels heretical even writing that, but let me explain.
As I discuss briefly in Bootable Duplicates in Ventura and at length in Take Control of Backing Up Your Mac, Apple made big changes in Catalina and Big Sur, and even more dramatic changes in Macs with M-series processors, the combined result of which is that bootable backups are now both harder to achieve and far less necessary. Making matters more complicated, for anything approaching usability, you’ll want to store a bootable duplicate on an external SSD (which costs much more than an external hard drive), and in some ill-defined situations, you may need an even more-expensive Thunderbolt 3 or 4 SSD, as opposed to a mere USB 3 or USB4 SSD. In sum, it’s still (usually) possible to create a bootable duplicate, but not worth the hassle and expense—especially when I can now suggest reasonable alternatives.
Yes, you should definitely have an excellent, full backup before installing Ventura. Here are some of the ways you can achieve that:
Create a data-only duplicate: Starting with Catalina, macOS splits your startup volume in two: one volume holds macOS itself; the other, with “- Data” appended to the name, holds everything else. (Most users will never notice this split, because Apple does some magic behind the scenes to make it appear, in most places, that you have just one volume, called Macintosh HD by default.) Because only that data volume contains your personal files, preferences, and apps that weren’t included with macOS, that’s all you really need to back up. Backup apps such as Carbon Copy Cloner and SuperDuper! can clone just the data volume if you like. (You’ll have to jump through a few hoops to restore that data if you eventually decide to downgrade; see How to Downgrade macOS, later in this chapter, for details.)
Consult the documentation for whichever app you choose for complete instructions, but the basic idea is: first, erase the external SSD or hard drive using Disk Utility; then, open the backup app, select your Data volume as the source and the external drive as the destination, and click the button to start the duplication process.
Create a full Time Machine backup: To hear Apple tell the story, Time Machine is the only backup solution anyone needs. Attach an external hard drive, flip a switch in System Settings, and you’re done: automatic backups every hour with no further thought or fuss. As I explain in Take Control of Backing Up Your Mac, Time Machine is pretty good but far from perfect. The most important drawback for our current purposes is not a flaw in Time Machine as such, but rather the fact that, for any of numerous good reasons, you may opt to exclude some items from Time Machine (by going to System Settings > Time Machine > Options and adding files or folders to the exclusion list). If you do that, those files can’t be restored if and when you have to revert to an older version of macOS. So, fair warning: you can use Time Machine if you like, but first remove everything from that list and allow Time Machine to complete at least one hourly run.
Clone if you want to: If you have the necessary hardware, software, and patience, you can create a full bootable duplicate in Big Sur and later, even on an M-series Mac. But since this is so much more complicated and less necessary than in years past, I wouldn’t bother. (If you’re using Catalina or earlier, it’s far less of a production—just hook up any external drive, run Carbon Copy Cloner or SuperDuper!, and you’re good to go. And if you’re using Mojave or earlier, the startup volume isn’t split at all, so a data-only duplicate is off the table as an option anyway.)
One type of backup that will not suffice for this particular purpose is an online backup using a service such as Backblaze. I like Backblaze and use it myself, but because it excludes many types of files and is unavailable to the macOS installer or Migration Assistant as a data source, it can’t be used to restore an entire Data volume after a failed upgrade.
Decide on an Installation Method
The Ventura installer doesn’t give you many options, but you can still approach the process in either of two ways:
Plan A: In-Place Upgrade: This easy, default method is appropriate for most people (including anyone Upgrading from the Ventura Beta, with some qualifications.
Plan B: Clean Install: Although the installer offers no built-in option to start fresh by erasing your disk, you can accomplish the same thing in a slightly roundabout way.
Most users should start with Plan A and then if (and only if) they encounter problems, move on to Plan B. A few people may want to skip Plan A and go directly to Plan B. In almost every case, the end result will be virtually identical, regardless of which path you take.
In the pages that follow, I describe the differences between these two plans and help you choose which way to go. Then, later in this chapter, I give you step-by-step instructions for each plan.
Plan A: In-Place Upgrade
As has been true since Snow Leopard, the Ventura installer offers a single upgrade method that attempts to make the transition simple by leaving almost all your files, apps, and settings in place. You run the installer as you would any other app, and it replaces all the components of your old macOS installation with their Ventura equivalents, while deleting those that are obsolete—just as the App Store app does when it installs minor updates.
The Ventura installer even helps you avoid many common incompatibilities. It automatically checks for certain categories of incompatible software and moves any such files safely aside into a Relocated Items folder.
As long as you have a complete backup, you have little to fear from an in-place upgrade to Ventura, and it’s entirely reasonable for Apple to have made it the default—indeed, the only official—option.
However, I must reiterate that as good as the installer is, there are no guarantees. Something could still go wrong before, during, or after the upgrade. It’s also possible that, due to an error or design flaw in the installer, important files could be deleted. These are among the reasons to consider following the clean install procedure that I describe next.
Plan B: Clean Install
Whether or not you trust the installer (and Ventura itself) to protect you from software incompatibilities, you might consider making a fresh start by erasing your entire disk and installing a clean, pristine copy of Ventura. This process requires a few extra clicks and a bit more time, but it’s not hard to perform. You have to start up from another volume (which could be a bootable duplicate or a bootable installer volume, described ahead) to erase your previous system, run the installer, and restore your personal files.
The main reason to prefer a clean install over an in-place upgrade is that erasing your disk wipes out any hidden directory corruption, file system problems, and other disk gremlins that may cause problems.
If a clean install did nothing but erase your disk and install Ventura, then all your preferences, network settings, user-installed software, and files would be gone, and you’d have to either restore them from a backup or recreate them from scratch: not fun. But as in other recent versions of macOS, the Ventura installer also offers an optional Migration Assistant feature—available only when you install onto a blank volume—that makes the process easy. As soon as the installation completes, you’ll have the option to migrate all your apps and personal files from another volume. Since you’ve made a complete backup, the installer can take all your personal data from that disk and copy it to the analogous location on the Ventura volume.
When copying your old data, you can be somewhat selective, but you can’t select individual files or folders to migrate (or skip). If you select every possible category of data (the default), Migration Assistant dutifully copies virtually everything from your backup to your startup volume (while moving aside any software it identifies as incompatible, just as occurs in an in-place upgrade). Almost to a file, the results should be identical to what you’d get with an in-place upgrade! (There are some tiny differences, but almost certainly nothing you’d ever notice if you didn’t scrutinize every last file on your disk.)
The thing is, I recommend that you do copy all your old data, because otherwise you’re likely to be left without something you need and expect. Therefore, since the net result is essentially the same with the in-place upgrade method and a clean install, I now recommend the latter only in the following situations:
Your startup disk has errors that neither Disk Utility nor third-party utilities can repair.
You want to be selective about which folders and files you let Migration Assistant copy (to reduce the clutter on your disk, for example), and you’re willing to manually copy other files you may need later.
You’re installing Ventura onto a Mac that you just purchased, and you want to erase the drive and start fresh with Ventura. You’ll transfer your data from your old Mac (or Windows PC) during the installation process.
You attempted an in-place upgrade and it failed.
Pick a Plan
To summarize, I believe Plan A is best for most people. Let Apple’s installer do its thing. You’ll already have a full backup (because, remember, I insist on it!), so the worst thing that could happen is you lose an hour or so of your time and have to start over with Plan B’s clean install. The overwhelming probability is that everything will be just fine, however, if you go with the flow.
With any plan—even with an in-place upgrade—questions, choices, and issues may arise. I’ll explain how to deal with all of them as we go.
Make Final Preparations
Now that you know which basic installation technique you’re going to use, you’re nearly ready to proceed. Your next major step (which could take hours, or even longer) is to obtain the Ventura installer; then I’ll recommend a few other quick, last-minute tasks before you dive in.
Obtain the Installer
Depending on your situation, obtaining the Ventura installer may be a trivial matter of a few clicks, or it may be an involved ordeal.
If, in your Software Update or App Store Preferences (see Handle Software Updates), “Download new updates when available” box is checked, the Ventura installer may already have downloaded without any intervention on your part. Otherwise, if you have an internet connection that can comfortably download 12+ GB of data, obtaining Ventura is pretty much like downloading any other software update:
Use this link to go to the Ventura page on the Mac App Store.
Click Get. Depending on your version of macOS, this may open the System Preferences > Software Update (in which case, click Upgrade Now) or turn into an Install button (in which case, click it).
If prompted, enter your Apple ID and password, and click Sign In.
The Ventura installer downloads to your /Applications folder—a process that could take anywhere from minutes to days, depending on the bandwidth of your internet connection.
After it downloads, the installer launches automatically. But we’re not ready to install Ventura yet, so choose Install macOS Ventura > Quit Install macOS to quit for the time being; we’ll return shortly!
Copy the Installer to a Safe Place
Unlike most software that you download from the App Store, what shows up in the /Applications folder after you download Ventura is an installer (an app called Install macOS Ventura); you must run the installer to put all the necessary pieces in place. If you do an in-place upgrade (whether to your internal SSD or an external SSD), the installer is deleted once the process is finished!
I presume the reason for this is that, once Ventura is installed, Apple wants to give you back the 12 GB or so of disk space the installer was taking up, since you likely won’t need the installer in the future (and can download it again if you do). But what if you want to install Ventura on multiple Macs—or reinstall it later on the same Mac—without having to download that huge installer again? I’ll tell you what: you’d better put that installer in a safe place before you run it! If it’s anywhere else—your desktop, ~/Downloads, or wherever—it won’t be deleted after it runs.
So, before you do anything else, I suggest that you either ⌘-drag the installer to move it from /Applications to another location, or Option-drag the installer to copy it to another location—preferably another volume—so if it is deleted, you’ll have a spare. Or, create a bootable installation volume, as I describe next.
Make a Bootable Installer Volume
The installer for Ventura and other versions of macOS doesn’t include or require boot media. But you might want to have a copy of the installer on a bootable disk for one of these reasons:
As a backup, so you don’t have to re-download it if you need it in the future
To simplify installing Ventura on multiple Macs
To facilitate downgrading from Ventura to your previous version of macOS should that become necessary (in which case, you’d want to create a bootable installer volume for the old version, not for Ventura)
If none of that applies to you, skip ahead to Update Your Backup.
The easy way to create this sort of disk is to use an app that does all the work with a few clicks—all you’ll need is a blank USB thumb drive, SSD, or other storage device with a capacity of at least 16 GB. A free app that can do this is Install Disk Creator, but it has not been updated to work with Ventura (or even with Monterey), and I suspect it’s kaput.
The other option is a command-line tool called createinstallmedia that is buried inside the installer (and thus is a method that Apple officially sanctions). Using this tool requires mucking around in Terminal, but it requires no help from third-party apps. Apple offers complete instructions for using this tool. You can also find many tutorials on the web about how to use the command-line approach—for example, this one by iDownloadBlog.com.
But there’s a catch, in that a bootable installer requires a full macOS installer to work with, and in some cases, that may not be what you get when you download Ventura, as I explain in the sidebar ahead.
Update Your Backup
Earlier in this chapter, I instructed you to make a complete backup of your startup disk. If you did that just minutes ago—and your backup includes the Ventura installer file located outside of the /Applications folder—then you can move along to the next step. Otherwise, I suggest updating your backup before running the installer.
Upgrade Using Plan A: In‑Place Upgrade
Now that you’ve gone through all the preliminary steps, it’s time to begin the upgrade. For most people, Plan A—essentially letting the installer do what it wants to do—is the logical choice. And remember, if it doesn’t work out for any reason, you can always move on later to Upgrade Using Plan B: Clean Install. Nevertheless, because you may encounter some questions or confusion during the process, I detail exactly what steps to take from start to finish.
Start the Installer
Before you run the installer, if you haven’t already done so:
If you are installing onto a laptop, connect its AC adapter to a power source. (If you forget to do this, the installer will prompt you.)
Quit all open apps. (The installer attempts to do this for you—and prompts you if it can’t—but you might as well take care of this beforehand.)
To begin the process, double-click the Install macOS Ventura icon in your /Applications folder or wherever else you put it. A window appears with just one button: Continue. Click it!
The Software License Agreement appears next; click Agree, and then click Agree again in the confirmation dialog to proceed.
Select a Destination
The next screen asks you confirm which volume you want to install Ventura onto. In most cases, it displays its best guess—typically your startup volume (Figure 2)—but you may see multiple disks here, in which case you should select the one you want. To install Ventura onto a volume that’s not shown, click Show All Disks to display all available options and then make your selection.
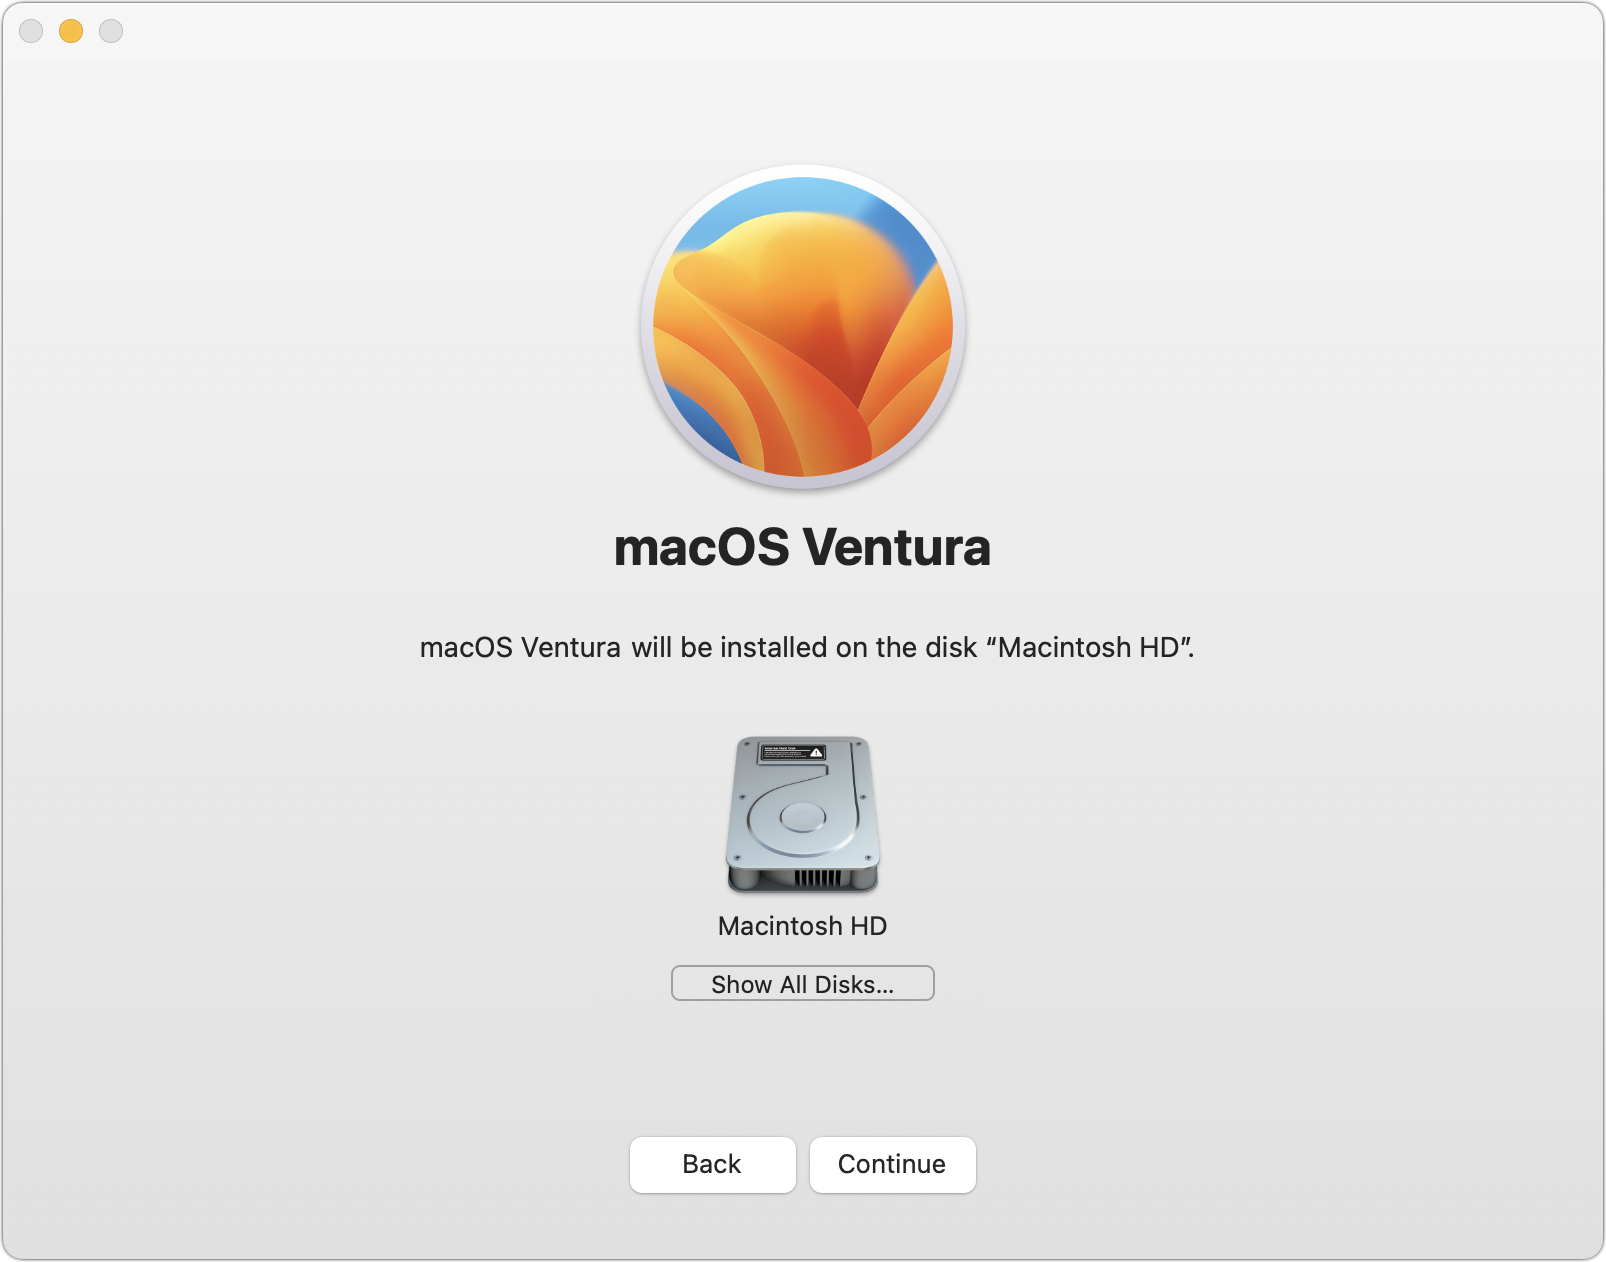
If the installer can’t use a volume as the destination for any reason, that volume is dimmed; click it for an explanation. If the volume is empty or contains a recent version of macOS, it should be OK; if not, the instructions may tell you to back it up and erase it (or in some cases reformat it).
With your desired destination volume selected, click Continue or Install (the wording varies depending on your setup).
At this point, particularly if you’re upgrading from Mojave or earlier, you may see a dialog listing any apps that are “not optimized for your Mac,” which means 32-bit apps that won’t run under Catalina or later. Make a note of these apps and click Continue.
Next, you’re prompted to enter your administrator credentials (in order to add a helper app); do so and click OK (or, in some cases, Unlock).
The installer begins copying files. The copy process typically takes several minutes, but when it finishes, the installer tells you that it will restart your computer automatically in 30 seconds; you can also click Restart to skip the wait. If any apps are still open and the installer is unable to close them automatically (for example, if there are unsaved changes you must respond to), the installer displays a prompt asking you to click Close Other Applications.
Clean Your Windows
Depending on a number of variables, including the speed of your Mac and the size of your disk, installation may take less than a half hour or as long as several hours. If you’re installing onto a hard drive or Fusion drive, it will be much longer than you might otherwise expect, because of the extra time required to convert your volume to APFS. Apart from the steps you’ve already performed, the process normally requires no intervention until the very end. Until then, you won’t be able to use your Mac for anything else, so now’s a good time to clean all the windows in your house, watch a movie, or go for a jog—you have a bit of time to kill.
As the installer progresses, your Mac will restart one or more times, and it may make some unusual sounds (like a long beep). If you weren’t already running Big Sur or later, you may also hear, for the first time in many years, your Mac’s startup chime—perhaps even more than once! (See the sidebar The Startup Chime for more on this topic.) At the end of the installation, you’ll continue with several additional configuration steps.
Finish Setup Assistant
What happens next depends on how your Mac was previously set up:
If you had Automatic Login turned on previously, Ventura should log you in automatically.
If Automatic Login was off, your entire screen becomes a login screen. Select (or enter) your username if necessary, enter your password, and press Return to log in. This initial login process may take longer than usual, so be prepared to wait a few minutes before the login screen disappears.
The first time you use Ventura, the installer’s Setup Assistant app runs, although you won’t see that name—if it appears at all, it looks like a continuation of the installer itself. Setup Assistant may display one or more screens that ask you to make various setup choices.
In some cases—especially if you’re doing an in-place upgrade from Big Sur or later and you already have most of Apple’s recommended features enabled—you may not see any Setup Assistant screens at all; or you may see just a Setting Up Your Mac screen that appears briefly and disappears on its own, because the installer may have all the information it needs without asking for any additional input.
However, depending on which version of macOS you’re upgrading from and your previous settings, you may see one or more additional screens. Those may include (not necessarily in this order):
Sign in with Your Apple ID: Even if you were signed in to iCloud in your previous version of macOS, this screen may prompt you to sign in again. Depending on the circumstances, you may be asked only for your password, or for both your Apple ID and your password. If you don’t want to enter an Apple ID—and are willing to forgo all iCloud features for the present—select Set Up Later (the wording may be slightly different), click Continue, and then click Skip again to confirm. (You can enter this information later, in System Settings > Apple ID.)
Terms and Conditions: Setup Assistant wants to be sure that you’ve consented to a bunch of additional legalese, so it may invite you to read, study, and agree to two or more statements, including “macOS Software License Agreement” and “Game Center Terms and Conditions.” Handle these however you want; I’ve found that my lawyer enjoys chatting with me about each paragraph of such agreements in detail (at his usual hourly rates).
Enable Location Services: If you hadn’t previously enabled Location Services (which is used for iCloud’s Find My Mac feature, Maps, Spotlight suggestions, and numerous other things), a dialog may appear asking if you’d like to do so. Check “Enable location services on this Mac” if you like (if you leave this disabled, you can enable the setting later in System Settings > Privacy & Security > Privacy > Location Services), or click the “About Location Services & Privacy” link to learn more.
Analytics: Ventura can automatically send diagnostic and usage data to Apple and/or third-party developers to help them track down the causes of crashes and other bugs you may encounter. This information is anonymous and doesn’t contain personal data.
If you want to send this troubleshooting data in the event that a problem occurs, select Send Diagnostics & Usage Data to Apple. With that selected, you may also select Share Crash Data with App Developers. (You can’t share crash data with app developers unless you also share diagnostic data with Apple.)
Siri: You’ll see this if Siri was disabled in your previous version of macOS. This screen has a single control, Enable Ask Siri, which is enabled by default. Leave it enabled to enable Siri voice control after Ventura is installed, or deselect it to disable Siri. (You can always enable or disable Ask Siri later—go to System Settings > Siri & Spotlight once Ventura is up and running.) You may also see a second Siri screen, titled Improve Siri & Dictation, which asks you to give Apple permission to listen to recordings of your voice in order to improve speech-to-text accuracy. For privacy reasons, I recommend selecting Not Now.
If you had to struggle through any or all of that, here’s when the “Setting Up Your Mac” screen makes its brief appearance. Then Setup Assistant quits automatically and your Ventura desktop appears.
Check for Proper Operation
In all probability, your upgrade will have gone smoothly, and everything will now work more or less the way you expect. However, even if everything looks fine, don’t declare upgrade victory until you Perform Post-Installation Tasks, including dealing with any alerts and queries that pop up shortly after installation, checking for software updates, and configuring a few new options in System Settings.
If anything did go amiss, or if you later discover problems that aren’t solved by following the advice in Troubleshoot Upgrade Problems, you can fall back to Upgrade Using Plan B: Clean Install.
Assuming your installation is now complete, you can skip the rest of this chapter and head on to Adapt to Ventura Changes.
Upgrade Using Plan B: Clean Install
If you prefer a cleaner installation of Ventura than what an in-place upgrade provides—specifically, one that gets rid of any disk errors and gives you a chance to weed out some types of user-created data—opt for Plan B. It’s also the right choice if you tried Plan A and encountered problems.
Much of Plan B is just like Plan A, so I refer to earlier discussions for some details. The differences come at the beginning (erasing your disk manually) and the end (using Setup Assistant to configure numerous settings and, optionally, using Migration Assistant to transfer data from your bootable duplicate).
Start Up from Another Volume
Unlike Plan A’s in-place upgrade, Plan B requires you to start up from another volume that contains the Ventura installer. You have a few choices:
A bootable installer volume (see Make a Bootable Installer Volume)
A bootable duplicate stored on an external SSD
Recovery mode
For the first two bullets, see the next topic; for recovery mode, skip ahead to Start Up in Recovery Mode.
Start Up from an External Drive
To start up from a bootable installer volume or a bootable duplicate:
Make sure the external drive is connected to your Mac.
On an Intel-based Mac, do the following:
Choose Apple > Restart.
Press and hold the Option key until a list of available startup volumes appears.
Use the arrow keys to select your duplicate, and then press Return to boot from it.
On an M-series Mac, do this instead:
Choose Apple > Shut Down.
Press and hold the power button until the text “Loading startup options” appears.
Wait for the available startup volumes to appear; this may take 30 seconds or more.
Select your external startup volume and click Continue.
Now that you’ve booted from another drive, you can erase your main disk and install Ventura onto it.
Start Up in Recovery Mode
To start an Intel-based Mac in recovery mode, turn it on (or restart) and hold down ⌘-R until the Apple logo appears. On an M-series Mac, turn it off and then press and hold the power button until you see “Loading startup options” on the screen; when the Options icon appears, click it and then click Continue.
Erase Your Disk
Having started up from another volume or recovery mode, follow these steps to erase your destination volume in preparation for Ventura:
Open Disk Utility. If you’ve started up from an external volume, you can find it in
/Applications/Utilities. If you’re in recovery mode, click Disk Utility in the macOS Utilities window.If only the volumes are visible in the sidebar and not the drive itself, choose View > Show All Devices.
In the sidebar, select the disk or partition you want to erase. (Be sure to select the top-level icon, not an indented container or volume.) If it is not already mounted, click the Mount icon on the toolbar; if prompted to unlock it, enter your password.
On the toolbar, click the Erase button.
Type a name for your disk, make sure Format is set to APFS, and if the Scheme pop-up menu appears, choose GUID Partition Map.
Click Erase.
If you see a confirmation dialog, click Erase again. Disk Utility erases the disk, which normally takes just a few seconds. Click Done if prompted to do so when the Erase process is complete.
Choose Disk Utility > Quit Disk Utility.
You’re now ready to install Ventura on the empty volume.
Run the Installer
Your next steps are slightly different depending on how you started your Mac:
If you’ve started from an external drive, make sure you’ve quit all running apps and then double-click the Install macOS Ventura icon in your
/Applicationsfolder or wherever else you put it.If you’re running in recovery mode, click Install macOS (or Install macOS Ventura).
A window appears with one button: Continue. Click it!
The next few steps are identical to those for an in-place upgrade:
The Software License Agreement appears; click Agree, and then click Agree again in the confirmation dialog.
Now select your destination. If needed, click Show All Disks to display all available options and click the one you want to use.
With your desired destination volume selected, click Continue or Install (the wording varies depending on your setup).
Next, you’re prompted to enter your administrator credentials (in order to add a helper app); do so and click OK (or, in some cases, Unlock).
The installer begins copying files, a process that typically takes just a few minutes, but may take longer. Then, depending on your configuration, it may restart your Mac automatically or it may ask you to click a Restart button. After the restart, the main portion of the installation process occurs.
During the installation, you may want to Clean Your Windows, but be sure to come back here once you’ve read that topic. As the installer progresses, your Mac will restart one or more times, with or without The Startup Chime. You’ll know the process has finished when the Select Your Country or Region screen appears. That’s part of Setup Assistant, to which we now turn our attention.
Use Setup Assistant
Setup Assistant is a program that looks like a continuation of the Ventura installer. It runs automatically after Ventura restarts at the end of the installation process, and walks you through a number of setup and configuration questions. It also offers to transfer files from another Mac or PC, another volume (which can be your bootable or data-only duplicate; see Use Migration Assistant, next), or a Time Machine backup.
Here’s an overview of the screens you may see. Depending on your hardware setup and which decisions you make as you work your way through the installer, this list may vary somewhat:
Hello: A “hello” screen greets you in a series of languages, changing every few seconds. There’s just one button at the bottom of the screen, “Get Started,” which you should click—even if the language has changed and you can’t read what it says!
Select Your Country or Region: Your first task is to select a country or region on the Welcome screen and click Continue.
Written and Spoken Languages: In some cases, you may be asked to confirm your preferred written and spoken languages, including those used for your keyboard and dictation.
Accessibility: This screen gives you a convenient way to set a wide variety of accessibility preferences. Clicking any of the four titles shown leads you through a series of options in that category, each with graphical descriptions of what the options do. You can adjust any or all of these, in any order—or click Not Now if you want to adjust them later in System Settings:
Vision: The nine screens that appear after you click Vision are VoiceOver, Zoom, Hover Text, Speak Selection, Pointer Size, Reduce Transparency, Increase Contrast, Appearance, and Reduce Motion.
Motor: The Motor category contains just one option: Accessibility Keyboard (an onscreen keyboard).
Hearing: In the Hearing category, there are screens for Closed Captions and “Flash for alerts.”
Cognitive: The four screens in the Cognitive category are Appearance, Speak Selection, Typing Feedback, and Hover Text. Except for Typing Feedback, these are identical to the options with the same names in the Vision category.
Select Your Wi-Fi Network: Setup Assistant next looks for a network connection. You see a screen called Select Your Wi-Fi Network. Select the network to which you want to connect and, if required, enter the password. Then click Continue. (If you connect to the internet some other way—or if you have no internet connection—click Other Network Options and select the appropriate option.)
Data & Privacy: A Data & Privacy screen appears, showing a handshake icon. Read the screen to learn that this icon should appear when an Apple feature is asking for permission to use your personal information. Finally, click Continue.
Migration Assistant: Next is the Migration Assistant screen (Figure 3), which enables you to transfer files from your backup. I cover this process next.

Use Migration Assistant
Setup Assistant includes a built-in version of the Migration Assistant app (found in /Applications/Utilities), which can copy important files from another computer or another volume in an intelligent way. We use it here to transfer the data from your backup.
To transfer your old data to your new installation, begin by selecting “From a Mac, Time Machine backup or Startup disk,” as shown in Figure 3, above. Click Continue. Then work your way through the following screens.
Transfer information to this Mac
Select your backup source—either an external drive containing a bootable or data-only duplicate or a Time Machine volume—and click Continue. For Time Machine backups, another screen appears listing each available backup; select the one you want to use (almost certainly the most recent one) and click Continue again.
Select the information to transfer
Now, select the kinds of data you want to transfer. The screen shows the size of each item. As you make your selections, the total size of the selected items, along with available space on your Ventura volume, updates automatically. (It may take a few minutes for the installer to initially display and calculate the size of each option.)
If the volume you’re transferring from has only one user account, you may see only three checkboxes, all selected by default: Applications, Documents & Data (with an accompanying Edit button), and System & Network. If the volume has more than one user account, you’ll see a scrolling list that contains numerous items—again, all selected by default: Applications, each user account listed by name, an Other Files & Folders entry, and System & Network.
Here’s an explanation of each option, and my recommendations:
Applications: This option transfers the contents of your previous
/Applicationsfolder (and its subfolders, such as Utilities), skipping any applications already installed as part of Ventura. Because you may find it tedious to reinstall your applications, leave this option selected, as it is by default.Documents & Data: If you have just one user account, you’ll see an option labeled Documents & Data—this refers to the data in your user account. Click Edit to view its contents. In the dialog that appears, you can deselect any top-level folder within the account, except for the Library folder. Along with the visible top-level folders is a folder called Other Data. Apple doesn’t specify what this includes, so I suggest leaving it selected just in case it contains anything you need. Finally, there’s an option labeled “Other data.” This refers to any files or folders at the root level of your old volume as well as anything in the
/Users/Sharedfolder. I suggest leaving this enabled.User accounts: If you have more than one user account, each is shown at the top level of the list.
This list may include “users” that don’t have a conventional user account or home folder on your Mac, but which your Mac considers to have an account of a sort—people with whom you’ve shared files using System Preferences > Sharing, for example, or special low-level accounts added by software such as MacPorts or a VPN service. It’s best to leave such user accounts selected, even if they have no home folder or appear to contain no data.
Transferring a user means copying the user’s entire home folder (
/Users/SomeUserName), if any, to the Ventura volume; once a user is transferred, the user can log in without having to set up an account again. You should transfer all the existing users unless you have accounts that are no longer in use. You can, if you like, deselect any individual (top-level) folders within a user’s home folder to skip copying those to your Ventura volume. As for the unexplained Other Data folder (mentioned in the previous bullet point), the safest course is to leave it selected.If you don’t transfer at least one account, your screens later in these steps will be slightly different. Also, if you ever want to transfer any of these accounts, now is by far the best time to do so; copying files manually may cause you no end of grief and the Migration Assistant may not work as you’d hope.
Other Files & Folders: As in the single-user account setting described in the second bullet point, this option refers to any files or folders at the root level of your old volume as well as anything in the
/Users/Sharedfolder. I suggest leaving this enabled.System & Network: This category sometimes has up to three sub-items that you can select: System Settings includes certain system-wide settings, such as sharing preferences, energy saver settings, and parental controls. Printers refers to your printer settings. Network includes the settings on your Network preference pane. I suggest leaving System & Network (and all sub-items, if present) checked.
After making your selections, click Continue.
Newer Macs may display a new screen asking you to set passwords for each user account that you’re migrating to your new Ventura volume. You must set a password for at least one administrator account you want to migrate; administrator accounts for which you don’t set a password can’t be copied to your Ventura volume. So, click Set Password next to an account name, enter and repeat a password for that user (which can be the same as the password that user currently uses), and click Set Password. Repeat for each administrator account you want to migrate.
If you’re asked to set up passwords and your backup contains accounts for any non-administrators, the installer screen automatically assigns them a new, temporary password. Be sure to write this password down (or take a photo, or both), as it won’t be shown again. Alternatively, if you prefer, you can click Promote to Admin and follow the prompts to promote any or all of these users to administrators. (You can always demote them to standard users later, if you like, by going to System Settings > Users & Groups.)
Transferring Your Information
Migration Assistant copies the selected items to your new Ventura volume—a process that may take just a few minutes or several hours, depending on how much data you are transferring. (And you should completely disregard any time estimates you see—as elsewhere in the installer, they’re wildly inaccurate.) Your Mac may restart during the transfer process.
Migration Completed
At the end of the migration process, and after one last restart, a Migration Completed screen appears, stating that your data has been migrated and is ready to use. Click Done to dismiss the window. At this point, your Mac should prompt you to log in, and then just a few questions remain.
Complete Setup Assistant
The next steps in Setup Assistant are mostly self-explanatory.
Depending on which version of macOS you’re upgrading from, what information you transferred, and your previous settings, you may see one or more additional screens. Most of these are identical to those described earlier in Finish Setup Assistant; refer back there for descriptions. After each one, click Continue to advance through the remaining screens.
Regardless of what, if anything, Setup Assistant displays, Ventura itself may display any number of dialogs and alerts the first time you use it, such as password prompts, software update messages, and requests to enable various features. To learn how to deal with these and other immediate concerns, see Perform Post-Installation Tasks.
Perform Post-Installation Tasks
If everything has gone as expected, your Mac is now successfully running Ventura. (If things haven’t gone as expected, flip forward to Troubleshoot Upgrade Problems.) But there are still a few tasks left to do before you get to work—or play—with your new operating system. Here I cover some important initial setup and configuration activities you should get out of the way right now.
Respond to Immediate Questions
Depending on your starting point, configuration, and upgrade path, you may see a normal desktop and nothing more after installing. In other situations—especially when you have a lot of third-party software—you may be immediately confronted with a large stack of overlapping dialogs and notifications.
Among the most common questions are requests for your user account password or Apple ID password. For example, certain apps may once again need an administrator’s authorization to make changes to your data, and various apps that use your Apple ID may need you to sign in again. You’ll also see requests to enable notifications; permit apps to have access to your contacts, calendars, bookmarks, and various resources in System Settings > Privacy & Security; and perhaps agree to updated iCloud terms and conditions—among other alerts.
Work your way through any such dialogs you see, even if they seem redundant or if they ask for permissions you’d previously granted. After that one-time process, most of them will not reappear.
Handle Software Updates
The next thing you should do is to update macOS itself (and any other crucial Apple software) to the latest version. Sometimes Apple releases bug fixes and security updates almost immediately after a major upgrade, and if any such urgent updates are available, it’s in your best interest to install them right away.
In some cases, Software Update and the App Store notify you automatically of updates, but I recommend checking manually after your Mac starts up under Ventura for the first time. Start with System Settings > General > Software Update for updates to Ventura itself.
For updates to other Apple software and third-party apps you’ve purchased from the App Store, choose Apple > App Store. Then click Updates in the sidebar. To update a single app or group of apps, click the Update button next to it. Or, to update all the listed apps at once, click Update All. The App Store downloads and installs the updates automatically.
In addition to installing any updates, decide how you want Software Update to handle future updates. Your Mac can optionally check for, download, and even install updates in the background.
Follow these steps to configure software updates:
Go to System Settings > General > Software Update (Figure 4). macOS checks for updates, and any available updates appear. To apply them, click Update Now.

Figure 4: Install software updates in the Software Update view. Click the Info
 icon next to Automatic Updates. A dialog (Figure 5) appears.
Figure 5: Select which types of automatic updates you want in this dialog. Turn on “Check for updates” (it’s on by default) to enable or disable automatic checking. (In some situations, you must enter your password after changing this.) If it’s enabled, you can also enable any or all of:
Download new updates when available, which not only notifies you of updates but also downloads them for you so you can install them as soon as you’re ready (in the notification, click Install to install immediately; click Later and choose Try in an Hour, Try Tonight, or Remind Me Tomorrow from the pop-up menu to “snooze” the reminder; or click the notification itself to open the App Store and see which updates are available)
Install macOS updates, which downloads and installs updates to macOS itself and asks you to restart your Mac (you may be prompted for your password if you change this)
Install app updates from the App Store, which silently updates installed apps from the App Store (except those requiring a restart or other interaction)
Install Security Responses and System Files, which automatically (without prompting you) installs these essential updates—without requiring a restart
Review the Relocated Items Folder
The Ventura installer places an alias named Relocated Items on your desktop; it points to a folder located in /Users/Shared, and it may contain any number of other files and folders, possibly including empty folders. (This will usually happen during smaller system updates, too.) There should also be a file called What Are Relocated Items?.lpdf, which you should double-click to open in Preview. It will tell you what’s in that folder, why, and what to do with it.
Although you might not understand all the explanations, or even recognize most of the items that were moved, the short version is that this folder, if it exists, contains items that the Ventura installer didn’t know what to do with for one reason or another. Follow Apple’s advice as best you can. Whatever you do, don’t try to move these items back to their original locations. Ventura will almost certainly prevent you from doing so, but even if you succeed, the software won’t work. In my experience, almost without exception, the files in this folder have been system files I never knowingly interacted with, and could therefore delete safely.
Once you’ve dealt with these items, or at least made a note of what they are, you can delete both the /Users/Shared/Relocated Items folder and the alias to it on your desktop.
Deal With Other Surprises
You may encounter a couple of other peculiarities when first using Ventura that cause some initial surprise.
Apple Mail
The first time you launch Mail under Ventura, a window informs you that it’s “optimizing” your Mail database. This step should take no more than a few minutes, and is necessary because the Ventura version of Mail has updated the database format it uses to store information about your messages.
In addition, some third-party Mail plugins you use may require Ventura updates for compatibility—and you’ll likely have to go through a tedious process of approving each one. To do so, go to Mail > Settings > General and click the Manage Plug-ins button at the bottom, which appears only when you have at least one plugin installed.
Mail opens a dialog that lists all installed plugins. Here, select the checkbox next to any plugin you want to enable. Then click Apply and Restart Mail—which, as the name suggests, quits and restarts Mail, this time with your plugin(s) enabled.
System Settings
The app formerly known as System Preferences is gone, replaced with a new one called System Settings, which looks quite a bit different. See Explore System Settings in the next chapter for details.
Troubleshoot Upgrade Problems
Even if you diligently followed all the instructions in this chapter, you might encounter problems while upgrading. I can’t anticipate every difficulty you may have (or provide solutions in every case), but here are two of the most likely issues and how to deal with them.
Can’t Select Installation Volume…
If you run the Ventura installer, click Show All Disks when asked to choose a destination, and find that the volume on which you want to install Ventura isn’t available, chances are excellent that if you click the volume in question, the installer will usually tell you why it can’t be used and explain how to fix that problem.
Mac Won’t Start Up Under Ventura…
Following installation, if your machine will not start up under Ventura at all, if it gets stuck on a gray or black screen for more than about 15 minutes, or if you experience a kernel panic upon the first restart, try these steps in order until you are able to start up normally:
Force a shutdown and restart: Press and hold the power button for about 10 seconds until your Mac shuts down. Then press it again and wait for it to restart. (In fact, wait a little longer than seems necessary—again, 15 minutes is not unreasonable—especially if you’re booting from a mechanical hard drive.)
Disconnect non-essential USB devices: If your Mac gets stuck on a gray screen and won’t finish booting, try this:
As in step 1, press and hold the power button for about 10 seconds until your Mac shuts down.
Disconnect all USB cables from your Mac except any that go to a keyboard, mouse, or other pointing device.
Press the power button again and wait for your Mac to start. If it starts normally, you can then reconnect your USB devices. If it’s still stuck after 15 minutes or so—or if it starts but then you experience a kernel panic—move on to the next step.
Try safe mode: Safe mode disables some third-party software and checks your disk for certain types of errors.
To enter safe mode on an Intel-based Mac, choose Apple > Restart. As soon as the screen goes black and your Mac begins to restart, press and hold the Shift key until the login window appears. (If the Mac is frozen or you see a kernel panic message, press and hold the power button for about 10 seconds until the Mac shuts down. Then press the power button to turn it back on and immediately hold down the Shift key until the login window appears.) The Mac will complete the startup process, which may take considerably longer than usual. You’ll eventually see the words “Safe Boot” on the screen—likely in red at the top of the login screen.
On an M-series Mac, choose Apple > Shut Down and wait until the Mac has fully shut down. Then press and hold the power button until you see “Loading startup options” on the screen. When the Options icon appears, select your startup disk, hold down the Shift key, click Continue in Safe Mode, and then release the Shift key.
If Ventura starts up normally after a safe boot, a third-party extension or startup item may be the culprit. Check in
/Library/LaunchAgents,/Library/LaunchDaemons, and~/Library/LaunchAgentsfor third-party items that haven’t been updated recently (older items are more likely to have compatibility problems).If you find any that you explicitly recognize and suspect, look for an uninstaller from the developer, and if there is one, use it. If not, consult the documentation that came with the software, or the developer’s website, for removal instructions.
Restart and see if the problem is still gone. If so, reinstall the uninstalled items one at a time, restarting after each one, until you find the culprit or you’ve installed new copies of them all and your Mac is still working well.
If the problem does not go away after a safe boot, go to…
Try recovery mode: You can boot into recovery mode on an Intel-based Mac by choosing Apple > Restart, clicking Restart, and immediately holding down ⌘-R until the Apple logo appears. On an M-series Mac, turn it off and then press and hold the power button until you see “Loading startup options” on the screen; when the Options icon appears, click it and then click Continue. Either way, a few moments later, you’ll see a macOS Utilities window; that means you’re using recovery mode.
Once in recovery mode, select Disk Utility and click Continue. When it opens, select the problematic Ventura volume in the sidebar, click First Aid, and follow the prompts to repair any problems that may have appeared on your Ventura volume. Choose Disk Utility > Quit Disk Utility to return to the macOS Utilities window. Then choose Apple > Restart.
Remove any nonessential hardware: Try restarting with only your Apple-supplied keyboard, mouse, and display attached, and (if you have a 2019 Mac Pro) without any third-party PCI or video cards. You may even need to remove extra RAM. If this works, check for driver updates, and then reattach the devices one at a time, restarting after each one.
Reinstall Ventura: If you still can’t start your Mac, consider reinstalling Ventura. Perform a clean install (described in Upgrade Using Plan B: Clean Install), omitting items in the Applications category when you work your way through the file transfer portion of the installation to eliminate any possibility of software conflicts. (You can add those items later using Migration Assistant.)
In most cases, these steps will lead to a happy Ventura installation.
How to Downgrade macOS
In all likelihood, your experience using Ventura will be just fine, and if you’re already using Monterey, the odds are even more in your favor. However, if you find yourself with an intractable problem that the troubleshooting steps above don’t help with and your only choice is to revert to your previous version of macOS, it is possible—though not convenient—as long as you have a full backup (see Back Up Your Disk).
macOS has no downgrade mechanism as such. All you can do is erase your disk—yes, you really do have to erase the whole thing—and then either restore the whole thing from a bootable duplicate or reinstall your older version of macOS and then separately migrate or restore the data from a data-only duplicate or a Time Machine backup. In order to erase your disk, you have to start from another volume—the logical options here are a bootable installer for your old version of macOS (see Make a Bootable Installer Volume) or a bootable duplicate. For this purpose, recovery mode won’t work; see the sidebar Why Won’t Recovery Mode Let Me Downgrade?.
The process is as follows:
Start up from another volume. To do this, attach the drive containing the other startup volume, go to System Settings > General > Startup Disk, select that volume, and restart your Mac.
Run Disk Utility and erase the entire disk (both system and Data volumes) containing Ventura:
Choose View > Show All Devices.
Select the topmost icon for the external drive in the list on the left.
Click Erase.
Fill in a name for the new volume, and make sure Format is set to APFS and Scheme is set to GUID Partition Map.
Click Erase.
When the Done button appears, click it. You’ll then have a new volume with the name you entered in step d.
Reinstall your old version of macOS. If you already have the installer on your boot volume, you can simply run it; if not, you may have to download it from Apple first using Terminal.
Using Migration Assistant at the end of the installation, restore your data from your backup—whether that’s a data-only duplicate or a Time Machine backup—following the instructions earlier in Use Migration Assistant.