
Share Your Screen
You may find yourself routinely sharing your screen in Zoom for many reasons: to walk through or narrate a presentation, demonstrate software, or help provide technical or other support to people in the meeting for a given feature. You might even use this method to record a video solo or with other people that you can post as a how-to.
Zoom makes it easy to share your screen to from a few to as many as hundreds, or even thousands, of people. Knowing a few key settings will help you from the get-go.
I start with how to share your screen, then look at what you don’t want to share. Next, I move into how manage presenting in Zoom using a variety of techniques, including with a single screen, multiple screens, and multiple devices. I also detail how to work around limitations in full-screen modes in macOS.
Pick What You Share
What you can share varies by platform, but it includes photos, apps, a full monitor or device screen, and files that an operating system can show natively without another app, like video and PDFs. While desktop apps have a lot of options, Zoom provides a robust set of choices for mobile devices, too.
Share from a Desktop App
Desktop apps offer a very long list of what you can share to other participants. Start by selecting an item and then proceed to share.
Choose a Desktop Option to Share
Click the Share Screen icon and Zoom reveals a three-tabbed window with an array of choices. Shared items either have a green outline or appear in a green-outlined window in Zoom, depending on the item.
The Basic tab includes screen-based options (Figure 43):
Any display: Zoom notes these as Desktop 1, Desktop 2, and so forth, and overlays large numbers on the corresponding displays.
Whiteboard: A blank screen appears that you (and others) can draw on with annotation tools, described in Mark Up a Screen.
iPhone/iPad via AirPlay (Mac/Windows) or via Cable (Mac only): Zoom can stream the screen from a device connected via Wi-Fi or via USB. With Wi-Fi, use the Control Center, tap Screen Mirroring, and select the Zoom destination as described in the app’s instructions; this works in Windows and in MacOS. On a Mac, you can also directly connect via USB: plug in the cable and then you may need to tap Trust and enter the connected device’s passcode. The device’s display appears as a resizable window in Zoom.
Any app window: All app windows appear as available choices. You can limit which windows are shown across an app via Settings > Share Screen > Advanced by selecting “Share selected app window only.” Zoom switches to the app’s window, and your interactions in the app are shared to the meeting.

The Advanced tab isn’t that different from some items in Basics, but presents five choices:
Slides as Virtual Background (beta): This feature first appeared in August 2020 with a “beta” label—and only lost that pre-release label in early 2022. It requires its own section; see below.
Portion of Screen: An outline appears that you can drag around your display (or across displays) and then drag on a corner to resize. This is an extremely useful way to take a portion of a window in an app without interface elements. However, because it always shows that part of the screen, and isn’t limited to a given window in an app, you have to be careful that the screen area you’ve selected remains free of other windows or elements overlaying it.
Computer Audio: If you want to pump in the audio emitting from your computer’s currently selected audio output device (the system default), you can pick this option to route it into Zoom. Click the downward-pointing arrow next to the label to select whether the sound should be sent as Mono or Stereo (High-fidelity).
Video: You can select a video file in MP4 format (native or within an Apple MOV file), and it’s streamed to the meeting. Zoom provides the host with standard video play controls, just like player a video in a native app, like play and pause, and the host sees the duration and current position. Attendees don’t see any of the controls or the video progress or length bar.
Content from 2nd Camera: This allows you to share an additional video input, such as a document camera, instead of selecting it as a different source for your participant video stream.
The Files tab reveals integrations with online cloud file services, including Box, Dropbox, Google Drive, and both Microsoft OneDrive and SharePoint. Sharing a file this way—as opposed to within an app you’re running on the same computer—opens it using a Zoom viewer that relies on formats supported natively on the operating system. With macOS and Windows, that’s typically PDF, Excel, JPEG images, Rich Text Format, and a number of other text and media formats.
Across all three tabs, you have the option to check “Share sound,” which uses the default system output, useful for video or presentations with embedded audio or video. Click the downward-pointing arrow next to the label to select Mono or Stereo (High-fidelity) as with Computer Audio sharing above.
When you start sharing, desktop apps briefly display a small lozenge-shaped banner that reads, “Participants can now see your [screen, application, etc.].”
Select “Optimize for video clip” if the item you’re sharing contains full-screen video. Zoom downsamples the clip to 1080p or 720p depending on its initial resolution. Optimizing improves streaming quality; for anything else, Zoom warns the setting makes screen sharing blurry. This is also available as a toggle on the menu that appears when you click or tap More ![]() , described next.
, described next.
Work with Slides as a Virtual Background
Zoom offers a desktop feature that provides a sort of hybrid option between a participant video stream and its screen-sharing option for presentations. It turns slides in a form of virtual background over which you can place yourself (Figure 44)!

The feature works on the Mac with Microsoft PowerPoint and Apple Keynote, while the Windows app supports only PowerPoint.
Select the Slides as Virtual Background option on the Advanced tab, as described above, and then select a presentation from a supported app. Zoom launches the presentation software if it’s not already running and performs some kind of behind-the-scenes operation to process the slides, while “Processing Slides” appears in lieu of your video stream. Then control resumes within Zoom.
Instead of a green-bordered sharing window, control is managed in a version of Speaker view. You have just ![]() backward and
backward and ![]() forward advance arrow icons; you can’t type in a slide number (Figure 45). All animations and videos are removed—these are just flat slides, like a PDF export (which may be what Zoom is using).
forward advance arrow icons; you can’t type in a slide number (Figure 45). All animations and videos are removed—these are just flat slides, like a PDF export (which may be what Zoom is using).

The unique part is that you are overlaid on top of the slides. Zoom uses either its algorithmic background removal or, if you have it checked in Settings > Background & Filters, green-screen removal. You can click on your image and drag and resize yourself; you can also click the slide control’s More ![]() icon, and choose Resize My Video.
icon, and choose Resize My Video.
It can look a little odd, like you’ve been slightly Tron-like inserted into your slides. But it also is potentially a warmer and more evocative way to interact with participants, as they can see you and your presentation in a single window in their view.
From that menu, you can also opt to take yourself out of the picture by selecting Split Video from Slides, which divides the slide view and your video into two separate feeds other participants can see.
As long as I’m using non-interactive PowerPoint or Keynote presentations, I like this mode quite a lot—it lets me work with Zoom’s participant view while still having the advantage of presenting a slide deck.
For a thorough look at presenting in full-screen mode, using PowerPoint and Keynote slideshows, and screen sharing with different combinations of monitors and devices, see Present in Zoom, next.
Control Sharing from the Desktop
When you’re ready to share, click Share and the selected content or item is shared. Instructions appear if you need guidance on how to proceed, like connecting an iPhone or selecting part of a screen.
Zoom brings up a control bar that shows meeting options alongside screen-sharing controls, including showing your status and a Stop Share button to end the session (Figure 46). It also provides details about the current session’s security, whether recording is underway, and whether the session is live streaming.

You can click New Share to swap the current sharing choice to another. Pause Share lets you temporarily stop sending without ending the sharing session, and resume it when you wish. Annotate brings up standard controls described in View a Shared Screen.
Click upward ![]() or downward
or downward ![]() pointing icon on the far-left side of the green bar on the second tier, and it swaps the bar docking from the top to bottom or bottom to top of the screen.
pointing icon on the far-left side of the green bar on the second tier, and it swaps the bar docking from the top to bottom or bottom to top of the screen.
Click the More ![]() icon, and you have several granular controls:
icon, and you have several granular controls:
Meeting Info: Select this if you need the particulars of the current meeting, such as its ID, while sharing.
Disable Annotation for Others: Even when you’re not the host, you can prevent others from marking up your screen.
Hide Names of Annotators: Enabled by default, Zoom labels attached to all on-screen markup. Select hide to remove those.
Hide Video Panel: The floating window with other participants can be hidden if you prefer while you’re sharing the screen.
Hide Floating Meetings Controls: If you want to avoid having this bar float around, choose this option or press ⌘-Control-Shift-H in macOS or Control-Alt-Shift-H in Windows. Press Esc to restore the controls.
Share Computer Sound: You can toggle this option, which is also found when originally selecting a shared item.
Optimize Screen Share for Video Clip: See the end of the preceding section, just above.
The menu that appears when you click More ![]() may show a number of other options for participants, depending on which features a host or administration has turned on. This can include options for recording, live transcription, live streaming, audio, and existing or ending a meeting—these supplement options that otherwise require the full session window interface. Hosts and co-hosts see additional options that vary by enabled features and the tier of service their account is on.
may show a number of other options for participants, depending on which features a host or administration has turned on. This can include options for recording, live transcription, live streaming, audio, and existing or ending a meeting—these supplement options that otherwise require the full session window interface. Hosts and co-hosts see additional options that vary by enabled features and the tier of service their account is on.
Share from a Mobile App
Choose what to share in a mobile app by tapping the Share Content ![]() icon. You can then select from a set of options:
icon. You can then select from a set of options:
Screen: Stream the device’s screen. You can navigate among apps. Tap Screen and then:
Android: Tap Start Now. (You can select “Don’t show again” to avoid a prompt in the future.) If prompted, enable “Allow display over other apps” to let Zoom interface elements appear. Tap Start Now. You’ll see a tiny set of icons in the lower-left of the screen for annotation, sharing audio, and to stop sharing. Tap Stop Share to end sharing the screen.
iOS/iPadOS: A setup screen appears that discloses how your device will be shared and offers an option to enable or disable the device microphone (Figure 47). Tap Start Broadcast to begin and a countdown appears and then a message show the broadcast underway. Tap elsewhere on the screen to dismiss the overlay. In Zoom, you can tap Share Device Audio: On to disable it; if enabled, all device audio will be shared. Stop sharing by tapping Stop Share within Zoom or tapping the red recording-active lozenge in the upper-left corner of the screen and then tapping Stop when prompted.
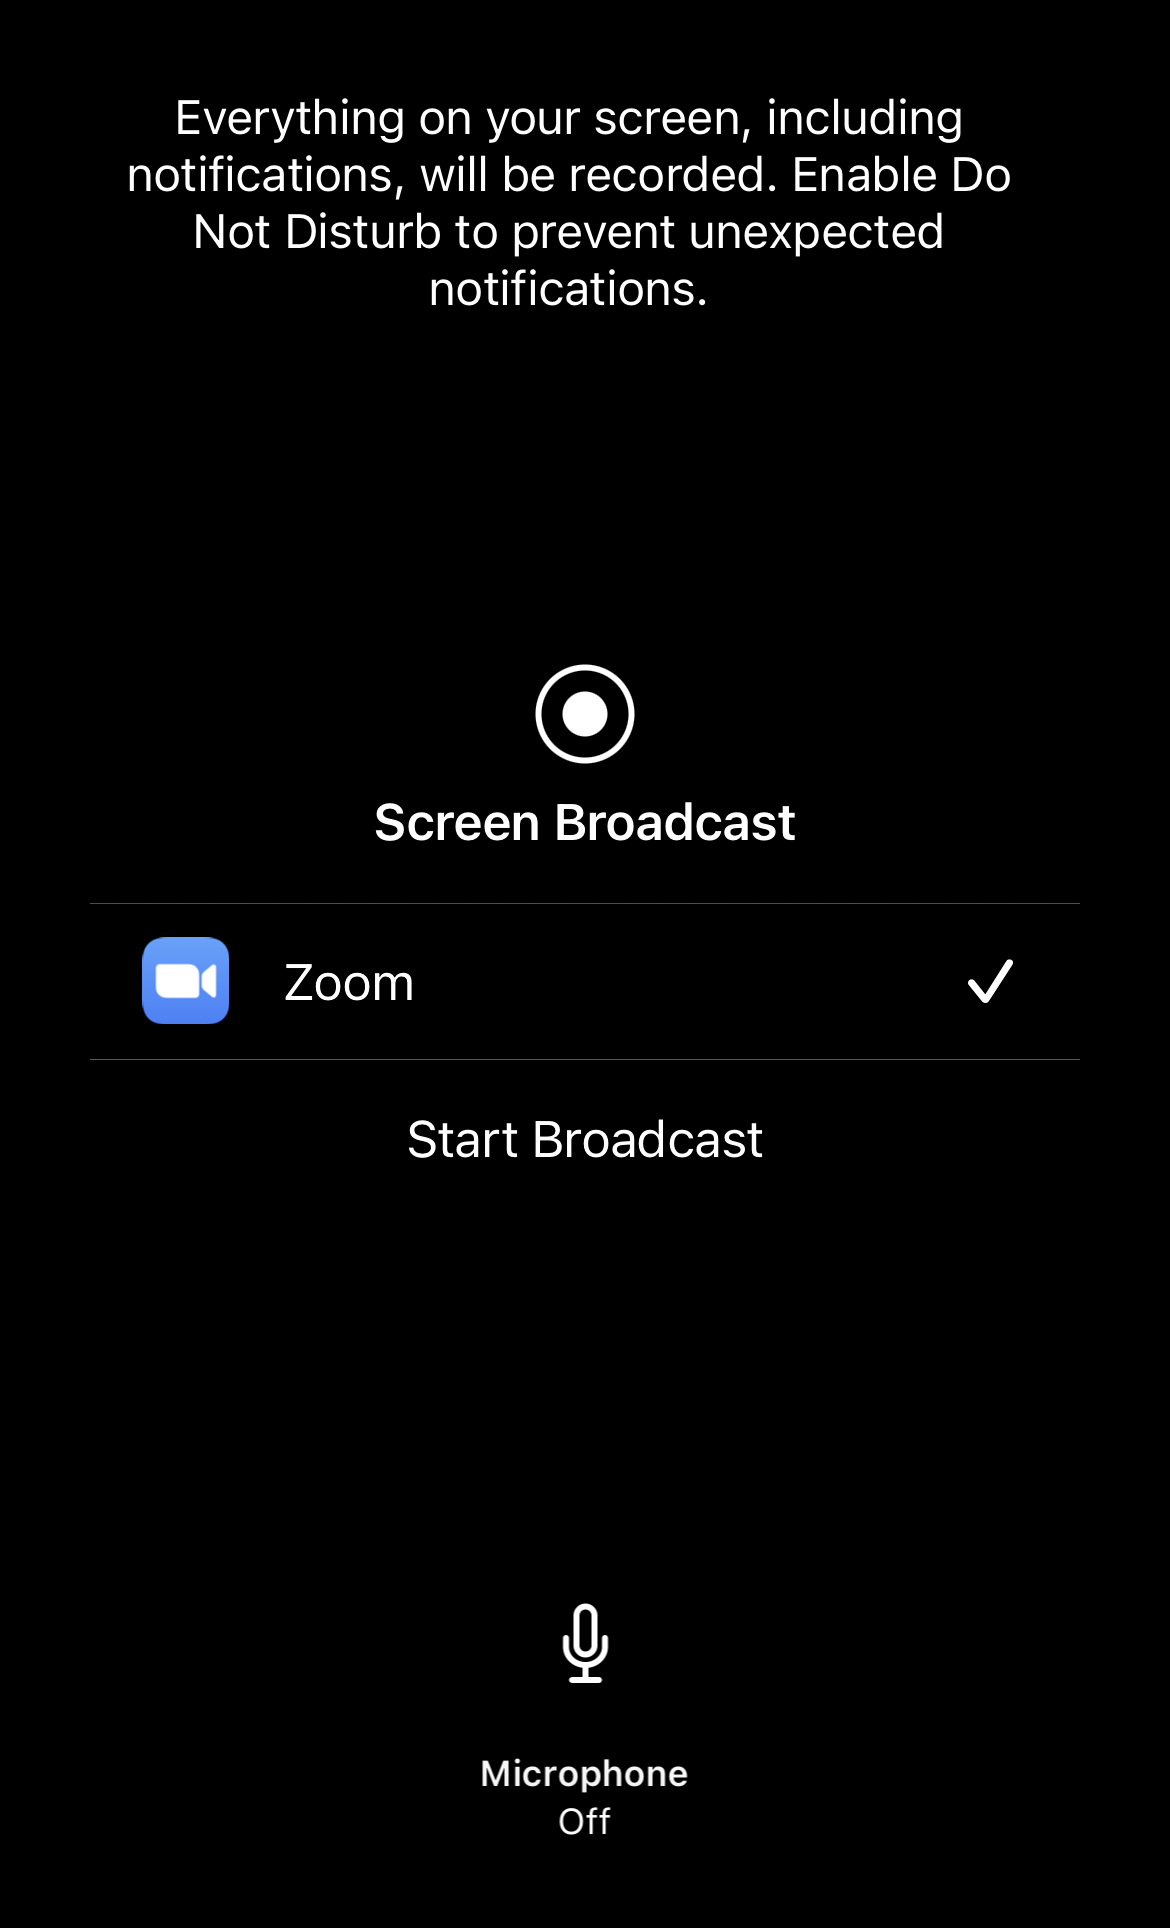
Figure 47: iOS provides a strong warning before you start. Photo (Android)/Photos (iOS/iPadOS): Select an image to share.
Camera (Android): The camera’s live feed is shared. (In iOS and iPadOS, you have to share the screen.)
Document (Android): Android’s Documents option only allows sharing PDFs, which can be navigating through in Zoom.
Cloud services, including Box, Dropbox, iCloud Drive (iOS/iPadOS), Google Drive, and Microsoft OneDrive: The broader file-selection options allow both images and navigable PDFs. The specific set of cloud services varies by platform.
Web URL (Android)/Website URL (iOS/iPadOS), Bookmark: Type in a URL or select a bookmark and the mobile app opens a browser window within the app. The browser can be used as if it were freestanding.
Share Whiteboard (Android): Share a whiteboard you can annotate on, just like in desktop apps.
Mobile apps offer no control for managing the session after selecting a sharing option, including a pause. Tap Stop Share and then share again to change selections.
Share from a Web App
Web apps have limited but useful sharing capability. Click the Share Screen icon and the web app shows Entire Screen and Window tabs; in Chrome, it also shows Chrome Tabs.
Select a screen, window, or tab in Chrome, and then click Share. Windows and screens don’t get the green border treatment as with a desktop Zoom client, but Chrome tabs are highlighted when shared.
A brief sharing bar appears in the Zoom window with a minuscule live preview while screen sharing is active. You can click a pause ![]() icon to halt sharing temporarily or click the
icon to halt sharing temporarily or click the ![]() Stop Sharing button to exit.
Stop Sharing button to exit.
Protect Your Privacy While Sharing
Sharing items from your computer or mobile device can unintentionally reveal more about you than intended. Tab names aren’t designed to preserve your privacy, and may contain information you don’t want anyone to see: “How to file for bankr…”, “Divorce basics”, and “MEMO: FIRE ALL EMPL…” are probably not appropriate to share.
That’s not the only risk. On an iPhone or Android device or when sharing a full screen with a desktop app, an errant notification might plop onto the screen that you’re streaming, and contain absolutely private information. Click Bookmarks and your fascination with honing sharp objects—a perfectly legitimate hobby—might be unleashed on the local parent-teacher association.
To protect your personal life and professional details when sharing a screen, here are a variety of tips:
Do Not Disturb: Turn on your operating system’s do not disturb setting, in whatever form it’s available. See Turn Off Notifications While Using Zoom.
Guest account: Consider setting up a guest account on a computer and using that account for sharing.
Private browsing: Open a new browser window, perhaps even in private browsing/incognito mode.
Avoid bookmarks and filling in URLs: Unless you’re scrupulous about organizing bookmarks, your browser menu (not to mention a history view), might show way too much. Likewise, with auto-completion of previous URLs in a Location or Address bar, starting to type anything could lead to unwelcome results.
Special browser: Reserve a browser app you don’t normally use exclusively for sharing. I rely on Safari and could switch to Chrome for sharing sessions.
Blur iOS/iPadOS app switching: In iOS and iPadOS, enable “Blur snapshot on task switcher” in your Settings > General. This prevents a clear view at the static or moving screen of other apps as you switch intentionally or accidentally among them while sharing your device’s screen.